首页 文章 精选 留言 我的

精选列表

搜索[融合分析],共10000篇文章
优秀的个人博客,低调大师

MapReudce源码分析之Mapper

Mapper是MapReduce编程模型中一个将输入的key/value对映射成一组中间key/value对的组件。Map是将输入记录转换成中间记录的单个任务。被转换的中间记录不需要与输入记录一样的类型。一个给定的输入对可能被映射成0个货多个输出对。Hadoop的MapReduce框架为作业中输入格式InputFormat产生的每个输入分片InputSplit产生一个Map任务。通过JobContext的getConfiguration()方法,Mapper的实现者可以获得任务的配置信息。MapReduce框架中Map部分首先会调用setup()方法,然后接着为输入分片的每个KeyValue对调用map()方法进行处理,最见后再调用cleanup()方法。所有给定输出key相关的中间值随后会被框架进行分组,继而被传递给Reducer以确定最终的输出。通过指定两个关键的RawComparator类,用户可以控制排序和分组。Mapper输出被每个Reducer分区。通过实现一个定值分区器Partitioner,用户可以控制哪些key和相关记录进入哪个Reducer。 Mapper的执行主流程在其run()方法内,代码如下: /** * Expert users can override this method for more complete control over the * execution of the Mapper. * 熟练或者老练的用户可以覆写该方法,以便更完整的控制Mapper的运行 * @param context * @throws IOException */ public void run(Context context) throws IOException, InterruptedException { // task开始运行时调用setup()方法进行初始化 setup(context); try { // 当context中仍有KeyValye对的话,一直循环 while (context.nextKeyValue()) { // 取出context中当前key、valye,连同context本身,调用map()方法处理 map(context.getCurrentKey(), context.getCurrentValue(), context); } } finally { // task结束运行时调用cleanup()方法进行清理 cleanup(context); } } run()方法执行的流程很简单,大体如下: 1、task开始运行时setup()初始化方法; 2、在try模块中,当context中仍有KeyValye对的话,一直循环: 取出context中当前key、valye,连同context本身,调用map()方法处理; 3、在finally模块中,task结束运行时调用cleanup()方法进行清理 。 是不是很简单,就像一个模板一样,按照setup()--map()--map()--......--map()--cleanup()的执行主线运行。而且,熟练或者老练的用户可以覆写该方法,以便更完整的控制Mapper的运行。 我们接下来再看下进行初始化的setup()方法和进行清理的cleanup()方法,代码如下: /** * Called once at the beginning of the task. * task开始运行时调用一次,做初始化工作 */ protected void setup(Context context ) throws IOException, InterruptedException { // NOTHING } /** * Called once at the end of the task. * task结束运行时调用一次,做清理工作 */ protected void cleanup(Context context ) throws IOException, InterruptedException { // NOTHING } 这两个函数分别在task开始运行或结束运行时调用一次,一遍完成初始化或清理工作,用户可覆写这两个方法,以便实现自己的初始化或清理逻辑,或者,干脆不用管,那么这两个方法是空方法,什么都不会做。 再来看下实现KeyValue对转换的核心功能map()方法,代码如下: /** * Called once for each key/value pair in the input split. Most applications * should override this, but the default is the identity function. * 针对输入分片split的每个key/value对都会调用一次。大多数应用程序应该覆写该方法,而默认实现是一个类似恒等式的功能,原样输出key、value */ @SuppressWarnings("unchecked") protected void map(KEYIN key, VALUEIN value, Context context) throws IOException, InterruptedException { context.write((KEYOUT) key, (VALUEOUT) value); } map()方法针对输入分片split的每个key/value对都会调用一次。大多数应用程序应该覆写该方法,而默认实现是一个类似恒等式的功能,原样输出key、value。 另外,Mapper中还有一个抽象内部类Context,它实现了MapContext接口,代表了Map任务运行时的上下文信息,我们后续再讲。

优秀的个人博客,低调大师

HBase源码分析之KeyValue

HBase内部,单元格Cell的实现为KeyValue,它是HBase某行数据的某个单元格在内存中的组织形式,由Key Length、Value Length、Key、Value四大部分组成。其中,Key又由Row Length、Row、Column Family Length、Column Family、Column Qualifier、Time Stamp、Key Type七部分组成。在HBase1.0.2版本中,它的结构如图: 从左到右,依次为: 1、Key Length:存储Key的长度,占4B; 2、Value Length:存储Value的长度,占4B; 3、Key:由Row Length、Row、Column Family Length、Column Family 3.1、Row Length:存储Row的长度,即rowkey的长度,占2B; 3.2、Row:存储Row实际内容,即Rowkey,其大小为Row Length; 3.3、Column Family Length:存储列簇Column Family的长度,占1B; 3.4、Column Family:存储Column Family实际内容,大小为Column Family Length; 3.5、Column Qualifier:存储Column Qualifier对应的数据,既然key中其他所有字段的大小都知道了,整个key的大小也知道了,那么这个Column Qualifier大小也是明确的了,无需再存储其length; 3.6、Time Stamp:存储时间戳Time Stamp,占8B; 3.7、Key Type:存储Key类型Key Type,占1B,Type分为Put、Delete、DeleteColumn、DeleteFamilyVersion、DeleteFamily等类型,标记这个KeyValue的类型; 4、Value:存储单元格Cell对应的实际的值Value。 下面,我们看下HBase中KeyValue是如何实现的。在KeyValue中,有三个十分重要的变量,如下: // KeyValue core instance fields. // KeyValyeh核心实例存储域 // KeyValue相关的不变byte[]数组,存储KeyValue实际内容 protected byte [] bytes = null; // an immutable byte array that contains the KV // KeyValue在数组bytes的起始位置 protected int offset = 0; // offset into bytes buffer KV starts at // KeyValue在数组bytes自起始位置offset后的长度 protected int length = 0; // length of the KV starting from offset. KeyValue内容是存储在byte[]数组bytes中的,它是一个不变的byte[]数组,而存储的起始位置与长度,则分别由offset和length标识。 下面,我们看下KeyValue中获取Key Length、Value Length、Row Length、Column Family、Value等等相关字段的方法,来验证下我们上面罗列出的KeyValue结构。 1、Key Length /** * @return Length of key portion. */ public int getKeyLength() { // 从KeyValue底层byte[]数组bytes中位置offset开始,获取一个int,也就是4B return Bytes.toInt(this.bytes, this.offset); } getKeyLength()方法用于获取KeyValue中Key长度Key Length,它从KeyValue底层byte[]数组bytes中位置offset开始,获取一个int,也就是4B,这也就验证了我们上面说的,KeyValue中第一个是Key Length,大小为4B。 2、Value Length /** * @return Value length */ @Override public int getValueLength() { // 从KeyValue底层byte[]数组bytes中offset+4开始,获取一个int,也就是4B // 也就是说,key length后紧跟着4B是value length int vlength = Bytes.toInt(this.bytes, this.offset + Bytes.SIZEOF_INT); return vlength; } getValueLength()方法用于获取KeyValue中Value长度Value Length,它从KeyValue底层byte[]数组bytes中offset+4开始,获取一个int,也就是4B,这也就验证了我们上面说的Key Length后紧跟着4B是Value Length。 3、Key起始位置 /** * @return Key offset in backing buffer.. */ public int getKeyOffset() { // ROW_OFFSET为key length、value length之后的位置 return this.offset + ROW_OFFSET; } ROW_OFFSET为Key Length、Value Length之后的位置,定义如下: // How far into the key the row starts at. First thing to read is the short // that says how long the row is. public static final int ROW_OFFSET = Bytes.SIZEOF_INT /*keylength*/ + Bytes.SIZEOF_INT /*valuelength*/; getKeyOffset()方法用于获取KeyValue中Key的起始位置,它的取值为整个KeyValue的起始位置offset加上ROW_OFFSET,而ROW_OFFSET为Key Length和Value Length所占大小,这也就验证了Key Length和Value Length之后就是Key。 4、Value起始位置 /** * @return the value offset */ @Override public int getValueOffset() { // Key的起始位置,再加上Key的长度,就是Value的起始位置 int voffset = getKeyOffset() + getKeyLength(); return voffset; } getValueOffset()方法用于获取KeyValue中Value的起始位置,它的值为通过getKeyOffset()方法获取的Key的起始位置,再加上通过getKeyLength()方法获取的Key的长度,这也就验证了KeyValue中继Key Length、Value Length、Key之后,就是Value。 5、Row Length /** * @return Row length */ @Override public short getRowLength() { // 从KeyValue底层byte[]数组bytes中key起始位置开始,获取一个short,也就是2B // getKeyOffset()起始时获取的key length加value length后的位置 // 也就是说,key length后紧跟着4B是value length,而value length后就是key的开始, // 而key前面的2B是row length return Bytes.toShort(this.bytes, getKeyOffset()); } getRowLength()方法用于获取KeyValue中Row长度Row Length,它从KeyValue底层byte[]数组bytes中key起始位置开始,获取一个short,也就是2B,这也就证明了Row Length是Key中第一个字段。 5、Row起始位置 /** * @return Row offset */ @Override public int getRowOffset() { // key的起始位置再加2B,即row length之后就是row return getKeyOffset() + Bytes.SIZEOF_SHORT; } getRowOffset()方法用于获取KeyValue中Row的起始位置,它的取值为Key的起始位置再加2B,即Row Length之后就是Row,与上面所讲一致! 6、Row /** * Primarily for use client-side. Returns the row of this KeyValue in a new * byte array.<p> * * If server-side, use {@link #getBuffer()} with appropriate offsets and * lengths instead. * @return Row in a new byte array. */ @Deprecated // use CellUtil.getRowArray() public byte [] getRow() { return CellUtil.cloneRow(this); } getRow()方法用于获取Row内容,它通过CellUtil的cloneRow()方法,传入本身KeyValue实例,返回一个byte[],而cloneRow()方法如下: public static byte[] cloneRow(Cell cell){ // output为一个大小为row length的byte[]数组 byte[] output = new byte[cell.getRowLength()]; // 将row从cell中copy至output copyRowTo(cell, output, 0); return output; } 可以看到,先构造一个Row Length大小的byte[]数组output,这也就意味着Row的大小是由之前的Row Length对应的值确定的。然后,调用copyRowTo()方法,将KeyValue中Row存储的内容拷贝至output数组并返回。而copyRowTo()方法,将cell(也就是KeyValue)中byte[]数组bytes,从Row的起始位置Row Offset处开始,拷贝到目标byte[]数组destination(也就是output),从0开始,拷贝数据的长度为Row Length,也就是会填满整个destination(output),代码如下: public static int copyRowTo(Cell cell, byte[] destination, int destinationOffset) { // 将cell中byte[]数组bytes,从row offset处开始,拷贝到目标byte[]数组destination,从0开始,拷贝数据的长度为row length, // 也就是会填满整个destination System.arraycopy(cell.getRowArray(), cell.getRowOffset(), destination, destinationOffset, cell.getRowLength()); // 返回数据拷贝的终止点 return destinationOffset + cell.getRowLength(); } 7、Family起始位置 /** * @return Family offset */ @Override public int getFamilyOffset() { return getFamilyOffset(getRowLength()); } /** * @return Family offset */ private int getFamilyOffset(int rlength) { // 获取family的起始位置:整个KeyValue起始位置offset + ROW_OFFSET(Key Length + Value Length) + 2B(Row Length) + 实际Row大小rlength + 1B(Family Length) return this.offset + ROW_OFFSET + Bytes.SIZEOF_SHORT + rlength + Bytes.SIZEOF_BYTE; } getFamilyOffset()方法用于获取KeyValue中Family的起始位置,它是整个KeyValue起始位置offset,加上ROW_OFFSET,也就是Key Length、Value Length所占大小,然后再加上Row Length所占大小2B,和通过getRowLength()方法获取的实际Row大小rlength,最后加上1B,即Family Length所占大小。这也就说明了,Key中ROw Length、Row之后就是Family Length和Family,而Family Length大小占1B。 8、Family Length /** * @return Family length */ @Override public byte getFamilyLength() { return getFamilyLength(getFamilyOffset()); } /** * @return Family length */ public byte getFamilyLength(int foffset) { // family起始位置减1,这个1B就是family length return this.bytes[foffset-1]; } getFamilyLength()方法用于获取KeyValue中Family长度Family Length,它是通过由getFamilyOffset()方法获取的Family位置减1来获取的,与上面得到的验证一致,Family前面1B就是Family Length。 9、Qualifier起始位置 /** * @return Qualifier offset */ @Override public int getQualifierOffset() { return getQualifierOffset(getFamilyOffset()); } /** * @return Qualifier offset */ private int getQualifierOffset(int foffset) { // Family起始位置加上Family长度Family Length return foffset + getFamilyLength(foffset); } getQualifierOffset()方法用于获取KeyValue中Qualifier的起始位置,它实际上是通过Family的起始位置再加上Family的长度Family Length,这也就说明了Family后就是Qualifier。 10、Qualifier长度 /** * @return Qualifier length */ @Override public int getQualifierLength() { return getQualifierLength(getRowLength(),getFamilyLength()); } /** * @return Qualifier length */ private int getQualifierLength(int rlength, int flength) { // Key长度减去Row长度、Family长度、Row Length长度、Family Length长度、Time Stamp长度、Key Type长度 return getKeyLength() - (int) getKeyDataStructureSize(rlength, flength, 0); } getQualifierLength()方法,用于获取KeyValue中Qualifier长度,KeyValue中并没有直接存储Qualifier长度,而是通过Key的总长度减去Key中除Qualifier外其它各部分长度来得到的,实际上是一个计算的过程,为Key长度减去Row长度、Family长度、Row Length长度、Family Length长度、Time Stamp长度、Key Type长度的和。 11、Timestamp起始位置 /** * @return Timestamp offset */ public int getTimestampOffset() { return getTimestampOffset(getKeyLength()); } /** * @param keylength Pass if you have it to save on a int creation. * @return Timestamp offset */ private int getTimestampOffset(final int keylength) { // Key的起始位置加上Key的长度,再减去Time Stamp和Key Type所占大小 return getKeyOffset() + keylength - TIMESTAMP_TYPE_SIZE; } getTimestampOffset()方法用于获取KeyValue中Time Stamp的起始位置,它是通过Key的起始位置加上Key的长度,再减去Time Stamp和Key Type所占大小来计算得到的。这意味着,在Key中,Time Stamp处于倒数第二个位置,也就是在Qualifier之后,在Key Type之前,而Key Type则居于最后。 12、获取TimeStamp /** * * @return Timestamp */ @Override public long getTimestamp() { return getTimestamp(getKeyLength()); } /** * @param keylength Pass if you have it to save on a int creation. * @return Timestamp */ long getTimestamp(final int keylength) { // 获取TimeStamp起始位置tsOffset int tsOffset = getTimestampOffset(keylength); // 从bytes中tsOffset位置开始读取一个Long,即8B return Bytes.toLong(this.bytes, tsOffset); } getTimestamp()方法是用来获取KeyValue中TimeStamp的,它先获取TimeStamp起始位置tsOffset,然后从bytes中tsOffset位置开始读取一个Long,即8B,这与上面提到的TimeStamp占8B是一致的。 13、获取Key Type /** * @return Type of this KeyValue. */ @Deprecated public byte getType() { return getTypeByte(); } /** * @return KeyValue.TYPE byte representation */ @Override public byte getTypeByte() { // 整个KeyValue的位置offset + Key长度 - 1 + Key Length所占长度和Value Length所占长度和 // 即Key Type位于整个Key的最后一个1B return this.bytes[this.offset + getKeyLength() - 1 + ROW_OFFSET]; } getType()和getTypeByte()方法用来获取KeyValue中Key Type值,它是通过在bytes中,从整个KeyValue的位置offset + Key长度 - 1 + Key Length所占长度和Value Length所占长度和位置处获取的一个Byte来得到的,即Key Type位于整个Key的最后一个1B,这与上面所述也是一致的。 14、获取Value值 /** * Returns value in a new byte array. * Primarily for use client-side. If server-side, use * {@link #getBuffer()} with appropriate offsets and lengths instead to * save on allocations. * @return Value in a new byte array. */ @Deprecated // use CellUtil.getValueArray() public byte [] getValue() { return CellUtil.cloneValue(this); } getValue()方法是用来从KeyValue中获取Value值得,它是整个Cell实际存储的内容,通过CellUtil的cloneValue()方法,传入KeyValue自身实力来获得。我们来看下这个cloneValue()方法: public static byte[] cloneValue(Cell cell){ // 创建Value Length大小的byte[]数组output byte[] output = new byte[cell.getValueLength()]; // 将cell中的value值copy至output copyValueTo(cell, output, 0); return output; } cloneValue()方法首先创建Value Length大小的byte[]数组output,然后调用copyValue()方法,将cell中的value值copy至output。而copyValue()方法很简单,从bytes数组的Value Offset处开始拷贝Value Length大小,至destination,代码如下: public static int copyValueTo(Cell cell, byte[] destination, int destinationOffset) { // 从bytes数组的Value Offset处开始拷贝Value Length大小,至destination System.arraycopy(cell.getValueArray(), cell.getValueOffset(), destination, destinationOffset, cell.getValueLength()); return destinationOffset + cell.getValueLength(); }

优秀的个人博客,低调大师

HBase的Nonce实现分析

一、问题背景 当客户端发送RPC请求给服务端时,基于各种原因,服务器的响应很可能会超时。如果客户端只是在那等待,针对数据的操作,很可能出现服务器端已处理完毕,但是无法通知客户端,此时,客户端只能重新发起请求,可是又可能造成服务端重复处理请求。该如何解决该问题呢? 二、解决方案 实际上,客户端发送RPC请求给服务器后,如果响应超时,那么客户端会重复发送请求,直到达到参数配置的重试次数上限。而且,客户端第一次发送和以后重发请求时,会附带相同的nonce,服务端只要根据nonce进行判断,就能得知是否为同一请求,并根据之前请求处理的结果,决定是等待、拒绝还是直接处理。 三、HBase如何实现的 在HRegionServer中,有一个ServerNonceManager类型的成员变量nonceManager,由它负责管理该RegionServer上的nonce。其定义如下: final ServerNonceManager nonceManager; ServerNonceManager中有一个十分重要的方法,用于当一个操作在服务端执行后未及时反馈响应给客户端,客户端重新发起携带相同nonceGroup和nonce的同一操作的请求时,服务端根据nonceGroup和nonce做相应的判断。定义如下: /** * Starts the operation if operation with such nonce has not already succeeded. If the * operation is in progress, waits for it to end and checks whether it has succeeded. * * 如果操作未执行成功,重新开始一个操作。如果该操作在进行过程中,等待它完成并判断它是否成功。 * @param group Nonce group. * @param nonce Nonce. * @param stoppable Stoppable that terminates waiting (if any) when the server is stopped. * @return true if the operation has not already succeeded and can proceed; false otherwise. */ public boolean startOperation(long group, long nonce, Stoppable stoppable) throws InterruptedException { // 如果传入的nonce为0,则返回true,表明操作可以进行 if (nonce == HConstants.NO_NONCE) return true; // 构造NonceKey实例nk NonceKey nk = new NonceKey(group, nonce); // 构造OperationContext实例ctx,初始状态为WAIT OperationContext ctx = new OperationContext(); while (true) { // 将NonceKey到OperationContext的映射,添加到ConcurrentHashMap类型的nonces中去 OperationContext oldResult = nonces.putIfAbsent(nk, ctx); // 如果之前没有,则说明该操作可以直接执行 if (oldResult == null) return true; // Collision with some operation - should be extremely rare. // 如果之前存在该操作,则取出该操作nonce对应的OperationContext synchronized (oldResult) { // 获得该nonce对应的OperationContext状态 int oldState = oldResult.getState(); LOG.debug("Conflict detected by nonce: " + nk + ", " + oldResult); // 如果之前的状态不是WAIT if (oldState != OperationContext.WAIT) { // 如果之前的状态是PROCEED,说明之前的操作执行完成且以失败告终,此处返回true,表示操作可以再次执行 return oldState == OperationContext.PROCEED; // operation ended } // 等待一段时间后继续循环 oldResult.setHasWait(); oldResult.wait(this.conflictWaitIterationMs); // operation is still active... wait and loop // 判断RegionServer的状态 if (stoppable.isStopped()) { throw new InterruptedException("Server stopped"); } } } } 在RSRpcServices的append()方法中,有如下代码: if (r == null) { long nonce = startNonceOperation(m, nonceGroup); boolean success = false; try { r = region.append(append, nonceGroup, nonce); success = true; } finally { endNonceOperation(m, nonceGroup, success); } if (region.getCoprocessorHost() != null) { region.getCoprocessorHost().postAppend(append, r); } } 其中,startNonceOperation()方法源码如下: /** * Starts the nonce operation for a mutation, if needed. * * 如果需要的话,为mutation开启一个nonce操作 * * @param mutation Mutation. * @param nonceGroup Nonce group from the request. * @returns Nonce used (can be NO_NONCE). */ private long startNonceOperation(final MutationProto mutation, long nonceGroup) throws IOException, OperationConflictException { // 如果RegionServer上的nonceManager为null,或者该mutation不存在nonce,那么直接返回HConstants.NO_NONCE,即0 if (regionServer.nonceManager == null || !mutation.hasNonce()) return HConstants.NO_NONCE; // 标志位,是否可以运行 boolean canProceed = false; try { // 调用RegionServer上nonceManager的startOperation()方法,确定是否可以执行该操作 canProceed = regionServer.nonceManager.startOperation( nonceGroup, mutation.getNonce(), regionServer); } catch (InterruptedException ex) { throw new InterruptedIOException("Nonce start operation interrupted"); } if (!canProceed) {// 如果不能运行,抛出OperationConflictException异常,即操作冲突异常 // TODO: instead, we could convert append/increment to get w/mvcc String message = "The operation with nonce {" + nonceGroup + ", " + mutation.getNonce() + "} on row [" + Bytes.toString(mutation.getRow().toByteArray()) + "] may have already completed"; throw new OperationConflictException(message); } // 最后,返回mutation的nonce return mutation.getNonce(); } 它会调用RegionServer上nonceManager的startOperation()方法,确定是否可以执行该操作。

优秀的个人博客,低调大师

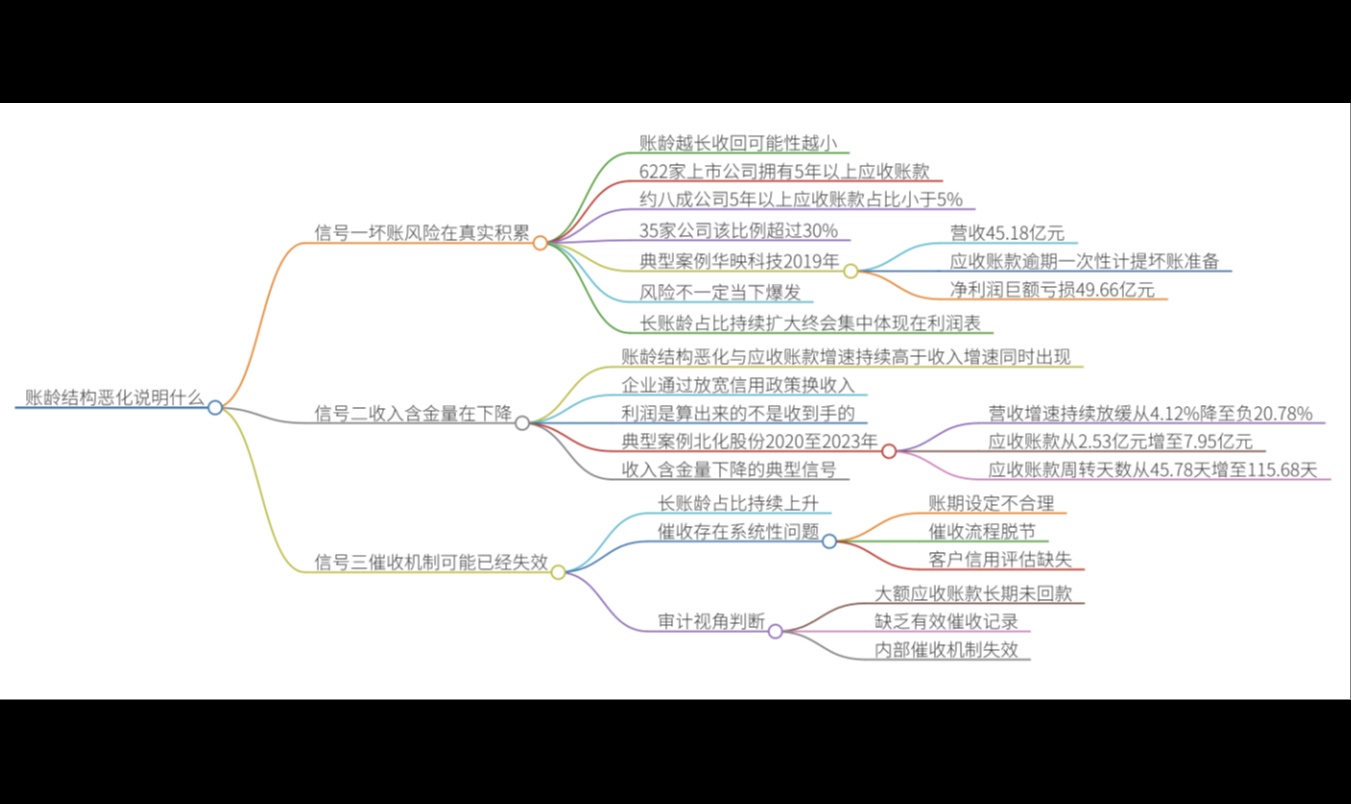
账龄分析表怎么读?账龄分析发现结构恶化,说明什么?

有位财务经理曾经跟我分享过一个经历:两家客户的应收账款周转天数都是43天,看起来差不多,他放心地给两家都批了相同的信用额度。结果半年后,其中一家突然爆雷,欠款收不回来了。回头看账龄表时才发现——这家公司近三分之一的账款已经逾期超过61天,只是被那些按时付款的大单平均成了43天的正常数据。

优秀的个人博客,低调大师

Java源码分析专题系列之【ClassLoader】深入浅出的源码分析

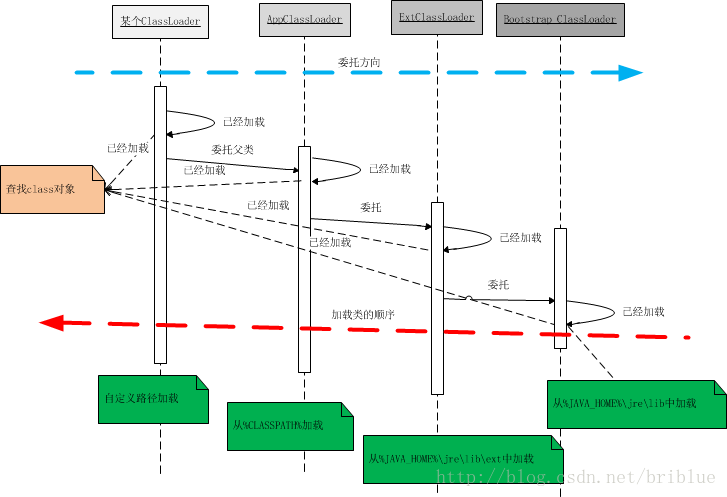
每日一句 在人生的道路上,即使一切都失去了,只要一息尚存,你就没有丝毫理由绝望。因为失去的一切,又可能在新的层次上复得。 前提概要 Java体系中的所有类,必须以【class字节码文件】必须被装载到JVM中才能运行,这个装载工作是由JVM中的类装载器完成的,类装载器所做的工作实质是把class字节码文件从存储介质(网络、硬盘、数据库等多元化方式)读取到JVM内存中,JVM在加载类的时候,都是通过ClassLoader的loadClass()方法来加载class字节码的,Java的类加载器使用双亲委派模式进行加载类。 官方给出ClassLoader功能翻译为 ClassLoader类是一个抽象类 /** * A class loader is an object that is responsible for loading classes. The * class <tt>ClassLoader</tt> is an abstract class. Given the <a * href="#name">binary name</a> of a class, a class loader should attempt to * locate or generate data that constitutes a definition for the class. A * typical strategy is to transform the name into a file name and then read a * "class file" of that name from a file system. **/ public abstract class ClassLoader 大致意思如下(个人补充了完整信息) Classloader是一个负责加载classes的对象,ClassLoader类是一个抽象类,给定类的二进制名称(全限定名),尝试定位或者产生一个class的元数据信息(class静态常量池中的元数据)存放到方法区中的运行时常量池以及字符串常量池中。并且创建一个class实例对象指向该方法区内存的地址。 我们常用的解析方式策略就是将名称转换为物理位置及文件名,然后定位到文件系统等相关媒介中,并且读取该名称的“class类文件”。 前提概要 为了更好的理解类的加载机制,我们来深入研究一下ClassLoader和他的loadClass()方法。 ClassLoader分类 Java系统自带有三个类加载器 Bootstrap ClassLoader 最顶层的加载类,主要加载核心类库,%JRE_HOME%\lib下的rt.jar、resources.jar、charsets.jar等。 Java命令行提供了如何扩展bootStrap级别加载class的简单方法。 另外需要注意的是可以通过启动JVM时指定 -Xbootclasspath 和路径来改变Bootstrap ClassLoader的加载目录。 语法如下: -Xbootclasspath: 完全取代基本核心的Java class 搜索路径,不常用,否则要重新写所有Java核心class。 -Xbootclasspath/a: 被指定的文件追加到默认的bootstrap路径中。 -Xbootclasspath/p: 前缀在核心class搜索路径前面。不常用,避免引起不必要的冲突。 -Dsun.boot.class.path=XXXX 分隔符与classpath参数类似,unix使用:号,windows使用;号,这里以unix为例 java -Xbootclasspath/a:/usrhome/thirdlib.jar: -jar yourJarExe.jar Extention ClassLoader(扩展的类加载器) 加载目录%JRE_HOME%\lib\ext目录下的jar包和class文件。还可以加载-D java.ext.dirs选项指定的目录。 可以采用 java.ext.dirs 这个虚拟机参数选项进行设置。 Appclass Loader(系统型类加载器) 也称为SystemAppClass加载当前应用的classpath的所有类。 ClassLoader从继承关系 为了更好的理解,我们可以查看源码。看sun.misc.Launcher,它是一个java虚拟机的入口应用。 public class Launcher { private static Launcher launcher = new Launcher(); private static String bootClassPath = System.getProperty("sun.boot.class.path"); public static Launcher getLauncher() { return launcher; } private ClassLoader loader; public Launcher() { // Create the extension class loader ClassLoader extcl; try { extcl = ExtClassLoader.getExtClassLoader(); } catch (IOException e) { throw new InternalError( "Could not create extension class loader", e); } // Now create the class loader to use to launch the application try { loader = AppClassLoader.getAppClassLoader(extcl); } catch (IOException e) { throw new InternalError( "Could not create application class loader", e); } //设置AppClassLoader为线程上下文类加载器,这个文章后面部分讲解 Thread.currentThread().setContextClassLoader(loader); } /* * Returns the class loader used to launch the main application. */ public ClassLoader getClassLoader() { return loader; } /* * The class loader used for loading installed extensions. */ static class ExtClassLoader extends URLClassLoader {} /** * The class loader used for loading from java.class.path. * runs in a restricted security context. */ static class AppClassLoader extends URLClassLoader {} 源码有精简,我们可以得到相关的信息。 Launcher初始化了ExtClassLoader和AppClassLoader。 Launcher中并没有看见BootstrapClassLoader,但通过System.getProperty("sun.boot.class.path")得到了字符串bootClassPath,这个应该就是BootstrapClassLoader加载的jar包路径。 我们可以先代码测试一下sun.boot.class.path是什么内容。 System.out.println(System.getProperty("sun.boot.class.path")); 得到的结果是: C:\Program Files\Java\jre1.8.0_91\lib\resources.jar; C:\Program Files\Java\jre1.8.0_91\lib\rt.jar; C:\Program Files\Java\jre1.8.0_91\lib\sunrsasign.jar; C:\Program Files\Java\jre1.8.0_91\lib\jsse.jar; C:\Program Files\Java\jre1.8.0_91\lib\jce.jar; C:\Program Files\Java\jre1.8.0_91\lib\charsets.jar; C:\Program Files\Java\jre1.8.0_91\lib\jfr.jar; C:\Program Files\Java\jre1.8.0_91\classes 可以看到,这些全是JRE目录下的jar包或者是class文件。 ExtClassLoader源码 /* * The class loader used for loading installed extensions. */ static class ExtClassLoader extends URLClassLoader { static { ClassLoader.registerAsParallelCapable(); } /** * create an ExtClassLoader. The ExtClassLoader is created * within a context that limits which files it can read */ public static ExtClassLoader getExtClassLoader() throws IOException { final File[] dirs = getExtDirs(); try { // Prior implementations of this doPrivileged() block supplied // aa synthesized ACC via a call to the private method // ExtClassLoader.getContext(). return AccessController.doPrivileged( new PrivilegedExceptionAction<ExtClassLoader>() { public ExtClassLoader run() throws IOException { int len = dirs.length; for (int i = 0; i < len; i++) { MetaIndex.registerDirectory(dirs[i]); } return new ExtClassLoader(dirs); } }); } catch (java.security.PrivilegedActionException e) { throw (IOException) e.getException(); } } private static File[] getExtDirs() { String s = System.getProperty("java.ext.dirs"); File[] dirs; if (s != null) { StringTokenizer st = new StringTokenizer(s, File.pathSeparator); int count = st.countTokens(); dirs = new File[count]; for (int i = 0; i < count; i++) { dirs[i] = new File(st.nextToken()); } } else { dirs = new File[0]; } return dirs; } ...... } 指定-D java.ext.dirs参数来添加和改变ExtClassLoader的加载路径。这里我们通过可以编写测试代码。 System.out.println(System.getProperty("java.ext.dirs")); 结果如下: C:\Program Files\Java\jre1.8.0_91\lib\ext;C:\Windows\Sun\Java\lib\ext AppClassLoader源码 /** * The class loader used for loading from java.class.path. * runs in a restricted security context. */ static class AppClassLoader extends URLClassLoader { public static ClassLoader getAppClassLoader(final ClassLoader extcl) throws IOException{ final String s = System.getProperty("java.class.path"); final File[] path = (s == null) ? new File[0] : getClassPath(s); return AccessController.doPrivileged( new PrivilegedAction<AppClassLoader>() { public AppClassLoader run() { URL[] urls = (s == null) ? new URL[0] : pathToURLs(path); return new AppClassLoader(urls, extcl); } }); } ...... } 可以看到AppClassLoader加载的就是 -Djava.class.path 下的路径。我们同样打印它的值。 System.out.println(System.getProperty("java.class.path")); 结果如下: D:\workspace\ClassLoaderDemo\bin 这个路径其实就是当前java工程目录bin,里面存放的是编译生成的class文件。 自此我们已经知道了BootstrapClassLoader、ExtClassLoader、AppClassLoader实际是查阅相应的环境属性(-Xbootclasspath[/a/p]:)sun.boot.class.path、java.ext.dirs和java.class.path来加载资源文件的。 ClassLoader加载顺序 我们看到了系统的3种类加载器,但我们可能不知道具体哪个先行呢?这与我们的加载方式模型来决定的:上面说过Java使用的是双亲委托模型。 Java的类加载器查找class和resource时,是通过“委托模式”进行的,它首先判断这个class是不是已经加载成功,如果没有的话它并不是自己进行查找,而是先通过父加载器,然后递归下去,直到Bootstrap ClassLoader。 如果Bootstrap ClassLoader也没有加载过此class实例,那么它就会从它指定的路径中去查找,如果查找成功则返回,如果没有查找成功则交给子类加载器,也就是ExtClassLoader,这样类似操作直到终点,也就是我上图中的红色箭头示例。这种机制就叫做双亲委托。 什么是双亲委派机制? 整个流程可以如下图所示: 如果当前的类加载器没有查询到这个class对象已经加载就请求父加载器(不一定是父类)进行操作,然后以此类推。 具体流程描述 一个AppClassLoader查找资源时,先看看缓存是否有,缓存有从缓存中获取,否则委托给父加载器。 递归,重复第1部的操作。 如果ExtClassLoader也没有加载过,则由Bootstrap ClassLoader出面,它首先查找缓存,如果没有找到的话,就去找自己的规定的路径下,也就是sun.mic.boot.class下面的路径。找到就返回,没有找到,让子加载器自己去找。 Bootstrap ClassLoader如果没有查找成功,则ExtClassLoader自己在java.ext.dirs路径中去查找,查找成功就返回,查找不成功,再向下让子加载器找。 ExtClassLoader查找不成功,AppClassLoader就自己查找,在java.class.path路径下查找。找到就返回。如果没有找到就让子类找,如果没有子类会怎么样?抛出各种异常。 上面的序列,详细说明了双亲委托的加载流程。我们可以发现委托是从下向上,然后具体查找过程却是自上至下。 加载类过程 首先加载类是通过Classloader中的loadClass方法加载,Classloader部分代码: loadClass JDK文档中是这样写的,通过指定的全限定类名加载class,它通过同名的loadClass(String,boolean)方法。 protected Class<?> loadClass(String name, boolean resolve) throws ClassNotFoundException { synchronized (getClassLoadingLock(name)) { // 首先,检测是否已经加载 Class<?> c = findLoadedClass(name); if (c == null) { long t0 = System.nanoTime(); try { if (parent != null) { //父加载器不为空则调用父加载器的loadClass c = parent.loadClass(name, false); } else { //父加载器为空则调用Bootstrap Classloader c = findBootstrapClassOrNull(name); } } catch (ClassNotFoundException e) { // ClassNotFoundException thrown if class not found // from the non-null parent class loader } if (c == null) { // If still not found, then invoke findClass in order // to find the class. long t1 = System.nanoTime(); //父加载器没有找到,则调用findclass c = findClass(name); // this is the defining class loader; record the stats sun.misc.PerfCounter.getParentDelegationTime().addTime(t1 - t0); sun.misc.PerfCounter.getFindClassTime().addElapsedTimeFrom(t1); sun.misc.PerfCounter.getFindClasses().increment(); } } if (resolve) { //调用resolveClass() resolveClass(c); } return c; } } // 篡改双亲委托 @Override protected Class<?> loadClass(String className, boolean resolve) throws ClassNotFoundException { Class<?> clazz = findLoadedClass(className); if (clazz == null) { clazz = findClass(className); } return clazz; } // 主要用于覆盖此方法去控制双亲委托下的加载实现 protected final Class<?> findLoadedClass(String name) { ClassLoader loader; if (this == BootClassLoader.getInstance()) loader = null; else loader = this; return VMClassLoader.findLoadedClass(loader, name); } 上面是方法原型,一般实现这个方法的步骤是: 执行findLoadedClass(String)去检测这个class是不是已经加载过了,直接获取当前的类加载器(系统类加载器)。 执行父加载器的loadClass方法。如果父加载器为null,则jvm内置的加载器去替代,也就是Bootstrap ClassLoader。这也解释了ExtClassLoader的parent为null,但仍然说Bootstrap ClassLoader是它的父加载器。 如果向上委托父加载器没有加载成功,则通过findClass(String)查找。 如果class在上面的步骤中找到了,参数resolve又是true的话,那么loadClass()又会调用resolveClass(Class)这个方法来生成最终的Class对象。 我们可以从源代码看出这个步骤。 另外,要注意的是如果要编写一个classLoader的子类,也就是自定义一个classloader,建议覆盖findClass()方法,而不要直接改写loadClass()方法。 if (parent != null) { //父加载器不为空则调用父加载器的loadClass c = parent.loadClass(name, false); } else { //父加载器为空则调用Bootstrap Classloader c = findBootstrapClassOrNull(name); } 前面说过ExtClassLoader的parent为null,所以它向上委托时,系统会为它指定Bootstrap ClassLoader。 synchronized (getClassLoadingLock(name)) 看到这行代码,我们能知道的是,这是一个同步代码块,那么synchronized的括号中放的应该是一个对象。我们来看getClassLoadingLock(name)方法的作用是什么: protected Object getClassLoadingLock(String className) { Object lock = this; if (parallelLockMap != null) { Object newLock = new Object(); lock = parallelLockMap.putIfAbsent(className, newLock); if (lock == null) { lock = newLock; } } return lock; } 以上是getClassLoadingLock(name)方法的实现细节,我们看到这里用到变量parallelLockMap ,根据这个变量的值进行不同的操作,如果这个变量是Null,那么直接返回this,如果这个属性不为Null,那么就新建一个对象,然后在调用一个putIfAbsent(className, newLock); 那么这个parallelLockMap变量又是哪来的那,我们发现这个变量是ClassLoader类的成员变量: private final ConcurrentHashMap<String, Object> parallelLockMap; 这个变量的初始化工作在ClassLoader的构造函数中: private ClassLoader(Void unused, ClassLoader parent) { this.parent = parent; if (ParallelLoaders.isRegistered(this.getClass())) { parallelLockMap = new ConcurrentHashMap<>(); package2certs = new ConcurrentHashMap<>(); domains = Collections.synchronizedSet(new HashSet<ProtectionDomain>()); assertionLock = new Object(); } else { // no finer-grained lock; lock on the classloader instance parallelLockMap = null; package2certs = new Hashtable<>(); domains = new HashSet<>(); assertionLock = this; } } 这里我们可以看到构造函数根据一个属性ParallelLoaders的Registered状态的不同来给parallelLockMap 赋值。 在ClassLoader类中包含一个静态内部类private static class ParallelLoaders,在ClassLoader被加载的时候这个静态内部类就被初始化。这个静态内部类的代码我就不贴了,直接告诉大家什么意思,sun公司是这么说的:Encapsulates the set of parallel capable loader types,意识就是说:封装了并行的可装载的类型的集合。 上面这个说的是不是有点乱,那让我们来整理一下: 首先,在ClassLoader类中有一个静态内部类ParallelLoaders,他会指定的类的并行能力,如果当前的加载器被定位为具有并行能力,那么他就给parallelLockMap定义,就是new一个 ConcurrentHashMap<>(),那么这个时候,我们知道如果当前的加载器是具有并行能力的,那么parallelLockMap就不是Null,这个时候,我们判断parallelLockMap是不是Null,如果他是null,说明该加载器没有注册并行能力,那么我们没有必要给他一个加锁的对象,getClassLoadingLock方法直接返回this,就是当前的加载器的一个实例。 如果这个parallelLockMap不是null,那就说明该加载器是有并行能力的,那么就可能有并行情况,那就需要返回一个锁对象。然后就是创建一个新的Object对象,调用parallelLockMap的putIfAbsent(className, newLock)方法,这个方法的作用是: 根据传进来的className,检查该名字是否已经关联了一个value值,如果已经关联过value值,那么直接把他关联的值返回,如果没有关联过值的话,那就把我们传进来的Object对象作为value值,className作为Key值组成一个map返回。 无论putIfAbsent方法的返回值是什么,都把它赋值给我们刚刚生成的那个Object对象。 这个时候,我们来简单说明一下getClassLoadingLock(String className)的作用,就是: 为类的加载操作返回一个锁对象。 为了向后兼容,这个方法这样实现:如果当前的classloader对象注册了并行能力,方法返回一个与指定的名字className相关联的特定对象,否则,直接返回当前的ClassLoader对象。 双亲委派机制的作用 避免重复加载,当父类加载器已经加载了该类的时候,就没有必要子类加载器再加载一次了。 首先,类加载器是按照级别层层往下加载的,当下层的加载器去加载某一个类时,有可能上层的加载已经加载过的,比如FrameWork层的加载被BootClassLoader加载过,下层不用再去加载了。 安全性考虑,防止核心API库被随意篡改。 系统类加载器已经加载过了FrameWork层了类,如果我们自己再写一个系统级别的类,创建包java.lang,创建一个自己的String类,类加载器去加载这个类覆盖了原本的java.lang下的String,那么这个时候使用String整个应用就出问题了。 package java.lang; class String { @NonNull @Override public String toString() { return ""; } @Override public boolean equals(@Nullable Object obj) { return false; } } 而因为双亲委派机制,加载这个String类之前,调用parent的BootClassloader,判断已经加载过String类,这个类其实不会再去找了,解决了被篡改的问题。 类加载的动态性体现 一个应用程序总是由n多个类组成,Java程序启动时,并不是一次把所有的类全部加载后再运行,它总是先把保证程序运行的基础类一次性加载到jvm中,其它类等到jvm用到的时候再加载,这样的好处是节省了内存的开销,因为java最早就是为嵌入式系统而设计的,内存宝贵,这是一种可以理解的机制,而用到时再加载这也是java动态性的一种体现。 类的加载过程 装载:通过“类全路径名”查找并加载类的二进制数据,并且生成class实例对象指向对应的方法区的内存数据结构。 链接:把类的二进制数据合并到JVM中(主要作为校验阶段中的class文件格式校验阶段完成存入方法区内存中)。 验证:确保被加载类的正确性,确保加载内容不危害虚拟机; 准备:为类的静态变量分配内存,并将其初始化为默认值,常量直接赋值; 解析:把类中的符号引用转换为直接引用; 初始化:直接进行先关的静态类构造器,实现相关的相关的类属性和类代码块的执行和赋值操作。

资源下载

更多资源
Mario

Mario

马里奥是站在游戏界顶峰的超人气多面角色。马里奥靠吃蘑菇成长,特征是大鼻子、头戴帽子、身穿背带裤,还留着胡子。与他的双胞胎兄弟路易基一起,长年担任任天堂的招牌角色。

Nacos

Nacos

Nacos /nɑ:kəʊs/ 是 Dynamic Naming and Configuration Service 的首字母简称,一个易于构建 AI Agent 应用的动态服务发现、配置管理和AI智能体管理平台。Nacos 致力于帮助您发现、配置和管理微服务及AI智能体应用。Nacos 提供了一组简单易用的特性集,帮助您快速实现动态服务发现、服务配置、服务元数据、流量管理。Nacos 帮助您更敏捷和容易地构建、交付和管理微服务平台。

Rocky Linux

Rocky Linux

Rocky Linux(中文名:洛基)是由Gregory Kurtzer于2020年12月发起的企业级Linux发行版,作为CentOS稳定版停止维护后与RHEL(Red Hat Enterprise Linux)完全兼容的开源替代方案,由社区拥有并管理,支持x86_64、aarch64等架构。其通过重新编译RHEL源代码提供长期稳定性,采用模块化包装和SELinux安全架构,默认包含GNOME桌面环境及XFS文件系统,支持十年生命周期更新。

WebStorm

WebStorm

WebStorm 是jetbrains公司旗下一款JavaScript 开发工具。目前已经被广大中国JS开发者誉为“Web前端开发神器”、“最强大的HTML5编辑器”、“最智能的JavaScript IDE”等。与IntelliJ IDEA同源,继承了IntelliJ IDEA强大的JS部分的功能。

用户登录
用户注册