首页 文章 精选 留言 我的

精选列表

搜索[LNMP],共347篇文章
优秀的个人博客,低调大师

CentOS 7下基于LNMP的电子商务网站

一、环境准备: 在CentOS系统上使用 yum 安装 Nginx、mariadb、php-fpm、php-mysql 软件包 yum -y install nginx mariadb-server php-fpm php-mysql 二、下载小米商城源码: 将其解压缩到 /data/web 目录下,并将其属主和属组修改为nobody,以便实现最小权限运行 unzip -d /data/web/ xiaomi.zip chown -R nobody.nobody /data/web/* 三、修改配置文件: 修改nginx的配置文件: vim /etc/nginx/nginx.conf user nobody; #Nginx程序用户 error_log /var/log/nginx/error.log info; #启用的日志级别及存放路径 events { worker_connections 65535; #允许的最大连接数 } log_format main '$remote_addr - $remote_user [$time_local] "$request" ' #启用的日志格式 '$status $body_bytes_sent "$http_referer" ' '"$http_user_agent" "$http_x_forwarded_for"'; access_log /var/log/nginx/access.log main; #日志的保存路径 #以下两项是设置是否网络加速的 tcp_nopush on; tcp_nodelay on; gzip on; server { listen 80; server_name xiaomi.magedu.com; #名称可以随便取 root /data/web; #指定网站的访问目录 location / { #root /html index index.php index.html index.htm; #可以在进入包含这些文件的目录下后,不用再写这些文件的名称,而可以直接访问这些文件 } location ~ \.php$ { #所有以.php结尾的文件,都走到这里执行 #root html; fastcgi_pass 127.0.0.1:9000; #指定与php-fpm进行交互的地址与端口 fastcgi_index index.php; #php的fastcgi默认的起始文件位置 fastcgi_param SCRIPT_FILENAME $document_root$fastcgi_script_name; #php扩展解析文件路径 include fastcgi_params; } ulimit -n 65535 #修改单个进程操作系统允许能打开文件数量的最大限制,默认是1024 #ulimit -n #可以查看单个进程操作系统允许能打开的文件数量 修改php初始化配置文件: vim /etc/php.ini date.timezone = Asia/Shanghai #修改时钟配置 short_open_tag = On #设置打开短标签 修改php-fpm的配置文件: vim /etc/php-fpm.d/www.conf user = nobody 修改后台数据配置文件: vim /data/web/data/config.php // 数据库名称 $db_name = "xiaomi"; #要连接的数据库名称 // 数据库用户名 $db_user = "root"; #数据库用户名称,一般是能够执行数据库软件的用户 // 数据库密码 $db_pass = ""; #数据库用户没有设置密码,所以为空即可 四、创建数据库 在命令行运行 mysql -uroot create database xiaomi #向数据库中添加xiaomi数据库 五、开启各项服务 systemctl start nginx php-fpm mariadb

优秀的个人博客,低调大师

centos6.5下使用lnmp架构安装nextcloud云盘

最近两年随着各大网盘纷纷关闭,百度云也早早的就开始限速,文件的安全也没有保障。所以还不如自己搭建一个网盘。网上看了下,发现有一个nextcloud比较好用。支持多平台客户端,支持分享,使用操作简单。支持插件扩展,文件预览,在线协作。 安装nginx wgethttp://nginx.org/download/nginx-1.10.3.tar.gz tar-zxfnginx-1.10.3.tar.gz&&cdnginx-1.10.3 ./configure--prefix=/usr/local/data/nginx--user=nginx--group=nginx--with-pcre--with-http_stub_status_module--with-http_ssl_module--with-http_gzip_static_module make&&makeinstall 2.安装配置php yuminstallhttp://rpms.famillecollet.com/enterprise/remi-release-6.rpm yum--enablerepo=remi-php56installphpphp-fpmphp-mysqlphp-gdphp-xmlphp-redisphp-libsphp-develphp-zlibphp-mbstring nginx 和php-fpm 的运行用户这里使用nginx vim/etc/php-fpm.conf user=nginx group=nginx listen=127.0.0.1:9000 env[HOSTNAME]=$HOSTNAME env[PATH]=/usr/local/bin:/usr/bin:/bin env[TMP]=/tmp env[TMPDIR]=/tmp env[TEMP]=/tmp 3.安装mysql yum-yinstallmysqlmysql-server servicemysqldstart 4.建库,授权 CREATEDATABASEnextcloud_db;GRANTALLONnextcloud_db.*TO'nextcloud'@'%'IDENTIFIEDBY'nextcloud';//注意一定要加"%",否则无法让网络让任何人上传文件 FLUSHPRIVILEGES; 5.安装nextcloud wgethttps://download.nextcloud.com/server/releases/nextcloud-10.0.2.zip--no-check-certificate unzipnextcloud-10.0.2.zip mvnextcloud/usr/local/data/nginx/html /usr/local/data/nginx/html chown-Rnginx.nginx 创建数据目录,这里建议数据目录不要和web目录放到一起 /usr/local/data/nginx/html/nextcloud/data 6.申请证书 为了网盘的安全,有必要使用https 证书,这里可以在阿里云后台申请免费的DV证书 7.配置nginx 创建虚拟主机文件 cd/usr/local/data/nginx/conf vimnextcloud.conf upstreamphp-handler{ server127.0.0.1:9000; }server{listen80; server_namecloud.nextcloud.com; return301https://$server_name$request_uri;}server{listen443ssl;server_namecloud.nextcloud.com; ssl_certificate/usr/local/data/nginx/conf/nextcloud.crt; ssl_certificate_key/usr/local/data/nginx/conf/nextcloud.key; #添加如下header主要为了安全 add_headerStrict-Transport-Security"max-age=15768000;includeSubDomains;preload;";add_headerX-Content-Type-Optionsnosniff;add_headerX-Frame-Options"SAMEORIGIN";add_headerX-XSS-Protection"1;mode=block";add_headerX-Robots-Tagnone;add_headerX-Download-Optionsnoopen;add_headerX-Permitted-Cross-Domain-Policiesnone; #nextcloud代码目录 root/usr/local/data/nginx/html/nextcloud/; location=/robots.txt{allowall;log_not_foundoff;access_logoff;} #为了支持user_webfingerapp rewrite^/.well-known/host-meta/public.php?service=host-metalast; rewrite^/.well-known/host-meta.json/public.php?service=host-meta-jsonlast; #这儿是为了支持日历和联系人,建议加上 location=/.well-known/carddav{return301$scheme://$host/remote.php/dav;}location=/.well-known/caldav{return301$scheme://$host/remote.php/dav;} #设置上传文件的最大大小,php也得修改 client_max_body_size512M;fastcgi_buffers644K;#DisablegziptoavoidtheremovaloftheETagheadergzipoff; error_page403/core/templates/403.php;error_page404/core/templates/404.php; #重要的:将所有请求转发到index.php上 location/{rewrite^/index.php$uri; } #安全设置,禁止访问部分敏感内容 location~^/(?:build|tests|config|lib|3rdparty|templates|data)/{denyall;}location~^/(?:\.|autotest|occ|issue|indie|db_|console){denyall;}location~^/(?:index|remote|public|cron|core/ajax/update|status|ocs/v[12]|updater/.+|ocs-provider/.+|core/templates/40[34])\.php(?:$|/){includefastcgi_params;fastcgi_split_path_info^(.+\.php)(/.*)$;fastcgi_paramSCRIPT_FILENAME$document_root$fastcgi_script_name;fastcgi_paramPATH_INFO$fastcgi_path_info;fastcgi_paramHTTPSon;#Avoidsendingthesecurityheaderstwicefastcgi_parammodHeadersAvailabletrue;fastcgi_paramfront_controller_activetrue;fastcgi_passphp-handler;fastcgi_intercept_errorson;fastcgi_request_bufferingoff; } #安全设置,禁止访问部分敏感内容 location~^/(?:updater|ocs-provider)(?:$|/){try_files$uri/=404;indexindex.php;} #添加js和css文件的缓存控制头 location~*\.(?:css|js)${try_files$uri/index.php$uri$is_args$args; add_headerCache-Control"public,max-age=7200"; add_headerStrict-Transport-Security"max-age=15768000;includeSubDomains;preload;";add_headerX-Content-Type-Optionsnosniff;add_headerX-Frame-Options"SAMEORIGIN";add_headerX-XSS-Protection"1;mode=block";add_headerX-Robots-Tagnone;add_headerX-Download-Optionsnoopen;add_headerX-Permitted-Cross-Domain-Policiesnone; access_logoff;}location~*\.(?:svg|gif|png|html|ttf|woff|ico|jpg|jpeg)${try_files$uri/index.php$uri$is_args$args; access_logoff;}} vimnginx.conf includenextcloud.conf; servicenginxstart 8.配置php上传大小 vim/etc/php.ini max_execution_time=0 post_max_size=512M upload_max_filesize=512M servicephp-fpmstart 9.配置nextcloud 10.nextcloud 配置redis缓存 使用Redis做内存缓存可以有效提升程序运行速度。 curl-Ohttp://download.redis.io/releases/redis-3.2.8.tar.gz tar-zxvfredis-3.2.8.tar.gz cdredis-3.2.8/deps/ makegeohash-inthiredisjemalloclinenoiselua cd.. make&&makeinstall cdutils/ ./install_server.sh 配置redis vim/etc/redis/6379.conf#requirepassfoobared requirepassExpvUwNOk9XRawC8 bind192.168.40.200 启动 redis-server/etc/redis/6379.conf 配置nextcloud cd/usr/local/nginx/html/nextcloud/config vimconfig.php 'memcache.local'=>'\OC\Memcache\Redis', 'redis'=>array( 'host'=>'192.168.40.200', 'port'=>6379, 'password'=>'ExpvUwNOk9XRawC8', ), 刷新页面 设置定时 */15****/usr/bin/php/usr/local/nginx/html/nextcloud/cron.php>/dev/null 参考文档 https://docs.nextcloud.com/server/10/admin_manual/installation/index.html

优秀的个人博客,低调大师

HAProxy+Varnish+LNMP实现高可用负载均衡动静分离集群部署

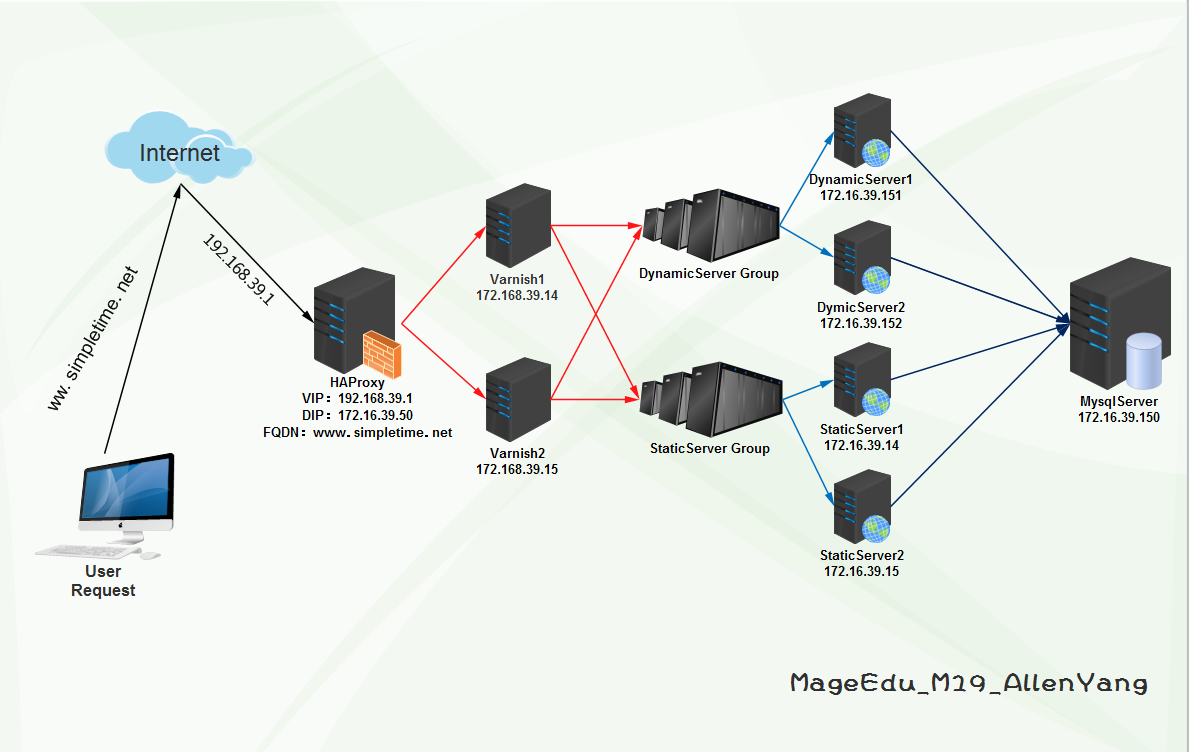
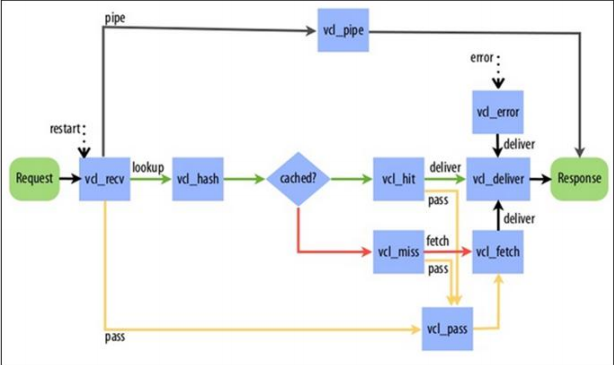
HAProxy高可用负载均衡集群部署 基本信息: 系统平台:VMware WorkStation 系统版本: CentOS Linux release 7.2.1511 (Core) 内核版本: 3.10.0-327.el7.x86_64 集群架构: 前端:HAProxy 1、虚拟FQDN:www.simpletime.net 2、VIP:192.168.39.1;DIP:172.16.39.50 3、调度服务器:Varnish1、Varnish2 4、调度算法:URL_Hash_Consistent 5、集群统计页:172.16.39.50:9091/simpletime?admin 缓存服务器:Varnish 1、VarnishServer1:172.16.39.14:9527 2、VarnishServer2:172.16.39.15:9527 3、开启健康状态探测,提供高可用 4、负载均衡后端Web服务器组 5、动静分离后端服务器,并动静都提供负载均衡效果 后端服务器: StaticServer1:172.16.39.14:80 StaticServer2:172.16.39.15:80 DynamicServer1:172.16.39.151 DynamicServer2:172.16.39.152 Mysql服务器: MysqlServer:172.16.39.150 思考: 1、负载均衡动静分离后,会话如何保持? 2、负载均衡动静分离后,存储如何解决? 3、该方案适用于什么样的场景? 4、该方案缺陷有哪些? 5、如何改进? 一、部署HAProxy 1、安装HAProxy ~]#yuminstallHAProxy 2、配置HAProxy #--------------------------------------------------------------------- #mainfrontendwhichproxystothebackends #--------------------------------------------------------------------- frontendweb*:80 #aclurl_staticpath_beg-i/static/p_w_picpaths/javascript/stylesheets #aclurl_staticpath_end-i.jpg.gif.png.css.js.html.txt.htm #aclurl_dynamicpath_begin-i.php.jsp #default_backendstatic_srvifurl_static #use_backenddynamic_srvifurl_dynamic use_backendvarnish_srv #--------------------------------------------------------------------- #roundrobinbalancingbetweenthevariousbackends #--------------------------------------------------------------------- backendvarnish_srv balanceuri#使用基于URL的一致性哈希调度算法 hash-typeconsistent servervarnish1172.16.39.14:9527check servervarnish2172.16.39.15:9527check listenstats#开启HAProxy图形化Web管理功能 bind:9091 statsenable statsuri/simpletime?admin statshide-version statsauthadmin:abc.123 statsadminifTRUE 3、启动服务 ~]#systemctlstarthaproxy ~]#systemctlstatushaproxy#查看状态 ~]#ss-tnlp#查看80和9091端口是否启用 ~]#systemctlenablehaproxy#设置开机启动 二、部署Varnish,两台配置一致(172.16.39.14|15) 1、安装及配置 ~]#yuminstallvarnish-y ~]#vim/etc/varnish/varnish.params VARNISH_LISTEN_PORT=9527#更改默认端口 ~]#systemctlstartvarnish ~]#systemctlenablevarnish ~]#vim/etc/varnish/default.vcl vcl4.0; ##############启用负载均衡模块############### importdirectors; ################定义Purge-ACL控制####################### aclpurgers{ "127.0.0.1"; "172.16.39.0"/16; } #Defaultbackenddefinition.Setthistopointtoyourcontentserver. ##############配置健康状态探测############## probeHE{#静态检测 .url="/health.html";#指定检测URL .timeout=2s;#探测超时时长 .window=5;#探测次数 .threshold=2;#探测次数成功多少次才算健康 .initial=2;#Varnish启动探测后端主机2次健康后加入主机 .interval=2s;#探测间隔时长 .expected_response=200;#期望状态响应码 } probeHC{#动态监测 .url="/health.php"; .timeout=2s; .window=5; .threshold=2; .initial=2; .interval=2s; .expected_response=200; } #############添加后端主机################ backendweb1{ .host="172.16.39.151:80"; .port="80"; .probe=HC; } backendweb2{ .host="172.16.39.152:80"; .port="80"; .probe=HC; } backendapp1{ .host="172.16.39.14:80"; .port="80"; .probe=HE; } backendapp2{ .host="172.16.39.15:80"; .port="80"; .probe=HE; } #############定义负载均衡及算法############### subvcl_init{ newwebcluster=directors.round_robin(); webcluster.add_backend(web1); webcluster.add_backend(web2); newappcluster=directors.round_robin(); appcluster.add_backend(app1); appcluster.add_backend(app2); } ################定义vcl_recv函数段###################### subvcl_recv{ #####ACL未授权,不允许PURGE,并返回405##### if(req.method=="PURGE"){ if(!client.ip~purgers){ return(synth(405,"Purgingnotallowedfor"+client.ip)); } return(purge); } #####添加首部信息,使后端服务记录访问者的真实IP #if(req.restarts==0){ #setreq.http.X-Forwarded-For=req.http.X-Forwarded-For+","+client.ip; #}else{ #setreq.http.X-Forwarded-For=client.ip; #} #setreq.backend_hint=webcluster.backend(); #setreq.backend_hint=appcluster.backend(); #注:因为Varnish不是一级代理,配置forward只能取到上级代理IP,而上级代理IP,本身就包含在HAProxy发送过来的Forward里,所以没必要配置,而后端服务器只要日志格式有启用记录Forward信息,并且上级代理没有做限制,那么,就能获取到客户端真实IP; #####动静分离##### if(req.url~"(?i)\.(php|asp|aspx|jsp|do|ashx|shtml)($|\?)"){ setreq.backend_hint=appcluster.backend(); } #####不正常的请求不缓存##### if(req.method!="GET"&& req.method!="HEAD"&& req.method!="PUT"&& req.method!="POST"&& req.method!="TRACE"&& req.method!="OPTIONS"&& req.method!="PATCH"&& req.method!="DELETE"){ return(pipe); } #####如果请求不是GET或者HEAD,不缓存##### if(req.method!="GET"&&req.method!="HEAD"){ return(pass); } #####如果请求包含Authorization授权或Cookie认证,不缓存##### if(req.http.Authorization||req.http.Cookie){ return(pass); } #####启用压缩,但排除一些流文件压缩##### if(req.http.Accept-Encoding){ if(req.url~"\.(bmp|png|gif|jpg|jpeg|ico|gz|tgz|bz2|tbz|zip|rar|mp3|mp4|ogg|swf|flv)$"){ unsetreq.http.Accept-Encoding; }elseif(req.http.Accept-Encoding~"gzip"){ setreq.http.Accept-Encoding="gzip"; }elseif(req.http.Accept-Encoding~"deflate"){ setreq.http.Accept-Encoding="deflate"; }else{ unsetreq.http.Accept-Encoding; } } return(hash); } ####################定义vcl_pipe函数段################# subvcl_pipe{ return(pipe); } subvcl_miss{ return(fetch); } ####################定义vcl_hash函数段################# subvcl_hash{ hash_data(req.url); if(req.http.host){ hash_data(req.http.host); }else{ hash_data(server.ip); } if(req.http.Accept-Encoding~"gzip"){ hash_data("gzip"); }elseif(req.http.Accept-Encoding~"deflate"){ hash_data("deflate"); } } ##############设置资源缓存时长################# subvcl_backend_response{ if(beresp.http.cache-control!~"s-maxage"){ if(bereq.url~"(?i)\.(jpg|jpeg|png|gif|css|js|html|htm)$"){ unsetberesp.http.Set-Cookie; setberesp.ttl=3600s; } } } ################启用Purge##################### subvcl_purge{ return(synth(200,"Purged")); } ###############记录缓存命中状态############## subvcl_deliver{ if(obj.hits>0){ setresp.http.X-Cache="HITfrom"+req.http.host; setresp.http.X-Cache-Hits=obj.hits; }else{ setresp.http.X-Cache="MISSfrom"+req.http.host; } unsetresp.http.X-Powered-By; unsetresp.http.Server; unsetresp.http.Via; unsetresp.http.X-Varnish; unsetresp.http.Age; } 2、加载配置,因为还没有配置后端应用服务器,可以看到后端主机健康检测全部处于Sick状态 ~]#varnishadm-S/etc/varnish/secret-T127.0.0.1:6082 varnish>vcl.loadconf1default.vcl 200 VCLcompiled. varnish>vcl.useconf1 200 VCL'conf1'nowactive varnish>backend.list 200 BackendnameRefsAdminProbe web1(172.16.39.151,,80)15probeSick0/5 web2(172.16.39.152,,80)15probeSick0/5 app1(172.16.39.14,,80)15probeSick0/5 app2(172.16.39.15,,80)15probeSick0/5 三、部署Mysql(172.16.39.150) ~]#yuminstallmariadb.server ~]#rpm-qemariadb-server mariadb-server-5.5.44-2.el7.centos.x86_64 ~]#vim/etc/my.cnf#数据库基本优化 [mysqld] innodb_file_per_table=ON skip_name_resolve=ON ~]#mysql#创建wordpress数据库并授权该数据库用户 >createdatabasewwwdb; >grantallonwwwdb.*towww@'172.16.39.%'identifiedby"abc.123"; >exit 四、部署NFS文件系统 1、后端所有主机安装服务 ~]#yuminstallnfs-utils 2、动态资源主机172.16.39.152设为动态web数据共享服务器 DynamicServer2~]#vim/etc/exports /data/web/172.16.39.151/16(rw,sync)#rw=可读写,sync=内存及硬盘同步写入数据 3、静态主机172.16.39.15设为静态web数据共享服务器 StaticServer2~]#vim/etc/exports /data/web/172.16.39.14/16(rw,sync)#rw=可读写,sync=内存及硬盘同步写入数据 ~]#systemctlstartnfs-server#启动服务 DynamicServer2~]#exportfs-avr#重载配置 exporting172.16.39.151/16:/data/web StaticServer2~]#exportfs-avr#重载配置 exporting172.16.39.14/16:/data/web 4、两台服务端设为开机启动 ~]#systemctlenablenfs-server 5、客户端同步,动态主机挂载动态服务器共享,静态主机挂载静态服务器共享 ~]#showmount-e172.16.39.152 Exportlistfor172.16.39.152: /data/web172.16.39.151/16 ~]#mount-tnfs172.16.39.15:/data/web/data/web 五、部署后端主机(注意:已经部署了NFS文件系统) 1、安装及配置(DynamicServer2:172.16.39.152) ~]#yuminstallnginxphp-fpmphp-mysql-y ~]#mkdir/data/web/www-pv ~]#vim/etc/nginx/conf.d/www.simple.com.conf server{ listen80; root/data/web/www; server_namewww.simple.com; indexindex.htmlindex.htmindex.php; location~[^/]\.php(/|$){ try_files$uri=404; fastcgi_pass127.0.0.1:9000; fastcgi_indexindex.php; includefastcgi.conf; #access_log_bypass_if($uri='/health.php'); } } 备注:access_log_bypass_if需添加日志过滤模块,本文主要实现过滤健康状态检测信息; ~]#systemctlstartnginxphp-fpm 2、部署wordpress应用 ~]#unzipwordpress-4.3.1-zh_CN.zip ~]#mvwordpress/*/data/web/www/ www]#cpwp-config{-sample,}.php www]#vimwp-config.php define('DB_NAME','wwwdb'); define('DB_USER','www'); define('DB_PASSWORD','abc.123'); define('DB_HOST','172.16.39.150'); 3、设置facl权限 ~]#idapache ~]#setfacl-mu:apache:rwx/data/web/www 4、拷贝web数据至StaticServer2,另两台后端主机挂载的是两台NFS服务端的数据文件,web数据数完成 ~]#tar-jcvfweb.tar.gz/data/web/www ~]#scpweb.tar.gz172.16.39.15: ~]#setfacl-mu:apache:rwx/data/web/www StaticServer2~]#tar-xfweb.tar.gz-C/data/web 5、创建动静资源主机组Varnish健康状态探测页面 DynamicServer2~]#echo"<h1>DynamicServerisHealth.</h1>>/data/web/www/health.php StaticServer2~]#echo"<h1>StaticServerisHealth.</h1>">/data/web/www/health.html 6、在Varnish主机上查看健康状态(172.16.39.14|15,也就是StaticServer主机) StaticServer2~]#varnishadm-S/etc/varnish/secret-T127.0.0.1:6082 varnish>backend.list#后端Web主机正常 200 BackendnameRefsAdminProbe web1(172.16.39.151,,80)15probeHealthy5/5 web2(172.16.39.152,,80)15probeHealthy5/5 app1(172.16.39.14,,80)15probeHealthy5/5 app2(172.16.39.15,,80)15probeHealthy5/5 7、web访问172.16.39.50完成wordpress配置 8、创建图文测试,发现动静分离下,图片上传后无法显示 9、分析原因,动静分离后,用户可以上传图片至动态资源主机上,但静态资源却没有该图片,初步解决方案:使用文件同步软件,实时同步图片等流格式资源。 六、部署Rsync+inodify,实现静态资源主机同步上传资源图片目录,解决图片不能显示问题 1、将StaticServer2配置为备份端,同步动态资源资源DynamicServer2下的web图片上传目录文件 ~]#rpm-qarsync ~]#vim/etc/rsyncd.conf#尾行追加 uid=root#指定执行备份的用户及组权限为root用户 gid=root userchroot=no#关闭chroot maxconnections=200#最大连接数 timeout=600 pidfile=/var/run/rsyncd.pid lockfile=/var/run/rsyncd.lock logfile=/var/log/rsyncd.log [web] path=/data/web/www/wp-content/uploads ignoreerrors readonly=no list=no hostsallow=172.16.39.0/255.255.0.0#只允许39网段进行同步 authusers=rsync#认证的用户名 secretsfile=/etc/rsyncd.password#指定密码文件 2、创建rsync同步用户密码文件 ~]#echo“rsync:abc.123”>/etc/rsyncd.password ~]#chmod600/etc/rsyncd.password 3、启动服务 ~]#systemctlstartrsyncd ~]#ss-tnlp|greprsync#查看是否开启873端口 ~]#systemctlenablersyncd#设置rsync开机启动 4、部署Rsync同步端DynamicServer2,实时同步本机web图片数据至StaticServer2,并保持以DynamicServer2为主两台服务器web图片资源一致性。 ~]#yuminstallrsyncinodify-toolsinodify-tools-devel 如果yum源没有找到inodify,就直接下载源码包进行编译 ~]#tar-xfinodify-tools-3.13.tar.gz ~]#./configure--prefix=/usr/local/inotify ~]#]#make-j2&&makeinstall ~]#ln-sv/usr/local/inotify/bin/inotifywait/usr/bin/ ~]#echo“abc.123”>/etc/rsyncd.password ~]#chmod600/etc/rsyncd.password #创建实时同步脚本 ~]#vim/etc/rsync.sh #!/bin/bash host=172.16.39.15#数据备份主机 src=/data/web/www/wp-content/uploads/#想要备份的目录 des=web user=rsync /usr/bin/rsync-vzrtopg--delete--progress--password-file=/etc/rsyncd.password$src$user@$host::$des /usr/bin/inotifywait-mrq--timefmt'%d/%m/%y%H:%M'--format'%T%w%f%e'-emodify,delete,create,attrib$src\ |whilereadfiles do /usr/bin/rsync-vzrtopg--delete--progress--password-file=/etc/rsyncd.password$src$user@$host::$des echo"${files}wasrsynced">>/tmp/rsync.log2>&1 done 5、添加开机自动运行脚本 ~]#chmod764/etc/rsync.sh ~]#echo"/usr/bin/bash/etc/rsync.sh&">>/etc/rc.local#开机后台自动运行该脚本 ~]#chmod750/etc/rc.d/rc.local#Centos7,rc.local没有执行权限,要给予权限才能执行 ~]#sh/etc/rsync.sh&#执行同步脚本 七、测试 1、图文博客发布 2、PURGE清空Varnish缓存测试 ~]#curl-XPURGEwww.simpletime.net/ <!DOCTYPEhtml> <html> <head> <title>200Purged</title> </head> <body> <h1>Error200Purged</h1> <p>Purged</p> <h3>GuruMeditation:</h3> <p>XID:100925448</p> <hr> <p>Varnishcacheserver</p> </body> </html> 3、压力测试#存在缓存服务器,单机测试只做参考 ~]#ab-c20000-n20000-rwww.simpletime.net/ Requestspersecond:670.86[#/sec](mean) Timeperrequest:29812.421[ms](mean) Timeperrequest:1.491[ms](mean,acrossallconcurrentrequests) ~]#ab-c20000-n20000-rwww.simpletime.net/ Requestspersecond:521.78[#/sec](mean) Timeperrequest:38330.212[ms](mean) Timeperrequest:1.917[ms](mean,acrossallconcurrentrequests) ~]#ab-c20000-n20000-rwww.simpletime.net/ Requestspersecond:521.78[#/sec](mean) Timeperrequest:38330.212[ms](mean) Timeperrequest:1.917[ms](mean,acrossallconcurrentrequests) 4、HAProxy调度器挂了,整个架构崩溃... 5、Varnish挂一台,没事,有冗余,高可用实现,另一台Varnish压力增大,尽快修复故障机器即可。 6、后端主机,理论上动静态群集组能冗余各组一台服务器故障,可因为NFS文件系统懒人配置,NFS客户端挂了没事,NFS服务端挂了,GameOver... 7、文件服务器NFS服务端挂了,(NFS服务器没有做冗余)GameOver... 8、Rsync+Inodify文件实时同步系统挂了,服务器还能访问,只是图片等流格式文件不显示了... 9、MysqlServer挂了,无冗余,(GameOver)... 10、后端应用服务器Nginx日志示例: ~]#tail/var/log/nginx/access.log 172.16.39.15(VarnishIP)--[26/Aug/2016:17:09:56+0800]"POST/wp-admin/admin-ajax.phpHTTP/1.1"20032 "http://172.16.39.50/wp-admin/post-new.php""Mozilla/5.0(WindowsNT6.1;WOW64)AppleWebKit/537.36 (KHTML,likeGecko)Chrome/49.0.2623.110Safari/537.36""172.16.39.5(客户端IP),172.16.39.50(HAProxyIP)" 八、总结 1、架构优点: (1)HAProxy为Varnish缓存服务器提供了高可用的负载均衡,其使用的算法,也为Varnish提升了缓存命中率; (2)HAProxy提供Web图形化管理界面,节约了学习成本; (3)Varnish的高效缓存机制极大的提升了Web应用的性能,降低了Web服务器的压力; (4)Varnish给后端Web服务器提供了高可用负载均衡,并使用了动态分离技术,保障了后端主机的冗余,显著提升了其性能; (5)NFS+Rsync+inodify基本解决了该架构存储的问题,该架构文件存储因服务器有限,并没有设计好,储存服务器因有单独的网络存储服务器来提供; 2、冗余不足: (1)Nginx负载均衡调度器,没有冗余能力,易出现单点故障。 解决方案:增加服务器,使用Keepalive做高可用。 (2)MysqlServer,没有冗余能力。 解决方案:主从复制、MHA。 (3)NFS文件服务,没有冗余能力。 解决方案:可以增加服务器,使用rsync+inodify实现数据实时同步,再用keepalive做高可用。 3、性能瓶颈: (1)NFS文件系统,因网络IO能力与磁盘本身性能,多台主机同时挂载执行读取读写操作,势必带来性能下降,根据木桶原理,此短板已成为该群集方案性能瓶颈。 (2)在大量的读写访问下,数据库的压力会非常大,从而影响性能。 解决方案:数据库主从复制,读写分离; 友情链接: 1、Nginx日志过滤模块官网下载链接 https://github.com/cfsego/ngx_log_if/ 2、Varnish4.0官方帮助指南 http://www.varnish-cache.org/docs/4.0/users-guide/ 以上均为个人观点,本架构还有许多不足之处,仅作学习交流之用;

优秀的个人博客,低调大师

阿里云ECS服务器安装纯净版centos7.4 LNMP教程

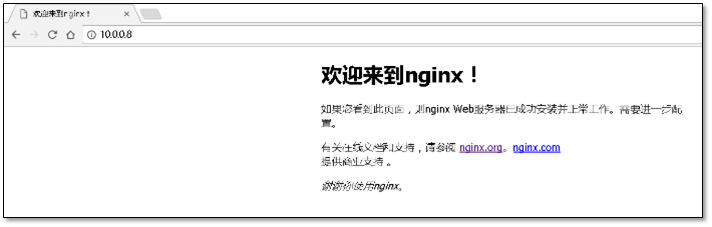
yum 安装依赖(很重要)yum -y install php-mcrypt libmcrypt-devel libxml2 libxml2-devel curl-devel libjpeg-devel libpng-devel freetype-devel libmcrypt-devel libxslt libxslt-devel cyrus-sasl-plain cyrus-sasl cyrus-sasl-devel cyrus-sasl-lib m4 autoconf gcc gcc-c++ openssl openssl-devel pcre pcre-devel zlib zlib-devel wget net-tools zip unzip bzip2 下载必要安装包wget -O nginx-1.12.1.tar.gz https://nginx.org/download/nginx-1.12.1.tar.gz //nginx 安装包 wget -O php-7.2.tar.gz http://cn2.php.net/get/php-7.2.3.tar.gz/from/this/mirror //php7.2安装1 安装nginx1.1 解压编译安装nginx(安装在/server/nginx目录下)tar zxvf nginx-1.12.1.tar.gz //解压 cd nginx-1.12.1/ //进入解压后的目录,###下面的代码复制每行行尾会有空格,请自行复制到文本编辑中去掉 ./configure \ --prefix=/server/nginx \ --pid-path=/server/var/nginx/nginx.pid \ --lock-path=/server/var/nginx/nginx.lock \ --error-log-path=/server/var/nginx/error.log \ --http-log-path=/server/var/nginx/access.log \ --with-http_gzip_static_module \ --with-http_stub_status_module \ --with-http_ssl_module 1.2安装make && make install1.3 安装完成后,开启nginx 服务/server/nginx/sbin/nginx1.3.1 可以将nginx 命令加入环境变量中,方便使用(此三步可以忽略)vi /etc/profile1.3.2 在文件末尾加入export PATH="$PATH:/server/nginx/sbin"1.3.3 保存退出后,使之立即生效source /etc/profile1.4 访问IP地址,如果没出现nginx欢迎页面,则开通防火墙80端口查看防火墙状态firewall-cmd --state打开80端口firewall-cmd --zone=public --add-port=80/tcp --permanent命令含义:--zone #作用域 --add-port=80/tcp #添加端口,格式为:端口/通讯协议 --permanent #永久生效,没有此参数重启后失效 重启防火墙firewall-cmd --reload防火墙常用命令介绍firewall-cmd --state ##查看防火墙状态,是否是running firewall-cmd --reload ##重新载入配置,比如添加规则之后,需要执行此命令 firewall-cmd --get-zones ##列出支持的zone firewall-cmd --get-services ##列出支持的服务,在列表中的服务是放行的 firewall-cmd --query-service ftp ##查看ftp服务是否支持,返回yes或者no firewall-cmd --add-service=ftp ##临时开放ftp服务 firewall-cmd --add-service=ftp --permanent ##永久开放ftp服务 firewall-cmd --remove-service=ftp --permanent ##永久移除ftp服务 firewall-cmd --add-port=80/tcp --permanent ##永久添加80端口 iptables -L -n ##查看规则,这个命令是和iptables的相同的 man firewall-cmd ##查看帮助 firewall-cmd --list-ports ##查看防火墙开启的端口 至此nginx安装完成 2 安装PHP7 2.1 解压编译安装php7(安装目录/server/php7) tar zxvf php-7.2.tar.gz //解压cd php-7.2.3 //进入安装目录 ###下面的代码复制每行行尾会有空格,请自行复制到文本编辑中去掉./configure --prefix=/server/php7 \ --with-config-file-path=/server/php7/etc \ --with-curl \ --with-gd \ --with-gettext \ --with-iconv-dir \ --with-kerberos \ --with-libdir=lib64 \ --with-libxml-dir \ --with-openssl \ --with-pcre-regex \ --with-pdo-sqlite \ --with-pear \ --with-xmlrpc \ --with-xsl \ --with-zlib \ --enable-fpm \ --enable-bcmath \ --enable-libxml \ --enable-inline-optimization \ --enable-mbregex \ --enable-mbstring \ --enable-opcache \ --enable-pcntl \ --enable-shmop \ --enable-soap \ --enable-sockets \ --enable-sysvsem \ --enable-xml \ --enable-zip \ --enable-static \ --with-mysqli=mysqlnd \ --with-pdo-mysql=mysqlnd \ --with-freetype-dir \ --with-jpeg-dir \ --with-png-dir \ --disable-debug \ --disable-fileinfo \ --enable-maintainer-zts 2.2 安装make && make install时间较长(根据机器性能决定,1G1核 大概在15分钟) 2.3 安装完成后,将php加入环境变量,添加php配置文件cp php.ini-production /server/php7/etc/php.ini //添加配置文件vi /etc/profile //编辑环境变量文件在文件中添加export PATH="$PATH:/server/php7/bin"使改动立即生效source /etc/profile 查看php版本php -v2.4 配置php-fpmcp /server/php7/etc/php-fpm.conf.default /server/php7/etc/php-fpm.conf cp /server/php7/etc/php-fpm.d/www.conf.default /server/php7/etc/php-fpm.d/www.conf cp sapi/fpm/init.d.php-fpm /etc/init.d/php-fpm chmod +x /etc/init.d/php-fpm //添加执行权限 启动php-fpm/etc/init.d/php-fpm start至此php7安装完成 3 yum安装mariadb 10 3.1 添加仓库vi /etc/yum.repos.d/MariaDB.repo文件中添加代码[mariadb] name = MariaDB baseurl = https://mirrors.ustc.edu.cn/mariadb/yum/10.2/centos7-amd64 gpgkey=https://mirrors.ustc.edu.cn/mariadb/yum/RPM-GPG-KEY-MariaDB gpgcheck=1 注:以上的源,如果无效,则使用下方官网的源[mariadb] name = MariaDB baseurl = http://yum.mariadb.org/10.2/centos7-amd64 gpgkey=https://yum.mariadb.org/RPM-GPG-KEY-MariaDB gpgcheck=13.2 编辑保存退出后,安装yum install -y MariaDB-server MariaDB-client3.3 安装成功后启动systemctl start mariadb //启动程序systemctl enable mariadb // 自启动systemctl status mariadb //查看状态3.4 配置mariadb设置Root 用户的登陆密码mysql_secure_installation根据命令提示,主要是做以下几件事情: 设置root密码 是否禁止远程 root访问 是否禁止 test数据库的访问 是否禁用匿名用户 是否重新加载privilleges-table信息 初始化完成后,登录测试mysql -uroot -p //代表你之前初始化设置的密码 exit命令可以退出配置字符集vi /etc/my.cnf在[mysqld]标签下添加init_connect='SET collation_connection = utf8_unicode_ci' init_connect='SET NAMES utf8' character-set-server=utf8 collation-server=utf8_unicode_ci skip-character-set-client-handshake vi /etc/my.cnf.d/mysql-clients.cnf在[mysql]中添加default-character-set=utf8全部配置完成,重启mariadbsystemctl restart mariadb之后进入MariaDB查看字符集mysql -uroot -p //代表密码mysql> show variables like "%character%";show variables like "%collation%"; //至此mariadb 安装完成。但是如果想要外面能访问此数据库,如想使用navicat来连接到这个数据库,则还要其它的配置,您往下看 首先开放防火墙端口,开启后要重启防火墙:firewall-cmd --zone=public --add-port=3306/tcp --permanent firewall-cmd --reload mysql>create user username@localhost identified by 'password';直接创建用户并授权的命令mysql>grant all on . to username@localhost identified by 'password';授予外网登陆权限 ,这里授权用户可以外网访问此数据库,如用数据库连接工具navicat连接mysql>grant all privileges on . to username@'%' identified by 'password';授予权限并且可以授权mysql>grant all privileges on . to username@'hostname' identified by 'password' with grant option;简单的用户和权限配置基本就这样了。 其中只授予部分权限把 其中 all privileges或者all改为select,insert,update,delete,create,drop,index,alter,grant,references,reload,shutdown,process,file其中一部分。

优秀的个人博客,低调大师

rhel6上搭建lnmp架构以及遇到的一些错误并排除方法

先装好rhel6.5 配置好实验环境 关掉NetworkManager,并停止掉开机自启动 [root@duwensql~]#serviceNetworkManagerstop [root@duwensql~]#chkconfig--listNetworkManager [root@duwensql~]#chkconfigNetworkManageroff 关掉iptables [root@duwensql~]#iptables-F [root@duwensql~]#serviceiptablessave iptables£o·àe1ò±£′μ/etc/sysconfig/iptables£o[è·¨] [root@duwensql~]#chkconfigiptablesoff 关掉selinux [root@duwensql~]#getenforce Enforcing [root@duwensql~]#setenforce usage:setenforce[Enforcing|Permissive|1|0] [root@duwensql~]#setenforce0 [root@duwensql~]# [root@duwensql~]#vim/etc/selinux/config 打开这个档案以后你可以看到如下的内容,把SELINUX的值改成disabled就好 #ThisfilecontrolsthestateofSELinuxonthesystem. #SELINUX=cantakeoneofthesethreevalues: #enforcing-SELinuxsecuritypolicyisenforced. #permissive-SELinuxprintswarningsinsteadofenforcing. #disabled-NoSELinuxpolicyisloaded. SELINUX=disabled #SELINUXTYPE=cantakeoneofthesetwovalues: #targeted-Targetedprocessesareprotected, #mls-MultiLevelSecurityprotection. SELINUXTYPE=targeted 修改主机名映射,可以不改,但是为了方便还是改下吧 [root@duwensql~]#cat/etc/hosts 127.0.0.1localhostlocalhost.localdomainlocalhost4localhost4.localdomain4 ::1localhostlocalhost.localdomainlocalhost6localhost6.localdomain6 [root@duwensql~]#echo"192.168.20.253duwensql.cnMySQL">>/etc/hosts [root@duwensql~]#cat/etc/hosts 127.0.0.1localhostlocalhost.localdomainlocalhost4localhost4.localdomain4 ::1localhostlocalhost.localdomainlocalhost6localhost6.localdomain6 192.168.20.253duwensql.cnMySQL [root@duwensql~]# 修改主机名,就是编辑下面的这个档案,这里只贴上修改后的内容 [root@duwensql~]#cat/etc/sysconfig/network NETWORKING=yes HOSTNAME=duwensql.cn GATEWAY=192.168.20.2 NTPSERVERARGS=iburst [root@duwensql~]# 配置本地yum源 [root@duwensql~]# [root@duwensql~]#mount/dev/sr0/mnt/ mount:blockdevice/dev/sr0iswrite-protected,mountingread-only [root@duwensql~]#df-h|tail-1 /dev/sr03.6G3.6G0100%/mnt [root@duwensql~]#echo"/dev/sr0/mnt/iso9660defaults00">>/etc/fstab [root@duwensql~]#rm-rf/etc/yum.repos.d/* [root@duwensql~]#cat>/etc/yum.repos.d/rhel6.repo<<EOF >[rhel6-source] >name=rhel6-source >baseurl=file:///mnt >enabled=1 >gpgcheck=0 >EOF [root@duwensql~]#yumcleanall Loadedplugins:product-id,refresh-packagekit,security,subscription-manager ThissystemisnotregisteredtoRedHatSubscriptionManagement.Youcanusesubscription-managertoregister. Cleaningrepos:rhel6-source CleaningupEverything [root@duwensql~]#yumlist 检测依赖环境,包括gcc,gcc-c++,autoconf,automake,zlib ,zlib-devel, openssl ,openssl-devel ,pcre-devel, [root@duwensql~]# [root@duwensql~]#yuminstall-ygccgcc-c++autoconfautomake [root@duwensql~]#yuminstall-yzlibzlib-developensslopenssl-develpcre-devel 为了方便从xshell上传软件包,这里安装一个工具 [root@duwensql~]#rpm/mnt/Packages/lrzsz-0.12.20-27.1.el6.x86_64.rpm-ih warning:/mnt/Packages/lrzsz-0.12.20-27.1.el6.x86_64.rpm:HeaderV3RSA/SHA256Signature,keyIDfd431d51:NOKEY ###########################################[100%] ###########################################[100%] [root@duwensql~]# //上传软件包:nginx-1.6.0.tar.gzmysql-5.5.30.tar.gz php-5.4.14.tar.bz2 [root@duwensql~]#rz zwaitingtoreceive.**B0100000023be50 [root@duwensql~]#ls anaconda-ks.cfginstall.log.syslognginx-1.6.0.tar.gz公共的视频文档音乐 install.logmysql-5.5.30.tar.gzphp-5.4.14.tar.bz2模板图片下载桌面 正式开始安装MySQL了 解压到指定目录/usr/local/src/ [root@duwensql~]# [root@duwensql~]#tar-zxfmysql-5.5.30.tar.gz-C/usr/local/src/ 建一个mysql用户,这里把这个用户显示出来 [root@duwensql~]#tail-1/etc/passwd mysql:x:500:500::/home/mysql:/sbin/nologin [root@duwensql~]# //安装cmake [root@duwensql~]#yuminstall-ycmake 建立mysql的目录 [root@duwensql/]#mkdir/server [root@duwensql~]#cd/usr/local/src/mysql-5.5.30/ [root@duwensqlmysql-5.5.30]#cmake-DCMAKE_INSTALL_PREFIX=/server/mysql-5.5-DMYSQL_UNIX_ADDR=/tmp/mysql.sock-DDEFAULT_CHARSET=utf8-DDEFAULT_COLLATION=utf8_general_ci-DWITH_EXTRA_CHARSERS=all-DWITH_MYISAM_STORAGE_ENGINE=1-DWITH_INNOBASE_STORAGE_ENGINE=1-DWITH_MEMORY_STORAGE_ENGINE=1-DWITH_READLINT=1-DENABLED_LOCAL_INFILE=1-DMYSQL_DATADIR=/server/mysql/data-DMYSQL_USER=mysql //报错啦啦啦啦 CMakeErroratcmake/readline.cmake:83(MESSAGE): Curseslibrarynotfound.Pleaseinstallappropriatepackage, removeCMakeCache.txtandreruncmake.OnDebian/Ubuntu,packagenameislibncurses5-dev,onRedhatandderivatesitisncurses-devel. CallStack(mostrecentcallfirst): cmake/readline.cmake:127(FIND_CURSES) cmake/readline.cmake:217(MYSQL_USE_BUNDLED_LIBEDIT) CMakeLists.txt:269(MYSQL_CHECK_READLINE) --Configuringincomplete,errorsoccurred! //这个错误就是ncurses这个依赖没有装,yum安装一下 [root@duwensqlncurses-5.9]#yum-yinstallncurses-devel //装了那个ncurses依赖,还是报错,就只好把这个CMakeCache.txt找出来干掉了 [root@duwensqlmysql-5.5.30]#find/-nameCMakeCache.txt /usr/local/src/mysql-5.5.30/CMakeCache.txt [root@duwensqlmysql-5.5.30]#rm-rf/usr/local/src/mysql-5.5.30/CMakeCache.txt //OK,现在重新cmake //呐开心不,没有报错了呢!!! 现在make &&make install,过程就不写了 配置运行环境 [root@duwensqlmysql-5.5.30]#cd/server/ [root@duwensqlserver]#ls mysql-5.5 [root@duwensqlserver]#chown-Rmysql:mysql/server/mysql-5.5/ 复制mysql配置文件 [root@duwensqlserver]#cd/etc/ [root@duwensqletc]#llmy.cnf -rw-r--r--.1rootroot2518月92013my.cnf [root@duwensqletc]#mv./my.cnf./my.cnf.back [root@duwensqletc]#cp/usr/local/src/mysql-5.5.30/support-files/my-large.cnf/etc/my.cnf [root@duwensqletc]# 这个步骤是加入开机启动项 [root@duwensqlinit.d]#cp/usr/local/src/mysql-5.5.30/support-files/mysql.server/etc/init.d/mysqld5.5 [root@duwensqlinit.d]#chmod+x./mysqld5.5 [root@duwensqlinit.d]#pwd /etc/init.d [root@duwensqlinit.d]# //这里要改下,大概在第70行 [root@duwensqlinit.d]#vim/etc/init.d/mysqld5.5 [root@duwensqlinit.d]#head-71/etc/init.d/mysqld5.5|tail-7 then basedir=/server/mysql-5.5 bindir=/server/mysql-5.5/bin iftest-z"$datadir" then datadir=/server/mysql-5.5/data fi [root@duwensqlinit.d]# //加入开机启动项 [root@duwensqlinit.d]#chkconfigmysqld5.5on [root@duwensqlinit.d]#chkconfig--listmysqld5.5 mysqld5.50:关闭1:关闭2:启用3:启用4:启用5:启用6:关闭 [root@duwensqlinit.d]# 初始化mysql [root@duwensqlinit.d]#cd/usr/local/src/mysql-5.5.30/scripts/ [root@duwensqlscripts]#chmod+xmysql_install_db [root@duwensqlscripts]#./mysql_install_db--defaults-file=/etc/my.cnf--basedir=/server/mysql-5.5--datadir=/server/mysql-5.5/data--user=mysql InstallingMySQLsystemtables... OK Fillinghelptables... OK Tostartmysqldatboottimeyouhavetocopy support-files/mysql.servertotherightplaceforyoursystem PLEASEREMEMBERTOSETAPASSWORDFORTHEMySQLrootUSER! Todoso,starttheserver,thenissuethefollowingcommands: /server/mysql-5.5/bin/mysqladmin-urootpassword'new-password' /server/mysql-5.5/bin/mysqladmin-uroot-hduwensqlpassword'new-password' Alternativelyyoucanrun: /server/mysql-5.5/bin/mysql_secure_installation whichwillalsogiveyoutheoptionofremovingthetest databasesandanonymoususercreatedbydefault.Thisis stronglyrecommendedforproductionservers. Seethemanualformoreinstructions. YoucanstarttheMySQLdaemonwith: cd/server/mysql-5.5;/server/mysql-5.5/bin/mysqld_safe& YoucantesttheMySQLdaemonwithmysql-test-run.pl cd/server/mysql-5.5/mysql-test;perlmysql-test-run.pl Pleasereportanyproblemswiththe/server/mysql-5.5/scripts/mysqlbugscript! [root@duwensqlscripts]# 开启mysql [root@duwensqlscripts]#/etc/init.d/mysqld5.5start StartingMySQL...[确定] [root@duwensqlscripts]# 测试MySQL //我这里最开始在家目录输入mysql显示没有命令,是因为没有加入环境变量的缘故啦,这里就不写出来了,直接到绝对路径去测试 root@duwensqlmysql-test]#cd/server [root@duwensqlserver]#ls mysql-5.5 [root@duwensqlserver]#cdmysql-5.5/ [root@duwensqlmysql-5.5]#ls binCOPYINGdatadocsincludeINSTALL-BINARYlibmanmysql-testREADMEscriptssharesql-benchsupport-files [root@duwensqlmysql-5.5]#cdbin/ [root@duwensqlbin]#./mysql WelcometotheMySQLmonitor.Commandsendwith;or\g. YourMySQLconnectionidis1 Serverversion:5.5.30-logSourcedistribution Copyright(c)2000,2013,Oracleand/oritsaffiliates.Allrightsreserved. OracleisaregisteredtrademarkofOracleCorporationand/orits affiliates.Othernamesmaybetrademarksoftheirrespective owners. Type'help;'or'\h'forhelp.Type'\c'toclearthecurrentinputstatement. mysql>showdatabases; +--------------------+ |Database| +--------------------+ |information_schema| |mysql| |performance_schema| |test| +--------------------+ 4rowsinset(0.04sec) mysql> ctrl + c 退出 给他加个环境变量吧 [root@duwensql~]#echo$PATH /usr/lib64/qt-3.3/bin:/usr/local/sbin:/usr/local/bin:/sbin:/bin:/usr/sbin:/usr/bin:/root/bin [root@duwensql~]#PATH="$PATH":/server/mysql-5.5/bin/ 设置mysql的root账户密码,并测试登陆 [root@duwensql~]#mysqladmin-urootpassword'123456' [root@duwensql~]#mysql-uroot-p123456 WelcometotheMySQLmonitor.Commandsendwith;or\g. YourMySQLconnectionidis4 Serverversion:5.5.30-logSourcedistribution Copyright(c)2000,2013,Oracleand/oritsaffiliates.Allrightsreserved. OracleisaregisteredtrademarkofOracleCorporationand/orits affiliates.Othernamesmaybetrademarksoftheirrespective owners. Type'help;'or'\h'forhelp.Type'\c'toclearthecurrentinputstatement. mysql> ctrl + c 退出 MySQL安装完了 来安装nginx吧 解压 [root@duwensql~]#tar-zxfnginx-1.6.0.tar.gz 编译 [root@duwensqlnginx-1.6.0]#./configure--prefix=server/nginx-1.6.0--user=nginx--group=nginx--with-http_dav_module--with-http_stub_status_module--with-http_addition_module--with-http_sub_module--with-http_flv_module--with-http_mp4_module 结果太多就不写了,放一个图 make&&make install [root@duwensqlnginx-1.6.0]#make-j4&&makeinstall 开始配置 [root@duwensqlnginx-1.2.8]#pwd /server/nginx-1.2.8 [root@duwensqlnginx-1.2.8]#vimconf/nginx.conf 第二行加 usernginxnginx; 然后加下面的内容,括号{前面有空格 location~\.php${ roothtml; fastcgi_pass127.0.0.1:9000; fastcgi_indexindex.php; fastcgi_paramSCRIPT_FILENAME/server/nginx-1.2.8/html$fastcgi_script_name; includefastcgi_params; } 大概的位置如下图 启动服务 [root@duwensqlnginx-1.2.8]#/server/nginx-1.2.8/sbin/nginx 把服务加入开机启动 [root@duwensqlnginx-1.2.8]#echo'/server/nginx-1.2.8/sbin/nginx&'>>/etc/rc.local [root@duwensqlnginx-1.2.8]# 测试下 测试配置文件和重新加载配置文件 [root@duwensqlnginx-1.2.8]#/server/nginx-1.2.8/sbin/nginx-t nginx:theconfigurationfile/server/nginx-1.2.8/conf/nginx.confsyntaxisok nginx:configurationfile/server/nginx-1.2.8/conf/nginx.conftestissuccessful [root@duwensqlnginx-1.2.8]#/server/nginx-1.2.8/sbin/nginx-sreload 来安装PHP 给PHP添加扩展模块:libmcrypt-2.5.8.tar.gz 1、 让 PHP 编译支持这个功能 2、 生成扩展模块 3、 --with-mcrypt=/usr/local/ 安装libmcrypt库 [root@duwensql~]#tar-zxflibmcrypt-2.5.8.tar.gz [root@duwensql~]#cdlibmcrypt-2.5.8 [root@duwensqllibmcrypt-2.5.8]#./configure--prefix=/usr/local/ [root@duwensqllibmcrypt-2.5.8]#echo$? 0 [root@duwensqllibmcrypt-2.5.8]#make-j4&&makeinstall 加个环境 [root@duwensqllibmcrypt-2.5.8]#yum-yinstallphp-pear 解压以及编译 //在这一步出了好多好多错误,始料不及啊,本文把错误和解决贴上,如果还是不明白的话可以直接搜索错误,这里就不写了 [root@duwensql~]#tarjxfphp-5.4.14.tar.bz2-C/usr/local/src/ [root@duwensql~]#cd/usr/local/src/php-5.4.14/ [root@duwensqlphp-5.4.14]#./configure--prefix=/server/php-5.4-nginx--with-config-file-path=/server/php-5.4-nginx--with-mysql=/server-5.5/--with-mysqli=/server/mysql-5.5/bin/mysql_config--with-iconv-dir--with-freetype-dir--with-jpeg-dir--with-png-dir--with-zlib--with-libxml-dir=/usr--enable-xml--disable-rpath--enable-bcmath--enable-shmop--enable-sysvsem--enable-inline-optimization--with-curl--with-curlwrappers--enable-mbregex--enable-fpm--enable-mbstring--with-gd--enable-gd-native-ttf--with-openssl--with-mhash--enable-pcntl--enable-sockets--with-xmlrpc--enable-zip--enable-soap--with-mcrypt=/usr/local/ 报错1 ####### configure:error:xml2-confignotfound.Pleasecheckyourlibxml2installation. [root@duwensqlphp-5.4.14]# 解决1 [root@duwensqlphp-5.4.14]#yum-yinstalllibxml2* 重新编译 [root@duwensqlphp-5.4.14]#./configure--prefix=/server/php-5.4-nginx--with-config-file-path=/server/php-5.4-nginx--with-mysql=/server/mysql-5.5/--with-mysqli=/server/mysql-5.5/bin/mysql_config--with-iconv-dir--with-freetype-dir--with-jpeg-dir--with-png-dir--with-zlib--with-libxml-dir=/usr--enable-xml--disable-rpath--enable-bcmath--enable-shmop--enable-sysvsem--enable-inline-optimization--with-curl--with-curlwrappers--enable-mbregex--enable-fpm--enable-mbstring--with-gd--enable-gd-native-ttf--with-openssl--with-mhash--enable-pcntl--enable-sockets--with-xmlrpc--enable-zip--enable-soap--with-mcrypt=/usr/local/ 报错2 checkingifweshouldusecURLforurlstreams...yes checkingforcURLindefaultpath...notfound configure:error:Pleasereinstallthelibcurldistribution- easy.hshouldbein<curl-dir>/include/curl/ [root@duwensqlphp-5.4.14]# 解决2: [root@duwensqlphp-5.4.14]#yum-yinstallcurl-devel 重新编译 [root@duwensqlphp-5.4.14]#./configure--prefix=/server/php-5.4-nginx--with-config-file-path=/server/php-5.4-nginx--with-mysql=/server/mysql-5.5/--with-mysqli=/server/mysql-5.5/bin/mysql_config--with-iconv-dir--with-freetype-dir--with-jpeg-dir--with-png-dir--with-zlib--with-libxml-dir=/usr--enable-xml--disable-rpath--enable-bcmath--enable-shmop--enable-sysvsem--enable-inline-optimization--with-curl--with-curlwrappers--enable-mbregex--enable-fpm--enable-mbstring--with-gd--enable-gd-native-ttf--with-openssl--with-mhash--enable-pcntl--enable-sockets--with-xmlrpc--enable-zip--enable-soap--with-mcrypt=/usr/local/ 报错3 checkingwhethertoenableJIS-mappedJapanesefontsupportinGD...no checkingforfabsf...yes checkingforfloorf...yes configure:error:jpeglib.hnotfound 解决3:*不要丢了 [root@duwensqlphp-5.4.14]#yum-yinstalllibjpeg* 再次编译 [root@duwensqlphp-5.4.14]./configure--prefix=/server/php-5.4-nginx--with-config-file-path=/server/php-5.4-nginx--with-mysql=/server/mysql-5.5/--with-mysqli=/server/mysql-5.5/bin/mysql_config--with-iconv-dir--with-freetype-dir--with-jpeg-dir--with-png-dir--with-zlib--with-libxml-dir=/usr--enable-xml--disable-rpath--enable-bcmath--enable-shmop--enable-sysvsem--enable-inline-optimization--with-curl--with-curlwrappers--enable-mbregex--enable-fpm--enable-mbstring--with-gd--enable-gd-native-ttf--with-openssl--with-mhash--enable-pcntl--enable-sockets--with-xmlrpc--enable-zip--enable-soap--with-mcrypt=/usr/local/ 报错4: checkingforjpeg_read_headerin-ljpeg...yes Ifconfigurefailstry--with-vpx-dir=<DIR> configure:error:png.hnotfound. [root@duwensqlphp-5.4.14]# 解决4:*不要丢了 [root@duwensqlphp-5.4.14]#yum-yinstalllibpng* 再次编译 [root@duwensqlphp-5.4.14]#./configure--prefix=/server/php-5.4-nginx--with-config-file-path=/server/php-5.4-nginx--with-mysql=/server/mysql-5.5/--with-mysqli=/server/mysql-5.5/bin/mysql_config--with-iconv-dir--with-freetype-dir--with-jpeg-dir--with-png-dir--with-zlib--with-libxml-dir=/usr--enable-xml--disable-rpath--enable-bcmath--enable-shmop--enable-sysvsem--enable-inline-optimization--with-curl--with-curlwrappers--enable-mbregex--enable-fpm--enable-mbstring--with-gd--enable-gd-native-ttf--with-openssl--with-mhash--enable-pcntl--enable-sockets--with-xmlrpc--enable-zip--enable-soap--with-mcrypt=/usr/local/ 报错5: configure:error:freetype.hnotfound. 解决5:*不要丢掉了 [root@duwensqlphp-5.4.14]#yum-yinstallfreetype* 再次编译 [root@duwensqlphp-5.4.14]#./configure--prefix=/server/php-5.4-nginx--with-config-file-path=/server/php-5.4-nginx--with-mysql=/server/mysql-5.5/--with-mysqli=/server/mysql-5.5/bin/mysql_config--with-iconv-dir--with-freetype-dir--with-jpeg-dir--with-png-dir--with-zlib--with-libxml-dir=/usr--enable-xml--disable-rpath--enable-bcmath--enable-shmop--enable-sysvsem--enable-inline-optimization--with-curl--with-curlwrappers--enable-mbregex--enable-fpm--enable-mbstring--with-gd--enable-gd-native-ttf--with-openssl--with-mhash--enable-pcntl--enable-sockets--with-xmlrpc--enable-zip--enable-soap--with-mcrypt=/usr/local/ 报错6: checkingforspecifiedlocationoftheMySQLUNIXsocket...no configure:error:CannotfindMySQLheaderfilesunder/server-5.5/. NotethattheMySQLclientlibraryisnotbundledanymore! 这个应该是指定路径错误,改下 再次编译 [root@duwensqlphp-5.4.14]#./configure--prefix=/server/php-5.4-nginx--with-config-file-path=/server/php-5.4-nginx--with-mysql=/server/mysql-5.5/--with-mysqli=/server/mysql-5.5/bin/mysql_config--with-iconv-dir--with-freetype-dir--with-jpeg-dir--with-png-dir--with-zlib--with-libxml-dir=/usr--enable-xml--disable-rpath--enable-bcmath--enable-shmop--enable-sysvsem--enable-inline-optimization--with-curl--with-curlwrappers--enable-mbregex--enable-fpm--enable-mbstring--with-gd--enable-gd-native-ttf--with-openssl--with-mhash--enable-pcntl--enable-sockets--with-xmlrpc--enable-zip--enable-soap--with-mcrypt=/usr/local/ 报错7: configure:error:wrongmysqllibraryversionorlibnotfound.Checkconfig.logformoreinformation. 解决7: “=/server/mysql-5.5/bin/mysql_config”删掉试试 改好以后的执行: [root@duwensqlphp-5.4.14]#./configure--prefix=/server/php-5.4-nginx--with-config-file-path=/server/php-5.4-nginx--with-mysql=/server/mysql-5.5/--with-mysqli--with-iconv-dir--with-freetype-dir--with-jpeg-dir--with-png-dir--with-zlib--with-libxml-dir=/usr--enable-xml--disable-rpath--enable-bcmath--enable-shmop--enable-sysvsem--enable-inline-optimization--with-curl--with-curlwrappers--enable-mbregex--enable-fpm--enable-mbstring--with-gd--enable-gd-native-ttf--with-openssl--with-mhash--enable-pcntl--enable-sockets--with-xmlrpc--enable-zip--enable-soap--with-mcrypt=/usr/local/ 历经千辛万苦啊 这里贴上一些参数的意思 --with-iconv-dir #字符集转换 需要的扩展模块 –without-iconv 关闭 iconv 函数,种字符集间的转换 –with-freetype-dir 打开对 freetype 字体库的支持 –with-jpeg-dir 打开对 jpeg 图片的支持 –with-png-dir 打开对 png 图片的支持 –with-libxml-dir 打开 libxml2 库的支持 –disable-rpath 关闭额外的运行库文件 –enable-bcmath 打开图片大小调整,用到 zabbix 监控的时候用到了这个模块 下面 是make && make install [root@duwensqlphp-5.4.14]#make-j4&&makeinstall 生成配置文件 [root@duwensql~]#cp/usr/local/src/php-5.4.14/php.ini-production/server/php-5.4-nginx/php.ini 生成php-fpm配置文件 [root@duwensql~]#cp/server/php-5.4-nginx/etc/php-fpm.conf.default/server/php-5.4-nginx/etc/php-fpm.conf 生成php-fpm启动脚本 [root@duwensql~]#cp/usr/local/src/php-5.4.14/sapi/fpm/init.d.php-fpm/etc/init.d/php-fpm [root@duwensql~]#chmod+x/etc/init.d/php-fpm [root@duwensql~]#/etc/init.d/php-fpmstart Startingphp-fpmdone [root@duwensql~]#netstat-anptu|grep9000 tcp00127.0.0.1:90000.0.0.0:*LISTEN76616/php-fpm [root@duwensql~]# 测试php [root@duwensql~]#vim/server/nginx-1.2.8/html/a.php [root@duwensql~]#cat/server/nginx-1.2.8/html/a.php <?php phpinfo(); ?> [root@duwensql~]# 效果图如下 The End!

资源下载

更多资源
腾讯云软件源

腾讯云软件源

为解决软件依赖安装时官方源访问速度慢的问题,腾讯云为一些软件搭建了缓存服务。您可以通过使用腾讯云软件源站来提升依赖包的安装速度。为了方便用户自由搭建服务架构,目前腾讯云软件源站支持公网访问和内网访问。

Nacos

Nacos

Nacos /nɑ:kəʊs/ 是 Dynamic Naming and Configuration Service 的首字母简称,一个易于构建 AI Agent 应用的动态服务发现、配置管理和AI智能体管理平台。Nacos 致力于帮助您发现、配置和管理微服务及AI智能体应用。Nacos 提供了一组简单易用的特性集,帮助您快速实现动态服务发现、服务配置、服务元数据、流量管理。Nacos 帮助您更敏捷和容易地构建、交付和管理微服务平台。

Rocky Linux

Rocky Linux

Rocky Linux(中文名:洛基)是由Gregory Kurtzer于2020年12月发起的企业级Linux发行版,作为CentOS稳定版停止维护后与RHEL(Red Hat Enterprise Linux)完全兼容的开源替代方案,由社区拥有并管理,支持x86_64、aarch64等架构。其通过重新编译RHEL源代码提供长期稳定性,采用模块化包装和SELinux安全架构,默认包含GNOME桌面环境及XFS文件系统,支持十年生命周期更新。

WebStorm

WebStorm

WebStorm 是jetbrains公司旗下一款JavaScript 开发工具。目前已经被广大中国JS开发者誉为“Web前端开发神器”、“最强大的HTML5编辑器”、“最智能的JavaScript IDE”等。与IntelliJ IDEA同源,继承了IntelliJ IDEA强大的JS部分的功能。

用户登录
用户注册