HAProxy高可用负载均衡集群部署
![HAProxy+Varnish_Version_1.0.png wKiom1e5aZvTXGaFAAL8xjM2YpA837.png]()
基本信息:
系统平台:VMware WorkStation
系统版本: CentOS Linux release 7.2.1511 (Core)
内核版本: 3.10.0-327.el7.x86_64
集群架构:
前端:HAProxy
1、虚拟FQDN:www.simpletime.net
2、VIP:192.168.39.1;DIP:172.16.39.50
3、调度服务器:Varnish1、Varnish2
4、调度算法:URL_Hash_Consistent
5、集群统计页:172.16.39.50:9091/simpletime?admin
缓存服务器:Varnish
1、VarnishServer1:172.16.39.14:9527
2、VarnishServer2:172.16.39.15:9527
3、开启健康状态探测,提供高可用
4、负载均衡后端Web服务器组
5、动静分离后端服务器,并动静都提供负载均衡效果
后端服务器:
StaticServer1:172.16.39.14:80
StaticServer2:172.16.39.15:80
DynamicServer1:172.16.39.151
DynamicServer2:172.16.39.152
Mysql服务器:
MysqlServer:172.16.39.150
思考:
1、负载均衡动静分离后,会话如何保持?
2、负载均衡动静分离后,存储如何解决?
3、该方案适用于什么样的场景?
4、该方案缺陷有哪些?
5、如何改进?
一、部署HAProxy
1、安装HAProxy
~]# yum install HAProxy
2、配置HAProxy
#---------------------------------------------------------------------
# main frontend which proxys to the backends
#---------------------------------------------------------------------
frontend  web *:80
    #acl url_static       path_beg       -i /static /p_w_picpaths /javascript /stylesheets
    #acl url_static       path_end       -i .jpg .gif .png .css .js .html .txt .htm
    #acl url_dynamic      path_begin     -i .php .jsp
    #default_backend      static_srv if url_static
    #use_backend          dynamic_srv if url_dynamic
    use_backend        varnish_srv

#---------------------------------------------------------------------
# round robin balancing between the various backends
#---------------------------------------------------------------------
backend varnish_srv
    balance     uri           #使用基于URL的一致性哈希调度算法
    hash-type   consistent
    server varnish1 172.16.39.14:9527 check
    server varnish2 172.16.39.15:9527 check

listen stats     #开启HAProxy图形化Web管理功能
    bind :9091
    stats enable
    stats uri   /simpletime?admin
    stats hide-version
    stats auth admin:abc.123
    stats admin if TRUE
3、启动服务
~]# systemctl start haproxy
~]# systemctl status haproxy #查看状态
~]# ss -tnlp #查看80和9091端口是否启用
~]# systemctl enable haproxy #设置开机启动
二、部署Varnish,两台配置一致(172.16.39.14|15)
1、安装及配置
~]# yum install varnish -y
~]# vim /etc/varnish/varnish.params
VARNISH_LISTEN_PORT=9527 #更改默认端口
~]# systemctl start varnish
~]# systemctl enable varnish
~]# vim /etc/varnish/default.vcl
vcl 4.0;
##############启用负载均衡模块###############
import directors;
################定义Purge-ACL控制#######################
acl purgers {
    "127.0.0.1";
    "172.16.39.0"/16;
}
# Default backend definition. Set this to point to your content server.
##############配置健康状态探测##############
probe HE {                      #静态检测
    .url = "/health.html";      #指定检测URL
    .timeout = 2s;              #探测超时时长
    .window = 5;                #探测次数
    .threshold = 2;             #探测次数成功多少次才算健康
    .initial = 2;               #Varnish启动探测后端主机2次健康后加入主机
    .interval = 2s;             #探测间隔时长
    .expected_response = 200;   #期望状态响应码
}
probe HC {                      #动态监测
    .url = "/health.php";
    .timeout = 2s;
    .window = 5;
    .threshold = 2;
    .initial = 2;
    .interval = 2s;
    .expected_response = 200;
}
#############添加后端主机################
backend web1 {
    .host = "172.16.39.151:80";
    .port = "80";
    .probe = HC;
}

backend web2 {
    .host = "172.16.39.152:80";
    .port = "80";
    .probe = HC;
}

backend app1 {
    .host = "172.16.39.14:80";
    .port = "80";
    .probe = HE;
}

backend app2 {
    .host = "172.16.39.15:80";
    .port = "80";
    .probe = HE;
}

#############定义负载均衡及算法###############
sub vcl_init {
    new webcluster = directors.round_robin();
    webcluster.add_backend(web1);
    webcluster.add_backend(web2);

    new appcluster = directors.round_robin();
    appcluster.add_backend(app1);
    appcluster.add_backend(app2);
}
################定义vcl_recv函数段######################
sub vcl_recv {
#####ACL未授权,不允许PURGE,并返回405#####
    if (req.method == "PURGE") {
        if(!client.ip ~ purgers){
            return(synth(405,"Purging not allowed for" + client.ip));
        }
        return (purge);
    }
#####添加首部信息,使后端服务记录访问者的真实IP
#    if (req.restarts == 0) {
#        set req.http.X-Forwarded-For = req.http.X-Forwarded-For + ", " + client.ip;
#    } else {
#        set req.http.X-Forwarded-For = client.ip;
#    }
#    set req.backend_hint = webcluster.backend();
#    set req.backend_hint = appcluster.backend();
#注:因为Varnish不是一级代理,配置forward只能取到上级代理IP,而上级代理IP,本身就包含在HAProxy发送过来的Forward里,所以没必要配置,而后端服务器只要日志格式有启用记录Forward信息,并且上级代理没有做限制,那么,就能获取到客户端真实IP;
#####动静分离#####
    if (req.url ~ "(?i)\.(php|asp|aspx|jsp|do|ashx|shtml)($|\?)") {
        set req.backend_hint = appcluster.backend();
    }
#####不正常的请求不缓存#####
    if (req.method != "GET" &&
        req.method != "HEAD" &&
        req.method != "PUT" &&
        req.method != "POST" &&
        req.method != "TRACE" &&
        req.method != "OPTIONS" &&
        req.method != "PATCH" &&
        req.method != "DELETE") {
        return (pipe);
    }
#####如果请求不是GET或者HEAD,不缓存#####
    if (req.method != "GET" && req.method != "HEAD") {
        return (pass);
    }
#####如果请求包含Authorization授权或Cookie认证,不缓存#####
    if (req.http.Authorization || req.http.Cookie) {
        return (pass);
    }
#####启用压缩,但排除一些流文件压缩#####
    if (req.http.Accept-Encoding) {
        if (req.url ~ "\.(bmp|png|gif|jpg|jpeg|ico|gz|tgz|bz2|tbz|zip|rar|mp3|mp4|ogg|swf|flv)$") {
            unset req.http.Accept-Encoding;
        } elseif (req.http.Accept-Encoding ~ "gzip") {
            set req.http.Accept-Encoding = "gzip";
        } elseif (req.http.Accept-Encoding ~ "deflate") {
            set req.http.Accept-Encoding = "deflate";
        } else {
            unset req.http.Accept-Encoding;
        }
    }
        return (hash);
}
####################定义vcl_pipe函数段#################
sub vcl_pipe {
    return (pipe);
}
sub vcl_miss {
    return (fetch);
}
####################定义vcl_hash函数段#################
sub vcl_hash {
    hash_data(req.url);
    if (req.http.host) {
        hash_data(req.http.host);
    } else {
        hash_data(server.ip);
    }
    if (req.http.Accept-Encoding ~ "gzip") {
        hash_data ("gzip");
    } elseif (req.http.Accept-Encoding ~ "deflate") {
        hash_data ("deflate");
    }
}
##############设置资源缓存时长#################
sub vcl_backend_response {
    if (beresp.http.cache-control !~ "s-maxage") {
       if (bereq.url ~ "(?i)\.(jpg|jpeg|png|gif|css|js|html|htm)$") {
          unset beresp.http.Set-Cookie;
          set beresp.ttl = 3600s;
       }
    }
}
################启用Purge#####################
sub vcl_purge {
    return(synth(200,"Purged"));
}
###############记录缓存命中状态##############
sub vcl_deliver {
    if (obj.hits > 0) {
        set resp.http.X-Cache = "HIT from " + req.http.host;
        set resp.http.X-Cache-Hits = obj.hits;
    } else {
        set resp.http.X-Cache = "MISS from " + req.http.host;
    }
    unset resp.http.X-Powered-By;
    unset resp.http.Server;
    unset resp.http.Via;
    unset resp.http.X-Varnish;
    unset resp.http.Age;
}
2、加载配置,因为还没有配置后端应用服务器,可以看到后端主机健康检测全部处于Sick状态
~]# varnishadm -S /etc/varnish/secret -T 127.0.0.1:6082
varnish> vcl.load conf1 default.vcl
200
VCL compiled.
varnish> vcl.use conf1
200
VCL 'conf1' now active
varnish> backend.list
200
Backend name                   Refs   Admin      Probe
web1(172.16.39.151,,80)        15     probe      Sick 0/5
web2(172.16.39.152,,80)        15     probe      Sick 0/5
app1(172.16.39.14,,80)         15     probe      Sick 0/5
app2(172.16.39.15,,80)         15     probe      Sick 0/5
三、部署Mysql(172.16.39.150)
~]# yum install mariadb.server
~]# rpm -qe mariadb-server
mariadb-server-5.5.44-2.el7.centos.x86_64
~]# vim /etc/my.cnf   #数据库基本优化
[mysqld]
innodb_file_per_table = ON
skip_name_resolve = ON
~]# mysql  #创建wordpress数据库并授权该数据库用户
> create database wwwdb;
> grant all on wwwdb.* to www@'172.16.39.%' identified by "abc.123";
> exit
四、部署NFS文件系统
1、后端所有主机安装服务
~]# yum install nfs-utils
2、动态资源主机172.16.39.152设为动态web数据共享服务器
DynamicServer2 ~]# vim /etc/exports
/data/web/      172.16.39.151/16(rw,sync)  #rw=可读写,sync=内存及硬盘同步写入数据
3、静态主机172.16.39.15设为静态web数据共享服务器
StaticServer2 ~]# vim /etc/exports
/data/web/      172.16.39.14/16(rw,sync)  #rw=可读写,sync=内存及硬盘同步写入数据
~]# systemctl start nfs-server #启动服务
DynamicServer2 ~]# exportfs -avr   #重载配置
exporting 172.16.39.151/16:/data/web
StaticServer2 ~]# exportfs -avr   #重载配置
exporting 172.16.39.14/16:/data/web
4、两台服务端设为开机启动
~]# systemctl enable nfs-server
5、客户端同步,动态主机挂载动态服务器共享,静态主机挂载静态服务器共享
~]# showmount -e 172.16.39.152
Export list for 172.16.39.152:
/data/web 172.16.39.151/16
~]# mount -t nfs 172.16.39.15:/data/web /data/web
五、部署后端主机(注意:已经部署了NFS文件系统)
1、安装及配置(DynamicServer2:172.16.39.152)
~]# yum install nginx php-fpm php-mysql -y
~]# mkdir /data/web/www -pv
~]# vim /etc/nginx/conf.d/www.simple.com.conf
server {
    listen       80;
    root         /data/web/www;
    server_name     www.simple.com;
    index index.html index.htm index.php;
    location ~ [^/]\.php(/|$) {
        try_files $uri = 404;
        fastcgi_pass 127.0.0.1:9000;
        fastcgi_index index.php;
        include fastcgi.conf;
        #access_log_bypass_if ($uri = '/health.php');
    }
}

备注:access_log_bypass_if 需添加日志过滤模块,本文主要实现过滤健康状态检测信息;

~]# systemctl start nginx php-fpm
2、部署wordpress应用
~]# unzip wordpress-4.3.1-zh_CN.zip
~]# mv wordpress/* /data/web/www/
www]# cp wp-config{-sample,}.php
www]# vim wp-config.php
define('DB_NAME', 'wwwdb');
define('DB_USER', 'www');
define('DB_PASSWORD', 'abc.123');
define('DB_HOST', '172.16.39.150');
3、设置facl权限
~]# id apache
~]# setfacl -m u:apache:rwx /data/web/www
4、拷贝web数据至StaticServer2,另两台后端主机挂载的是两台NFS服务端的数据文件,web数据数完成
~]# tar -jcvf web.tar.gz  /data/web/www
~]# scp web.tar.gz 172.16.39.15:
~]# setfacl -m u:apache:rwx /data/web/www
StaticServer2 ~]# tar -xf web.tar.gz -C /data/web
5、创建动静资源主机组Varnish健康状态探测页面
DynamicServer2~]# echo "<h1>DynamicServer is Health.</h1> > /data/web/www/health.php
StaticServer2~]# echo "<h1>StaticServer is Health.</h1>" > /data/web/www/health.html
6、在Varnish主机上查看健康状态(172.16.39.14|15,也就是StaticServer主机)
StaticServer2~]# varnishadm -S /etc/varnish/secret -T 127.0.0.1:6082
varnish> backend.list #后端Web主机正常
200
Backend name                   Refs   Admin      Probe
web1(172.16.39.151,,80)        15     probe      Healthy 5/5
web2(172.16.39.152,,80)        15     probe      Healthy 5/5
app1(172.16.39.14,,80)         15     probe      Healthy 5/5
app2(172.16.39.15,,80)         15     probe      Healthy 5/5
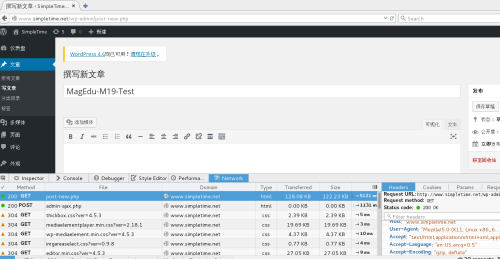
7、web访问172.16.39.50完成wordpress配置
![spacer.gif]()
![HAProxy.png wKioL1e5sHGjBUo7AABzivXU5O8464.png-wh_50]()
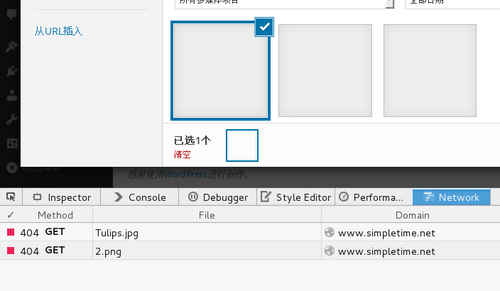
8、创建图文测试,发现动静分离下,图片上传后无法显示
![HAProxy5.png wKiom1e5svrjhRNfAAHrL2t1ouk311.png-wh_50]()
9、分析原因,动静分离后,用户可以上传图片至动态资源主机上,但静态资源却没有该图片,初步解决方案:使用文件同步软件,实时同步图片等流格式资源。
![HAProxy2.png wKioL1e5sJWzXsVrAAB7Rcvi01I405.png-wh_50]()
六、部署Rsync+inodify,实现静态资源主机同步上传资源图片目录,解决图片不能显示问题
1、将StaticServer2配置为备份端,同步动态资源资源DynamicServer2下的web图片上传目录文件
~]# rpm -qa rsync
~]# vim /etc/rsyncd.conf #尾行追加
uid = root    #指定执行备份的用户及组权限为root用户
gid = root
user chroot = no  #关闭chroot
max connections = 200 #最大连接数
timeout = 600
pid file = /var/run/rsyncd.pid
lock file = /var/run/rsyncd.lock
log file = /var/log/rsyncd.log
[web]
path=/data/web/www/wp-content/uploads
ignore errors
read only = no
list = no
hosts allow = 172.16.39.0/255.255.0.0 #只允许39网段进行同步
auth users = rsync #认证的用户名
secrets file = /etc/rsyncd.password  #指定密码文件
2、创建rsync同步用户密码文件
~]# echo “rsync:abc.123” > /etc/rsyncd.password
~]# chmod 600 /etc/rsyncd.password
3、启动服务
~]# systemctl start rsyncd
~]# ss -tnlp |grep rsync #查看是否开启873端口
~]# systemctl enable rsyncd #设置rsync开机启动
4、部署Rsync同步端DynamicServer2,实时同步本机web图片数据至StaticServer2,并保持以DynamicServer2为主两台服务器web图片资源一致性。
~]# yum install rsync inodify-tools inodify-tools-devel
如果yum源没有找到inodify,就直接下载源码包进行编译
~]# tar -xf inodify-tools-3.13.tar.gz
~]# ./configure --prefix=/usr/local/inotify
~]# ]# make -j 2 && make install
~]# ln -sv /usr/local/inotify/bin/inotifywait /usr/bin/
~]# echo “abc.123” > /etc/rsyncd.password
~]# chmod 600 /etc/rsyncd.password
#创建实时同步脚本
~]# vim /etc/rsync.sh
#!/bin/bash
host=172.16.39.15     #数据备份主机
src=/data/web/www/wp-content/uploads/    #想要备份的目录
des=web
user=rsync
/usr/bin/rsync -vzrtopg --delete --progress --password-file=/etc/rsyncd.password $src $user@$host::$des
/usr/bin/inotifywait -mrq --timefmt '%d/%m/%y %H:%M' --format '%T %w%f%e' -e modify,delete,create,attrib $src \
    | while read files
do
/usr/bin/rsync -vzrtopg --delete --progress --password-file=/etc/rsyncd.password $src $user@$host::$des
echo "${files} was rsynced" >>/tmp/rsync.log 2>&1
done
5、添加开机自动运行脚本
~]# chmod 764 /etc/rsync.sh
~]# echo "/usr/bin/bash /etc/rsync.sh &" >> /etc/rc.local #开机后台自动运行该脚本
~]# chmod 750 /etc/rc.d/rc.local   #Centos7,rc.local没有执行权限,要给予权限才能执行
~]# sh /etc/rsync.sh & #执行同步脚本
七、测试
1、图文博客发布
![Haproxy6.png wKioL1e5uLCSxkaeAAG14d5QWKY759.png-wh_50]()
2、PURGE清空Varnish缓存测试
~]# curl -X PURGE www.simpletime.net/
<!DOCTYPE html>
<html>
  <head>
    <title>200 Purged</title>
  </head>
  <body>
    <h1>Error 200 Purged</h1>
    <p>Purged</p>
    <h3>Guru Meditation:</h3>
    <p>XID: 100925448</p>
    <hr>
    <p>Varnish cache server</p>
  </body>
</html>
3、压力测试 #存在缓存服务器,单机测试只做参考
~]# ab -c 20000 -n 20000 -r www.simpletime.net/
Requests per second:    670.86 [#/sec] (mean)
Time per request:       29812.421 [ms] (mean)
Time per request:       1.491 [ms] (mean, across all concurrent requests)
~]# ab -c 20000 -n 20000 -r www.simpletime.net/
Requests per second:    521.78 [#/sec] (mean)
Time per request:       38330.212 [ms] (mean)
Time per request:       1.917 [ms] (mean, across all concurrent requests)
~]# ab -c 20000 -n 20000 -r www.simpletime.net/
Requests per second:    521.78 [#/sec] (mean)
Time per request:       38330.212 [ms] (mean)
Time per request:       1.917 [ms] (mean, across all concurrent requests)
4、HAProxy调度器挂了,整个架构崩溃...
5、Varnish挂一台,没事,有冗余,高可用实现,另一台Varnish压力增大,尽快修复故障机器即可。
6、后端主机,理论上动静态群集组能冗余各组一台服务器故障,可因为NFS文件系统懒人配置,NFS客户端挂了没事,NFS服务端挂了,GameOver...
7、文件服务器NFS服务端挂了,(NFS服务器没有做冗余)GameOver...
8、Rsync+Inodify文件实时同步系统挂了,服务器还能访问,只是图片等流格式文件不显示了...
9、MysqlServer挂了,无冗余,(GameOver)...
10、后端应用服务器Nginx日志示例:
~]# tail /var/log/nginx/access.log
172.16.39.15(VarnishIP) - - [26/Aug/2016:17:09:56 +0800] "POST /wp-admin/admin-ajax.php HTTP/1.1" 200 32
"http://172.16.39.50/wp-admin/post-new.php" "Mozilla/5.0 (Windows NT 6.1; WOW64) AppleWebKit/537.36
(KHTML, like Gecko) Chrome/49.0.2623.110 Safari/537.36" "172.16.39.5(客户端IP), 172.16.39.50(HAProxyIP)"
八、总结
1、架构优点:
(1)HAProxy为Varnish缓存服务器提供了高可用的负载均衡,其使用的算法,也为Varnish提升了缓存命中率;
(2)HAProxy提供Web图形化管理界面,节约了学习成本;
(3)Varnish的高效缓存机制极大的提升了Web应用的性能,降低了Web服务器的压力;
(4)Varnish给后端Web服务器提供了高可用负载均衡,并使用了动态分离技术,保障了后端主机的冗余,显著提升了其性能;
(5)NFS+Rsync+inodify基本解决了该架构存储的问题,该架构文件存储因服务器有限,并没有设计好,储存服务器因有单独的网络存储服务器来提供;
2、冗余不足:
(1)Nginx负载均衡调度器,没有冗余能力,易出现单点故障。
解决方案:增加服务器,使用Keepalive做高可用。
(2)MysqlServer,没有冗余能力。
解决方案:主从复制、MHA。
(3)NFS文件服务,没有冗余能力。
解决方案:可以增加服务器,使用rsync+inodify实现数据实时同步,再用keepalive做高可用。
3、性能瓶颈:
(1)NFS文件系统,因网络IO能力与磁盘本身性能,多台主机同时挂载执行读取读写操作,势必带来性能下降,根据木桶原理,此短板已成为该群集方案性能瓶颈。
(2)在大量的读写访问下,数据库的压力会非常大,从而影响性能。
解决方案:数据库主从复制,读写分离;
友情链接:
1、Nginx日志过滤模块官网下载链接
https://github.com/cfsego/ngx_log_if/
2、Varnish4.0官方帮助指南
http://www.varnish-cache.org/docs/4.0/users-guide/
以上均为个人观点,本架构还有许多不足之处,仅作学习交流之用;


