Spring Cloud 升级之路 - 2020.0.x - 5. 理解 NamedContextF
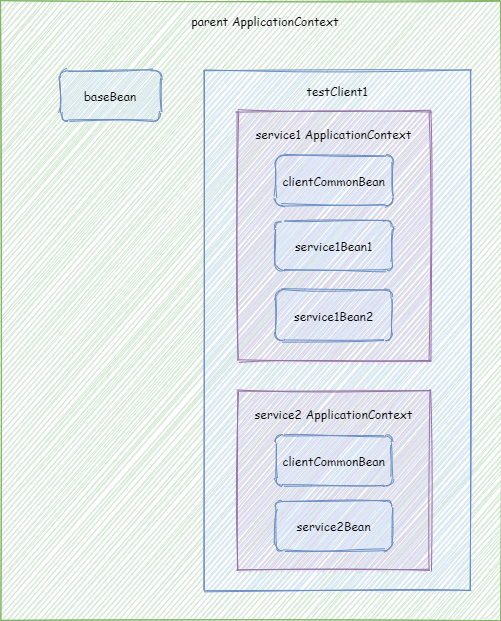
spring-cloud-commons 中参考了 spring-cloud-netflix 的设计,引入了 NamedContextFactory 机制,一般用于对于不同微服务的客户端模块使用不同的 子 ApplicationContext 进行配置。 spring-cloud-commons 是 Spring Cloud 对于微服务基础组件的抽象。在一个微服务中,调用微服务 A 与调用微服务 B 的配置可能不同。比较简单的例子就是,A 微服务是一个简单的用户订单查询服务,接口返回速度很快,B 是一个报表微服务,接口返回速度比较慢。这样的话我们就不能对于调用微服务 A 和微服务 B 使用相同的超时时间配置。还有就是,我们可能对于服务 A 通过注册中心进行发现,对于服务 B 则是通过 DNS 解析进行服务发现,所以对于不同的微服务我们可能使用不同的组件,在 Spring 中就是使用不同类型的 Bean。 在这种需求下,不同微服务的客户端有不同的以及相同的配置,有不同的 Bean,也有相同的 Bean。所以,我们可以针对每一个微服务将他们的 Bean 所处于 ApplicationContext 独立开来,不同微服务客户端使用不同的 ApplicationContext。NamedContextFactory 就是用来实现这种机制的。 通过实例了解 NamedContextFactory 的使用 编写源码: package com.github.hashjang.spring.cloud.iiford.service.common; import org.junit.Assert; import org.junit.Test; import org.springframework.cloud.context.named.NamedContextFactory; import org.springframework.context.annotation.AnnotationConfigApplicationContext; import org.springframework.context.annotation.Bean; import org.springframework.context.annotation.Configuration; import org.springframework.core.env.Environment; import java.util.List; import java.util.Objects; public class CommonNameContextTest { private static final String PROPERTY_NAME = "test.context.name"; @Test public void test() { //创建 parent context AnnotationConfigApplicationContext parent = new AnnotationConfigApplicationContext(); //添加 BaseConfig 相关配置 parent.register(BaseConfig.class); //初始化 parent parent.refresh(); //创建 testClient1,默认配置使用 ClientCommonConfig TestClient testClient1 = new TestClient(ClientCommonConfig.class); //创建 service1 与 service2 以及指定对应额外的配置类 TestSpec testSpec1 = new TestSpec("service1", new Class[]{Service1Config1.class, Service1Config2.class}); TestSpec testSpec2 = new TestSpec("service2", new Class[]{Service2Config.class}); //设置 parent ApplicationContext 为 parent testClient1.setApplicationContext(parent); //将 service1 与 service2 的配置加入 testClient1 testClient1.setConfigurations(List.of(testSpec1, testSpec2)); BaseBean baseBean = testClient1.getInstance("service1", BaseBean.class); System.out.println(baseBean); //验证正常获取到了 baseBean Assert.assertNotNull(baseBean); ClientCommonBean commonBean = testClient1.getInstance("service1", ClientCommonBean.class); System.out.println(commonBean); //验证正常获取到了 commonBean Assert.assertNotNull(commonBean); Service1Bean1 service1Bean1 = testClient1.getInstance("service1", Service1Bean1.class); System.out.println(service1Bean1); //验证正常获取到了 service1Bean1 Assert.assertNotNull(service1Bean1); Service1Bean2 service1Bean2 = testClient1.getInstance("service1", Service1Bean2.class); System.out.println(service1Bean2); //验证正常获取到了 service1Bean2 Assert.assertNotNull(service1Bean2); BaseBean baseBean2 = testClient1.getInstance("service2", BaseBean.class); System.out.println(baseBean2); //验证正常获取到了 baseBean2 并且 baseBean2 就是 baseBean Assert.assertEquals(baseBean, baseBean2); ClientCommonBean commonBean2 = testClient1.getInstance("service2", ClientCommonBean.class); System.out.println(commonBean2); //验证正常获取到了 commonBean2 并且 commonBean 和 commonBean2 不是同一个 Assert.assertNotNull(commonBean2); Assert.assertNotEquals(commonBean, commonBean2); Service2Bean service2Bean = testClient1.getInstance("service2", Service2Bean.class); System.out.println(service2Bean); //验证正常获取到了 service2Bean Assert.assertNotNull(service2Bean); } @Configuration(proxyBeanMethods = false) static class BaseConfig { @Bean BaseBean baseBean() { return new BaseBean(); } } static class BaseBean {} @Configuration(proxyBeanMethods = false) static class ClientCommonConfig { @Bean ClientCommonBean clientCommonBean(Environment environment, BaseBean baseBean) { //在创建 NamedContextFactory 里面的子 ApplicationContext 的时候,会指定 name,这个 name 对应的属性 key 即 PROPERTY_NAME return new ClientCommonBean(environment.getProperty(PROPERTY_NAME), baseBean); } } static class ClientCommonBean { private final String name; private final BaseBean baseBean; ClientCommonBean(String name, BaseBean baseBean) { this.name = name; this.baseBean = baseBean; } @Override public String toString() { return "ClientCommonBean{" + "name='" + name + '\'' + ", baseBean=" + baseBean + '}'; } } @Configuration(proxyBeanMethods = false) static class Service1Config1 { @Bean Service1Bean1 service1Bean1(ClientCommonBean clientCommonBean) { return new Service1Bean1(clientCommonBean); } } static class Service1Bean1 { private final ClientCommonBean clientCommonBean; Service1Bean1(ClientCommonBean clientCommonBean) { this.clientCommonBean = clientCommonBean; } @Override public String toString() { return "Service1Bean1{" + "clientCommonBean=" + clientCommonBean + '}'; } } @Configuration(proxyBeanMethods = false) static class Service1Config2 { @Bean Service1Bean2 service1Bean2() { return new Service1Bean2(); } } static class Service1Bean2 { } @Configuration(proxyBeanMethods = false) static class Service2Config { @Bean Service2Bean service2Bean(ClientCommonBean clientCommonBean) { return new Service2Bean(clientCommonBean); } } static class Service2Bean { private final ClientCommonBean clientCommonBean; Service2Bean(ClientCommonBean clientCommonBean) { this.clientCommonBean = clientCommonBean; } @Override public String toString() { return "Service2Bean{" + "clientCommonBean=" + clientCommonBean + '}'; } } static class TestSpec implements NamedContextFactory.Specification { private final String name; private final Class<?>[] configurations; public TestSpec(String name, Class<?>[] configurations) { this.name = name; this.configurations = configurations; } @Override public String getName() { return name; } @Override public Class<?>[] getConfiguration() { return configurations; } } static class TestClient extends NamedContextFactory<TestSpec> { public TestClient(Class<?> defaultConfigType) { super(defaultConfigType, "testClient", PROPERTY_NAME); } } } 结果输出为: com.github.hashjang.spring.cloud.iiford.service.common.CommonNameContextTest$BaseBean@3faf2e7d ClientCommonBean{name='service1', baseBean=com.github.hashjang.spring.cloud.iiford.service.common.CommonNameContextTest$BaseBean@3faf2e7d} Service1Bean1{clientCommonBean=ClientCommonBean{name='service1', baseBean=com.github.hashjang.spring.cloud.iiford.service.common.CommonNameContextTest$BaseBean@3faf2e7d}} com.github.hashjang.spring.cloud.iiford.service.common.CommonNameContextTest$Service1Bean2@4648ce9 com.github.hashjang.spring.cloud.iiford.service.common.CommonNameContextTest$BaseBean@3faf2e7d ClientCommonBean{name='service2', baseBean=com.github.hashjang.spring.cloud.iiford.service.common.CommonNameContextTest$BaseBean@3faf2e7d} Service2Bean{clientCommonBean=ClientCommonBean{name='service2', baseBean=com.github.hashjang.spring.cloud.iiford.service.common.CommonNameContextTest$BaseBean@3faf2e7d}} 代码中实现了这样一个 Context 结构: 图中的被包含的 ApplicationContext 可以看到外层 ApplicationContext 的 Bean,也就是通过对被包含的 ApplicationContext 调用 getBean(xxx) 可以获取到外层 ApplicationContext 的 Bean (其实外层就是 parent ApplicationContext),但是外层的看不到内层私有的 Bean。 在我们的测试代码中,首先,创建了一个 AnnotationConfigApplicationContext。这个其实就是模拟了我们平常使用 Spring 框架的时候的根核心 ApplicationContext,所以我们将其命名为 parent。我们向里面注册了 BaseConfig,BaseConfig 里面的 BaseBean 会注册到 parent。之后我们 建 testClient1,默认配置使用 ClientCommonConfig。如果我们指定了 testClient1 的 parent ApplicationContext 为 parent,那么 parent 里面的 Bean 都能被 testClient1 里面的子 ApplicationContext 访问到。然后,我们创建 service1 与 service2 以及指定对应额外的配置类。service1 会创建 ClientCommonConfig、Service1Config1 和 Service1Config2 里面配置的 Bean。service2 会创建 ClientCommonConfig 和 Service2Config 里面配置的 Bean。 NamedContextFactory 的基本原理以及源码 NamedContextFactory 的核心方法是 public <T> T getInstance(String name, Class<T> type),通过这个方法获取 NamedContextFactory 里面的子 ApplicationContext 里面的 Bean。源码是: NamedContextFactory.java /** * 获取某个 name 的 ApplicationContext 里面的某个类型的 Bean * @param name 子 ApplicationContext 名称 * @param type 类型 * @param <T> Bean 类型 * @return Bean */ public <T> T getInstance(String name, Class<T> type) { //获取或者创建对应名称的 ApplicationContext AnnotationConfigApplicationContext context = getContext(name); try { //从对应的 ApplicationContext 获取 Bean,如果不存在则会抛出 NoSuchBeanDefinitionException return context.getBean(type); } catch (NoSuchBeanDefinitionException e) { //忽略 NoSuchBeanDefinitionException } //没找到就返回 null return null; } protected AnnotationConfigApplicationContext getContext(String name) { //如果 map 中不存在,则创建 if (!this.contexts.containsKey(name)) { //防止并发创建多个 synchronized (this.contexts) { //再次判断,防止有多个等待锁 if (!this.contexts.containsKey(name)) { this.contexts.put(name, createContext(name)); } } } return this.contexts.get(name); } //根据名称创建对应的 context protected AnnotationConfigApplicationContext createContext(String name) { AnnotationConfigApplicationContext context = new AnnotationConfigApplicationContext(); //如果 configurations 中有对应名称的配置类,则注册之 if (this.configurations.containsKey(name)) { for (Class<?> configuration : this.configurations.get(name).getConfiguration()) { context.register(configuration); } } //如果 configurations 中有名称开头为 default. 的配置类,则注册之 for (Map.Entry<String, C> entry : this.configurations.entrySet()) { if (entry.getKey().startsWith("default.")) { for (Class<?> configuration : entry.getValue().getConfiguration()) { context.register(configuration); } } } //注册 PropertyPlaceholderAutoConfiguration,这样可以解析 spring boot 相关的 application 配置 //注册默认的配置类 defaultConfigType context.register(PropertyPlaceholderAutoConfiguration.class, this.defaultConfigType); //将当前 context 的名称,放入对应的属性中,在配置类中可能会用到 //我们上面举得例子,就是通过 environment.getProperty() 获取了这个属性 context.getEnvironment().getPropertySources().addFirst(new MapPropertySource(this.propertySourceName, Collections.<String, Object>singletonMap(this.propertyName, name))); if (this.parent != null) { // Uses Environment from parent as well as beans context.setParent(this.parent); //spring boot 可以打包成一种 fatjar 的形式,将依赖的 jar 包都打入同一个 jar 包中 //fatjar 中的依赖,通过默认的类加载器是加载不正确的,需要通过定制的类加载器 //由于 JDK 11 LTS 相对于 JDK 8 LTS 多了模块化,通过 ClassUtils.getDefaultClassLoader() 有所不同 //在 JDK 8 中获取的就是定制的类加载器,JDK 11 中获取的是默认的类加载器,这样会有问题 //所以,这里需要手动设置当前 context 的类加载器为父 context 的类加载器 context.setClassLoader(this.parent.getClassLoader()); } //生成展示名称 context.setDisplayName(generateDisplayName(name)); context.refresh(); return context; }