首页 文章 精选 留言 我的

精选列表

搜索[团队协作工具],共10000篇文章
优秀的个人博客,低调大师

SpringIoc容器之Aware | 京东云技术团队

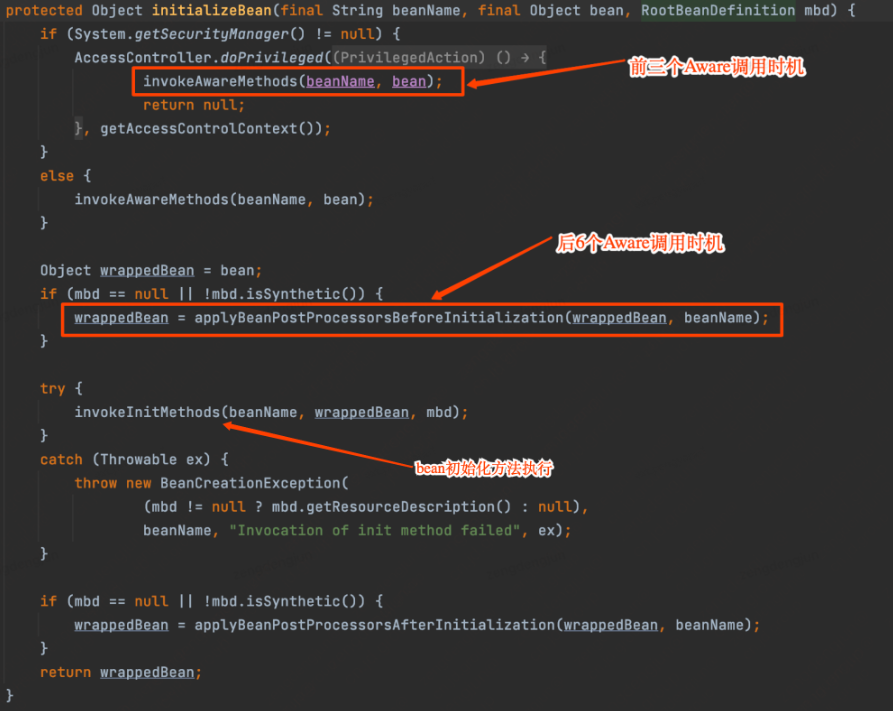
1 前言 Aware是Spring提供的一个标记超接口,指示bean有资格通过回调样式的方法由Spring容器通知特定的框架对象,以获取到容器中特有对象的实例的方法之一。实际的方法签名由各个子接口确定,但通常只包含一个接受单个参数的void返回方法。 2 Spring中9个Aware内置实现 |--Aware |--BeanNameAware |--BeanClassLoaderAware |--BeanFactoryAware |--EnvironmentAware |--EmbeddedValueResolverAware |--ResourceLoaderAware |--ApplicationEventPublisherAware |--MessageSourceAware |--ApplicationContextAware 9个内置实现又分两类,前三个为直接调用,后6个通过ApplicationContextAwareProcessor后置处理器,间接回调 2.1 BeanNameAware public interface BeanNameAware extends Aware { /** *设置创建此bean的bean工厂中的bean的名称。 *在普通bean属性填充之后但在 *初始化之前回调,如{@link InitializingBean#afterPropertiesSet()} *或自定义初始化方法。 * @param name工厂中bean的名称。 *注意,此名称是工厂中使用的实际bean名称,这可能 *与最初指定的名称不同:特别是对于内部bean * names,实际的bean名称可以通过添加 *“#…”后缀。使用{@link BeanFactoryUtils#originalBeanName(String)} *方法提取原始bean名称(不带后缀),如果需要的话。 * / void setBeanName(String name); } 实现BeanNameAware接口需要实现setBeanName()方法,这个方法只是简单的返回我们当前的beanName,这个接口表面上的作用就是让实现这个接口的bean知道自己在spring容器里的名字,而且官方的意思是这个接口更多的使用在spring的框架代码中,实际开发环境应该不建议使用,因为spring认为bean的名字与bean的联系并不是很深,(的确,抛开spring API而言,我们如果获取了该bean的名字,其实意义不是很大,我们没有获取该bean的class,只有该bean的名字,我们也无从下手,相反,因为bean的名称在spring容器中可能是该bean的唯一标识,也就是说再beanDefinitionMap中,key值就是这个name,spring可以根据这个key值获取该bean的所有特性)所以spring说这个不是非必要的依赖。 2.2 BeanClassLoaderAware public interface BeanClassLoaderAware extends Aware { /** *提供bean {@link ClassLoader}类加载器的回调 *一个bean实例在属性的填充之后但在初始化回调之前调用 * {@link InitializingBean * {@link InitializingBean#afterPropertiesSet()} *方法或自定义初始化方法。 * @param类加载器拥有的类加载器;可能是{@code null}在例如,必须使用默认的{@code ClassLoader} * 获取的{@code ClassLoader} * {@link org.springframework.util.ClassUtils#getDefaultClassLoader()} * / void setBeanClassLoader(ClassLoader classLoader); } 在bean属性填充之后初始化之前,提供类加制器的回调。让受管Bean本身知道它是由哪一类装载器负责装载的。 2.3 BeanFactoryAware public interface BeanFactoryAware extends Aware { /** * 为bean实例提供所属工厂的回调。 * 在普通bean属性填充之后调用但在初始化回调之前,如 * {@link InitializingBean#afterPropertiesSet()}或自定义初始化方法。 * @param beanFactory拥有beanFactory(非空)。bean可以立即调用工厂上的方法。 * @在初始化错误时抛出BeansException * @参见BeanInitializationException * / void setBeanFactory(BeanFactory beanFactory) throws BeansException; } 在bean属性填充之后初始化之前,提bean工厂的回调。实现 BeanFactoηAware 接口的 bean 可以直接访问 Spring 容器,被容器创建以后,它会拥有一个指向 Spring 容器的引用,可以利用该bean根据传入参数动态获取被spring工厂加载的bean 2.4 EnvironmentAware public interface EnvironmentAware extends Aware { /** * 设置该对象运行的{@code环境}。 */ void setEnvironment(Environment environment); } 设置该对象运行的。所有注册到 Spring容器内的 bean,只要该bean 实现了 EnvironmentAware接口,并且进行重写了setEnvironment方法的情况下,那么在工程启动时就可以获取得 application.properties 的配置文件配置的属性值,这样就不用我们将魔法值写到代码里面了。 2.5 EmbeddedValueResolverAware public interface EmbeddedValueResolverAware extends Aware { /** * 设置StringValueResolver用于解析嵌入的定义值。 */ void setEmbeddedValueResolver(StringValueResolver resolver); } 在基于Spring获取properties文件属性值的时候,一般使用@Value的方式注入配置文件属性值,但是@Value必须要在Spring的Bean生命周期管理下才能使用,比如类被@Controller、@Service、@Component等注解标注。如有的抽象类中,基于Spring解析@Value的方式,使用EmbeddedValueResolverAware解析配置文件来实现。 2.6 ResourceLoaderAware public interface ResourceLoaderAware extends Aware { /** *设置该对象运行的ResourceLoader。这可能是一个ResourcePatternResolver,它可以被检查 *通过{@code instanceof ResourcePatternResolver}。另请参阅 * {@code ResourcePatternUtils。getResourcePatternResolver}方法。 * <p>在填充普通bean属性之后但在init回调之前调用 *像InitializingBean的{@code afterPropertiesSet}或自定义初始化方法。 *在ApplicationContextAware的{@code setApplicationContext}之前调用。 * @param resourceLoader该对象使用的resourceLoader对象 * @ @ springframework.core. io.support.resourcepatternresolver * @ @ resourcepatternutils #获取resourcepatternresolver * / void setResourceLoader(ResourceLoader resourceLoader); } ResourceLoaderAware 是特殊的标记接口,它希望拥有一个 ResourceLoader 引用的对象。当实现了 ResourceLoaderAware接口的类部署到application context(比如受Spring管理的bean)中时,它会被application context识别为 ResourceLoaderAware。 接着application context会调用setResourceLoader(ResourceLoader)方法,并把自身作为参数传入该方法(记住,所有Spring里的application context都实现了ResourceLoader接口)。 既然 ApplicationContext 就是ResourceLoader,那么该bean就可以实现 ApplicationContextAware接口并直接使用所提供的application context来载入资源,但是通常更适合使用特定的满足所有需要的 ResourceLoader 实现。 这样一来,代码只需要依赖于可以看作辅助接口的资源载入接口,而不用依赖于整个Spring ApplicationContext 接口。 2.7 ApplicationEventPublisherAware public interface ApplicationEventPublisherAware extends Aware { /** *设置该对象运行的ApplicationEventPublisher。 * <p>在普通bean属性填充之后但在init之前调用像InitializingBean的afterPropertiesSet或自定义初始化方法。 *在ApplicationContextAware的setApplicationContext之前调用。 *该对象使用的事件发布者 * / void setApplicationEventPublisher(ApplicationEventPublisher applicationEventPublisher); } ApplicationEventPublisherAware 是由 Spring 提供的用于为 Service 注入 ApplicationEventPublisher 事件发布器的接口,使用这个接口,我们自己的 Service 就拥有了发布事件的能力。 2.8 MessageSourceAware public interface MessageSourceAware extends Aware { /** *设置该对象运行的MessageSource。 * <p>在普通bean属性填充之后但在init之前调用像InitializingBean的afterPropertiesSet或自定义初始化方法。 *在ApplicationContextAware的setApplicationContext之前调用。 * @param messageSource消息源 * / void setMessageSource(MessageSource messageSource); } 获得message source这样可以获得文本信息,使用场景如为了国际化。 2.9 ApplicationContextAware public interface ApplicationContextAware extends Aware { /** *设置该对象运行的ApplicationContext。通常这个调用将用于初始化对象。 * <p>在普通bean属性填充之后但在init回调之前调用 *作为{@link org.springframework.beans.factory.InitializingBean#afterPropertiesSet()} *或自定义初始化方法。在{@link ResourceLoaderAware#setResourceLoader}之后调用, * {@link ApplicationEventPublisherAware#setApplicationEventPublisher}和 * {@link MessageSourceAware},如果适用。 * @param applicationContext该对象将使用的applicationContext对象 * @在上下文初始化错误时抛出ApplicationContextException如果由应用程序上下文方法抛出,则抛出BeansException * @see org.springframework.beans.factory.BeanInitializationException * / void setApplicationContext(ApplicationContext applicationContext) throws BeansException; } ApplicationContextAware的作用是可以方便获取Spring容器ApplicationContext,从而可以获取容器内的Bean。ApplicationContextAware接口只有一个方法,如果实现了这个方法,那么Spring创建这个实现类的时候就会自动执行这个方法,把ApplicationContext注入到这个类中,也就是说,spring 在启动的时候就需要实例化这个 class(如果是懒加载就是你需要用到的时候实例化),在实例化这个 class 的时候,发现它包含这个 ApplicationContextAware 接口的话,sping 就会调用这个对象的 setApplicationContext 方法,把 applicationContext Set 进去了。 3 Spring中调用时机 Aware接口由Spring在AbstractAutowireCapableBeanFactory.initializeBean(beanName, bean,mbd)方法中通过调用invokeAwareMethods(beanName, bean)方法和applyBeanPostProcessorsBeforeInitialization(wrappedBean, beanName)触发Aware方法的调用 3.1 invokeAwareMethods private void invokeAwareMethods(final String beanName, final Object bean) { if (bean instanceof Aware) { if (bean instanceof BeanNameAware) { ((BeanNameAware) bean).setBeanName(beanName); } if (bean instanceof BeanClassLoaderAware) { ((BeanClassLoaderAware) bean).setBeanClassLoader(getBeanClassLoader()); } if (bean instanceof BeanFactoryAware) { ((BeanFactoryAware) bean).setBeanFactory(AbstractAutowireCapableBeanFactory.this); } } } 判断并直接回调 3.2 applyBeanPostProcessorsBeforeInitialization public Object applyBeanPostProcessorsBeforeInitialization(Object existingBean, String beanName) throws BeansException { Object result = existingBean; for (BeanPostProcessor beanProcessor : getBeanPostProcessors()) { result = beanProcessor.postProcessBeforeInitialization(result, beanName); if (result == null) { return result; } } return result; } 通过ApplicationContextAwareProcessor.postProcessBeforeInitialization(Object bean, String beanName)间接调用,并在方法invokeAwareInterfaces中进行回调。 public Object postProcessBeforeInitialization(final Object bean, String beanName) throws BeansException { AccessControlContext acc = null; if (System.getSecurityManager() != null && (bean instanceof EnvironmentAware || bean instanceof EmbeddedValueResolverAware || bean instanceof ResourceLoaderAware || bean instanceof ApplicationEventPublisherAware || bean instanceof MessageSourceAware || bean instanceof ApplicationContextAware)) { acc = this.applicationContext.getBeanFactory().getAccessControlContext(); } if (acc != null) { AccessController.doPrivileged(new PrivilegedAction<Object>() { @Override public Object run() { invokeAwareInterfaces(bean); return null; } }, acc); } else { invokeAwareInterfaces(bean); } return bean; } private void invokeAwareInterfaces(Object bean) { if (bean instanceof Aware) { if (bean instanceof EnvironmentAware) { ((EnvironmentAware) bean).setEnvironment(this.applicationContext.getEnvironment()); } if (bean instanceof EmbeddedValueResolverAware) { ((EmbeddedValueResolverAware) bean).setEmbeddedValueResolver( new EmbeddedValueResolver(this.applicationContext.getBeanFactory())); } if (bean instanceof ResourceLoaderAware) { ((ResourceLoaderAware) bean).setResourceLoader(this.applicationContext); } if (bean instanceof ApplicationEventPublisherAware) { ((ApplicationEventPublisherAware) bean).setApplicationEventPublisher(this.applicationContext); } if (bean instanceof MessageSourceAware) { ((MessageSourceAware) bean).setMessageSource(this.applicationContext); } if (bean instanceof ApplicationContextAware) { ((ApplicationContextAware) bean).setApplicationContext(this.applicationContext); } } } 4 总结 通过上面的分析,可以知道Spring生命周期中的初始化方法里,在真正执行初始化方法之前,分别通过invokeAwareMethods方法和后置处理器ApplicationContextAwareProcessor来触发Aware的调用,那么,Spring为什么要使用两种方式而不使用其中之一呢? 通过本章我们了解了9中内置接口的作用,以及它们能够获取到的不同上下文信息。 作者:京东零售 曾登均 来源:京东云开发者社区
优秀的个人博客,低调大师

Spring源码核心剖析 | 京东云技术团队

前言 SpringAOP作为Spring最核心的能力之一,其重要性不言而喻。然后需要知道的是AOP并不只是Spring特有的功能,而是一种思想,一种通用的功能。而SpringAOP只是在AOP的基础上将能力集成到SpringIOC中,使其作为bean的一种,从而我们能够很方便的进行使用。 一、SpringAOP的使用方式 1.1 使用场景 当我们在日常业务开发中,例如有些功能模块是通用的(日志、权限等),或者我们需要在某些功能前后去做一些增强,例如在某些方法执行后发送一条mq消息等。 如果我们将这些通用模块代码与业务代码放在一块,那么每个业务代码都要写这些通用模块,维护成本与耦合情况都十分严重。 因此,我们可以将此模块抽象出来,就有了”切面“的概念。 1.2 常用方式 AOP的使用方式相对比较简单,首先我们需要完成业务代码 @Service public class AopDemo implements AopInterface{ public Student start(String name) { System.out.println("执行业务逻辑代码....."); return new Student(name); } } 业务逻辑比较简单,接收一个name参数。 接下来我们需要创建其对应的切面 //将该切面加入spring容器 @Service //声明该类为一个切面 @Aspect class AopAspect { //声明要进行代理的方法 @Pointcut("execution(* com.example.demo.aop.AopInterface.start(..))") public void startAspect() { } //在方法执行之前的逻辑 @Before(value = "startAspect()") public void beforeAspect() { System.out.println("业务逻辑前代码....."); } //在方法执行之后的逻辑 @After(value = "startAspect()") public void afterAspect() { System.out.println("业务逻辑后代码....."); } //围绕方法前后的逻辑 @Around("startAspect()") public Object aroundAspect(ProceedingJoinPoint point) throws Throwable { Object[] requestParams = point.getArgs(); String name = requestParams[0].toString(); System.out.println("传入参数:" + name); requestParams[0] = "bob"; return point.proceed(requestParams); } } 可以看到,首先需要我们指明要代理的对象及方法,然后根据需要选择不同的注解即可实现代理对象。 传入参数:tom 业务逻辑前代码..... 执行业务逻辑代码..... 业务逻辑后代码..... 二、SpringAOP源码解析 2.1 被代理对象的开始initializeBean 根据上面的使用情况,我们知道只需要声明对应的注解即可,不需要其他额外的配置,然后我们获得的bean对象就已经是被代理的了,那么我们可以推断代理对象的过程一定是发生在bean创建的过程的。 我们回顾一下创建bean的流程 实例化bean 装配属性 初始化bean 只有第三步初始化bean的时候才会有机会进行代理。 找到对应的代码位置: protected Object initializeBean(String beanName, Object bean, @Nullable RootBeanDefinition mbd) { Object wrappedBean = bean; if (mbd == null || !mbd.isSynthetic()) { //前置处理器 wrappedBean = applyBeanPostProcessorsBeforeInitialization(wrappedBean, beanName); } //... try { //对象的初始化方法 invokeInitMethods(beanName, wrappedBean, mbd); } if (mbd == null || !mbd.isSynthetic()) { //后置处理器,AOP开始的地方 wrappedBean = applyBeanPostProcessorsAfterInitialization(wrappedBean, beanName); } return wrappedBean; } 2.2 后置处理器applyBeanPostProcessorsAfterInitialization 后置处理器会执行那些实现了后置处理器接口的代码: public Object applyBeanPostProcessorsAfterInitialization(Object existingBean, String beanName) throws BeansException { Object result = existingBean; //获取所有的后置处理器 for (BeanPostProcessor processor : getBeanPostProcessors()) { //实现其要执行的方法 Object current = processor.postProcessAfterInitialization(result, beanName); if (current == null) { return result; } result = current; } return result; } 而AOP的后置处理器就是其中的一个: AbstractAutoProxyCreator 其对应的方法为(以下代码不为同一个类,而是对应的执行顺序): public Object postProcessAfterInitialization(@Nullable Object bean, String beanName) { if (bean != null) { Object cacheKey = getCacheKey(bean.getClass(), beanName); if (this.earlyProxyReferences.remove(cacheKey) != bean) { //执行到下面方法 return wrapIfNecessary(bean, beanName, cacheKey); } } return bean; } protected Object wrapIfNecessary(Object bean, String beanName, Object cacheKey) { // Create proxy if we have advice. Object[] specificInterceptors = getAdvicesAndAdvisorsForBean(bean.getClass(), beanName, null); if (specificInterceptors != DO_NOT_PROXY) { this.advisedBeans.put(cacheKey, Boolean.TRUE); //创建代理对象 Object proxy = createProxy( bean.getClass(), beanName, specificInterceptors, new SingletonTargetSource(bean)); this.proxyTypes.put(cacheKey, proxy.getClass()); return proxy; } this.advisedBeans.put(cacheKey, Boolean.FALSE); return bean; } protected Object createProxy(Class beanClass, @Nullable String beanName, @Nullable Object[] specificInterceptors, TargetSource targetSource) { //获取advisors Advisor[] advisors = buildAdvisors(beanName, specificInterceptors); proxyFactory.addAdvisors(advisors); proxyFactory.setTargetSource(targetSource); customizeProxyFactory(proxyFactory); proxyFactory.setFrozen(this.freezeProxy); if (advisorsPreFiltered()) { proxyFactory.setPreFiltered(true); } // Use original ClassLoader if bean class not locally loaded in overriding class loader ClassLoader classLoader = getProxyClassLoader(); if (classLoader instanceof SmartClassLoader && classLoader != beanClass.getClassLoader()) { classLoader = ((SmartClassLoader) classLoader).getOriginalClassLoader(); } //通过代理工厂创建代理对象 return proxyFactory.getProxy(classLoader); } public Object getProxy(@Nullable ClassLoader classLoader) { //首先获取对应的代理 return createAopProxy().getProxy(classLoader); } //该方法根据要被代理的类选择使用jdk代理还是cglib代理 public AopProxy createAopProxy(AdvisedSupport config) throws AopConfigException { if (!NativeDetector.inNativeImage() && (config.isOptimize() || config.isProxyTargetClass() || hasNoUserSuppliedProxyInterfaces(config))) { Class targetClass = config.getTargetClass(); //如果被代理的类是一个接口则使用jdk代理 if (targetClass.isInterface() || Proxy.isProxyClass(targetClass) || ClassUtils.isLambdaClass(targetClass)) { return new JdkDynamicAopProxy(config); } //否则使用cglib代理 return new ObjenesisCglibAopProxy(config); } else { //根据配置选择强制使用jdk代理 return new JdkDynamicAopProxy(config); } } 我们知道,代理方式有jdk动态代理与cglib动态代理两种方式,而我们一个bean使用那种代理方式则由上述的方法决定。 至此,我们已经确定了使用那种代理方式获取代理对象。 2.3 获取代理对象 从上文中,我们已经确定了选用何种方式构建代理对象。接下来就是通过不同的方式是如何获取代理对象的。 看懂本章需要实现了解jdk动态代理或者cglib动态代理的方式。 2.3.1 JDK代理 首先在获取代理对象时选择 JdkDynamicAopProxy public Object getProxy(@Nullable ClassLoader classLoader) { if (logger.isTraceEnabled()) { logger.trace("Creating JDK dynamic proxy: " + this.advised.getTargetSource()); } //这里通过反射创建代理对象 return Proxy.newProxyInstance(classLoader, this.proxiedInterfaces, this); } 当被代理对象执行被代理的方法时,会进入到此方法。(jdk动态代理的概念) JDK通过反射创建对象,效率上来说相对低一些。 public Object invoke(Object proxy, Method method, Object[] args) throws Throwable { try { // 获取被代理对象的所有切入点 List chain = this.advised.getInterceptorsAndDynamicInterceptionAdvice(method, targetClass); // 如果调用链路为空说明没有需要执行的切入点,直接执行对应的方法即可 if (chain.isEmpty()) { // We can skip creating a MethodInvocation: just invoke the target directly // Note that the final invoker must be an InvokerInterceptor so we know it does // nothing but a reflective operation on the target, and no hot swapping or fancy proxying. Object[] argsToUse = AopProxyUtils.adaptArgumentsIfNecessary(method, args); retVal = AopUtils.invokeJoinpointUsingReflection(target, method, argsToUse); } else { // 如果有切入点的话则按照切入点顺序开始执行 MethodInvocation invocation = new ReflectiveMethodInvocation(proxy, target, method, args, targetClass, chain); // Proceed to the joinpoint through the interceptor chain. retVal = invocation.proceed(); } return retVal; } } invocation.proceed();这个方法就是通过递归的方式执行所有的调用链路。 public Object proceed() throws Throwable { // We start with an index of -1 and increment early. if (this.currentInterceptorIndex == this.interceptorsAndDynamicMethodMatchers.size() - 1) { return invokeJoinpoint(); } Object interceptorOrInterceptionAdvice = this.interceptorsAndDynamicMethodMatchers.get(++this.currentInterceptorIndex); if (interceptorOrInterceptionAdvice instanceof InterceptorAndDynamicMethodMatcher) { InterceptorAndDynamicMethodMatcher dm = (InterceptorAndDynamicMethodMatcher) interceptorOrInterceptionAdvice; Class targetClass = (this.targetClass != null ? this.targetClass : this.method.getDeclaringClass()); if (dm.methodMatcher.matches(this.method, targetClass, this.arguments)) { return dm.interceptor.invoke(this); } else { // 继续执行 return proceed(); } } else { // 如果调用链路还持续的话,下一个方法仍会调用proceed() return ((MethodInterceptor) interceptorOrInterceptionAdvice).invoke(this); } } 2.3.2 cglib代理 public Object getProxy(@Nullable ClassLoader classLoader) { try { //配置CGLIB Enhancer... Enhancer enhancer = createEnhancer(); if (classLoader != null) { enhancer.setClassLoader(classLoader); if (classLoader instanceof SmartClassLoader && ((SmartClassLoader) classLoader).isClassReloadable(proxySuperClass)) { enhancer.setUseCache(false); } } enhancer.setSuperclass(proxySuperClass); enhancer.setInterfaces(AopProxyUtils.completeProxiedInterfaces(this.advised)); enhancer.setNamingPolicy(SpringNamingPolicy.INSTANCE); enhancer.setStrategy(new ClassLoaderAwareGeneratorStrategy(classLoader)); //1.获取回调函数,对于代理类上所有方法的调用,都会调用CallBack,而Callback则需要实现intercept()方法 Callback[] callbacks = getCallbacks(rootClass); Class[] types = new Class[callbacks.length]; for (int x = 0; x < types.length; x++) { types[x] = callbacks[x].getClass(); } // fixedInterceptorMap only populated at this point, after getCallbacks call above enhancer.setCallbackFilter(new ProxyCallbackFilter( this.advised.getConfigurationOnlyCopy(), this.fixedInterceptorMap, this.fixedInterceptorOffset)); enhancer.setCallbackTypes(types); //2.创建代理对象 return createProxyClassAndInstance(enhancer, callbacks); } catch (CodeGenerationException | IllegalArgumentException ex) { throw new AopConfigException("Could not generate CGLIB subclass of " + this.advised.getTargetClass() + ": Common causes of this problem include using a final class or a non-visible class", ex); } catch (Throwable ex) { // TargetSource.getTarget() failed throw new AopConfigException("Unexpected AOP exception", ex); } } 可以看到我们在创建代理对象前会先获取代理对象的所有回调函数: 首先可以看到我们一共有7个回调方法,其中第一个为AOP相关的方法,其他的为spring相关。 在第一个对调对象中持有的 advised 对象中有 advisors 属性,就是对应我们的代理类中四个切片,@Before等等。 然后我们看一下 createProxyClassAndInstance()都做了什么。 //CglibAopProxy类的创建代理对象方法 protected Object createProxyClassAndInstance(Enhancer enhancer, Callback[] callbacks) { enhancer.setInterceptDuringConstruction(false); enhancer.setCallbacks(callbacks); return (this.constructorArgs != null && this.constructorArgTypes != null ? enhancer.create(this.constructorArgTypes, this.constructorArgs) : enhancer.create()); } //ObjenesisCglibAopProxy继承了CglibAopProxy类,并覆写了其方法 protected Object createProxyClassAndInstance(Enhancer enhancer, Callback[] callbacks) { Class proxyClass = enhancer.createClass(); Object proxyInstance = null; //1.尝试使用objenesis创建对象 if (objenesis.isWorthTrying()) { try { proxyInstance = objenesis.newInstance(proxyClass, enhancer.getUseCache()); } catch (Throwable ex) { logger.debug("Unable to instantiate proxy using Objenesis, " + "falling back to regular proxy construction", ex); } } //2.根据commit的提交记录发现,objenesis有可能创建对象失败,如果失败的话则选用放射的方式创建对象 if (proxyInstance == null) { // Regular instantiation via default constructor... try { Constructor ctor = (this.constructorArgs != null ? proxyClass.getDeclaredConstructor(this.constructorArgTypes) : proxyClass.getDeclaredConstructor()); ReflectionUtils.makeAccessible(ctor); proxyInstance = (this.constructorArgs != null ? ctor.newInstance(this.constructorArgs) : ctor.newInstance()); } catch (Throwable ex) { throw new AopConfigException("Unable to instantiate proxy using Objenesis, " + "and regular proxy instantiation via default constructor fails as well", ex); } } // ((Factory) proxyInstance).setCallbacks(callbacks); return proxyInstance; } 2.3.3 cglib 此处有个遇到的问题,当我在debug的时候,发现怎么都进不去 createProxyClassAndInstance(),百思不得其解,然后看到IDEA旁边有一个向下的箭头,代表该方法可能其子类被覆写了。然后在其子类处打断点果然发现是其子类的实现。 此处在2.2中也可看到: 可以看到返回的是其子类的对象,而不是CglibAopProxy本身的对象。 作者:京东科技 韩国凯 来源:京东云开发者社区

资源下载

更多资源
Nacos

Nacos

Nacos /nɑ:kəʊs/ 是 Dynamic Naming and Configuration Service 的首字母简称,一个易于构建 AI Agent 应用的动态服务发现、配置管理和AI智能体管理平台。Nacos 致力于帮助您发现、配置和管理微服务及AI智能体应用。Nacos 提供了一组简单易用的特性集,帮助您快速实现动态服务发现、服务配置、服务元数据、流量管理。Nacos 帮助您更敏捷和容易地构建、交付和管理微服务平台。

Rocky Linux

Rocky Linux

Rocky Linux(中文名:洛基)是由Gregory Kurtzer于2020年12月发起的企业级Linux发行版,作为CentOS稳定版停止维护后与RHEL(Red Hat Enterprise Linux)完全兼容的开源替代方案,由社区拥有并管理,支持x86_64、aarch64等架构。其通过重新编译RHEL源代码提供长期稳定性,采用模块化包装和SELinux安全架构,默认包含GNOME桌面环境及XFS文件系统,支持十年生命周期更新。

Sublime Text

Sublime Text

Sublime Text具有漂亮的用户界面和强大的功能,例如代码缩略图,Python的插件,代码段等。还可自定义键绑定,菜单和工具栏。Sublime Text 的主要功能包括:拼写检查,书签,完整的 Python API , Goto 功能,即时项目切换,多选择,多窗口等等。Sublime Text 是一个跨平台的编辑器,同时支持Windows、Linux、Mac OS X等操作系统。

WebStorm

WebStorm

WebStorm 是jetbrains公司旗下一款JavaScript 开发工具。目前已经被广大中国JS开发者誉为“Web前端开发神器”、“最强大的HTML5编辑器”、“最智能的JavaScript IDE”等。与IntelliJ IDEA同源,继承了IntelliJ IDEA强大的JS部分的功能。

用户登录
用户注册