首页 文章 精选 留言 我的

精选列表

搜索[基础软件],共10000篇文章
优秀的个人博客,低调大师

2-openstack基础环境准备

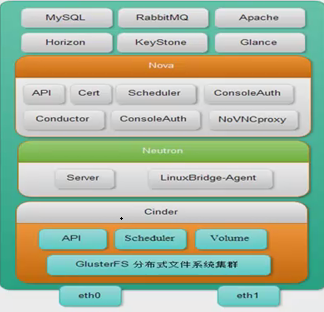
说明: linux-node1 控制节点 linux-node2 计算节点 2.1.两台centos7服务器 1 2 3 4 5 主机名: [root@linux-node1~] #hostname linux-node1 [root@linux-node2~] #hostname linux-node2 1 2 3 IP: linux-node1192.168.56.11 /24 linux-node2192.168.56.12 /24 1 2 3 4 5 6 host解析 cat /etc/hosts 127.0.0.1localhostlocalhost.localdomainlocalhost4localhost4.localdomain4 ::1localhostlocalhost.localdomainlocalhost6localhost6.localdomain6 192.168.56.11linux-node1linux-node1.oldboyedu.com 192.168.56.12linux-node2linux-node2.oldboyedu.com 2.2 selinux 和防火墙关闭 1 2 3 4 5 6 7 8 9 [root@linux-node2~] #getenforce Disabled [root@linux-node1~] #getenforce Disabled #可以用sed sed -i '/SELINUX/s/enforcing/disabled/' /etc/selinux/config 防火墙: systemctlstopfirewalld systemctldisablefirewalld 2.3 配置时间同步(两台都做) 1 2 3 4 5 6 yum–y install chrony grep "allow" /etc/chrony .conf #打开 allow192.168 /16 systemctl enable chronyd.service #设置开机自启 systemctlstartchronyd.service #启动 timedatectl set -timezoneAsia /Shanghai #同步时区 2.4 在linux-node1 上安装数据库 1 2 3 4 5 6 7 8 9 10 11 yum install -ymariadbmariadb-serverMySQl-python #安装数据库 \ cp /usr/share/mysql/my-medium .cnf /etc/my .cnf #拷贝配置文件 在 vi /etc/my .cnf添加如下几行 [mysqld] default-storage-engine=innodb #默认的存储引擎 innodb_file_per_table #使用独享的表空间 collation-server=utf8_general_ci #设置校对规则 init-connect= 'SETNAMESutf8' #设置链接的字符集 character- set -server=utf8 #设置默认的字符集 systemctl enable mariadb.service #开机启动数据库 systemctlstartmariadb.service #立马启动数据库 2.5 初始化数据库 2.6 为各个组件创建数据库并收授权 2.6.1 keystone 1 2 3 4 5 6 MariaDB[(none)]>createdatabasekeystone; QueryOK,1rowaffected(0.01sec) MariaDB[(none)]>grantallonkeystone.*to 'keystone' @ 'localhost' identifiedby 'keystonne' ; QueryOK,0rowsaffected(0.00sec) MariaDB[(none)]>grantallonkeystone.*to 'keystone' @ '%' identifiedby 'keystone' ; QueryOK,0rowsaffected(0.00sec) 2.6.2 glance 1 2 3 4 5 MariaDB[(none)]>createdatabaseglance; QueryOK,1rowaffected(0.00sec) MariaDB[(none)]>grantallonglance.*to 'glance' @ '%' identifiedby 'glance' ; QueryOK,0rowsaffected(0.00sec) MariaDB[(none)]>grantallonglance.*to 'glance' @ 'localhost' identifiedby 'glance' ; 2.6.3 nova和nova_api 1 2 3 4 5 6 7 8 9 10 11 MariaDB[(none)]>createdatabasenova; QueryOK,1rowaffected(0.00sec) MariaDB[(none)]>grantallonnova.*to 'nova' @ '%' identifiedby 'nova' ; QueryOK,0rowsaffected(0.00sec) MariaDB[(none)]>grantallonnova.*to 'nova' @ 'localhost' identifiedby 'nova' ; QueryOK,0rowsaffected(0.00sec) MariaDB[(none)]>createdatabasenova_api; QueryOK,1rowaffected(0.00sec) MariaDB[(none)]>grantallonnova_api.*to 'nova' @ 'localhost' identifiedby 'nova' ; QueryOK,0rowsaffected(0.00sec) MariaDB[(none)]>grantallonnova_api.*to 'nova' @ '%' identifiedby 'nova' ; 2.6.4 neutron 1 2 3 4 5 6 7 8 MariaDB[(none)]>createdatabaseneutron; QueryOK,1rowaffected(0.00sec) MariaDB[(none)]>grantallonneutron.*to 'neutron' @ '%' identifiedby 'neutron' ; QueryOK,0rowsaffected(0.00sec) MariaDB[(none)]>grantallonneutron.*to 'neutron' @ 'localhost' identifiedby 'neutron' ;; QueryOK,0rowsaffected(0.00sec) MariaDB[(none)]>flushprivileges; QueryOK,0rowsaffected(0.00sec) 2.6.5 检验数据库 1 2 3 4 5 6 7 8 9 10 11 12 13 14 15 16 MariaDB[(none)]>showdatabases; +--------------------+ |Database| +--------------------+ |information_schema| |glance| |keystone| |mysql| |neutron| |nova| |nova_api| |performance_schema| +--------------------+ 8rowsinset(0.00sec) MariaDB[(none)]> 2.7 安装消息队列(rabbitmq) 2.7.1 基本安装 1 2 3 4 5 6 7 8 9 10 11 yuminstallrabbitmq-server-y systemctl enable rabbitmq-server.service systemctlstartrabbitmq-server.service [root@linux-node1~] #rabbitmqctladd_useropenstackopenstack#创建消息队列认证用户 Creatinguser "openstack" ... ... done . [root@linux-node1~] # #创建的用户得授权才能使用 [root@linux-node1~] #rabbitmqctlset_permissionsopenstack".*"".*"".*"#授权用户才能使用 Settingpermissions for user "openstack" in vhost "/" ... ... done . 2.7.2 web界面安装 1 2 3 4 5 6 7 8 9 10 11 12 13 14 15 16 17 18 19 20 21 22 23 24 25 26 27 28 29 30 31 32 查看组件 [root@linux-node1~] #rabbitmq-pluginslist []amqp_client3.3.5 []cowboy0.5.0-rmq3.3.5-git4b93c2d []eldap3.3.5-gite309de4 []mochiweb2.7.0-rmq3.3.5-git680dba8 []rabbitmq_amqp1_03.3.5 []rabbitmq_auth_backend_ldap3.3.5 []rabbitmq_auth_mechanism_ssl3.3.5 []rabbitmq_consistent_hash_exchange3.3.5 []rabbitmq_federation3.3.5 []rabbitmq_federation_management3.3.5 []rabbitmq_management3.3.5 []rabbitmq_management_agent3.3.5 []rabbitmq_management_visualiser3.3.5 []rabbitmq_mqtt3.3.5 []rabbitmq_shovel3.3.5 []rabbitmq_shovel_management3.3.5 []rabbitmq_stomp3.3.5 []rabbitmq_test3.3.5 []rabbitmq_tracing3.3.5 []rabbitmq_web_dispatch3.3.5 []rabbitmq_web_stomp3.3.5 []rabbitmq_web_stomp_examples3.3.5 []sockjs0.3.4-rmq3.3.5-git3132eb9 []webmachine1.10.3-rmq3.3.5-gite9359c7 加载组件 rabbitmq-plugins enable rabbitmq_management systemctlrestartrabbitmq-server.service #重启消息队列 说明 rabbitmq监听的是5672 rabbitmq的管理界面监听的是15672 2.7.3 访问测试 默认是用户guest 密码是guest 让openstack用户拥有admistrator的权限进行登录 本文转自 小小三郎1 51CTO博客,原文链接:http://blog.51cto.com/wsxxsl/1883586,如需转载请自行联系原作者

优秀的个人博客,低调大师

Android图片显示ICON——基础编

今天写了一编小的图片显示代码,是从ICON的图片的显示结果来说明如果从以后的过程中更加适合里面去。先让我们看一下:图: 让我们看一下类中是代码: packagecom.smart.widget; importandroid.content.Context; importandroid.graphics.Bitmap; importandroid.graphics.BitmapFactory; importandroid.graphics.Canvas; importandroid.graphics.Rect; importandroid.util.AttributeSet; importandroid.widget.TextView; publicclassIconTextextendsTextView{ //命名空间的值 privatefinalStringnamespace="http://net.blogjava.mobile"; //图像资源ID privateintresourceId=0; privateBitmapbitmap; publicIconText(Contextcontext,AttributeSetattrs) { super(context,attrs); resourceId=attrs.getAttributeResourceValue(namespace,"iconSrc",0); if(resourceId>0) bitmap=BitmapFactory.decodeResource(getResources(),resourceId); } @Override protectedvoidonDraw(Canvascanvas) { if(bitmap!=null) { //从原图上截取图像的区域,在本例中为整个图像 Rectsrc=newRect(); //将截取的图像复制到bitmap上的目标区域,在本例中与复制区域相同 Recttarget=newRect(); src.left=0; src.top=0; src.right=bitmap.getWidth(); src.bottom=bitmap.getHeight(); inttextHeight=(int)getTextSize(); target.left=0; //计算图像复制到目录区域的纵坐标。由于TextView中文本内容并不是从最顶端开始绘制的,因此,需要重新计算绘制图像的纵坐标 target.top=(int)((getMeasuredHeight()-getTextSize())/2)+1; target.bottom=target.top+textHeight; //为了保证图像不变形,需要根据图像高度重新计算图像的宽度 target.right=(int)(textHeight*(bitmap.getWidth()/(float)bitmap .getHeight())); //开始绘制图像 canvas.drawBitmap(bitmap,src,target,getPaint()); //将TextView中的文本向右移动一定的距离(在本例中移动了图像宽度加2个象素点的位置) canvas.translate(target.right+2,0); } super.onDraw(canvas); } } main代码: <?xmlversion="1.0"encoding="utf-8"?> <LinearLayoutxmlns:android="http://schemas.android.com/apk/res/android" xmlns:mobile="http://www.baidu.com" android:orientation="vertical" android:layout_width="fill_parent" android:layout_height="fill_parent" > <com.smart.widget.IconText android:layout_width="fill_parent" android:layout_height="wrap_content" android:text="第一个笑脸" mobile:iconSrc="drawable/small" /> <com.smart.widget.IconText android:layout_width="fill_parent" android:layout_height="wrap_content" android:text="第二个笑脸" android:textSize="24dp" mobile:iconSrc="drawable/small" /> <com.smart.widget.IconText android:layout_width="fill_parent" android:layout_height="wrap_content" android:text="第三个笑脸" android:textSize="36dp" mobile:iconSrc="drawable/small" /> <com.smart.widget.IconText android:layout_width="fill_parent" android:layout_height="wrap_content" android:text="第四个笑脸" android:textSize="48dp" mobile:iconSrc="drawable/small" /> <com.smart.widget.IconText android:layout_width="fill_parent" android:layout_height="wrap_content" android:text="第五个笑脸" android:textSize="36dp" mobile:iconSrc="drawable/small" /> <com.smart.widget.IconText android:layout_width="fill_parent" android:layout_height="wrap_content" android:text="第六个笑脸" android:textSize="24dp" mobile:iconSrc="drawable/small" /> <com.smart.widget.IconText android:layout_width="fill_parent" android:layout_height="wrap_content" android:text="第七个笑脸" mobile:iconSrc="drawable/small" /> </LinearLayout> 本文转自 llb988 51CTO博客,原文链接:http://blog.51cto.com/llb988/497220,如需转载请自行联系原作者

优秀的个人博客,低调大师

android基础进度条原理

下面详细介绍ProgressBar 一、说明 在某些操作的进度中的可视指示器,为用户呈现操作的进度,还它有一个次要的进度条,用来显示中间进度,如在流媒体播放的缓冲区的进度。一个进度条也可不确定其进度。在不确定模式下,进度条显示循环动画。这种模式常用于应用程序使用任务的长度是未知的。 二、XML重要属性 android:progressBarStyle:默认进度条样式 android:progressBarStyleHorizontal:水平样式 三、重要方法 getMax():返回这个进度条的范围的上限 getProgress():返回进度 getSecondaryProgress():返回次要进度 incrementProgressBy(int diff):指定增加的进度 isIndeterminate():指示进度条是否在不确定模式下 setIndeterminate(boolean indeterminate):设置不确定模式下 setVisibility(int v):设置该进度条是否可视 四、重要事件 onSizeChanged(int w, int h, int oldw, int oldh):当进度值改变时引发此事件 看一下实现代码 packagecom.smart; importjava.util.Timer; importjava.util.TimerTask; importandroid.app.Activity; importandroid.os.Bundle; importandroid.os.Handler; importandroid.os.Message; importandroid.widget.ProgressBar; publicclassMainextendsActivity{ privateProgressBarprogressBar; privateHandlerhandler=newHandler(){ publicvoidhandleMessage(Messagemsg){ switch(msg.what){ case1: intcurrentProgress=progressBar.getProgress()+2; if(currentProgress>progressBar.getMax()) currentProgress=0;//断送进度条 progressBar.setProgress(currentProgress);//显示进度条进度 break; } super.handleMessage(msg); } }; privateTimerTasktimerTask=newTimerTask(){ //信息 @Override publicvoidrun(){ Messagemessage=newMessage(); message.what=1; handler.sendMessage(message); } }; @Override publicvoidonCreate(BundlesavedInstanceState){ super.onCreate(savedInstanceState); setContentView(R.layout.main); progressBar=(ProgressBar)findViewById(R.id.progressbar); Timertimer=newTimer(); timer.schedule(timerTask,0,500); //第二个参数为:从0开始,第三个参数为:它的速度,越大越慢,越小越快。 } } main.xml文件 <?xmlversion="1.0"encoding="utf-8"?> <LinearLayoutxmlns:android="http://schemas.android.com/apk/res/android" android:orientation="vertical" android:layout_width="fill_parent" android:layout_height="fill_parent" > <ProgressBar android:id="@+id/progressbar" android:layout_width="fill_parent" android:layout_height="wrap_content" android:layout_marginTop="20dp" android:max="100" style="?android:attr/progressBarStyleHorizontal" /> </LinearLayout> 本文转自 llb988 51CTO博客,原文链接:http://blog.51cto.com/llb988/510427,如需转载请自行联系原作者

优秀的个人博客,低调大师

android计数器——基础编

计数器是指一些常用计时器,例如体育比赛中测试时间的计时器等,但所要介绍的这种计时器一般原理,先让我们看一下图先 让我们看一下代码的实现方法: packagecom.smart; importandroid.app.Activity; importandroid.content.Context; importandroid.os.Bundle; importandroid.os.Handler; importandroid.view.View; importandroid.view.View.OnClickListener; importandroid.widget.Button; importandroid.widget.TextView; importandroid.widget.Toast; publicclassMainextendsActivityimplementsOnClickListener,Runnable{ privateHandlerhandler; privateTextViewsCount; privateintcount=0; @Override//创建方法 publicvoidonCreate(BundlesavedInstanceState){ super.onCreate(savedInstanceState); setContentView(R.layout.main); ButtonsStart=(Button)findViewById(R.id.sStart); ButtonsStop=(Button)findViewById(R.id.sStop); ButtonshowToast=(Button)findViewById(R.id.showToast); sCount=(TextView)findViewById(R.id.sCount); sStart.setOnClickListener(this); sStop.setOnClickListener(this); showToast.setOnClickListener(this); handler=newHandler(); } //吐丝显示 classRunToastimplementsRunnable{ privateContextcontext; publicRunToast(Contextcontext){ this.context=context; } @Override publicvoidrun(){//根据时间去显示内容 Toast.makeText(context,"15秒后显示信息内容",Toast.LENGTH_LONG).show(); } } @Override//事件点击 publicvoidonClick(Viewv){ switch(v.getId()) { caseR.id.sStart: handler.postDelayed(this,5000); break; caseR.id.sStop: handler.removeCallbacks(this); break; caseR.id.showToast: handler.postAtTime(newRunToast(this) { },android.os.SystemClock.uptimeMillis()+15*1000); break; } } @Override//线程运行 publicvoidrun(){ sCount.setText("Count:"+String.valueOf(++count));//显示计数: handler.postDelayed(this,5000); } } main.xml文件写法 <?xmlversion="1.0"encoding="utf-8"?> <LinearLayoutxmlns:android="http://schemas.android.com/apk/res/android" android:orientation="vertical" android:layout_width="fill_parent" android:layout_height="fill_parent" > <TextView android:id="@+id/sCount" android:layout_width="fill_parent" android:layout_height="wrap_content" android:text="@string/hello" /> <Button android:id="@+id/sStart" android:layout_width="fill_parent" android:layout_height="wrap_content" android:text="开始计数" /> <Button android:id="@+id/sStop" android:layout_width="fill_parent" android:layout_height="wrap_content" android:text="停止计数" /> <Button android:id="@+id/showToast" android:layout_width="fill_parent" android:layout_height="wrap_content" android:text="15秒后显示Toast信息" /> </LinearLayout> 附件:http://down.51cto.com/data/2357682 本文转自 llb988 51CTO博客,原文链接:http://blog.51cto.com/llb988/510350,如需转载请自行联系原作者

优秀的个人博客,低调大师

Activity多功能按钮——基础编

packagecom.smart; importandroid.app.Activity; importandroid.app.AlertDialog; importandroid.app.Dialog; importandroid.content.DialogInterface; importandroid.os.Bundle; importandroid.util.Log; importandroid.view.View; importandroid.view.View.OnClickListener; importandroid.widget.Button; importandroid.widget.ListView; //继承OnClickListener publicclassMainextendsActivityimplementsOnClickListener{ //固定的静态变量, privatefinalintDELETE_FILE=1; privatefinalintSIMPLE_LIST=2; privatefinalintSINGLE_CHOICE_LIST=3; privatefinalintMULTI_LIST=4; privateListViewlv=null; //定义一个字符串数组 privateString[]provinces=newString[]{"中国","泰国","美国","法国", "新加坡","英国"}; //按钮 privateButtonOnClickbuttonOnClick=newButtonOnClick(1); @Override//事件点击 publicvoidonClick(Viewv){ //开关选择 switch(v.getId()){ caseR.id.btnDeleteFile: showDialog(DELETE_FILE); break; caseR.id.btnSimpleList: showDialog(SIMPLE_LIST); break; caseR.id.btnChoiceList: showDialog(SINGLE_CHOICE_LIST); break; caseR.id.btnMultiChoiceList: showDialog(MULTI_LIST); break; caseR.id.btnRemoveDialog: removeDialog(DELETE_FILE); removeDialog(SIMPLE_LIST); removeDialog(SINGLE_CHOICE_LIST); removeDialog(MULTI_LIST); break; } } @Override protectedDialogonCreateDialog(intid){ Log.d("dialog",String.valueOf(id)); //用来判断选择的目标。如果没有选择,并提示出来,选择中了,也显示结果。详看代码 switch(id){ caseDELETE_FILE: returnnewAlertDialog.Builder(this).setIcon(R.drawable.question).setTitle("是否删除文件").setPositiveButton("确定",newDialogInterface.OnClickListener(){ @Override publicvoidonClick(DialogInterfacedialog,intwhich){ newAlertDialog.Builder(Main.this).setMessage("文件已经被删除").create().show(); } }).setNegativeButton("取消",newDialogInterface.OnClickListener(){ @Override publicvoidonClick(DialogInterfacedialog,intwhich){ newAlertDialog.Builder(Main.this).setMessage("您已经选择了取消,文件未删除").create().show(); } }).create(); caseSIMPLE_LIST: returnnewAlertDialog.Builder(this).setTitle("选择国家").setItems(provinces,newDialogInterface.OnClickListener(){ @Override publicvoidonClick(DialogInterfacedialog,intwhich){ finalAlertDialogad=newAlertDialog.Builder(Main.this).setMessage("您已经选择了"+which+":"+provinces[which]).show(); android.os.Handlerhander=newandroid.os.Handler(); hander.postDelayed(newRunnable(){ //线程管理 @Override publicvoidrun(){ ad.dismiss(); } },5*1000); } }).create(); caseSINGLE_CHOICE_LIST: returnnewAlertDialog.Builder(this).setTitle("选择国家").setSingleChoiceItems(provinces,1,buttonOnClick).setPositiveButton("确定",buttonOnClick).setNegativeButton("取消",buttonOnClick).create(); caseMULTI_LIST: AlertDialogad=newAlertDialog.Builder(this).setIcon(R.drawable.image).setTitle("选择国家").setMultiChoiceItems(provinces,newboolean[]{false,true,false,true,false,false},newDialogInterface.OnMultiChoiceClickListener(){ @Override publicvoidonClick(DialogInterfacedialog,intwhich,booleanisChecked){ } }).setPositiveButton("确定",newDialogInterface.OnClickListener(){ @Override publicvoidonClick(DialogInterfacedialog,intwhich){ intcount=lv.getCount(); Strings="您选择了:"; for(inti=0;i<provinces.length;i++){ if(lv.getCheckedItemPositions().get(i)){ s+=i+":"+lv.getAdapter().getItem(i)+""; } } if(lv.getCheckedItemPositions().size()>0){ newAlertDialog.Builder(Main.this).setMessage(s).show(); }else{ newAlertDialog.Builder(Main.this).setMessage("您未选择任何国家").show(); } } }).setNegativeButton("取消",null).create(); lv=ad.getListView(); returnad; } returnnull; } @Override publicvoidonCreate(BundlesavedInstanceState){ super.onCreate(savedInstanceState); setContentView(R.layout.main); //得到选中的哪一个按钮 ButtonbtnDeletefile=(Button)findViewById(R.id.btnDeleteFile); ButtonbtnSimpleList=(Button)findViewById(R.id.btnChoiceList); ButtonbtnSimngleChoiceList=(Button)findViewById(R.id.btnSimpleList); ButtonbtnMultiChoiceList=(Button)findViewById(R.id.btnMultiChoiceList); ButtonbtnRemoveDialog=(Button)findViewById(R.id.btnRemoveDialog); //绑定监听器 btnDeletefile.setOnClickListener(this); btnSimpleList.setOnClickListener(this); btnSimngleChoiceList.setOnClickListener(this); btnMultiChoiceList.setOnClickListener(this); btnRemoveDialog.setOnClickListener(this); } //定义一个类,用来判断选择中的。 privateclassButtonOnClickimplementsDialogInterface.OnClickListener{ privateintindex; publicButtonOnClick(intindex){ this.index=index; } @Override publicvoidonClick(DialogInterfacedialog,intwhichButton){ if(whichButton>=0){ index=whichButton; }else{ if(whichButton==DialogInterface.BUTTON_POSITIVE){ newAlertDialog.Builder(Main.this).setMessage("您已经选择了:"+index+":"+provinces[index]).show(); }elseif(whichButton==DialogInterface.BUTTON_NEGATIVE){ newAlertDialog.Builder(Main.this).setMessage("你未选择,请选择").show(); } } } } protectedvoidonPrepareDialog(intid,Dialogdialog){ super.onPrepareDialog(id,dialog); } } 另外很多朋友对Android系统构架图还不是很了解,我附上一张中文的图给大家观看 本文转自 llb988 51CTO博客,原文链接:http://blog.51cto.com/llb988/489522,如需转载请自行联系原作者

优秀的个人博客,低调大师

python文件基础之(文件操作)

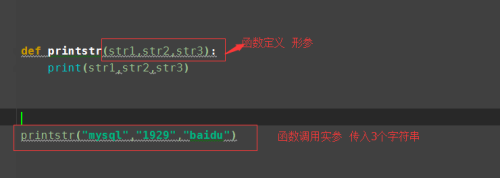
在之前学习了python的列表、元组、集合等知识,接下来将python的文件相关的知识做一总结和分析。 一 open函数 在我们用word、excel、vim对文件操作时,肯定要先打开文件,同样在编程里面也是需要将文件打开,然后再对文件操作,操作完对文件进行关闭。文件打开使用open()函数,同时创建一个相关的对象。 、基本语法: 1 2 3 4 5 6 7 8 9 10 11 12 13 14 15 16 17 18 19 20 21 22 23 open ( file ,mode = 'r' ,buffering = None ,encoding = None ,errors = None ,newline = None ,closefd = True ) 参数介绍: file :表示文件名,可以使用绝对路径和相对路径,还有可以根据mode方式决定文件的追加或者覆盖 mode:表示打开文件的模式 buffering:设置缓存模式。 0 表示不缓存, 1 表示缓存;如果大于 1 则表示缓冲区的大小,以字节为单位。 encoding:表示打开文件的编码格式 errors:参数errors是用来指明编码和解码错误时怎么样处理。不能在二进制的模式下使用。 1 )当指明为’strict’时,编码出错则抛出异常ValueError。 2 )当指明为’ignore’时,忽略错误。 3 )当指明为’replace’时,使用某字符进行替代模式,比如使用’?’来替换出错的。 4 )其它相应还有surrogateescape / xmlcharrefreplacs / backslashreplace。 newline: 参数newline是用来控制文本模式之下,一行的结束字符。可以是 None ,’’,\n,\r,\r\n等。 当在读取模式下,如果新行符为 None ,那么就作为通用换行符模式工作,意思就是说当遇到\n, \r或\r\n都可以作为换行标识,并且统一转换为\n作为文本输入的换行符。当设置为空’’时, 也是通用换行符模式工作,但不作转换为\n,输入什么样的,就保持原样全输入。当设置为其它相应 字符时,就会判断到相应的字符作为换行符,并保持原样输入到文本。 当在输出模式时,如果新行符为 None ,那么所有输出文本都是采用\n作为换行符。如果设置为’’ 或者\n时,不作任何的替换动作。如果是其它字符,会在字符后面添加\n作为换行符。 closefd:是用来当给一个文件句柄传进来时,而当退出文件使用时,而不对文件句柄进行关闭。如果传 递一个文件名进来,这个参数无效,必定为 True 方式。 关于上面提到的mode模式种类比较多,我们做以下相关介绍和总结, 模式 描述 r 打开一个文件为只读。文件指针置于该文件的开头。这是默认模式。 rb 打开一个文件只能以二进制格式读取。文件指针置于该文件的开头。这是默认模式。 r+ 打开用于读取和写入文件。文件指针将会在文件的开头。 rb+ 打开用于读取和写入二进制格式的文件。文件指针将会在文件的开头。 w 打开一个文件只写。覆盖该文件,如果该文件存在。如果该文件不存在,则创建用于写入一个新的文件。 wb 打开一个文件只能以二进制格式写入。覆盖该文件,如果该文件存在。如果该文件不存在,则创建用于写入一个新的文件。 w+ 打开用于写入和读取的文件。覆盖现有的文件,如果文件存在。如果该文件不存在,则创建读取和写入新的文件。 wb+ 打开用于写入和读取的二进制格式的文件。覆盖现有的文件,如果文件存在。如果该文件不存在,则创建读取和写入新的文件。 a 将打开追加文件。文件指针是在文件的结尾。也就是说,该文件是在附加模式。如果该文件不存在,它创造了写入一个新的文件。 ab 将打开追加的二进制格式的文件。文件指针在该文件的结束。也就是说,该文件为追加模式。如果该文件不存在,它创建并写入一个新的文件。 a+ 打开为追加和读取文件。文件指针在该文件的结束。该文件将为追加模式。如果该文件不存在,它创建并读取和写入的新文件。 ab+ 打开两个追加和读取的二进制格式的文件。文件指针在该文件的结束。该文件将在追加模式。如果该文件不存在,它创建并读取和写入的新文件。 二进制在我们处理图像等信息时使用比较多,而其他部分在我们操作字符串等内容比较多。 简单的示例: 1 2 3 4 5 6 7 8 9 10 11 12 13 14 15 16 17 18 19 20 21 22 23 24 25 26 27 28 29 30 31 32 33 34 35 36 37 38 39 40 41 42 43 44 45 46 47 48 49 50 51 52 53 54 55 示例文件内容: 我曾经问个不休你何时跟我走 可你却总是笑我一无所有 我要给你我的追求还有我的自由 可你却总是笑我一无所有 噢你何时跟我走 噢你何时跟我走 脚下的地在走身边的水在流 可你却总是笑我一无所有 为何你总笑个没够为何我总要追求 难道在你面前我永远是一无所有 Processfinishedwithexitcode 0 #!/usr/bin/envpython #_*_coding:utf-8_*_ a_File = open ( "D:\\pythonfile.txt" , "r" ,encoding = 'utf-8' ) readline = a_File.read() print (readline) 结果: 我曾经问个不休你何时跟我走 可你却总是笑我一无所有 我要给你我的追求还有我的自由 可你却总是笑我一无所有 噢你何时跟我走 噢你何时跟我走 脚下的地在走身边的水在流 可你却总是笑我一无所有 为何你总笑个没够为何我总要追求 难道在你面前我永远是一无所有 上面使用的r模式打开,我们采取尝试写入文件,写入内容为字符串openstack\nMYSQLDBA #!/usr/bin/envpython #_*_coding:utf-8_*_ a_File = open ( "D:\\pythonfile.txt" , "r" ,encoding = 'utf-8' ) readline = a_File.read() print (readline) a_File.write( "openstack\nMYSQLDBA" ) a_File.close() 结果:文件不可写 Traceback(mostrecentcalllast): File "D:/project/myapp/hello.py" ,line 6 , in <module> a_File.write( "openstack\nMYSQLDBA" ) io.UnsupportedOperation: not writable 我们再尝试用二进制方式打开文件查看内容: #!/usr/bin/envpython #_*_coding:utf-8_*_ a_File = open ( "D:\\pythonfile.txt" , "rb" ) #去掉了编码格式 readline = a_File.read() print (readline) #a_File.write("openstack\nMYSQLDBA") a_File.close() 结果: b'\xe6\x88\x91\xe6\x9b\xbe\xe7\xbb\x8f\xe9\x97\xae\xe4\xb8\xaa\xe4\xb8\x8d\xe4\xbc\x91\xe4\xbd\xa0\xe4\xbd\x95\xe 其他内容繁多,因此不再演示其他的mode模式 在研究完我们如何将文件打开后,我们就要考虑如何处理打开的文件,主要涉及到文件对象的一些方法。 序号 方法以及描述与应用 1 open()可以创建一个对象打开某个文件,这一部分涉及内容比较多,下一部分介绍,打开的方式以及编码格式等 2 file.close()关闭文件 关闭文件后不能再进行读写操作 3 file.read([size])从文件读取指定的字节数,要是未指定或为负则读取所有 4 file.readline([size])读取整行包括”\n”换行 5 file.readlines()读取文件里的所有行并返回列表,若sizeint>0返回总行约为sizeint字节的行,实际读取的值可能比sizeint较大,因为需要缓冲区 6 file.next()返回文件下一行 7 file.isatty()如果文件连接一个终端设备返回Ture 否则返回False 8 file.flush()刷新文件内部缓冲,直接把内部缓存区的数据写入文件,而不是被动的等待输出缓存区写入 9 file.fileno()返回一个整型的文件描述符(file descriptor FD)可以用在os模块的read方法等的底层操作 10 file.seek(offset[whencr])设置文件的当前位置 11 file.tell()返回文件的当前位置 12 file.truncate([size])截取文件,截取的字节通过size指定,默认当前位置开始 13 file.write(str)将字符串写入文件没有返回值 14 file.writelines(sequence)向文件写入一个序列字符串列表,如果需要换行则需要自己加入换行符 下面根据不同的方法做简单介绍以及相关示例 读操作:读的有file.read() filereadline() filereadlies()等三种方法 1、file.read()方法 里面的参数是size,表示从文件中读取size大小字节,当默认为空或者为负值时表示读取所有的字节, 示例: 1 2 3 4 5 6 7 8 9 10 11 12 13 14 15 16 17 18 19 20 21 22 23 24 25 26 27 28 29 30 31 32 33 34 35 36 37 38 39 40 41 42 43 44 45 46 47 48 49 50 51 52 53 54 #!/usr/bin/envpython #_*_coding:utf-8_*_ a_File = open ( "D:\\pythonfile.txt" , "r" ,encoding = 'utf-8' ) #readline=a_File.read(1) print ( "测试结果1" .center( 100 , '#' ))#为了更好的展现测试结果分割 print (a_File.read( - 1 )) 结果: ###############################################测试结果1################################################ 我曾经问个不休你何时跟我走 可你却总是笑我一无所有 我要给你我的追求还有我的自由 可你却总是笑我一无所有 噢你何时跟我走 噢你何时跟我走 脚下的地在走身边的水在流 #!/usr/bin/envpython #_*_coding:utf-8_*_ a_File = open ( "D:\\pythonfile.txt" , "r" ,encoding = 'utf-8' ) #readline=a_File.read(1) print ( "测试结果2" .center( 100 , '#' ))#为了更好的展现测试结果分割 print (a_File.read()) 结果: ###############################################测试结果2################################################ 我曾经问个不休你何时跟我走 可你却总是笑我一无所有 我要给你我的追求还有我的自由 可你却总是笑我一无所有 噢你何时跟我走 噢你何时跟我走 脚下的地在走身边的水在流 #!/usr/bin/envpython #_*_coding:utf-8_*_ a_File = open ( "D:\\pythonfile.txt" , "r" ,encoding = 'utf-8' ) #readline=a_File.read(1) print ( "测试结果3" .center( 100 , '#' ))#为了更好的展现测试结果分割 print (a_File.read( 3 )) 结果: ###############################################测试结果3################################################ 我曾经 #!/usr/bin/envpython #_*_coding:utf-8_*_ a_File = open ( "D:\\pythonfile.txt" , "r" ,encoding = 'utf-8' ) #readline=a_File.read(1) print ( "测试结果4" .center( 100 , '#' ))#为了更好的展现测试结果分割 print (a_File.read( 15 )) 结果: ###############################################测试结果4################################################ 我曾经问个不休你何时跟我走 可以发现read方法是受字节数量控制的,字节数量的控制影响其输出 2、readline()方法 读取整行包括”\n”换行,参数也是[size]控制,其和read()的区别就是当readline()某行中的字符不够时,只读取改行,而read()会读取其他行的内容。 示例(两者的区别) 1 2 3 4 5 6 7 8 9 10 11 12 13 14 15 16 17 18 #!/usr/bin/envpython #_*_coding:utf-8_*_ a_File = open ( "D:\\pythonfile.txt" , "r" ,encoding = 'utf-8' ) #readline=a_File.read(1) print ( "测试结果1" .center( 100 , '#' ))#为了更好的展现测试结果分割 print (a_File.read( 50 )) print ( "测试结果2" .center( 100 , '#' ))#为了更好的展现测试结果分割 print (a_File.readline( 100 )) 结果: ###############################################测试结果1################################################ 我曾经问个不休你何时跟我走 可你却总是笑我一无所有 我要给你我的追求还有我的自由 可你却总是笑 ###############################################测试结果2################################################ 我一无所有 readline()方法默认值和负值的相关示例 1 2 3 4 5 6 7 8 9 10 11 12 13 14 15 16 17 18 19 20 21 22 23 24 #!/usr/bin/envpython #_*_coding:utf-8_*_ a_File = open ( "D:\\pythonfile.txt" , "r" ,encoding = 'utf-8' ) #readline=a_File.read(1) print ( "测试结果1" .center( 100 , '#' ))#为了更好的展现测试结果分割 print (a_File.readline()) print ( "测试结果2" .center( 100 , '#' ))#为了更好的展现测试结果分割 print (a_File.readline( - 1 )) print ( "测试结果3" .center( 100 , '#' ))#为了更好的展现测试结果分割 print (a_File.readline( 4 )) print ( "测试结果4" .center( 100 , '#' ))#为了更好的展现测试结果分割 print (a_File.readline( 10 )) 结果: ###############################################测试结果1################################################ 我曾经问个不休你何时跟我走 ###############################################测试结果2################################################ 可你却总是笑我一无所有 ###############################################测试结果3################################################ 我要给你 ###############################################测试结果4################################################ 我的追求还有我的自 3、readlines()取文件里的所有行并返回列表,若sizeint>0返回总行约为sizeint字节的行,实际读取的值可能比sizeint较大,因为需要缓冲区。则读取指定长度的字节, 并且将这些字节按行分割。 例如: 1 2 3 4 5 6 7 8 9 10 11 12 13 14 15 16 17 18 19 #!/usr/bin/envpython #_*_coding:utf-8_*_ a_File = open ( "D:\\pythonfile.txt" , "r" ,encoding = 'utf-8' ) #readline=a_File.read(1) print ( "测试结果1" .center( 100 , '#' ))#为了更好的展现测试结果分割 print (a_File.readlines( 14 )) ###############################################测试结果1################################################ [ '我曾经问个不休你何时跟我走\n' ] #!/usr/bin/envpython #_*_coding:utf-8_*_ a_File = open ( "D:\\pythonfile.txt" , "r" ,encoding = 'utf-8' ) #readline=a_File.read(1) print ( "测试结果1" .center( 100 , '#' ))#为了更好的展现测试结果分割 print (a_File.readlines( 14 )) [ '我曾经问个不休你何时跟我走\n' , '可你却总是笑我一无所有\n' ] 当我们设置sizeint值大于行中的字符时才能显示其他行的内容 4、file.close() 关闭文件 关闭文件后不能再进行读写操作文件对象的close()方法刷新未写入的信息,并关闭该文件的对象,在这之后没有数据内容可以执行写入。 Python自动关闭,当文件的引用对象被重新分配给另外一个文件。它是使用close()方法来关闭文件是一个很好的做法。 1 2 3 4 5 6 7 8 9 #!/usr/bin/envpython #_*_coding:utf-8_*_ a_File = open ( "D:\\pythonfile2.txt" , "w+" ) #readline=a_File.read(1) a_File.write( "winnerlookopenatck" ) a_File.close() 将文件写入 写入内容: winnerlookopenatck 5、flie.write() write()方法写入字符串到任何一个打开的文件。要注意的是Python字符串可以具有二进制数据,而不仅仅是文字。 write()方法不要将换行字符(' ')添加到字符串的结尾。在文件关闭前或缓冲区刷新前,字符串内容存储在缓冲区中,这时你在文件中是看不到写入的内容。 例如: 1 2 3 4 5 6 #!/usr/bin/envpython #_*_coding:utf-8_*_ a_File = open ( "D:\\pythonfile2.txt" , "w+" ) #readline=a_File.read(1) a_File.write( "winnerlookopenatck" ) a_File.close() 6、file.writelines() file.writelines()方法用于向文件中写入一序列的字符串。这一序列字符串可以是由迭代对象产生的,如一个字符串列表。换行需要制定换行符 \n。 1 2 3 4 5 6 7 8 9 10 11 12 13 #!/usr/bin/envpython #_*_coding:utf-8_*_ sed = [ "openstack:1\n" , "docker2\n" , "mysqlDBA3\n" , "KVM4\n" ] #定义列表 a_File = open ( "D:\\pythonfile2.txt" , "w+" ) #readline=a_File.read(1) a_File.writelines(sed) a_File.close() 结果: openstack: 1 docker 2 mysqlDBA 3 KVM 4 7、file.flush() flush() 方法是用来刷新缓冲区的,即将缓冲区中的数据立刻写入文件,同时清空缓冲区,不需要是被动的等待输出缓冲区写入。 一般情况下,文件关闭后会自动刷新缓冲区,但有时你需要在关闭前刷新它,这时就可以使用 flush() 方法。没有返回值 例如 1 2 3 4 5 6 7 8 9 #!/usr/bin/envpython #_*_coding:utf-8_*_ sed = [ "openstack:1\n" , "docker2\n" , "mysqlDBA3\n" , "KVM4\n" ] a_File = open ( "D:\\pythonfile2.txt" , "w+" ) #readline=a_File.read(1) a_File.writelines(sed) a_File.flush() a_File.close() 8、file.next() next() 方法在文件使用迭代器时会使用到,在循环中,next()方法会在每次循环中调用,该方法返回文件的下一行,如果到达结尾(EOF),则触发StopIteration 示例: 1 2 3 4 5 6 7 8 #!/usr/bin/envpython #_*_coding:utf-8_*_ sed = [ "openstack:1\n" , "docker2\n" , "mysqlDBA3\n" , "KVM4\n" ] aFile = open ( "D:\\pythonfile2.txt" , "w+" ) for index in range ( 3 ): line = next (aFile) print ( "第%d行-%s" % (index,line)) 9、file.tell() file.tell()方法返回文件的当前位置,即文件指针当前位置。 语法: 1 fileObject.tell(offset[,whence]) 返回值当前文件指针 1 2 3 4 5 6 7 8 9 10 11 12 13 14 15 16 17 18 19 20 21 22 23 24 #!/usr/bin/envpython #_*_coding:utf-8_*_ sed = [ "openstack:1\n" , "docker2\n" , "mysqlDBA3\n" , "KVM4\n" ] aFile = open ( "D:\\pythonfile.txt" , "r" ,encoding = "utf-8" ) print (aFile.readline( 30 )) print (aFile.tell()) 我曾经问个不休你何时跟我走我曾经问个不休你何时跟我走我曾 86 #!/usr/bin/envpython #_*_coding:utf-8_*_ sed = [ "openstack:1\n" , "docker2\n" , "mysqlDBA3\n" , "KVM4\n" ] aFile = open ( "D:\\pythonfile.txt" , "r" ,encoding = "utf-8" ) print (aFile.readline()) print (aFile.tell()) 我曾经问个不休你何时跟我走我曾经问个不休你何时跟我走我曾经问个不休你何时跟我走我曾经问个不休你何时跟我走 162 10、file.isatty() file.isatty()方法检测文件是否连接到一个终端设备,如果是返回 True,否则返回 False 用法: fileObject.isatty() #!/usr/bin/envpython #_*_coding:utf-8_*_ sed=["openstack:1\n","docker2\n","mysqlDBA3\n","KVM4\n"] aFile=open("D:\\pythonfile.txt","r",encoding="utf-8") print(aFile.isatty()) False 11、file.seek() seek() 方法用于移动文件读取指针到指定位置,没有返回值 seek() 方法语法如下: fileObject.seek(offset[,whence]) offset -- 开始的偏移量,也就是代表需要移动偏移的字节数 whence:可选,默认值为 0。给offset参数一个定义,表示要从哪个位置开始偏移;0代表从文件开头开始算起,1代表从当前位置开始算起,2代表从文件末尾算起。 1 2 3 4 5 6 7 8 9 10 11 12 13 14 15 #!/usr/bin/envpython #_*_coding:utf-8_*_ sed = [ "openstack:1\n" , "docker2\n" , "mysqlDBA3\n" , "KVM4\n" ] aFile = open ( "D:\\pythonfile.txt" , "r" ,encoding = "utf-8" ) print (aFile.readline( 10 )) print (aFile.readline( 10 )) aFile.seek( 0 , 0 ) #设置起始位置为0 print (aFile.readline( 10 )) 结果: 我曾经问个不休你何 时跟我走我曾经问个不 我曾经问个不休你何 总结打印完第一行后,下次打印从上次的位置接上,而重新设置其位置后在开始位置打印 12、file.fileno() 方法返回一个整型的文件描述符(file descriptor FD 整型),可用于底层操作系统的 I/O 操作。返回值为一个文件描述符: 1 2 3 4 5 6 7 8 9 #!/usr/bin/envpython #_*_coding:utf-8_*_ sed = [ "openstack:1\n" , "docker2\n" , "mysqlDBA3\n" , "KVM4\n" ] aFile = open ( "D:\\pythonfile.txt" , "r" ,encoding = "utf-8" ) print (aFile.fileno()) 结果: 3 13、file.truncate() truncate() 方法用于截断文件,如果指定了可选参数 size,则表示截断文件为 size 个字符。 如果没有指定 size,则从当前位置起截断;截断之后 size 后面的所有字符被删除 truncate() 方法语法如下: fileObject.truncate([size]) 参数 本文转自 tianya1993 51CTO博客,原文链接:http://blog.51cto.com/dreamlinux/1910955,如需转载请自行联系原作者


优秀的个人博客,低调大师

Android多点触控手势基础

处理多点触控手势 多点触控就是同时把一根以上的手指放在屏幕上。 再继续往下以前需要补充一些名词: 触控手势:就是把一根或者几根手指放在屏幕上做各种动作,其中包括保留一根手指的前提下,拿起或者放下其余的手指。 触控事件:在触控手势中,有手指移动或者离开屏幕的时候就会引发一个触控事件。这个事件就存放在MotionEvent中。 在这个事件中,包含说与的触控数据。 触控:手指碰到屏幕的时候就产生了一个触控(pointer)。 追踪多个触控点 多个手指同时放在屏幕上的时候会触发以下的系统事件: ACTION_DOWN --第一个对屏幕的触碰。这是多点触控的开始。这个触碰的而数据 保存在index为0的MotionEvent中。 ACTION_POINTER_DOWN--其他对屏幕的触碰。触碰事件的index可以用方法getActionIndex()获取到。 触碰的数据保存在这个index指定的MotionEvent中。 ACTION_MOVE--放在屏幕上的任何一根手指移动的时候触发。 ACTION_POINTER_UP--第一个触摸屏幕的手指以外的其他手指离开屏幕的时候触发。 ACTION_UP--当最后一根手指离开屏幕的时候触发。 你可以通过触碰事件的index或者ID来获得事件MotionEvent。 Index: 一个MotionEvent存储了几根手指触摸屏幕的每一个手指的触碰数据。一般处理触摸 的是后都用index作为获取MotionEvent的依据,而不是触碰ID。 ID:整个多点触摸事件过程中,每一个触摸都有一个ID和整个触摸匹配。 一个触碰的index在MotionEvent中可能发生改变的。而整个触碰的ID是保持不变的,只要整个 触碰保持激活状态。用getPointerId()可以获取整个手势执行期间的每一个event里的触碰数据。 也可以通过findPointerIndex()来根据一个触控的ID来获取这触控在触控事件中的index。比如: var mActivePointerId: Int? = null override fun onTouchEvent(event: MotionEvent?): Boolean { mActivePointerId = event?.getPointerId(0) // 其他的事件先不管... // 用触控ID获得index,然后获取位置数据 var pointerIndex = event?.findPointerIndex(mActivePointerId!!) // 获取触控的当前位置 var x = event?.getX(pointerIndex!!) var y = event?.getY(pointerIndex!!) return true } 获取一个MotionEvent的Action 你应该使用getActionMasked()(或者从兼容方面考虑的话用MotionEventCompat.getAtionMasked()来获取MotionEvent的action。与getAction()不同,getActionMasked()就是被用来处理多点触控的。 这个方法的返回值不在包含触控index的位数。你可以用getActonIndex()来获取触控action的index。这些在后面详细叙述。 注意:后面的例子用的是MotionEventCompat类。这个类在Support Library中。 你可以使用MotionEventCompat来获得更多的平台支持。MotionEventCompat不是用来代替MotionEvent的。 其实,这个类只是提供了一些静态方法以方便使用。 override fun onTouchEvent(event: MotionEvent?): Boolean { var action = MotionEventCompat.getActionMasked(event!!) var index: Int = MotionEventCompat.getActionIndex(event!!) var xPos = -1.0f var yPos = -1.0f Log.d(TAG, "The action is " + actionToSring(action)) if (event!!.pointerCount > 1) { Log.d(TAG, "Mutipletouch event") // 坐标系是相对于处理这个事件的View或者Activity的 xPos = MotionEventCompat.getX(event!!, index) yPos = MotionEventCompat.getY(event!!, index) } else { //单点触控 Log.d(TAG, "Single touch event") xPos = MotionEventCompat.getX(event!!, index) yPos = MotionEventCompat.getY(event!!, index) } return true } fun actionToSring(action: Int): String { when (action) { MotionEvent.ACTION_DOWN -> return "Down" MotionEvent.ACTION_MOVE -> return "Move" MotionEvent.ACTION_POINTER_DOWN -> return "Pointer down" MotionEvent.ACTION_UP -> return "UP" MotionEvent.ACTION_POINTER_UP -> return "Pointer up" MotionEvent.ACTION_OUTSIDE -> return "Outside" MotionEvent.ACTION_CANCEL -> return "Cancel" } return "" } 原文是Google的文档。但是文档杜宇前提和一些概念的描述不足,会导致初学者理解出现偏差。我都加上了,我就是初学者。 代码都是用Kotlin写的,自从用了这个语言就再也不想用Java了。对于Java开发者理解Kotlin的代码没有什么太大的问题,基本上都一样。 欢迎加群互相学习,共同进步。QQ群:iOS: 58099570 | Android: 572064792 | Nodejs:329118122 做人要厚道,转载请注明出处! 本文转自张昺华-sky博客园博客,原文链接:http://www.cnblogs.com/sunshine-anycall/p/5245293.html ,如需转载请自行联系原作者

优秀的个人博客,低调大师

语音搜索的基础-语音识别

一直在想,假如有一天我们生活中的机器人像在很多科幻电影里面看到的那样,能够理解人类的语言,并能完成与人类的自然对话,是多爽的事情。语音的研究一直在试图解决这个问题。例如,语音到文字,即通常所说的语音识别,就试图将语音转换为文字,然后交给计算机进行后续的理解;而文字到语音,即语音合成,则试图将文字转换为声音,让人类可以听到。也许通过全世界语音界的科研和工程人员的努力,在不久的将来,我们真的可以和机器进行自由的对话(其实我一直很期待这一天的到来)。 语音识别有狭义的概念和广义的概念两种。狭义的语音识别,就是语音到文字的转换,即人对着机器说一句话,机器将其翻译为其对应的文字内容。而广义的语音识别,则包含了狭义的语音识别,并且也包含了哼唱搜索,说话人识别,说话人确认等等的技术领域。百度在9月初的时候,曾经推出过一个实验性的哼唱搜索功能,运气比较好的网友可能已经哼唱搜索有感性的认识了。实际上哼唱搜索,就是指我们在计算机或者某些设备前哼唱了某段歌曲,然后计算机根据哼唱的内容找到其对应的歌曲的功能。而说话人识别,则是利用人说的语音来识别人的身份。说话人确认则是根据人说的话确认此人所声称的身份。 语音识别经过几十年的发展,并伴随着计算机硬件的高速发展,已经从最初的只能识别若干个数字,发展到可以识别大词汇量,连续语音,并且说话人无关的语音识别技术。由于互联网和移动互联网发展的驱动,世界各大的互联网公司,手机厂商都在进行语音识别的应用,推出语音搜索,语音拨号,语音输入法等等的应用产品。可以说,语音识别已经迎来了新一轮的发展高潮。 按照识别的形式看,语音识别大体都可以划为孤立词识别,带语法规则的连接词识别,以及连续语音识别。孤立词识别,指的是每次只能说一个词或者一小段固定的话,并且在其配置的词表外的词,全部都不能识别。而连接词识别,则可以识别根据其配置规则生成的句子,比如“请 呼叫 ×××”。连续语音识别,则可以认为能识别任意词搭配的短句,或者完整的句子。按照说话人是否有关来分,则分为说话人相关的语音识别和说话人无关的语音识别。从总体上看,限制条件越少,其难度越大。 限于当前技术的发展水平,计算机并不能凭空识别语音,而是需要相当多的知识源。按照识别的形式看,语音识别大体都可以划为孤立词识别,带语法规则的连接词识别,以及连续语音识别。拿连续语音识别来说,需要描述语音发音特性的知识源,也需要描述人类语言搭配习惯的知识源。具体说,就是需要对人类语音的发音单元进行建模并估计出其相关参数,由此得到描述发音单元的模型,简称声学模型。而描述人类语言搭配的知识源,则可以是人工总结和构造的某些规则,也可以是从大量的文本资料统计出来的参数。当前连续语音识别中使用比较多的是从文本资料统计出来的n元文法模型,即常说的ngram语言模型。这种模型假设第N个词出现的概率,只和其前面的N-1个词有关。声学模型和语言模型是语音识别中最重要的两个知识源,而根据声学模型发音单元选择的不同,,可能需要一个从发音单元到词的对照表,比如我们选择的是声母和韵母作为建模单元,则需要知道某个字或某个词是由哪些声韵母组合的,我们一般把这个对照表成为发音字典。 再说说中文语音识别的一些与英文识别不同的难点。虽然语音识别是从西方国家起源的,但是随着语音识别学者对中文语音识别的研究的深入,当前我们已经可以看到中文的语音识别产品,包括百度的语音搜索,以及智能手机中内嵌的语音识别产品等等,都是对此很好的说明(我们需要感谢前辈们做出的贡献)。但是中文识别和英文毕竟是不同的,感谢我们的祖先,中文词汇是封闭的,即任何词都可以用字来组成,这给中文识别提供了方便,使得中文识别不像英文那样,只要没在发音词典中配置的词都不能识别。不过这同时也给我们带来一定的麻烦,使得我们做语言模型的时候选择其词集合相当困难。想象中,使用所有的单字即可,可惜的是,我们的实验告诉我们,使用单字的识别率不高,所以词典选择很重要。另外,由于中文是由字组成的,所以识别过程中使用的一些技术对中文不太好用,甚至会导致错误,这个问题可以以后再慢慢探讨。还有就是中文的方言实在是太丰富了,这使得我们做语音识别系统的时候倍感困难,其原因就是尽管我们可以做到说话人无关,但是由于声学模型却是和方言发音直接相关的。不过我相信,这些困难我们都可以克服,并且希望在不久的将来,全国人民都能用上我们的语音识别产品。 技术是为了方便人类生活和工作的,语音技术也不例外,所有需要文字输入,但是不能让人方便使用的地方,都是语音识别技术未来应用的地方,比如手机,比如对不习惯使用键盘的人群等等。此外,语音识别除了作为输入外,还可以在呼叫中心,语音翻译等等地方得到广泛的应用。 让我们一起迎接语音识别光明的未来吧。 By liangweiwen 【本文首发于: 搜索研发部官方博客】 http://stblog.baidu-tech.com/?p=74 【 关注百度技术沙龙】 本文转自百度技术51CTO博客,原文链接:http://blog.51cto.com/baidutech/743800 ,如需转载请自行联系原作者

优秀的个人博客,低调大师

【Android 基础】EditText的属性介绍

EditText继承TextView,所以EditText具有TextView的属性特点,下面主要介绍一些EditText的特有的输入法的属性特点 android:layout_gravity="center_vertical":设置控件显示的位置:默认top,这里居中显示,还有bottom android:hin :Text为空时显示的文字提示信息,可通过textColorHint设置提示信息的颜色。 android:singleLine :设置单行输入,一旦设置为 true ,则文字不会自动换行。 android:gray="top" :多行中指针在第一行第一位置 et.setSelection(et.length()); :调整光标到最后一行 android:autoText :自动拼写帮助。这里单独设置是没有效果的,可能需要其他输入法辅助才行 android:capitalize :设置英文字母大写类型。设置如下值:sentences仅第一个字母大写;words每一个单词首字母大小,用空格区分单词;characters每一个英文字母都大写。 android:digits :设置允许输入哪些字符。如“1234567890.+-*/%\n()” android:singleLine :是否单行或者多行,回车是离开文本框还是文本框增加新行 android:numeric :如果被设置,该TextView接收数字输入。有如下值设置:integer正整数、signed带符号整数、decimal带小数点浮点数。 android:inputType:设置文本的类型 android:password :密码,以小点”.”显示文本 android:phoneNumber :设置为电话号码的输入方式。 android:editable :设置是否可编辑。仍然可以获取光标,但是无法输入。 android:autoLink=”all” :设置文本超链接样式当点击网址时,跳向该网址 android:textColor = "#ff8c00" :字体颜色 android:textStyle="bold" :字体, bold, italic, bolditalic android:textAlign="center" : EditText 没有这个属性,但 TextView 有 android:textColorHighlight="#cccccc" :被选中文字的底色,默认为蓝色 android:textColorHint="#ffff00" :设置提示信息文字的颜色,默认为灰色 android:textScaleX="1.5" :控制字与字之间的间距 android:typeface="monospace" :字型, normal, sans, serif, monospace android:background="@null" :空间背景,这里没有,指透明 android:layout_weight="1" :权重在控制控件显示的大小时蛮有用的。 android:textAppearance="?android:attr/textAppearanceLargeInverse" :文字外观,这里引用的是系统自带的一个外观,?表示系统是否有这种外观,否则使用默认的外观。 本文转自叶超Luka博客园博客,原文链接:http://www.cnblogs.com/yc-755909659/archive/2012/08/18/2645426.html,如需转载请自行联系原作者

优秀的个人博客,低调大师

Android RenderScript 的使用基础篇

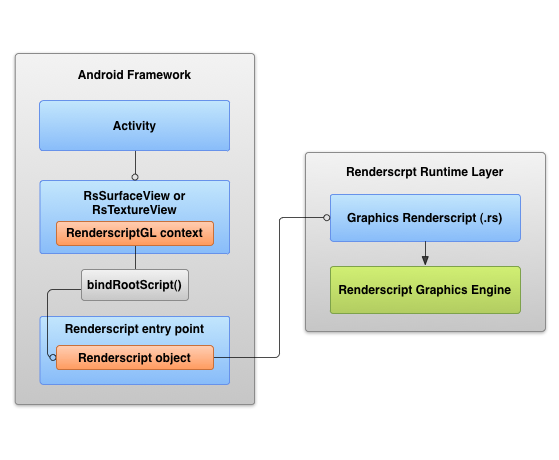
准备上4.0项目,最近接触API 的时候看到了RenderScript 。通过运行google 那几个项目发现这个真是一个非常不错的API,但是google 所提供的文档非常少,有助于了解计算机图形计算,虽然我们做应用编程的不一定要涉及这块,但涉猎一下总是不错的。 RenderScript 是Android 平台上的一种类C脚本语言。要在我们程序上实现RenderScript 渲染功能,最少需要实现的几个功能如下,以一个Hello Wold 为例: helloworld.rs实现RenderScript 的代码 RenderScriptRS.java 一个辅助类,简化操作RenderScript (非必要) RenderScriptView.java 一个继承于RSSurfaceView的类,用于显示RenderScript 的渲染或者用来处理用户的触摸等视图 RenderScriptHelloWorldActivity.java 这个不用多说,Android 应用程序的界面类 当创建一个RenderScript 的项目的时候,必须在包名下创建一个以rs为后缀的文件(位于我们Activity 同包名下),如本篇文章使用的helloworld.rs文件. #pragmaversion(1) #pragmarsjava_package_name(com.xuzhi.rs.helloworld) #include"rs_graphics.rsh" intgTouchX ;intgTouchY ; voidinit(){ gTouchX=50.0f ;gTouchY=50.0f ;} //applicationmain introot(void){ rsgClearColor(0.0f,1.0f,0.0f,0.0f) ;//颜色更改为no red,full green,no blue,no opacity ,的RGBA值rsgFontColor(1.0f,0.0f,1.0f,1.0f) ;//设置字体颜色rsgDrawText("myfirstrenderscriptapplication",gTouchX,gTouchY) ;//根据应用传上来的x,y 将字画在屏幕对应的坐标上rsDebug("======myrenderscriptdebug========",rsUptimeMillis()) ;//打印日志return 20 ; } 注解: #pragma:简单的可以理解告诉或者通知编译器编译这个文件时需要的参数或者指定编译的版本等,跟编译器有关。 void init():这个函数作一些初始化动作 int root(viod):程序入口,根据返回值(ms)作刷新。比如上面写的20相当于每20毫秒刷新一次。 root 函数下rsgClearColor,rsgFontColor,rsgDrawText都位于rs_graphics.rsh头文件下。 rsDebug是打印日志函数,位于rs_core.rsh头文件。 在上面的代码中,日志将己每20毫秒打印一次这样的日志:03-01 11:09:18.289: D/RenderScript(1838): ======my renderscript debug======== 600462 0x9298e rsUptimeMillis则定义在rs_time.rsh头文件中。 目前有关于RenderScript调用的函数位于我们SDK目录下(platforms/android-*[目前11-15]/renderscript/include)目录里面的头文件中。 好了,rs文件己经编写完成,接着往下走。 下一步,为了方便调用RenderScript 这里创建了一个辅助类,RenderScriptRS.java。 /** *RenderScripthelp * @author terry * */ public classRenderScriptRS{ privateRenderScriptGLmRS; privateScriptC_hellowoldmScript; publicRenderScriptRS(RenderScriptGLrs,Resourcesresource){ // TODOAuto-generatedconstructorstub mRS=rs; mScript= newScriptC_helloworld(mRS,resource,R.raw.hellowold); mRS.bindRootScript(mScript); //绑定脚本 } /** *传入坐标 * @param x * @param y */ public voidonActionDown( intx, inty){ mScript.set_gTouchX(x); mScript.set_gTouchY(y); } } 目前我们所做的一切都是要使用到的RenderScriptGL(RenderScript 图形的衍生),实例化RenderScriptGL并绑定脚本。如果你的开发ADT高于或者是1.5的话Eclipse 会根据你的rs文件生成ScriptC_你的rs文件为名的java类。如上面代码的ScriptC_helloworld一样,并且在资源目录res/raw生成一个.bc的文件,在实例化ScriptC_hellowold会需要传进去。 下一步,创建RenderScriptView.java,让其可以显示在界面上。 importandroid.content.Context; importandroid.renderscript.RSSurfaceView; importandroid.renderscript.RenderScriptGL; importandroid.renderscript.RenderScriptGL.SurfaceConfig; importandroid.view.MotionEvent; public classRenderScriptView extendsRSSurfaceView{ privateRenderScriptGLmRS; privateRenderScriptRSmRender; publicRenderScriptView(Contextcontext){ super(context); // TODOAuto-generatedconstructorstub initRenderScript(); } /** *初始化RenderScriptRS */ private voidinitRenderScript(){ if(mRS== null){ RenderScriptGL.SurfaceConfigconfig= newSurfaceConfig(); mRS=createRenderScriptGL(config); mRender= newRenderScriptRS(mRS,getResources()); } } @Override protected voidonDetachedFromWindow(){ // Handlethesystemeventandcleanup mRender= null; if(mRS!= null){ mRS= null; destroyRenderScriptGL(); } } @Override protected voidonAttachedToWindow(){ // TODOAuto-generatedmethodstub super.onAttachedToWindow(); initRenderScript(); } @Override public booleanonTouchEvent(MotionEventevent){ // TODOAuto-generatedmethodstub /** *传入点击坐标 */ if(event.getAction()==MotionEvent.ACTION_DOWN){ mRender.onActionDown(( int)event.getX(),( int)event.getY()); return true; } return false; } } RSSurfaceView扩展自SurfaceView,用来显示这些需要渲染的图形界面。 上述代码的initRenderScript方法,如果RenderScriptGL 未实例化,就需要创建一个SurfaceConfig(这是用来控制深度的颜色,深度缓冲区等等,这里使用默认),并且让它实现自身的onTouchEvent事件,传入x,y坐标轴进入RenderScript,改变文本显示的位置(跟随鼠标的点击点变化)。 最后的界面只需要让它显示出来即可: public classRenderScriptHelloWorldActivity extendsActivity{ /** Calledwhentheactivityisfirstcreated. */ @Override public voidonCreate(BundlesavedInstanceState){ super.onCreate(savedInstanceState); setContentView( newRenderScriptView( this)); } } 这一系列的步骤可以用一张图来做说明,详细的规划了RenderScript 的图形概述: 这是一个简单的DEMO,介绍了RenderScript 使用的一些基本步骤,详细的使用后面会慢慢提到。最后通过上面的代码可以看到的运行效果如下: 另外,后文还会提供一些详细的文档和例子。比如: rs_graphics rs_core rs_math rs_time 上面这四个的头文件的API。 代码可以在Android 4.0中找到,RenderScript->Helloworld。 注:模拟器无法运行。 本文转自 terry_龙 51CTO博客,原文链接:http://blog.51cto.com/terryblog/801089,如需转载请自行联系原作者

优秀的个人博客,低调大师

Android基础:shape的基本用法

<?xml version="1.0" encoding="utf-8"?> <shape xmlns:android="http://schemas.android.com/apk/res/android" > <!-- 边角的圆弧半径 --> <corners android:radius="9dp" /> <!-- 实心填充 --> <solid android:color="#00000000" /> <!-- 描边:一般大小都是1dp --> <stroke android:width="1dp" android:color="#ff000000" /> <!-- 四周留出来的空白,和xml文件中的pad效果一样,对内起作用 --> <padding android:bottom="30dp" android:left="20dp" android:right="30dp" android:top="20dp" /> <!-- 背景颜色渐变 --> <gradient android:angle="90" android:endColor="#ff00ff00" android:startColor="#ff0000ff" /> </shape> shape总体说来可以看做是使一张图片,放在drawable目录下,可以单独使用,也可以和selector一起使用,主要用户处理图片的圆角,点击变色的变化。可以单独写comm_shape.xml,press_shape.xml(文件名是随便取的), 然后结合selector使用,如果熟练的话可以直接在selector中直接写,那样看起来文件不是那么多。注意上面的代码中,实心solid和渐变gradient一般不会一起使用。 本文转自demoblog博客园博客,原文链接http://www.cnblogs.com/0616--ataozhijia/archive/2012/10/31/2747284.html如需转载请自行联系原作者 demoblog

资源下载

更多资源
Mario

Mario

马里奥是站在游戏界顶峰的超人气多面角色。马里奥靠吃蘑菇成长,特征是大鼻子、头戴帽子、身穿背带裤,还留着胡子。与他的双胞胎兄弟路易基一起,长年担任任天堂的招牌角色。

腾讯云软件源

腾讯云软件源

为解决软件依赖安装时官方源访问速度慢的问题,腾讯云为一些软件搭建了缓存服务。您可以通过使用腾讯云软件源站来提升依赖包的安装速度。为了方便用户自由搭建服务架构,目前腾讯云软件源站支持公网访问和内网访问。

Spring

Spring

Spring框架(Spring Framework)是由Rod Johnson于2002年提出的开源Java企业级应用框架,旨在通过使用JavaBean替代传统EJB实现方式降低企业级编程开发的复杂性。该框架基于简单性、可测试性和松耦合性设计理念,提供核心容器、应用上下文、数据访问集成等模块,支持整合Hibernate、Struts等第三方框架,其适用范围不仅限于服务器端开发,绝大多数Java应用均可从中受益。

Rocky Linux

Rocky Linux

Rocky Linux(中文名:洛基)是由Gregory Kurtzer于2020年12月发起的企业级Linux发行版,作为CentOS稳定版停止维护后与RHEL(Red Hat Enterprise Linux)完全兼容的开源替代方案,由社区拥有并管理,支持x86_64、aarch64等架构。其通过重新编译RHEL源代码提供长期稳定性,采用模块化包装和SELinux安全架构,默认包含GNOME桌面环境及XFS文件系统,支持十年生命周期更新。

用户登录
用户注册