首页 文章 精选 留言 我的

精选列表

搜索[本地部署],共10000篇文章
优秀的个人博客,低调大师

Postgresql服务部署

PostgreSQL 是一种非常复杂的对象-关系型数据库管理系统(ORDBMS),也是目前功能最强大,特性最丰富和最复杂的自由软件数据库系统。os:centos6.5 x64 ip:192.168.85.130 hostname: vm2.lansgg.com pg 版本:postgresql-9.2.4.tar.bz2 一、yum安装二、源码安装 三、系统数据库 1、yum安装 [root@vm2~]#wget [root@vm2~]#rpm-vhipgdg-redhat92-9.2-8.noarch.rpm [root@vm2~]#yuminstallpostgresql92-serverpostgresql92-contrib-y 1.2、初始化并启动数据库 [root@vm2~]#/etc/init.d/postgresql-9.2initdb 正在初始化数据库:[确定] [root@vm2~]#/etc/init.d/postgresql-9.2start 启动postgresql-9.2服务:[确定] [root@vm2~]#echo"PATH=/usr/pgsql-9.2/bin:$PATH">>/etc/profile [root@vm2~]#echo"exportPATH">>/etc/profile 1.3、测试 [root@vm2~]#su-postgres -bash-4.1$psql psql(9.2.19) 输入"help"来获取帮助信息. postgres=#\l 资料库列表 名称|拥有者|字元编码|校对规则|Ctype|存取权限 -----------+----------+----------+-------------+-------------+----------------------- postgres|postgres|UTF8|zh_CN.UTF-8|zh_CN.UTF-8| template0|postgres|UTF8|zh_CN.UTF-8|zh_CN.UTF-8|=c/postgres+ |||||postgres=CTc/postgres template1|postgres|UTF8|zh_CN.UTF-8|zh_CN.UTF-8|=c/postgres+ |||||postgres=CTc/postgres (3行记录) postgres=# 1.4、修改管理员密码 修改PostgreSQL 数据库用户postgres的密码(注意不是linux系统帐号)PostgreSQL 数据库默认会创建一个postgres的数据库用户作为数据库的管理员,默认密码为空,我们需要修改为指定的密码,这里设定为’postgres’。 postgres=#select*frompg_shadow; usename|usesysid|usecreatedb|usesuper|usecatupd|userepl|passwd|valuntil|useconfig ----------+----------+-------------+----------+-----------+---------+--------+----------+----------- postgres|10|t|t|t|t||| (1行记录) postgres=#ALTERUSERpostgresWITHPASSWORD'postgres'; ALTERROLE postgres=#select*frompg_shadow; usename|usesysid|usecreatedb|usesuper|usecatupd|userepl|passwd|valuntil|useconfig ----------+----------+-------------+----------+-----------+---------+-------------------------------------+----------+----------- postgres|10|t|t|t|t|md53175bce1d3201d16594cebf9d7eb3f9d|| (1行记录) postgres=# 1.5、创建测试数据库 postgres=#createdatabasetestdb; CREATEDATABASE postgres=#\ctestdb; 您现在已经连线到数据库"testdb",用户"postgres". testdb=# 1.6、创建测试表 testdb=#createtabletest(idinteger,nametext); CREATETABLE testdb=#insertintotestvalues(1,'lansgg'); INSERT01 testdb=#select*fromtest; id|name ----+-------- 1|lansgg (1行记录) 1.7、查看表结构 testdb=#\dtest; 资料表"public.test" 栏位|型别|修饰词 ------+---------+-------- id|integer| name|text| 1.8、修改PostgresSQL 数据库配置实现远程访问 修改postgresql.conf 文件 如果想让PostgreSQL 监听整个网络的话,将listen_addresses 前的#去掉,并将 listen_addresses = 'localhost' 改成 listen_addresses = '*'修改客户端认证配置文件pg_hba.conf [root@vm2~]#vim/var/lib/pgsql/9.2/data/pg_hba.conf hostallall127.0.0.1/32ident hostallallallmd5 [root@vm2~]#/etc/init.d/postgresql-9.2restart 停止postgresql-9.2服务:[确定] 启动postgresql-9.2服务:[确定] [root@vm2~]# 2、源码安装 停止上面yum安装的pgsql服务,下载PostgreSQL 源码包 [root@vm2~]#/etc/init.d/postgresql-9.2stop 停止postgresql-9.2服务:[确定] [root@vm2~]#wget [root@vm2~]#tarjxvfpostgresql-9.2.4.tar.bz2 [root@vm2~]#cdpostgresql-9.2.4 查看INSTALL 文件more INSTALLINSTALL 文件中Short Version 部分解释了如何安装PostgreSQL 的命令,Requirements 部分描述了安装PostgreSQL 所依赖的lib,比较长,先configure 试一下,如果出现error,那么需要检查是否满足了Requirements 的要求。开始编译安装PostgreSQL 数据库。 [root@vm2postgresql-9.2.4]#./configure [root@vm2postgresql-9.2.4]#gmake [root@vm2postgresql-9.2.4]#gmakeinstall [root@vm2postgresql-9.2.4]#echo"PGHOME=/usr/local/pgsql">>/etc/profile [root@vm2postgresql-9.2.4]#echo"exportPGHOME">>/etc/profile [root@vm2postgresql-9.2.4]#echo"PGDATA=/usr/local/pgsql/data">>/etc/profile [root@vm2postgresql-9.2.4]#echo"exportPGDATA">>/etc/profile [root@vm2postgresql-9.2.4]#echo"PATH=$PGHOME/bin:$PATH">>/etc/profile [root@vm2postgresql-9.2.4]#echo"exportPATH">>/etc/profile [root@vm2postgresql-9.2.4]#source/etc/profile [root@vm2postgresql-9.2.4]# 2.2、初始化数据库 useradd-d/opt/postgrespostgres######如果没有此账户就创建,前面yum安装的时候已经替我们创建了 [root@vm2postgresql-9.2.4]#mkdir/usr/local/pgsql/data [root@vm2postgresql-9.2.4]#chownpostgres.postgres/usr/local/pgsql/data/ [root@vm2postgresql-9.2.4]#su-postgres -bash-4.1$/usr/local/pgsql/bin/initdb-D/usr/local/pgsql/data/ Thefilesbelongingtothisdatabasesystemwillbeownedbyuser"postgres". Thisusermustalsoowntheserverprocess. Thedatabaseclusterwillbeinitializedwithlocale"zh_CN.UTF-8". Thedefaultdatabaseencodinghasaccordinglybeensetto"UTF8". initdb:couldnotfindsuitabletextsearchconfigurationforlocale"zh_CN.UTF-8" Thedefaulttextsearchconfigurationwillbesetto"simple". fixingpermissionsonexistingdirectory/usr/local/pgsql/data...ok creatingsubdirectories...ok selectingdefaultmax_connections...100 selectingdefaultshared_buffers...32MB creatingconfigurationfiles...ok creatingtemplate1databasein/usr/local/pgsql/data/base/1...ok initializingpg_authid...ok initializingdependencies...ok creatingsystemviews...ok loadingsystemobjects'descriptions...ok creatingcollations...ok creatingconversions...ok creatingdictionaries...ok settingprivilegesonbuilt-inobjects...ok creatinginformationschema...ok loadingPL/pgSQLserver-sidelanguage...ok vacuumingdatabasetemplate1...ok copyingtemplate1totemplate0...ok copyingtemplate1topostgres...ok WARNING:enabling"trust"authenticationforlocalconnections Youcanchangethisbyeditingpg_hba.conforusingtheoption-A,or --auth-localand--auth-host,thenexttimeyouruninitdb. Success.Youcannowstartthedatabaseserverusing: /usr/local/pgsql/bin/postgres-D/usr/local/pgsql/data or /usr/local/pgsql/bin/pg_ctl-D/usr/local/pgsql/data-llogfilestart -bash-4.1$ 1.3、添加到系统服务 -bash-4.1$exit logout [root@vm2postgresql-9.2.4]#cp/root/postgresql-9.2.4/contrib/start-scripts/linux/etc/init.d/postgresql [root@vm2postgresql-9.2.4]#chmod+x/etc/init.d/postgresql [root@vm2postgresql-9.2.4]#/etc/init.d/postgresqlstart StartingPostgreSQL:ok [root@vm2postgresql-9.2.4]#chkconfig--addpostgresql [root@vm2postgresql-9.2.4]#chkconfigpostgresqlon [root@vm2postgresql-9.2.4]# 1.4、测试使用 [root@vm2postgresql-9.2.4]#su-postgres -bash-4.1$psql-l Listofdatabases Name|Owner|Encoding|Collate|Ctype|Accessprivileges -----------+----------+----------+-------------+-------------+----------------------- postgres|postgres|UTF8|zh_CN.UTF-8|zh_CN.UTF-8| template0|postgres|UTF8|zh_CN.UTF-8|zh_CN.UTF-8|=c/postgres+ |||||postgres=CTc/postgres template1|postgres|UTF8|zh_CN.UTF-8|zh_CN.UTF-8|=c/postgres+ |||||postgres=CTc/postgres (3rows) -bash-4.1$psql psql(9.2.4) Type"help"forhelp. postgres=#createdatabasetestdb; CREATEDATABASE postgres=#\ctestdb; Youarenowconnectedtodatabase"testdb"asuser"postgres". testdb=#createtabletest(idint,nametext,ageint); CREATETABLE testdb=#\dtest Table"public.test" Column|Type|Modifiers --------+---------+----------- id|integer| name|text| age|integer| testdb=#insertintotestvalues(1,'lansgg',25); INSERT01 testdb=#select*fromtest; id|name|age ----+--------+----- 1|lansgg|25 (1row) testdb=# 3、系统数据库 在创建数据集簇之后,该集簇中默认包含三个系统数据库template1、template0和postgres。其中template0和postgres都是在初始化过程中从template1拷贝而来的。 template1和template0数据库用于创建数据库。PostgreSQL中采用从模板数据库复制的方式来创建新的数据库,在创建数据库的命令中可以用“-T”选项来指定以哪个数据库为模板来创建新数据库。 template1数据库是创建数据库命令默认的模板,也就是说通过不带“-T”选项的命令创建的用户数据库是和template1一模一样的。template1是可以修改的,如果对template1进行了修改,那么在修改之后创建的用户数据库中也能体现出这些修改的结果。template1的存在允许用户可以制作一个自定义的模板数据库,在其中用户可以创建一些应用需要的表、数据、索引等,在日后需要多次创建相同内容的数据库时,都可以用template1作为模板生成。 由于template1的内容有可能被用户修改,因此为了满足用户创建一个“干净”数据库的需求,PostgreSQL提供了template0数据库作为最初始的备份数据,当需要时可以用template0作为模板生成“干净”的数据库。 而第三个初始数据库postgres用于给初始用户提供一个可连接的数据库,就像Linux系统中一个用户的主目录一样。 上述系统数据库都是可以删除的,但是两个模板数据库在删除之前必须将其在pg_database中元组的datistemplate属性改为FALSE,否则删除时会提示“不能删除一个模板数据库”

优秀的个人博客,低调大师

Hive的安装部署

1.环境准备 1.1软件版本 hive-0.14 下载地址 2.配置 安装hive的前提,必需安装好hadoop环境,可以参考我之前Hadoop社区版搭建,先搭建好hadoop环境;接下来我们开始配置hive 2.1环境变量 sudo vi /etc/profile HIVE_HOME=/home/hadoop/source/hive-0.14.0 PATH=$HIVE_HOME/bin export HIVE_HOME 2.2hive-site.xml <configuration> <property> <name>datanucleus.fixedDatastore</name> <value>false</value> </property> <property> <name>hive.metastore.execute.setugi</name> <value>true</value> </property> <property> <name>hive.metastore.warehouse.dir</name> <value>/home/hive/warehouse</value> <description>location of default database for the warehouse</description> </property> <!-- metadata database connection configuration --> <property> <name>javax.jdo.option.ConnectionURL</name> <value>jdbc:mysql://10.211.55.18:3306/hive?useUnicode=true&characterEncoding=UTF-8&createDatabaseIfNotExist=true</value> <description>JDBC connect string for a JDBC metastore</description> </property> <property> <name>javax.jdo.option.ConnectionDriverName</name> <value>com.mysql.jdbc.Driver</value> <description>Driver class name for a JDBC metastore</description> </property> <property> <name>javax.jdo.option.ConnectionUserName</name> <value>root</value> <description>username to use against metastore database</description> </property> <property> <name>javax.jdo.option.ConnectionPassword</name> <value>root</value> <description>password to use against metastore database</description> </property> <property> <name>hive.hwi.listen.host</name> <value>10.211.55.18</value> <description>This is the host address the Hive Web Interface will listen on</description> </property> <property> <name>hive.hwi.listen.port</name> <value>9999</value> <description>This is the port the Hive Web Interface will listen on</description> </property> <!-- configure hwi war package location --> <!-- <property> <name>hive.hwi.war.file</name> <value>lib/hive-hwi-0.14.0.war</value> <description>This is the WAR file with the jsp content for Hive Web Interface</description> </property> --> </configuration> 2.3hive-env.sh # Set HADOOP_HOME to point to a specific hadoop install directory HADOOP_HOME=/home/hadoop/source/hadoop-2.5.1 2.4启动 [hadoop@cloud001 ~]$ hive Logging initialized using configuration in file:/home/hadoop/source/hive-0.14.0/conf/hive-log4j.properties SLF4J: Class path contains multiple SLF4J bindings. SLF4J: Found binding in [jar:file:/home/hadoop/source/hadoop-2.5.1/share/hadoop/common/lib/slf4j-log4j12-1.7.5.jar!/org/slf4j/impl/StaticLoggerBinder.class] SLF4J: Found binding in [jar:file:/home/hadoop/source/hive-0.14.0/lib/hive-jdbc-0.14.0-standalone.jar!/org/slf4j/impl/StaticLoggerBinder.class] SLF4J: See http://www.slf4j.org/codes.html#multiple_bindings for an explanation. SLF4J: Actual binding is of type [org.slf4j.impl.Log4jLoggerFactory] hive> 至此,hive配置完成。 注:由于配置的是mysql驱动,所以需要把mysql的驱动包放到$HIVE_HOME/lib下

优秀的个人博客,低调大师

【监控】ganglia 安装部署

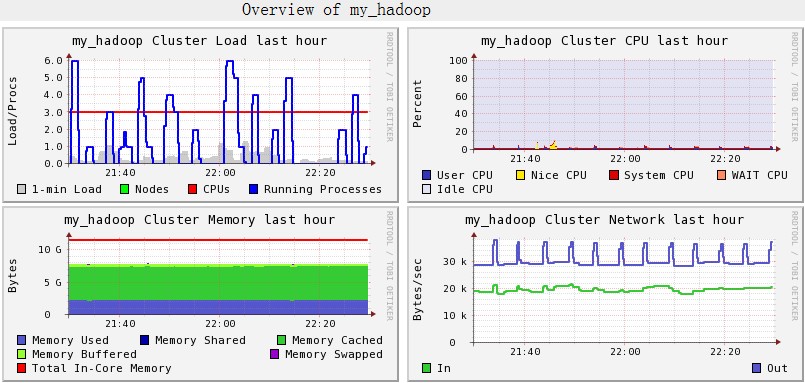
Ganglia 是 UC Berkeley 发起的一个开源监视项目,设计用于测量数以千计的节点。每台计算机都运行一个收集和发送度量数据(如处理器速度、内存使用量等)的名为 gmond 的守护进程。它将从操作系统和指定主机中收集。接收所有度量数据的主机可以显示这些数据并且可以将这些数据的精简表单传递到层次结构中。正因为有这种层次结构模式,才使得 Ganglia 可以实现良好的扩展。gmond 带来的系统负载非常少,这使得它成为在集群中各台计算机上运行的一段代码,而不会影响用户性能。 ganglia的架构为层次架构,安装的过程主要是主节点和从节点的安装 1 ganglia 主节点上安装步骤 1.1 安装php和apache 默认是安装的! [root@rac1 ~]#yum install httpd php 1.2 安装必要的库, [root@rac1 ~]#yum -y install apr-devel apr-util check-devel cairo-devel pango-devel libxml2-devel glib2-devel dbus-devel freetype-devel fontconfig-devel gcc-c++ expat-devel python--devel libXrender-devel zlib libpng freetype libjpeg fontconfig gd libxml2 pcre pcre-devel [root@rac1 ~]#yum -y install libconfuse libconfuse-devel.x86_64 # 安装confuse库 [root@rac1 ~]#yum install rrdtool 1.3 安装rrdtiool库 [root@rac1 ~]# wget http://oss.oetiker.ch/rrdtool/pub/rrdtool.tar.gz [root@rac1 ~]# tar zxvf rrdtool.tar.gz [root@rac1 ~]# cd rrdtool-1.4.5 [root@rac1 ~]# ./configure --prefix=/usr && make -j8 && make install [root@rac1 ~]# which rrdtool [root@rac1 ~]# ldconfig 1.4 开始正式安装ganglia [root@rac1 ~]# wget http://cdnetworks-kr-1.dl.sourceforge.net/project/ganglia/ganglia%20monitoring%20core/3.1.7/ganglia-3.1.7.tar.gz [root@rac1 ~]# tar zxvf ganglia-3.1.7.tar.gz [root@rac1 ~]# cd ganglia-3.1.7 [root@rac1 ~]# ./configure --with-gmetad --sysconfdir=/etc/ganglia && make -j8 && make install # 在主节点上需要编译安装gmetad进程,这个是和从节点安装的主要不同点 [root@rac1 ~]# cp -rp ./web /var/www/html/ganglia [root@rac1 ~]# cp ./gmetad/gmetad.init /etc/init.d/gmetad [root@rac1 ~]# cp ./gmond/gmond.init /etc/init.d/gmond [root@rac1 ~]# gmond -t |tee /etc/ganglia/gmond.conf # generate initial gmond config 1.5 为rrds创建存放图片文件的目录以及进行配置 [root@rac1 ~]# mkdir -p /u01/ganglia/rrds [root@rac1 ~]# chown -R nobody:nobody /u01/ganglia [root@rac1 ~]# vi /var/www/html/ganglia/conf.php# 修改以下内容,指定rrds存放位置 # Where gmetad stores the rrd archives. $gmetad_root = "/u01/ganglia"; $rrds = "$gmetad_root/rrds"; 1.6 对gmond gmetad 以及apache进行配置 [root@rac1 ~]# vi /etc/ganglia/gmetad.conf # 修改将data source后面的字符串换成你的集群名字,例如my cluster 将rrd_rootdir "/u01/ganglia/rrds"加入最后一行 [root@rac1 ~]# vi /etc/ganglia/gmond.conf # 修改将cluster中的name后换成你的集群名字,例如my cluster,记得一定要和gmetad.conf中data source的集群名字一样, # 另外,为了将ganglia监控集群的传播消息方式由广播改为单博,需要注释掉和默认的广播地址239.2.11.71相关的所有行,将host=主节点ip或是主机名加入udp_send_channel所在的配置组中。对于单播和多播的区别,建议查看ganglia的手册 vi /etc/httpd/conf.d/php.conf# 去掉最后一行的井号,使得apache可以解析php脚本 1.7 启动gmond gmetad 以及apache [root@rac1 ~]# /etc/init.d/gmetad start #start service [root@rac1 ~]# /etc/init.d/gmond start service httpd start [root@rac1 ~]# 主节点上这三个进程成功启动后,可以使用浏览器通过 :主机的ip/ganglia 这样URL来访问,会发现集群中有一个主机被监控 ganglia 2 从节点上安装步骤 在主机点上,使用pgm远程操作rac[2-3]三台机器,在这三台机器上安装gmond进程,来作为从进程 ganglia 2.1 安装依赖的库 pgmscp -A rac[2-3] ganglia-3.1.7.tar.gz /home/hadoop pgm rac[2-3] "yum -y install apr-devel apr-util check-devel cairo-devel pango-devel libxml2-devel glib2-devel dbus-devel freetype-devel fontconfig-devel gcc-c++ expat-devel python-devel libXrender-devel zlib libpng freetype libjpeg fontconfig gd libxml2 pcre pcre-devel" pgm rac[2-3] "yum -y install libconfuse libconfuse-devel.x86_64 -b test" ganglia 2.2 配置安装ganglia pgmscp rac[2-3] ganglia-3.1.7.tar.gz /home/hadoop pgm rac[2-3] "tar zxvf ganglia-3.1.7.tar.gz" pgm rac[2-3] "cd ganglia-3.1.7 && ./configure --sysconfdir=/etc/ganglia && make -j8 && make install" pgm rac[2-3] "cd ganglia-3.1.7 && cp gmond/gmond.init /etc/init.d/gmond " pgmscp -A rac[2-3] /etc/ganglia/gmond.conf /home/hadoop pgm rac[2-3] "cp /home/hadoop/gmond.conf /etc/ganglia/" # 将本机的gmond.conf复制到远程的ganglia配置目录下,其实也可以采用gmond -t |tee /etc/ganglia/gmond.conf来生成配置文件的,但是,还是需要再配置成和主节点上一样的,不如直接将主节点上的复制过来,一步到位:) ganglia 2.3启动从节点上的gmond进程 pgm rac[2-3] "/etc/init.d/gmond start" # 从节点上gmond进程成功启动后,可以使用浏览器通过 :主机的ip/ganglia 这样URL来访问,会发现集群中多了三个被监控的主机! 结果截图: 1.JPG 2.JPG 3.JPG

优秀的个人博客,低调大师

本地缓存 Caffeine 中的时间轮(TimeWheel)是什么?

我们详细介绍了 Caffeine 缓存添加元素和读取元素的流程,并详细解析了配置固定元素数量驱逐策略的实现原理。在本文中我们将主要介绍 配置元素过期时间策略的实现原理,补全 Caffeine 对元素管理的机制。在创建有过期时间策略的 Caffeine 缓存时,它提供了三种不同的方法,分别为 expireAfterAccess, expireAfterWrite 和 expireAfter,前两者的元素过期机制非常简单:通过遍历队列中的元素(expireAfterAccess 遍历的是窗口区、试用区和保护区队列,expireAfterWrite 有专用的写顺序队列 WriteOrderDeque),并用当前时间减去元素的最后访问时间(或写入时间)的结果值和配置的时间作对比,如果超过配置的时间,则认为元素过期。而 expireAfter 为自定义过期策略,使用到了时间轮 TimeWheel。它的实现相对复杂,在源码中相关的方法都会包含 Variable 命名(变量;可变的),如 expiresVariable。本文以如下源码创建自定义过期策略的缓存来了解 Caffeine 中的 TimeWheel 机制,它创建的缓存类型为 SSA,表示 Key 和 Value 均为强引用且配置了自定义过期策略: public class TestReadSourceCode { @Test public void doReadTimeWheel() { Cache<String, String> cache2 = Caffeine.newBuilder() // .expireAfterAccess(5, TimeUnit.SECONDS) // .expireAfterWrite(5, TimeUnit.SECONDS) .expireAfter(new Expiry<>() { @Override public long expireAfterCreate(Object key, Object value, long currentTime) { // 指定过期时间为 Long.MAX_VALUE 则不会过期 if ("key0".equals(key)) { return Long.MAX_VALUE; } // 设置条目在创建后 5 秒过期 return TimeUnit.SECONDS.toNanos(5); } // 以下两个过期时间指定为默认 duration 不过期 @Override public long expireAfterUpdate(Object key, Object value, long currentTime, @NonNegative long currentDuration) { return currentDuration; } @Override public long expireAfterRead(Object key, Object value, long currentTime, @NonNegative long currentDuration) { return currentDuration; } }) .build(); cache2.put("key2", "value2"); System.out.println(cache2.getIfPresent("key2")); try { Thread.sleep(6000); } catch (InterruptedException e) { e.printStackTrace(); } System.out.println(cache2.getIfPresent("key2")); } } 在前文中我们提到过,Caffeine 中 maintenance 方法负责缓存的维护,包括执行缓存的驱逐,所以我们便以这个方法作为起点去探究时间过期策略的执行: abstract class BoundedLocalCache<K, V> extends BLCHeader.DrainStatusRef implements LocalCache<K, V> { @GuardedBy("evictionLock") void maintenance(@Nullable Runnable task) { setDrainStatusRelease(PROCESSING_TO_IDLE); try { drainReadBuffer(); drainWriteBuffer(); if (task != null) { task.run(); } drainKeyReferences(); drainValueReferences(); // 元素过期策略执行 expireEntries(); evictEntries(); climb(); } finally { if ((drainStatusOpaque() != PROCESSING_TO_IDLE) || !casDrainStatus(PROCESSING_TO_IDLE, IDLE)) { setDrainStatusOpaque(REQUIRED); } } } } 在其中我们能发现 expireEntries 元素过期策略的执行方法,该方法的源码如下所示: abstract class BoundedLocalCache<K, V> extends BLCHeader.DrainStatusRef implements LocalCache<K, V> { @GuardedBy("evictionLock") void expireEntries() { // 获取当前时间 long now = expirationTicker().read(); // 基于访问和写后的过期策略 expireAfterAccessEntries(now); expireAfterWriteEntries(now); // *主要关注*:执行自定义过期策略 expireVariableEntries(now); // Pacer 用于调度和执行定时任务,创建 Caffeine 缓存时可通过 scheduler 方法来配置 // 默认为 null Pacer pacer = pacer(); if (pacer != null) { long delay = getExpirationDelay(now); if (delay == Long.MAX_VALUE) { pacer.cancel(); } else { pacer.schedule(executor, drainBuffersTask, now, delay); } } } } 在自定义的过期策略中,我们便能够发现 TimeWheel 的身影,并调用了它的 TimeWheel#advance 方法: abstract class BoundedLocalCache<K, V> extends BLCHeader.DrainStatusRef implements LocalCache<K, V> { @GuardedBy("evictionLock") void expireVariableEntries(long now) { if (expiresVariable()) { timerWheel().advance(this, now); } } } 在深入 TimeWheel 的源码前,我们先通过源码注释了解下它的作用。TimeWheel 是 Caffeine 缓存中定义的类,它的类注释如下写道: 一个 分层的 时间轮,能够以O(1)的时间复杂度添加、删除和触发过期事件。过期事件的执行被推迟到 maintenance 维护方法中的 TimeWheel#advance 逻辑中。 A hierarchical timer wheel to add, remove, and fire expiration events in amortized O(1) time. The expiration events are deferred until the timer is advanced, which is performed as part of the cache's maintenance cycle. 可见上文中我们看见的 TimeWheel#advance 方法是用来执行元素过期事件的。在这段注释中提到了 分层(hierarchical) 的概念,注释中还有一段内容对这个特性进行了描述: 时间轮将计时器事件存储在循环缓冲区的桶中。Bucket 表示粗略的时间跨度,例如一分钟,并使用一个双向链表来记录事件。时间轮按层次结构(秒、分钟、小时、天)构建,这样当时间轮旋转时,在遥远的未来安排的事件会级联到较低的桶中。它允许在O(1)的时间复杂度下添加、删除和过期事件,在整个 Bucket 中的元素都会发生过期,同时有大部分元素过期的特殊情况由时间轮的轮换分摊。 A timer wheel stores timer events in buckets on a circular buffer. A bucket represents a coarse time span, e.g. one minute, and holds a doubly-linked list of events. The wheels are structured in a hierarchy (seconds, minutes, hours, days) so that events scheduled in the distant future are cascaded to lower buckets when the wheels rotate. This allows for events to be added, removed, and expired in O(1) time, where expiration occurs for the entire bucket, and the penalty of cascading is amortized by the rotations. 大概能够推测,它的“分层”概念指的是根据事件的过期时间将这些事件放在不同的“层”去管理,秒级别的在一层,分钟级别的在一层等等。那么接下来我们根据它的注释内容,详细探究一下 TimeWheel 是如何实现这种机制的。 constructor 我们先来看它的构造方法: final class TimerWheel<K, V> implements Iterable<Node<K, V>> { // 定义了 5 个桶,每个桶的容量分别为 64、64、32、4、1 static final int[] BUCKETS = {64, 64, 32, 4, 1}; final Node<K, V>[][] wheel; TimerWheel() { wheel = new Node[BUCKETS.length][]; for (int i = 0; i < wheel.length; i++) { wheel[i] = new Node[BUCKETS[i]]; for (int j = 0; j < wheel[i].length; j++) { wheel[i][j] = new Sentinel<>(); } } } // 定义 Sentinel 内部类,创建对象表示双向链表的哨兵节点 static final class Sentinel<K, V> extends Node<K, V> { Node<K, V> prev; Node<K, V> next; Sentinel() { prev = next = this; } } } 它会创建如下所示的二维数组,每行都作为一个桶(Bucket),根据 BUCKETS 数组中定义的容量,每行桶的容量分别为 64、64、32、4、1,每个桶中的初始元素是创建 Sentinel 为节点的双向链表,如下所示(其中...表示图中省略了31个桶): 它为什么会创建一个内部类 Sentinel 并将其作为桶中的初始元素呢?在《算法导论》中讲解链表的章节提到过这个方法:双向链表中没有元素时也不为 null,而是创建一个哨兵节点(Sentinel),它不存储任何数据,只是为了方便链表的操作,减少代码中的判空逻辑,而在此处将其命名为 Sentinel,表示采用这个方法,又同时提高了代码的可读性。 schedule 现在它的数据结构我们已经有了基本的了解,那么究竟什么时候会向其中添加元素呢?在前文中我们提到过,向 Caffeine 缓存中 put 元素时会注册 AddTask 任务,任务中有一段逻辑会调用 TimeWheel#schedule 方法向其中添加元素: final class AddTask implements Runnable { @Override @GuardedBy("evictionLock") @SuppressWarnings("FutureReturnValueIgnored") public void run() { // ... if (isAlive) { // ... // 如果自定义时间策略,则执行 schedule 方法 if (expiresVariable()) { // node 为添加的节点 timerWheel().schedule(node); } } // ... } } 我们来看看 schedule 方法,根据的它的入参可以发现上文注释中提到的“过期事件”便是 Node 节点本身: final class TimerWheel<K, V> implements Iterable<Node<K, V>> { static final long[] SPANS = { // 1073741824L 2^30 1.07s ceilingPowerOfTwo(TimeUnit.SECONDS.toNanos(1)), // 68719476736L 2^36 1.14m ceilingPowerOfTwo(TimeUnit.MINUTES.toNanos(1)), // 36028797018963968L 2^45 1.22h ceilingPowerOfTwo(TimeUnit.HOURS.toNanos(1)), // 864691128455135232L 2^50 1.63d ceilingPowerOfTwo(TimeUnit.DAYS.toNanos(1)), // 5629499534213120000L 2^52 6.5d BUCKETS[3] * ceilingPowerOfTwo(TimeUnit.DAYS.toNanos(1)), BUCKETS[3] * ceilingPowerOfTwo(TimeUnit.DAYS.toNanos(1)), }; // Long.numberOfTrailingZeros 表示尾随 0 的数量 static final long[] SHIFT = { // 30 Long.numberOfTrailingZeros(SPANS[0]), // 36 Long.numberOfTrailingZeros(SPANS[1]), // 45 Long.numberOfTrailingZeros(SPANS[2]), // 50 Long.numberOfTrailingZeros(SPANS[3]), // 52 Long.numberOfTrailingZeros(SPANS[4]), }; final Node<K, V>[][] wheel; long nanos; public void schedule(Node<K, V> node) { // 在 wheel 中找到对应的桶,node.getVariableTime() 获取的是元素的“过期时间” Node<K, V> sentinel = findBucket(node.getVariableTime()); // 将该节点添加到桶中 link(sentinel, node); } // 初次添加时,time 为元素的“过期时间” Node<K, V> findBucket(long time) { // 计算 duration 持续时间(有效期) long duration = time - nanos; // length 为 4 int length = wheel.length - 1; for (int i = 0; i < length; i++) { // 注意这里它是将持续时间和 SPANS[i + 1] 作比较,如果小于则认为该节点在这个“层级”中 if (duration < SPANS[i + 1]) { // tick 指钟表的滴答声,用于表示它所在层级的偏移量,举个例子: // 如果 duration < SPANS[1] 表示秒级别的时间跨度,则右移 SHIFT[0] 30 位,SPANS[0] 为 2^30 对应 1.07s,右移 30 位足以将 time 表示为秒级别的时间跨度 long ticks = (time >>> SHIFT[i]); // 2进制数-1 的位与运算计算出节点在该层级的实际索引位置 int index = (int) (ticks & (wheel[i].length - 1)); return wheel[i][index]; } } // 如果遍历完所有层级都没有合适的,那么将其放在最后一层 return wheel[length][0]; } // 双向链表的尾插法添加元素,有了 Sentinel 哨兵节点避免了代码中的判空逻辑 void link(Node<K, V> sentinel, Node<K, V> node) { node.setPreviousInVariableOrder(sentinel.getPreviousInVariableOrder()); node.setNextInVariableOrder(sentinel); sentinel.getPreviousInVariableOrder().setNextInVariableOrder(node); sentinel.setPreviousInVariableOrder(node); } } 其中 node.getVariableTime() 为元素的过期时间,那么这个过期时间是何时计算的呢?在 put 方法中有如下逻辑: abstract class BoundedLocalCache<K, V> extends BLCHeader.DrainStatusRef implements LocalCache<K, V> { @Nullable V put(K key, V value, Expiry<K, V> expiry, boolean onlyIfAbsent) { requireNonNull(key); requireNonNull(value); Node<K, V> node = null; long now = expirationTicker().read(); int newWeight = weigher.weigh(key, value); Object lookupKey = nodeFactory.newLookupKey(key); for (int attempts = 1; ; attempts++) { Node<K, V> prior = data.get(lookupKey); if (prior == null) { if (node == null) { node = nodeFactory.newNode(key, keyReferenceQueue(), value, valueReferenceQueue(), newWeight, now); // 计算过期时间并为 variableTime 赋值 setVariableTime(node, expireAfterCreate(key, value, expiry, now)); } } // ... } // ... } long expireAfterCreate(@Nullable K key, @Nullable V value, Expiry<? super K, ? super V> expiry, long now) { if (expiresVariable() && (key != null) && (value != null)) { // 此处的 expireAfterCreate 便为自定义的有效期 long duration = expiry.expireAfterCreate(key, value, now); // 将定义的有效期在当前操作时间上进行累加得出过期时间 return isAsync ? (now + duration) : (now + Math.min(duration, MAXIMUM_EXPIRY)); } return 0L; } } 可以发现在元素被添加时它的过期时间已经被计算好了。接着回到 findBucket 方法,其中有逻辑 duration < SPANS[i + 1] 确定节点所在时间轮的层级。SPANS 数组中存储的是层级的“时间跨度边界”,如注释中标记的,SPANS[0] 表示第一层级的时间为 1.07s,SPANS[1] 表示第二层级的时间为 1.14m,for 循环开始时便以 SPANS[1] 作为比较,如果 duration 小于 SPANS[1],那么将该节点放在第一层级,那么第一层级的时间范围为 t < 1.14 min,为秒级的时间跨度;第二层级的时间范围为 1.14 min <= t < 1.22 h,为分钟级的时间跨度,接下来的时间跨度以此类推。在这里也明白了为什么 final Node<K, V>[][] wheel 数据结构会将第一行、第二行元素大小设定为 64,因为第一行为秒级别的时间跨度,60s 即为 1min,那么在这个秒级别的跨度下 64 的容量足以,同理,第二行为分钟级别的时间跨度,60min 即为 1h,那么在这个分钟级别的跨度下 64 的容量也足够了。 现在我们已经了解了向 TimeWheel 中添加元素的逻辑,那么现在我们可以回到文章开头提到的 maintenance 方法中调用的 TimeWheel#advance 方法了。 advance advance 有推进、前进的意思,我认为在 TimeWheel 中,advance 用来表示“某个层级的时间有没有流动”会更合适,以下是它的源码: final class TimerWheel<K, V> implements Iterable<Node<K, V>> { static final long[] SHIFT = { Long.numberOfTrailingZeros(SPANS[0]), Long.numberOfTrailingZeros(SPANS[1]), Long.numberOfTrailingZeros(SPANS[2]), Long.numberOfTrailingZeros(SPANS[3]), Long.numberOfTrailingZeros(SPANS[4]), }; long nanos; public void advance(BoundedLocalCache<K, V> cache, long currentTimeNanos) { // nanos 总是记录 advance 方法被调用时的时间 long previousTimeNanos = nanos; nanos = currentTimeNanos; // 校正时间戳的溢出 if ((previousTimeNanos < 0) && (currentTimeNanos > 0)) { previousTimeNanos += Long.MAX_VALUE; currentTimeNanos += Long.MAX_VALUE; } try { // 遍历所有层级,如果当前层级的时间没有流动,则结束循环 // 因为所有的层级是按照时间递增的顺序排列的,如果低层级的时间都没有流动,那么证明更高的层级时间更没有流动了,比如秒级别时间没变,那么分钟级别的时间更不可能变 for (int i = 0; i < SHIFT.length; i++) { long previousTicks = (previousTimeNanos >>> SHIFT[i]); long currentTicks = (currentTimeNanos >>> SHIFT[i]); // 计算出某层级下时间的流动范围 long delta = (currentTicks - previousTicks); if (delta <= 0L) { break; } // 如果当前层级的时间有流动,则调用 expire 方法 expire(cache, i, previousTicks, delta); } } catch (Throwable t) { nanos = previousTimeNanos; throw t; } } } 我们接着看 expire 方法: final class TimerWheel<K, V> implements Iterable<Node<K, V>> { final Node<K, V>[][] wheel; long nanos; void expire(BoundedLocalCache<K, V> cache, int index, long previousTicks, long delta) { Node<K, V>[] timerWheel = wheel[index]; int mask = timerWheel.length - 1; // 计算要遍历处理的槽位数量,假设 delta 不会出现负值(只有时间范围超过 2^61 nanoseconds (73 years) 才会溢出) int steps = Math.min(1 + (int) delta, timerWheel.length); // 上一次 advance 的操作时间即为起始索引 int start = (int) (previousTicks & mask); // 计算结果索引 int end = start + steps; for (int i = start; i < end; i++) { // 拿到桶中的哨兵节点,获取到尾节点和头节点 Node<K, V> sentinel = timerWheel[i & mask]; Node<K, V> prev = sentinel.getPreviousInVariableOrder(); Node<K, V> node = sentinel.getNextInVariableOrder(); // 重置哨兵节点,意味着这个桶中的元素都需要被处理,该层级的时间有流逝,处理但不意味着有元素过期 sentinel.setPreviousInVariableOrder(sentinel); sentinel.setNextInVariableOrder(sentinel); // node != sentinel 表示 node 并不是哨兵节点,证明其中有元素需要被处理 while (node != sentinel) { // 标记 next 节点的引用 Node<K, V> next = node.getNextInVariableOrder(); // 将当前节点从双向链表中断开 node.setPreviousInVariableOrder(null); node.setNextInVariableOrder(null); try { // 先拿元素的过期时间与当前操作时间比较,判断有没有过期,如果过期则会执行 evictEntry 方法,驱逐元素 if (((node.getVariableTime() - nanos) > 0) || !cache.evictEntry(node, RemovalCause.EXPIRED, nanos)) { // 如果没有过期则重新 schedule 节点,因为随着时间的流逝,该节点可能会被重新分配到更低的时间层级中,以便被更好的管理过期时间 schedule(node); } node = next; } catch (Throwable t) { // 处理时发生异常,将节点重新加入到链表中 node.setPreviousInVariableOrder(sentinel.getPreviousInVariableOrder()); node.setNextInVariableOrder(next); sentinel.getPreviousInVariableOrder().setNextInVariableOrder(node); sentinel.setPreviousInVariableOrder(prev); throw t; } } } } } expire 方法并不复杂,本质上是将未过期的节点重新执行 TimeWheel#schedule 方法,将其划分到更精准的时间分层;将过期的节点驱逐,evictEntry 方法在 缓存之美:万文详解 Caffeine 实现原理 中已经介绍过了,这里就不再赘述了。 总结一下 TimeWheel 的流程:只有指定了 expireAfter 时间过期策略的缓存才会使用到时间轮。当元素被添加时,它的过期时间已经被计算好并赋值到 variableTime 字段中,根据当前元素的剩余有效期(variableTime - nanos)划分它在具体的时间轮层级(wheel),随着时间的流逝(advance),它所在的时间轮层级可能会不断变化,可能由小时级别被转移(schedule)到分钟级,当然它也可能过期直接被驱逐(evictEntry)。这样操作按照元素剩余有效期将其划分到更精准的时间层级中,可以更精准的控制元素的过期时间,比如秒级时间没有流逝的话,那么便无需检查分钟级或更高时间跨度级别的元素是否过期。Caffeine 缓存完整的原理图如下: 详细了解需要结合 缓存之美:万文详解 Caffeine 实现原理。


资源下载

更多资源
腾讯云软件源

腾讯云软件源

为解决软件依赖安装时官方源访问速度慢的问题,腾讯云为一些软件搭建了缓存服务。您可以通过使用腾讯云软件源站来提升依赖包的安装速度。为了方便用户自由搭建服务架构,目前腾讯云软件源站支持公网访问和内网访问。

Nacos

Nacos

Nacos /nɑ:kəʊs/ 是 Dynamic Naming and Configuration Service 的首字母简称,一个易于构建 AI Agent 应用的动态服务发现、配置管理和AI智能体管理平台。Nacos 致力于帮助您发现、配置和管理微服务及AI智能体应用。Nacos 提供了一组简单易用的特性集,帮助您快速实现动态服务发现、服务配置、服务元数据、流量管理。Nacos 帮助您更敏捷和容易地构建、交付和管理微服务平台。

Spring

Spring

Spring框架(Spring Framework)是由Rod Johnson于2002年提出的开源Java企业级应用框架,旨在通过使用JavaBean替代传统EJB实现方式降低企业级编程开发的复杂性。该框架基于简单性、可测试性和松耦合性设计理念,提供核心容器、应用上下文、数据访问集成等模块,支持整合Hibernate、Struts等第三方框架,其适用范围不仅限于服务器端开发,绝大多数Java应用均可从中受益。

WebStorm

WebStorm

WebStorm 是jetbrains公司旗下一款JavaScript 开发工具。目前已经被广大中国JS开发者誉为“Web前端开发神器”、“最强大的HTML5编辑器”、“最智能的JavaScript IDE”等。与IntelliJ IDEA同源,继承了IntelliJ IDEA强大的JS部分的功能。

用户登录
用户注册