retrofit网络请求入门(多实例讲解)
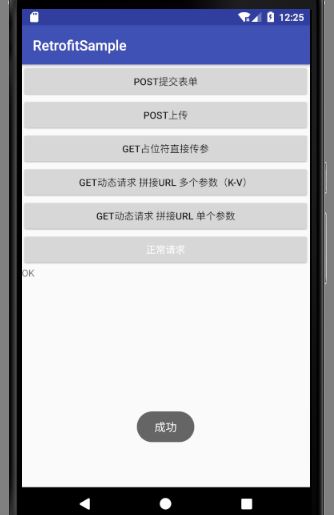
之前就想抽空写一篇关于retrofit的博客,今天终于有空啦= =,话不多说。上博。 一.相关资料: Github:http://github.com/square/retrofit 官网文档:http://square.github.io/retrofit/ 相关博客:Retrofit2.0通俗易懂的学习姿势,Retrofit2.0 + OkHttp3 + Gson + RxJava 这是一份很详细的 Retrofit 2.0 使用教程(含实例讲解) 二.:模拟实现的请求以及retrofit实现步骤 本次主要使用retrofit模拟实现 1.正常get请求 2.拼接get请求(单个参数) 3.拼接get请求(多个参数) 4.get占位符请求 5.post请求 概览.JPG retrofit实现步骤: 步骤1:添加Retrofit库的依赖 步骤2:创建 接收服务器返回数据 的类 步骤3:创建 用于描述网络请求 的接口 步骤4:创建 Retrofit 实例 步骤5:创建 网络请求接口实例 并 配置网络请求参数 步骤6:发送网络请求(异步 / 同步) 步骤7: 处理服务器返回的数据 步骤讲解: 步骤1:添加Retrofit库的依赖 project下的build.gradle: implementation 'com.squareup.okhttp3:okhttp:3.8.1' //retrofit基于okhttp进行网络请求,所以这里添加它的依赖,都是square公司的 implementation 'com.squareup.retrofit2:retrofit:2.1.0' //retrofit2的库 implementation 'com.squareup.retrofit2:converter-gson:2.1.0' //配套的JSON解析库 同时清单的网络权限也不要忘记 AndroidManifest.xml: <uses-permission android:name="android.permission.INTERNET"/> 步骤2:创建 接收服务器返回JSON数据 的类(实体类/VO类的创建) public static class ResultsBean { //服务端返回的数据在前端/客户端对应的实体类 //下面的实例中我们都选择使用GsonFormat插件直接对JSON数据生成实体类 } 步骤3:创建 用于描述网络请求 的接口 public interface GnakApi { @GET("api/data/Android/10/1") Call<GankBean> getAndroidInfo(); //将官方的ResponseBody改成我们自己定的Gson实体类 这样响应请求以后 给回调方法返回的就是实体类了 //之后的实例里,对不同的实例,会使用不同的注解,不同的参数来对应各种不同情况下的请求 } 步骤4:创建 Retrofit 实例 Retrofit retrofit = new Retrofit.Builder() .baseUrl("http://gank.io/")//这里的url要和接口注解中的url拼接起来 http://gank.io/api/data/Android/10/1 .addConverterFactory(GsonConverterFactory.create()) .build(); 步骤5:创建 网络请求接口实例 //创建网络请求接口的实例 GnakApi api = retrofit.create(GnakApi.class); //对发送的请求进行封装 以及对实体类进行指定 Call<GankBean> call = api.getAndroidInfo(); 步骤6:发送网络请求(异步) 这里解释一下,这里不用写子线程是因为retrofit是基于okhttp的网络请求库,而okhttp的call回调中有一个namedrunnable是runnable接口的实现类,所以我们回调方法,即enqueue中的内容是在子线程中执行的。 call.enqueue(new Callback<GankBean>() {//这里回调有子线程 所以可以进行UI操作 @Override public void onResponse(Call<GankBean> call, Response<GankBean> response) { //请求成功时的逻辑 } @Override public void onFailure(Call<GankBean> call, Throwable t) { //请求失败时的逻辑 } }); 步骤7:处理返回数据(我之后的实例都是使用一个textview文本来取出服务器响应并返回的数据) call.enqueue(new Callback<GankBean>() {//这里回调有子线程 所以可以进行UI操作 @Override public void onResponse(Call<GankBean> call, Response<GankBean> response) { //我们对返回的GankBean实体类以及response响应数据进行回调函数编写操作 GankBean.ResultsBean bean = response.body().getResults().get(0); //以上代码将实体类bean与返回数据索引为0的数据对应 mTvResult.setText( "_id:" + bean.get_id() + "\n" + "createdAt:" + bean.getCreatedAt() + "\n" + "desc:" + bean.getDesc() + "\n" + "images:" + bean.getImages() + "\n" + "publishedAt:" + bean.getPublishedAt() + "\n" + "source:" + bean.getSource() + "\n" + "type:" + bean.getType() + "\n" + "url:" + bean.getUrl() + "\n" + "who:" + bean.getWho() + "\n"); } @Override public void onFailure(Call<GankBean> call, Throwable t) { } }); 三.实例讲解 1.正常get请求(http://gank.io/api/data/Android/10/1) 然后这是返回的JSON数据: { "error": false, "results": [ { "_id": "5b21f019421aa92a57e29e96", "createdAt": "2018-06-14T12:33:29.592Z", "desc": "\u53d7Android FAB\u7684\u542f\u53d1\u7684\u52a8\u753b\u9690\u85cf/\u663e\u793a\u89c6\u56fe\u3002", "images": [ "http://img.gank.io/228dcb82-b6cb-40bc-ac14-c2d909105176", "http://img.gank.io/97a2cf03-6aee-41c2-9179-72534d53de33", "http://img.gank.io/c6fc42e8-d13c-4b42-9771-74b7d46d69d9" ], "publishedAt": "2018-06-15T00:00:00.0Z", "source": "chrome", "type": "Android", "url": "https://github.com/3llomi/Hidely", "used": true, "who": "lijinshanmx" } } 步骤1略 步骤2创建 接收服务器返回数据 的类 (使用GsonFormat) GankBean: package com.example.sl.retrofitsample.Gson; import java.util.List; /** Created by sl on 2018/5/15. */ public class GankBean { private boolean error; private List<ResultsBean> results; public boolean isError() { return error; } public void setError(boolean error) { this.error = error; } public List<ResultsBean> getResults() { return results; } public void setResults(List<ResultsBean> results) { this.results = results; } public static class ResultsBean { /** * _id : 5a967b41421aa91071b838f7 * createdAt : 2018-02-28T17:49:53.265Z * desc : MusicLibrary-一个丰富的音频播放SDK * publishedAt : 2018-03-12T08:44:50.326Z * source : web * type : Android * url : https://github.com/lizixian18/MusicLibrary * used : true * who : lizixian * images : ["http://img.gank.io/90db2f35-2e9d-4d75-b5a9-53ee1719b57b"] */ private String _id; private String createdAt; private String desc; private String publishedAt; private String source; private String type; private String url; private boolean used; private String who; private List<String> images; public String get_id() { return _id; } public void set_id(String _id) { this._id = _id; } public String getCreatedAt() { return createdAt; } public void setCreatedAt(String createdAt) { this.createdAt = createdAt; } public String getDesc() { return desc; } public void setDesc(String desc) { this.desc = desc; } public String getPublishedAt() { return publishedAt; } public void setPublishedAt(String publishedAt) { this.publishedAt = publishedAt; } public String getSource() { return source; } public void setSource(String source) { this.source = source; } public String getType() { return type; } public void setType(String type) { this.type = type; } public String getUrl() { return url; } public void setUrl(String url) { this.url = url; } public boolean isUsed() { return used; } public void setUsed(boolean used) { this.used = used; } public String getWho() { return who; } public void setWho(String who) { this.who = who; } public List<String> getImages() { return images; } public void setImages(List<String> images) { this.images = images; } } } 步骤3创建 用于描述网络请求 的接口(一般请求的选择就在这里使用注解体现出来,我们这里使用普通的get请求,不带参数) GankApi: public interface GnakApi { @GET("api/data/Android/10/1") Call<GankBean> getAndroidInfo();//将官方的ResponseBody改成我们自己定的Gson实体类 这样响应请求以后 给回调方法返回的就是实体类了 } 然后我们在MainActivity实现步骤4,5,6,7,并且使用按钮点击事件发送实例请求1,返回的数据使用id名为mTvResult的TextView空间显示 步骤4:创建Retrofit对象 步骤5:创建 网络请求接口 的实例 步骤6:发送网络请求 步骤7:处理返回数据 Retrofit retrofit = new Retrofit.Builder() .baseUrl("http://gank.io/") .addConverterFactory(GsonConverterFactory.create()) .build(); //创建网络请求接口的实例 GnakApi api = retrofit.create(GnakApi.class); //对发送的请求进行封装 以及对实体类进行指定 Call<GankBean> call = api.getAndroidInfo(); call.enqueue(new Callback<GankBean>() {//这里回调有子线程 所以可以进行UI操作 @Override public void onResponse(Call<GankBean> call, Response<GankBean> response) { //我们对返回的GankBean实体类以及response响应数据进行回调函数编写操作 GankBean.ResultsBean bean = response.body().getResults().get(0); //以上代码将实体类bean与返回数据索引为0的数据对应 mTvResult.setText( "_id:" + bean.get_id() + "\n" + "createdAt:" + bean.getCreatedAt() + "\n" + "desc:" + bean.getDesc() + "\n" + "images:" + bean.getImages() + "\n" + "publishedAt:" + bean.getPublishedAt() + "\n" + "source:" + bean.getSource() + "\n" + "type:" + bean.getType() + "\n" + "url:" + bean.getUrl() + "\n" + "who:" + bean.getWho() + "\n"); } @Override public void onFailure(Call<GankBean> call, Throwable t) { } }); 然后我们演示下结果QAQ,就用个动图来显示吧~ 正常get请求.gif 2.拼接get请求(单个参数) 这里我们使用天气请求为例。我们使用查询串拼接http://op.juhe.cn/onebox/weather/query?cityname=深圳&key=XXXX 参数即为KEY 步骤1:添加Retrofit库的依赖 略 步骤2:创建 接收服务器返回数据 的类 WeatherDataBean:(代码过多,我们只看我们用到的) public class WeatherDataBean { private String reason; private ResultBean result; private int error_code; public ResultBean getResult() { return result; } public static class ResultBean { private DataBean data; public DataBean getData() { return data; } public void setData(DataBean data) { this.data = data; } public static class DataBean { private RealtimeBean realtime; private List<WeatherBeanX> weather; public RealtimeBean getRealtime() { return realtime; } public static class RealtimeBean { private WeatherBean weather; public String getTime() { return time; } public void setTime(String time) { this.time = time; } public WeatherBean getWeather() { return weather; } } } 步骤3:创建 用于描述网络请求 的接口 WeatherApi: public interface WeatherApi { @GET("onebox/weather/query?cityname=深圳") Call<WeatherDataBean>getWeather(@Query("key")String key);//拼接查询串 我们这里只带了一个参数 } MainActivity完成以下步骤: 步骤4:创建 Retrofit 实例 步骤5:创建 网络请求接口实例 并 配置网络请求参数 步骤6:发送网络请求(异步 / 同步) 步骤7: 处理服务器返回的数据 Retrofit retrofit1 = new Retrofit.Builder() .baseUrl("http://op.juhe.cn/") .addConverterFactory(GsonConverterFactory.create()) .build(); WeatherApi api1 = retrofit1.create(WeatherApi.class);//创建这次请求的回调接口引用 Call<WeatherDataBean> call1 = api1.getWeather("4ea58de8a7573377cec0046f5e2469d5");//从这里 调用回调函数的时候 拼接url call1.enqueue(new Callback<WeatherDataBean>() { @Override public void onResponse(Call<WeatherDataBean> call, Response<WeatherDataBean> response) { String info = response.body().getResult().getData().getRealtime().getWeather().getInfo(); mTvResult.setText("深圳天气:" + info); } @Override public void onFailure(Call<WeatherDataBean> call, Throwable t) { t.printStackTrace(); } }); 然后看一下我们的结果: 单个参数.gif 3.拼接get请求(多个参数) //http://op.juhe.cn/onebox/weather/query?cityname=深圳&key=您申请的KEY 这里我们将cityname与key都设置为参数,来拼接我们的查询串(K-V方式) 步骤1:添加Retrofit库的依赖 略 步骤2:创建 接收服务器返回数据 的类 (仍旧是WeatherDataBean) 步骤3:创建 用于描述网络请求 的接口 WeatherApi1: public interface WeatherApi1 { @GET("onebox/weather/query?") Call<WeatherDataBean>getWeatherInfo(@QueryMap Map<String,String> params);//K-V键值对的形式 等会可以put多个参数 } MainActivity中完成: 步骤4:创建 Retrofit 实例 步骤5:创建 网络请求接口实例 并 配置网络请求参数 步骤6:发送网络请求(异步 / 同步) 步骤7: 处理服务器返回的数据 Retrofit retrofit3 = new Retrofit.Builder() .baseUrl("http://op.juhe.cn/") .addConverterFactory(GsonConverterFactory.create()) .build(); WeatherApi1 api12 = retrofit3.create(WeatherApi1.class);//将api转换成接口的形式 为了完成我们1发送请求以及2从接口返回数据的任务 Map<String, String> params = new HashMap<>(); params.put("cityname", "深圳");//这里使用K-V形式 params.put("key", "4ea58de8a7573377cec0046f5e2469d5"); Call<WeatherDataBean> call3 = api12.getWeatherInfo(params);//完成URL请求的拼接 call3.enqueue(new Callback<WeatherDataBean>() {//返回的数据回调处理 @Override public void onResponse(Call<WeatherDataBean> call, Response<WeatherDataBean> response) { String info = response.body().getResult().getData().getRealtime().getWeather().getInfo(); mTvResult.setText("深圳天气:" + info); } @Override public void onFailure(Call<WeatherDataBean> call, Throwable t) { } }); 然后我们看看效果: 多个参数.gif 4.get占位符请求 注解为我们提供了一种占位符方式,来拼接我们的url,适用于参数可选的情况http://gank.io/api/data/Android/10/1 其中Android/10/1: Android可接受参数 | Android | iOS | 休息视频 | 福利 | 前端 | App count 最大 50 page 是页数 这里我们使用占位符占位Page 步骤1:添加Retrofit库的依赖 略 步骤2:创建 接收服务器返回数据 的类 (上文的GankBean) 步骤3:创建 用于描述网络请求 的接口 GankApi1: //这里我们使用占位符占位Page public interface GnakApi1 { @GET("api/data/Android/10/{page}") Call<GankBean>getAndroidInfo1(@Path("page")int page);//登记回调函数 } MainActivity中: 步骤4:创建 Retrofit 实例 步骤5:创建 网络请求接口实例 并 配置网络请求参数 步骤6:发送网络请求(异步 / 同步) 步骤7: 处理服务器返回的数据 Retrofit retrofit2 = new Retrofit.Builder() .baseUrl("http://gank.io/") .addConverterFactory(GsonConverterFactory.create()) .build(); GnakApi1 api11 = retrofit2.create(GnakApi1.class);//将api变成我们的java接口 Call<GankBean> call2 = api11.getAndroidInfo1(1);//传入参数 发送请求 //返回数据 将Gson实体类数据与服务器响应的api数据进行关联 在新建的回调中 call2.enqueue(new Callback<GankBean>() { @Override public void onResponse(Call<GankBean> call, Response<GankBean> response) { mTvResult.setText(response.body().getResults().get(0).getDesc()); } @Override public void onFailure(Call<GankBean> call, Throwable t) { t.printStackTrace(); } }); 然后我们看看效果: 占位符.gif 最后我们实现一个简单的post请求吧,别的博客中实现的是英汉互译之类的,我这里就直接对请求成功作一个json数据返回。 5.post请求 我这里使用https://www.mocky.io/创建一个restapi接口,模拟我们对post请求响应的数据。 post请求.JPG post请求1.JPG 然后我们可以看到它给我们生成的一个restful api接口:http://www.mocky.io/v2/5b27a2392e000010009e4497 步骤1:添加Retrofit库的依赖 略 步骤2:创建 接收服务器返回数据 的类 Result: public class Result { /** * result : yes */ private String result; public String getResult() { return result; } public void setResult(String result) { this.result = result; } } 步骤3:创建 用于描述网络请求 的接口 PostApi: public interface PostApi { @POST("v2/5b27a2392e000010009e4497") Call<Result> postUser(@Body User user);//这里我们返回的Result必定是yes 但是上传的User对象 并没有后台处理 } MainActivity: 步骤4:创建 Retrofit 实例 步骤5:创建 网络请求接口实例 并 配置网络请求参数 步骤6:发送网络请求(异步 / 同步) 步骤7: 处理服务器返回的数据 Retrofit retrofit4 = new Retrofit.Builder() .baseUrl("http://www.mocky.io/") .addConverterFactory(GsonConverterFactory.create()) .build(); PostApi api13 = retrofit4.create(PostApi.class); User user = new User(); user.setId(1); user.setName("lgl"); Call<Result> call4 = api13.postUser(user);//这里 我们上传的是user对象,返回的是JSON数据的result 而后用GSON解析 call4.enqueue(new Callback<Result>() { @Override public void onResponse(Call<Result> call, Response<Result> response) { if (response.body().getResult().equals("OK")) { mTvResult.setText(response.body().getResult()); Toast.makeText(MainActivity.this, "成功", Toast.LENGTH_SHORT).show(); } } @Override public void onFailure(Call<Result> call, Throwable t) { } }); 如果成功,那么我们显示一个Toast并且修改TextView内容: post请求.gif 以上就是实例的所有内容。代码地址。我的github:Ricardo-L-Song/retrofitsample 喜欢就给颗小吧~