首页 文章 精选 留言 我的

精选列表

搜索[高并发],共10007篇文章
优秀的个人博客,低调大师

微服务架构的高并发问题

1 准备环境 1.1 准备商品微服务和订单微服务 其中商品微服务的findById()方法设置休眠2秒,用来模拟网络波动等情况: package com.sunxiaping.product.controller; import com.sunxiaping.product.domain.Product; import com.sunxiaping.product.service.ProductService; import org.springframework.beans.factory.annotation.Autowired; import org.springframework.beans.factory.annotation.Value; import org.springframework.web.bind.annotation.*; @RestController @RequestMapping(value = "/product") public class ProductController { @Autowired private ProductService productService; @Value("${server.port}") private String port; @Value("${spring.cloud.client.ip-address}") private String ip; @PostMapping(value = "/save") public String save(@RequestBody Product product) { productService.save(product); return "新增成功"; } @GetMapping(value = "/findById/{id}") public Product findById(@PathVariable(value = "id") Long id) { try { //休眠2秒,用来模拟 网络波动等情况 Thread.sleep(2000); } catch (InterruptedException e) { e.printStackTrace(); } Product product = productService.findById(id); product.setProductName("访问的地址是:" + ip + ":" + port); return product; } } 设置订单微服务的Tomcat的最大线程数是10: server: port: 9002 # 微服务的端口号 tomcat: max-threads: 10 # 最大线程数是10 spring: application: name: service-order # 微服务的名称 datasource: url: jdbc:mysql://192.168.1.57:3306/test?useUnicode=true&characterEncoding=UTF-8&autoReconnect=true&useSSL=false&serverTimezone=GMT%2B8&allowPublicKeyRetrieval=true driver-class-name: com.mysql.cj.jdbc.Driver username: root password: 123456 jpa: generate-ddl: true show-sql: true open-in-view: true database: mysql jmx: unique-names: true # 配置Eureka eureka: instance: # 实例的名称 instance-id: service-order:9002 # 显示IP信息 prefer-ip-address: true lease-renewal-interval-in-seconds: 5 # 发送心跳续约间隔(默认30秒) lease-expiration-duration-in-seconds: 10 # Eureka Client发送心跳给Eureka Server端后,续约到期时间(默认90秒) client: healthcheck: enabled: true service-url: # Eureka Server的地址 # defaultZone: http://localhost:9000/eureka/ defaultZone: http://eureka7001.com:7001/eureka/,http://eureka7002.com:7002/eureka/ # Ribbon的重试机制 service-product: ribbon: # 修改ribbon的负载均衡策略 服务名 - ribbon - NFLoadBalancerRuleClassName :负载均衡策略 # NFLoadBalancerRuleClassName: com.netflix.loadbalancer.RandomRule # 修改ribbon的负载均衡策略为权重策略 # Ribbon的重试机制参数 ConnectTimeout: 250 # Ribbon的连接超时时间 ReadTimeout: 1000 # Ribbon的数据读取超时时间 OkToRetryOnAllOperations: true # 是否对所有操作都进行重试 MaxAutoRetriesNextServer: 50 # 切换实例的重试次数 MaxAutoRetries: 1 # 对当前实例的重试次数 # 微服务info内容详细信息 info: app.name: xxx company.name: xxx build.artifactId: $project.artifactId$ build.version: $project.version$ # 开启日志debug logging: level: root: info 订单微服务中的SpringConfig.java package com.sunxiaping.order.config; import org.springframework.context.annotation.Bean; import org.springframework.context.annotation.Configuration; import org.springframework.web.client.RestTemplate; @Configuration public class SpringConfig { @Bean // @LoadBalanced public RestTemplate restTemplate() { return new RestTemplate(); } } 订单微服务的OrderController.java package com.sunxiaping.order.controller; import com.sunxiaping.order.domain.Product; import org.springframework.beans.factory.annotation.Autowired; import org.springframework.web.bind.annotation.GetMapping; import org.springframework.web.bind.annotation.PathVariable; import org.springframework.web.bind.annotation.RequestMapping; import org.springframework.web.bind.annotation.RestController; import org.springframework.web.client.RestTemplate; @RestController @RequestMapping(value = "/order") public class OrderController { @Autowired private RestTemplate restTemplate; /** * @param id * @return */ @GetMapping(value = "/buy/{id}") public Product buy(@PathVariable(value = "id") Long id) { Product product = restTemplate.getForObject("http://localhost:9001/product/findById/" + id, Product.class); return product; } @GetMapping(value = "/findOrder") public String findOrder() { return "商品查询到了"; } } 2 使用Jmeter测试接口 使用JMeter性能测试工具以50个线程每个线程循环50次测试:http://localhost:9002/order/buy/1接口,然后通过浏览器调用http://localhost:9002/order/findOrder接口,发现特别慢。 3 系统负载过高存在的问题 3.1 问题分析 在微服务架构中,我们将业务拆成一个个的服务,服务和服务之间可以相互调用,由于网络原因或者自身的原因,服务并不能保证100%可用,如果单个服务出现问题,调用这个服务就会出现网络延迟,此时如果有大量的网络请求涌入,会形成任务累计,导致服务瘫痪。 换句话说,Tomcat等容器会以线程池的方式对所有的请求进行统一的管理,如果某个方法可能存着耗时问题,随着外面积压的请求越来越多,势必会造成系统的崩溃、瘫痪等。 为了不影响其他接口的正常访问:对多个服务之间进行隔离。 服务隔离的方式: :one:线程池隔离。 :two:信号量隔离(计数器,就是对某个方法进行设置阈值,如果超过了阈值,直接报错)。 4 线程池隔离的方式处理积压问题 4.1 在订单微服务中引入相关jar包的Maven坐标 <dependency> <groupId>com.netflix.hystrix</groupId> <artifactId>hystrix-metrics-event-stream</artifactId> <version>1.5.12</version> </dependency> <dependency> <groupId>com.netflix.hystrix</groupId> <artifactId>hystrix-javanica</artifactId> <version>1.5.12</version> </dependency> 4.2 配置线程池 配置HystrixCommand接口的实现类,在实现类中可以对线程池进行配置: package com.sunxiaping.order.command; import com.netflix.hystrix.*; import com.sunxiaping.order.domain.Product; import org.springframework.web.client.RestTemplate; public class OrderCommand extends HystrixCommand<Product> { private RestTemplate restTemplate; private Long id; public OrderCommand(RestTemplate restTemplate, Long id) { super(setter()); this.restTemplate = restTemplate; this.id = id; } private static Setter setter() { // 服务分组 HystrixCommandGroupKey groupKey = HystrixCommandGroupKey.Factory.asKey("order_product"); // 服务标识 HystrixCommandKey commandKey = HystrixCommandKey.Factory.asKey("product"); // 线程池名称 HystrixThreadPoolKey threadPoolKey = HystrixThreadPoolKey.Factory.asKey("order_product_pool"); /** * 线程池配置 * withCoreSize : 线程池大小为10 * withKeepAliveTimeMinutes: 线程存活时间15秒 * withQueueSizeRejectionThreshold :队列等待的阈值为100,超过100执行拒绝策略 */ HystrixThreadPoolProperties.Setter threadPoolProperties = HystrixThreadPoolProperties.Setter().withCoreSize(50) .withKeepAliveTimeMinutes(15).withQueueSizeRejectionThreshold(100); // 命令属性配置Hystrix 开启超时 HystrixCommandProperties.Setter commandProperties = HystrixCommandProperties.Setter() // 采用线程池方式实现服务隔离 .withExecutionIsolationStrategy(HystrixCommandProperties.ExecutionIsolationStrategy.THREAD) // 禁止 .withExecutionTimeoutEnabled(false); return Setter.withGroupKey(groupKey).andCommandKey(commandKey).andThreadPoolKey(threadPoolKey) .andThreadPoolPropertiesDefaults(threadPoolProperties).andCommandPropertiesDefaults(commandProperties); } @Override protected Product run() throws Exception { System.out.println(Thread.currentThread().getName()); return restTemplate.getForObject("http://localhost:9001/product/findById/" + id, Product.class); } /** * 服务降级 * * @return */ @Override protected Product getFallback() { Product product = new Product(); product.setProductName("不好意思,出错了"); return product; } } 4.3 修改Controller package com.sunxiaping.order.controller; import com.sunxiaping.order.command.OrderCommand; import com.sunxiaping.order.domain.Product; import org.springframework.beans.factory.annotation.Autowired; import org.springframework.web.bind.annotation.GetMapping; import org.springframework.web.bind.annotation.PathVariable; import org.springframework.web.bind.annotation.RequestMapping; import org.springframework.web.bind.annotation.RestController; import org.springframework.web.client.RestTemplate; @RestController @RequestMapping(value = "/order") public class OrderController { @Autowired private RestTemplate restTemplate; /** * 使用OrderCommand调用远程远程服务 * * @param id * @return */ @GetMapping(value = "/buy/{id}") public Product buy(@PathVariable(value = "id") Long id) { return new OrderCommand(restTemplate, id).execute(); } @GetMapping(value = "/findOrder") public String findOrder() { System.out.println(Thread.currentThread().getName()); return "商品查询到了"; } }

优秀的个人博客,低调大师

java高并发之CountDownLatch,CyclicBarrier和join

晚上打车回家,在车上看到一篇文章《22岁大学生获谷歌天价Offer,年薪千万!》,讲的是印度一个22岁大学生多次参加ACM大赛,开源多个项目,以非常牛逼的履历通过了谷歌的AI测试,斩获谷歌仅有的50个顶尖offer之一。于是感慨:同样是大学生,为何这哥们就这么一枝独秀呢?难道印度也有陈独秀?为啥自己都12年义务教育+4年大学教育+3年烟酒僧教育了,连人家个零头都挣不了啊?真恨不得在地上挖个洞钻进去。不行,今晚必须输出篇博客安慰下被打击的心!想到这里顿时酒也醒了(老大走了,今晚几个同事送他,喝了点酒),心也不再那么伤感了,决定把今天get的一些知识点做个梳理,知识是一点点积累起来的,比你牛逼的人比你还努力,你还有什么资格不努力? 早上看了下CountDownLatch和CyclicBarrier的用法和区别,讲到CountDownLatch又想到了Thread.join()方法,就来讲讲这3兄弟的功能,特点&&用法,讲的不对的地方欢迎指正。 一、CountDownLatch: 功能:同步辅助类,也可以理解为倒计时锁,用于同步线程状态,允许一个或多个线程,等待其他一组线程完成操作,再继续往下执行。 特点:不可复用! 重要方法:countDown()方法:计数器-1,每次线程执行完后调用;await()方法:等待方法,在需要阻塞的地方调用,当所有线程都执行完后,自动往下执行 用法:构造的时候指定一个计数器的值,每个线程执行完后就减1,直到为0再往下走。如下: 输出结果: 可以看到:2个子线程分别睡眠了3s和5s,而主线的打印的“所有现场执行完毕”却是在所有子线程执行完成后才输出的,原因就是阻塞在了latch.await()方法,这个方法会等到所有线程都执行完才往下执行,阻塞的原理后面有空再研究分析 二、CyclicBarrier(循环栅栏): 功能:同步辅助类,功能和CountDownLatch类似,用于同步线程状态,允许一组线程相互之间等待,达到一个共同点,再继续执行。 特点:可复用!当组内所有线程都到达某个执行点后,count参数会被重置,于是就可重用了。 重要方法:await()方法:当某个线程到达某个点(比如执行完某个任务)后调用该方法,就会等待其他线程,直到所有线程都到达这个点,再自动往下执行。还有个重载方法await(long timeOut,TimeUnit unit),用于当某个线程执行超过指定时间后还未到达某个点时,就会抛出异常,不再等待这个线程,并往下执行。 用法:构造的时候指定一个线程数量的值和到达某个点后执行的动作,如下: 执行结果如下: 可以看到:当前线程先于2个子线程打印执行结果,原因就是CyclicBarrier针对的是一组线程之间的等待,await方法会等待该组内所有线程都执行完毕再往下执行,Runnable接口里定义的动作是在所有线程执行完毕后,随机选择一个线程来执行 三、join()方法: join方法也是管理线程状态同步的一个方法,和CountDownLatch和CyclicBarrier均由自身调用不同的是,join的调用者为当前线程,后面的线程必须等调用join的线程执行完后才能执行。参考例子如下: 执行结果: 结果分析:新创建了2个线程,每个线程的执行功能和时间是一样的,由于调用了join,主线程确实是在调用join的2个线程执行后才开始执行的 3者区别: 1、CountDownLatch不可复用,当计数器减为0后,只能重新构造新的计数器,CyclicBarrier可以复用,原因上面已说。 2、CyclicBarrier针对的是一组线程之间的等待,是组内等待关系,CountDownLatch针对的是一个线程等待别的一组线程的关系,是组间等待关系。 3、join方法和CountDownLatch方法功能类似,但是join方法不如CountdownLatch控制灵活,可以参考:https://blog.csdn.net/zhutulang/article/details/48504487。 本来还想讲讲volatile关键字的原理和特性,以及activeMQ中quene,topic和virtualTop之间的区别和用法的,以及mysql索引结构的实现原理的,时间不够了,明早还要去申请廉租房得早起,下次再讲吧。

优秀的个人博客,低调大师

Java高并发秒杀Api-web 层

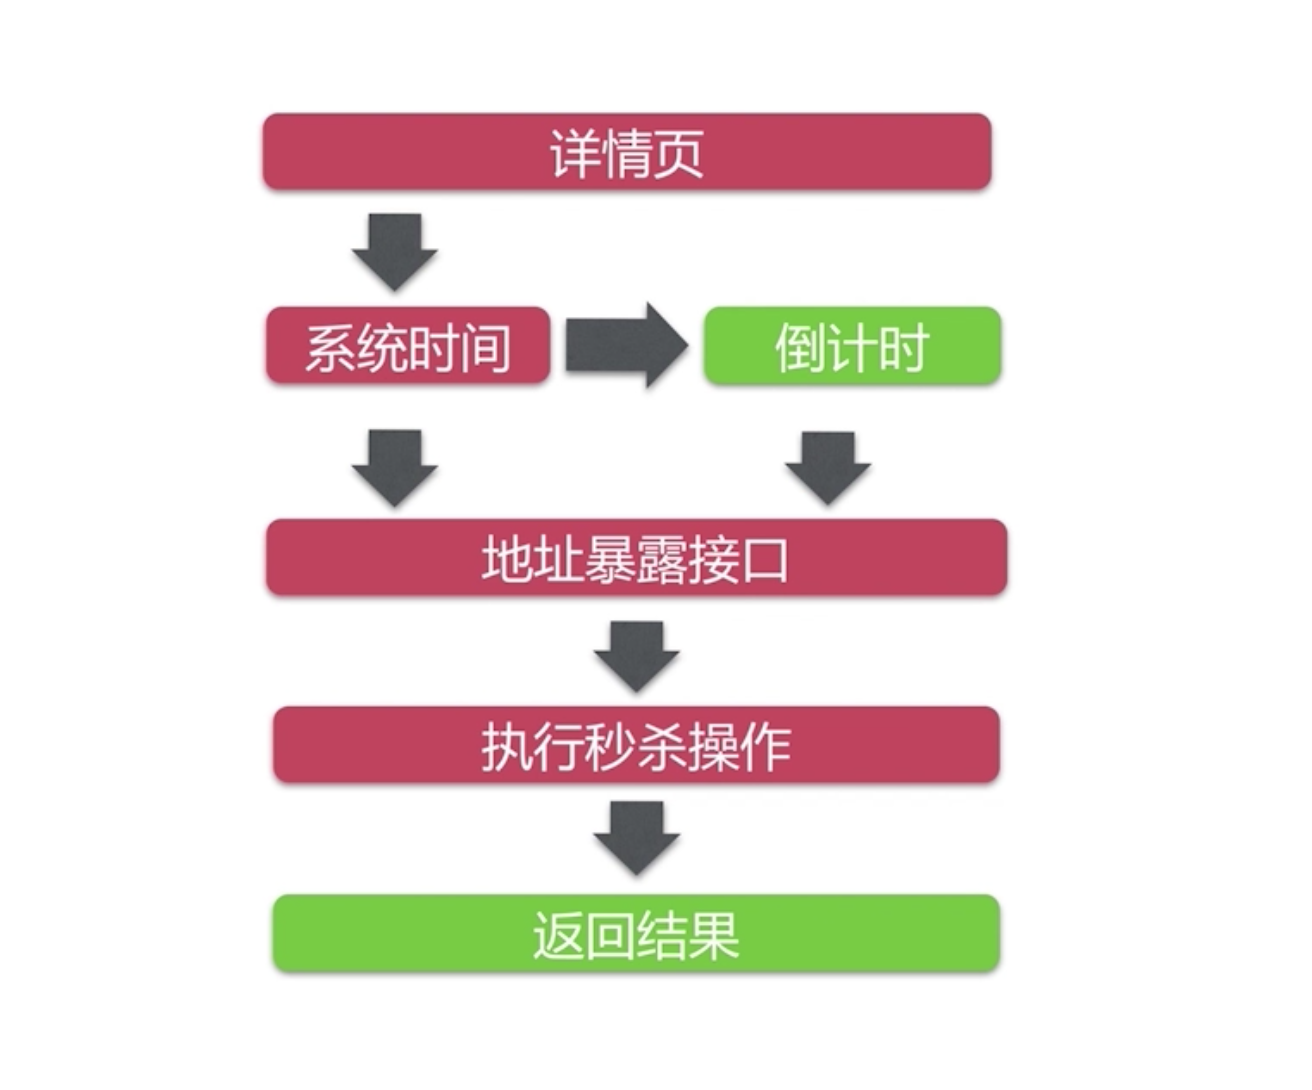
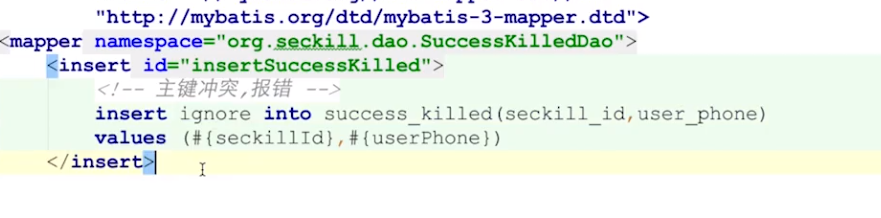
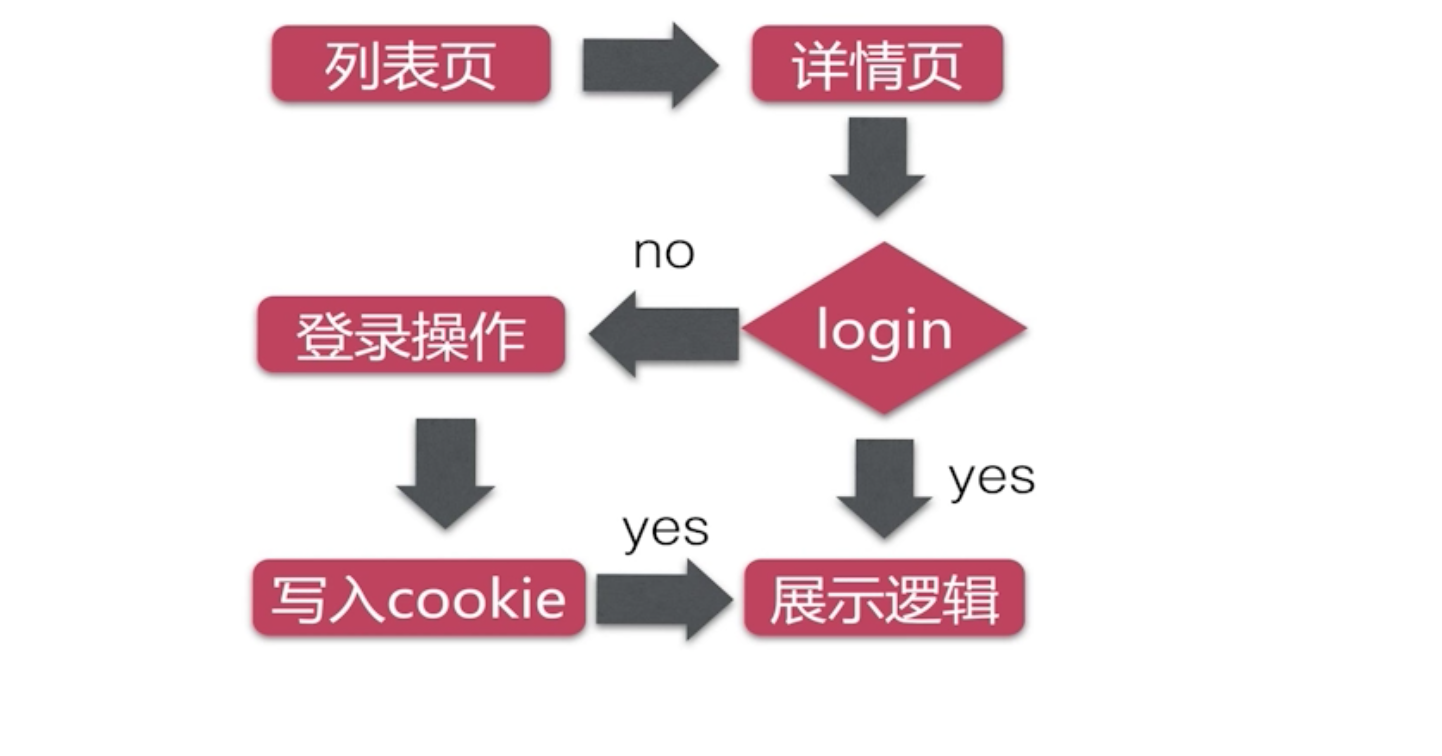
章节目录 前端交互设计 Restful Spring MVC理论 整合配置MVC框架 bootstrap+jquery 福利彩蛋 前端交互设计 前端交互设计 详情页流程逻辑 Restful接口 什么是Restful Restful 是接口设计规范 一种优雅的URI表达方式 资源的状态和状态转移 获取的是资源的状态,删除的时候,其实是更改资源的状态 put、post、delete Restful示例 image.png image.png 不同的请求方法代表着对资源的不同操作类型。操作类型应与资源的接下来发生的状态状态转移对应起来 GET 请求是幂等性的 URL设计 url设计 秒杀Api设计 Spring MVC理论 理论部分 围绕handler开发 image.png Spring mvc 的运行流程 image.png 解释: 用户请求->前端控制器->寻找对应处理请求的handler,默认为DefaultAnnotationHandlerMapping->DefaultAnnotationHandlerAdapter->寻找处理请求的Controller->请求生成ModelAndView至中央控制器->中央控制器将数据转发给InternalResourceViewResolver去解析->解析完成的数据及页面结构,组合后,被生成资源,返回给用户。 HTTP请求映射的原理 image.png 默认使用DefaultAnnotationHandlerMapping->handler方法 注解映射技巧 @RequestMapping 注解 (1) 支持标准标准的URL (2) Ant风格URL (3) 带{xxx}占位符的URL 注解映射技巧 请求方法细节处理 (1) 请求参数绑定 (2) 请求方式限制 (3) 请求转发与重定向 (4) 数据模型赋值 (5) 返回json数据 (6) cookie的访问 请求参数绑定、重定向与转发、model数据绑定 返回json数据 cookie 数据 整合配置Spring MVC配置文件 <web-app xmlns="http://xmlns.jcp.org/xml/ns/javaee" xmlns:xsi="http://www.w3.org/2001/XMLSchema-instance" xsi:schemaLocation="http://xmlns.jcp.org/xml/ns/javaee http://xmlns.jcp.org/xml/ns/javaee/web-app_3_1.xsd" version="3.1" metadata-complete="true"> <!-- 修改servlet版本为3.1 --> <!-- 配置DispatcherServlet--> <servlet> <servlet-name>seckill-dispatcher</servlet-name> <servlet-class>org.springframework.web.servlet.DispatcherServlet</servlet-class> <!-- 配置SpringMVC需要加载的配置文件 Spring-dao.xml, spring-service.xml, spring-web.xml MyBatis -> Spring -> SpringMVC --> <init-param> <param-name>contextConfigLocation</param-name> <param-value>classpath:spring/spring-*.xml</param-value> </init-param> </servlet> <servlet-mapping> <servlet-name>seckill-dispatcher</servlet-name> <!-- 默认匹配所有的请求--> <url-pattern>/</url-pattern> </servlet-mapping> </web-app> Spring MVC 配置 spring-web.xml <?xml version="1.0" encoding="UTF-8"?> <beans xmlns="http://www.springframework.org/schema/beans" xmlns:xsi="http://www.w3.org/2001/XMLSchema-instance" xmlns:context="http://www.springframework.org/schema/context" xmlns:mvc="http://www.springframework.org/schema/mvc" xsi:schemaLocation="http://www.springframework.org/schema/beans http://www.springframework.org/schema/beans/spring-beans.xsd http://www.springframework.org/schema/context http://www.springframework.org/schema/context/spring-context.xsd http://www.springframework.org/schema/mvc http://www.springframework.org/schema/mvc/spring-mvc.xsd"> <!--配置Spring MVC--> <!--1:开启Spring MVC注解模式--> <!--简化配置 (1):自动注册DefaultAnnotationHandlerMapping、AnnotationMethodHandlerAdapter url->handler 映射 (2):默认提供一系列功能、数据绑定、数字与日期format @NumberFormat @DateTimeFormat xml json 默认读写支持 --> <mvc:annotation-driven/> <!--servlet-mapping 映射路径 /--> <!--静态资源配置,默认servlet配置--> <!-- 1:加入对静态资源的处理:js、png 2:允许使用"/"作为映射 --> <mvc:default-servlet-handler/> <!--配置jsp 显示 view Resolver--> <bean class="org.springframework.web.servlet.view.InternalResourceViewResolver"> <property name="viewClass" value="org.springframework.web.servlet.view.JstlView"/> <property name="prefix" value="/WEB-INF/jsp/"/> <property name="suffix" value=".jsp"/> </bean> <!--扫描web相关的bean--> <context:component-scan base-package="org.seckill.web"/> </beans> **SecKillController ** package org.seckill.web; import org.seckill.domain.SecKill; import org.seckill.dto.Exposer; import org.seckill.dto.SecKillResult; import org.seckill.service.SecKillService; import org.slf4j.Logger; import org.slf4j.LoggerFactory; import org.springframework.beans.factory.annotation.Autowired; import org.springframework.stereotype.Controller; import org.springframework.ui.Model; import org.springframework.web.bind.annotation.PathVariable; import org.springframework.web.bind.annotation.RequestMapping; import org.springframework.web.bind.annotation.RequestMethod; import org.springframework.web.bind.annotation.ResponseBody; import java.util.List; @Controller @RequestMapping("/seckill") //url:/模块/资源/{id}/细分 public class SecKillController { private final Logger logger = LoggerFactory.getLogger(this.getClass()); @Autowired private SecKillService secKillService; /** * 获取秒杀商品list * * @param model * @return */ @RequestMapping(value = "/list", method = RequestMethod.GET) public String list(Model model) { //1.获取列表页面 List<SecKill> secKillList = secKillService.getSecKillList(); model.addAttribute("list", secKillList); //2.返回页面并携带model 数据list.jsp + model = ModelAndView return "list"; } /** * 接收参数、参数验证、业务逻辑调用并处理 * 获取秒杀商品详情 * * @param model * @param secKillId * @return */ @RequestMapping(value = "/{secKillId}/detial", method = RequestMethod.GET) public String detial(Model model, @PathVariable("secKillId") Long secKillId) { if (secKillId == null) {//请求重定向到list页面 return "redirect:/seckill/list"; } SecKill secKill = secKillService.getSecKillById(secKillId); if (secKill == null) { return "forward:/seckill/list"; } model.addAttribute("seckill", secKill); return "detial"; } /** * ajax接口-返回类型 json * 获取秒杀曝露地址 * * @param secKillId */ @RequestMapping(value = "/{secKillId}/exposer", method = RequestMethod.POST, produces = {"application/json;charset=UTF-8"}//告诉浏览器返回数据类型是json ) @ResponseBody public SecKillResult<Exposer> /*TODO*/ exposer(@PathVariable("secKillId") Long secKillId) { SecKillResult<Exposer> result; try { Exposer exposer = secKillService.exportSecKillUrl(secKillId);//返回秒杀地址 result = new SecKillResult<Exposer>(true, exposer); } catch (Exception e) { logger.error(e.getMessage()); result = new SecKillResult<Exposer>(false, e.getMessage()); } return result; } } 福利彩蛋 职位:腾讯OMG 广告后台高级开发工程师; Base:深圳; 场景:海量数据,To B,To C,场景极具挑战性。 基础要求: 熟悉常用数据结构与算法; 熟悉常用网络协议,熟悉网络编程; 熟悉操作系统,有线上排查问题经验; 熟悉MySQL,oracle; 熟悉JAVA,GoLang,c++其中一种语言均可; 可内推,欢迎各位优秀开发道友私信[微笑] 期待关注我的开发小哥哥,小姐姐们私信我,机会很好,平台对标抖音,广告生态平台,类似Facebook 广告平台,希望你们用简历砸我~ 联系方式 微信 13609184526

资源下载

更多资源
优质分享App

优质分享App

近一个月的开发和优化,本站点的第一个app全新上线。该app采用极致压缩,本体才4.36MB。系统里面做了大量数据访问、缓存优化。方便用户在手机上查看文章。后续会推出HarmonyOS的适配版本。

Mario

Mario

马里奥是站在游戏界顶峰的超人气多面角色。马里奥靠吃蘑菇成长,特征是大鼻子、头戴帽子、身穿背带裤,还留着胡子。与他的双胞胎兄弟路易基一起,长年担任任天堂的招牌角色。

Nacos

Nacos

Nacos /nɑ:kəʊs/ 是 Dynamic Naming and Configuration Service 的首字母简称,一个易于构建 AI Agent 应用的动态服务发现、配置管理和AI智能体管理平台。Nacos 致力于帮助您发现、配置和管理微服务及AI智能体应用。Nacos 提供了一组简单易用的特性集,帮助您快速实现动态服务发现、服务配置、服务元数据、流量管理。Nacos 帮助您更敏捷和容易地构建、交付和管理微服务平台。

Rocky Linux

Rocky Linux

Rocky Linux(中文名:洛基)是由Gregory Kurtzer于2020年12月发起的企业级Linux发行版,作为CentOS稳定版停止维护后与RHEL(Red Hat Enterprise Linux)完全兼容的开源替代方案,由社区拥有并管理,支持x86_64、aarch64等架构。其通过重新编译RHEL源代码提供长期稳定性,采用模块化包装和SELinux安全架构,默认包含GNOME桌面环境及XFS文件系统,支持十年生命周期更新。

用户登录
用户注册