首页 文章 精选 留言 我的

精选列表

搜索[鸿蒙渲染],共9151篇文章
优秀的个人博客,低调大师

鸿蒙HI3516-驱动开发(1.1-LTS)

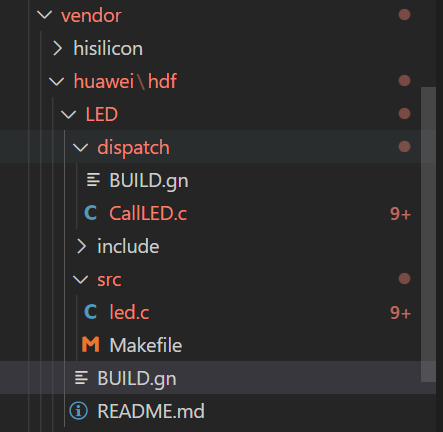
代码在:https://gitee.com/kwydm/open-harmony-taurus 目录大致结构 1.驱动开发 创建目录://vendor/huawei/hdf/LED/src 新建Makefile include $(LITEOSTOPDIR)/../../drivers/adapter/khdf/liteos/lite.mk MODULE_NAME := hdf_led_driver LOCAL_SRCS += led.c LOCAL_INCLUDE := ./include LOCAL_CFLAGS += -fstack-protector-strong -Wextra -Wall -Werror include $(HDF_DRIVER) 打开//device/hisilicon/drivers/lite.mk 编译结果文件链接到内核镜像 ## 在头部添加变量 VENDOR_HDF_DRIVERS_ROOT := $(LITEOSTOPDIR)/../../vendor/huawei/hdf LITEOS_BASELIB += -lhdf_led_driver LIB_SUBDIRS += $(VENDOR_HDF_DRIVERS_ROOT)/LED/src 新建led.c #include "hdf_device_desc.h" // HDF框架对驱动开放相关能力接口的头文件 #include "hdf_log.h" // HDF 框架提供的日志接口头文件 #include "device_resource_if.h" #include "osal_io.h" #include "osal_mem.h" #include "gpio_if.h" #include "osal_irq.h" #include "osal_time.h" #define HDF_LOG_TAG led_driver // 打印日志所包含的标签,如果不定义则用默认定义的HDF_TAG标签 #define LED_WRITE_READ 1 // 读写操作码1 static int32_t CtlLED(int mode) { int32_t ret; uint16_t valRead; /* LED的GPIO管脚号 */ uint16_t gpio = 5 * 8 + 1; // 红外补光灯 // uint16_t gpio = 2 * 8 + 3; // 绿色指示灯 // uint16_t gpio = 3 * 8 + 4; // 红色指示灯 /* 将GPIO管脚配置为输出 */ ret = GpioSetDir(gpio, GPIO_DIR_OUT); if (ret != 0) { HDF_LOGE("GpioSerDir: failed, ret %d\n", ret); return ret; } if (mode == -1) { // 翻转输出口 (void)GpioRead(gpio, &valRead); ret = GpioWrite(gpio, (valRead == GPIO_VAL_LOW) ? GPIO_VAL_HIGH : GPIO_VAL_LOW); } else { ret = GpioWrite(gpio, mode); } if (ret != 0) { HDF_LOGE("GpioWrite: failed, ret %d\n", ret); return ret; } return ret; } // Dispatch是用来处理用户态发下来的消息 int32_t LedDriverDispatch(struct HdfDeviceIoClient *client, int cmdCode, struct HdfSBuf *data, struct HdfSBuf *reply) { int32_t result = HDF_FAILURE; HDF_LOGE("Led driver dispatch"); if (client == NULL || client->device == NULL) { HDF_LOGE("Led driver device is NULL"); return HDF_ERR_INVALID_OBJECT; } switch (cmdCode){ case LED_WRITE_READ: const char *recv = HdfSbufReadString(data); if (recv != NULL) { //HDF_LOGI("recv: %s", recv); result = CtlLED(-1); // CtlLED(GPIO_VAL_HIGH); if (!HdfSbufWriteInt32(reply, result)){ //HDF_LOGE("replay is fail"); } return HdfDeviceSendEvent(client->device, cmdCode, data); } break; default: break; } return result; } //驱动对外提供的服务能力,将相关的服务接口绑定到HDF框架 int32_t HdfLedDriverBind(struct HdfDeviceObject *deviceObject) { if (deviceObject == NULL) { HDF_LOGE("Led driver bind failed!"); return HDF_ERR_INVALID_OBJECT; } static struct IDeviceIoService ledDriver = { .Dispatch = LedDriverDispatch, }; deviceObject->service = (struct IDeviceIoService *)(&ledDriver); HDF_LOGD("Led driver bind success"); return HDF_SUCCESS; } // 驱动自身业务初始的接口 int32_t HdfLedDriverInit(struct HdfDeviceObject *deviceObject) { if (deviceObject == NULL) { HDF_LOGE("Led driver Init failed!"); return HDF_ERR_INVALID_OBJECT; } HDF_LOGD("Led driver Init success"); return HDF_SUCCESS; } // 驱动资源释放的接口 void HdfLedDriverRelease(struct HdfDeviceObject *deviceObject) { if (deviceObject == NULL) { HDF_LOGE("Led driver release failed!"); return; } HDF_LOGD("Led driver release success"); return; } // 定义驱动入口的对象,必须为HdfDriverEntry(在hdf_device_desc.h中定义)类型的全局变量 struct HdfDriverEntry g_ledDriverEntry = { .moduleVersion = 1, .moduleName = "led_driver", .Bind = HdfLedDriverBind, .Init = HdfLedDriverInit, .Release = HdfLedDriverRelease, }; // 调用HDF_INIT将驱动入口注册到HDF框架中,在加载驱动时HDF框架会先调用Bind函数,再调用Init函数加载该驱动,当Init调用异常时,HDF框架会调用Release释放驱动资源并退出。 HDF_INIT(g_ledDriverEntry); 2.用户态 \vendor\huawei\hdf\LED\dispatch\CallLED.c #include <stdio.h> #include <fcntl.h> #include <sys/stat.h> #include <sys/ioctl.h> #include <unistd.h> #include "hdf_log.h" #include "hdf_sbuf.h" #include "hdf_io_service_if.h" #define LED_WRITE_READ 1 #define HDF_LOG_TAG LED_APP #define LED_SERVICE "led_service" // 接收驱动上报事件 static int OnDevEventReceived(void *priv, uint32_t id, struct HdfSBuf *data) { const char *string = HdfSbufReadString(data); if (string == NULL) { HDF_LOGE("fail to read string in event data"); return HDF_FAILURE; } HDF_LOGE("%s: dev event received: %u %s", (char *)priv, id, string); return HDF_SUCCESS; } static int SendEvent(struct HdfIoService *serv, char *eventData) { int ret = 0; struct HdfSBuf *data = HdfSBufObtainDefaultSize(); if (data == NULL) { HDF_LOGE("fail to obtain sbuf data"); return 1; } struct HdfSBuf *reply = HdfSBufObtainDefaultSize(); if (reply == NULL) { HDF_LOGE("fail to obtain sbuf reply"); ret = HDF_DEV_ERR_NO_MEMORY; goto out; } if (!HdfSbufWriteString(data, eventData)) { HDF_LOGE("fail to write sbuf"); ret = HDF_FAILURE; goto out; } ret = serv->dispatcher->Dispatch(&serv->object, LED_WRITE_READ, data, reply); if (ret != HDF_SUCCESS) { HDF_LOGE("fail to send service call"); goto out; } int replyData = 0; if (!HdfSbufReadInt32(reply, &replyData)) { HDF_LOGE("fail to get service call reply"); ret = HDF_ERR_INVALID_OBJECT; goto out; } HDF_LOGE("Get reply is: %d", replyData); out: HdfSBufRecycle(data); HdfSBufRecycle(reply); return ret; } int main(void) { struct HdfIoService *serv = HdfIoServiceBind(LED_SERVICE);// 用户态获取驱动的服务 if (serv == NULL) { HDF_LOGE("fail to get service %s", LED_SERVICE); return HDF_FAILURE; } static struct HdfDevEventlistener listener = { .callBack = OnDevEventReceived, .priv = "Service0"}; // 用户态程序注册接收驱动上报事件的操作方法。 if (HdfDeviceRegisterEventListener(serv, &listener) != HDF_SUCCESS) { HDF_LOGE("fail to register event listener"); return HDF_FAILURE; } char *send_cmd = "toggle LED"; while (1) { if (SendEvent(serv, send_cmd)) { HDF_LOGE("fail to send event"); return HDF_FAILURE; } sleep(1); } if (HdfDeviceUnregisterEventListener(serv, &listener)) { HDF_LOGE("fail to unregister listener"); return HDF_FAILURE; } HdfIoServiceRecycle(serv);// 释放驱动服务。 HDF_LOGI("exit"); return HDF_SUCCESS; } \vendor\huawei\hdf\LED\dispatch\BUILD.gn # Copyright (c) 2020 Huawei Device Co., Ltd. # Licensed under the Apache License, Version 2.0 (the "License"); # you may not use this file except in compliance with the License. # You may obtain a copy of the License at # # http://www.apache.org/licenses/LICENSE-2.0 # # Unless required by applicable law or agreed to in writing, software # distributed under the License is distributed on an "AS IS" BASIS, # WITHOUT WARRANTIES OR CONDITIONS OF ANY KIND, either express or implied. # See the License for the specific language governing permissions and # limitations under the License. HDF_FRAMEWORKS = "//drivers/framework" # 暂时放在这里编译用户态设备驱动消息调用程序,回头在考虑移到独立组件去编译Gavin Lee executable("CallLED") { sources = [ "//vendor/huawei/hdf/LED/dispatch/CallLED.c" ] include_dirs = [ "//vendor/huawei/hdf/LED/include", "$HDF_FRAMEWORKS/core/adapter/vnode/include", "$HDF_FRAMEWORKS/core/adapter/syscall/include", "$HDF_FRAMEWORKS/core/shared/include", "$HDF_FRAMEWORKS/core/host/include", "$HDF_FRAMEWORKS/core/manager/include", "$HDF_FRAMEWORKS/ability/sbuf/include", "$HDF_FRAMEWORKS/include/core", "$HDF_FRAMEWORKS/include/utils", "$HDF_FRAMEWORKS/utils/include", "$HDF_FRAMEWORKS/include/osal", "$HDF_FRAMEWORKS/../adapter/uhdf/posix/include", "//third_party/bounds_checking_function/include", "//base/hiviewdfx/hilog_lite/interfaces/native/innerkits", ] deps = [ "//base/hiviewdfx/hilog_lite/frameworks/featured:hilog_shared", "//drivers/adapter/uhdf/posix:hdf_posix", "//drivers/adapter/uhdf/manager:hdf_core", "//drivers/adapter/uhdf/posix:hdf_posix_osal" ] public_deps = [ "//third_party/bounds_checking_function:libsec_shared", ] defines = [ "__USER__", ] cflags = [ "-Wall", "-Wextra", "-Werror", ] } vendor\huawei\hdf\LED\BUILD.gn import("//build/lite/config/component/lite_component.gni") lite_component("led_gpio"){ features = ["dispatch:CallLED"] } build\lite\components\drivers.json 3.烧录运行 串口发送下面的代码 ./bin/CallLED 执行之后这个补光灯会1S闪一次 参考:https://harmonyos.51cto.com/posts/2820,Gavin,Dweb九弓子

优秀的个人博客,低调大师

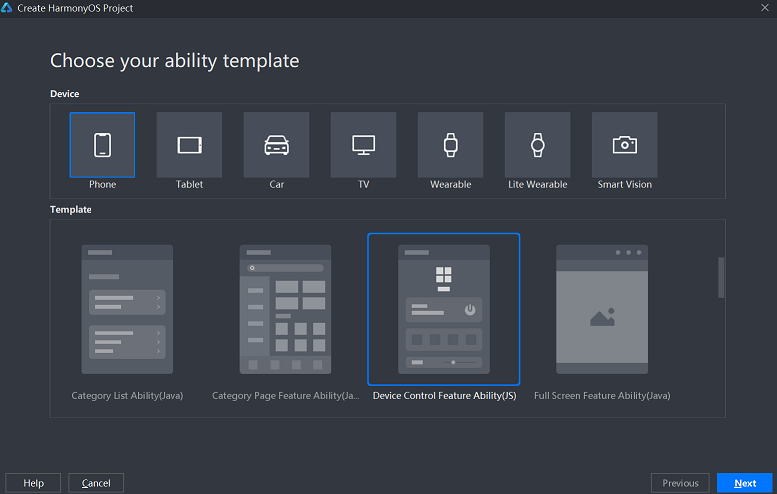
华为鸿蒙OS 尝鲜 (二)创建TV(JS)应用

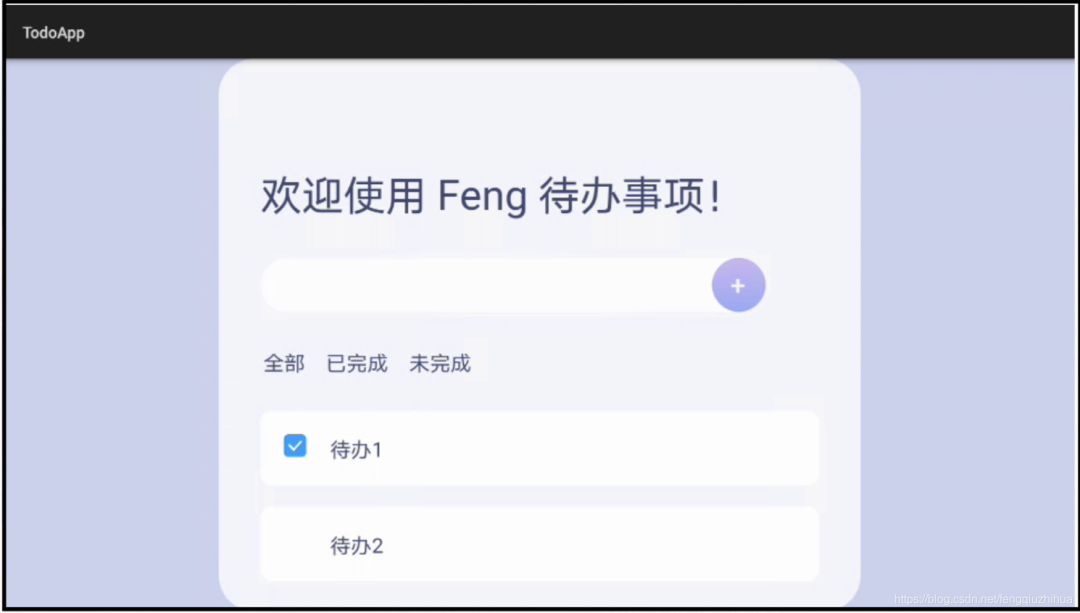
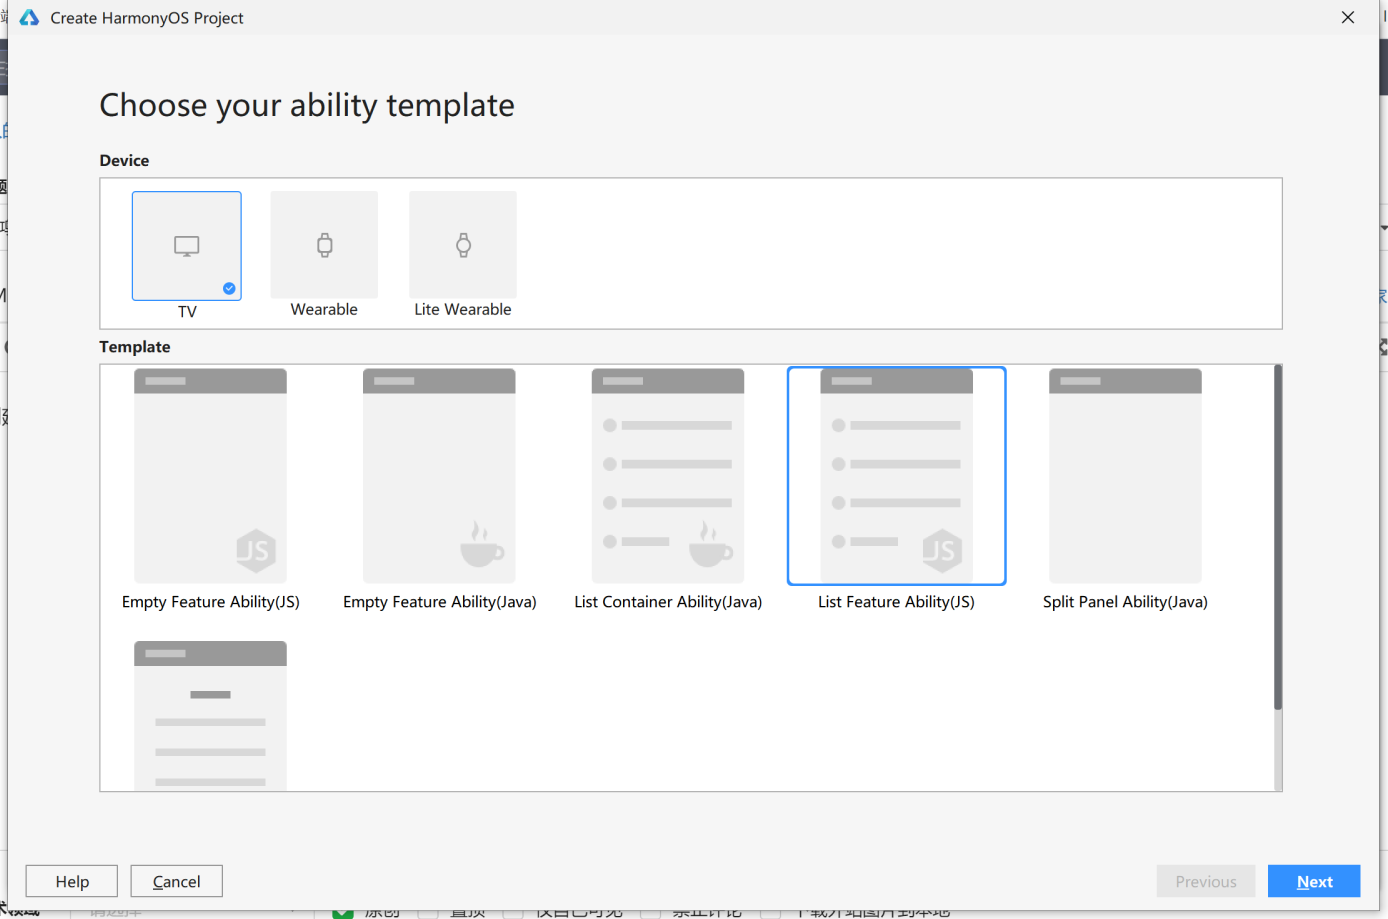
1. 选择TV设备 列表模板(JS版本) ![] 2. 生成后JS版本部分如下: index.css 样式控制和平常css没啥两样 .container { flex-direction: row; justify-content: flex-start; align-items: flex-start; background-color: #000000; } .title { line-height: 60px; font-size: 48px; margin-bottom: 16px; color: #ffffff; margin-left: 48px; } .content_box { flex-direction: column; justify-content: flex-start; align-items: flex-start; width: 516px; margin-top: 24px; } .content-list { width: 516px; flex-direction: column; justify-content: flex-start; align-items: flex-start; flex-grow: 1; } .content-bar { flex-direction: row; justify-content: space-between; align-items: center; width: 420px; height: 48px; margin-left: 48px; margin-right: 48px; background-color: #808080; border-radius: 8px; } .content-bar-focus { flex-direction: row; justify-content: space-between; align-items: center; width: 420px; height: 48px; margin-left: 48px; margin-right: 48px; background-color: #ffffff; border-radius: 8px; } .bar-title { color: #ffffff; font-size: 24px; margin-left: 15px; } .bar-title-focus { color: #000000; font-size: 24px; margin-left: 15px; } .bar-more { flex-direction: row; justify-content: space-between; align-items: center; margin-right: 15px; width: 30px; height: 24px; } .bar-img { object-fit: contain; } .content_img { width: 444px; flex-direction: column; justify-content: flex-start; align-items: flex-end; } .img-box { margin-top: 160px; margin-right: 160px; background-color: #808080; width: 198px; height: 198px; } .img-img { object-fit: contain; width: 198px; height: 198px; } .text_box { width: 272px; justify-content: center; margin-right: 123px; margin-top: 12px; } .img-text { font-size: 24px; color: #ffffff; } index.hml 模板文件 <div class="container"> <div class="content_box"> <text class="title">{{Title}} </text> <list class="content-list"> <list-item type="listItem" class="{{list_item_class1}}" onfocus="focusFunc1" onblur="blurFunc1"> <text class="{{text_class1}}">{{$t('strings.list')}} 1 </text> <div class="bar-more"> <image class="bar-img" src="../../common/arrow.png"></image> </div> </list-item> <list-item type="divider" style="height: 12px"></list-item> <list-item type="listItem" class="{{list_item_class2}}" onfocus="focusFunc2" onblur="blurFunc2"> <text class="{{text_class2}}">{{$t('strings.list')}} 2 </text> <div class="bar-more"> <image class="bar-img" src="../../common/arrow.png"></image> </div> </list-item> <list-item type="divider" style="height: 12px"></list-item> <list-item type="listItem" class="{{list_item_class3}}" onfocus="focusFunc3" onblur="blurFunc3"> <text class="{{text_class3}}">{{$t('strings.list')}} 3 </text> <div class="bar-more"> <image class="bar-img" src="../../common/arrow.png"></image> </div> </list-item> <list-item type="divider" style="height: 12px"></list-item> <list-item type="listItem" class="{{list_item_class4}}" onfocus="focusFunc4" onblur="blurFunc4"> <text class="{{text_class4}}">{{$t('strings.list')}} 4 </text> <div class="bar-more"> <image class="bar-img" src="../../common/arrow.png"></image> </div> </list-item> <list-item type="divider" style="height: 12px"></list-item> <list-item type="listItem" class="{{list_item_class5}}" onfocus="focusFunc5" onblur="blurFunc5"> <text class="{{text_class5}}">{{$t('strings.list')}} 5 </text> <div class="bar-more"> <image class="bar-img" src="../../common/arrow.png"></image> </div> </list-item> <list-item type="divider" style="height: 12px"></list-item> <list-item type="listItem" class="{{list_item_class6}}" onfocus="focusFunc6" onblur="blurFunc6"> <text class="{{text_class6}}">{{$t('strings.list')}} 6 </text> <div class="bar-more"> <image class="bar-img" src="../../common/arrow.png"></image> </div> </list-item> </list> </div> <div class="content_img"> <div class="img-box"> <image class="img-img" src=""></image> </div> <div class="text_box"> <text class="img-text">{{$t('strings.img-text')}} </text> </div> </div> </div> index.js 脚本控制部分 export default { data: { Title: "", list_item_class1: "content-bar", text_class1: "bar-title", list_item_class2: "content-bar", text_class2: "bar-title", list_item_class3: "content-bar", text_class3: "bar-title", list_item_class4: "content-bar", text_class4: "bar-title", list_item_class5: "content-bar", text_class5: "bar-title", list_item_class6: "content-bar", text_class6: "bar-title", }, onInit (){ this.Title = this.$t('strings.title'); }, /* activated when the component has focus */ focusFunc1: function () { this.list_item_class1 = "content-bar-focus"; this.text_class1 = "bar-title-focus"; }, /* activated when the component loses focus */ blurFunc1: function () { this.list_item_class1 = "content-bar"; this.text_class1 = "bar-title"; }, focusFunc2: function () { this.list_item_class2 = "content-bar-focus"; this.text_class2 = "bar-title-focus"; }, blurFunc2: function () { this.list_item_class2 = "content-bar"; this.text_class2 = "bar-title"; }, focusFunc3: function () { this.list_item_class3 = "content-bar-focus"; this.text_class3 = "bar-title-focus"; }, blurFunc3: function () { this.list_item_class3 = "content-bar"; this.text_class3 = "bar-title"; }, focusFunc4: function () { this.list_item_class4 = "content-bar-focus"; this.text_class4 = "bar-title-focus"; }, blurFunc4: function () { this.list_item_class4 = "content-bar"; this.text_class4 = "bar-title"; }, focusFunc5: function () { this.list_item_class5 = "content-bar-focus"; this.text_class5 = "bar-title-focus"; }, blurFunc5: function () { this.list_item_class5 = "content-bar"; this.text_class5 = "bar-title"; }, focusFunc6: function () { this.list_item_class6 = "content-bar-focus"; this.text_class6 = "bar-title-focus"; }, blurFunc6: function () { this.list_item_class6 = "content-bar"; this.text_class6 = "bar-title"; } } 国际化(i18n)的支持: 从观看直播华为应该是对这块很重视帮助开发者“走出去”。 zh-CN.json { "strings":{ "title":"标题", "list": "栏目", "img-text":"显示图片" }, "Files":{ } } en-US.json { "strings":{ "title":"Title", "list": "List", "img-text":"Display Image" }, "Files":{ } } 3. 结尾 运行看效果: 这个和混合APP开发没啥太大区别(可能API,个别语法稍微不太一样)前端开发者应该能很快上手。

优秀的个人博客,低调大师

用鸿蒙写出第一个 Hello World!鸿蒙开发快速入门之:Hi3861 开发板(4)

最激动入门级选手的心的时刻来了,本示例将演示如何编写简单业务,输出“Hello World”。 修改源码 bugfix和新增业务两种情况,涉及源码修改。下面以新增业务举例,向开发者介绍如何进行源码修改。 确定目录结构。 开发者编写业务时,务必先在./applications/sample/wifi-iot/app路径下新建一个目录(或一套目录结构),用于存放业务源码文件。 例如:在app下新增业务my_first_app,其中hello_world.c为业务代码,BUILD.gn为编译脚本,具体规划目录结构如下: . └── applications └── sample └── wifi-iot └── app │── my_first_app │ │── hello_world.c │ └── BUILD.gn └── BUILD.gn 编写业务代码。 在hello_world.c中新建业务入口函数HelloWorld,并实现业务逻辑。并在代码最下方,使用OpenHarmony启动恢复模块接口SYS_RUN()启动业务。(SYS_RUN定义在ohos_init.h文件中) #include "ohos_init.h" #include "ohos_types.h" void HelloWorld(void) { printf("[DEMO] Hello world.\n"); } SYS_RUN(HelloWorld); 编写用于将业务构建成静态库的BUILD.gn文件。 如步骤1所述,BUILD.gn文件由三部分内容(目标、源文件、头文件路径)构成,需由开发者完成填写。以my_first_app为例,需要创建./applications/sample/wifi-iot/app/my_first_app/BUILD.gn,并完如下配置。 static_library("myapp") { sources = [ "hello_world.c" ] include_dirs = [ "//utils/native/liteos/include" ] } static_library中指定业务模块的编译结果,为静态库文件libmyapp.a,开发者根据实际情况完成填写。 sources中指定静态库.a所依赖的.c文件及其路径,若路径中包含"//"则表示绝对路径(此处为代码根路径),若不包含"//"则表示相对路径。 include_dirs中指定source所需要依赖的.h文件路径。 编写模块BUILD.gn文件,指定需参与构建的特性模块。 配置./applications/sample/wifi-iot/app/BUILD.gn文件,在features字段中增加索引,使目标模块参与编译。features字段指定业务模块的路径和目标,以my_first_app举例,features字段配置如下。 import("//build/lite/config/component/lite_component.gni") lite_component("app") { features = [ "my_first_app:myapp", ] } my_first_app是相对路径,指向./applications/sample/wifi-iot/app/my_first_app/BUILD.gn。 myapp是目标,指向./applications/sample/wifi-iot/app/my_first_app/BUILD.gn中的static_library("myapp")。 调测验证 目前调试验证的方法有两种,分别为通过printf打印日志、通过asm文件定位panic问题,开发者可以根据具体业务情况选择。 由于本示例业务简单,采用printf打印日志的调试方式即可。下面开始介绍这两种调试手段的使用方法。 printf打印 代码中增加printf维测,信息会直接打印到串口上。开发者可在业务关键路径或业务异常位置增加日志打印,如下所示。 void HelloWorld(void) { printf("[DEMO] Hello world.\n"); } 根据asm文件进行问题定位 系统异常退出时,会在串口上打印异常退出原因调用栈信息,如下文所示。通过解析异常栈信息可以定位异常位置。 =======KERNEL PANIC======= **********************Call Stack********************* Call Stack 0 -- 4860d8 addr:f784c Call Stack 1 -- 47b2b2 addr:f788c Call Stack 2 -- 3e562c addr:f789c Call Stack 3 -- 4101de addr:f78ac Call Stack 4 -- 3e5f32 addr:f78cc Call Stack 5 -- 3f78c0 addr:f78ec Call Stack 6 -- 3f5e24 addr:f78fc ********************Call Stack end******************* 为解析上述调用栈信息,需要使用到Hi3861_wifiiot_app.asm文件,该文件记录了代码中函数在Flash上的符号地址以及反汇编信息。asm文件会随版本大包一同构建输出,存放在./out/wifiiot/路径下。 将调用栈CallStack信息保存到txt文档中,以便于编辑。(可选) 打开asm文件,并搜索CallStack中的地址,列出对应的函数名 信息。通常只需找出前几个栈信息对应的函数,就可明确异常代码方向。 Call Stack 0 -- 4860d8 addr:f784c -- WadRecvCB Call Stack 1 -- 47b2b2 addr:f788c -- wal_sdp_process_rx_data Call Stack 2 -- 3e562c addr:f789c Call Stack 3 -- 4101de addr:f78ac Call Stack 4 -- 3e5f32 addr:f78cc Call Stack 5 -- 3f78c0 addr:f78ec Call Stack 6 -- 3f5e24 addr:f78fc 根据以上调用栈信息,可以定位WadRecvCB函数中出现了异常。 完成代码排查及修改。 运行结果 示例代码编译、烧录、运行、调测后,会显示如下结果: ready to OS start FileSystem mount ok. wifi init success! [DEMO] Hello world.

优秀的个人博客,低调大师

热缓存与瓦片注意力:无限画布大场景渲染优化方案

先看清问题出在哪。一堵墙是计算量。全注意力复杂度随序列长度二次方增长,学术界叫它"二次方之墙"。对无限画布,序列长度就是画布 token 数,分辨率翻一倍,计算量翻四倍。另一堵墙是显存。扩散模型推理里,注意力层是显存消耗大头:社区实测拆解中,空间注意力约占峰值显存 40%,时序窗口缓存约 25%,VAE 编解码约 20%,中间特征约 15%。有多严重?4K 无限画布的峰值显存,比同分辨率固定画幅高出约 170%;画幅再翻一倍,显存约翻三倍。模型权重其实只占 8-10GB(FP16),真正吃显存的是中间状态和缓存。

优秀的个人博客,低调大师

Blender 4.1 将在 AMD RDNA3 APU 上支持 Cycles 渲染器

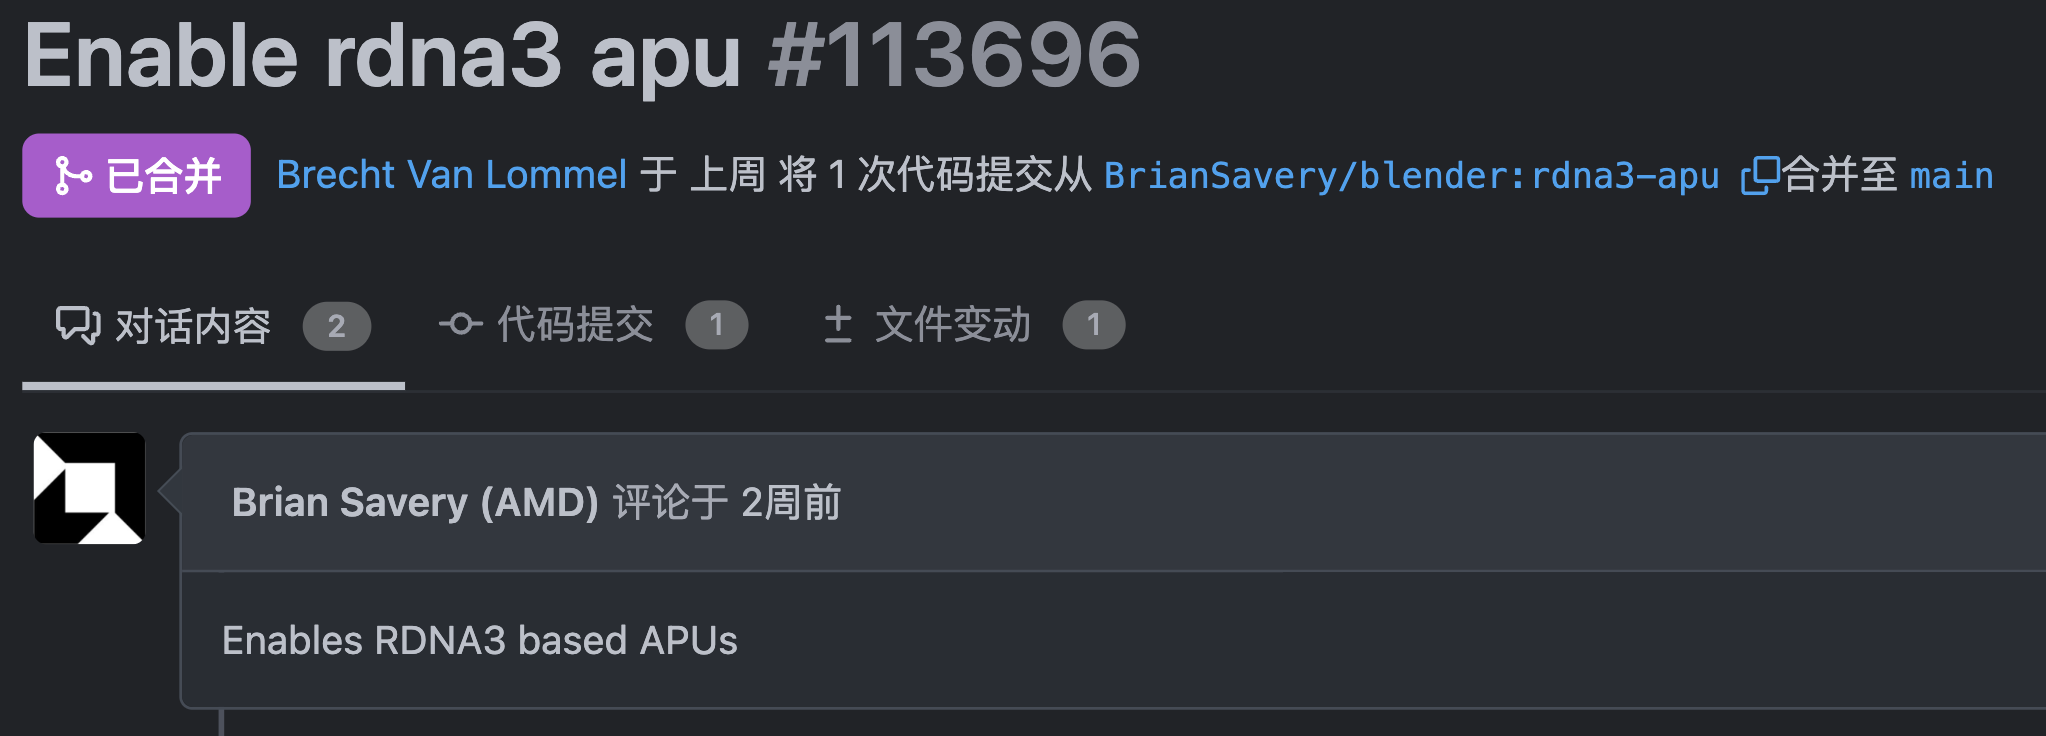
Blender 4.0 将于 11 月 7 日正式发布,而它的下一个更新 Blender 4.1 已经有了更值得期待的变化。 从 Blender 最近合并的 PR 可以看到,Blender 4.1 将支持 Cycles 引擎在 AMD RDNA3 APU 上运行。目前 Blender 已经支持 GFX11/RDNA3 独立显卡,而针对 AMD RDNA3 APU 的 Cycles HIP 支持将在 4.1 版本中推出。 遗憾的是,Blender 4.0 未能实现这一小改动,但它将会在 4.1 版本中出现。支持 RDNA3 APU 的 PR 于两周前开放,上周被合并。 正在进行中的 Blender 4.1 发布说明还概述了现在支持Wayland on Linux 上的输入法编辑器 (IME),以及正在进行的其他各种变更。Blender 4.1 的功能特性工作将持续到 12 月底,届时 Bcon2 阶段将开始稳定和改进工作,而仅修复错误的 "Bcon3 "阶段将于 1 月底开始。根据计划,Blender 4.1 将于 3 月 5 日发布。

资源下载

更多资源
Mario

Mario

马里奥是站在游戏界顶峰的超人气多面角色。马里奥靠吃蘑菇成长,特征是大鼻子、头戴帽子、身穿背带裤,还留着胡子。与他的双胞胎兄弟路易基一起,长年担任任天堂的招牌角色。

腾讯云软件源

腾讯云软件源

为解决软件依赖安装时官方源访问速度慢的问题,腾讯云为一些软件搭建了缓存服务。您可以通过使用腾讯云软件源站来提升依赖包的安装速度。为了方便用户自由搭建服务架构,目前腾讯云软件源站支持公网访问和内网访问。

Nacos

Nacos

Nacos /nɑ:kəʊs/ 是 Dynamic Naming and Configuration Service 的首字母简称,一个易于构建 AI Agent 应用的动态服务发现、配置管理和AI智能体管理平台。Nacos 致力于帮助您发现、配置和管理微服务及AI智能体应用。Nacos 提供了一组简单易用的特性集,帮助您快速实现动态服务发现、服务配置、服务元数据、流量管理。Nacos 帮助您更敏捷和容易地构建、交付和管理微服务平台。

Sublime Text

Sublime Text

Sublime Text具有漂亮的用户界面和强大的功能,例如代码缩略图,Python的插件,代码段等。还可自定义键绑定,菜单和工具栏。Sublime Text 的主要功能包括:拼写检查,书签,完整的 Python API , Goto 功能,即时项目切换,多选择,多窗口等等。Sublime Text 是一个跨平台的编辑器,同时支持Windows、Linux、Mac OS X等操作系统。

用户登录
用户注册