首页 文章 精选 留言 我的

精选列表

搜索[超融合软件],共10000篇文章
优秀的个人博客,低调大师

19个JS超有用的简写技巧

1.三元操作符 当想写if...else语句时,使用三元操作符来代替。 constx=20;letanswer;if(x>10){answer='isgreater';}else{answer='islesser';} 简写: const answer = x > 10 ? 'is greater' : 'is lesser'; 也可以嵌套if语句:const big = x > 10 ? " greater 10" : x 2.短路求值简写方式 当给一个变量分配另一个值时,想确定源始值不是null,undefined或空值。可以写撰写一个多重条件的if语句。 if(variable1!==null||variable1!==undefined||variable1!==''){letvariable2=variable1;} 或者可以使用短路求值方法:const variable2 = variable1 || 'new'; 3.声明变量简写方法 letx;lety;letz=3; 简写方法:let x, y, z=3; 4.if存在条件简写方法 if (likeJavaScript === true) 简写: if (likeJavaScript) 只有likeJavaScript是真值时,二者语句才相等 如果判断值不是真值,则可以这样: leta;if(a!==true){//dosomething...} 简写: leta;if(!a){//dosomething...} 5.JavaScript循环简写方法 for (let i = 0; i < allImgs.length; i++) 简写:for (let index in allImgs)也可以使用Array.forEach: functionlogArrayElements(element,index,array){console.log("a["+index+"]="+element);}[2,5,9].forEach(logArrayElements);//logs://a[0]=2//a[1]=5//a[2]=9 6.短路评价 给一个变量分配的值是通过判断其值是否为null或undefined,则可以: letdbHost;if(process.env.DB_HOST){dbHost=process.env.DB_HOST;}else{dbHost='localhost';} 简写:const dbHost = process.env.DB_HOST || 'localhost'; 7.十进制指数 当需要写数字带有很多零时(如10000000),可以采用指数(1e7)来代替这个数字:for (let i = 0; i < 10000; i++) {}简写: for(leti=0;i<1e7;i++){}//下面都是返回true1e0===1;1e1===10;1e2===100;1e3===1000;1e4===10000;1e5===100000; 8.对象属性简写 如果属性名与key名相同,则可以采用ES6的方法:const obj = { x:x, y:y }; 简写: const obj = { x, y }; 9.箭头函数简写 传统函数编写方法很容易让人理解和编写,但是当嵌套在另一个函数中,则这些优势就荡然无存。 functionsayHello(name){console.log('Hello',name);}setTimeout(function(){console.log('Loaded')},2000);list.forEach(function(item){console.log(item);}); 简写: sayHello=name=>console.log('Hello',name);setTimeout(()=>console.log('Loaded'),2000);list.forEach(item=>console.log(item)); 10.隐式返回值简写 经常使用return语句来返回函数最终结果,一个单独语句的箭头函数能隐式返回其值(函数必须省略{}为了省略return关键字) 为返回多行语句(例如对象字面表达式),则需要使用()包围函数体。 functioncalcCircumference(diameter){returnMath.PI*diameter}varfunc=functionfunc(){return{foo:1};}; 简写: calcCircumference=diameter=>(Math.PI*diameter;)varfunc=()=>({foo:1}); 11.默认参数值 为了给函数中参数传递默认值,通常使用if语句来编写,但是使用ES6定义默认值,则会很简洁: functionvolume(l,w,h){if(w===undefined)w=3;if(h===undefined)h=4;returnl*w*h;} 简写: volume=(l,w=3,h=4)=>(l*w*h);volume(2)//output:24 12.模板字符串 传统的JavaScript语言,输出模板通常是这样写的。 constwelcome='Youhaveloggedinas'+first+''+last+'.'constdb='http://'+host+':'+port+'/'+database; ES6可以使用反引号和${}简写: constwelcome=`Youhaveloggedinas${first}${last}`;constdb=`http://${host}:${port}/${database}`; 13.解构赋值简写方法 在web框架中,经常需要从组件和API之间来回传递数组或对象字面形式的数据,然后需要解构它 constobservable=require('mobx/observable');constaction=require('mobx/action');construnInAction=require('mobx/runInAction');conststore=this.props.store;constform=this.props.form;constloading=this.props.loading;consterrors=this.props.errors;constentity=this.props.entity; 简写: import{observable,action,runInAction}from'mobx';const{store,form,loading,errors,entity}=this.props; 也可以分配变量名: const{store,form,loading,errors,entity:contact}=this.props;//最后一个变量名为contact 14.多行字符串简写 需要输出多行字符串,需要使用+来拼接: constlorem='Loremipsumdolorsitamet,consectetur\n\t'+'adipisicingelit,seddoeiusmodtemporincididunt\n\t'+'utlaboreetdoloremagnaaliqua.Utenimadminim\n\t'+'veniam,quisnostrudexercitationullamcolaboris\n\t'+'nisiutaliquipexeacommodoconsequat.Duisaute\n\t'+'iruredolorinreprehenderitinvoluptatevelitesse.\n\t' 使用反引号,则可以达到简写作用: constlorem=`Loremipsumdolorsitamet,consecteturadipisicingelit,seddoeiusmodtemporincididuntutlaboreetdoloremagnaaliqua.Utenimadminimveniam,quisnostrudexercitationullamcolaborisnisiutaliquipexeacommodoconsequat.Duisauteiruredolorinreprehenderitinvoluptatevelitesse.` 15.扩展运算符简写 扩展运算符有几种用例让JavaScript代码更加有效使用,可以用来代替某个数组函数。 //joiningarraysconstodd=[1,3,5];constnums=[2,4,6].concat(odd);//cloningarraysconstarr=[1,2,3,4];constarr2=arr.slice() 简写: //joiningarraysconstodd=[1,3,5];constnums=[2,4,6,...odd];console.log(nums);//[2,4,6,1,3,5]//cloningarraysconstarr=[1,2,3,4];constarr2=[...arr]; 不像concat()函数,可以使用扩展运算符来在一个数组中任意处插入另一个数组。 constodd=[1,3,5];constnums=[2,...odd,4,6]; 也可以使用扩展运算符解构: const{a,b,...z}={a:1,b:2,c:3,d:4};console.log(a)//1console.log(b)//2console.log(z)//{c:3,d:4} 16.强制参数简写 JavaScript中如果没有向函数参数传递值,则参数为undefined。为了增强参数赋值,可以使用if语句来抛出异常,或使用强制参数简写方法。 functionfoo(bar){if(bar===undefined){thrownewError('Missingparameter!');}returnbar;} 简写: mandatory=()=>{thrownewError('Missingparameter!');}foo=(bar=mandatory())=>{returnbar;} 17.Array.find简写 想从数组中查找某个值,则需要循环。在ES6中,find()函数能实现同样效果。 constpets=[{type:'Dog',name:'Max'},{type:'Cat',name:'Karl'},{type:'Dog',name:'Tommy'},]functionfindDog(name){for(leti=0;i<pets.length;++i){if(pets[i].type==='Dog'&&pets[i].name===name){returnpets[i];}}} 简写: pet=pets.find(pet=>pet.type==='Dog'&&pet.name==='Tommy');console.log(pet);//{type:'Dog',name:'Tommy'} 18.Object[key]简写 考虑一个验证函数 functionvalidate(values){if(!values.first)returnfalse;if(!values.last)returnfalse;returntrue;}console.log(validate({first:'Bruce',last:'Wayne'}));//true 假设当需要不同域和规则来验证,能否编写一个通用函数在运行时确认? //对象验证规则constschema={first:{required:true},last:{required:true}}//通用验证函数constvalidate=(schema,values)=>{for(fieldinschema){if(schema[field].required){if(!values[field]){returnfalse;}}}returntrue;}console.log(validate(schema,{first:'Bruce'}));//falseconsole.log(validate(schema,{first:'Bruce',last:'Wayne'}));//true 现在可以有适用于各种情况的验证函数,不需要为了每个而编写自定义验证函数了 19.双重非位运算简写 有一个有效用例用于双重非运算操作符。可以用来代替Math.floor(),其优势在于运行更快,可以阅读此文章了解更多位运算。 Math.floor(4.9) === 4 //true 简写:~~4.9 === 4 //true 本文分享自微信公众号 - JavaScript忍者秘籍(js-obok)。如有侵权,请联系 support@oschina.cn 删除。本文参与“OSC源创计划”,欢迎正在阅读的你也加入,一起分享。

优秀的个人博客,低调大师

超详细Netty入门,看这篇就够了!

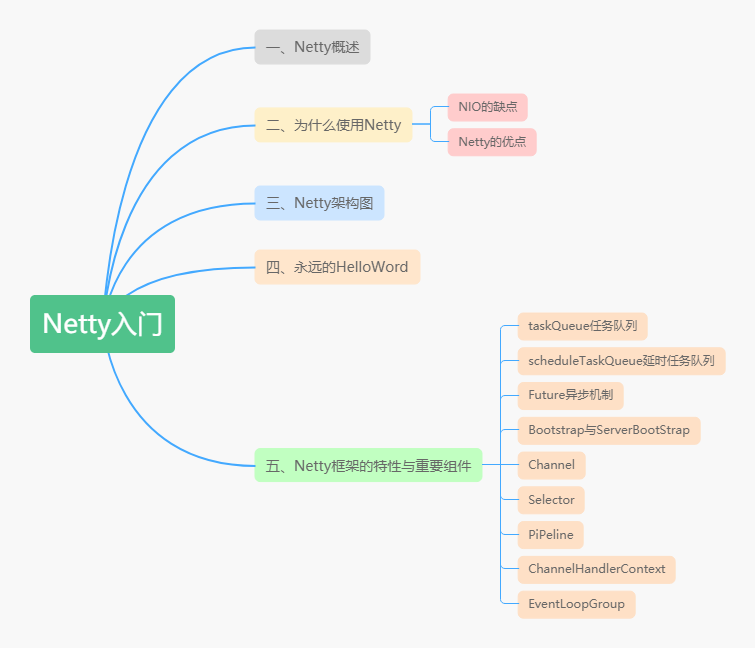
思维导图 前言 本文主要讲述Netty框架的一些特性以及重要组件,希望看完之后能对Netty框架有一个比较直观的感受,希望能帮助读者快速入门Netty,减少一些弯路。 一、Netty概述 官方的介绍: Netty is an asynchronous event-driven network application framework for rapid development of maintainable high performance protocol servers & clients. Netty是 一个异步事件驱动的网络应用程序框架,用于快速开发可维护的高性能协议服务器和客户端。 二、为什么使用Netty 从官网上介绍,Netty是一个网络应用程序框架,开发服务器和客户端。也就是用于网络编程的一个框架。既然是网络编程,Socket就不谈了,为什么不用NIO呢? 2.1 NIO的缺点 对于这个问题,之前我写了一篇文章《NIO入门》对NIO有比较详细的介绍,NIO的主要问题是: NIO的类库和API繁杂,学习成本高,你需要熟练掌握Selector、ServerSocketChannel、SocketChannel、ByteBuffer等。 需要熟悉Java多线程编程。这是因为NIO编程涉及到Reactor模式,你必须对多线程和网络编程非常熟悉,才能写出高质量的NIO程序。 臭名昭著的epoll bug。它会导致Selector空轮询,最终导致CPU 100%。直到JDK1.7版本依然没得到根本性的解决。 2.2 Netty的优点 相对地,Netty的优点有很多: API使用简单,学习成本低。 功能强大,内置了多种解码编码器,支持多种协议。 性能高,对比其他主流的NIO框架,Netty的性能最优。 社区活跃,发现BUG会及时修复,迭代版本周期短,不断加入新的功能。 Dubbo、Elasticsearch都采用了Netty,质量得到验证。 三、架构图 上面这张图就是在官网首页的架构图,我们从上到下分析一下。 绿色的部分Core核心模块,包括零拷贝、API库、可扩展的事件模型。 橙色部分Protocol Support协议支持,包括Http协议、webSocket、SSL(安全套接字协议)、谷歌Protobuf协议、zlib/gzip压缩与解压缩、Large File Transfer大文件传输等等。 红色的部分Transport Services传输服务,包括Socket、Datagram、Http Tunnel等等。 以上可看出Netty的功能、协议、传输方式都比较全,比较强大。 四、永远的Hello Word 首先搭建一个HelloWord工程,先熟悉一下API,还有为后面的学习做铺垫。以下面这张图为依据: 4.1 引入Maven依赖 使用的版本是4.1.20,相对比较稳定的一个版本。 <dependency> <groupId>io.netty</groupId> <artifactId>netty-all</artifactId> <version>4.1.20.Final</version> </dependency> 4.2 创建服务端启动类 public class MyServer { public static void main(String[] args) throws Exception { //创建两个线程组 boosGroup、workerGroup EventLoopGroup bossGroup = new NioEventLoopGroup(); EventLoopGroup workerGroup = new NioEventLoopGroup(); try { //创建服务端的启动对象,设置参数 ServerBootstrap bootstrap = new ServerBootstrap(); //设置两个线程组boosGroup和workerGroup bootstrap.group(bossGroup, workerGroup) //设置服务端通道实现类型 .channel(NioServerSocketChannel.class) //设置线程队列得到连接个数 .option(ChannelOption.SO_BACKLOG, 128) //设置保持活动连接状态 .childOption(ChannelOption.SO_KEEPALIVE, true) //使用匿名内部类的形式初始化通道对象 .childHandler(new ChannelInitializer<SocketChannel>() { @Override protected void initChannel(SocketChannel socketChannel) throws Exception { //给pipeline管道设置处理器 socketChannel.pipeline().addLast(new MyServerHandler()); } });//给workerGroup的EventLoop对应的管道设置处理器 System.out.println("java技术爱好者的服务端已经准备就绪..."); //绑定端口号,启动服务端 ChannelFuture channelFuture = bootstrap.bind(6666).sync(); //对关闭通道进行监听 channelFuture.channel().closeFuture().sync(); } finally { bossGroup.shutdownGracefully(); workerGroup.shutdownGracefully(); } } } 4.3 创建服务端处理器 /** * 自定义的Handler需要继承Netty规定好的HandlerAdapter * 才能被Netty框架所关联,有点类似SpringMVC的适配器模式 **/ public class MyServerHandler extends ChannelInboundHandlerAdapter { @Override public void channelRead(ChannelHandlerContext ctx, Object msg) throws Exception { //获取客户端发送过来的消息 ByteBuf byteBuf = (ByteBuf) msg; System.out.println("收到客户端" + ctx.channel().remoteAddress() + "发送的消息:" + byteBuf.toString(CharsetUtil.UTF_8)); } @Override public void channelReadComplete(ChannelHandlerContext ctx) throws Exception { //发送消息给客户端 ctx.writeAndFlush(Unpooled.copiedBuffer("服务端已收到消息,并给你发送一个问号?", CharsetUtil.UTF_8)); } @Override public void exceptionCaught(ChannelHandlerContext ctx, Throwable cause) throws Exception { //发生异常,关闭通道 ctx.close(); } } 4.4 创建客户端启动类 public class MyClient { public static void main(String[] args) throws Exception { NioEventLoopGroup eventExecutors = new NioEventLoopGroup(); try { //创建bootstrap对象,配置参数 Bootstrap bootstrap = new Bootstrap(); //设置线程组 bootstrap.group(eventExecutors) //设置客户端的通道实现类型 .channel(NioSocketChannel.class) //使用匿名内部类初始化通道 .handler(new ChannelInitializer<SocketChannel>() { @Override protected void initChannel(SocketChannel ch) throws Exception { //添加客户端通道的处理器 ch.pipeline().addLast(new MyClientHandler()); } }); System.out.println("客户端准备就绪,随时可以起飞~"); //连接服务端 ChannelFuture channelFuture = bootstrap.connect("127.0.0.1", 6666).sync(); //对通道关闭进行监听 channelFuture.channel().closeFuture().sync(); } finally { //关闭线程组 eventExecutors.shutdownGracefully(); } } } 4.5 创建客户端处理器 public class MyClientHandler extends ChannelInboundHandlerAdapter { @Override public void channelActive(ChannelHandlerContext ctx) throws Exception { //发送消息到服务端 ctx.writeAndFlush(Unpooled.copiedBuffer("歪比巴卜~茉莉~Are you good~马来西亚~", CharsetUtil.UTF_8)); } @Override public void channelRead(ChannelHandlerContext ctx, Object msg) throws Exception { //接收服务端发送过来的消息 ByteBuf byteBuf = (ByteBuf) msg; System.out.println("收到服务端" + ctx.channel().remoteAddress() + "的消息:" + byteBuf.toString(CharsetUtil.UTF_8)); } } 4.6 测试 先启动服务端,再启动客户端,就可以看到结果: MyServer打印结果: MyClient打印结果: 五、Netty的特性与重要组件 5.1 taskQueue任务队列 如果Handler处理器有一些长时间的业务处理,可以交给taskQueue异步处理。怎么用呢,请看代码演示: public class MyServerHandler extends ChannelInboundHandlerAdapter { @Override public void channelRead(ChannelHandlerContext ctx, Object msg) throws Exception { //获取到线程池eventLoop,添加线程,执行 ctx.channel().eventLoop().execute(new Runnable() { @Override public void run() { try { //长时间操作,不至于长时间的业务操作导致Handler阻塞 Thread.sleep(1000); System.out.println("长时间的业务处理"); } catch (Exception e) { e.printStackTrace(); } } }); } } 我们打一个debug调试,是可以看到添加进去的taskQueue有一个任务。 5.2 scheduleTaskQueue延时任务队列 延时任务队列和上面介绍的任务队列非常相似,只是多了一个可延迟一定时间再执行的设置,请看代码演示: ctx.channel().eventLoop().schedule(new Runnable() { @Override public void run() { try { //长时间操作,不至于长时间的业务操作导致Handler阻塞 Thread.sleep(1000); System.out.println("长时间的业务处理"); } catch (Exception e) { e.printStackTrace(); } } },5, TimeUnit.SECONDS);//5秒后执行 依然打开debug进行调试查看,我们可以有一个scheduleTaskQueue任务待执行中 5.3 Future异步机制 在搭建HelloWord工程的时候,我们看到有一行这样的代码: ChannelFuture channelFuture = bootstrap.connect("127.0.0.1", 6666); 很多操作都返回这个ChannelFuture对象,究竟这个ChannelFuture对象是用来做什么的呢? ChannelFuture提供操作完成时一种异步通知的方式。一般在Socket编程中,等待响应结果都是同步阻塞的,而Netty则不会造成阻塞,因为ChannelFuture是采取类似观察者模式的形式进行获取结果。请看一段代码演示: //添加监听器 channelFuture.addListener(new ChannelFutureListener() { //使用匿名内部类,ChannelFutureListener接口 //重写operationComplete方法 @Override public void operationComplete(ChannelFuture future) throws Exception { //判断是否操作成功 if (future.isSuccess()) { System.out.println("连接成功"); } else { System.out.println("连接失败"); } } }); 5.4 Bootstrap与ServerBootStrap Bootstrap和ServerBootStrap是Netty提供的一个创建客户端和服务端启动器的工厂类,使用这个工厂类非常便利地创建启动类,根据上面的一些例子,其实也看得出来能大大地减少了开发的难度。首先看一个类图: 可以看出都是继承于AbstractBootStrap抽象类,所以大致上的配置方法都相同。 一般来说,使用Bootstrap创建启动器的步骤可分为以下几步: 5.4.1 group() 在上一篇文章《Reactor模式》中,我们就讲过服务端要使用两个线程组: bossGroup 用于监听客户端连接,专门负责与客户端创建连接,并把连接注册到workerGroup的Selector中。 workerGroup用于处理每一个连接发生的读写事件。 一般创建线程组直接使用以下new就完事了: EventLoopGroup bossGroup = new NioEventLoopGroup(); EventLoopGroup workerGroup = new NioEventLoopGroup(); 有点好奇的是,既然是线程组,那线程数默认是多少呢?深入源码: //使用一个常量保存 private static final int DEFAULT_EVENT_LOOP_THREADS; static { //NettyRuntime.availableProcessors() * 2,cpu核数的两倍赋值给常量 DEFAULT_EVENT_LOOP_THREADS = Math.max(1, SystemPropertyUtil.getInt( "io.netty.eventLoopThreads", NettyRuntime.availableProcessors() * 2)); if (logger.isDebugEnabled()) { logger.debug("-Dio.netty.eventLoopThreads: {}", DEFAULT_EVENT_LOOP_THREADS); } } protected MultithreadEventLoopGroup(int nThreads, Executor executor, Object... args) { //如果不传入,则使用常量的值,也就是cpu核数的两倍 super(nThreads == 0 ? DEFAULT_EVENT_LOOP_THREADS : nThreads, executor, args); } 通过源码可以看到,默认的线程数是cpu核数的两倍。假设想自定义线程数,可以使用有参构造器: //设置bossGroup线程数为1 EventLoopGroup bossGroup = new NioEventLoopGroup(1); //设置workerGroup线程数为16 EventLoopGroup workerGroup = new NioEventLoopGroup(16); 5.4.2 channel() 这个方法用于设置通道类型,当建立连接后,会根据这个设置创建对应的Channel实例。 使用debug模式可以看到 通道类型有以下: NioSocketChannel: 异步非阻塞的客户端 TCP Socket 连接。 NioServerSocketChannel: 异步非阻塞的服务器端 TCP Socket 连接。 常用的就是这两个通道类型,因为是异步非阻塞的。所以是首选。 OioSocketChannel: 同步阻塞的客户端 TCP Socket 连接。 OioServerSocketChannel: 同步阻塞的服务器端 TCP Socket 连接。 稍微在本地调试过,用起来和Nio有一些不同,是阻塞的,所以API调用也不一样。因为是阻塞的IO,几乎没什么人会选择使用Oio,所以也很难找到例子。我稍微琢磨了一下,经过几次报错之后,总算调通了。代码如下: //server端代码,跟上面几乎一样,只需改三个地方 //这个地方使用的是OioEventLoopGroup EventLoopGroup bossGroup = new OioEventLoopGroup(); ServerBootstrap bootstrap = new ServerBootstrap(); bootstrap.group(bossGroup)//只需要设置一个线程组boosGroup .channel(OioServerSocketChannel.class)//设置服务端通道实现类型 //client端代码,只需改两个地方 //使用的是OioEventLoopGroup EventLoopGroup eventExecutors = new OioEventLoopGroup(); //通道类型设置为OioSocketChannel bootstrap.group(eventExecutors)//设置线程组 .channel(OioSocketChannel.class)//设置客户端的通道实现类型 NioSctpChannel: 异步的客户端 Sctp(Stream Control Transmission Protocol,流控制传输协议)连接。 NioSctpServerChannel: 异步的 Sctp 服务器端连接。 本地没启动成功,网上看了一些网友的评论,说是只能在linux环境下才可以启动。从报错信息看:SCTP not supported on this platform,不支持这个平台。因为我电脑是window系统,所以网友说的有点道理。 5.4.3 option()与childOption() 首先说一下这两个的区别。 option()设置的是服务端用于接收进来的连接,也就是boosGroup线程。 childOption()是提供给父管道接收到的连接,也就是workerGroup线程。 搞清楚了之后,我们看一下常用的一些设置有哪些: SocketChannel参数,也就是childOption()常用的参数: SO_RCVBUF Socket参数,TCP数据接收缓冲区大小。TCP_NODELAY TCP参数,立即发送数据,默认值为Ture。SO_KEEPALIVE Socket参数,连接保活,默认值为False。启用该功能时,TCP会主动探测空闲连接的有效性。 ServerSocketChannel参数,也就是option()常用参数: SO_BACKLOG Socket参数,服务端接受连接的队列长度,如果队列已满,客户端连接将被拒绝。默认值,Windows为200,其他为128。 由于篇幅限制,其他就不列举了,大家可以去网上找资料看看,了解一下。 5.4.4 设置流水线(重点) ChannelPipeline是Netty处理请求的责任链,ChannelHandler则是具体处理请求的处理器。实际上每一个channel都有一个处理器的流水线。 在Bootstrap中childHandler()方法需要初始化通道,实例化一个ChannelInitializer,这时候需要重写initChannel()初始化通道的方法,装配流水线就是在这个地方进行。代码演示如下: //使用匿名内部类的形式初始化通道对象 bootstrap.childHandler(new ChannelInitializer<SocketChannel>() { @Override protected void initChannel(SocketChannel socketChannel) throws Exception { //给pipeline管道设置自定义的处理器 socketChannel.pipeline().addLast(new MyServerHandler()); } }); 处理器Handler主要分为两种: ChannelInboundHandlerAdapter(入站处理器)、ChannelOutboundHandler(出站处理器) 入站指的是数据从底层java NIO Channel到Netty的Channel。 出站指的是通过Netty的Channel来操作底层的java NIO Channel。 ChannelInboundHandlerAdapter处理器常用的事件有: 注册事件 fireChannelRegistered。 连接建立事件 fireChannelActive。 读事件和读完成事件 fireChannelRead、fireChannelReadComplete。 异常通知事件 fireExceptionCaught。 用户自定义事件 fireUserEventTriggered。 Channel 可写状态变化事件 fireChannelWritabilityChanged。 连接关闭事件 fireChannelInactive。 ChannelOutboundHandler处理器常用的事件有: 端口绑定 bind。 连接服务端 connect。 写事件 write。 刷新时间 flush。 读事件 read。 主动断开连接 disconnect。 关闭 channel 事件 close。 还有一个类似的handler(),主要用于装配parent通道,也就是bossGroup线程。一般情况下,都用不上这个方法。 5.4.5 bind() 提供用于服务端或者客户端绑定服务器地址和端口号,默认是异步启动。如果加上sync()方法则是同步。 有五个同名的重载方法,作用都是用于绑定地址端口号。不一一介绍了。 5.4.6 优雅地关闭EventLoopGroup //释放掉所有的资源,包括创建的线程 bossGroup.shutdownGracefully(); workerGroup.shutdownGracefully(); 会关闭所有的child Channel。关闭之后,释放掉底层的资源。 5.5 Channel Channel是什么?不妨看一下官方文档的说明: A nexus to a network socket or a component which is capable of I/O operations such as read, write, connect, and bind 翻译大意:一种连接到网络套接字或能进行读、写、连接和绑定等I/O操作的组件。 如果上面这段说明比较抽象,下面还有一段说明: A channel provides a user: the current state of the channel (e.g. is it open? is it connected?),the configuration parameters of the channel (e.g. receive buffer size),the I/O operations that the channel supports (e.g. read, write, connect, and bind), andthe ChannelPipeline which handles all I/O events and requests associated with the channel. 翻译大意: channel为用户提供: 通道当前的状态(例如它是打开?还是已连接?) channel的配置参数(例如接收缓冲区的大小) channel支持的IO操作(例如读、写、连接和绑定),以及处理与channel相关联的所有IO事件和请求的ChannelPipeline。 5.5.1 获取channel的状态 boolean isOpen(); //如果通道打开,则返回true boolean isRegistered();//如果通道注册到EventLoop,则返回true boolean isActive();//如果通道处于活动状态并且已连接,则返回true boolean isWritable();//当且仅当I/O线程将立即执行请求的写入操作时,返回true。 以上就是获取channel的四种状态的方法。 5.5.2 获取channel的配置参数 获取单条配置信息,使用getOption(),代码演示: ChannelConfig config = channel.config();//获取配置参数 //获取ChannelOption.SO_BACKLOG参数, Integer soBackLogConfig = config.getOption(ChannelOption.SO_BACKLOG); //因为我启动器配置的是128,所以我这里获取的soBackLogConfig=128 获取多条配置信息,使用getOptions(),代码演示: ChannelConfig config = channel.config(); Map<ChannelOption<?>, Object> options = config.getOptions(); for (Map.Entry<ChannelOption<?>, Object> entry : options.entrySet()) { System.out.println(entry.getKey() + " : " + entry.getValue()); } /** SO_REUSEADDR : false WRITE_BUFFER_LOW_WATER_MARK : 32768 WRITE_BUFFER_WATER_MARK : WriteBufferWaterMark(low: 32768, high: 65536) SO_BACKLOG : 128 以下省略... */ 5.5.3 channel支持的IO操作 写操作,这里演示从服务端写消息发送到客户端: @Override public void channelRead(ChannelHandlerContext ctx, Object msg) throws Exception { ctx.channel().writeAndFlush(Unpooled.copiedBuffer("这波啊,这波是肉蛋葱鸡~", CharsetUtil.UTF_8)); } 客户端控制台: //收到服务端/127.0.0.1:6666的消息:这波啊,这波是肉蛋葱鸡~ 连接操作,代码演示: ChannelFuture connect = channelFuture.channel().connect(new InetSocketAddress("127.0.0.1", 6666));//一般使用启动器,这种方式不常用 通过channel获取ChannelPipeline,并做相关的处理: //获取ChannelPipeline对象 ChannelPipeline pipeline = ctx.channel().pipeline(); //往pipeline中添加ChannelHandler处理器,装配流水线 pipeline.addLast(new MyServerHandler()); 5.6 Selector 在NioEventLoop中,有一个成员变量selector,这是nio包的Selector,在之前《NIO入门》中,我已经讲过Selector了。 Netty中的Selector也和NIO的Selector是一样的,就是用于监听事件,管理注册到Selector中的channel,实现多路复用器。 5.7 PiPeline与ChannelPipeline 在前面介绍Channel时,我们知道可以在channel中装配ChannelHandler流水线处理器,那一个channel不可能只有一个channelHandler处理器,肯定是有很多的,既然是很多channelHandler在一个流水线工作,肯定是有顺序的。 于是pipeline就出现了,pipeline相当于处理器的容器。初始化channel时,把channelHandler按顺序装在pipeline中,就可以实现按序执行channelHandler了。 在一个Channel中,只有一个ChannelPipeline。该pipeline在Channel被创建的时候创建。ChannelPipeline包含了一个ChannelHander形成的列表,且所有ChannelHandler都会注册到ChannelPipeline中。 5.8 ChannelHandlerContext 在Netty中,Handler处理器是有我们定义的,上面讲过通过集成入站处理器或者出站处理器实现。这时如果我们想在Handler中获取pipeline对象,或者channel对象,怎么获取呢。 于是Netty设计了这个ChannelHandlerContext上下文对象,就可以拿到channel、pipeline等对象,就可以进行读写等操作。 通过类图,ChannelHandlerContext是一个接口,下面有三个实现类。 实际上ChannelHandlerContext在pipeline中是一个链表的形式。看一段源码就明白了: //ChannelPipeline实现类DefaultChannelPipeline的构造器方法 protected DefaultChannelPipeline(Channel channel) { this.channel = ObjectUtil.checkNotNull(channel, "channel"); succeededFuture = new SucceededChannelFuture(channel, null); voidPromise = new VoidChannelPromise(channel, true); //设置头结点head,尾结点tail tail = new TailContext(this); head = new HeadContext(this); head.next = tail; tail.prev = head; } 下面我用一张图来表示,会更加清晰一点: 5.9 EventLoopGroup 我们先看一下EventLoopGroup的类图: 其中包括了常用的实现类NioEventLoopGroup。OioEventLoopGroup在前面的例子中也有使用过。 从Netty的架构图中,可以知道服务器是需要两个线程组进行配合工作的,而这个线程组的接口就是EventLoopGroup。 每个EventLoopGroup里包括一个或多个EventLoop,每个EventLoop中维护一个Selector实例。 5.9.1 轮询机制的实现原理 我们不妨看一段DefaultEventExecutorChooserFactory的源码: private final AtomicInteger idx = new AtomicInteger(); private final EventExecutor[] executors; @Override public EventExecutor next() { //idx.getAndIncrement()相当于idx++,然后对任务长度取模 return executors[idx.getAndIncrement() & executors.length - 1]; } 这段代码可以确定执行的方式是轮询机制,接下来debug调试一下: 它这里还有一个判断,如果线程数不是2的N次方,则采用取模算法实现。 @Override public EventExecutor next() { return executors[Math.abs(idx.getAndIncrement() % executors.length)]; } 写在最后 参考Netty官网文档:API文档 创作不易,觉得有用就点个赞吧。 我不要下次一定,希望这次一定素质三连,感谢! 想第一时间看到我更新的文章,可以微信搜索公众号「java技术爱好者」,拒绝做一条咸鱼,我是一个努力让大家记住的程序员。我们下期再见!!! 能力有限,如果有什么错误或者不当之处,请大家批评指正,一起学习交流!

优秀的个人博客,低调大师

APIJSON 3.7.0 发布,Star 超 6666 支持 JFinal

APIJSON 3.7.0更新内容: 新增支持多表关联操作的事务处理; RemoteFunction 内强制校验远程函数必须符合 Function 表的配置; Function 表新增 methods,tag,version 用于限制远程函数的使用范围; APIJSONBoot 升级 fastjson 版本,纠正版本号; APIJSONFinal 与 APIJSONBoot 同步代码和依赖; 完善对首页简介及通过用文档的英文翻译,感谢@ruoranw 的贡献; 具体见Release 发布版本。 已通过 APIAuto自动化接口回归测试(两个测试账号,85+66=151 条测试用例)。 APIJSON 简介 APIJSON是一种专为API而生的JSON网络传输协议以及基于这套协议实现的ORM库。 为简单的增删改查、复杂的查询、简单的事务操作提供了完全自动化的API。 能大幅降低开发和沟通成本,简化开发流程,缩短开发周期。 适合中小型前后端分离的项目,尤其是互联网创业项目和企业自用项目。 通过自动化API,前端可以定制任何数据、任何结构! 大部分HTTP请求后端再也不用写接口了,更不用写文档了! 前端再也不用和后端沟通接口或文档问题了!再也不会被文档各种错误坑了! 后端再也不用为了兼容旧接口写新版接口和文档了!再也不会被前端随时随地没完没了地烦了! APIJSON 生态内项目 APIAuto自动化接口管理工具,自动生成文档与注释、自动生成代码、自动化回归测试、自动静态检查等 apijson-docAPIJSON 官方文档,提供排版清晰、搜索方便的文档内容展示,包括设计规范、图文教程等 apijson.orgAPIJSON 官方网站,提供 APIJSON 的 功能简介、登记用户、作者与贡献者、相关链接 等 APIJSON.NETC# 版 APIJSON ,支持 MySQL, PostgreSQL, MS SQL Server, Oracle, SQLite apijson-phpPHP 版 APIJSON,基于 ThinkPHP,支持 MySQL, PostgreSQL, MS SQL Server, Oracle 等 apijsonNode.ts 版 APIJSON,支持 MySQL, PostgreSQL, MS SQL Server, Oracle, SQLite, MariaDB, WebSQL uliweb-apijsonPython 版 APIJSON,支持 MySQL, PostgreSQL, MS SQL Server, Oracle, SQLite 等 APIJSONGo 版 APIJSON,功能开发中... APIJSONKOTLINKotlin 版 APIJSON,基础框架搭建中... APIJSONParser第三方 APIJSON 解析器,将 JSON 动态解析成 SQL ApiJsonByJFinal整合 APIJSON 和 JFinal 的 Demo SpringServer1.2-APIJSON智慧党建服务器端,提供 上传 和 下载 文件的接口 APIJSON-Android-RxJava仿微信朋友圈动态实战项目,ZBLibrary(UI) + APIJSON(HTTP) + RxJava(Data) 感谢热心的作者们的贡献,点 ⭐Star 支持下他们吧。 几周前主项目的Star 在 6666 时特地截屏纪念,现在 6789 了嘿嘿。 创作不易,Gitee右上角点 ⭐Star 支持下吧,谢谢^_^ https://gitee.com/TommyLemon/APIJSON

优秀的个人博客,低调大师

阿里云服务器超详细连接

今天发布 更新一下1、远程服务器安装iis+php+mysql环境 iis+php+mysql环境:https://download.csdn.net/download/qq_39161501/10402847 2、解析域名 3、登录服务器绑定域名服务器路径 4、 (1)云服务器ECSA->网络和安全->安全组->创建安全组 https://help.aliyun.com/document_detail/25471.html 5、 (1)云服务器ECS->实例->点击(实例ID/名称) (2)弹出本地实例安全组->加入安全组->找到创建的test安全组 6、访问网址(阿里云服务器搭建成功) 护卫神集成环境下载地址:https://www.huweishen.com/ 护卫神集成环境下载地址:https://www.huweishen.com/优惠详情路径

优秀的个人博客,低调大师

Android超简单的进度条源码

相信大家都知道,打开程序的时候,需要通过进度条或者图片显示。这个时候很方便给应用程序优质的效果。下面我们来看看是如何实现进度条的代码,原理非常简单。 如图: packagecom.smart; importandroid.app.Activity; importandroid.os.Bundle; importandroid.os.Handler; importandroid.widget.ProgressBar; publicclassMainextendsActivity{ privateProgressBarpro1; privateProgressBarpro2; privateHandlerhandler=newHandler(); privateintcount1=0; privateintcount2=0;//进度条的从0开始 privateRunnabledoUpdateProgressBar1=newRunnable(){ @Override publicvoidrun(){ for(count1=0;count1<pro1.getMax();count1++){ handler.post(newRunnable(){ //增加进度 @Override publicvoidrun(){ pro1.setProgress(count1); } }); } } }; privateRunnabledoUpdateProgressBar2=newRunnable(){ @Override publicvoidrun(){ for(count2=0;count2<pro2.getMax();count2++){ handler.post(newRunnable(){ @Override publicvoidrun(){ pro2.setProgress(count2); } }); } } }; @Override publicvoidonCreate(BundlesavedInstanceState){ super.onCreate(savedInstanceState); setContentView(R.layout.main); pro1=(ProgressBar)findViewById(R.id.progressBar1);//得到组件 pro2=(ProgressBar)findViewById(R.id.progressBar2); Threadthread1=newThread(doUpdateProgressBar1,"thread1"); thread1.start();//开始 Threadthread2=newThread(doUpdateProgressBar2,"thread2"); thread2.start(); } } <?xmlversion="1.0"encoding="utf-8"?> <LinearLayoutxmlns:android="http://schemas.android.com/apk/res/android" android:orientation="vertical" android:layout_width="fill_parent" android:layout_height="fill_parent" > <ProgressBar android:id="@+id/progressBar1" android:layout_width="fill_parent" android:layout_height="wrap_content" style="?android:attr/progressBarStyleHorizontal" android:max="20000" /> <ProgressBar android:id="@+id/progressBar2" android:layout_width="fill_parent" android:layout_height="wrap_content" style="?android:attr/progressBarStyleHorizontal" android:max="20000" android:layout_marginTop="10dp" /> </LinearLayout> 本文转自 llb988 51CTO博客,原文链接:http://blog.51cto.com/llb988/517713,如需转载请自行联系原作者

优秀的个人博客,低调大师

Swift:超炫的View Controller切换动画

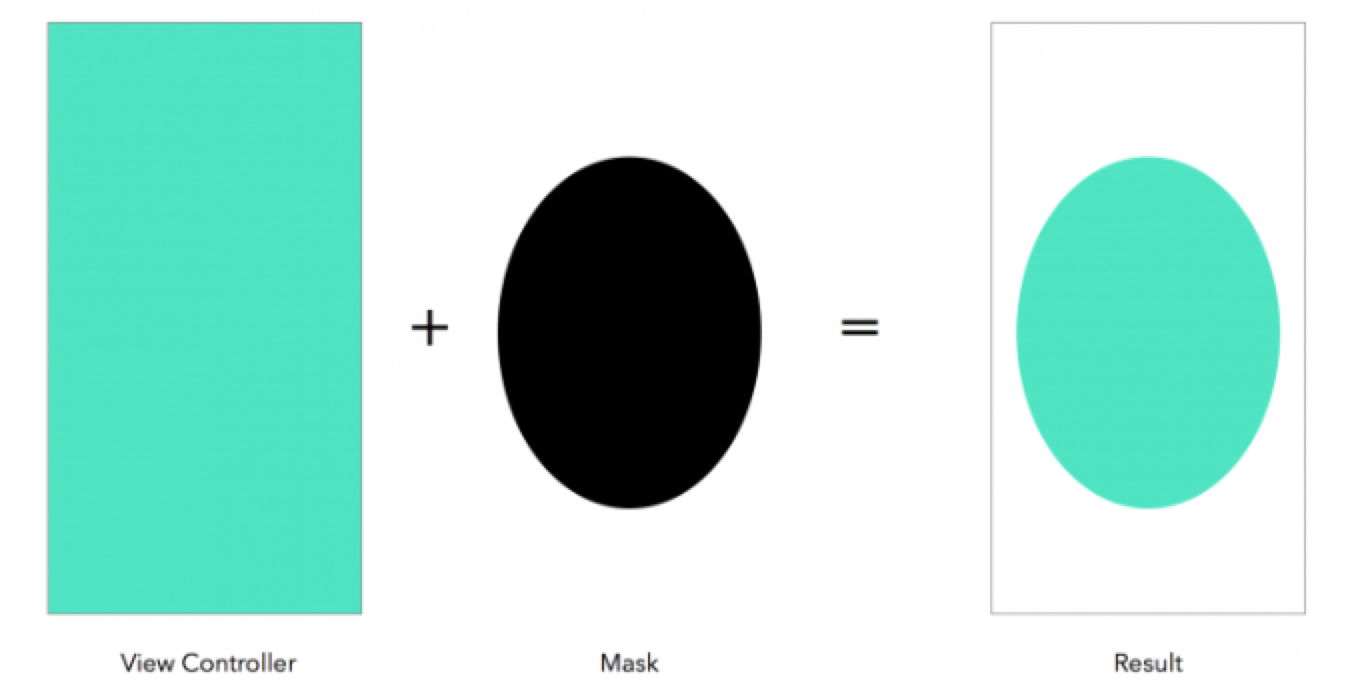
匿名社交应用Secret的开发者开发了一款叫做Ping的应用,用户可以他们感兴趣的话题的推送。 Ping有一个很炫的东西,就是主界面和之间切换的动画做的非常的好。每次看到一个非常炫的动画,都不由得会想:“这个东西我要不要自己实现以下”。哈哈~~~ 这个教程里,你会学到如何用Swift实现这样的很酷的动画。你会学到如何使用shape layer,遮罩和使用UIViewControllerAnimnatedTransitioning协议和UIPercentDrivenInteractivetransition类等实现View Controller界面切换动画。 不过需要注意,这里假定你已经有一定的Swift开发基础。如果只是初学的话,请自行查看我得其他Swift教程。 开篇简介 我们主要介绍Ping里从一个View Controller跳转到另一个的时候的动画。 在iOS里,你可以在UINavigationController中放入两个View Controller,并实现UIViewControllerAnimatedTransitioning协议来实现界面切换的动画。具体的细节有: 动画的时间长度 创建一个容器View来控制两个View Controller的View 可以实现任意你能想到的动画 这些动画,你可以用UIView得动画方法来作,也可以用core animation这样的比较底层的方法来做。本教程会使用后者。 如何实现 现在你已经知道代码大概会添加到什么地方。下面讨论下如何实现那个Ping的那个圈圈动画。这动画严格的描述起来是: 圆圈是从右侧的按钮产生。并且从圈中可以看到下面一层试图的内容。 也就是说,这个圆圈是一个遮罩。圆圈里的都可以看到,外面的全部都隐藏。 你可以用CALayer的mask可以达到这个效果。当然还需要设置alpha为0来隐藏下面一个视图的内容。alpha值设定为1的时候显示下面视图的内容。 现在你就懂了遮罩了。下一步就是决定用哪一种CAShapeLayer来实现这个遮罩。只需要修改这些CAShapeLayer组成的圆圈的半径。 现在开始 这里就不十分详细的叙述了,都是些关于创建和配置项目的步骤。 1. 创建一个新的项目。选择一个single view application 2. 项目名称设置为CircleTransition。语言选择Swift。Devices就选择iPhone 项目到此初步创建好了。在Main.stroyboard里只有一个view controller。但是我们的动画需要两个至少的view controller。不过首先需要把现在的这个view controller和UINavigationController关联起来。选中这个唯一的view controller,之后在菜单栏中选择Editor->Embed In->Navigation Controller。之后这个navigation controller就会成为initial controller,后面连着最开始生成的那个view controller。之后,选中这个navigation controller,在右侧菜单栏的第四个tab中勾去“Shows navigation bar”。因为在我们的app中不需要navigation bar。 接下来添加另外一个view controller。给这个view controller指定class为ViewController。 然后,给每一个view controller,除了navigation controller,添加一个按钮。双击按钮,删除文字,之后把按钮的背景色设置为黑色。另外一个按钮也同样处理。给这两个按钮设定autolayout。指定他们在右上角上。指定这两个按钮的宽度和高度为40。 最后让按钮变成圆形的。右边菜单的第三个tab中选择“user defined runtime attributes”。点下面的加号,添加如图所示的内容。设置button的corner radius为15。 这样这个按钮在运行起来的时候就是圆形的了。设定完成之后暂时看不到这个效果。运行起来以后: 现在需要在每个view controller中添加些内容了。先把这两个view controller的背景色修改一下。 现在这个app大致已经成型了。不同的颜色可以代表你将来要显示出来的各种各样的内容。所需要的就是把这个两个view controller连起来。在橘色的controller的按钮中放下鼠标。按下ctrl然后把光标拖动到另外一个controller上。这是会出现一个弹出的菜单。把这个菜单的action用同样的方法和这个controller再连接一次,并选择show。这样,在这个按钮选择的时候,navigation controller就会push到下一个view controller中。这是一个segue。后面的教程会需要这个segue所以这里给这个segue一个identifer,叫做“PushSegue”。运行代码,点击橘色controller的按钮就会跳转到紫色的controller了。 因为这是一个循环的过程,所以从橘色到紫色之后还需要从紫色回到橘色。现在就完成这个功能。首先,在紫色controller绑定的ViewController类中添加一个action方法。 @IBAction func circleTapped(sender: UIButton){ self.navigationController?.popViewControllerAnimated(true) } 并添加紫色controller上的按钮的引用,这个会在后面用到: @IBOutlet weak var button: UIButton! 之后给紫色controller的按钮的“touch up inside”事件添加上面的@IBAction。 绑定按钮的属性: 再运行起来看看。橘色到紫色,紫色到橘色循环往复! 注意:两个view controller都需要绑定按钮和按钮事件!否则后面的动画只能执行一次! 自定义动画 这里主要处理的就是navigation controller的push和pop动画。这需要我们实现UINavigationControllerDelegate协议的animationControllerForOperation方法。直接在ViewController中添加一个新的类: class NavigationControllerDelegate: NSObject, UINavigationControllerDelegate{ func navigationController(navigationController: UINavigationController, animationControllerForOperation operation: UINavigationControllerOperation, fromViewController fromVC: UIViewController, toViewController toVC: UIViewController) -> UIViewControllerAnimatedTransitioning? { return nil } } 首先,在右侧的菜单中选中Object这个item。 之后,把这个东西拖动到navigation controller secene下。 然后选中这个Object,在右侧菜单的第三个tab上修改class为我们刚刚定义的NavigationControllerDelegate。 下一步,给navigation controller指定delegate。选中navigation controller,然后在右侧最后的菜单中连接navigation controller的delegate选项到刚刚拖进来的Object上: 这个时候还是不会有特定的效果出现。因为方法还是空的,只能算是一个placeholder方法。 func navigationController(navigationController: UINavigationController, animationControllerForOperation operation: UINavigationControllerOperation, fromViewController fromVC: UIViewController, toViewController toVC: UIViewController) -> UIViewControllerAnimatedTransitioning? { return nil } 这个方法接受两个在navigation controller中得controller。从一个跳转到另一个的两个controller。并返回一个实现了UIViewControllerAnimatedTransitioning的对象。所以,我们需要创建一个实现了UIViewControllerAnimatedTransitioning协议的类。 class CircleTransitionAnimator: NSObject, UIViewControllerAnimatedTransitioning 首先添加一个属性: weak var transitionContext: UIViewControllerContextTransitioning? 这个属性会在后面的代码中用到。 添加一个方法: func transitionDuration(transitionContext: UIViewControllerContextTransitioning) -> NSTimeInterval { return 0.5 } 这个方法返回动画执行的时间。 添加动画方法: func animateTransition(transitionContext: UIViewControllerContextTransitioning) { // 1 self.transitionContext = transitionContext // 2 var containerView = transitionContext.containerView() var fromViewController = transitionContext.viewControllerForKey(UITransitionContextFromViewControllerKey) as ViewController var toViewController = transitionContext.viewControllerForKey(UITransitionContextToViewControllerKey) as ViewController var button = fromViewController.button // 3 containerView.addSubview(toViewController.view) // 4 var circleMaskPathInitial = UIBezierPath(ovalInRect: button.frame) var extremePoint = CGPointMake(button.center.x, button.center.y - CGRectGetHeight(toViewController.view.bounds)) // need more research var radius = sqrt(extremePoint.x * extremePoint.x + extremePoint.y * extremePoint.y) var circleMaskPathFinal = UIBezierPath(ovalInRect: CGRectInset(button.frame, -radius, -radius)) // 5 var maskLayer = CAShapeLayer() maskLayer.path = circleMaskPathFinal.CGPath toViewController.view.layer.mask = maskLayer // 6 var maskLayerAnimation = CABasicAnimation(keyPath: "path") maskLayerAnimation.fromValue = circleMaskPathInitial.CGPath maskLayerAnimation.toValue = circleMaskPathFinal.CGPath maskLayerAnimation.duration = self.transitionDuration(self.transitionContext!) maskLayerAnimation.delegate = self maskLayer.addAnimation(maskLayerAnimation, forKey: "CircleAnimation") } 一步步的解释: transitionContext属性保持了一个类成员的引用。这样在后面的代码中可以用到。 取出containerView以及fromViewController和toViewController和controller上面的button引用。动画主要还是作用在container view上的。 把toViewController的view添加到container view上。 创建两个路劲,一个就是button的大小(button在运行起来之后是圆形的),另一个要足够大到可以cover整个screen。动画就是在这两个path上来来回回。 创建一个CAShapeLayer作为mask用。给这个layer的path赋值为circleMaskPathFinal,否则动画执行完成以后可能又缩回来。 创建一个CABasicAnimation动画,key path是“path”,这个动画作用于layer的path属性上。动画从circleMaskPathInitial执行到circleMaskPathFinal。并给这个动画添加一个delegate,在动画执行完成以后清理现场。 实现animation代理的方法: override func animationDidStop(anim: CAAnimation!, finished flag: Bool) { self.transitionContext?.completeTransition(!self.transitionContext!.transitionWasCancelled()) self.transitionContext?.viewControllerForKey(UITransitionContextFromViewControllerKey)?.view.layer.mask = nil } 现在就可以用CircleTransitionAnimator来实现动画的效果了。修改代码NavigationControllerDelegate的代码: class NavigationControllerDelegate: NSObject, UINavigationControllerDelegate{ func navigationController(navigationController: UINavigationController, animationControllerForOperation operation: UINavigationControllerOperation, fromViewController fromVC: UIViewController, toViewController toVC: UIViewController) -> UIViewControllerAnimatedTransitioning? { return CircleTransitionAnimator() } } 运行起来吧。点击黑色的按钮,动画效果就出现了。 感觉不错吧,但是这个是不够的! 给动画添加手势响应 我们还要给这个动画添加一个可以响应手势的transition。响应手势需要用到一个方法:navigationController->interactionControllerForAnimationController。这是UINavigationControllerDelegate中得一个方法。这个方法返回一个实现了协议UIViewControllerInteractiveTransitioning的对象。 iOS的SDK中提供了一个UIPercentDrivenInteractiveTransition的类。这个类实现了上面的协议,并且提供了很多其他的手势处理实现。 在NavigationControllerDelegate类中添加以下的属性和方法: class NavigationControllerDelegate: NSObject, UINavigationControllerDelegate{ var interactionController: UIPercentDrivenInteractiveTransition? func navigationController(navigationController: UINavigationController, animationControllerForOperation operation: UINavigationControllerOperation, fromViewController fromVC: UIViewController, toViewController toVC: UIViewController) -> UIViewControllerAnimatedTransitioning? { return CircleTransitionAnimator() } func navigationController(navigationController: UINavigationController, interactionControllerForAnimationController animationController: UIViewControllerAnimatedTransitioning) -> UIViewControllerInteractiveTransitioning? { return self.interactionController } } 既然是响应手势的,那么一个pan的手势是必不可少的了。不过首先要添加一些辅助的东西。 1. 在NavigationControllerDelegate中添加对navigation controller的引用。 @IBOutlet weak var navigationController: UINavigationController? 给这个引用添加对navigation controller的引用,如图: 实现awakeFromNib方法: override func awakeFromNib() { super.awakeFromNib() var pan = UIPanGestureRecognizer(target: self, action: "panned:") self.navigationController!.view.addGestureRecognizer(pan) } 当pan这个动作在navigation controller的view上发生的时候就会触发panned回调方法。给这个方法添加如下代码: func panned(gestureRecognizer: UIPanGestureRecognizer){ switch gestureRecognizer.state { case .Began: self.interactionController = UIPercentDrivenInteractiveTransition() if self.navigationController?.viewControllers.count > 1 { self.navigationController?.popViewControllerAnimated(true) } else{ self.navigationController?.topViewController.performSegueWithIdentifier("PushSegue", sender: nil) } case .Changed: var translation = gestureRecognizer.translationInView(self.navigationController!.view) var completionProgress = translation.x / CGRectGetWidth(self.navigationController!.view.bounds) self.interactionController?.updateInteractiveTransition(completionProgress) case .Ended: if gestureRecognizer.velocityInView(self.navigationController!.view).x > 0 { self.interactionController?.finishInteractiveTransition() } else{ self.interactionController?.cancelInteractiveTransition() } self.interactionController = nil default: self.interactionController?.cancelInteractiveTransition() self.interactionController = nil } } 在Begin中,pan手势一开始执行就初始化出UIPercentDrivenInteractiveTransition对象,并作为值赋给属性self.interactionController。 如果在第一个view controller就设定一个push(在早先定义的一个segue),在第二个view controller的时候就设定一个pop。 在navigation controller的push或者pop的时候则触发NavigationControllerDelegate的返回self.interactionController对象的方法。 Changed,在这个方法中根据手势移动的距离让动画移动不同的距离。这里apple已经替我们做了很多。 Ended,这里你会看到手势的移动速度。如果是正则transition结束,如果是负则取消。同时,把interactionController值设置为nil。 default,如果是其他的状态就直接取消trnasition并把interactionController值设置为nil。 运行程序,在屏幕上左右移动你的手指看看效果吧! 欢迎加群互相学习,共同进步。QQ群:iOS: 58099570 | Android: 572064792 | Nodejs:329118122 做人要厚道,转载请注明出处! 本文转自张昺华-sky博客园博客,原文链接:http://www.cnblogs.com/sunshine-anycall/p/4283255.html ,如需转载请自行联系原作者

优秀的个人博客,低调大师

商用市场发力,Chromebook 销量超 Mac

IDC最近的市场调查显示,2016第一季度美国市场Chromebook笔记本电脑的销量接近200万台,首次超过苹果Mac电脑,后者同期的销量只有176万台。 IDC认为Chromebook今天的业绩主要归功于K12教育市场份额的提升,谷歌公司在教育市场的大力推广收到了成效。 但是教育市场并不是Chromebook增长动力的全部,去年市场调查公司NPD发布的数据显示,Chromebook在企业级技术市场取得了重大突破,虽然很多企业依然依赖Windows电脑,但是搭载ChromeOS和Android的商用设备在2015年上半年增长了29%,增长速度远超Windows和苹果公司的产品。 Chromebook的市场表现说明,Chromebook作为上网、处理邮件和行业应用的低成本的计算工具,可以很好满足学生和上班族的需要,而且ChromeOS最近也增强了其离线功能,进一步提高了Chromebook的实用性和适用性。 文章转载自 开源中国社区[http://www.oschina.net]

优秀的个人博客,低调大师

Android属性动画源代码解析(超详细)

本文假定你已经对属性动画有了一定的了解,至少使用过属性动画。下面我们就从属性动画最简单的使用开始。 ObjectAnimator .ofInt(target,propName,values[]) .setInterpolator(LinearInterpolator) .setEvaluator(IntEvaluator) .setDuration(500) .start(); 相信这段代码对你一定不陌生,代码中有几个地方是本文中将要重点关注的,setInterpolator(...)、setEvaluator(...)、setDuration(...)在源代码中是如何被使用的。另外,我们也将重点关注Android中属性动画是如何一步步地实现动画效果的(精确到每一帧(frame))。最后啰嗦几句,本文中使用的代码是Android 4.2.2。 上面代码的作用就是生成一个属性动画,根据ofInt()我们知道只是一个属性值类型为Int的View的动画。先放过其他的函数,从ObjectAnimator的start()函数开始。 public void start() { //...省略不必要代码 super.start(); } 从代码中我们知道,它调用了父类的start()方法,也就是ValueAnimator.start()。这个方法内部又调用了自身类内部的start(boolean playBackwards)方法。 /** * 方法简要介绍: * 这个方法开始播放动画。这个start()方法使用一个boolean值playBackwards来判断是否需 * 要回放动画。这个值通常为false,但当它从reverse()方法被调用的时候也 * 可能为true。有一点需要注意的是,这个方法必须从UI主线程调用。 */ private void start(boolean playBackwards) { if (Looper.myLooper() == null) { throw new AndroidRuntimeException("Animators may only be run on Looper threads"); } mPlayingBackwards = playBackwards; mCurrentIteration = 0; mPlayingState = STOPPED; mStarted = true; mStartedDelay = false; AnimationHandler animationHandler = getOrCreateAnimationHandler(); animationHandler.mPendingAnimations.add(this); if (mStartDelay == 0) { // 在动画实际运行前,设置动画的初始值 setCurrentPlayTime(0); mPlayingState = STOPPED; mRunning = true; notifyStartListeners(); } animationHandler.start(); } 对代码中几个值的解释: mPlayingStated代表当前动画的状态。用于找出什么时候开始动画(if state == STOPPED)。当然也用于在animator被调用了cancel()或end()在动画的最后一帧停止它。可能的值为STOPPED, RUNNING, SEEKED. mStarted是Animator中一个额外用于标识播放状态的值,用来指示这个动画是否需要延时执行。 mStartedDelay指示这个动画是否已经从startDelay中开始执行。 AnimationHandleranimationHandler 是一个实现了Runnable接口的ValueAnimator内部类,暂时先放过,后面我们会具体谈到。 从上面这段代码中,我们了解到一个ValueAnimator有它自己的状态(STOPPED, RUNNING, SEEKED),另外是否延时也影响ValueAnimator的执行。代码的最后调用了animationHandler.start(),看来动画就是从这里启动的。别急,我们还没初始化ValueAnimator呢,跟进setCurrentPlayTime(0)看看。 public void setCurrentPlayTime(long playTime) { initAnimation(); long currentTime = AnimationUtils.currentAnimationTimeMillis(); if (mPlayingState != RUNNING) { mSeekTime = playTime; mPlayingState = SEEKED; } mStartTime = currentTime - playTime; doAnimationFrame(currentTime); } 这个函数在animation开始前,设置它的初始值。这个函数用于设置animation进度为指定时间点。playTime应该介于0到animation的总时间之间,包括animation重复执行的时候。如果animation还没有开始,那么它会等到被设置这个时间后才开始。如果animation已经运行,那么setCurrentTime()会将当前的进度设置为这个值,然后从这个点继续播放。 接下来让我们看看initAnimation() void initAnimation() { if (!mInitialized) { int numValues = mValues.length; for (int i = 0; i < numValues; ++i) { mValues[i].init(); } mInitialized = true; } } 这个函数一看就觉得跟初始化动画有关。这个函数在处理动画的第一帧前就会被调用。如果startDelay不为0,这个函数就会在就会在延时结束后调用。它完成animation最终的初始化。 那么mValues是什么呢?还记得我们在文章的开头介绍ObjectAnimator的使用吧?还有一个ofInt(T target, Propertyproperty, int... values)方法没有介绍。官方文档中对这个方法的解释是:构造并返回一个在int类型的values数值之间ObjectAnimator对象。当values只有一个值的时候,这个值就作为animator的终点值。如果有两个值的话,那么这两个值就作为开始值和结束值。如果有超过两个以上的值的话,那么这些值就作为开始值,作为animator运行的中间值,以及结束值。这些值将均匀地分配到animator的持续时间。,> 先中断ObjectAnimator.start()流程的分析,回到开头ObjectAnimator.ofInt(...) 接下来让我们深入ofInt(...)的内部看看。 public static ObjectAnimator ofInt(Object target, String propertyName, int... values) { ObjectAnimator anim = new ObjectAnimator(target, propertyName); anim.setIntValues(values); return anim; } 对这个函数的解释: target 就是将要进行动画的对象 propertyName 就是这个对象属性将要进行动画的属性名 values 一组值。随着时间的推移,动画将根据这组值进行变化。 再看看anim.setIntValues这个函数 public void setIntValues(int... values) { if (mValues == null || mValues.length == 0) { // No values yet - this animator is being constructed piecemeal. Init the values with // whatever the current propertyName is if (mProperty != null) { setValues(PropertyValuesHolder.ofInt(mProperty, values)); } else { setValues(PropertyValuesHolder.ofInt(mPropertyName, values)); } } else { super.setIntValues(values); } } 一开始的时候,mProperty肯定还没有初始化,我们进去setValues(PropertyValuesHolder.ofInt(mPropertyName, values))看看。这里涉及到PropertyValuesHolder这个类。PropertyValuesHolder这个类拥有关于属性的信息和动画期间需要使用的值。PropertyValuesHolder对象可以用来和ObjectAnimator或ValueAnimator一起创建可以并行操作不PropertyValuesHolder同属性的animator。 那么PropertyValuesHolder.ofInt()是干嘛用的呢?它通过传入的属性和values来构造并返回一个特定类型的PropertyValuesHolder对象(在这里是IntPropertyValuesHolder类型)。 public static PropertyValuesHolder ofInt(String propertyName, int... values) { return new IntPropertyValuesHolder(propertyName, values); } 在IntPropertyValuesHolder内部 public IntPropertyValuesHolder(String propertyName, int... values) { super(propertyName); setIntValues(values); } @Override public void setIntValues(int... values) { super.setIntValues(values); mIntKeyframeSet = (IntKeyframeSet) mKeyframeSet; } 跳转到父类(PropertyValuesHolder)的setIntValues public void setIntValues(int... values) { mValueType = int.class; mKeyframeSet = KeyframeSet.ofInt(values); } 这个函数其实跟我们前面介绍到的 PropertyValueHolder的构造函数相似,它就是设置动画过程中需要的值。如果只有一个值,那么这个值就假定为animator的终点值,动画的初始值会自动被推断出来,通过对象的getter方法得到。当然,如果所有值都为空,那么同样的这些值也会在动画开始的时候也会自动被填上。这套自动推断填值的机制只在PropertyValuesHolder对象跟ObjectAnimator一起使用的时候才有效,并且有一个能从propertyName自动推断出的getter方法这些条件都成立的时候才能用,不然PropertyValuesHolder没有办法决定这些值是什么。 接下来我们看到KeyframeSet.ofInt(values)方法。KeyframeSet这个类持有Keyframe的集合,在一组给定的animator的关键帧(keyframe)中会被ValueAnimator用来计算值。这个类的访问权限为包可见,因为这个类实现Keyframe怎么被存储和使用的具体细节,外部不需要知道。 接下来我们看看KeyframeSet.ofInt(values)方法。 public static KeyframeSet ofInt(int... values) { int numKeyframes = values.length; IntKeyframe keyframes[] = new IntKeyframe[Math.max(numKeyframes,2)]; if (numKeyframes == 1) { keyframes[0] = (IntKeyframe) Keyframe.ofInt(0f); keyframes[1] = (IntKeyframe) Keyframe.ofInt(1f, values[0]); } else { keyframes[0] = (IntKeyframe) Keyframe.ofInt(0f, values[0]); for (int i = 1; i < numKeyframes; ++i) { keyframes[i] = (IntKeyframe) Keyframe.ofInt((float) i / (numKeyframes - 1), values[i]); } } return new IntKeyframeSet(keyframes); } 在这个方法里面,我们看见从最开始的ObjectAnimator.ofInt(target,propName,values[]),也就是我们在文章的开头使用系统提供的动画初始化函数中传入的int数组,在这里得到了具体的使用。先不关心具体的使用Keyframe.ofInt(...)。从这里我们就可以知道原来Android SDK通过传入的int[]的长度来决定animator中每个帧(frame)的值。具体的对传入的int[]的使用可以参考文章里面对ObjectAnimator.ofInt(...)的介绍。在KeyframeSet.ofInt这个函数的最后一句话使用了IntKeyframeSet的构造函数来初始化这些Keyframe。 public IntKeyframeSet(IntKeyframe... keyframes) { super(keyframes); } 在IntKeyframeSet的构造函数中又调用父类KeyframeSet的构造函数来实现。 public KeyframeSet(Keyframe... keyframes) { mNumKeyframes = keyframes.length; mKeyframes = new ArrayList<Keyframe>(); mKeyframes.addAll(Arrays.asList(keyframes)); mFirstKeyframe = mKeyframes.get(0); mLastKeyframe = mKeyframes.get(mNumKeyframes - 1); mInterpolator = mLastKeyframe.getInterpolator(); } 从这个构造函数中我们又可以了解到刚刚初始化后的Keyframe数组的第一项和最后一项(也就是第一帧和最后一帧)得到了优先的待遇,作为在KeyframeSet中的字段,估计是为了后面计算动画开始和结束的时候方便。 小结ObjectValue、PropertyValueHolder、KeyframeSet的关系 我们绕了很久,不知道是否把你弄晕了,这里稍稍总结一下。我们就不从调用的顺序一步步分析下来了,太长了。我直接说说ObjectValue、PropertyValueHolder、KeyframeSet之间的关系。这三个类比较有特点的地方,ObjectAnimator无疑是对的API接口,ObjectAnimator持有PropertyValuesHolder作为存储关于将要进行动画的具体对象(通常是View类型的控件)的属性和动画期间需要的值。而PropertyValueHolder又使用KeyframeSet来保存animator从开始到结束期间关键帧的值。这下子我们就了解animator在执行期间用来存储和使用的数据结构。废话一下,从PropertyValueHolder、KeyframeSet这个两个类的源代码来看,这三个类的API的设计挺有技巧的,他们都是通过将具有特定类型的实现作为一个大的概况性的类的内部实现,通过这个大的抽象类提供对外的API(例如,PropertyValuesHolder.ofInt(...)的实现)。 回到ObjectAnimator.start()流程的分析 不知道是否把你上面你是否能清楚,反正不太影响下面对ObjectAnimator.start()流程的分析。从上面一段的分析我们了解到ValueAnimator.initAnimation()中的mValue是 PropertyValuesHolder类型的东西。在initAnimation()里mValues[i].init()初始化它们的估值器Evaluator void init() { if (mEvaluator == null) { // We already handle int and float automatically, but not their Object // equivalents mEvaluator = (mValueType == Integer.class) ? sIntEvaluator : (mValueType == Float.class) ? sFloatEvaluator : null; } if (mEvaluator != null) { // KeyframeSet knows how to evaluate the common types - only give it a custom // evaluator if one has been set on this class mKeyframeSet.setEvaluator(mEvaluator); } } mEvaluator当然也可以使用ObjectAnimator.setEvaluator(...)传入;为空时,SDK根据mValueType为我们初始化特定类型的Evaluator。这样我们的初始化就完成了。接下来,跳出initAnimation()回到 setCurrentPlayTime(...) public void setCurrentPlayTime(long playTime) { initAnimation(); long currentTime = AnimationUtils.currentAnimationTimeMillis(); if (mPlayingState != RUNNING) { mSeekTime = playTime; mPlayingState = SEEKED; } mStartTime = currentTime - playTime; doAnimationFrame(currentTime); } 对animator三种状态STOPPED、RUNNING、SEEKED的解释 static final int STOPPED = 0; // 还没开始播放 static final int RUNNING = 1; // 正常播放中 static final int SEEKED = 2; // 定位到一些时间值(Seeked to some time value) 对mSeekedTime、mStartTime的解释 mSeekedTime 当setCurrentPlayTime()被调用的时候设置。如果为负数,animator还没能定位到一个值。 mStartTime 第一次在animation.animateFrame()方法调用时使用。这个时间在第二次调用animateFrame()时用来确定运行时间(以及运行的分数值) setCurrentPlayTime(...)中doAnimationFrame(currentTime) 之前的代码其实都是对Animator的初始化。看来doAnimator(...)就是真正处理动画帧的函数了。这个函数主要主要用来处理animator中的一帧,并在有必要的时候调整animator的开始时间。 final boolean doAnimationFrame(long frameTime) { //对animator的开始时间和状态进行调整 if (mPlayingState == STOPPED) { mPlayingState = RUNNING; if (mSeekTime < 0) { mStartTime = frameTime; } else { mStartTime = frameTime - mSeekTime; // Now that we're playing, reset the seek time mSeekTime = -1; } } // The frame time might be before the start time during the first frame of // an animation. The "current time" must always be on or after the start // time to avoid animating frames at negative time intervals. In practice, this // is very rare and only happens when seeking backwards. final long currentTime = Math.max(frameTime, mStartTime); return animationFrame(currentTime); } 看来这个函数就是调整了一些参数,真正的处理函数还在animationFrame(...)中。我们跟进去看看。 boolean animationFrame(long currentTime) { boolean done = false; switch (mPlayingState) { case RUNNING: case SEEKED: float fraction = mDuration > 0 ? (float)(currentTime - mStartTime) / mDuration : 1f; if (fraction >= 1f) { if (mCurrentIteration < mRepeatCount || mRepeatCount == INFINITE) { // Time to repeat if (mListeners != null) { int numListeners = mListeners.size(); for (int i = 0; i < numListeners; ++i) { mListeners.get(i).onAnimationRepeat(this); } } if (mRepeatMode == REVERSE) { mPlayingBackwards = mPlayingBackwards ? false : true; } mCurrentIteration += (int)fraction; fraction = fraction % 1f; mStartTime += mDuration; } else { done = true; fraction = Math.min(fraction, 1.0f); } } if (mPlayingBackwards) { fraction = 1f - fraction; } animateValue(fraction); break; } return done; } 这个内部函数对给定的animation的一个简单的动画帧进行处理。currentTime这个参数是由定时脉冲(先不要了解这个定时脉冲是什么,后面我们会涉及)通过handler发送过来的(当然也可能是初始化的时候,被程序调用的,就像我们的分析过程一样),它用于计算animation已运行的时间,以及已经运行分数值。这个函数的返回值标识这个animation是否应该停止(在运行时间超过animation应该运行的总时长的时候,包括重复次数超过的情况)。 我们可以把这个函数里面的fraction简单地理解成animator的进度条的当前的位置。if (fraction >= 1f)注意到函数里面的这句话,当animator开始需要重复执行的时候,那么就需要执行这个if判断里面的东西,这里面主要就是记录和改变重复执行animator的一些状态和变量。为了不让这篇文章太复杂,我们这里就不进行分析了。通过最简单的animator只执行一次的情况来分析。那么接下来就应该执行animateValue(fraction)了。 void animateValue(float fraction) { fraction = mInterpolator.getInterpolation(fraction); mCurrentFraction = fraction; int numValues = mValues.length; for (int i = 0; i < numValues; ++i) { mValues[i].calculateValue(fraction); } if (mUpdateListeners != null) { int numListeners = mUpdateListeners.size(); for (int i = 0; i < numListeners; ++i) { mUpdateListeners.get(i).onAnimationUpdate(this); } } } 在每一个animator的帧,这个函数都会被调用,结合传入的参数:已运行时间分数(fraction)。这个函数将已经运行的分数转为interpolaterd分数,然后转化成一个可用于动画的值(通过evaluator、这个函数通常在animation update的时候调用,但是它也可能在end()函数调用的时候被调用,用来设置property的最终值)。 在这里我们需要理清一下Interpolaterd和evaluator之间的关系。 Interpolator:用来定义animator变化的速率。它让基础的动画效果(渐变、拉伸、平移、旋转)有加速、减速、重复等效果。在源代码中,其实interpolation的作用就是根据某一个时间点来计算它的播放时间分数,具体见官方文档。 evaluator: evaluator全部继承至TypeEvaluator接口,它只有一个evaluate()方法。它用来返回你要进行动画的那个属性在当前时间点所需要的属性值。 我们可以把动画的过程想象成是一部电影的播放,电影的播放中有进度条,Interpolator就是用来控制电影播放频率,也就是快进快退要多少倍速。然后Evaluator根据Interpolator提供的值计算当前播放电影中的哪一个画面,也就是进度条要处于什么位置。 这个函数分三步: 通过Interpolator计算出动画运行时间的分数 变量ValueAnimator中的mValues[i].calculateValue(fraction)(也就是 PropertyValuesHolder对象数组)计算当前动画的值 调用animation的onAnimationUpdate(...)通知animation更新的消息 //PropertyValuesHolder.calculateValue(...) void calculateValue(float fraction) { mAnimatedValue = mKeyframeSet.getValue(fraction); } //mKeyframeSet.getValue public Object getValue(float fraction) { // Special-case optimization for the common case of only two keyframes if (mNumKeyframes == 2) { if (mInterpolator != null) { fraction = mInterpolator.getInterpolation(fraction); } return mEvaluator.evaluate(fraction, mFirstKeyframe.getValue(), mLastKeyframe.getValue()); } if (fraction <= 0f) { final Keyframe nextKeyframe = mKeyframes.get(1); final TimeInterpolator interpolator = nextKeyframe.getInterpolator(); if (interpolator != null) { fraction = interpolator.getInterpolation(fraction); } final float prevFraction = mFirstKeyframe.getFraction(); float intervalFraction = (fraction - prevFraction) / (nextKeyframe.getFraction() - prevFraction); return mEvaluator.evaluate(intervalFraction, mFirstKeyframe.getValue(), nextKeyframe.getValue()); } else if (fraction >= 1f) { final Keyframe prevKeyframe = mKeyframes.get(mNumKeyframes - 2); final TimeInterpolator interpolator = mLastKeyframe.getInterpolator(); if (interpolator != null) { fraction = interpolator.getInterpolation(fraction); } final float prevFraction = prevKeyframe.getFraction(); float intervalFraction = (fraction - prevFraction) / (mLastKeyframe.getFraction() - prevFraction); return mEvaluator.evaluate(intervalFraction, prevKeyframe.getValue(), mLastKeyframe.getValue()); } Keyframe prevKeyframe = mFirstKeyframe; for (int i = 1; i < mNumKeyframes; ++i) { Keyframe nextKeyframe = mKeyframes.get(i); if (fraction < nextKeyframe.getFraction()) { final TimeInterpolator interpolator = nextKeyframe.getInterpolator(); if (interpolator != null) { fraction = interpolator.getInterpolation(fraction); } final float prevFraction = prevKeyframe.getFraction(); float intervalFraction = (fraction - prevFraction) / (nextKeyframe.getFraction() - prevFraction); return mEvaluator.evaluate(intervalFraction, prevKeyframe.getValue(), nextKeyframe.getValue()); } prevKeyframe = nextKeyframe; } // shouldn't reach here return mLastKeyframe.getValue(); } 我们先只关注if (mNumKeyframes == 2)这种情况,因为这种情况最常见。还记的我们使用ObjectAnimator.ofInt(...)传入的int[]数组吗?我们一般就传入动画开始值和结束值,也就是这里的mNumKeyframes ==2 的情况。这里通过mEvaluator来计算,我们看看代码(IntEvaluator.evaluate(...)的代码)。 public Integer evaluate(float fraction, Integer startValue, Integer endValue) { int startInt = startValue; return (int)(startInt + fraction * (endValue - startInt)); } mEvaluator.evaluate(...)计算后,我们就返回到ValueAnimator.animateValue(...)中,再回退到ValueAnimator.setCurrentPlayTime(...)。最后回到ValueAnimator.start(boolean playBackwards)。终于解析完了setCurrentPlayTime(...)这个函数,总结一下:这个函数主要用来初始化动画的值,当然这个初始化比我们想象中的复杂多了,它主要通过PropertyValuesHolder、Evaluator、Interpolator来进行值的初始化。PropertyValueHolder又通过KeyframeSet来存储需要的值。 我们回到文章开头介绍的ValueAnimator.start(boolean playBackwards) private void start(boolean playBackwards) { if (Looper.myLooper() == null) { throw new AndroidRuntimeException("Animators may only be run on Looper threads"); } mPlayingBackwards = playBackwards; mCurrentIteration = 0; mPlayingState = STOPPED; mStarted = true; mStartedDelay = false; AnimationHandler animationHandler = getOrCreateAnimationHandler(); animationHandler.mPendingAnimations.add(this); if (mStartDelay == 0) { // This sets the initial value of the animation, prior to actually starting it running setCurrentPlayTime(0); mPlayingState = STOPPED; mRunning = true; notifyStartListeners(); } animationHandler.start(); } 在setCurrentPlayTime(0)后,紧接着就通过notifyStartListeners()通知animation启动的消息。最后通过animationHandler.start()去执行。animationHandler是一个AnimationHandler类型的对象,它实现了runable接口。 //AnimationHandler.start() public void start() { scheduleAnimation(); } //AnimationHandler.scheduleAnimation() private void scheduleAnimation() { if (!mAnimationScheduled) { mChoreographer.postCallback(Choreographer.CALLBACK_ANIMATION, this, null); mAnimationScheduled = true; } } // Called by the Choreographer. @Override public void run() { mAnimationScheduled = false; doAnimationFrame(mChoreographer.getFrameTime()); } mHandler.start()最终就是通过mChoreographer.发送给UI系统。这个过程比较复杂,这里不介绍。我们仅仅需要知道,动画中的一帧通过这种方式发送给UI系统后,在UI系统执行完一帧后,又会回调AnimationHandler.run()。那么其实这个过程就相当于,AnimationHandler.start()开始第一次动画的执行→UI系统执行AnimationHandler.run()→UI系统执行完后,回调相关函数→再执行AnimationHandler.run().可以理解为AnimationHandler.run()会一直调用自身多次(当然这是由UI系统驱动的),直至动画结束。 这个过程比较复杂,如果你感兴趣,可以关注我的下一篇博客。 本文转自陈哈哈博客园博客,原文链接http://www.cnblogs.com/kissazi2/p/4249213.html如需转载请自行联系原作者 kissazi2

优秀的个人博客,低调大师

超赞的OOM检测(除了mat以外)

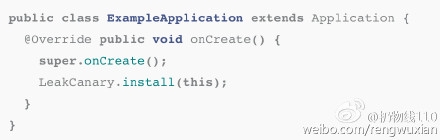
今天看了下微博,扔物线分享了个内存检测的工具: 内存泄露是 OOM 最常见的原因,但它的侦测需人工排查,往往眼看瞎也未必能找到泄露的内存。Square 新库 LeakCanary 用一种巧妙的思路实现了自动探测内存泄露,这已经帮他们减少了94%的 OOM。 在这篇文中,Square 介绍了这个帅气的库,也提出了一种新颖的获取测试设备的方式:"偷": 是不是这种检测OOm问题的方式比其MAT来说简直爽的一逼一逼的。 这是这个检测工具的官网: https://corner.squareup.com/2015/05/leak-canary.html 开源库地址:https://github.com/square/leakcanary 一下是相关翻译: LeakCanary: Detect all memory leaks! May 08, 2015 java.lang.OutOfMemoryError at android.graphics.Bitmap.nativeCreate(Bitmap.java:-2) at android.graphics.Bitmap.createBitmap(Bitmap.java:689) at com.squareup.ui.SignView.createSignatureBitmap(SignView.java:121) 没有任何人会喜欢OOM问题的出现 In Square Register, wedraw the customer's signatureon a bitmap cache. This bitmap is the size of the device's screen, and we had a significant number of out of memory (OOM) crashes when creating it. 这个图片的大小是设备大小,我们在显示这个图片的时候会出现OOM的问题。 We tried a few approaches, none of which solved the issue: 我们尝试了一些方法,其中没有解决的问题: UseBitmap.Config.ALPHA_8(a signature doesn't need color). 使用bitmap.config.alpha_8 CatchOutOfMemoryError, trigger the GC and retry a few times (inspired fromGCUtils). 抓住OutOfMemoryError,触发GC和重试几次(灵感来自gcutils)。 We didn't think of allocating bitmaps off the Java heap. Lucky for us,Frescodidn't exist yet. 我们不想把Java堆分配位图。幸运的是,Fresco这个开源项目不存在这种问题。 We were looking at it the wrong way The bitmap size was not a problem. When the memory is almost full, an OOM can happen anywhere. It tends to happen more often in places where you create big objects, like bitmaps. The OOM is a symptom of a deeper problem:memory leaks. 位图是没问题的,如果内存满的话,一个oom会出现在任何地方。当你创建比较大的对象,像bitmap这种东西的地方就会出现这种问题,oom更深层次的问题就是内存泄漏的问题。 What is a memory leak? 什么是内存泄漏呢? Some objects have a limited lifetime. When their job is done, they are expected to be garbage collected. If a chain of references holds an object in memory after the end of its expected lifetime, this creates a memory leak. When these leaks accumulate, the app runs out of memory. 许多对象是有有限制的生命周期的,当他们工作完成后,就会被垃圾回收。当对象的引用在对象的生命周期后还在持有该引用的话,就会出现内存泄漏的问题。当引用累计到一定一定时候,就会出现OOM的问题。 For instance, afterActivity.onDestroy()is called, the activity, its view hierarchy and their associated bitmaps should all be garbage collectable. If a thread running in the background holds a reference to the activity, then the corresponding memory cannot be reclaimed. This eventually leads to anOutOfMemoryErrorcrash. 例如,在Actiivity ondestroy()后,它的视图层次结构及其相关的位图应该都是垃圾收集。如果一个线程在后台运行,持有该activity引用,那么相应的内存不能被回收。这最终导致OutOfMemoryError错误,崩溃。 捕获OOM的问题 Hunting memory leaks is a manual process, well described in Raizlabs’Wrangling Dalvikseries. 捕获OOM的问题是一个手动的过程。 Here are the key steps: 关键步骤如下: Learn aboutOutOfMemoryErrorcrashes viaBugsnag,Crashlytics, or theDeveloper Console. 在使用Bugsnag,Crashlytics以及Developer Console工具去检测OutOfMemoryError这种问题。 Attempt to reproduce the problem. You might need to buy, borrow, or steal the specific device that suffered the crash. (Not all devices will exhibit all leaks!) You also need to figure out what navigation sequence triggers the leak, possibly by brute force. 重现问题,你可能需要购买或者借到一些特殊的设备来重现crash问题(并不是所有的设备都会出现这种问题),你需要知道是什么导致内存泄漏的问题,有可能是蛮力(这句翻译的有点怪,我擦)。 Dump the heap when the OOM occurs (here's how). 堆积OOM的问题 Poke around the heap dump withMATorYourKitand find an object that should have been garbage collected. 使用MAT或者YourKit工具去发现那些对象应该被回收。 Compute the shortest strong reference path from that object to the GC roots. 计算最短路径的强引用对象的GC根。 Figure out which reference in the path should not exist, and fix the memory leak. 找出那些引用是不应该存在的,并处理内存对这些引用。 What if a library could do all this before you even get to an OOM, and let you focus on fixing the memory leak? 如果有一个库帮助你在oom问题出现之前去检测OOM的问题,你会去关注如何修复内存引用的问题吗? 介绍使用LeakCanary LeakCanaryis an Open Source Java library to detect memory leaks in your debug builds. LeakCanary是一个开源项目,通过java库去检测内存泄漏的问题。 Let's look at a cat example: 看下下面的例子: class Cat { } class Box { Cat hiddenCat; } class Docker { static Box container; } // ... Box box = new Box(); Cat schrodingerCat = new Cat(); box.hiddenCat = schrodingerCat; Docker.container = box; You create aRefWatcherinstance and give it an object to watch: 你创造了一个refwatcher实例,给它一个对象去检测: // We expect schrodingerCat to be gone soon (or not), let's watch it. refWatcher.watch(schrodingerCat); When the leak is detected, you automatically get a nice leak trace: 当内存检测的时候,你会检测到内存的内存的使用的痕迹。 * GC ROOT static Docker.container * references Box.hiddenCat * leaks Cat instance We know you're busy writing features, so we made it very easy to setup. With just one line of code, LeakCanary will automatically detect activity leaks: public class ExampleApplication extends Application { @Override public void onCreate() { super.onCreate(); LeakCanary.install(this); } } You get a notification and a nice display out of the box: 你能得到通知,并且能够良好的展示在界面上: Conclusion After enabling LeakCanary, we discovered and fixed many memory leaks in our app. We even found a fewleaks in the Android SDK. 在启用的leakcanary,我们能够发现并修复你APP里面出现的内存泄漏的问题。我们甚至发现了一些leaks in the Android SDK。 The results are amazing. We now have94% fewer crashesfrom OOM errors. 结果让人吃惊,能够检测出94%的OOM的问题。 If you want to eliminate OOM crashes,install LeakCanary now! 如果你想消除OOM导致额问题,先学习leakcanary开始 我英语是数学老师教的,如果翻译的不好,请留言指教下我这个小学生,我一定会改正。

优秀的个人博客,低调大师

阿里 2026 财年净利润超 1021 亿元,AI 收入占比首超三成

阿里巴巴集团公布截至 2026 年 3 月份季度及 2026 财年业绩。 截至2026年3月31日止季度: 收入为人民币2,433.80亿元(352.83亿美元),同比增长3%。若不考虑高鑫零售和银泰的已处置业务的收入,同口径收入同比增长将为11%。 客户管理收入同比增长1%。若不考虑新营销发展计划所产生的视作收入冲减项影响,同口径客户管理收入同比增长将为8%。 经营亏损为人民币8.48亿元(1.23亿美元),2025年同期则为经营利润人民币284.65亿元,主要是由于经调整EBITA的减少所致。经调整EBITA(一项非公认会计准则财务指标)同比下降84%至人民币51.02亿元(7.40亿美元),主要归因于对科技业务、即时零售以及用户体验的投入,部分被客户管理服务和云业务的持续增长所带来的经营业绩改善,以及多项业务运营效率的提升所抵销。 归属于普通股股东的净利润为人民币254.76亿元(36.93亿美元)。净利润为人民币235.02亿元(34.07亿美元),同比增长96%,主要归因于我们所持有的股权投资按市值计价变动的净收益同比增加,以及去年同期处置高鑫零售和银泰所产生的损失,部分被经调整EBITA的减少所抵销。截至2026年3月31日止季度,非公认会计准则净利润为人民币0.86亿元(0.12亿美元),相较2025年同期的人民币298.47亿元下降100%。 摊薄每股美国存托股收益为人民币10.36元(1.50美元)及摊薄每股收益为人民币1.30元(0.19美元或1.47港元)。非公认会计准则摊薄每股美国存托股收益为人民币0.62元(0.09美元),同比下降95%及非公认会计准则摊薄每股收益为人民币0.08元(0.01美元或0.09港元),同比下降95%。 经营活动产生的现金流量净额为人民币94.10亿元(13.64亿美元),相较2025年同期的人民币275.20亿元下降66%。自由现金流(一项非公认会计准则财务流动性指标)为净流出人民币173.00亿元(25.08亿美元),2025年同期则为净流入人民币37.43亿元。自由现金流的下降主要归因于对即时零售的投入、千问app的用户获取以及我们的云基础设施支出增加。截至2026年3月31日,我们的现金及其他流动投资(1)为人民币5,208.24亿元(755.04亿美元)。 截至2026年3月31日止财务年度: 收入为人民币10,236.70亿元(1,484.01亿美元),同比增长3%。若不考虑高鑫零售和银泰的已处置业务的收入,同口径收入同比增长将为11%。 客户管理收入同比增长5%。若不考虑新营销发展计划所产生的视作收入冲减项影响,同口径客户管理收入同比增长将为7%。 经营利润为人民币501.50亿元(72.70亿美元),同比下降64%,主要是由于经调整EBITA的减少及商誉减值的增加所致,部分被一次性计提准备金和非现金股权激励费用的减少所抵销。经调整EBITA(一项非公认会计准则财务指标)同比下降56%至人民币764.16亿元(110.78亿美元),主要归因于对即时零售、用户体验以及科技业务的投入,部分被客户管理服务和云业务的持续增长所带来的经营业绩改善,以及多项业务运营效率的提升所抵销。 归属于普通股股东的净利润为人民币1,059.04亿元(153.53亿美元)。净利润为人民币1,021.27亿元(148.05亿美元),同比下降19%,主要是由于经营利润的减少所致,部分被我们所持有的股权投资按市值计价变动的净收益同比增加,以及2026财年处置投资(包括Trendyol本地生活服务业务在内)实现净收益,而2025财年处置高鑫零售和银泰则录得亏损所抵销。2026财年的非公认会计准则净利润为人民币606.58亿元(87.94亿美元),相较2025财年的人民币1,581.22亿元下降62%。 摊薄每股美国存托股收益为人民币44.00元(6.38美元)及摊薄每股收益为人民币5.50元(0.80美元或6.23港元)。非公认会计准则摊薄每股美国存托股收益为人民币26.80元(3.89美元),同比下降59%及非公认会计准则摊薄每股收益为人民币3.35元(0.49美元或3.79港元),同比下降59%。 经营活动产生的现金流量净额为人民币762.13亿元(110.49亿美元),相较2025财年的人民币1,635.09亿元下降53%。自由现金流(一项非公认会计准则财务流动性指标)为净流出人民币466.09亿元(67.57亿美元),2025财年则为净流入人民币738.70亿元。自由现金流的下降主要归因于对即时零售的投入以及我们的云基础设施支出增加。截至2026年3月31日,我们的现金及其他流动投资(1)为人民币5,208.24亿元(755.04亿美元)。 阿里巴巴集团首席执行官吴泳铭表示: “阿里全栈AI技术投入已正式跨越初期培育阶段,进入正向的规模商业化回报周期。本季度,我们在模型、云基础设施和应用各层实现加速突破。云外部商业化收入增速提升至40%,AI相关收入占比达30%。在AI模型层,千问大模型在推理、编程等方面展现领先地位,同时,我们推出视频生成模型和世界模型以丰富多模态模型矩阵。在AI应用层,我们看到智能体AI的巨大潜力——我们推出了覆盖办公编程等场景的多个企业级智能体,C端应用千问app全面接通电商服务能力,进一步深化AI应用与大消费生态的协同。”

资源下载

更多资源
Mario

Mario

马里奥是站在游戏界顶峰的超人气多面角色。马里奥靠吃蘑菇成长,特征是大鼻子、头戴帽子、身穿背带裤,还留着胡子。与他的双胞胎兄弟路易基一起,长年担任任天堂的招牌角色。

腾讯云软件源

腾讯云软件源

为解决软件依赖安装时官方源访问速度慢的问题,腾讯云为一些软件搭建了缓存服务。您可以通过使用腾讯云软件源站来提升依赖包的安装速度。为了方便用户自由搭建服务架构,目前腾讯云软件源站支持公网访问和内网访问。

Spring

Spring

Spring框架(Spring Framework)是由Rod Johnson于2002年提出的开源Java企业级应用框架,旨在通过使用JavaBean替代传统EJB实现方式降低企业级编程开发的复杂性。该框架基于简单性、可测试性和松耦合性设计理念,提供核心容器、应用上下文、数据访问集成等模块,支持整合Hibernate、Struts等第三方框架,其适用范围不仅限于服务器端开发,绝大多数Java应用均可从中受益。

Sublime Text

Sublime Text

Sublime Text具有漂亮的用户界面和强大的功能,例如代码缩略图,Python的插件,代码段等。还可自定义键绑定,菜单和工具栏。Sublime Text 的主要功能包括:拼写检查,书签,完整的 Python API , Goto 功能,即时项目切换,多选择,多窗口等等。Sublime Text 是一个跨平台的编辑器,同时支持Windows、Linux、Mac OS X等操作系统。

用户登录
用户注册