LAMP架构升级版--LNMMP
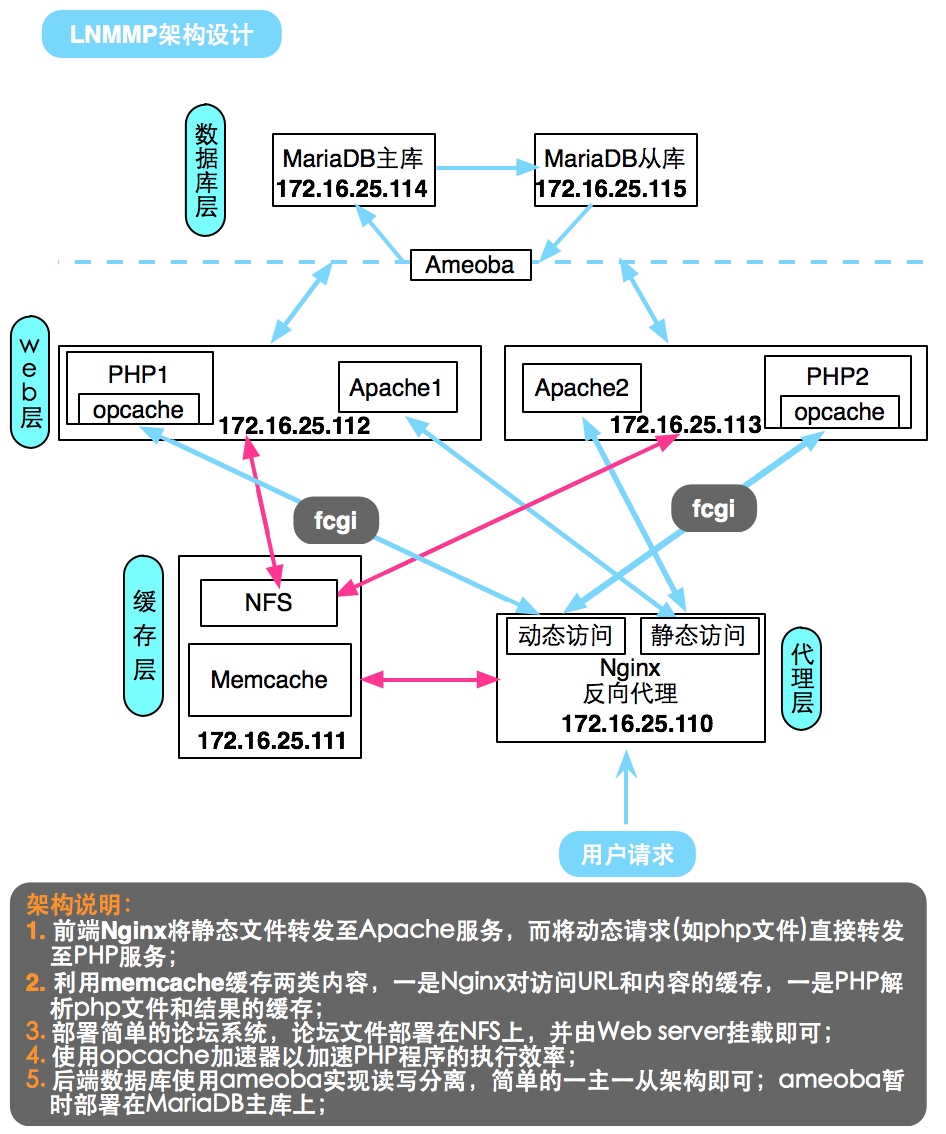
简介 LNMMP=Linux+Nginx+MySQL+Memcache+PHP; 利用Nginx的高性能特点做前端反向代理服务器,分发用户请求,并在能够利用缓存的地方使用Memcache缓存服务,以加速缓存效率,具体架构图如下; 具体部署 代理层:Nginx 编译安装Nginx 1 2 3 4 5 6 7 8 9 10 11 12 13 14 15 16 17 18 19 20 21 22 23 24 25 26 27 28 29 30 31 32 33 34 35 36 37 38 39 40 41 42 43 44 45 46 47 48 49 50 51 52 53 54 55 56 57 58 59 60 61 62 63 64 65 66 67 68 69 70 71 72 73 74 75 76 77 78 79 80 81 82 83 84 85 86 87 88 89 90 91 92 93 94 95 96 97 98 99 100 101 102 103 104 105 106 107 108 109 110 111 112 113 114 115 116 117 118 119 120 121 122 123 124 125 126 127 128 129 130 131 132 133 134 yum install gcc openssl-devel pcre-devel zlib-devel groupadd -r nginx useradd -r -g nginx -M nginx . /configure \ --prefix= /usr/local/nginx \ --sbin-path= /usr/sbin/nginx \ --conf-path= /etc/nginx/nginx .conf \ --error-log-path= /var/log/nginx/error .log \ --http-log-path= /var/log/nginx/access .log \ --pid-path= /var/run/nginx/nginx .pid \ --lock-path= /var/lock/nginx .lock \ --user=nginx \ --group=nginx \ --with-http_ssl_module \ --with-http_flv_module \ --with-http_stub_status_module \ --with-http_gzip_static_module \ --http-client-body-temp-path= /var/tmp/nginx/client/ \ --http-proxy-temp-path= /var/tmp/nginx/proxy/ \ --http-fastcgi-temp-path= /var/tmp/nginx/fcgi/ \ --http-uwsgi-temp-path= /var/tmp/nginx/uwsgi \ --http-scgi-temp-path= /var/tmp/nginx/scgi \ --with-pcre make && make install vi /etc/init .d /nginx # 编辑服务脚本 #!/bin/sh # # nginx - this script starts and stops the nginx daemon # # chkconfig: - 85 15 # description: Nginx is an HTTP(S) server, HTTP(S) reverse \ # proxy and IMAP/POP3 proxy server # processname: nginx # config: /etc/nginx/nginx.conf # config: /etc/sysconfig/nginx # pidfile: /var/run/nginx.pid # Source function library. . /etc/rc .d /init .d /functions # Source networking configuration. . /etc/sysconfig/network # Check that networking is up. [ "$NETWORKING" = "no" ] && exit 0 nginx= "/usr/sbin/nginx" prog=$( basename $nginx) NGINX_CONF_FILE= "/etc/nginx/nginx.conf" [ -f /etc/sysconfig/nginx ] && . /etc/sysconfig/nginx lockfile= /var/lock/subsys/nginx make_dirs() { # make required directories user=`nginx -V 2>&1 | grep "configure arguments:" | sed 's/[^*]*--user=\([^ ]*\).*/\1/g' -` options=`$nginx -V 2>&1 | grep 'configure arguments:' ` for opt in $options; do if [ ` echo $opt | grep '.*-temp-path' ` ]; then value=` echo $opt | cut -d "=" -f 2` if [ ! -d "$value" ]; then # echo "creating" $value mkdir -p $value && chown -R $user $value fi fi done } start() { [ -x $nginx ] || exit 5 [ -f $NGINX_CONF_FILE ] || exit 6 make_dirs echo -n $ "Starting $prog: " daemon $nginx -c $NGINX_CONF_FILE retval=$? echo [ $retval - eq 0 ] && touch $lockfile return $retval } stop() { echo -n $ "Stopping $prog: " killproc $prog -QUIT retval=$? echo [ $retval - eq 0 ] && rm -f $lockfile return $retval } restart() { configtest || return $? stop sleep 1 start } reload() { configtest || return $? echo -n $ "Reloading $prog: " killproc $nginx -HUP RETVAL=$? echo } force_reload() { restart } configtest() { $nginx -t -c $NGINX_CONF_FILE } rh_status() { status $prog } rh_status_q() { rh_status > /dev/null 2>&1 } case "$1" in start) rh_status_q && exit 0 $1 ;; stop) rh_status_q || exit 0 $1 ;; restart|configtest) $1 ;; reload) rh_status_q || exit 7 $1 ;; force-reload) force_reload ;; status) rh_status ;; condrestart|try-restart) rh_status_q || exit 0 ;; *) echo $ "Usage: $0 {start|stop|status|restart|condrestart|try-restart|reload|force-reload|configtest}" exit 2 esac 配置Nginx 1 2 3 4 5 6 7 8 9 10 11 12 13 14 15 16 17 18 19 20 21 22 23 24 25 26 27 28 29 30 31 32 33 34 35 36 upstream memcached { server 172.16.25.111:11211; keepalive 1024; } upstream webserver { server 172.16.25.112:80; server 172.16.25.113:80; } upstream phpserver { server 172.16.25.112:9000; server 172.16.25.113:9000; } server { listen 80; server_name xxrenzhe.lnmmp.com; access_log /var/log/nginx/lnmmp .access.log; error_log /var/log/nginx/lnmmp .errors.log notice; root /www/lnmmp .com; index index.php index.html; location / { set $memcached_key $request_uri; add_header X-mem-key $memcached_key; memcached_pass memcached; default_type test /html ; error_page 404 500 502 504 = @webnocache; } location @webnocache { rewrite ^(\/)?$ /index .php last; # 配置直接访问域名或IP地址时,重定向至index.php文件 rewrite ^/.*$ /set_mem .php?$request_uri last; # 将静态访问重定向至后端set_mem.php,以实现set memcache的功能 proxy_pass http: //webserver ; } location ~* \.php(\?.*)?$ { fastcgi_pass phpserver; fastcgi_param SCRIPT_FILENAME $document_root$fastcgi_script_name; include fastcgi_params; } 启动服务 1 2 3 4 chmod +x /etc/init .d /nginx chkconfig --add nginx chkconfig nginx on service nginx start 缓存层:Memcache+NFS 安装配置memcache 1 2 3 4 5 6 7 8 9 10 11 12 13 14 15 16 17 18 19 20 21 22 23 24 25 26 27 28 29 30 31 32 33 34 35 36 37 38 39 40 41 42 43 44 45 46 47 48 49 50 51 52 53 54 55 56 57 58 59 60 61 62 63 64 65 66 67 68 69 70 71 72 73 74 75 76 77 78 79 80 81 82 83 84 85 86 87 88 89 90 91 # 安装libevent tar xf libevent-2.0.21-stable. tar .gz cd libevent-2.0.21 . /configure --prefix= /usr/local/libevent make && make install echo "/usr/local/libevent/lib" > /etc/ld .so.conf.d /libevent .conf ldconfig # 安装memcache tar xf memcached-1.4.15. tar .gz cd memcached-1.4.15 . /configure --prefix= /usr/local/memcached --with-libevent= /usr/local/libevent make && make install # 编辑服务脚本 # 一次启动了2个memcache实例,一个用于Nginx,一个用于后端PHP服务 vi /etc/init .d /memcached #!/bin/bash # # Init file for memcached # # chkconfig: - 86 14 # description: Distributed memory caching daemon # # processname: memcached # config: /etc/sysconfig/memcached . /etc/rc .d /init .d /functions ## Default variables PORT1= "11211" PORT2= "11311" USER= "nobody" MAXCONN= "1024" CACHESIZE= "64" OPTIONS= "" RETVAL=0 prog= "/usr/local/memcached/bin/memcached" desc= "Distributed memory caching" lockfile1= "/var/lock/subsys/memcached_$PORT1" lockfile2= "/var/lock/subsys/memcached_$PORT2" start() { echo -n $ "Starting $desc (memcached): " daemon $prog -d -p $PORT1 -u $USER -c $MAXCONN -m $CACHESIZE -o "$OPTIONS" daemon $prog -d -p $PORT2 -u $USER -c $MAXCONN -m $CACHESIZE -o "$OPTIONS" RETVAL=$? [ $RETVAL - eq 0 ] && success && touch $lockfile1 && touch $lockfile2 || failure echo return $RETVAL } stop() { echo -n $ "Shutting down $desc (memcached): " killproc $prog RETVAL=$? [ $RETVAL - eq 0 ] && success && rm -f $lockfile1 && rm -f $lockfile2 | failure echo return $RETVAL } restart() { stop start } reload() { echo -n $ "Reloading $desc ($prog): " killproc $prog -HUP RETVAL=$? [ $RETVAL - eq 0 ] && success || failure echo return $RETVAL } case "$1" in start) start ;; stop) stop ;; restart) restart ;; condrestart) [ -e $lockfile1 ] && [ -e $lockfile1 ] && restart RETVAL=$? ;; reload) reload ;; status) status $prog RETVAL=$? ;; *) echo $ "Usage: $0 {start|stop|restart|condrestart|status}" RETVAL=1 esac exit $RETVAL 启动memcache服务 1 2 3 4 chmod +x /etc/init .d /memcached chkconfig --add memcached chkconfig memcached on service memcached start 安装配置NFS 1 2 3 4 5 6 7 8 yum -y install nfs-utils vi /etc/exports /www/lnmmp .com 172.16.0.0 /16 (rw,no_root_squash) exportfs -ar # 导出NFS共享目录 cd /www/lnmmp .com unzip phpwind_v9.0_utf8.zip mv phpwind_v9.0_utf8 /upload/ * . chmod -R 777 attachment conf data html res src themes windid Web层:Apache Apache的安装见博客“httpd-2.4编译安装及新特性详解”; PHP-fpm的安装见博客“LAMP-PHP-fpm服务器配置”; PHP加速器opcache的安装配置见博客“LAMP-各PHP加速器性能剖析”; 配置PHP支持memcache 1 2 3 4 5 6 7 8 9 10 11 12 13 14 15 16 17 18 19 20 21 22 23 24 25 26 27 28 29 30 tar xf memcache-2.2.5.tgz cd memcache-2.2.5 /usr/local/php/bin/phpize . /configure --with-php-config= /usr/local/php/bin/php-config -- enable -memcache make && make install # 上述安装完后会有类似这样的提示: Installing shared extensions: /usr/local/php/lib/php/extensions/no-debug-non-zts-20090626/ vi /usr/local/php/lib/php .ini # 配置memcache模块位置及php会话保存至memcache中 extension= /usr/local/php/lib/php/extensions/no-debug-non-zts-20090626/memcache .so session.save_handler = memcache session.save_path = "tcp://172.16.25.111:11311" # 自定义set memcache的程序 vi /www/lnmmp .com /set_mem .php <?php $fn = dirname (__FILE__).$_SERVER[ 'QUERY_STRING' ]; if (file_exists($fn)) { $data = file_get_contents($fn); $mem = new Memcache(); $mem->connect( "172.16.25.111" ,11311) or die( "Could not connect" ); $mem-> set ($_SERVER[ 'QUERY_STRING' ],$data,0,600) or die( "Failed to save data at the memcached server" ); header( 'Content-Length: ' .filesize($fn). "\r\n" ); header( 'Content-Type: text/html' . "\r\n" ); header( 'X-cache: MISS' . "\r\n" ); print "$data" ; } else { header( 'Location: http://xxrenzhe.lnmmp.com' . "\r\n" ); header( 'Content-Length: ' .filesize($fn). "\r\n" ); header( 'X-cache: ' .$fn. "\r\n" ); } ?> Apache配置 1 2 3 4 5 6 7 8 9 10 11 12 13 14 15 vi /etc/httpd/httpd .conf # DocumentRoot "/usr/local/apache/htdocs" # 注释掉此行 Include /etc/httpd/extra/httpd-vhosts .conf # 取消此行注释 vi /etc/httpd/extra/httpd-vhosts .conf <VirtualHost *:80> DocumentRoot "/www/lnmmp.com" ServerName xxrenzhe.lnmmp.com ErrorLog "logs/lnmmp.com-error_log" CustomLog "logs/lnmmp.com-access_log" common <Directory "/www/lnmmp.com" > Options Indexes FollowSymLinks AllowOverride None Require all granted < /Directory > < /VirtualHost > NFS目录挂载 1 mount -t nfs 172.16.25.111: /www/lnmmp .com /www/lnmmp .com 服务启动 1 2 service httpd start service php-fpm start 数据库层:Ameoba+MariaDB MariaDB的安装详见博客“MySQL初识-架构-安装-初始化-连接-管理工具-数据文件”; MariaDB的主从复制架构配置见博客“Maria10实现主从复制架构及SSL复制”; Ameoba安装见“http://docs.hexnova.com/amoeba/index.html”; Ameoba实现读写分离见“http://docs.hexnova.com/amoeba/rw-splitting.html” 测试验证 Nginx利用memcache缓存小静态文件测试效果 Nginx利用memcache缓存大静态文件测试效果 PHP利用memcache保存session数据测试效果 本文转自 xxrenzhe11 51CTO博客,原文链接:http://blog.51cto.com/xxrenzhe/1403784,如需转载请自行联系原作者