首页 文章 精选 留言 我的

精选列表

搜索[快速模式],共10000篇文章
优秀的个人博客,低调大师

Docker进阶-快速扩容

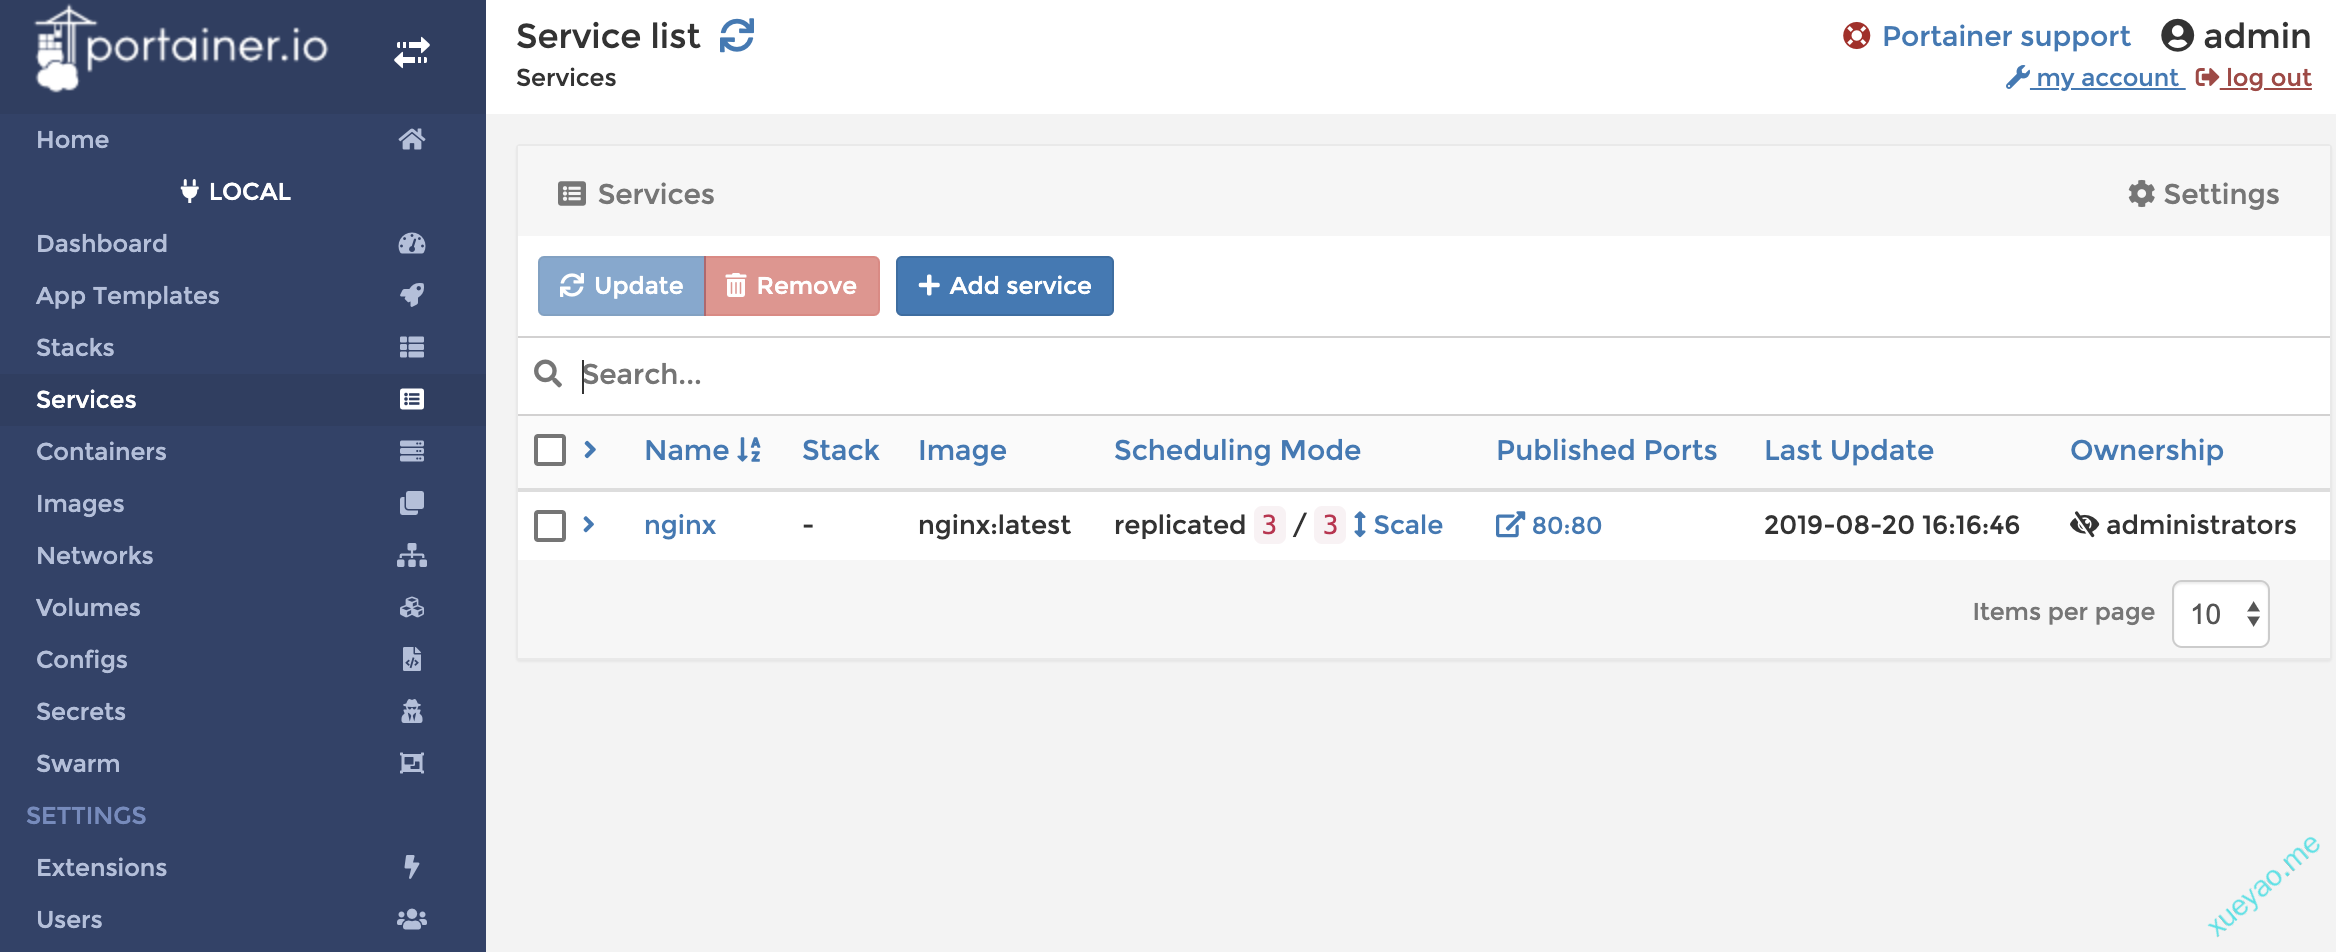
1、命令方式 在创建好的Swarm集群中运行nginx服务,并使用--replicas参数指定启动的副本数。 docker service create --replicas 3 -p 80:80 --name nginx nginx:latest 或者 docker service create -p 80:80 --name nginx nginx:latest docker service scale nginx=3 docker service ls #查看副本情况 2、portainer方式 可以使用portainer的方式在web界面上创建服务并指定副本数,同时可以随时动态增减副本数。

优秀的个人博客,低调大师

guava快速入门(二)

Guava工程包含了若干被Google的 Java项目广泛依赖 的核心库,例如:集合 [collections] 、缓存 [caching] 、原生类型支持 [primitives support] 、并发库 [concurrency libraries] 、通用注解 [common annotations] 、字符串处理 [string processing] 、I/O 等等。 guava类似Apache Commons工具集 Collection 不可变集合 不可变对象有很多优点,包括: 当对象被不可信的库调用时,不可变形式是安全的; 不可变对象被多个线程调用时,不存在竞态条件问题 不可变集合不需要考虑变化,因此可以节省时间和空间。所有不可变的集合都比它们的可变形式有更好的内存利用率(分析和测试细节); 不可变对象因为有固定不变,可以作为常量来安全使用。 JDK也提供了Collections.unmodifiableXXX方法把集合包装为不可变形式,但: 笨重而且累赘:不能舒适地用在所有想做防御性拷贝的场景; 不安全:要保证没人通过原集合的引用进行修改,返回的集合才是事实上不可变的; 低效:包装过的集合仍然保有可变集合的开销,比如并发修改的检查、散列表的额外空间,等等。 创建不可变集合方法: copyOf方法,如ImmutableSet.copyOf(set); of方法,如ImmutableSet.of(“a”, “b”, “c”)或 ImmutableMap.of(“a”, 1, “b”, 2); Builder工具 import com.google.common.collect.ImmutableList; import com.google.common.collect.ImmutableSet; public class ImmutableDemo { public static void main(String[] args) { ImmutableSet<String> set = ImmutableSet.of("a", "b", "c", "d"); ImmutableSet<String> set1 = ImmutableSet.copyOf(set); ImmutableSet<String> set2 = ImmutableSet.<String> builder().addAll(set).add("e").build(); ImmutableList<String> list = set.asList(); System.out.println("set:"+set); System.out.println("set1:"+set1); System.out.println("set2:"+set2); //set.add("f");//java.lang.UnsupportedOperationException } } 返回: set:[a, b, c, d] set1:[a, b, c, d] set2:[a, b, c, d, e] 新型集合类 Multiset Multiset可统计一个词在文档中出现了多少次 import com.google.common.collect.LinkedHashMultiset; import com.google.common.collect.Multiset; public class MultiSetDemo { public static void main(String[] args) { Multiset<String> set = LinkedHashMultiset.create(); set.add("a"); set.add("a"); set.add("lucas"); set.add("lucas"); set.setCount("a", 5); // 添加或删除指定元素使其在集合中的数量是count System.out.println(set); System.out.println(set.count("a")); // 给定元素在Multiset中的计数 System.out.println(set.size()); // 所有元素计数的总和,包括重复元素 System.out.println(set.elementSet().size()); // 所有元素计数的总和,不包括重复元素 set.clear(); // 清空集合 System.out.println(set); } } 返回: [a x 5, lucas x 2] 5 7 2 [] Multimap Multimap可以很容易地把一个键映射到多个值。换句话说,Multimap是把键映射到任意多个值的一般方式。 import java.util.Collection; import java.util.Map; import com.google.common.collect.HashMultimap; import com.google.common.collect.Multimap; public class MultiMapDemo { public static void main(String[] args) { Multimap<String, Integer> map = HashMultimap.create(); // Multimap是把键映射到任意多个值的一般方式 map.put("a", 1); // key相同时不会覆盖原value map.put("a", 2); map.put("a", 3); map.put("b", 1); map.put("b", 2); System.out.println(map); // {a=[1, 2, 3]} System.out.println(map.get("a")); // 返回的是集合 System.out.println(map.size()); // 返回所有”键-单个值映射”的个数,而非不同键的个数 System.out.println(map.keySet().size()); // 返回不同key的个数 Map<String, Collection<Integer>> mapView = map.asMap(); System.out.println(mapView); } } 返回: {a=[1, 2, 3], b=[1, 2]} [1, 2, 3] 5 2 {a=[1, 2, 3], b=[1, 2]} BiMap BiMap import com.google.common.collect.BiMap; import com.google.common.collect.HashBiMap; public class BitMapDemo { public static void main(String[] args) { BiMap<String, String> biMap = HashBiMap.create(); biMap.put("sina", "sina.com"); biMap.put("qq", "qq.com"); biMap.put("sina", "sina.cn"); // 会覆盖原来的value /* * 在BiMap中,如果你想把键映射到已经存在的值,会抛出IllegalArgumentException异常 * 如果对特定值,你想要强制替换它的键,请使用 BiMap.forcePut(key, value) */ // 抛出异常java.lang.IllegalArgumentException: value already present: qq.com //biMap.put("tecent", "qq.com"); biMap.forcePut("tecent", "qq.com"); // 强制替换key System.out.println(biMap); System.out.println(biMap.inverse()); // 翻转value-key System.out.println(biMap.inverse().get("sina.cn")); // 通过value找key System.out.println(biMap.inverse().inverse() == biMap); // true } } 返回: {sina=sina.cn, tecent=qq.com} {sina.cn=sina, qq.com=tecent} sina true Table Table它有两个支持所有类型的键:”行”和”列”。 import java.util.Set; import com.google.common.collect.HashBasedTable; import com.google.common.collect.Table; public class TableDemo { public static void main(String[] args) { // 记录学生在某门课上的成绩 Table<String, String, Integer> table = HashBasedTable.create(); table.put("jack", "java", 100); table.put("jack", "c", 90); table.put("mike", "java", 93); table.put("mike", "c", 100); Set<Table.Cell<String, String, Integer>> cells = table.cellSet(); for (Table.Cell<String, String, Integer> cell : cells) { System.out.println(cell.getRowKey() + " " + cell.getColumnKey() + " " + cell.getValue()); } System.out.println("----------------------"); System.out.println(table.row("jack")); System.out.println(table); System.out.println(table.rowKeySet()); System.out.println(table.columnKeySet()); System.out.println(table.values()); } } 返回: mike java 93 mike c 100 jack java 100 jack c 90 ---------------------- {java=100, c=90} {mike={java=93, c=100}, jack={java=100, c=90}} [mike, jack] [java, c] [93, 100, 100, 90] Collections2 filter():只保留集合中满足特定要求的元素 import java.util.Collection; import java.util.List; import com.google.common.collect.Collections2; import com.google.common.collect.Lists; public class FilterDemo { public static void main(String[] args) { List<String> list = Lists.newArrayList("moon", "dad", "refer", "son"); Collection<String> palindromeList = Collections2.filter(list, input -> { return new StringBuilder(input).reverse().toString().equals(input); // 找回文串 }); System.out.println(palindromeList);//palindromeList 回文,也叫做镜文,正写倒写一样,如mam } } 返回: [dad, refer] transform():类型转换 import java.text.SimpleDateFormat; import java.util.Collection; import java.util.Set; import com.google.common.base.Function; import com.google.common.collect.Collections2; import com.google.common.collect.Sets; public class TransformDemo { public static void main(String[] args) { Set<Long> times = Sets.newHashSet(); times.add(91299990701L); times.add(9320001010L); times.add(9920170621L); Collection<String> timeStrCol = Collections2.transform(times, new Function<Long, String>() { @Override public String apply( Long input) { return new SimpleDateFormat("yyyy-MM-dd").format(input); } }); System.out.println(timeStrCol); } } 返回: [1970-04-19, 1970-04-26, 1972-11-23] 多个Function组合 import java.util.Collection; import java.util.List; import com.google.common.base.Function; import com.google.common.base.Functions; import com.google.common.collect.Collections2; import com.google.common.collect.Lists; public class TransformDemo2 { public static void main(String[] args) { List<String> list = Lists.newArrayList("abcde", "good", "happiness"); // 确保容器中的字符串长度不超过5 Function<String, String> f1 = new Function<String, String>() { @Override public String apply( String input) { return input.length() > 5 ? input.substring(0, 5) : input; } }; // 转成大写 Function<String, String> f2 = new Function<String, String>() { @Override public String apply( String input) { return input.toUpperCase(); } }; Function<String, String> function = Functions.compose(f1, f2); Collection<String> results = Collections2.transform(list, function); System.out.println(results); } } 返回: [ABCDE, GOOD, HAPPI] 集合操作:交集、差集、并集 import java.util.Set; import com.google.common.collect.Sets; public class CollectionsDemo { public static void main(String[] args) { Set<Integer> set1 = Sets.newHashSet(1, 2, 3, 4, 5); Set<Integer> set2 = Sets.newHashSet(3, 4, 5, 6); Sets.SetView<Integer> inter = Sets.intersection(set1, set2); // 交集 System.out.println(inter); Sets.SetView<Integer> diff = Sets.difference(set1, set2); // 差集,在A中不在B中 System.out.println(diff); Sets.SetView<Integer> union = Sets.union(set1, set2); // 并集 System.out.println(union); } } 返回: [3, 4, 5] [1, 2] [1, 2, 3, 4, 5, 6]


优秀的个人博客,低调大师

guava快速入门(三)

Guava工程包含了若干被Google的 Java项目广泛依赖 的核心库,例如:集合 [collections] 、缓存 [caching] 、原生类型支持 [primitives support] 、并发库 [concurrency libraries] 、通用注解 [common annotations] 、字符串处理 [string processing] 、I/O 等等。 guava类似Apache Commons工具集 Cache 缓存在很多场景下都是相当有用的。例如,计算或检索一个值的代价很高,并且对同样的输入需要不止一次获取值的时候,就应当考虑使用缓存。 Guava Cache与ConcurrentMap很相似,但也不完全一样。最基本的区别是ConcurrentMap会一直保存所有添加的元素,直到显式地移除。相对地,Guava Cache为了限制内存占用,通常都设定为自动回收元素。在某些场景下,尽管LoadingCache 不回收元素,它也是很有用的,因为它会自动加载缓存。 Guava Cache是一个全内存的本地缓存实现,它提供了线程安全的实现机制。 通常来说,Guava Cache适用于: 你愿意消耗一些内存空间来提升速度。 你预料到某些键会被查询一次以上。 缓存中存放的数据总量不会超出内存容量。(Guava Cache是单个应用运行时的本地缓存。它不把数据存放到文件或外部服务器。 如果这不符合你的需求,请尝试Memcached这类工具) Guava Cache有两种创建方式: cacheLoader callable callback LoadingCache是附带CacheLoader构建而成的缓存实现 import java.util.concurrent.ExecutionException; import java.util.concurrent.TimeUnit; import com.google.common.cache.CacheBuilder; import com.google.common.cache.CacheLoader; import com.google.common.cache.LoadingCache; public class LoadingCacheDemo { public static void main(String[] args) { LoadingCache<String, String> cache = CacheBuilder.newBuilder().maximumSize(100) // 最大缓存数目 .expireAfterAccess(2, TimeUnit.SECONDS) // 缓存1秒后过期 .build(new CacheLoader<String, String>() { @Override public String load(String key) throws Exception { return key; } }); cache.put("j", "java"); cache.put("c", "cpp"); cache.put("s", "scala"); cache.put("g", "go"); try { System.out.println(cache.get("j")); TimeUnit.SECONDS.sleep(1); System.out.println(cache.get("s")); // 1秒后 输出scala TimeUnit.SECONDS.sleep(2); System.out.println(cache.get("s")); // 2秒后 输出s } catch (ExecutionException | InterruptedException e) { e.printStackTrace(); } } } 返回: java scala s 回调: import java.util.concurrent.ExecutionException; import java.util.concurrent.TimeUnit; import com.google.common.cache.Cache; import com.google.common.cache.CacheBuilder; public class CallbackDemo { public static void main(String[] args) { Cache<String, String> cache = CacheBuilder.newBuilder().maximumSize(100) .expireAfterAccess(1, TimeUnit.SECONDS) .build(); try { String result = cache.get("java", () -> "hello java"); System.out.println(result); } catch (ExecutionException e) { e.printStackTrace(); } } } refresh机制:- LoadingCache.refresh(K) 在生成新的value的时候,旧的value依然会被使用。- CacheLoader.reload(K, V) 生成新的value过程中允许使用旧的value- CacheBuilder.refreshAfterWrite(long, TimeUnit) 自动刷新cache 并发 ListenableFuture 传统JDK中的Future通过异步的方式计算返回结果:在多线程运算中可能或者可能在没有结束返回结果,Future是运行中的多线程的一个引用句柄,确保在服务执行返回一个Result。 ListenableFuture可以允许你注册回调方法(callbacks),在运算(多线程执行)完成的时候进行调用, 或者在运算(多线程执行)完成后立即执行。这样简单的改进,使得可以明显的支持更多的操作,这样的功能在JDK concurrent中的Future是不支持的。 import java.util.concurrent.ExecutionException; import java.util.concurrent.Executors; import com.google.common.util.concurrent.FutureCallback; import com.google.common.util.concurrent.Futures; import com.google.common.util.concurrent.ListenableFuture; import com.google.common.util.concurrent.ListeningExecutorService; import com.google.common.util.concurrent.MoreExecutors; public class ListenableFutureDemo { public static void main(String[] args) { // 将ExecutorService装饰成ListeningExecutorService ListeningExecutorService service = MoreExecutors. listeningDecorator(Executors.newCachedThreadPool()); // 通过异步的方式计算返回结果 ListenableFuture<String> future = service.submit(() -> { System.out.println("call execute.."); return "task success!"; }); // 有两种方法可以执行此Future并执行Future完成之后的回调函数 future.addListener(() -> { // 该方法会在多线程运算完的时候,指定的Runnable参数传入的对象会被指定的Executor执行 try { System.out.println("result: " + future.get()); } catch (InterruptedException | ExecutionException e) { e.printStackTrace(); } }, service); Futures.addCallback(future, new FutureCallback<String>() { @Override public void onSuccess( String result) { System.out.println("callback result: " + result); } @Override public void onFailure(Throwable t) { System.out.println(t.getMessage()); } }, service); } } 返回: call execute.. result: task success! callback result: task success! IO import java.io.File; import java.io.IOException; import java.util.List; import com.google.common.base.Charsets; import com.google.common.collect.ImmutableList; import com.google.common.io.Files; public class FileDemo { public static void main(String[] args) { File file = new File(System.getProperty("user.dir")); System.out.println(file.getName()); System.out.println(file.getPath()); } // 写文件 private void writeFile(String content, File file) throws IOException { if (!file.exists()) { file.createNewFile(); } Files.write(content.getBytes(Charsets.UTF_8), file); } // 读文件 private List<String> readFile(File file) throws IOException { if (!file.exists()) { return ImmutableList.of(); // 避免返回null } return Files.readLines(file, Charsets.UTF_8); } // 文件复制 private void copyFile(File from, File to) throws IOException { if (!from.exists()) { return; } if (!to.exists()) { to.createNewFile(); } Files.copy(from, to); } } 返回: collection-others D:\GITHUB\java\code\test01\collection-others 参考:Google Guava官方教程(中文版)guava-importnew

优秀的个人博客,低调大师

[jvm]jvm快速入门

本篇以jdk1.7为例 jvm内存结构 堆内存 方法区 jvm栈 程序计数器 本地方法栈如图: 使用processon作图 所以,这里可以看到jvm内存三大主要结构 方法区 堆区 栈区 常用jvm控制参数 -Xms 设置堆的最小空间大小。 -Xmx 设置堆的最大空间大小。 -XX:NewSize 设置新生代最小空间大小。 -XX:MaxNewSize 设置新生代最大空间大小。 -XX:PermSize 设置永久代最小空间大小。 -XX:MaxPermSize 设置永久代最大空间大小。 -Xss 设置每个线程的堆栈大小。 一张图来了解如何通过参数来控制各区域的内存大小 简单介绍每个区域的作用 Java堆(Heap)对于大多数应用来说,Java堆(Java Heap)是Java虚拟机所管理的内存中最大的一块。Java堆是被所有线程共享的一块内存区域,在虚拟机启动时创建。此内存区域的唯一目的就是存放对象实例,几乎所有的对象实例都在这里分配内存。 Java堆是垃圾收集器管理的主要区域,因此很多时候也被称做“GC堆”。如果从内存回收的角度看,由于现在收集器基本都是采用的分代收集算法,所以Java堆中还可以细分为:新生代和老年代;再细致一点的有Eden空间、From Survivor空间、To Survivor空间等。 根据Java虚拟机规范的规定,Java堆可以处于物理上不连续的内存空间中,只要逻辑上是连续的即可,就像我们的磁盘空间一样。在实现时,既可以实现成固定大小的,也可以是可扩展的,不过当前主流的虚拟机都是按照可扩展来实现的(通过-Xmx和-Xms控制)。 如果在堆中没有内存完成实例分配,并且堆也无法再扩展时,将会抛出OutOfMemoryError异常。 方法区(Method Area)方法区(Method Area)与Java堆一样,是各个线程共享的内存区域,它用于存储已被虚拟机加载的类信息、常量、静态变量、即时编译器编译后的代码等数据。虽然Java虚拟机规范把方法区描述为堆的一个逻辑部分,但是它却有一个别名叫做Non-Heap(非堆),目的应该是与Java堆区分开来。 对于习惯在HotSpot虚拟机上开发和部署程序的开发者来说,很多人愿意把方法区称为“永久代”(Permanent Generation),本质上两者并不等价,仅仅是因为HotSpot虚拟机的设计团队选择把GC分代收集扩展至方法区,或者说使用永久代来实现方法区而已。 Java虚拟机规范对这个区域的限制非常宽松,除了和Java堆一样不需要连续的内存和可以选择固定大小或者可扩展外,还可以选择不实现垃圾收集。相对而言,垃圾收集行为在这个区域是比较少出现的,但并非数据进入了方法区就如永久代的名字一样“永久”存在了。这个区域的内存回收目标主要是针对常量池的回收和对类型的卸载,一般来说这个区域的回收“成绩”比较难以令人满意,尤其是类型的卸载,条件相当苛刻,但是这部分区域的回收确实是有必要的。 根据Java虚拟机规范的规定,当方法区无法满足内存分配需求时,将抛出OutOfMemoryError异常。 程序计数器(Program Counter Register) 程序计数器(Program Counter Register)是一块较小的内存空间,它的作用可以看做是当前线程所执行的字节码的行号指示器。在虚拟机的概念模型里(仅是概念模型,各种虚拟机可能会通过一些更高效的方式去实现),字节码解释器工作时就是通过改变这个计数器的值来选取下一条需要执行的字节码指令,分支、循环、跳转、异常处理、线程恢复等基础功能都需要依赖这个计数器来完成。由于Java虚拟机的多线程是通过线程轮流切换并分配处理器执行时间的方式来实现的,在任何一个确定的时刻,一个处理器(对于多核处理器来说是一个内核)只会执行一条线程中的指令。因此,为了线程切换后能恢复到正确的执行位置,每条线程都需要有一个独立的程序计数器,各条线程之间的计数器互不影响,独立存储,我们称这类内存区域为“线程私有”的内存。如果线程正在执行的是一个Java方法,这个计数器记录的是正在执行的虚拟机字节码指令的地址;如果正在执行的是Natvie方法,这个计数器值则为空(Undefined)。 此内存区域是唯一一个在Java虚拟机规范中没有规定任何OutOfMemoryError情况的区域。 JVM栈(JVM Stacks)与程序计数器一样,Java虚拟机栈(Java Virtual Machine Stacks)也是线程私有的,它的生命周期与线程相同。虚拟机栈描述的是Java方法执行的内存模型:每个方法被执行的时候都会同时创建一个栈帧(Stack Frame)用于存储局部变量表、操作栈、动态链接、方法出口等信息。每一个方法被调用直至执行完成的过程,就对应着一个栈帧在虚拟机栈中从入栈到出栈的过程。 局部变量表存放了编译期可知的各种基本数据类型(boolean、byte、char、short、int、float、long、double)、对象引用(reference类型,它不等同于对象本身,根据不同的虚拟机实现,它可能是一个指向对象起始地址的引用指针,也可能指向一个代表对象的句柄或者其他与此对象相关的位置)和returnAddress类型(指向了一条字节码指令的地址)。 其中64位长度的long和double类型的数据会占用2个局部变量空间(Slot),其余的数据类型只占用1个。局部变量表所需的内存空间在编译期间完成分配,当进入一个方法时,这个方法需要在帧中分配多大的局部变量空间是完全确定的,在方法运行期间不会改变局部变量表的大小。 在Java虚拟机规范中,对这个区域规定了两种异常状况:如果线程请求的栈深度大于虚拟机所允许的深度,将抛出StackOverflowError异常;如果虚拟机栈可以动态扩展(当前大部分的Java虚拟机都可动态扩展,只不过Java虚拟机规范中也允许固定长度的虚拟机栈),当扩展时无法申请到足够的内存时会抛出OutOfMemoryError异常。 本地方法栈(Native Method Stacks) 本地方法栈(Native Method Stacks)与虚拟机栈所发挥的作用是非常相似的,其区别不过是虚拟机栈为虚拟机执行Java方法(也就是字节码)服务,而本地方法栈则是为虚拟机使用到的Native方法服务。虚拟机规范中对本地方法栈中的方法使用的语言、使用方式与数据结构并没有强制规定,因此具体的虚拟机可以自由实现它。甚至有的虚拟机(譬如Sun HotSpot虚拟机)直接就把本地方法栈和虚拟机栈合二为一。与虚拟机栈一样,本地方法栈区域也会抛出StackOverflowError和OutOfMemoryError异常。 参考自《深入理解Java虚拟机:JVM高级特性与最佳实践 作者:周志明》 JVM (Java Virtual Machine)

优秀的个人博客,低调大师

docker快速部署gitlab

docker安装gitlabhttps://docs.gitlab.com/omnibus/docker/使用文档:https://docs.gitlab.com.cn/ce/gitlab-basics/README.htmlgit使用:http://blog.jobbole.com/25775/ 拉取镜像:docker pull gitlab/gitlab-ce 运行gitlab sudo docker run --detach \ --hostname 10.39.10.223 \ --publish 443:443 --publish 80:80 --publish 2222:22 \ --name gitlab \ --restart always \ --volume /data0/gitlab/config:/etc/gitlab \ --volume /data0/gitlab/logs:/var/log/gitlab \ --volume /data0/gitlab/data:/var/opt/gitlab \ gitlab/gitlab-ce:latest 运行成功后,即可通过80访问页面,2222为ssh端口。 配置gitlab服务器的访问地址修改gitlab的配置文件vi /data0/gitlab/config/gitlab.rb 配置http协议所使用的访问地址,此处为主机ip地址: external_url 'http://10.39.10.223' 修改gitlab.rb配置文件之后,重启容器。或者在容器里执行gitlab-ctl reconfigure命令 http://10.39.3.23 Command line instructions Git global setup git config --global user.name "dataqa"git config --global user.email "249016681@qq.com" Create a new repository git clone git@10.39.10.223:dataqa/te.gitcd tetouch README.mdgit add README.mdgit commit -m "add README"git push -u origin master Existing folder cd existing_foldergit initgit remote add origin git@10.39.3.23:dataqa/te.gitgit add .git commit -m "Initial commit"git push -u origin master Existing Git repository cd existing_repogit remote add origin git@10.39.3.23:dataqa/te.gitgit push -u origin --allgit push -u origin --tags

优秀的个人博客,低调大师

Python快速入门_1

注释 # 用#号字符开头注释单行 """ 三个引号可以注释多行 三个引号可以注释多行 三个引号可以注释多行 """ 原始数据类型和运算符 (1)整型 #整数 3 #=>3 (2)算术运算 #加法 1+1 #=>2 #减法 8-1 #=>7 #乘法 10*2 #=>20 #除法 !!!结果自动转换成浮点数 35/5 #=>7.0 5/3 #=>1.6666666666666667 #整数除法 !!!结果向下取整 5//3 #=>1 5.0//3.0 #=>1.0 -5//3 #=>-2 5//(-3) #=>-2 -5.0//3.0 #=>-2.0 #浮点数的运算结果也是浮点数 3*2.0 #=>6.0 #取模 7%3 #=>1 #x的y次方 2**4 #=>16 #用括号决定优先级 (1+3)*2 #=>8 (2)布尔运算与比较运算 #布尔值 True #=>True False #=>False #用not取非 not True #=>False not False #=>True #逻辑运算符,注意and和or都是小写 True and False #=>False True or False #=>True #整数也可以当做布尔值 0== False #=>True 2==True #=>False 1==True #=>True #用==判断相等 1==1 #=>True 2==1 #=>False #用!=判断不等 1!=1 #=>False 1!=2 #=>True #比较大小 1<10 #=>True 2<=2 #=>True 2>=2 #=>True (4)字符串运算 #字符串用单引号双引号都可以 '这个是字符串' "这个也是字符串" #用加号连接字符串 'Hello '+'World' #=>'Hello World' #字符串可以被当做字符列表 'This is a string'[0] #=>'T' #用format来格式化字符串 "{} can be {}".format("string",'interpolated') #=>'string can be interpolated' #可以重复参数以节省时间 "{0} be nimble,{0} be quick,{0} jump over the {1}".format("jack","candle stick") #=>'jack be nimble,jack be quick,jack jump over the candle stick' #如果不想数参数可以用关键词 "{name} wants to eat {food}".format(name='Bob',food='lasagna') #=>'Bob wants to eat lasagna' #如果你的python3程序也要运行在Python2.5以下环境运行,也可以用老式的格式化语法 "%s can be %s the %s way"%('strings','interpolater','old') #=>'strings can be interpolater the old way' (2)None #None是一个对象 None #当与None进行比较时不要用==,要用is,is是用来比较两个变量是否指向同一个对象 'etc' is None #=>False None is None #=>True #None,0,空字符串,空列表,空字典都算是False,其他都是True bool(None) #=>False bool(0) #=>False bool("") #=>False bool({}) #=>False bool([]) #=>False

优秀的个人博客,低调大师

Visual Basic快速入门

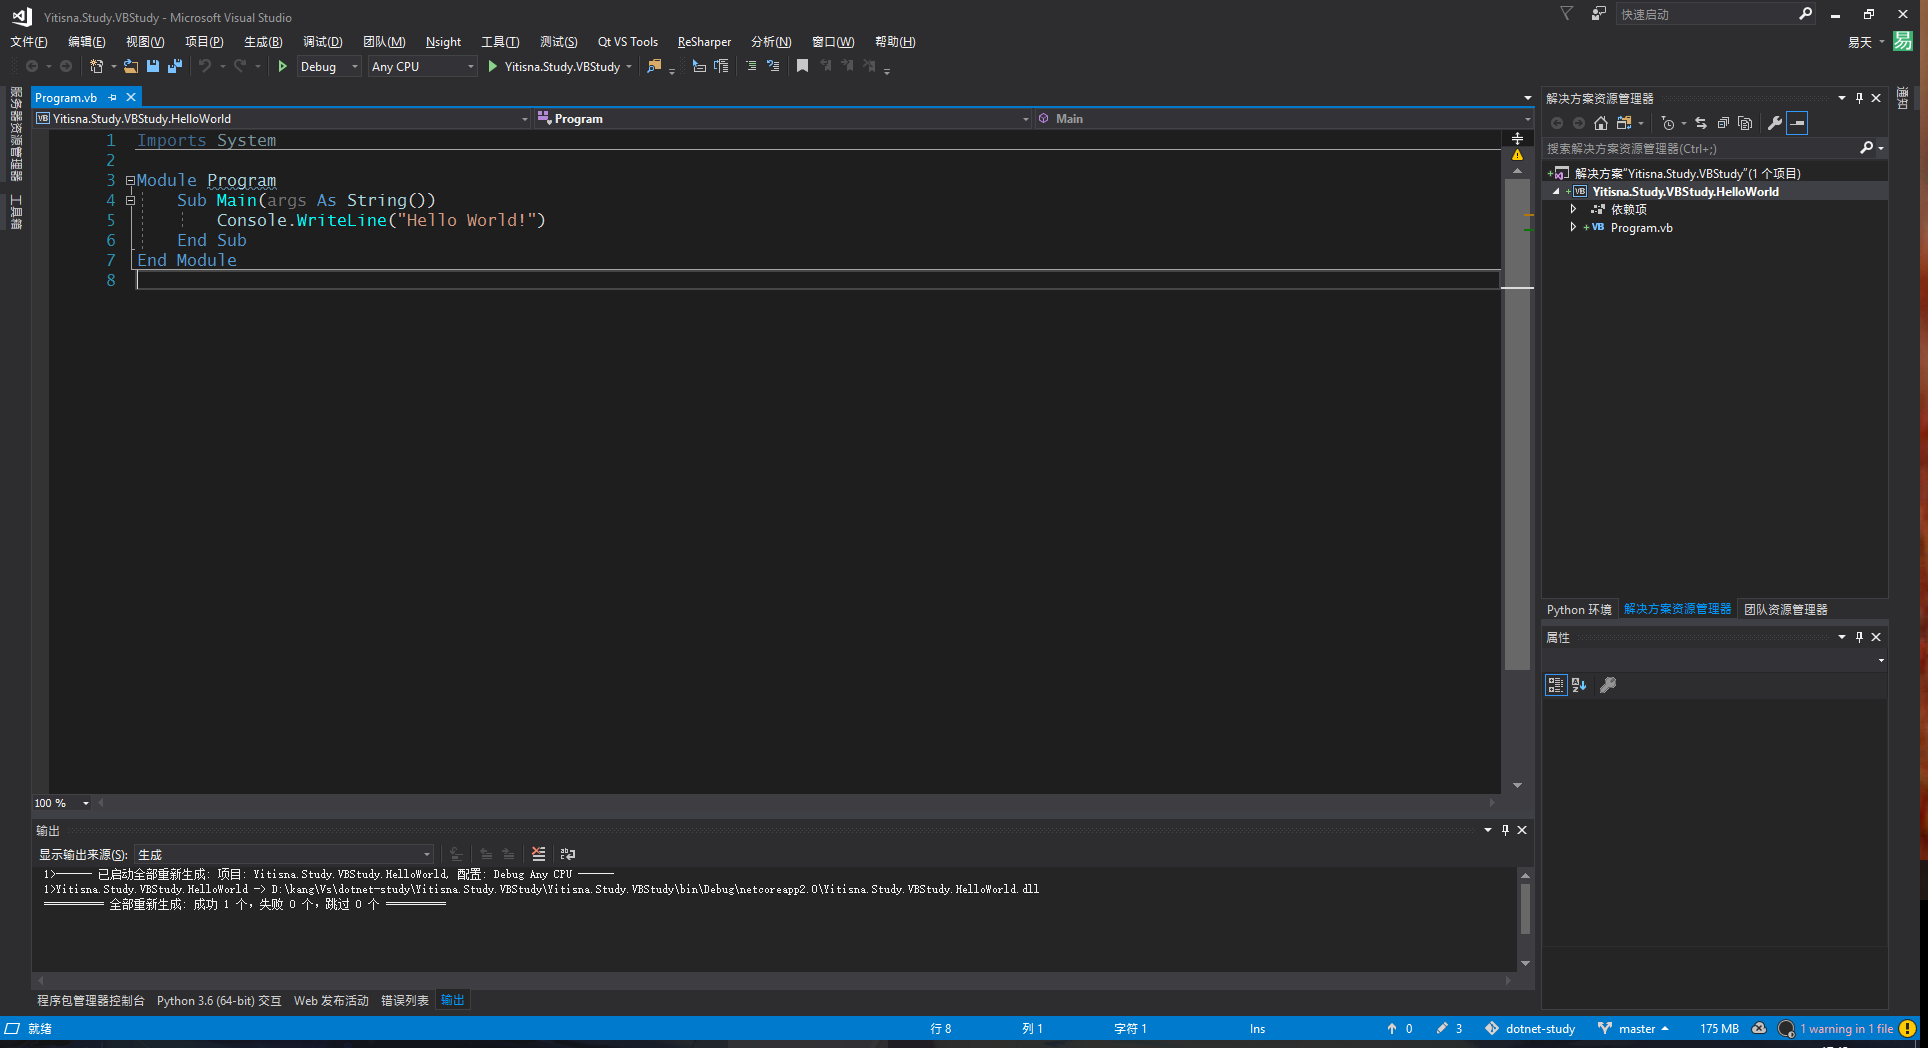
Basic语言的全名是Beginner's All-purpose Symbolic Instruction Code(初学者通用的符号指令代码),是几十年前流行过的一门语言。我高中时候一门数学选修课中使用的也是Basic语言。我还记得当时我为了使用Basic语言,还从网上下了一个简陋的QBasic工具。当时第一次接触编程的我对编程语言充满了兴趣。当然在现在,Basic语言已经基本没什么用了。现在还在使用的Basic语言大概就是微软的Visual Basic了。今天就来介绍一下Visual Basic语言。需要注意的是,VB语言运行在微软的CLR上,所以如果你对C#比较熟悉的话,学习VB就很简单了。 HelloWorld 照例,第一个项目自然应该是HelloWorld。打开Visuall Studio,创建一个VB项目,然后就会出现如下图所示的代码。 HelloWorld 来解释一下HelloWorld的代码。首先第一行是导入类库,和C#、java的import语句是一个道理。然后下面定义了一个Program模块,其中定义了Main函数,在函数中输出Hello World。在VB中,不使用大括号作为块分隔符,而是使用End语句来结束块作用域。 Imports System Module Program Sub Main(args As String()) Console.WriteLine("Hello World!") End Sub End Module 基本数据类型 由于VB和C#都是运行在CLR上的语言,所以其实它们的基本类型是一样的,都有有/无符号的各种长度整数、单精度双精度浮点数、布尔类型、字符和字符串等类型。下面的代码仅列出几个常用的。 Public Class DataType Sub DataType() Dim b As Byte Dim i As Integer Dim s As Single Dim d As Double Dim c As Char Dim str As String Dim bool As Boolean b = 100 i = 1000 s = 1.5 d = 3.1415926 c = "c"c str = "abc" bool = True End Sub End Class 变量和常量 VB的变量定义也和C系语言不同,使用的是Dim 变量名 As 变量类型的语法进行定义。变量必须先定义才能使用。如果想同时定义多个变量,可以这么写。 Dim i, j As Integer 如果想在定义变量的同时初始化,可以这样。 Dim bool As Boolean = True 如果要定义常量,可以变量类似,只不过使用Const关键字。 Const cs As Integer = 1000 运算符 先来看看算术运算符。 运算符 用途 例子 ^ 幂运算符 3 ^ 2 = 9 + 加法 - 减法 * 乘法 / 小数除法 3 / 2 = 1.5 \ 整除 3 \ 2 = 1 MOD 取模 6 MOD 4 = 2 然后是比较运算符。这里需要注意的就是VB的相等和不等和其他语言的可能不太一样。 运算符 用途 = 相等 <> 不等 < 小于 > 大于 <= 不大于 >= 不小于 然后是逻辑运算符。 运算符 用途 And 与运算符,不短路求值 Or 或运算符,不短路求值 Not 非运算符 Xor 异或运算符 AndAlso 与运算符,短路求值 OrElse 或运算符,短路求值 IsTrue 是否为真 IsFalse 是否为假 条件语句 If语句 先来看看VB中的If语句,其基本结构是If 条件 Then 执行体 Else 执行体 End If。 Dim num As Integer = 5 If num\2 = 0 Then Console.WriteLine($"{num} is even") Else Console.WriteLine($"{num} is odd") End If 如果需要多重If语句,可以添加ElseIf语句块。 If num = 1 Then Console.WriteLine($"{num} is 1") ElseIf num = 2 Console.WriteLine($"{num} is 2") Else Console.WriteLine($"{num} is other") End If Select语句 Select语句相当于其他语言中的switch语句,如果没有匹配项,会执行Case Else语句块。 Dim c As Char = "c"c Select c Case "a"c Console.WriteLine("a") Case "b"c, "c"c Console.WriteLine("b or c") Case Else Console.WriteLine("others") End Select 循环语句 Do语句循环 Do语句循环有两种结构,第一种是循环条件在前。先来看看Do-While语句,当满足循环条件的时候会继续循环,不满足条件时跳出循环。这里顺便提一下,VB中没有块注释,只有单行注释,以单引号开头,直到句末。 'Do While语句 Dim i = 0 Do While i < 5 If i = 3 Then Exit Do End If Console.Write(i) i += 1 Loop 再来看看Do-Until语句,和Do-While相反,在不满足条件的时候会执行循环,满足条件时跳出循环。 'Do Until语句 i = 0 Do Until i > 5 If i < 3 Then i += 2 Continue Do End If Console.Write(i) i += 1 Loop Do循环的第二种形式就是先执行循环体,然后进行判断,同样有While和Until两种。 i = 0 Do Console.Write(i) i += 1 Loop While i < 5 Console.WriteLine While循环 还有就是传统的While循环。 'While循环 i = 0 While i < 5 Console.Write(i) i += 1 End While For循环 下面是For循环的例子,在For循环中可以使用Step指定步长。 For counter As Integer = 1 To 9 Step 1 Console.Write(counter) Next Foreach循环 Foreach循环用于迭代一个列表中的每一项。 Dim array() as Integer = {1, 2, 3, 4, 5, 6, 7} For Each item As Integer In array Console.Write(item) Next With语句 With语句其实不算循环语句,不过我看的这个VB教程把With语句放到这里说,那我也放到这里好了。With语句在有些语言中也有,主要用途是节省代码数量。比方说有下面这个Person类。 Public Class Person Public Property Name As String Public Property Age As Integer End Class 假如有一个person对象多次出现的话,就可以使用With语句,在With语句中,点访问符默认指向的就是With语句指定的对象。 Dim person As Person = New Person With person .Name = "yitian" .Age = 25 Console.WriteLine($"Person(Name:{.Name}, Age:{.Age})") End With 跳转语句 Exit语句 Exit语句用于结束某个代码块,它的形式如下。想用Exit退出哪个代码块,就写哪个代码块的类型。 Exit { Do | For | Function | Property | Select | Sub | Try | While } Continue语句 Continue语句用于结束当前循环,直接进行下一次循环。它的形式如下,后面跟要继续的代码块类型。 Continue { Do | For | While } Goto语句 最后就是Goto语句,它会直接跳转到指定的标签处。 'Goto语句 GoTo Ending Console.WriteLine("Print something") Ending: Console.WriteLine("This is end.") 数组 先来看看数组定义。VB中的数组比较特殊,定义一个Dim a1(3),其实是下标0-4长度为四的一维数组,这一点要非常注意。 '下标0-9的十个元素的数组 Dim array1(9) As Integer '11X11的二维数组 Dim array2(2, 2) As Integer '定义并初始化数组 Dim array3() = {1, 2, 3, 4, 5} '锯齿数组,也就是数组的数组 Dim array4 As Integer()() = New Integer(1)() {} array4(0) = New Integer() {1, 2} array4(1) = New Integer() {3, 4} 访问数组元素需要使用圆括号,而不是一般语言的方括号。 '初始化一维数组 For i As Integer = 0 To 9 array1(i) = i Next '初始化二维数组 For i = 0 To 2 For j = 0 To 2 array2(i, j) = (i + 1)*(j + 1) Next Next 最后就是遍历数组了,可以使用For循环迭代下标,或者用Foreach循环直接遍历元素。 '显示数组 For Each e In array1 Console.Write(e) Next Console.WriteLine For i As Integer = 0 To 2 For j = 0 To 2 Console.Write(array2(i, j)) Next Console.WriteLine Next For Each e In array3 Console.Write(e) Next Console.WriteLine For i As Integer = 0 To 1 For j = 0 To 1 Console.Write(array4(i)(j)) Next Console.WriteLine Next 函数 Sub函数 回头来看看前面的HelloWorld,其中就有一个Main函数,它是一个Sub函数,也就是没有返回值的函数。 Imports System Module Program Sub Main(args As String()) Console.WriteLine("Hello World!") End Sub End Module 函数可以按值传参,也可以按引用传参,默认情况下是按值传参。 Function GetParam(ByVal a As Integer, ByRef b As Integer) a = 10 b = 10 Console.WriteLine("Param changed") End Function Function函数 Function函数就是有返回值的函数。在函数中,如果要返回值,可以有两种办法,第一种是使用Return语句,第二种是在函数体中向函数名赋值。 '函数返回值可以用Return语句 Function Return1() As Integer Return 1 End Function '也可以向函数名赋值 Function Return2() As Integer Return2 = 2 End Function 可变参数列表 可变参数列表使用ParamArray声明。 Function PrintIntegers(ParamArray integers As Integer()) For Each i In integers Console.Write(i) Next Console.WriteLine End Function 面向对象编程 类 VB的类和C#的类非常相似,同样有字段、属性等概念。构造函数使用New声明,不需要返回值。析构函数使用Finalize声明,也不需要返回值。 Class Contact ' 字段 Private _name As String Private _tel As String '构造函数 Public Sub New(name As String, tel As String) _name = name _tel = tel End Sub '析构函数 Protected Overrides Sub Finalize() End Sub '属性 Public Property Tel As String Get Return _tel End Get Set _tel = value End Set End Property Public Property Name As String Get Return _name End Get Set(value As String) _name = value End Set End Property '重写方法 Public Overrides Function ToString() As String Return $"Contact(Name:{Name}, Tel:{Tel})" End Function End Class 抽象类和接口 如果一个类的方法含有MustOverride修饰符,那么这个方法就是一个抽象方法。含有抽象方法的类就是抽象类,需要使用MustInherit关键字修饰。 MustInherit Class Shape MustOverride Function GetArea() As Double End Class Interface Color Function GetColor() As String End Interface 继承 继承基类和实现接口的声明必须写在类实现的前面。如果一个方法重写了基类的版本,那么这个方法应该使用Overrides关键字修饰。如果不希望类被其他类继承,可以使用NotInheritable修饰,类似于Java的final关键字或者C#的sealed关键字。如果子类需要调用基类的方法,可以使用MyBase关键字代表基类。 Class Circle Inherits Shape Protected radius As Double Public Sub New(r As Double) radius = r End Sub Public Overrides Function GetArea() As Double Return Math.PI*radius*radius End Function End Class NotInheritable Class RedCircle Inherits Circle Implements Color Public Sub New(r As Double) MyBase.New(r) End Sub Public Function Color_GetColor() As String Implements Color.GetColor Return "Red" End Function End Class 静态成员 静态成员和静态函数使用Shared关键字声明,对于每个类来说Shared成员只会存在一个。 Class MyMath Public Shared PI As Double = 3.1415926 Public Shared Function GetPI As Double Return PI End Function End Class 模块 Module类似于Class,不同之处在于Module不需要实例化,其中的函数可以直接调用,就像静态函数一样。 Module Program Sub Main(args As String()) Console.WriteLine("Hello World!") End Sub End Module 异常处理 VB的异常处理和C#的一样,都有Try、Catch、Finally部分。 Public Module ExceptionHandling Sub HandleException() Try Throw New ArithmeticException("除数不能为零") Catch ex As ArithmeticException Console.WriteLine($"捕获了数学计算异常:{ex.Message}") Catch ex As Exception Console.WriteLine($"捕获了异常:{ex.Message}") Finally Console.WriteLine("终结代码") End Try End Sub End Module 以上就是VB语言的一些介绍了,希望对大家能有所帮助。

优秀的个人博客,低调大师

[Phoenix] 一、快速入门

Phoenix作为应用层和HBASE之间的中间件,以下特性使它在大数据量的简单查询场景有着独有的优势 二级索引支持(global index + local index) 编译SQL成为原生HBASE的可并行执行的scan 在数据层完成计算,server端的coprocessor执行聚合 下推where过滤条件到server端的scan filter上 利用统计信息优化、选择查询计划(5.x版本将支持CBO) skip scan功能提高扫描速度 一般可以使用以下三种方式访问Phoenix JDBC API 使用Python编写的命令行工具(sqlline, sqlline-thin和psql等) SQuirrel 一、命令行工具psql使用示例 1.创建一个建表的sql脚本文件us_population.sql: CREATE TABLE IF NOT E

优秀的个人博客,低调大师

快速搭建 Hadoop 环境

对于Hadoop来说,最主要的是两个方面,一个是分布式文件系统HDFS,另一个是MapReduce计算模型,下面讲解下我在搭建Hadoop 环境过程。 Hadoop 测试环境 共4台测试机,1台namenode3台datanode OS版本:RHEL5.5X86_64 Hadoop:0.20.203.0 Jdk:jdk1.7.0 角色ip地址 namenode 192.168.57.75 datanode1192.168.57.76 datanode2192.168.57.78 datanode3192.168.57.79 一 部署 Hadoop 前的准备工作 1需要知道hadoop依赖Java和SSH Java1.5.x(以上),必须安装。 ssh必须安装并且保证sshd一直运行,以便用Hadoop脚本管理远端Hadoop守护进程。 2建立Hadoop公共帐号 所有的节点应该具有相同的用户名,可以使用如下命令添加: useraddhadoop passwdhadoop 3配置host主机名 tail-n3/etc/hosts 192.168.57.75namenode 192.168.57.76datanode1 192.168.57.78datanode2 192.168.57.79datanode3 4以上几点要求所有节点(namenode|datanode)配置全部相同 二 ssh 配置ssh 详细了解 1生成私匙id_rsa与公匙id_rsa.pub配置文件 [hadoop@hadoop1~]$ssh-keygen-trsa Generatingpublic/privatersakeypair. Enterfileinwhichtosavethekey(/home/hadoop/.ssh/id_rsa): Enterpassphrase(emptyfornopassphrase): Entersamepassphraseagain: Youridentificationhasbeensavedin/home/hadoop/.ssh/id_rsa. Yourpublickeyhasbeensavedin/home/hadoop/.ssh/id_rsa.pub. Thekeyfingerprintis: d6:63:76:43:e2:5b:8e:85:ab:67:a2:7c:a6:8f:23:f9hadoop@hadoop1.test.com 2私匙id_rsa与公匙id_rsa.pub配置文件 [hadoop@hadoop1~]$ls.ssh/ authorized_keysid_rsaid_rsa.pubknown_hosts 3把公匙文件上传到datanode服务器 [hadoop@hadoop1~]$ssh-copy-id-i~/.ssh/id_rsa.pubhadoop@datanode1 28 hadoop@datanode1'spassword: Nowtryloggingintothemachine,with"ssh'hadoop@datanode1'",andcheckin: .ssh/authorized_keys tomakesurewehaven'taddedextrakeysthatyouweren'texpecting. [hadoop@hadoop1~]$ssh-copy-id-i~/.ssh/id_rsa.pubhadoop@datanode2 28 hadoop@datanode2'spassword: Nowtryloggingintothemachine,with"ssh'hadoop@datanode2'",andcheckin: .ssh/authorized_keys tomakesurewehaven'taddedextrakeysthatyouweren'texpecting. [hadoop@hadoop1~]$ssh-copy-id-i~/.ssh/id_rsa.pubhadoop@datanode3 28 hadoop@datanode3'spassword: Nowtryloggingintothemachine,with"ssh'hadoop@datanode3'",andcheckin: .ssh/authorized_keys tomakesurewehaven'taddedextrakeysthatyouweren'texpecting. [hadoop@hadoop1~]$ssh-copy-id-i~/.ssh/id_rsa.pubhadoop@localhost 28 hadoop@localhost'spassword: Nowtryloggingintothemachine,with"ssh'hadoop@localhost'",andcheckin: .ssh/authorized_keys tomakesurewehaven'taddedextrakeysthatyouweren'texpecting. 4验证 [hadoop@hadoop1~]$sshdatanode1 Lastlogin:ThuFeb209:01:162012from192.168.57.71 [hadoop@hadoop2~]$exit logout [hadoop@hadoop1~]$sshdatanode2 Lastlogin:ThuFeb209:01:182012from192.168.57.71 [hadoop@hadoop3~]$exit logout [hadoop@hadoop1~]$sshdatanode3 Lastlogin:ThuFeb209:01:202012from192.168.57.71 [hadoop@hadoop4~]$exit logout [hadoop@hadoop1~]$sshlocalhost Lastlogin:ThuFeb209:01:242012from192.168.57.71 [hadoop@hadoop1~]$exit logout 三 java环境配置 1下载合适的jdk //此文件为64Linux系统使用的RPM包 wgethttp://download.oracle.com/otn-pub/java/jdk/7/jdk-7-linux-x64.rpm 2安装jdk rpm-ivhjdk-7-linux-x64.rpm 3验证java [root@hadoop1~]#java-version javaversion"1.7.0" Java(TM)SERuntimeEnvironment(build1.7.0-b147) JavaHotSpot(TM)64-BitServerVM(build21.0-b17,mixedmode) [root@hadoop1~]#ls/usr/java/ defaultjdk1.7.0latest 4配置java环境变量 #vim/etc/profile//在profile文件中加入如下信息: #addforhadoop exportJAVA_HOME=/usr/java/jdk1.7.0 exportCLASSPATH=.:$JAVA_HOME/jre/lib/rt.jar:$JAVA_HOME/lib/dt.jar:$JAVA_HOME/ exportPATH=$PATH:$JAVA_HOME/bin //使环境变量生效 source/etc/profile 5拷贝/etc/profile到datanode [root@hadoop1 src]#scp/etc/profileroot@datanode1:/etc/ Theauthenticityofhost'datanode1(192.168.57.86)'can'tbeestablished. RSAkeyfingerprintisb5:00:d1:df:73:4c:94:f1:ea:1f:b5:cd:ed:3a:cc:e1. Areyousureyouwanttocontinueconnecting(yes/no)?yes Warning:Permanentlyadded'datanode1,192.168.57.86'(RSA)tothelistofknownhosts. root@datanode1'spassword: profile100%16241.6KB/s00:00 [root@hadoop1 src]#scp/etc/profileroot@datanode2:/etc/ Theauthenticityofhost'datanode2(192.168.57.87)'can'tbeestablished. RSAkeyfingerprintis57:cf:96:15:78:a3:94:93:30:16:8e:66:47:cd:f9:cd. Areyousureyouwanttocontinueconnecting(yes/no)?yes Warning:Permanentlyadded'datanode2,192.168.57.87'(RSA)tothelistofknownhosts. root@datanode2'spassword: profile100%16241.6KB/s00:00 [root@hadoop1 src]#scp/etc/profileroot@datanode3:/etc/ Theauthenticityofhost'datanode3(192.168.57.88)'can'tbeestablished. RSAkeyfingerprintis31:73:e8:3c:20:0c:1e:b2:59:5c:d1:01:4b:26:41:70. Areyousureyouwanttocontinueconnecting(yes/no)?yes Warning:Permanentlyadded'datanode3,192.168.57.88'(RSA)tothelistofknownhosts. root@datanode3'spassword: profile100%16241.6KB/s00:00 6 拷贝 jdk 安装包,并在每个datanode 节点安装 jdk 包 [root@hadoop1 ~]#scp-r/home/hadoop/src/hadoop@datanode1:/home/hadoop/ hadoop@datanode1'spassword: hadoop-0.20.203.0rc1.tar.gz100%58MB57.8MB/s00:01 jdk-7-linux-x64.rpm100%78MB77.9MB/s00:01 [root@hadoop1 ~]#scp-r/home/hadoop/src/hadoop@datanode2:/home/hadoop/ hadoop@datanode2'spassword: hadoop-0.20.203.0rc1.tar.gz100%58MB57.8MB/s00:01 jdk-7-linux-x64.rpm100%78MB77.9MB/s00:01 [root@hadoop1 ~]#scp-r/home/hadoop/src/hadoop@datanode3:/home/hadoop/ hadoop@datanode3'spassword: hadoop-0.20.203.0rc1.tar.gz100%58MB57.8MB/s00:01 jdk-7-linux-x64.rpm100%78MB77.9MB/s00:01 四 hadoop 配置 //注意使用hadoop 用户 操作 1配置目录 [hadoop@hadoop1~]$pwd /home/hadoop [hadoop@hadoop1~]$ll total59220 lrwxrwxrwx1hadoophadoop17Feb116:59hadoop->hadoop-0.20.203.0 drwxr-xr-x12hadoophadoop4096Feb117:31hadoop-0.20.203.0 -rw-r--r--1hadoophadoop60569605Feb114:24hadoop-0.20.203.0rc1.tar.gz 2配置hadoop-env.sh,指定java位置 vimhadoop/conf/hadoop-env.sh exportJAVA_HOME=/usr/java/jdk1.7.0 3配置core-site.xml//定位文件系统的namenode [hadoop@hadoop1~]$cathadoop/conf/core-site.xml <?xmlversion="1.0"?> <?xml-stylesheettype="text/xsl"href="configuration.xsl"?> <!--Putsite-specificpropertyoverridesinthisfile.--> <configuration> <property> <name>fs.default.name</name> <value>hdfs://namenode:9000</value> </property> </configuration> 4配置mapred-site.xml//定位jobtracker所在的主节点 [hadoop@hadoop1~]$cathadoop/conf/mapred-site.xml <?xmlversion="1.0"?> <?xml-stylesheettype="text/xsl"href="configuration.xsl"?> <!--Putsite-specificpropertyoverridesinthisfile.--> <configuration> <property> <name>mapred.job.tracker</name> <value>namenode:9001</value> </property> </configuration> 5配置hdfs-site.xml//配置HDFS副本数量 [hadoop@hadoop1~]$cathadoop/conf/hdfs-site.xml <?xmlversion="1.0"?> <?xml-stylesheettype="text/xsl"href="configuration.xsl"?> <!--Putsite-specificpropertyoverridesinthisfile.--> <configuration> <property> <name>dfs.replication</name> <value>3</value> </property> </configuration> 6配置master与slave配置文档 [hadoop@hadoop1~]$cathadoop/conf/masters namenode [hadoop@hadoop1~]$cathadoop/conf/slaves datanode1 datanode2 7拷贝hadoop目录到所有节点(datanode) [hadoop@hadoop1~]$scp-rhadoophadoop@datanode1:/home/hadoop/ [hadoop@hadoop1~]$scp-rhadoophadoop@datanode2:/home/hadoop/ [hadoop@hadoop1~]$scp-rhadoophadoop@datanode3:/home/hadoop 8格式化HDFS [hadoop@hadoop1hadoop]$bin/hadoopnamenode-format 12/02/0211:31:15INFOnamenode.NameNode:STARTUP_MSG: /************************************************************ STARTUP_MSG:StartingNameNode STARTUP_MSG:host=hadoop1.test.com/127.0.0.1 STARTUP_MSG:args=[-format] STARTUP_MSG:version=0.20.203.0 STARTUP_MSG:build=http://svn.apache.org/repos/asf/hadoop/common/branches/branch-0.20-security-203-r1099333;compiledby'oom'onWedMay407:57:50PDT2011 ************************************************************/ Re-formatfilesystemin/tmp/hadoop-hadoop/dfs/name?(YorN) Y//这里输入Y 12/02/0211:31:17INFOutil.GSet:VMtype=64-bit 12/02/0211:31:17INFOutil.GSet:2%maxmemory=19.33375MB 12/02/0211:31:17INFOutil.GSet:capacity=2^21=2097152entries 12/02/0211:31:17INFOutil.GSet:recommended=2097152,actual=2097152 12/02/0211:31:17INFOnamenode.FSNamesystem:fsOwner=hadoop 12/02/0211:31:18INFOnamenode.FSNamesystem:supergroupsupergroup=supergroup 12/02/0211:31:18INFOnamenode.FSNamesystem:isPermissionEnabled=true 12/02/0211:31:18INFOnamenode.FSNamesystem:dfs.block.invalidate.limit=100 12/02/0211:31:18INFOnamenode.FSNamesystem:isAccessTokenEnabled=falseaccessKeyUpdateInterval=0min(s),accessTokenLifetime=0min(s) 12/02/0211:31:18INFOnamenode.NameNode:Cachingfilenamesoccuringmorethan10times 12/02/0211:31:18INFOcommon.Storage:Imagefileofsize112savedin0seconds. 12/02/0211:31:18INFOcommon.Storage:Storagedirectory/tmp/hadoop-hadoop/dfs/namehasbeensuccessfullyformatted. 12/02/0211:31:18INFOnamenode.NameNode:SHUTDOWN_MSG: /************************************************************ SHUTDOWN_MSG:ShuttingdownNameNodeathadoop1.test.com/127.0.0.1 ************************************************************/ [hadoop@hadoop1hadoop]$ 9启动hadoop守护进程 [hadoop@hadoop1hadoop]$bin/start-all.sh startingnamenode,loggingto/home/hadoop/hadoop/bin/../logs/hadoop-hadoop-namenode-hadoop1.test.com.out datanode1:startingdatanode,loggingto/home/hadoop/hadoop/bin/../logs/hadoop-hadoop-datanode-hadoop2.test.com.out datanode2:startingdatanode,loggingto/home/hadoop/hadoop/bin/../logs/hadoop-hadoop-datanode-hadoop3.test.com.out datanode3:startingdatanode,loggingto/home/hadoop/hadoop/bin/../logs/hadoop-hadoop-datanode-hadoop4.test.com.out startingjobtracker,loggingto/home/hadoop/hadoop/bin/../logs/hadoop-hadoop-jobtracker-hadoop1.test.com.out datanode1:startingtasktracker,loggingto/home/hadoop/hadoop/bin/../logs/hadoop-hadoop-tasktracker-hadoop2.test.com.out datanode2:startingtasktracker,loggingto/home/hadoop/hadoop/bin/../logs/hadoop-hadoop-tasktracker-hadoop3.test.com.out datanode3:startingtasktracker,loggingto/home/hadoop/hadoop/bin/../logs/hadoop-hadoop-tasktracker-hadoop4.test.com.out 10验证 //namenode [hadoop@hadoop1logs]$jps 2883JobTracker 3002Jps 2769NameNode //datanode [hadoop@hadoop2~]$jps 2743TaskTracker 2670DataNode 2857Jps [hadoop@hadoop3~]$jps 2742TaskTracker 2856Jps 2669DataNode [hadoop@hadoop4~]$jps 2742TaskTracker 2852Jps 2659DataNode Hadoop监控web页面 http://192.168.57.75:50070/dfshealth.jsp 五 简单验证HDFS hadoop的文件命令格式如下: hadoopfs-cmd<args> //建立目录 [hadoop@hadoop1hadoop]$bin/hadoopfs-mkdir/test-hadoop //査看目录 [hadoop@hadoop1hadoop]$bin/hadoopfs-ls/ Found2items drwxr-xr-x-hadoopsupergroup02012-02-0213:32/test-hadoop drwxr-xr-x-hadoopsupergroup02012-02-0211:32/tmp //査看目录包括子目录 [hadoop@hadoop1hadoop]$bin/hadoopfs-lsr/ drwxr-xr-x-hadoopsupergroup02012-02-0213:32/test-hadoop drwxr-xr-x-hadoopsupergroup02012-02-0211:32/tmp drwxr-xr-x-hadoopsupergroup02012-02-0211:32/tmp/hadoop-hadoop drwxr-xr-x-hadoopsupergroup02012-02-0211:32/tmp/hadoop-hadoop/mapred drwx-------hadoopsupergroup02012-02-0211:32/tmp/hadoop-hadoop/mapred/system -rw-------2hadoopsupergroup42012-02-0211:32/tmp/hadoop-hadoop/mapred/system/jobtracker.info //添加文件 [hadoop@hadoop1hadoop]$bin/hadoopfs-put/home/hadoop/hadoop-0.20.203.0rc1.tar.gz/test-hadoop [hadoop@hadoop1hadoop]$bin/hadoopfs-lsr/ drwxr-xr-x-hadoopsupergroup02012-02-0213:34/test-hadoop -rw-r--r--2hadoopsupergroup605696052012-02-0213:34/test-hadoop/hadoop-0.20.203.0rc1.tar.gz drwxr-xr-x-hadoopsupergroup02012-02-0211:32/tmp drwxr-xr-x-hadoopsupergroup02012-02-0211:32/tmp/hadoop-hadoop drwxr-xr-x-hadoopsupergroup02012-02-0211:32/tmp/hadoop-hadoop/mapred drwx-------hadoopsupergroup02012-02-0211:32/tmp/hadoop-hadoop/mapred/system -rw-------2hadoopsupergroup42012-02-0211:32/tmp/hadoop-hadoop/mapred/system/jobtracker.info //获取文件 [hadoop@hadoop1hadoop]$bin/hadoopfs-get/test-hadoop/hadoop-0.20.203.0rc1.tar.gz/tmp/ [hadoop@hadoop1hadoop]$ls/tmp/*.tar.gz /tmp/1.tar.gz/tmp/hadoop-0.20.203.0rc1.tar.gz //删除文件 [hadoop@hadoop1hadoop]$bin/hadoopfs-rm/test-hadoop/hadoop-0.20.203.0rc1.tar.gz Deletedhdfs://namenode:9000/test-hadoop/hadoop-0.20.203.0rc1.tar.gz [hadoop@hadoop1hadoop]$bin/hadoopfs-lsr/ drwxr-xr-x-hadoopsupergroup02012-02-0213:57/test-hadoop drwxr-xr-x-hadoopsupergroup02012-02-0211:32/tmp drwxr-xr-x-hadoopsupergroup02012-02-0211:32/tmp/hadoop-hadoop drwxr-xr-x-hadoopsupergroup02012-02-0211:32/tmp/hadoop-hadoop/mapred drwx-------hadoopsupergroup02012-02-0211:32/tmp/hadoop-hadoop/mapred/system -rw-------2hadoopsupergroup42012-02-0211:32/tmp/hadoop-hadoop/mapred/system/jobtracker.info drwxr-xr-x-hadoopsupergroup02012-02-0213:36/user -rw-r--r--2hadoopsupergroup3212012-02-0213:36/user/hadoop //删除目录 [hadoop@hadoop1hadoop]$bin/hadoopfs-rmr/test-hadoop Deletedhdfs://namenode:9000/test-hadoop [hadoop@hadoop1hadoop]$bin/hadoopfs-lsr/ drwxr-xr-x-hadoopsupergroup02012-02-0211:32/tmp drwxr-xr-x-hadoopsupergroup02012-02-0211:32/tmp/hadoop-hadoop drwxr-xr-x-hadoopsupergroup02012-02-0211:32/tmp/hadoop-hadoop/mapred drwx-------hadoopsupergroup02012-02-0211:32/tmp/hadoop-hadoop/mapred/system -rw-------2hadoopsupergroup42012-02-0211:32/tmp/hadoop-hadoop/mapred/system/jobtracker.info drwxr-xr-x-hadoopsupergroup02012-02-0213:36/user -rw-r--r--2hadoopsupergroup3212012-02-0213:36/user/hadoop //hadoopfs帮助(部分) [hadoop@hadoop1hadoop]$bin/hadoopfs-help hadoopfsisthecommandtoexecutefscommands.Thefullsyntaxis: hadoopfs[-fs<local|filesystemURI>][-conf<configurationfile>] [-D<propertyproperty=value>][-ls<path>][-lsr<path>][-du<path>] [-dus<path>][-mv<src><dst>][-cp<src><dst>][-rm[-skipTrash]<src>] [-rmr[-skipTrash]<src>][-put<localsrc>...<dst>][-copyFromLocal<localsrc>...<dst>] [-moveFromLocal<localsrc>...<dst>][-get[-ignoreCrc][-crc]<src><localdst> [-getmerge<src><localdst>[addnl]][-cat<src>] [-copyToLocal[-ignoreCrc][-crc]<src><localdst>][-moveToLocal<src><localdst>] [-mkdir<path>][-report][-setrep[-R][-w]<rep><path/file>] [-touchz<path>][-test-[ezd]<path>][-stat[format]<path>] [-tail[-f]<path>][-text<path>] [-chmod[-R]<MODE[,MODE]...|OCTALMODE>PATH...] [-chown[-R][OWNER][:[GROUP]]PATH...] [-chgrp[-R]GROUPPATH...] [-count[-q]<path>] [-help[cmd]] 更多Hadoop 相关知识 结束 Hadoop 环境搭建步骤繁琐,需要具备一定的Linux 系统知识,需要注意的是,通过以上步骤搭建的Hadoop 环境只能让你大体了解的hadoop ,如果想将HDFS 用于线上服务,还需对hadoop 配置文档做进一步配置 ,后续文档将继续以博文的形式发布,敬请期待。 本文转自 dongnan 51CTO博客,原文链接:http://blog.51cto.com/dngood/775368

优秀的个人博客,低调大师

Swift语法快速索引

在WWDC的演示中就可以看出来Swift这个更接近于脚本的语言可以用更少的代码量完成和OC同样的功能。但是对于像我一样在战争中学习战争的同学们来说,天天抱着笨Swift Programming Language Reference之类的大部头看不实际。毕竟还是要养家糊口的。而且,那么1000+页内容讲的东西不是什么都要全部在平时工作中用到的。咱们就把平时用到的全部都放在一起,忘记了立马翻开看看,不知不觉的就学会了之后变成习惯。这样多省事。 变量 1 // Variable 2 var int_variable = 1 // 类型推断 3 var message : String 4 var x = 0.0, y = 0.0, z = 0.0 常量 // Constant let const_int = 1 //const_int = 10 ERROR: can not assign to let value 字符串 // String // 1. 定义 var empty_string = "" var another_empty_string = String() // 2. 拼接 var hello_string = "hello" var world_string = " world" hello_string += world_string // hello world let multiplier = 3 //let multiplier_message = "\(mulitplier) times 2.5 is \(Double(multiplier) * 2.5)" // 3. 比较 var hello_world_string = "hello world" hello_string == hello_world_string // all are "hello world", result is true if hello_string == hello_world_string { println("These two are equal") } Tuple // Tuple // 1. Unnamed tuple let http_not_found = (404, "Not Found") println("tuple item 1 \(http_not_found.0), tuple item 2 \(http_not_found.1)") // 2. Named tuple let (statusCode, statusMessage) = (404, "Not Found") statusCode // 404 statusMessage // "Not Found" let http_not_found2 = (statusCode:404, statusMessage:"Not Found") http_not_found2.statusCode // 404 http_not_found2.statusMessage // "Not Found" // 3. return tuple func getHttpStatus() -> (statusCode : Int, statusMessage : String){ // request http return (404, "Not Found") } 数组 // Array // 1. 定义 //var empty_array = [] // 在swift里没事不要这样定义数组。这是NSArray类型的,一般是Array<T>类型的 var empty_array : [Int] var empty_array2 = [Int]() var fire_works = [String]() var colors = ["red", "yellow"] var fires : [String] = ["small fire", "big fire"]; // Xcode6 beta3里数组的类型是放在方括号里的 var red = colors[0] // 2. append & insert colors.append("black") colors += "blue" colors += fires colors.insert("no color", atIndex: 0) // 3. update colors[2] = "light blue" //colors[5...9] = ["pink", "orange", "gray", "limon"] // 4. remove colors.removeAtIndex(5) //colors[0] = nil ERROR! // other colors.isEmpty colors.count 字典 // Dictionary // 1. 定义 var airports : Dictionary<String, String> = ["TYP":"Tokyo", "DUB":"Boublin"] var airports2 = ["TYP":"Tokyo", "DUB":"Boublin"] var empty_dic = Dictionary<String, String>() var empty_dic2 = [:] // 2. update airports.updateValue("Dublin International", forKey: "DUB") airports["DUB"] = "Dublin International" // 3. insert airports["CHN"] = "China International" // 4. check exists if let airportName = airports["DUB"] { println("The name of the airport is \(airportName).") } else{ println("That airport is not in the airports dictionary.") } // 5. iterate for (airportCode, airportName) in airports{ println("\(airportCode):\(airportName)") } // 6. remove airports.removeValueForKey("TYP") airports["DUB"] = nil 枚举 // Enum // 1. defination & usage enum PowerStatus: Int{ case On = 1 case Off = 2 } enum PowerStatus2: Int{ case On = 1, Off, Unknown } var status = PowerStatus.On enum Barcode { case UPCA(Int, Int, Int) case QRCode(String) } var product_barcode = Barcode.UPCA(8, 8679_5449, 9) product_barcode = .QRCode("ABCDEFGHIJKLMN") switch product_barcode{ case .UPCA(let numberSystem, let identifier, let check): println("UPC-A with value of \(numberSystem), \(identifier), \(check)") case .QRCode(let productCode): println("QR code with value of \(productCode)") } 方法 // Function // 1. 定义 func yourFuncName(){ } // 2. 返回值 func yourFuncNameWithReturnType()->String{ return "" } // 3. 参数 func funcWithParameter(parameter1:String, parameter2:String)->String{ return parameter1 + parameter2 } funcWithParameter("1", "2") // 4. 外部参数名 func funcWithExternalParameter(externalParameter p1:String) -> String{ return p1 + " " + p1 } funcWithExternalParameter(externalParameter: "hello world") func joinString(string s1: String, toString s2: String, withJoiner joiner: String) -> String { return s1 + joiner + s2 } joinString(string: "hello", toString: "world", withJoiner: "&") // 外部内部参数同名 func containsCharacter(#string: String, #characterToFind: Character) -> Bool { for character in string { if character == characterToFind { return true } } return false } containsCharacter(string: "aardvark", characterToFind: "v") // 默认参数值 func joinStringWithDefaultValue(string s1: String, toString s2: String, withJoiner joiner: String = " ") -> String { return s1 + joiner + s2 } joinStringWithDefaultValue(string: "hello", toString: "world") //joiner的值默认为“ ” // inout参数 func swapTwoInts(inout a: Int, inout b: Int) { let temporaryA = a a = b b = temporaryA } var someInt = 3 var anotherInt = 107 swapTwoInts(&someInt, &anotherInt) println("someInt is now \(someInt), and anotherInt is now \(anotherInt)") // prints "someInt is now 107, and anotherInt is now 3 类 // Class // 1. 定义 class NamedShape { var numberOfSides: Int = 0 var name: String // *这样定义的初始化函数,其参数在调用的时候必须作为外名称使用 init(name: String) { self.name = name } // *这样定义的参数,在初始化的时候可以不使用外名称 init(_ nickName: String){ self.name = nickName } func simpleDescription() -> String { return "A shape with \(numberOfSides) sides." } }// 2. 继承 & 函数重载 & 属性getter setter class Square: NamedShape { var sideLength: Double init(sideLength: Double, name: String) { self.sideLength = sideLength super.init(name: name) numberOfSides = 4 } func area() -> Double { return sideLength * sideLength } // 函数重载 override func simpleDescription() -> String { return "A square with sides of length \(sideLength)." } } class EquilateralTriangle: NamedShape { var sideLength: Double = 0.0 init(sideLength: Double, name: String) { self.sideLength = sideLength super.init(name: name) numberOfSides = 3 } // 属性的getter setter var perimeter: Double { get { return 3.0 * sideLength } set { sideLength = newValue / 3.0 } } override func simpleDescription() -> String { return "An equilateral triagle with sides of length \(sideLength)." } } // 3. 使用 var triangle = EquilateralTriangle(sideLength: 3.1, name: "a triangle") triangle.perimeter triangle.perimeter = 9.9 triangle.sideLength 使用闭包给属性赋初值 struct Checkerboard { let boardColors: Bool[] = { var temporaryBoard = Bool[]() var isBlack = false for i in 1...10 { for j in 1...10 { temporaryBoard.append(isBlack) isBlack = !isBlack } isBlack = !isBlack } return temporaryBoard }() func squareIsBlackAtRow(row: Int, column: Int) -> Bool { return boardColors[(row * 10) + column] } } 类(二) 1. 属性的初始化 2. init函数中修改常量属性 struct Color{ // 在初始化函数中可以修改这些在定义时没有给出初始值的属性 let red, green, blue: Double // stored property(就是下面这样定义的),如果是optional的(结尾时?活着!),可以在初始化函数 // 中不给出初始值,否则必须给出初始值。 var alpha: Double! init(r red: Double, green: Double, blue: Double){ self.red = red self.green = green self.blue = blue } init(white: Double){ red = white green = white blue = white } init(_ aColor: Double){ self.red = aColor self.green = aColor self.blue = aColor } } 3. 构造函数 // 默认init函数 class ShoppingItem { var name: String? // var quantity: Int // 编译错误,要使代码正确需要注释掉这一句 var purchased = false // 除非定义的属性全部都有初始值。optional的属性的默认值是nil。 // 否则的话必须显示定义一个init函数。 init(){ } init(name: String, purchased: Bool){ self.name = name self.purchased = purchased } // 结构体等自定义值类型可以直接在一个init函数中使用self.init(...)的方式调用 // 其他的init函数。但是在class(引用类型)中需要显示制定convenience关键字 // 才可以调用其他的init函数 convenience init(name: String){ self.init(name: "hello", purchased: true) } } var item = ShoppingItem() struct Color{ // 在初始化函数中可以修改这些在定义时没有给出初始值的属性 let red, green, blue: Double // stored property(就是下面这样定义的),如果是optional的(结尾时?活着!),可以在初始化函数 // 中不给出初始值,否则必须给出初始值。 var alpha: Double! init(r red: Double, green: Double, blue: Double){ self.red = red self.green = green self.blue = blue } //在init函数中调用其他init函数 init(white: Double){ // red = white // green = white // blue = white self.init(r: 1.0, green: 2.0, blue:1.0) } } convenience的init函数只能在本类中调用。而一般的init函数(也就是designated init)可以在继承的链中在一个类中调用super类的init函数。 继承 不想什么被继承就在什么的前面放个final关键字(以前有@号,现在木有了)。如果在class前面放final关键字的话,那么整个类不可以被继承。 class ShoppingListItem: ShoppingItem{ final var wishListed: Bool? // 不被继承 override init(){ super.init(name: "what", purchased: false) } } 析构函数 class Vehicle{ var numberOfWheels = 0 var description: String{ return "\(numberOfWheels) wheel(s)" } deinit{ // 析构具体内容 } } 析构函数执行的特点: 1. 系统自动调用,不允许手动调用 2. 执行完本类调执行super类的 3. 执行完析构函数之后实例才释放,所以可以析构函数里可以访问全部属性的值 WEAK和UNOWNED关键字 class Customer{ let name: String var card: CreditCard? init(name: String) { self.name = name } } class CreditCard{ let number: Int /* * weak和owned关键字都用来修饰属性的,为了防止循环引用造成的内存无法释放。 * 区别就在于unowned是一定要有值的。所以unowned只可以用在非可选类型上(non-optional type) */ unowned let customer: Customer init(number: Int, customer: Customer){ self.number = number self.customer = customer } } 在闭包中也会出现这样的问题。如果在闭包中使用了self.xxxProperty也会出现对类实例本身的一个强引用,从而出现了循环引用。PS:在闭包中使用类成员的时候必须要用self.的写法。 } } class HTMLElement { let name: String let text: String? lazy var asHTML: () -> String = { [unowned self] in if let text = self.text { return "<\(self.name)>\(text)</\(self.name)>" } else { return "<\(self.name) />" } } init(name: String, text: String? = nil) { self.name = name self.text = text } deinit { println("\(name) is being deinitialized") } } 其他稍后补充 欢迎加群互相学习,共同进步。QQ群:iOS: 58099570 | Android: 572064792 | Nodejs:329118122 做人要厚道,转载请注明出处! 本文转自张昺华-sky博客园博客,原文链接:http://www.cnblogs.com/sunshine-anycall/p/3851717.html ,如需转载请自行联系原作者

资源下载

更多资源
Mario

Mario

马里奥是站在游戏界顶峰的超人气多面角色。马里奥靠吃蘑菇成长,特征是大鼻子、头戴帽子、身穿背带裤,还留着胡子。与他的双胞胎兄弟路易基一起,长年担任任天堂的招牌角色。

腾讯云软件源

腾讯云软件源

为解决软件依赖安装时官方源访问速度慢的问题,腾讯云为一些软件搭建了缓存服务。您可以通过使用腾讯云软件源站来提升依赖包的安装速度。为了方便用户自由搭建服务架构,目前腾讯云软件源站支持公网访问和内网访问。

Nacos

Nacos

Nacos /nɑ:kəʊs/ 是 Dynamic Naming and Configuration Service 的首字母简称,一个易于构建 AI Agent 应用的动态服务发现、配置管理和AI智能体管理平台。Nacos 致力于帮助您发现、配置和管理微服务及AI智能体应用。Nacos 提供了一组简单易用的特性集,帮助您快速实现动态服务发现、服务配置、服务元数据、流量管理。Nacos 帮助您更敏捷和容易地构建、交付和管理微服务平台。

Rocky Linux

Rocky Linux

Rocky Linux(中文名:洛基)是由Gregory Kurtzer于2020年12月发起的企业级Linux发行版,作为CentOS稳定版停止维护后与RHEL(Red Hat Enterprise Linux)完全兼容的开源替代方案,由社区拥有并管理,支持x86_64、aarch64等架构。其通过重新编译RHEL源代码提供长期稳定性,采用模块化包装和SELinux安全架构,默认包含GNOME桌面环境及XFS文件系统,支持十年生命周期更新。

用户登录
用户注册