首页 文章 精选 留言 我的

精选列表

搜索[笔记工具],共10000篇文章
优秀的个人博客,低调大师

普林斯顿《算法》笔记 (一)

官方网站 官方代码 第一章 基础 1.1 基础编程模型 1.1节的内容主要为介绍Java的基本语法以及书中会用到的库。 下图为一个Java程序示例和相应的注解: 本书用到的几种基本语法: 初始数据类型 (primitive data tyoes):整型 (int),浮点型 (double),布尔型 (boolean),字符型 (char)以及组合起来的表达式。 语句 (statements):声明 (declarations),赋值 (assignments),条件 (conditionals),循环 (loops),调用 (calls),返回 (returns)。 数组 (arrays) 静态方法 (static methods):即函数。 字符串 (strings) 标准输入/输出 (input/output) 数据抽象 (data abstraction) Java的int为32位,double为64位 除int和double以外的其他初始数据类型: 64位整数 (long) 16位整数 (short) 16位字符 (char) 8位整数 (byte) 32位单精度实数 (float) i++和++i的区别: ++i等价于i = i + 1和i += 1,即先+1,再进行运算;而i++是先运算再+1。下面演示一下: public class i_test { public static void main(String[] args) { int i = 0; int j = 0; System.out.printf("%s: %d%n","++i",++i); System.out.printf("%s: %d%n","i++",j++); } } /**输出: ++i: 1 i++: 0 */ 数组 1. 创建数组 长模式: double[] a; a = new double[N]; for (int i = 0; i < N; i++) a[i] = 0.0 短模式 double[] a = new double[N]; int[] a = {1,1,2,3,6} 二维数组 double[][] a = new double[M][N]; 2. 别名 数组名表示的是整个数组,如果将一个数组变量赋给另外一个变量,则两个变量将会指向同一个数组: int[] a = new int[N]; a[i] = 1234; int[] b = a; b[i] = 5678 // a[i]也变成5678, 不改变原数组的复制方法见下文 3. 几种数组操作 1)找最大值 double max = a[0]; for (int i = 1;i < a.length; i++) if (a[i] > max) max = a[i]; 2)计算平均值 int N = a.length; double sum = 0.0; for (int i = 0; i < N; i++) sum += a[i]; double average = sum / N; 3)复制数组 int N = a.length; double[] b = new double[N]; for (int i = 0; i < N; i++) b[i] = a[i]; 4)反转数组中元素 int N = a.length; for (int i = 0; i < N/2; i++) { double temp = a[i]; a[i] = a[N-i-1]; a[N-i-1] = temp; } 5)矩阵乘法 int N = a.length; double[][] c = new double[N][N]; for (int i = 0; i < N; i++) for (int j = 0; j < N; j++) {// Compute dot product of row i and column j for (int k = 0; k < N; k++) c[i][j] += a[i][k]*b[k][j]; } 静态方法 典型的静态方法如下图所示: 1. 几种静态方法实现 1)判断是否为素数 public static boolean isPrime(int N) { if (N < 2) return false; for (int N = 2; i*i <= N; i++) if (N % i == 0) return false; return true; } 2)计算调和级数 public static double H(int N) { double sum = 0.0; for (int i = 1; i < N; i++) sum += 1.0 / i; return sum; } 输入与输出 1. 格式化输出: 2. 标准输入 3. 重定向和管道 "<" 表示从文件读取,">"表示写入文件 4. 从文件输入输出 1.2 数据抽象 数据类型是指一组值和一组对值的操作的集合,对象是能够存储任意该数据类型的实体,或数据类型的实例。 一个数据类型的例子: 抽象数据类型和静态方法的相同点: 两者的实现均为Java类 实例方法可能接受0个或多个指定类型的参数,在括号中以逗号分隔 可能返回一个指定类型的值,也可能不会(用void表示) 不同点: API中可能会出现名称与类名相同且没有返回值的函数,这些特殊的函数被称为构造函数。在上例中,Counter对象有一个接受一个String参数的构造函数 实例方法不需要static关键字,它们不是静态方法,它们的目的是操作该数据类型中的值 某些实例方法的存在是为了符合Java的习惯,我们将此类方法称为_继承_方法,如上例的toString方法 实例方法和静态方法 : 对象 Java中,所有非原始数据类型的值都是对象。对象的三大特性:状态、标识、行为。 引用 (reference) 是访问对象的一种方式,如图所示: 创建对象 要创建 (或实例化) 一个对象,用关键字new并紧跟类名以及 () 来触发它的构造函数。每当用例调用new (),系统都会:1. 为新对象分配内存空间。 2. 调用构造函数初始化对象中的值。 3. 返回该对象的一个引用。 创建一个对象,并通过声明语句将变量与对象的引用关联起来: 抽象数据类型的实现 组成部分:私有实例变量 (private instance variable),构造函数 (constructor),实例方法 (instance method) 和一个测试用例(client) 。 构造函数 每个Java类都至少含有一个构造函数以创建一个对象的标识。一般来说,构造函数的作用是初始化实例变量。如果没有定义构造函数,类将会隐式将所有实例变量初始化为默认值,原始数字类型默认值为0,布尔型为false,引用类型变量为null。 作用域 在方法中调用实例变量,若出现二义性,可使用 this 来区别: 1.3 背包、队列和栈 本节用到的API: 链表 (Linked List) 链表是一种递归的数据结构,它或者为空 (Null),或者是指向一个结点 (Node) 的引用,该结点包含一个泛型元素和一个指向另一条链表的引用。 使用嵌套类定义结点的抽象数据类型: private class Node { Item item; Node next; } 一个Node对象包含两个实例变量,类型分别为Item (参数类型) 和Node,通过new Node () 触发构造函数来创建一个Node类型的对象。调用的对象是一个指向Node对象的引用,它的实例变量均被初始化为null。 构造链表 构造一条含有元素to、be和or的链表,首先为每个元素创建结点: Node first = new Node(); Node second = new Node(); Node third = new Node(); 将每个结点的item域设为所需的值: first.item = "to"; second.item = "be"; third.item = "or"; 然后用next域构造链表: first.next = second; second.next = third; 在表头插入结点 在表头删除节点 将first指向first.next: 在表尾插入节点 链表的遍历 一般数组a[] 的遍历: for (int i = 0; i < N; i++) { // Process a[i]. } 链表的遍历: for (Node x = first; x != null; x = x.next) { // Process x.item. } 栈 (stack) 栈是一种基于后进先出 (LIFO) 策略的集合类型。 栈的链表实现: public class Stack<Item> { private Node first; private int N; private class Node { Item item; Node next; } public boolean isEmpty() { return first == null; } public int size() { return N; } public void push(Item item) { Node oldfirst = first; first = new Node(); first.item = item; first.next = oldfirst; N++; } public Item pop() { Item item = first.item; first = first.next; N--; return item; } } 栈测试用例: public static void main(String[] args) { // Create a stack and push/pop strings as directed on StdIn. Stack<String> s = new Stack<String>(); while (!StdIn.isEmpty()) { String item = StdIn.readString(); if (!item.equals("-")) s.push(item); else if (!s.isEmpty()) StdOut.print(s.pop() + " "); } StdOut.println("(" + s.size() + " left on stack)"); } 用链表实现栈的优点: 可以处理任意类型的数据 所需的空间总与集合的大小成正比 操作所需的时间和集合的大小无关 队列 (queues) 队列是一种基于先进先出(FIFO)策略的集合类型。 队列的链表实现: public class Queue<Item> { private Node first; private Node last; private int N; private class Node { Item item; Node next; } public boolean isEmpty() { return first == null; } public int size() { return N; } public void enqueue(Item item) { Node oldlast = last; last = new Node(); last.item = item; last.next = null; if (isEmpty()) first = last; else oldlast.next = last; N++; } public Item dequeue() { Item item = first.item; first = first.next; if (isEmpty()) last = null; N--; return item; } } 队列测试用例: public static void main(String[] args) { // Create a queue and enqueue/dequeue strings. Queue<String> q = new Queue<String>(); while (!StdIn.isEmpty()) { String item = StdIn.readString(); if (!item.equals("-")) q.enqueue(item); else if (!q.isEmpty()) StdOut.print(q.dequeue() + " "); } StdOut.println("(" + q.size() + " left on queue)"); } 背包 (bag) 背包是一种不支持从中删除元素的集合数据类型,它的目的是收集元素并迭代遍历所有收集到的元素。使用背包说明元素的处理顺序不重要。 背包的链表实现 + 迭代 import java.util.Iterator; public class Bag<Item> implements Iterable<Item> { private Node first; private class Node { Item item; Node next; } public void add(Item item) { Node oldfirst = first; first = new Node(); first.item = item; first.next = oldfirst; } public Iterator<Item> iterator() { return new ListIterator(); } private class ListIterator implements Iterator<Item> { private Node current = first; public boolean hasNext() { return current != null; } public void remove() { } public Item next() { Item item = current.item; current = current.next; return item; } } } 两种基本的数据结构 数组,顺序存储 (sequential allocation) 链表,链式存储 (linked allocation) 本书所采取的研究新应用的步骤 定义API 根据特定的应用场景开发用例代码 描述一种数据结构 (一组值的表示),在此基础上定义类的实例变量,该类将实现一种抽象数据类型来满足API中的说明 描述一种算法 (实现一组操作的方式),在此基础上实现类的实例方法 分析算法的性能特点 1.4 算法分析 计时器 —— Stopwatch实现 基于Java中的currentTimeMillis() 方法,该方法能返回以毫秒计数的当前时间。 常见的增长数量级函数 成本模型 (cose model) 本书使用成本模型来评估算法的性质,这个模型定义了算法中的基本操作。例如3-sum问题的成本模型是访问数组元素的次数。 得到运行时间的数学模型,步骤如下: 1. 确定输入模型,定义问题的规模 2. 识别内循环 3. 根据内循环中的操作确定成本模型 4. 对于给定的输入,判断这些操作的执行频率 算法分析的常见函数: 常见增长数量级: 原始数据类型的内存:

优秀的个人博客,低调大师

Java学习笔记--泛型(巨细)

泛型: 泛型在java基础中属于重要的一部分,掌握泛型是必要的。接下来以我的理解来解释一下 背景:编译器是先通过检查代码中泛型的类型 再进行类型擦除 再进行编译的 什么是泛型, 什么时候需要泛型, 泛型怎么用, 泛型注意的问题。 目前我接触的泛型应用就是集合使用泛型达到 一个集合里面只有一种类型的数据 泛型的好处: 1. 将运行时的异常提前至了编译时。 2. 避免了无谓的强制类型转换 。 泛型在集合中的常见应用: ArrayList<String> list = new ArrayList<String>(); true 推荐使用。 ArrayList<Object> list = new ArrayList<String>(); false ArrayList<String> list = new ArrayList<Object>(); false //以下两种写法主要是为了兼顾新老系统的兼用性问题。 * ArrayList<String> list = new ArrayList(); true ArrayList list = new ArrayList<String>(); true 注意: 泛型没有多态的概念,左右两边的数据 类型必须 要一致,或者只是写一边的泛型类型。 推荐使用: 两边都写泛型。 具体集合是上面类型的 是看左边的泛型是什么 举个常见的例子: 集合: ArrayList list = new ArrayList(); list.add("11"); list.add(3); 这个时候ArrayList集合中存储了多种类型,是不是看起来很不顺眼,日常应用中 我们想要的结果是 一个集合里面存储的类型是同一个。 如: ArrayList<String> list = new ArrayList<String>(); list.add("11"); list.add(3); //这个时候 集合list只能存放String类型的数据 //如果存储了其他的如 Integer类型之类的就会报错,是在编译前检查 泛型方法 public <T> T showKeyName(T a){//<T>是声明泛型方法 return a; } 泛型类: 自定义泛型: 自定义泛型就是一个数据类型的占位符或者是一个数据类型的变量。 class Point< T>{ // 此处可以随便写标识符号,T是type的简称 一般都是T private T var ; // var的类型由T指定,即:由外部指定 public T getVar(){ // 返回值的类型由外部决定 return var ; } public void setVar(T var){ // 设置的类型也由外部决定 this.var = var ; } }; 注意:在方法上自定义泛型,这个自定义泛型的具体数据类型 是在调用该方法的时候传入实参时确定具体的数据类型的。 泛型类还可以同时定义多个泛型 栗子: class Point< K,V>{ // 不一样的泛型 private K var ; // var的类型由K指定 private V time ; //time的类型由V指定 } }; 泛型类中要注意一: 静态方法无法访问类上定义的泛型 如果静态方法要使用泛型的话,必须将静态方法也定义成泛型方法 (原因我也不知道) 声明泛型一定要写在static后,返回值类型之前 class MyMessage<T>{ public T qu(T a) { System.out.println("qu"); return a; } public static <t> t ha(t a){ //静态函数需要重新泛型 System.out.println("ha"); return a; } } class new1{ public static void main(String[] args) { System.out.println(MyMessage.ha("aaa")); } } 注意 如果是调用静态的泛型函数时不能MyMessage<String>.ha("aaa") 传入具体泛型 泛型类中要注意二: 泛型类与泛型方法共存: public class Test1<T>{ public void testMethod(T t){ System.out.println(t.getClass().getName()); } public <T> T testMethod1(T t){ return t; } } 上面代码中,Test1<T> 是泛型类,testMethod 是泛型类中的普通方法, 而testMethod1是一个泛型方法。而泛型类中的类型参数与泛型方法中的类型参数 是没有相应的联系的,泛型方法始终以自己定义的类型参数为准。 意思就是调用testMethod1 结果是里面里面的那个决定的 而不是外面的那个类 如果在一个泛型类中存在泛型方法,那么两者的类型参数最好不要同名。 泛型方法与可变参数 再看一个泛型方法和可变参数的例子: public <T> void printMsg( T... args){ for(T t : args){ System.out.println(t); } } 泛型父类子类继承: class Son1 extends MyMessage<String>{ //指的是父类里面T是用String来代替了 //如果有重写的话 那么重写的父类类型是String public String ha(String a) { return a; } } class Son2<T> extends MyMessage<T>{ public T xx(T a) { return a; } } 泛型接口: class person<T>{ public T a(T az) { System.out.println("futher"); return az; } } class son extends person<Integer>{ @Override public Integer a(Integer az) { System.out.println("son"); return az; } } 注意:不能对确切的泛型类型使用instanceof操作。如下面的操作是非法的,编译时会出错。 List<String> aList=new ArrayList<String>(); aList instanceof List<String>//编译错误 泛型有个叫泛型擦除的 意思就是说 虽然有不同的泛型 但是在编译后计算机只看到Object类型的 举个栗子: List<String> aList1=new ArrayList<String>(); List<Integer> aList2=new ArrayList<Integer>(); 编译后就变成 List aList1=new ArrayList(); List aList2=new ArrayList(); //在编译生成的字节码中不包含泛型中的类型参数,类型参数会在编译时去掉。 //例如:List<String> 和 List<Integer> 在编译后都变成 List。 泛型通配符 先来看一个问题: public void showKeyValue1(Generic<Number> obj){ Log.d("泛型测试","key value is " + obj.getKey()); } Generic<Integer> gInteger = new Generic<Integer>(); Generic<Number> gNumber = new Generic<Number>(); showKeyValue(gInteger); // showKeyValue这个方法编译器会为我们报错: 我们来解决一下为什么会报错 问: 首先有个疑惑 不是有泛型擦除吗?为什么Generic<Integer>传递给 Generic<Number>的参数会报错 编译后不是变成Generic类型传递给Generic吗? 答:类型检查是在编译前判断的 所以是先判断类型 然后再泛型擦除 先来看一个问题: public void showKeyValue1(Generic<Number> obj){ Log.d("泛型测试","key value is " + obj.getKey()); } Generic<Integer> gInteger = new Generic<Integer>(); Generic<Number> gNumber = new Generic<Number>(); showKeyValue(gInteger); // showKeyValue这个方法编译器会为我们报错: 我们来解决一下为什么会报错 问: 首先有个疑惑 不是有泛型擦除吗?为什么Generic<Integer>传递给 Generic<Number>的参数会报错 编译后不是变成Generic类型传递给Generic吗? 答:类型检查是在编译前判断的 所以是先判断类型 然后再泛型擦除 问:Integer不是继承Number吗 为什么还无法传递? 答:相同参数类型的泛型类的继承关系取决于泛型类自身的继承结构。 List<Integer>和List<Number>是不同的对象 没有继承关系 前提泛型类自身一定要有继承关系 而泛型继承没有一点卵用 泛型一定要相同才行 (如果有通配符那么两个维度的继承同时满足也可以) 例如 List<String> 是 Collection<String> 的子类 List<Integer> 不是 Collection<Number> 的子类 栗子: 传入的参数是List<Integer> 形参1.public static String print(List<Integer> a) 可以通过 形参2.public static String print(List<Number> a) 不能通过 两个维度没有继承关系 形参3.public static<T> String print(List<T> a) 可以通过 形参4.public static String print(List<?> a) 可以通过 public static void zz(Collection<Integer> a) 可以通过 因为存在继承 public static void zz(Collection<Number> a) 不可以 传入参数List<String> 形参1 public static void xx(List<?> a)可以 形参2 public static void xx(List<? extends Number> a) 不可以 因为限制了范围 当类型声明中使用通配符 ? 时, 其子类型可以在两个维度上扩展。 例如 Collection<Number> 在维度1上扩展:List<? extends Number> 在维度2上扩展:Collection<Integer> 两个维度上同时扩展:List<Integer> 意思就是 Collection<Number>可以接收List<Integer> 总结: 引入泛型之后的类型系统增加了两个维度:一个是类型参数自身的继承体系结构, 另外一个是泛型类或接口自身的继承体系结构。第一个指的是对于 List<String> 和List<Object>这样的情况,类型参数String是继承自Object的。 而第二种指的是 List接口继承自Collection接口。 对于这个类型系统,有如下的一些规则: 相同类型参数的泛型类的关系取决于泛型类自身的继承体系结构。 即List<String>是Collection<String> 的子类型, List<String>可以替换Collection<String>。 这种情况也适用于带有上下界的类型声明。 当泛型类的类型声明中使用了通配符的时候,其子类型可以在两个维度上分别展开 如对Collection<? extends Number>来说, 其子类型可以在Collection这个维度上展开, 即List<? extends Number>和Set<? extends Number>等; 也可以在Number这个层次上展开,即Collection<Double>和 Collection<Integer>等。如此循环下去,ArrayList<Long>和 如果泛型类中包含多个类型参数,则对于每个类型参数分别应用上面的规则。 通配符写法: public static void zz(List<?> a) 通配符是实参而且还是根实参 不是形参 所以可接受任何泛型对象 还可以定义上边界和下边界: 上边界: public static void zz(List<? extends Number> a){ // 只能接收Number及其Number的子类 } 下边界: public static void zz(List<? super Integer > a){ // 只能接收Integer及其Integer的父类 } 如果类型的变量有限定那么原始类型就用第一个边界的类型变量代替 上界通配符后不能往集合添加元素 取出的元素也是上界父元素 add受限制 下届通配符 可以添加元素 必须是子类或者本身 取出的元素类型都是Object get受限制 获取数据用extend通配符 添加数据用super通配符 两个都想就不别用通配符 只有super有权限添加 其他的只能查看 提一下: Java泛型无法向上转型 class Info< T>{ private T var ; // 定义泛型变量 public void setVar(T var){ this.var = var ; } public T getVar(){ return this.var ; } public String toString(){ // 直接打印 return this.var.toString() ; } }; public class GenericsDemo23{ public static void main(String args[]){ Info< String> i1 = new Info< String>() ; // 泛型类型为String Info< Object> i2 = null ; i2 = i1 ; //这句会出错 incompatible types 因为两者不是一个对象 } }; 还有: 泛型的类型参数不能用在Java异常处理的catch语句中。因为异常处理是由JVM在运行时刻来进行的。由于类型信息被擦除,JVM是无法区分两个异常类型MyException;和MyException的。对于JVM来说,它们都是 MyException类型的。也就无法执行与异常对应的catch语句。 重点:在泛型中不能使用基本数据类型,如果需要使用基本数据类型,那么就使用基本数据类型对应的包装类型。 桥方法: 看看下面这个类SonPair class SonPair extends Pair<String>{ public void setFirst(String fir){....} } 很明显,程序员的本意是想在SonPair类中覆盖父类Pair的setFirst(T fir)这个方法。但事实上,SonPair中的setFirst(String fir)方法根本没有覆盖住Pair中的这个方法。 原因很简单,Pair在编译阶段已经被类型擦除为Pair了,它的setFirst方法变成了setFirst(Object fir)。 那么SonPair中setFirst(String)当然无法覆盖住父类的setFirst(Object)了。 这对于多态来说确实是个不小的麻烦,我们看看编译器是如何解决这个问题的。 编译器 会自动在 SonPair中生成一个桥方法(bridge method ) : public void setFirst(Object fir) { setFirst((String) fir) } 这样,SonPair的桥方法确实能够覆盖泛型父类的setFirst(Object) 了。而且桥方法内部其实调用的是子类字节setFirst(String)方法。对于多态来说就没问题了。 1.2)问题还没有完,多态中的方法覆盖是可以了,但是桥方法却带来了一个疑问: 现在,假设 我们还想在 SonPair 中覆盖getFirst()方法呢? class SonPair extends Pair<String> { public String getFirst(){....} } 由于需要桥方法来覆盖父类中的getFirst,编译器会自动在SonPair中生成一个 public Object getFirst()桥方法。 (干货——引入了桥方法,该方法是编译器生成的,不是程序员码出来的) 但是,疑问来了,SonPair中出现了两个方法签名一样的方法(只是返回类型不同): ①String getFirst() // 自己定义的方法 ②Object getFirst() // 编译器生成的桥方法 难道,编译器允许出现方法签名相同的多个方法存在于一个类中吗?事实上有一个知识点可能大家都不知道: ① 方法签名 确实只有方法名+参数列表 。这毫无疑问! ② 我们绝对不能编写出方法签名一样的多个方法 。如果这样写程序,编译器是不会放过的。这也毫无疑问! ③ 最重要的一点是: JVM会用参数类型和返回类型来确定一个方法。 一旦编译器通某种方式自己编译出方法签名一样的两个方法 (只能编译器自己来创造这种奇迹,我们程序员却不能人为的编写这种代码)。JVM还是能够分清楚这些方法的,前提是需要返回类型不一样。 结论: 在编译阶段,所有泛型类的类型参数都会被Object或者它们的限定边界来替换。(类型擦除) 在继承泛型类型的时候,桥方法的合成是为了避免类型变量擦除所带来的多态灾难。 最后提一下泛型数组 : List<String>[] ls = new ArrayList<String>[10]; 而使用通配符创建泛型数组是可以的,如下面这个例子: List<?>[] ls = new ArrayList<?>[10]; 泛型数组在java中是不支持的 因为泛型擦除的原因 如果创建了泛型数组 Object[] aa=new ArrayList[]; 加入可以创建 aa[0]=new ArrayList(); 编译器被骗 那么就是不安全的 还有协变……不是很了解

优秀的个人博客,低调大师

学习笔记:openstack 实验环境安装

学习openstack 安装实验环境,经过诸多挫折,顺利搭建,记录如下,以作备忘。 环境: linux ubuntu16.04.3 , 虚拟机上安装,openstack是由devstack安装 版本stable/pike 两主机,一个是controller控制节点,安装所有组件,另一台是compute1计算节点 控制主机三个虚拟网卡,计算主机两个虚拟网卡 首先两台电脑安装 ubuntu16.04.3 server版,controller第一网卡设置静态ip:192.168.0.102, 计算节点compute第一个网卡ip:192.168.0.103,安装openssh 并设置允许root远程登录 分别在两台主机开始安装以下步骤: 1.修改apt为国内源 vi /etc/apt/sources.list deb http://mirrors.aliyun.com/ubuntu/ xenial main restricted universe multiversedeb http://mirrors.aliyun.com/ubuntu/ xenial-security main restricted universe multiversedeb http://mirrors.aliyun.com/ubuntu/ xenial-updates main restricted universe multiversedeb http://mirrors.aliyun.com/ubuntu/ xenial-proposed main restricted universe multiversedeb http://mirrors.aliyun.com/ubuntu/ xenial-backports main restricted universe multiverse 2.更新源 apt update 3.取得devstack代码 git clone http://git.trystack.cn/openstack-dev/devstack -b stable/pike 4.创建stack用户 devstack/tools/create-stack-user.sh 5.移动目录 mv devstack /opt/stack chown -R stack:stack /opt/stack/devstack 6.切换到 stack 用户 su - stack cd devstack 7.编辑local.conf在 /opt/stack/devstack 目录下,创建 local.conf,控制节和计算节点分别如下 --------------controller节点----------------------[[local|localrc]]MULTI_HOST=true management & api network HOST_IP=192.168.1.102LOGFILE=/opt/stack/logs/stack.sh.log Credentials ADMIN_PASSWORD=adminMYSQL_PASSWORD=secretRABBIT_PASSWORD=secretSERVICE_PASSWORD=secretSERVICE_TOKEN=abcdefghijklmnopqrstuvwxyz enable neutron-ml2-vlan disable_service n-netenable_service q-svc,q-agt,q-dhcp,q-l3,q-meta,neutron,q-lbaas,q-fwaasQ_AGENT=linuxbridgeENABLE_TENANT_VLANS=TrueTENANT_VLAN_RANGE=3001:4000PHYSICAL_NETWORK=defaultLOG_COLOR=TrueLOGDIR=$DEST/logsSCREEN_LOGDIR=$LOGDIR/screen --------------compute节点----------------------[[local|localrc]] use TryStack git mirror GIT_BASE=http://git.trystack.cnNOVNC_REPO=http://git.trystack.cn/kanaka/noVNC.gitSPICE_REPO=http://git.trystack.cn/git/spice/spice-html5.git LIBVIRT_TYPE=kvm DEST=/opt/stackLOGFILE=$DEST/logs/stack.sh.logVERBOSE=TrueLOGDAYS=1LOG_COLOR=TrueRECLONE=falsePIP_UPGRADE=FlaseDOWNLOAD_DEFAULT_IMAGES=FalseIMAGE_URLS="http://download.cirros-cloud.net/0.4.0/cirros-0.4.0-x86_64-disk.img"IP_VERSION=4SERVICE_IP_VERSION=4ENABLE_IDENTITY_V2=FalseDATABASE_TYPE=mysqlSERVICE_HOST=192.168.1.102MYSQL_HOST=$SERVICE_HOSTRABBIT_HOST=$SERVICE_HOSTGLANCE_HOSTPORT=$SERVICE_HOST:9292ADMIN_PASSWORD=adminMYSQL_PASSWORD=secretRABBIT_PASSWORD=secretSERVICE_PASSWORD=secret Neutron options NEUTRON_CREATE_INITIAL_NETWORKS=FalseMULTI_HOST=1 ---------------compute node common section ENABLED_SERVICES=n-cpu,q-agt,n-api-meta,placement-client,n-novncNOVA_VNC_ENABLED=TrueNOVNCPROXY_URL="http://$SERVICE_HOST:6080/vnc_auto.html" ---------------compute node special section HOST_IP=192.168.1.103FLAT_INTERFACE=ens33VNCSERVER_PROXYCLIENT_ADDRESS=$HOST_IPVNCSERVER_LISTEN=$HOST_IP ENABLED_SERVICES+=,c-vol 8.执行安装脚本 ./stack.sh 如果中途退出 可以再次运行也可以运行 ./unstack.sh ./clean.sh清理后重新再执行./stack.sh 直至安装成功 安装成功屏幕 DevStack Component Timing (times are in seconds) run_process 50test_with_retry 10apt-get-update 46pip_install 673osc 283wait_for_service 93git_timed 1628dbsync 41 apt-get 286 Unaccounted time 922 Total runtime 4032 This is your host IP address: 192.168.1.102This is your host IPv6 address: ::1Horizon is now available at http://192.168.1.102/dashboardKeystone is serving at http://192.168.1.102/identity/The default users are: admin and demoThe password: secret 10.可以在浏览器登录web管理界面

优秀的个人博客,低调大师

java并发编程笔记--ScheduledThreadPoolExecutor实现

ScheduledThreadPoolExecutor作为ScheduledExecutorService接口的实现,提供了延迟执行任务或者周期性执行任务的能力。通过名称可以看出,ScheduledThreadPoolExecutor基于线程池实现,它通过继承ThreadPoolExecutor实现线程池管理能力的复用,同时扩展了自己的定时任务调度能力。 首先来看ScheduledExecutorServicej接口,它继承了ExecutorService接口,作为任务执行器的一种扩展类型,提供了如下方法: schedule方法:用于任务的单次执行,允许指定延迟时间,当时间为0或者负数时,表示立即执行任务; scheduleAtFixedRate方法:以固定的时间间隔执行任务,当任务本身的执行时间超过时间间隔时,会等到任务执行完成后,立即执行下一次任务;同一个任务总是串行执行,不会并发执行; scheduleWithFixedDelay方法:以固定的延迟执行任务,当前任务执行时间与上一次任务执行时间相隔固定的延迟;任务每次执行完成后,会在结束时间上加上固定的延迟作为下一次执行时间。任务执行的周期会将任务本身执行耗时考虑在内,因而并非每次执行的时间间隔都相同; ScheduledThreadPoolExecutor继承ThreadPoolExecutor,主要做了如下改变: 使用ScheduledFutureTask作为任务封装类,代替原先的FutureTask类; 使用DelayedWorkQueue作为阻塞队列,队列为无界队列;ScheduledThreadPoolExecutor的构造器仅需要传入corePoolSize,使用"corePoolSize+无界队列"实现任务调度; 支持run-after-shutdown参数,使得ScheduledThreadPoolExecutor重写shutdown方法,允许移除并且取消不需要在shutdown后执行的任务; 提供了decorateTask方法,用来定制任务操作; ScheduledThreadPoolExecutor的组成 ScheduledThreadPoolExecutor由3部分组成: 任务调度控制:ScheduledThreadPoolExecutor,负责任务调度控制,实现了ScheduledExecutorService接口; 阻塞队列:DelayedWorkQueue,作为ScheduledThreadPoolExecutor的内部类,用于缓存线程任务的阻塞队列,仅能够存放RunnableScheduledFuture对象;该队列实现了延迟调度任务的逻辑,如果当前时间大于等于任务的延迟执行时间,任务才可以被调度。 调度任务:ScheduledFutureTask,作为ScheduledFutureTask的内部类,实现了RunnableScheduledFuture,封装了调度任务的执行逻辑。其中的time字段存放下一次执行时间,DelayedWorkQueue会据此判断任务是否可以被执行。period字段存放执行周期,对于周期性执行任务,每次会根据period计算time。 ScheduledThreadPoolExecutor初始化 ScheduledThreadPoolExecutor的构造器最多指定3个参数: corePoolSize:线程池核心工作线程数量; threadFactory:定制工作线程创建方式; handler:驳回任务处理策略; ScheduledThreadPoolExecutor构造器会调用父类构造器进行线程池初始化,使用DelayedWorkQueue作为阻塞队列,该队列为无界队列,因而maximumPoolSize属性配置无效。又因为都是核心工作线程,没有非核心线程需要回收,因而keepAliveTime配置为0。代码如下: public ScheduledThreadPoolExecutor(int corePoolSize, ThreadFactory threadFactory, RejectedExecutionHandler handler) { super(corePoolSize, Integer.MAX_VALUE, 0, NANOSECONDS, new DelayedWorkQueue(), threadFactory, handler); } ScheduledThreadPoolExecutor初始化时并不会预先创建工作线程,而是在提交任务的时候,通过父类java.util.concurrent.ThreadPoolExecutor#ensurePrestart方法判断线程数是否达到corePoolSize,如果未达到,则新增线程;实现逻辑如下: void ensurePrestart() { int wc = workerCountOf(ctl.get()); // 当前线程数 < corePoolSize,则添加核心工作线程; if (wc < corePoolSize) addWorker(null, true); // 如果0 == wc >= corePoolSize,则表示corePoolSize配置为0,则初始化一个非核心工作线程; else if (wc == 0) addWorker(null, false); } 任务执行 ScheduledThreadPoolExecutor的任务执行分为单次执行和周期性执行。 单次执行:通过schedule方法执行的任务属于单次执行任务。Executor的execute方法、ExecutorService的submit方法都是通过调用schedule方法执行,故也是单次执行的任务。除了schedule可以指定延迟时间以外,其余方法的延迟时间均为0,即立刻执行任务。比如:execute方法实现如下: public void execute(Runnable command) { schedule(command, 0, NANOSECONDS); } 周期性执行:通过scheduleAtFixedRate、scheduleWithFixedDelay方法执行的任务均为周期性执行任务。周期性执行的实现可以理解为每次执行完成后设定下一次执行时间,然后将任务重新放入到阻塞队列等待下一次调度。 任务入口:delayedExecute() 无论是单次执行还是周期性执行,其执行的入口都是delayedExecute方法。delayedExecute()将任务放入到阻塞队列中,复用ThreadPoolExecutor的逻辑进行任务调度。代码如下: private void delayedExecute(RunnableScheduledFuture<?> task) { // 如果调度器关闭,则拒绝接收任务 if (isShutdown()) // 执行拒绝策略 reject(task); // 如果调度器未关闭 else { // 添加任务到阻塞队列,等待调度执行; super.getQueue().add(task); // 如果此时调度器关闭,则取消任务; if (isShutdown() && !canRunInCurrentRunState(task.isPeriodic()) && remove(task)) task.cancel(false); // 如果调度器正常运行,则检查开启线程数是否达到corePoolSize // 如果未达到corePoolSize,则初始化1个工作线程; // 如果corePoolSize设置为0,则会初始化1个非core工作线程; else ensurePrestart(); } } 当ThreadPoolExecutor的Worker线程从阻塞队列取出任务执行时,会调用ScheduledFutureTask的run方法。该方法对任务类型进行判断,如果是单次执行任务,则立即执行并设置返回结果。如果是周期性执行任务,则执行任务并设置下一次执行时间,然后将任务放入到阻塞队列中,等待下一次调度。方法代码如下: public void run() { boolean periodic = isPeriodic(); // 如果当前不可运行任务,则取消任务 if (!canRunInCurrentRunState(periodic)) cancel(false); // 如果是单次执行的任务 else if (!periodic) // 直接调用FutureTask.run()方法执行; ScheduledFutureTask.super.run(); // 如果是周期性任务,则运行任务但不设置结果; else if (ScheduledFutureTask.super.runAndReset()) { // 设置任务下一次执行时间 setNextRunTime(); // 将任务重新加入队列,等待下一次调度 reExecutePeriodic(outerTask); } } 单次执行:schedule() schedule的执行主要分为参数封装和执行两个步骤。实现如下: public ScheduledFuture<?> schedule(Runnable command, long delay, TimeUnit unit) { if (command == null || unit == null) throw new NullPointerException(); // 封装任务参数,调用decorateTask装饰方法进行任务定制 RunnableScheduledFuture<?> t = decorateTask(command, new ScheduledFutureTask<Void>(command, null, triggerTime(delay, unit))); // 执行任务 delayedExecute(t); return t; } 参数封装过程会调用decorateTask方法,该方法为protected的空方法,用于定制RunnableScheduledFuture的属性,可以通过重写实现定制。 protected <V> RunnableScheduledFuture<V> decorateTask( Runnable runnable, RunnableScheduledFuture<V> task) { return task; } 周期性执行:scheduleAtFixedRate() / scheduleWithFixedDelay() scheduleAtFixedRate()的实现与schedule()方法非常相似,仅是将decorateTask()返回的RunnableScheduledFuture对象设置为原有Future的outerTask属性。在重新知心任务时,会将outerTask添加到阻塞队列,从而保证decorateTask()的定制效果一直有效。 public ScheduledFuture<?> scheduleAtFixedRate(Runnable command, long initialDelay, long period, TimeUnit unit) { if (command == null || unit == null) throw new NullPointerException(); if (period <= 0) throw new IllegalArgumentException(); ScheduledFutureTask<Void> sft = new ScheduledFutureTask<Void>(command, null, triggerTime(initialDelay, unit), unit.toNanos(period)); RunnableScheduledFuture<Void> t = decorateTask(command, sft); // 保存定制后的Future对象,便于再次调用; sft.outerTask = t; delayedExecute(t); return t; } scheduleAtFixedRate()的实现与schedule()方法非常相似,仅是设置ScheduledFutureTask延迟时,使用负数,标识执行方式为scheduleAtFixedRate。 public ScheduledFuture<?> scheduleWithFixedDelay(Runnable command, long initialDelay, long delay, TimeUnit unit) { if (command == null || unit == null) throw new NullPointerException(); if (delay <= 0) throw new IllegalArgumentException(); ScheduledFutureTask<Void> sft = new ScheduledFutureTask<Void>(command, null, triggerTime(initialDelay, unit), unit.toNanos(-delay)); RunnableScheduledFuture<Void> t = decorateTask(command, sft); sft.outerTask = t; delayedExecute(t); return t; } ScheduledFutureTask并没有设置单独的字段用于标识执行类型,而是通过period字段的正负号和是否为0表示执行方式: 正数:fixed-rate执行方式; 负数:fixed-delay执行方式; 0:单次执行任务; scheduleAtFixedRate() / scheduleWithFixedDelay()执行的主要区别在于设置下一次执行时间的策略不同,而执行时间通过ScheduledFutureTask的time字段保存,通过ScheduledFutureTask#setNextRunTime()进行设置,代码如下: private void setNextRunTime() { long p = period; // 如果是fixed-rate执行方式:下一次执行时间 = 上一次执行时间 + period if (p > 0) time += p; // 如果是fixed-delay执行方式:下一次执行时间 = now() + period else time = triggerTime(-p); } 延迟功能实现:DelayedWorkQueue DelayedWorkQueue是专门存放RunnableScheduledFuture和ScheduledFutureTask对象的优先队列,底层基于最小二叉堆实现,为了能够提升任务的查找和删除效率,ScheduledFutureTask中增加了一个heapIndex的成员变量,用于存放任务在堆数组中的索引位置,当需要查找或者删除某个特定的任务时,直接根据任务的heapIndex访问堆数组中的元素。任务是否到达执行时间的判断逻辑均在DelayedWorkQueue中实现。 主要成员变量 /** * 存放堆的数组,初始化大小为16 */ private RunnableScheduledFuture<?>[] queue = new RunnableScheduledFuture<?>[INITIAL_CAPACITY]; /** * 队列中的任务个数 */ private int size = 0; /** * 保证队列操作的锁 */ private final ReentrantLock lock = new ReentrantLock(); /** * 存放用于等待任务的leader线程引用; * 为降低性能消耗,同一时间并不需要所有线程都轮询等待任务到达执行时间; * 只需要一个leader线程负责轮询等待即可; */ private Thread leader = null; /** * Condition signalled when a newer task becomes available at the * head of the queue or a new thread may need to become leader. */ private final Condition available = lock.newCondition(); 与PriorityQueue的实现不同,DelayedWorkQueue涉及到多线程访问,因而需要保证线程同步测正确性,故使用ReentrantLock来控制操作的原子性,同时使用Condition来协调线程的执行; 设置任务索引 为了方便在DelayedWorkQueue中查找和删除任务,ScheduledFutureTask有一个heapIndex用于存放任务在堆数组中的索引位置。每当任务在队列中的位置改变时,需要同步更新任务的heapIndex。 private void setIndex(RunnableScheduledFuture<?> f, int idx) { if (f instanceof ScheduledFutureTask) ((ScheduledFutureTask)f).heapIndex = idx; } 上浮、下沉操作 上浮、下沉操作的实现与PriorityQueue实现相似,只多了更新索引位置的操作,且需要在加锁的环境下调用。 /** * 上浮操作 */ private void siftUp(int k, RunnableScheduledFuture<?> key) { while (k > 0) { int parent = (k - 1) >>> 1; RunnableScheduledFuture<?> e = queue[parent]; if (key.compareTo(e) >= 0) break; queue[k] = e; // 更新父节点索引位置 setIndex(e, k); k = parent; } queue[k] = key; // 更新当前节点索引位置 setIndex(key, k); } /** * 下沉操作 */ private void siftDown(int k, RunnableScheduledFuture<?> key) { int half = size >>> 1; while (k < half) { int child = (k << 1) + 1; RunnableScheduledFuture<?> c = queue[child]; int right = child + 1; if (right < size && c.compareTo(queue[right]) > 0) c = queue[child = right]; if (key.compareTo(c) <= 0) break; queue[k] = c; // 更新子节点索引 setIndex(c, k); k = child; } queue[k] = key; // 更新当前节点索引 setIndex(key, k); } 入队操作 public boolean offer(Runnable x) { if (x == null) throw new NullPointerException(); // 操作前先加锁,保证原子性 RunnableScheduledFuture<?> e = (RunnableScheduledFuture<?>)x; final ReentrantLock lock = this.lock; lock.lock(); try { int i = size; // 容量不够,则成倍扩容 if (i >= queue.length) grow(); size = i + 1; // 如果队列为空,则直接放入任务 if (i == 0) { queue[0] = e; setIndex(e, 0); } else { // 如果队列不为空,则执行上浮操作 siftUp(i, e); } // queue[0] == e包含两种情况: // 1)e为队列中的第一个元素; // 2)e为队列中最近要执行的任务; if (queue[0] == e) { leader = null; available.signal(); } } finally { lock.unlock(); } return true; } public void put(Runnable e) { offer(e); } public boolean add(Runnable e) { return offer(e); } 出队操作 /** * 任务出队后,通过下沉操作使得堆有序; */ private RunnableScheduledFuture<?> finishPoll(RunnableScheduledFuture<?> f) { int s = --size; RunnableScheduledFuture<?> x = queue[s]; queue[s] = null; if (s != 0) siftDown(0, x); // 出队任务heapIndex设置为-1 setIndex(f, -1); return f; } /** * 出队,非阻塞 */ public RunnableScheduledFuture<?> poll() { final ReentrantLock lock = this.lock; lock.lock(); try { RunnableScheduledFuture<?> first = queue[0]; // 如果队列为空或者没有任务到执行时间,则返回null if (first == null || first.getDelay(NANOSECONDS) > 0) return null; else // 执行下沉操作,返回队首任务 return finishPoll(first); } finally { lock.unlock(); } } /** * 出队,阻塞线程,直到有任务返回 */ public RunnableScheduledFuture<?> take() throws InterruptedException { final ReentrantLock lock = this.lock; // 加锁,允许响应中断 lock.lockInterruptibly(); try { for (;;) { RunnableScheduledFuture<?> first = queue[0]; // 如果队列为空,则阻塞等待 if (first == null) available.await(); else { long delay = first.getDelay(NANOSECONDS); // 如果第一个任务已经到达时间点,则立刻返回任务 if (delay <= 0) return finishPoll(first); // 如果未到达时间点 first = null; // don't retain ref while waiting // 如果已经有leader线程等待任务,则阻塞当前线程 if (leader != null) available.await(); // 如果没有leader线程,则设置当前线程为leader线程,轮询等待任务到达执行时间点 else { Thread thisThread = Thread.currentThread(); leader = thisThread; try { // 等待队首任务到达执行时间 available.awaitNanos(delay); } finally { if (leader == thisThread) leader = null; } } } } } finally { // 唤醒一个线程,确保至少有一个线程未被阻塞 if (leader == null && queue[0] != null) available.signal(); lock.unlock(); } } /** * 出队,阻塞线程,直到有任务返回或者超时 */ public RunnableScheduledFuture<?> poll(long timeout, TimeUnit unit) throws InterruptedException { long nanos = unit.toNanos(timeout); final ReentrantLock lock = this.lock; // 加锁,允许响应中断 lock.lockInterruptibly(); try { for (;;) { RunnableScheduledFuture<?> first = queue[0]; // 如果队列为空 if (first == null) { // 如果到达超时时间,则返回null if (nanos <= 0) return null; // 未到达超时时间,则等待超时 else nanos = available.awaitNanos(nanos); } else { long delay = first.getDelay(NANOSECONDS); // 如果队首任务到达执行时间,则立即返回任务; if (delay <= 0) return finishPoll(first); // 如果未到达执行时间,且超时,则返回null; if (nanos <= 0) return null; // 如果未到达执行时间,且没有超时 first = null; // don't retain ref while waiting // 如果已经有leader线程,或者超时时间小于第一个任务执行时间, // 则阻塞当前线程直至超时 if (nanos < delay || leader != null) nanos = available.awaitNanos(nanos); // 如果没有leader线程,或者没有超时且没有任务到达时间点; // 则阻塞等待任务到达执行时间点 else { Thread thisThread = Thread.currentThread(); leader = thisThread; try { long timeLeft = available.awaitNanos(delay); nanos -= delay - timeLeft; } finally { // 如果当前线程是leader线程,则取消其leader属性 if (leader == thisThread) leader = null; } } } } } finally { // 唤醒一个线程,确保至少有一个线程未被阻塞 if (leader == null && queue[0] != null) available.signal(); lock.unlock(); } } 根据heapIndex查找和删除任务 /** * 查找一个任务的index,如果未找到,则返回-1 */ private int indexOf(Object x) { if (x != null) { // 如果是ScheduledFutureTask类型任务,则直接返回heapIndex,效率O(1) if (x instanceof ScheduledFutureTask) { int i = ((ScheduledFutureTask) x).heapIndex; // 检查ScheduledFutureTask是否属于当前pool if (i >= 0 && i < size && queue[i] == x) return i; } // 如果是RunnableScheduledFuture类型任务,则遍历查找,效率O(1) else { for (int i = 0; i < size; i++) if (x.equals(queue[i])) return i; } } return -1; } /** * 查找任务 */ public boolean contains(Object x) { final ReentrantLock lock = this.lock; lock.lock(); try { return indexOf(x) != -1; } finally { lock.unlock(); } } /** * 从队列中删除任务,用于取消任务的场景 */ public boolean remove(Object x) { final ReentrantLock lock = this.lock; lock.lock(); try { // 查找任务索引 int i = indexOf(x); // 未找到任务,则不执行删除操作,返回false if (i < 0) return false; // 清空任务索引信息,减小任务队列size // 使用队尾任务替换现有任务索引位置,然后通过下沉、上浮操作找到合适位置 setIndex(queue[i], -1); int s = --size; RunnableScheduledFuture<?> replacement = queue[s]; queue[s] = null; if (s != i) { siftDown(i, replacement); // 如果任务未下沉,则执行上浮操作 if (queue[i] == replacement) siftUp(i, replacement); } return true; } finally { lock.unlock(); } } 通过上面代码我们总结DelayedWorkQueue的实现原理:1)基于最小二叉堆实现的优先队列,根据ScheduledFutureTask.compareTo方法比较任务执行时间,使得最近要执行的任务位于队首;2)任务出队时,通过轮询判断任务是否到达执行时间点,ScheduledFutureTask实现了Delayed接口,通过getDelay方法能够获取到任务还有多长时间执行;3)当队列中所有任务都没有到达执行时间时,队列中会维持一个leader线程,用于轮询等待队首任务,其余线程均await()。4)ScheduledFutureTask增加heapIndex属性,用于标记任务在堆数组中的索引,从而便于任务的快速查找(是否存在)与取消(删除); 任务取消 任务的取消通过ScheduledFutureTask.cancel()方法实现,该方法调用ThreadPoolExecutor.cancel(),在取消任务后,判断是否需要从阻塞队列中移除任务。其中removeOnCancel参数通过setRemoveOnCancelPolicy()设置。之所以要在取消任务后移除阻塞队列中任务,是为了防止队列中积压大量已被取消的任务。 public boolean cancel(boolean mayInterruptIfRunning) { // 调用ThreadPoolExecutor.cancel方法取消任务 boolean cancelled = super.cancel(mayInterruptIfRunning); // 从阻塞队列中移除任务 if (cancelled && removeOnCancel && heapIndex >= 0) remove(this); return cancelled; } 关闭调度器 ScheduledThreadPoolExecutor的shutdown() / shutdownNow()方法均调用ThreadPoolExecutor的相应方法实现。同时,ScheduledThreadPoolExecutor实现了ThreadPoolExecutor的onShutdown()用于在shutdown()执行过程中取消任务执行。 此处涉及2个参数: executeExistingDelayedTasksAfterShutdown:当执行shutdown()后,是否继续执行队列中的单次执行任务;默认为true,即执行; continueExistingPeriodicTasksAfterShutdown:当执行shutdown()后,是否继续执行队列中的周期性任务;默认为false,即不执行; @Override void onShutdown() { BlockingQueue<Runnable> q = super.getQueue(); boolean keepDelayed = getExecuteExistingDelayedTasksAfterShutdownPolicy(); boolean keepPeriodic = getContinueExistingPeriodicTasksAfterShutdownPolicy(); // 如果设置不执行队列中的任务,则取消队列中所有任务,清空队列; if (!keepDelayed && !keepPeriodic) { for (Object e : q.toArray()) if (e instanceof RunnableScheduledFuture<?>) ((RunnableScheduledFuture<?>) e).cancel(false); q.clear(); } // 如果设置执行队列中的任务:周期性的或者单次的任务 else { // 遍历队列中的任务,逐个取消并删除不需要执行的任务 // 先拷贝到数组再遍历,防止遍历时队列元素更新,导致异常; for (Object e : q.toArray()) { if (e instanceof RunnableScheduledFuture) { RunnableScheduledFuture<?> t = (RunnableScheduledFuture<?>)e; if ((t.isPeriodic() ? !keepPeriodic : !keepDelayed) || t.isCancelled()) { if (q.remove(t)) t.cancel(false); } } } } tryTerminate(); }

优秀的个人博客,低调大师

Docker技术笔记:Docker入门浅尝

版权声明:本文为博主原创文章,未经博主允许不得转载。 https://blog.csdn.net/zhaobryant/article/details/79600059 简介 本文将用Docker的方式来构建一个应用APP。 过去,如果要开发一个Python应用APP,所需做的第一件事就是在开发机上安装Python运行时环境。在这种情形下,开发机的环境必须与APP所要求的环境一致,同时还需要与生产环境相匹配。 通过使用Docker,可以将一个可移植的Python运行时环境作为一个image获取,而无需安装。然后,就可以基于Python运行时环境image,将APP代码及其依赖库合并构建,从而简化了应用APP的部署难度。 用Dockerfile定义容器Container Dockerfile是由一系列命令和参数构成的脚本,这些命令应用于基础镜像并最终创建一个新的镜像。它简化了业务部署的流程,大大提高了业务的部署速度。Dockerfile的产出为一个新的可以用于创建容器的镜像。 Dockerfile语法由两部分构成,分别是“注释”和“命令+参数”。 # Line blocks used for commenting COMMAND argument1 argument2 ... 对于Dockerfile,我们首先创建一个空目录,然后cd到该目录,并创建Dockerfile文件。 # Use an official Python runtime as a parent image FROM python:2.7-slim # Set the working directory to /app WORKDIR /app # Copy the current directory contents into the container at /app ADD . /app # Install any needed packages specified in requirements.txt RUN pip install --trusted-host pypi.python.org -r requirements.txt # Make port 80 available to the world outside this container EXPOSE 80 # Define environment variable ENV NAME World # Run app.py when the container launches CMD ["python", "app.py"] 其中,app.py和requirements.txt都位于与Dockerfile相同的目录下,具体如下: zjl@ubuntu:~/docker/pyapp$ ls app.py Dockerfile requirements.txt 对于requirements.txt,其内容如下: Flask Redis 对于app.py,其内容如下: from flask import Flask from redis import Redis, RedisError import os import socket redis = Redis(host="redis", db=0, socket_connect_timeout=2, socket_timeout=2) app = Flask(__name__) @app.route("/") def hello(): try: visits = redis.incr("counter") except RedisError: visits = "<i>cannot connect to Redis, counter disabled</i>" html = "<h3>Hello {name}!</h3>" \ "<b>Hostname:</b> {hostname}<br/>" \ "<b>Visits:</b> {visits}" return html.format(name=os.getenv("NAME", "world"), hostname=socket.gethostname(), visits=visits) if __name__ == "__main__": app.run(host="0.0.0.0", port=80) 现在,我们知道,pip install -r requirements.txt为Python安装了Flask和Redis库,同时APP会打印出环境变量NAME,同时将socket.gethostname()打印出来。 构建新的image镜像 下面,我们进行构建,具体如下: zjl@ubuntu:~/docker/pyapp$ ls app.py Dockerfile requirements.txt zjl@ubuntu:~/docker/pyapp$ sudo docker build -t fhello . Sending build context to Docker daemon 4.608kB Step 1/7 : FROM python:2.7-slim 2.7-slim: Pulling from library/python d2ca7eff5948: Pull complete cef69dd0e5b9: Pull complete 50e1d7e4f3c6: Pull complete 861e9de5333f: Pull complete Digest: sha256:e9baca9b405d3bbba71d4c3c4ce8a461e4937413b8b910cb1801dfac0a2423aa Status: Downloaded newer image for python:2.7-slim ---> 52ad41c7aea4 Step 2/7 : WORKDIR /app ... Step 3/7 : ADD . /app ... Step 4/7 : RUN pip install --trusted-host pypi.python.org -r requirements.txt ... Step 5/7 : EXPOSE 80 ... Step 6/7 : ENV NAME World ... Step 7/7 : CMD ["python", "app.py"] ... Successfully built d3fafd68e807 Successfully tagged fhello:latest zjl@ubuntu:~/docker/pyapp$ sudo docker image ls REPOSITORY TAG IMAGE ID CREATED SIZE fhello latest 12d000cd7a1b 12 minutes ago 148MB 运行新的image镜像 $ sudo docker run -p 4000:80 fhello * Running on http://0.0.0.0:80/ (Press CTRL+C to quit) # 访问该网站 $ curl localhost:4000 <h3>Hello World!</h3><b>Hostname:</b> f4e37f061593<br/><b>Visits:</b> <i>cannot connect to Redis, counter disabled</i> $ sudo docker container ls CONTAINER ID IMAGE COMMAND CREATED STATUS PORTS NAMES 4a150bdc67cd fhello "python app.py" 10 seconds ago Up 9 seconds 0.0.0.0:4000->80/tcp upbeat_austin 关闭容器,命令如下: $ sudo docker container stop 4a150bdc67cd 4a150bdc67cd 给镜像打上标签 syntax: -->> docker tag image username/repository:tag $ sudo docker tag fhello zhjl/getstarted:alpha-1 $ sudo docker image ls REPOSITORY TAG IMAGE ID CREATED SIZE fhello latest 12d000cd7a1b 18 minutes ago 148MB zhjl/getstarted alpha-1 12d000cd7a1b 18 minutes ago 148MB $ docker run -p 4000:80 zhjl/getstarted:alpha-1 Recap and cheat sheet # Create image using this directory's Dockerfile docker build -t fhello . # Run "friendlyname" mapping port 4000 to 80 docker run -p 4000:80 fhello # Same thing, but in detached mode docker run -d -p 4000:80 fhello # List all running containers docker container ls # List all containers, even those not running docker container ls -a # Gracefully stop the specified container docker container stop <hash> # Force shutdown of the specified container docker container kill <hash> # Remove specified container from this machine docker container rm <hash> # Remove all containers docker container rm $(docker container ls -a -q) # List all images on this machine docker image ls -a # Remove specified image from this machine docker image rm <image id> # Remove all images from this machine docker image rm $(docker image ls -a -q) # Log in this CLI session using your Docker credential docker login # Tag <image> for upload to registry docker tag <image> username/repository:tag # Upload tagged image to registry docker push username/repository:tag # Run image from a registry docker run username/repository:tag

优秀的个人博客,低调大师

C++ activemq CMS 学习笔记

很早前就仓促的接触过activemq,但当时太赶时间.后面发现activemq 需要了解的东西实在是太多了. 关于activemq 一直想起一遍文章.但也一直缺少自己的见解.或许是网上这些文章太多了.也可能是自己知识还不足够. 0,activemq-cpp 能解决什么问题. 实际应用就是让开发者能从多线程,多消息通信中解救出来.更多的关注应用逻辑. CMS (stands for C++ Messaging Service) is a JMS-like API for C++ for interfacing with Message Brokers such asApache ActiveMQ. CMS helps to make your C++ client code much neater and easier to follow. To get a better feel for CMS try theAPIReference. ActiveMQ-CPP is a client only library, a message broker such asApache ActiveMQis still needed for your clients to communicate. Our implementation of CMS is called ActiveMQ-CPP, which has an architecture that allows for pluggable transports and wire formats. Currently we support theOpenWireandStompprotocols, both over TCP and SSL, we also now support a Failover Transport for more reliable client operation. In addition to CMS, ActiveMQ-CPP also provides a robust set of classes that support platform independent constructs such as threading, I/O, sockets, etc. You may find many of these utilities very useful, such as a Java like Thread class or the "synchronized" macro that let's you use a Java-like synchronization on any object that implements the activemq::concurrent::Synchronizable interface. ActiveMQ-CPP is released under theApache2.0 License 大意: CMS (C++ 消息 服务)是一个面象apache activemq 的 消息 中间层的C++接口. CMS的实现 叫做activemq-cpp ,不过当前只支持openwire,amqp,TCP,ssl. 现在还支持 主备切换功能(这个是重点,当时我不懂,结果就走了弯路!_!). -_- ,意思是 activemq\conf\activemq.xml中的stomp,mqtt,ws 是没办法的. <transportConnectors> <!-- DOS protection, limit concurrent connections to 1000 and frame size to 100MB --> <transportConnector name="openwire" uri="tcp://0.0.0.0:61616?maximumConnections=1000&amp;wireFormat.maxFrameSize=104857600"/> <transportConnector name="amqp" uri="amqp://0.0.0.0:5672?maximumConnections=1000&amp;wireFormat.maxFrameSize=104857600"/> <transportConnector name="stomp" uri="stomp://0.0.0.0:61613?maximumConnections=1000&amp;wireFormat.maxFrameSize=104857600"/> <transportConnector name="mqtt" uri="mqtt://0.0.0.0:1883?maximumConnections=1000&amp;wireFormat.maxFrameSize=104857600"/> <transportConnector name="ws" uri="ws://0.0.0.0:61614?maximumConnections=1000&amp;wireFormat.maxFrameSize=104857600"/> </transportConnectors> 1,acticvemq-cpp 的配置使用. 参考:Active MQ C++实现通讯http://blog.csdn.net/lee353086/article/details/6777261 activemq-cpp下载地址: http://activemq.apache.org/cms/download.html 相关依赖库 在http://activemq.apache.org/cms/building.html中是有介绍的.不过是en的. 还是再说下吧.本人en也特差. "With versions of ActiveMQ-CPP 2.2 and later, we have a dependency on theApache Portable Runtimeproject. You'll need to install APR on your system before you'll be able to build ActiveMQ-CPP." "The package contains a complete set of CppUnit tests. In order for you to build an run the tests, you will need to download and install the CppUnit library. Seehttp://cppunit.sourceforge.net/cppunit-wiki" 所以就包含了:apr,apr-iconv,apr-util,cppunit. http://mirrors.hust.edu.cn/apache/apr/ 中可以下载apr,apr-iconv,apr-util(版本号都找最高的,不要一高一低,不然编译会出问题). apr-1.5.1-win32-src.zip, apr-iconv-1.2.1-win32-src-r2.zip, apr-util-1.5.4-win32-src.zip. 解压后记得重命令文件夹,去掉版本号,改成如下图,不然工程编译时默认的 [附加包含目录] 是找不到的. 所有文件夹放在一个根目录下. 打开 activemq-cpp-library\vs2008-build\activemq-cpp.sln 依次添加[现在项目]:libapr.vcproj,libapriconv.vcproj,libaprutil.vcproj. 只需要lib项就行了. 最后项目图: libapriconv.vcproj,libaprutil.vcproj 的[项目依赖项]都需要libapr activemq-cpp的[项目依赖项]需要libapriconv,libaprutil,libapr. activemq-cpp 的[附加包含目录] 需要包含 这三个的的include目录. 经过漫长的编译后, 这个大lib文件就出来. activemq-cpp-example 这个工程 ,就有 hello world 的代码. 2,activemq-cpp-example 项目代码解析. 通过这个项目可以让我们更好的认识 activemq-cpp的结构. /* * Licensed to the Apache Software Foundation (ASF) under one or more * contributor license agreements. See the NOTICE file distributed with * this work for additional information regarding copyright ownership. * The ASF licenses this file to You under the Apache License, Version 2.0 * (the "License"); you may not use this file except in compliance with * the License. You may obtain a copy of the License at * * http://www.apache.org/licenses/LICENSE-2.0 * * Unless required by applicable law or agreed to in writing, software * distributed under the License is distributed on an "AS IS" BASIS, * WITHOUT WARRANTIES OR CONDITIONS OF ANY KIND, either express or implied. * See the License for the specific language governing permissions and * limitations under the License. */ // START SNIPPET: demo #include <activemq/library/ActiveMQCPP.h> #include <decaf/lang/Thread.h> #include <decaf/lang/Runnable.h> #include <decaf/util/concurrent/CountDownLatch.h> #include <decaf/lang/Integer.h> #include <decaf/lang/Long.h> #include <decaf/lang/System.h> #include <activemq/core/ActiveMQConnectionFactory.h> #include <activemq/util/Config.h> #include <cms/Connection.h> #include <cms/Session.h> #include <cms/TextMessage.h> #include <cms/BytesMessage.h> #include <cms/MapMessage.h> #include <cms/ExceptionListener.h> #include <cms/MessageListener.h> #include <stdlib.h> #include <stdio.h> #include <iostream> #include <memory> using namespace activemq::core; using namespace decaf::util::concurrent; using namespace decaf::util; using namespace decaf::lang; using namespace cms; using namespace std; class HelloWorldProducer : public Runnable { private: Connection* connection; Session* session; Destination* destination; MessageProducer* producer; int numMessages; bool useTopic; bool sessionTransacted; std::string brokerURI; private: HelloWorldProducer(const HelloWorldProducer&); HelloWorldProducer& operator=(const HelloWorldProducer&); public: HelloWorldProducer(const std::string& brokerURI, int numMessages, bool useTopic = false, bool sessionTransacted = false) : connection(NULL), session(NULL), destination(NULL), producer(NULL), numMessages(numMessages), useTopic(useTopic), sessionTransacted(sessionTransacted), brokerURI(brokerURI) { } virtual ~HelloWorldProducer(){ cleanup(); } void close() { this->cleanup(); } virtual void run() { try { // Create a ConnectionFactory auto_ptr<ConnectionFactory> connectionFactory( ConnectionFactory::createCMSConnectionFactory(brokerURI)); // Create a Connection connection = connectionFactory->createConnection(); connection->start(); // Create a Session if (this->sessionTransacted) { session = connection->createSession(Session::SESSION_TRANSACTED); } else { session = connection->createSession(Session::AUTO_ACKNOWLEDGE); } // Create the destination (Topic or Queue) if (useTopic) { destination = session->createTopic("TEST.FOO"); } else { destination = session->createQueue("TEST.FOO"); } // Create a MessageProducer from the Session to the Topic or Queue producer = session->createProducer(destination); producer->setDeliveryMode(DeliveryMode::NON_PERSISTENT); // Create the Thread Id String string threadIdStr = Long::toString(Thread::currentThread()->getId()); // Create a messages string text = (string) "Hello world! from thread " + threadIdStr; for (int ix = 0; ix < numMessages; ++ix) { std::auto_ptr<TextMessage> message(session->createTextMessage(text)); message->setIntProperty("Integer", ix); printf("Sent message #%d from thread %s\n", ix + 1, threadIdStr.c_str()); producer->send(message.get()); } } catch (CMSException& e) { e.printStackTrace(); } } private: void cleanup() { if (connection != NULL) { try { connection->close(); } catch (cms::CMSException& ex) { ex.printStackTrace(); } } // Destroy resources. try { delete destination; destination = NULL; delete producer; producer = NULL; delete session; session = NULL; delete connection; connection = NULL; } catch (CMSException& e) { e.printStackTrace(); } } }; class HelloWorldConsumer : public ExceptionListener, public MessageListener, public Runnable { private: CountDownLatch latch; CountDownLatch doneLatch; Connection* connection; Session* session; Destination* destination; MessageConsumer* consumer; long waitMillis; bool useTopic; bool sessionTransacted; std::string brokerURI; private: HelloWorldConsumer(const HelloWorldConsumer&); HelloWorldConsumer& operator=(const HelloWorldConsumer&); public: HelloWorldConsumer(const std::string& brokerURI, int numMessages, bool useTopic = false, bool sessionTransacted = false, int waitMillis = 30000) : latch(1), doneLatch(numMessages), connection(NULL), session(NULL), destination(NULL), consumer(NULL), waitMillis(waitMillis), useTopic(useTopic), sessionTransacted(sessionTransacted), brokerURI(brokerURI) { } virtual ~HelloWorldConsumer() { cleanup(); } void close() { this->cleanup(); } void waitUntilReady() { latch.await(); } virtual void run() { try { // Create a ConnectionFactory auto_ptr<ConnectionFactory> connectionFactory( ConnectionFactory::createCMSConnectionFactory(brokerURI)); // Create a Connection connection = connectionFactory->createConnection(); connection->start(); connection->setExceptionListener(this); // Create a Session if (this->sessionTransacted == true) { session = connection->createSession(Session::SESSION_TRANSACTED); } else { session = connection->createSession(Session::AUTO_ACKNOWLEDGE); } // Create the destination (Topic or Queue) if (useTopic) { destination = session->createTopic("TEST.FOO"); } else { destination = session->createQueue("TEST.FOO"); } // Create a MessageConsumer from the Session to the Topic or Queue consumer = session->createConsumer(destination); consumer->setMessageListener(this); std::cout.flush(); std::cerr.flush(); // Indicate we are ready for messages. latch.countDown(); // Wait while asynchronous messages come in. doneLatch.await(waitMillis); } catch (CMSException& e) { // Indicate we are ready for messages. latch.countDown(); e.printStackTrace(); } } // Called from the consumer since this class is a registered MessageListener. virtual void onMessage(const Message* message) { static int count = 0; try { count++; const TextMessage* textMessage = dynamic_cast<const TextMessage*> (message); string text = ""; if (textMessage != NULL) { text = textMessage->getText(); } else { text = "NOT A TEXTMESSAGE!"; } printf("Message #%d Received: %s\n", count, text.c_str()); } catch (CMSException& e) { e.printStackTrace(); } // Commit all messages. if (this->sessionTransacted) { session->commit(); } // No matter what, tag the count down latch until done. doneLatch.countDown(); } // If something bad happens you see it here as this class is also been // registered as an ExceptionListener with the connection. virtual void onException(const CMSException& ex AMQCPP_UNUSED) { printf("CMS Exception occurred. Shutting down client.\n"); ex.printStackTrace(); exit(1); } private: void cleanup() { if (connection != NULL) { try { connection->close(); } catch (cms::CMSException& ex) { ex.printStackTrace(); } } // Destroy resources. try { delete destination; destination = NULL; delete consumer; consumer = NULL; delete session; session = NULL; delete connection; connection = NULL; } catch (CMSException& e) { e.printStackTrace(); } } }; int main(int argc AMQCPP_UNUSED, char* argv[] AMQCPP_UNUSED) { activemq::library::ActiveMQCPP::initializeLibrary(); { std::cout << "=====================================================\n"; std::cout << "Starting the example:" << std::endl; std::cout << "-----------------------------------------------------\n"; // Set the URI to point to the IP Address of your broker. // add any optional params to the url to enable things like // tightMarshalling or tcp logging etc. See the CMS web site for // a full list of configuration options. // // http://activemq.apache.org/cms/ // // Wire Format Options: // ========================= // Use either stomp or openwire, the default ports are different for each // // Examples: // tcp://127.0.0.1:61616 default to openwire // tcp://127.0.0.1:61616?wireFormat=openwire same as above // tcp://127.0.0.1:61613?wireFormat=stomp use stomp instead // // SSL: // ========================= // To use SSL you need to specify the location of the trusted Root CA or the // certificate for the broker you want to connect to. Using the Root CA allows // you to use failover with multiple servers all using certificates signed by // the trusted root. If using client authentication you also need to specify // the location of the client Certificate. // // System::setProperty( "decaf.net.ssl.keyStore", "<path>/client.pem" ); // System::setProperty( "decaf.net.ssl.keyStorePassword", "password" ); // System::setProperty( "decaf.net.ssl.trustStore", "<path>/rootCA.pem" ); // // The you just specify the ssl transport in the URI, for example: // // ssl://localhost:61617 // std::string brokerURI = "failover:(tcp://localhost:61616" // "?wireFormat=openwire" // "&transport.useInactivityMonitor=false" // "&connection.alwaysSyncSend=true" // "&connection.useAsyncSend=true" // "?transport.commandTracingEnabled=true" // "&transport.tcpTracingEnabled=true" // "&wireFormat.tightEncodingEnabled=true" ")"; //============================================================ // set to true to use topics instead of queues // Note in the code above that this causes createTopic or // createQueue to be used in both consumer an producer. //============================================================ bool useTopics = true; bool sessionTransacted = false; int numMessages = 2000; long long startTime = System::currentTimeMillis(); HelloWorldProducer producer(brokerURI, numMessages, useTopics); HelloWorldConsumer consumer(brokerURI, numMessages, useTopics, sessionTransacted); // Start the consumer thread. Thread consumerThread(&consumer); consumerThread.start(); // Wait for the consumer to indicate that its ready to go. consumer.waitUntilReady(); // Start the producer thread. Thread producerThread(&producer); producerThread.start(); // Wait for the threads to complete. producerThread.join(); consumerThread.join(); long long endTime = System::currentTimeMillis(); double totalTime = (double)(endTime - startTime) / 1000.0; consumer.close(); producer.close(); std::cout << "Time to completion = " << totalTime << " seconds." << std::endl; std::cout << "-----------------------------------------------------\n"; std::cout << "Finished with the example." << std::endl; std::cout << "=====================================================\n"; } activemq::library::ActiveMQCPP::shutdownLibrary(); } // END SNIPPET: demo 从main()开始吧. 这样便简快速的实现了应用逻辑. 3,activemq的几种通信模式. 可以参考: http://shmilyaw-hotmail-com.iteye.com/blog/1897635 目前本人需要的是activemq-cpp的request-response 模式. 4,activemq-cpp的request-response 模式的应用. 服务器与客户端通信 数据的交互 和 确认. 以下是本人修改后的简单代码,bug可能存在,请指出. 复制两份,一份定义USE_COMSUMER 一份定义USE_PRODUCER 就可以生成. /* * Licensed to the Apache Software Foundation (ASF) under one or more * contributor license agreements. See the NOTICE file distributed with * this work for additional information regarding copyright ownership. * The ASF licenses this file to You under the Apache License, Version 2.0 * (the "License"); you may not use this file except in compliance with * the License. You may obtain a copy of the License at * * http://www.apache.org/licenses/LICENSE-2.0 * * Unless required by applicable law or agreed to in writing, software * distributed under the License is distributed on an "AS IS" BASIS, * WITHOUT WARRANTIES OR CONDITIONS OF ANY KIND, either express or implied. * See the License for the specific language governing permissions and * limitations under the License. */ // START SNIPPET: demo #include <activemq/library/ActiveMQCPP.h> #include <decaf/lang/Thread.h> #include <decaf/lang/Runnable.h> #include <decaf/util/concurrent/CountDownLatch.h> #include <decaf/lang/Integer.h> #include <decaf/lang/Long.h> #include <decaf/lang/System.h> #include <activemq/core/ActiveMQConnectionFactory.h> #include <activemq/util/Config.h> #include <cms/Connection.h> #include <cms/Session.h> #include <cms/TextMessage.h> #include <cms/BytesMessage.h> #include <cms/MapMessage.h> #include <cms/ExceptionListener.h> #include <cms/MessageListener.h> #include <stdlib.h> #include <stdio.h> #include <iostream> #include <memory> #include <decaf/util/Random.h> using namespace activemq::core; using namespace decaf::util::concurrent; using namespace decaf::util; using namespace decaf::lang; using namespace cms; using namespace std; #define QUEUE_NAME "eventQueue" #define NAME_BYTE_LEN 16 class HelloWorldProducer : public ExceptionListener, public MessageListener, public Runnable { private: CountDownLatch latch; CountDownLatch doneLatch; Connection* connection; Session* session; Destination* destination; MessageProducer* producer; int numMessages; bool useTopic; bool sessionTransacted; std::string brokerURI; bool bReciveMessage; long waitMillis; private: HelloWorldProducer(const HelloWorldProducer&); HelloWorldProducer& operator=(const HelloWorldProducer&); public: HelloWorldProducer(const std::string& brokerURI, int numMessages, bool useTopic = false, bool sessionTransacted = false, long waitMillis=3000) : latch(1), doneLatch(numMessages), connection(NULL), session(NULL), destination(NULL), producer(NULL), numMessages(numMessages), useTopic(useTopic), sessionTransacted(sessionTransacted), brokerURI(brokerURI) , bReciveMessage(false), waitMillis(waitMillis) { } virtual ~HelloWorldProducer(){ cleanup(); } void close() { this->cleanup(); } void waitUntilReady() { latch.await(); } virtual void run() { try { // Create a ConnectionFactory auto_ptr<ConnectionFactory> connectionFactory( ConnectionFactory::createCMSConnectionFactory(brokerURI)); // Create a Connection connection = connectionFactory->createConnection(); connection->start(); // Create a Session if (this->sessionTransacted) { session = connection->createSession(Session::SESSION_TRANSACTED); } else { session = connection->createSession(Session::AUTO_ACKNOWLEDGE); } session = connection->createSession(); // Create the destination (Topic or Queue) if (useTopic) { destination = session->createTopic(QUEUE_NAME); } else { destination = session->createQueue(QUEUE_NAME); } // Create a MessageProducer from the Session to the Topic or Queue producer = session->createProducer(destination); producer->setDeliveryMode(DeliveryMode::NON_PERSISTENT); // Create the Thread Id String string threadIdStr = Long::toString(Thread::currentThread()->getId()); // Create a messages string text = (string) "Hello world! from thread " + threadIdStr; for (int ix = 0; ix < numMessages; ++ix) { std::auto_ptr<TextMessage> message(session->createTextMessage(text)); //关键消息... std::auto_ptr<Destination> tempDest(session->createTemporaryQueue()); //cms::Destination tempDest=session->createTemporaryTopic() ; MessageConsumer * responseConsumer = session->createConsumer(tempDest.get()); responseConsumer->setMessageListener(this);//监听... message->setCMSReplyTo(tempDest.get()); Random random; char buffer[NAME_BYTE_LEN]={0}; random.nextBytes((unsigned char *)buffer,NAME_BYTE_LEN); string correlationId=""; for(int i=0;i<NAME_BYTE_LEN;++i) { char ch[NAME_BYTE_LEN*2]={0}; sprintf(ch,"%02X",(unsigned char)buffer[i]); string str(ch); correlationId+=str; } message->setCMSCorrelationID(correlationId); message->setIntProperty("Integer", ix); printf("Producer Sent message #%d from thread %s\n", ix + 1, threadIdStr.c_str()); producer->send(message.get()); // Indicate we are ready for messages. latch.countDown(); // Wait while asynchronous messages come in. doneLatch.await(waitMillis); } } catch (CMSException& e) { printf("Producer run() CMSException \n" ); // Indicate we are ready for messages. latch.countDown(); e.printStackTrace(); } } // Called from the Producer since this class is a registered MessageListener. virtual void onMessage(const Message* message) { static int count = 0; try { count++; const TextMessage* textMessage = dynamic_cast<const TextMessage*> (message); //ActiveMQMessageTransformation //std::auto_ptr<TextMessage> responsemessage(session->createTextMessage()); //responsemessage->setCMSCorrelationID(textMessage->getCMSCorrelationID()); //responsemessage->getCMSReplyTo() string text = ""; if (textMessage != NULL) { text = textMessage->getText(); } else { text = "NOT A TEXTMESSAGE!"; } printf("Producer Message #%d Received: %s\n", count, text.c_str()); //producer.send } catch (CMSException& e) { printf("Producer onMessage() CMSException \n" ); e.printStackTrace(); } // Commit all messages. if (this->sessionTransacted) { session->commit(); } // No matter what, tag the count down latch until done. doneLatch.countDown(); } // If something bad happens you see it here as this class is also been // registered as an ExceptionListener with the connection. virtual void onException(const CMSException& ex AMQCPP_UNUSED) { printf("Producer onException() CMS Exception occurred. Shutting down client. \n" ); ex.printStackTrace(); exit(1); } private: void cleanup() { if (connection != NULL) { try { connection->close(); } catch (cms::CMSException& ex) { ex.printStackTrace(); } } // Destroy resources. try { delete destination; destination = NULL; delete producer; producer = NULL; delete session; session = NULL; delete connection; connection = NULL; } catch (CMSException& e) { e.printStackTrace(); } } }; class HelloWorldConsumer : public ExceptionListener, public MessageListener, public Runnable { private: CountDownLatch latch; CountDownLatch doneLatch; Connection* connection; Session* session; Destination* destination; MessageConsumer* consumer; MessageProducer *producer; long waitMillis; bool useTopic; bool sessionTransacted; std::string brokerURI; private: HelloWorldConsumer(const HelloWorldConsumer&); HelloWorldConsumer& operator=(const HelloWorldConsumer&); public: HelloWorldConsumer(const std::string& brokerURI, int numMessages, bool useTopic = false, bool sessionTransacted = false, int waitMillis = 30000) : latch(1), doneLatch(numMessages), connection(NULL), session(NULL), destination(NULL), consumer(NULL), producer(NULL), waitMillis(waitMillis), useTopic(useTopic), sessionTransacted(sessionTransacted), brokerURI(brokerURI) { } virtual ~HelloWorldConsumer() { cleanup(); } void close() { this->cleanup(); } void waitUntilReady() { latch.await(); } virtual void run() { try { // Create a ConnectionFactory auto_ptr<ConnectionFactory> connectionFactory( ConnectionFactory::createCMSConnectionFactory(brokerURI)); // Create a Connection connection = connectionFactory->createConnection(); connection->start(); connection->setExceptionListener(this); // Create a Session if (this->sessionTransacted == true) { session = connection->createSession(Session::SESSION_TRANSACTED); } else { session = connection->createSession(Session::AUTO_ACKNOWLEDGE); } // Create the destination (Topic or Queue) if (useTopic) { destination = session->createTopic(QUEUE_NAME); } else { destination = session->createQueue(QUEUE_NAME); } producer = session->createProducer(); producer->setDeliveryMode(DeliveryMode::NON_PERSISTENT); // Create a MessageConsumer from the Session to the Topic or Queue consumer = session->createConsumer(destination); consumer->setMessageListener(this); std::cout.flush(); std::cerr.flush(); // Indicate we are ready for messages. latch.countDown(); // Wait while asynchronous messages come in. doneLatch.await(); } catch (CMSException& e) { printf("Consumer onException() CMS Exception occurred. Shutting down client. \n" ); // Indicate we are ready for messages. latch.countDown(); e.printStackTrace(); } } // Called from the consumer since this class is a registered MessageListener. virtual void onMessage(const Message* message) { static int count = 0; try { count++; // Create the Thread Id String string threadIdStr = Long::toString(Thread::currentThread()->getId()); static bool bPrintf=true; if(bPrintf) { bPrintf=false; printf("consumer Message threadid: %s\n", threadIdStr.c_str()); } string strReply="consumer return xxx,ThreadID="+threadIdStr; const TextMessage* textMessage = dynamic_cast<const TextMessage*> (message); if(NULL==textMessage) { printf("NULL==textMessage", message->getCMSType().c_str()); //const cms::MapMessage* mapMsg = dynamic_cast<const cms::MapMessage*>(message); //if(mapMsg) //{ // // std::vector<std::string> elements = mapMsg->getMapNames(); // std::vector<std::string>::iterator iter = elements.begin(); // for(; iter != elements.end() ; ++iter) // { // std::string key = *iter; // cms::Message::ValueType elementType = mapMsg->getValueType(key); // string strxxx; // int cc=0; // switch(elementType) { // case cms::Message::BOOLEAN_TYPE: // //msg->setBoolean(key, mapMsg->getBoolean(key)); // break; // case cms::Message::BYTE_TYPE: // //msg->setByte(key, mapMsg->getByte(key)); // break; // case cms::Message::BYTE_ARRAY_TYPE: // //msg->setBytes(key, mapMsg->getBytes(key)); // break; // case cms::Message::CHAR_TYPE: // //msg->setChar(key, mapMsg->getChar(key)); // break; // case cms::Message::SHORT_TYPE: // //msg->setShort(key, mapMsg->getShort(key)); // break; // case cms::Message::INTEGER_TYPE: // //msg->setInt(key, mapMsg->getInt(key)); // break; // case cms::Message::LONG_TYPE: // //msg->setLong(key, mapMsg->getLong(key)); // break; // case cms::Message::FLOAT_TYPE: // //msg->setFloat(key, mapMsg->getFloat(key)); // break; // case cms::Message::DOUBLE_TYPE: // //msg->setDouble(key, mapMsg->getDouble(key)); // break; // case cms::Message::STRING_TYPE: // //msg->setString(key, mapMsg->getString(key)); // strxxx=mapMsg->getString(key); // cc=1; // break; // default: // break; // } // } //} return; } std::auto_ptr<TextMessage> responsemessage(session->createTextMessage(strReply)); responsemessage->setCMSCorrelationID(textMessage->getCMSCorrelationID()); string text = ""; if (textMessage != NULL) { text = textMessage->getText(); } else { text = "NOT A TEXTMESSAGE!"; } int nProPerty=textMessage->getIntProperty("Integer"); printf("consumer Message #%d Received: %s,nProPerty[%d]\n", count, text.c_str(),nProPerty); const cms::Destination* destSend=textMessage->getCMSReplyTo(); if(destSend) { this->producer->send(destSend,responsemessage.get()); printf("consumer Message #%d send: %s\n", count, strReply.c_str()); } } catch (CMSException& e) { printf("Consumer onMessage() CMS Exception occurred. Shutting down client. \n" ); e.printStackTrace(); } // Commit all messages. if (this->sessionTransacted) { session->commit(); } // No matter what, tag the count down latch until done. //doneLatch.countDown(); } // If something bad happens you see it here as this class is also been // registered as an ExceptionListener with the connection. virtual void onException(const CMSException& ex AMQCPP_UNUSED) { printf("Consumer onException() CMS Exception occurred. Shutting down client. \n" ); //printf("CMS Exception occurred. Shutting down client.\n"); ex.printStackTrace(); exit(1); } private: void cleanup() { if (connection != NULL) { try { connection->close(); } catch (cms::CMSException& ex) { ex.printStackTrace(); } } // Destroy resources. try { delete destination; destination = NULL; delete consumer; consumer = NULL; delete session; session = NULL; delete connection; connection = NULL; } catch (CMSException& e) { e.printStackTrace(); } } }; int main(int argc AMQCPP_UNUSED, char* argv[] AMQCPP_UNUSED) { //if(argc<2) //{ // printf("argc<2\r\n"); // return 0; //} activemq::library::ActiveMQCPP::initializeLibrary(); { std::cout << "=====================================================\n"; std::cout << "Starting the example:" << std::endl; std::cout << "-----------------------------------------------------\n"; // Set the URI to point to the IP Address of your broker. // add any optional params to the url to enable things like // tightMarshalling or tcp logging etc. See the CMS web site for // a full list of configuration options. // // http://activemq.apache.org/cms/ // // Wire Format Options: // ========================= // Use either stomp or openwire, the default ports are different for each // // Examples: // tcp://127.0.0.1:61616 default to openwire // tcp://127.0.0.1:61616?wireFormat=openwire same as above // tcp://127.0.0.1:61613?wireFormat=stomp use stomp instead // // SSL: // ========================= // To use SSL you need to specify the location of the trusted Root CA or the // certificate for the broker you want to connect to. Using the Root CA allows // you to use failover with multiple servers all using certificates signed by // the trusted root. If using client authentication you also need to specify // the location of the client Certificate. // // System::setProperty( "decaf.net.ssl.keyStore", "<path>/client.pem" ); // System::setProperty( "decaf.net.ssl.keyStorePassword", "password" ); // System::setProperty( "decaf.net.ssl.trustStore", "<path>/rootCA.pem" ); // // The you just specify the ssl transport in the URI, for example: // // ssl://localhost:61617 // std::string brokerURI = "failover:(tcp://192.168.10.143:61616" // "?wireFormat=openwire" // "&transport.useInactivityMonitor=false" // "&connection.alwaysSyncSend=true" // "&connection.useAsyncSend=true" // "?transport.commandTracingEnabled=true" // "&transport.tcpTracingEnabled=true" // "&wireFormat.tightEncodingEnabled=true" ")"; //============================================================ // set to true to use topics instead of queues // Note in the code above that this causes createTopic or // createQueue to be used in both consumer an producer. //============================================================ bool useTopics = false; bool sessionTransacted = true; int numMessages = 1; bool useConsumer=true; bool useProducer=true; //int nSet=atoi(argv[1]); //if(1==nSet) //{ //#define USE_COMSUMER //} //else //{ //#define USE_PRODUCER // //} long long startTime = System::currentTimeMillis(); #ifdef USE_PRODUCER printf("当前 USE_PRODUCER \r\n"); int numProducerMessages = 30; int nThreadNumber=10; vector<HelloWorldProducer *> vHelloWorldProducer; for(int i=0;i<nThreadNumber;++i) { HelloWorldProducer * producerTemp=new HelloWorldProducer(brokerURI, numProducerMessages, useTopics); vHelloWorldProducer.push_back(producerTemp); } #endif #ifdef USE_COMSUMER printf("当前 USE_COMSUMER \r\n"); HelloWorldConsumer consumer(brokerURI, numMessages, useTopics, sessionTransacted); // Start the consumer thread. Thread consumerThread(&consumer); consumerThread.start(); // Wait for the consumer to indicate that its ready to go. consumer.waitUntilReady(); #endif #ifdef USE_PRODUCER // Start the producer thread. vector<Thread *> vThread; for(int i=0;i<nThreadNumber;++i) { HelloWorldProducer & ProducerTemp=*vHelloWorldProducer[i]; Thread * threadTemp=new Thread(&ProducerTemp); vThread.push_back(threadTemp); threadTemp->start(); ProducerTemp.waitUntilReady(); } for(int i=0;i<vThread.size();++i) { Thread * threadTemp=vThread[i]; //threadTemp->join(); } while(1) { Thread::sleep(10); } //Thread producerThread1(&producer1); //producerThread1.start(); //producer1.waitUntilReady(); //Thread producerThread2(&producer2); //producerThread2.start(); //producer2.waitUntilReady(); //Thread producerThread3(&producer3); //producerThread3.start(); //producer3.waitUntilReady(); #endif #ifdef USE_PRODUCER // Wait for the threads to complete. //producerThread1.join(); //producerThread2.join(); //producerThread3.join(); #endif #ifdef USE_COMSUMER consumerThread.join(); #endif long long endTime = System::currentTimeMillis(); double totalTime = (double)(endTime - startTime) / 1000.0; #ifdef USE_PRODUCER //producer1.close(); //producer2.close(); //producer3.close(); for(int i=0;i<vHelloWorldProducer.size();++i) { HelloWorldProducer * ProducerTemp=vHelloWorldProducer[i]; ProducerTemp->close(); if(ProducerTemp) { delete ProducerTemp; ProducerTemp=NULL; } } #endif #ifdef USE_COMSUMER consumer.close(); #endif std::cout << "Time to completion = " << totalTime << " seconds." << std::endl; std::cout << "-----------------------------------------------------\n"; std::cout << "Finished with the example." << std::endl; std::cout << "=====================================================\n"; } activemq::library::ActiveMQCPP::shutdownLibrary(); return 0; } // END SNIPPET: demo 程序运行结果: 关于activemq-cpp 的Message 消息转换. activemq-cpp 中的转换ActiveMQMessageTransformation.transformMessage 中是有相应的实现. //////////////////////////////////////////////////////////////////////////////// bool ActiveMQMessageTransformation::transformMessage(cms::Message* message, ActiveMQConnection* connection, Message** amqMessage) { if (message == NULL) { throw NullPointerException(__FILE__, __LINE__, "Provided source cms::Message pointer was NULL"); } if (amqMessage == NULL) { throw NullPointerException(__FILE__, __LINE__, "Provided target commands::Message pointer was NULL"); } *amqMessage = dynamic_cast<Message*>(message); if (*amqMessage != NULL) { return false; } else { if (dynamic_cast<cms::BytesMessage*>(message) != NULL) { cms::BytesMessage* bytesMsg = dynamic_cast<cms::BytesMessage*>(message); bytesMsg->reset(); ActiveMQBytesMessage* msg = new ActiveMQBytesMessage(); msg->setConnection(connection); try { for (;;) { // Reads a byte from the message stream until the stream is empty msg->writeByte(bytesMsg->readByte()); } } catch (cms::MessageEOFException& e) { // if an end of message stream as expected } catch (cms::CMSException& e) { } *amqMessage = msg; } else if (dynamic_cast<cms::MapMessage*>(message) != NULL) { cms::MapMessage* mapMsg = dynamic_cast<cms::MapMessage*>(message); ActiveMQMapMessage* msg = new ActiveMQMapMessage(); msg->setConnection(connection); std::vector<std::string> elements = mapMsg->getMapNames(); std::vector<std::string>::iterator iter = elements.begin(); for(; iter != elements.end() ; ++iter) { std::string key = *iter; cms::Message::ValueType elementType = mapMsg->getValueType(key); switch(elementType) { case cms::Message::BOOLEAN_TYPE: msg->setBoolean(key, mapMsg->getBoolean(key)); break; case cms::Message::BYTE_TYPE: msg->setByte(key, mapMsg->getByte(key)); break; case cms::Message::BYTE_ARRAY_TYPE: msg->setBytes(key, mapMsg->getBytes(key)); break; case cms::Message::CHAR_TYPE: msg->setChar(key, mapMsg->getChar(key)); break; case cms::Message::SHORT_TYPE: msg->setShort(key, mapMsg->getShort(key)); break; case cms::Message::INTEGER_TYPE: msg->setInt(key, mapMsg->getInt(key)); break; case cms::Message::LONG_TYPE: msg->setLong(key, mapMsg->getLong(key)); break; case cms::Message::FLOAT_TYPE: msg->setFloat(key, mapMsg->getFloat(key)); break; case cms::Message::DOUBLE_TYPE: msg->setDouble(key, mapMsg->getDouble(key)); break; case cms::Message::STRING_TYPE: msg->setString(key, mapMsg->getString(key)); break; default: break; } } *amqMessage = msg; } else if (dynamic_cast<cms::ObjectMessage*>(message) != NULL) { cms::ObjectMessage* objMsg = dynamic_cast<cms::ObjectMessage*>(message); ActiveMQObjectMessage* msg = new ActiveMQObjectMessage(); msg->setConnection(connection); msg->setObjectBytes(objMsg->getObjectBytes()); *amqMessage = msg; } else if (dynamic_cast<cms::StreamMessage*>(message) != NULL) { cms::StreamMessage* streamMessage = dynamic_cast<cms::StreamMessage*>(message); streamMessage->reset(); ActiveMQStreamMessage* msg = new ActiveMQStreamMessage(); msg->setConnection(connection); try { while(true) { cms::Message::ValueType elementType = streamMessage->getNextValueType(); int result = -1; std::vector<unsigned char> buffer(255); switch(elementType) { case cms::Message::BOOLEAN_TYPE: msg->writeBoolean(streamMessage->readBoolean()); break; case cms::Message::BYTE_TYPE: msg->writeBoolean(streamMessage->readBoolean()); break; case cms::Message::BYTE_ARRAY_TYPE: while ((result = streamMessage->readBytes(buffer)) != -1) { msg->writeBytes(&buffer[0], 0, result); buffer.clear(); } break; case cms::Message::CHAR_TYPE: msg->writeChar(streamMessage->readChar()); break; case cms::Message::SHORT_TYPE: msg->writeShort(streamMessage->readShort()); break; case cms::Message::INTEGER_TYPE: msg->writeInt(streamMessage->readInt()); break; case cms::Message::LONG_TYPE: msg->writeLong(streamMessage->readLong()); break; case cms::Message::FLOAT_TYPE: msg->writeFloat(streamMessage->readFloat()); break; case cms::Message::DOUBLE_TYPE: msg->writeDouble(streamMessage->readDouble()); break; case cms::Message::STRING_TYPE: msg->writeString(streamMessage->readString()); break; default: break; } } } catch (cms::MessageEOFException& e) { // if an end of message stream as expected } catch (cms::CMSException& e) { } *amqMessage = msg; } else if (dynamic_cast<cms::TextMessage*>(message) != NULL) { cms::TextMessage* textMsg = dynamic_cast<cms::TextMessage*>(message); ActiveMQTextMessage* msg = new ActiveMQTextMessage(); msg->setConnection(connection); msg->setText(textMsg->getText()); *amqMessage = msg; } else { *amqMessage = new ActiveMQMessage(); (*amqMessage)->setConnection(connection); } ActiveMQMessageTransformation::copyProperties(message, dynamic_cast<cms::Message*>(*amqMessage)); } return true; } 5,activemq 的activemq broker cluster (activemq 集群). 可以参考: http://bh-keven.iteye.com/blog/1617788 http://blog.csdn.net/jason5186/article/details/18702523 6,activemq.xml 中的配置和activemq Connection URIS 配置 Index> Apache.NMS.ActiveMQ> ActiveMQ URI Configuration http://activemq.apache.org/nms/activemq-uri-configuration.html http://activemq.apache.org/tcp-transport-reference.html 是有相应介绍,但需要花一些时间去读. //7,wireFormat=openwire 的几种方式.的优缺点. //openwire,amqp,stomp,mqtt,ws

优秀的个人博客,低调大师

《View Programming Guide for iOS》阅读笔记

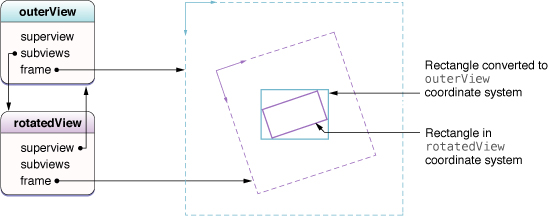
文档地址: 《View Programming Guide for iOS》 View and Window Architecture 视图绘制周期 UIView 类使用了请求式绘制模型来展示内容。当一个视图第一次出现在屏幕上时,系统要求它绘制自己的内容。系统截取视图内容的一个快照,并且将这个快照用于视图的可视化呈现。如果视图内容永远不改变,那么这个视图的绘图代码可能永远都不会再次调用。这个快照的图片在大部分涉及到该视图的操作中被重复使用。如果改变了视图内容,则需要通知系统视图发生了改变。之后视图会重复绘制过程并且为新的绘制结果截取一个快照。 当视图内容发生改变时,不需要直接重绘这些改变。相反,通过调用函数 setNeedsDisplay 或者 setNeedsDisplayInRect: 来使当前视图无效。这些函数会告诉系统视图的内容发生改变并且需要在下次时机到来时重绘。系统会一直等到当前的 run loop 结束后,才会开始任何绘制操作。这个延迟,给了你一个机会去废止多个视图,从当前视图层级中添加或者删除视图,隐藏视图,重设视图大小,和重定位视图。所有的这些改变稍后会再同一时间呈现。 备注:改变视图的几何结构并不会让系统自动重绘视图内容。视图的 contentMode 属性决定了视图几何结构的改变该如何解析。大部分的 content modes 只是在视图的边界中拉伸或者重定位已经存在的视图快照而不需要重新创建一个快照。 当绘制视图内容的时刻到来时,真正的绘制过程会根据视图和它的配置而有所不同。系统视图通常是实现自己的私有绘图函数来重绘内容。这些一样的系统视图通常会暴露一些接口,以便能用来配置视图实际的外观。对于自定义的 UIView 的子类,典型的应该重写视图的 drawRect: 函数,使用它来绘制视图内容。当然也存在一些其他的方法去提供视图的内容,比如直接设置内容下的图层。但是重写 drawRect: 函数是使用最多的技术。 UIKit 框架的坐标原点位于左上角,x 轴向右延伸,y 轴向下延伸。而 Core Graphics 和 OpenGL ES 的坐标系统原点则在左下角,y 轴向上延伸,x 轴向右延伸。 UIView 属性中的 frame和 center 是相对于父视图的坐标系统的。而 bounds属性相对于自身的坐标系统,故 bounds 默认的 point 位置是(0,0),大小与 frame 相同 改变视图的 transform 属性时,所有变形都是相对于视图中心点也就是 center 属性的。 在视图的 drawRect: 方法中,可以使用仿射变换来定位和确定需要绘制的元素。相比于在视图的某个地点固定一个对象的位置,相对于一个固定点(通常是(0,0))来创建每个对象是更为简单的。在绘制之前使用 transform 就能做到这点。在这种情况下,如果视图中的对象位置发生改变,只需要修改这个 transform 即可,这比在新的位置重新创建对象要快速并且花销更小。可以使用 CGContextGetCTM 函数来检索图形上下文的仿射变换矩阵,在绘制过程中也可以使用 Core Graphics 的相关函数来设置 CTM。 CTM(current transformation matrix) 是任何时候都被使用的仿射变换,当操作的是整个视图时,CTM 就是视图的 transform 属性。在 drawRect: 方法中, CTM 与当前活动的图形上下文有关 当一个视图的 transform 属性不是 identity transform 时,这个视图的 frame 属性就是未定义并且必须被忽视的。此时,你必须使用视图的 bounds 和 center 属性来获得视图的大小和位置。该视图的任何子视图的 frame 矩形依然是有效的,因为它们是基于父视图的 bounds 属性的。 一个点并不一定对应着屏幕上的一个像素 对于显式定义了 drawRect: 方法的视图来说,UIKit 负责调用这个方法。这个方法中的实现应该尽可能快地重绘视图的指定区域并且不应该做别的任何事情。不要在这里做额外的布局,也不要改变应用的数据模型。这个方法的唯一目的就是更新视图的可视内容。 自定义视图需要重写的事件处理函数有touchesBegan:withEvent:, touchesMoved:withEvent:, touchesEnded:withEvent:, touchesCancelled:withEvent: 如果使用了手势识别来处理事件,则不需要重写这些函数。如果视图不包含任何子视图或者它的尺寸不发生改变,也不需要重写 layoutSubviews 函数。最后,当视图内容在运行时发生改变,同时使用了 UIKit 或者 Core Graphics 来绘制图形,则需要重写drawRect:函数。 Windows 每个 iOS 应用程序至少包含一个窗口。窗口通常座位一个或者多个视图的空白容器。同时,应用程序也不通过展示新的窗口来改变内容。如果想要这么做,改变窗口最前面的视图来完成。 当创建窗口时,应该总是将窗口的大小设置为充满屏幕的边界。不应该为了容纳状态栏或者其他元素而减去窗口大小。无论何时,状态栏总是浮在窗口的上面的。所以应该是放入到窗口中的视图来缩减大小去适应状态栏。如果是使用视图控制器,则视图控制器应该自动处理视图大小。 窗口有等级概念,每个 UIWindow 对象都有一个可配置的 windowLevel 属性。通常不需要改变应用程序的窗口等级。新的窗口在创建时,会自动指派为正常窗口等级。高窗口等级是出现在应用程序内容之上的必要信息,比如系统状态栏和 alert 消息。虽然可以手动将窗口设置为这样的等级,但当使用到特殊接口时,通常系统会做好这些事情。举例来说,当显示隐藏状态栏,或者显示一个 alert 视图时,系统会自动创建必要的窗口去显示这些内容。 当应用程序进入到后台时,窗口改变通知并不会被传递。因为当程序进入后台时尽管窗口不在屏幕上显示了,但在应用程序环境中,窗口依然被认为是可见的。 retina 屏的 iOS 设备可以外接显示设备。 Views 使用编程方法来创建视图时,视图创建代码一般放在视图控制器的 loadView 函数中。无论是使用编程或者 nib 文件来创建视图,都可以在 viewDidLoad 函数中添加视图的配置代码。 父视图会自动 retain 子视图,所以当添加了一个子视图后,release 子视图的操作是安全的。事实上,推荐这么做,因为它能防止应用程序保持太多的视图而导致的内存泄露。记住,如果从父视图中移除了子视图后,还想继续使用子视图,必须对子视图做 retain 操作。removeFromSuperview 函数会在子视图从父视图中移除后,自动释放子视图。如果没有在下一个时间循环周期前做 retain 操作,这个视图将会被释放。 UIView的 window 属性代表当前正在显示的视图所在的窗口。对于当前在屏幕上显示的视图来说,窗口对象就是它们所在视图层次的根视图。 如果隐藏的视图是 first responder,这个视图不会自动的取消自己 first responder 的状态。以 first responder 为目标的事件依然会被传递到这个隐藏的视图。为了防止这种情况发生,应该在隐藏视图时,强制使其取消 first responder 状态。 当包含了旋转因子的视图做矩形转换时,看如下的图: uiview_convert_rotated.jpg 如果一个视图的 transform 属性不是 identity transform,那么它的 frame 和 autoresizing 行为结果都是未定义的。 视图在初始化过程之前调用 UIView 类方法 layerClass,并且使用返回的类来创建 layer 对象。此外,视图总是会指定自己本身作为 layer 对象的代理。在这点上,视图拥有着图层,并且视图和图层之前的关系必须不能改变。也就是说,不能指定相同的视图作为另一个图层对象的代理。改变这种所属关系或者代理关系,都可能会导致视图绘制的错误,并且应用程序存在潜在的 crash 问题。 通过创建 UIView 的子类,重写 layerClass 类函数可以改变创建图层时的默认的 CALayer 类。 自定义的 layer 不接收事件,也不参与到 responder chain 中,但是它们绘制自身,并且根据 Core Animation 的规则,在他们的父视图或者父图层中响应大小变化。 CGRectGetMidX(),CGRectGetMidY() 两个函数可以分别得到一个 frame 的中心点的 x 坐标和 y 坐标。 CALayer 的属性 position 就是中心点,和 UIView 的属性 center 效果相同。 自定义的视图类,如果是通过代码来创建,则需要重写 initWithFrame: 初始化函数。而若是从 nib 文件中加载,则需要重写 initWithCoder: 函数。注意:nib 加载的视图并不会调用 initWithFrame: 函数。 视图默认的行为是一次只响应一个 touch。如果用户按下了第二个手指,系统会忽视这个 touch 事件并且不会将它报告给视图。如果希望在视图的事件处理函数中跟踪多手指手势,需要设置视图的 multipleTouchEnabled 属性为 YES 来使多点触摸事件生效。 转自:WebFrogs 的博客

优秀的个人博客,低调大师

python-opencv学习笔记(二)

图像与原始字节之间的转换:从概念上,一个字节能表示0到255的整数,通常一个像素每个通道由一个字节表示。一个OpenCV图像是.array类型的二维或者三维数组。8位的灰度图像是一个含有字节值得二维数组。一个24位的BGR图像是一个三维数组,也包含了字节值,可以使用表达式访问这些值,如image[0,0]或者image[0,0,0]。第一个值表示y坐标,第二个值表示x坐标,第三个值为颜色通道。还可以使用image.item((0,0))或image.setitem((0,0),128)来访问像素和对像素进行操作。若一幅图像的每个通道为8位,则可以将其显式转换为标准的移位Python bytearray格式: byteArray=bytearray(image) bytearray含有恰当顺序的字节,可以通过显式转换和重构,得到numpy.array形式的图像: grayImage=numpy.array(grayByteArray).reshape(height,width) bgrImage=numpy.array(bgrByteArray).reshape(height,width,3) 下面介绍一个将含有随机字节bytearray转换为灰度图像和BGR图像: import cv2 import numpy as np import os randomByteArray=bytearray(os.urandom(120000)) flatNumpyArray=np.array(randomByteArray) grayImage=flatNumpyArray.reshape(300,400) cv2.imwrite('RandomGray.png',grayImage) bgrImage=flatNumpyArray.reshape(100,400,3) cv2.imwrite('RandomColor.png',bgrImage) 结果产生灰度图:和彩色图像:使用numpy.random.randint(0,256,120000).reshape(300,400)也可以并更加高效地生成Numpy数组。使用numpy.array访问图像数据:y.array结构针对数组操作有很好地优化,允许(bulk)操作。.array操作再OpenCV图像处理中会很方便使用,如对BGR图像的某一像素点进行操作,转换为白色像素点: import cv2 import numpy as np img=cv2.imread('time.jpg') img[0,0]=[255,255,255] cv2.imshow('1',img) cv2.waitKey() 用numpy.array函数来转换数组比普通的Python数组转换要快得多。方法: import cv2 import numpy as np img=cv2.imread('time.jpg') print(img.item(150,120,0)) img.itemset((150,120,0),255) print(img.item((150,120,0))) 使用numpy.array的原因:numpy.array处理这类问题进过很好地优化;通过Numpy的方法代码可读性更强。下面是对通道的操作,指定某一通道的所有值置为0: import cv2 import numpy as np img=cv2.imread('time.jpg') img[:,:,1]=0 cv2.imshow('1',img) cv2.waitKey() 注意:通过循环操作来处理Python数组的效率非常低,尽量避免;使用数组索引可以高效地操作像素,像素操作是一个高代价的低效操作,特别是在处理视频图像时,可用索引来解决这个问题。通过NumPy数组的索引访问原始图像:设置感兴趣区域(Region Of Interest ,ROI): import cv2 import numpy as np img=cv2.imread('time.jpg') my_roi=img[0:100,0:100] img[300:400,300:400]=my_roi cv2.imshow('1',img) cv2.waitKey() 要确保这两个区域大小相同。numpy.array获取图像的属性: import cv2 import numpy as np img=cv2.imread('time.jpg') print(img.shape) print(img.size) print(img.dtype) 结果: (1080, 1920, 3) 6220800 uint8 其中三个属性为:Shape:NumPy返回包含宽度,高度和通道数的数组,在调试图像类型调试时有用,如果图像是单色或灰度的,将不包含通道值。Size:该属性是指图像像素的大小Dtype:该属性会得到图像的数据类型(通常为一个无符号整数型的变量和该类型占的位数,比如uint8类型)

优秀的个人博客,低调大师

Python-OpenCV学习笔记(六)

颜色色域: 灰度色域,除去彩色信息将其转换成灰阶,灰度色域对中间处理有效,如人脸检测 BGR :每个像素点都是有一个三元数组来表示-HSV,H(Hue)色调,S(saturation)饱和度,V(Value)亮度 傅里叶变换:傅里叶变换可以区分图像哪里变换强,哪里变换不强,标记噪声区域,感兴趣区域,前景和背景等。在Python的Numpy中有快速傅里叶变换(FFT)包,其中包含了fft2()函数。图像的幅度谱是另一种图像,幅度谱呈现了原始图像在变化方面的一种表示:把一幅图像中明亮的像素放到图像中间,然后逐渐变暗,在边缘上的罪案,可以发现亮暗像素的分布及百分比。高通滤波器:例子: import cv2 import numpy as np from scipy import ndimage kernel_3x3 = np.array([[-1, -1, -1], [-1, 8, -1], [-1, -1, -1]]) kernel_5x5 = np.array([[-1, -1, -1, -1, -1], [-1, 1, 2, 1, -1], [-1, 2, 4, 2, -1], [-1, 1, 2, 1, -1], [-1, -1, -1, -1, -1]]) img = cv2.imread("time.jpg", 0) k3 = ndimage.convolve(img, kernel_3x3) k5 = ndimage.convolve(img, kernel_5x5) blurred = cv2.GaussianBlur(img, (17,17), 0) g_hpf = img - blurred cv2.imshow("3x3", k3) cv2.imshow("5x5", k5) cv2.imshow("g_hpf", g_hpf) cv2.waitKey() cv2.destroyAllWindows() 导入模块后,定义一个3x3和5x5的核,然后读入以灰度的形式读入图像,因为NumPy的卷积只能是一维的用SCiPy的convolve()函数来解决。边缘检测:Opencv提供了许多边缘滤波函数,包括Laplacian(),Sobel()以及Scharr()。这些函数都会将非边缘区域转为黑色,将边缘区域转换为白色或其他颜色。但缺点是容易将噪声错误地识别为边缘。所以之前一般加一些滤波器。创建filters.py import cv2 import numpy as np import scipy.interpolate def strokeEdges(src ,dst ,blurKsize=7,edgeKsize=5): if blurKsize>=3: blurredSrc=cv2.medianBlur(src,blurKsize) graySrc=cv2.cvtColor(blurredSrc,cv2.COLOR_BGR2GRAY) else: graySrc=cv2.cvtColor(src,cv2.COLOR_BGR2GRAY) cv2.Laplacian(graySrc,cv2.CV_8U,graySrc,ksize=edgeKsize) normalizedInverseAlpha=(1.0/255)*(255-graySrc) channels=cv2.split(src) for channel in channels: channel[:]=channel*normalizedInverseAlpha cv2.merge(channels,dst) Canny边缘检测:Canny边缘检测算法复杂,有五个步骤,即使用高斯滤波器对图像进行去噪,计算梯度,在边缘上使用非最大抑制(NMS),在检测到的边缘上使用双阈值去除假阳性(false positive),最后还会分析所有边缘及其之间的连接,,以保留真正的边缘并消除不明显的边缘。 import cv2 import numpy as np img=cv2.imread("time.jpg",0) cv2.imwrite("canny.jpg",cv2.Canny(img,200,300)) cv2.imshow("canny",cv2.imread("canny.jpg")) cv2.waitKey() cv2.destroyAllWindows() 轮廓检测: import cv2 import numpy as np img = np.zeros((200, 200), dtype=np.uint8) img[50:150, 50:150] = 255 ret, thresh = cv2.threshold(img, 127, 255, 0) image, contours, hierarchy = cv2.findContours(thresh, cv2.RETR_TREE, cv2.CHAIN_APPROX_SIMPLE) color = cv2.cvtColor(img, cv2.COLOR_GRAY2BGR) img = cv2.drawContours(color, contours, -1, (0,255,0), 2) cv2.imshow("contours", color) cv2.waitKey() cv2.destroyAllWindows() 代码先创造了一个200x200大小的黑色空白图像,接着在图像的中央放置一个白色方块,用到了np数组在切片上赋值的功能。接下来对对图像进行二值化操作,然后调用findContours()函数。该函数有三个参数:输入图像,层次类型和轮廓逼近方法。这个函数会修改输入图像,因此建议使用原始图像的一份拷贝(通过img.copy()来作为输入图像)。由函数返回的层次树相当重要:cv2.RETR_TREE参数会得到图形中的轮廓的整体层次结构,以此来建立轮廓之间的“关系”。如果只想用到最外面的轮廓,可以用到cv2.RETR_EXTERNAL。这对消除包含在其他轮廓中的轮廓有用。findContours()函数有三个返回值:修改后的图像,图像轮廓以及层次

优秀的个人博客,低调大师

Python-OpenCV学习笔记(五)

使用managers.CaptureManager提取视频流CaptureManager类能对异性差异进行抽象,并提供了更加高级的接口从获取流中分配图像,再将图像分配到一个或多个输出中(如图像文件、视频文件或窗口)。在VideoCapture类中初始化CaptureManager类,在应用程序主循环的每一次迭代中通常应调用CaptureManager中的enterFrame()和exitFrame()函数。在调用enterFrame()和exitFrame()函数之间,应用程序可能会设定通道属性并获取帧属性。通道属性的初始值为0.只有在多台摄像头的情况下,通道属性的初始值非0,。帧属性是调用enterFrame()函数时与当前通道状态对应的图像。可能会经常调用CapTureManager类的writeImage(),startWritingVideo()和stopWritingVideo()函数。在调用exitFrame()函数之前,会有延迟写入文件。并且,在调用existFrame()函数过程中,帧属性可能会在窗口中显示,这取决于应用程序代码是将WindowManager类作为CaptureManager的构造函数参数还是设置previewWindowManager属性。如果应用程序代码处理了帧属性,那么在记录文件和窗口中会有所体现。CaptureManager类有一个称为shouldMirrorPreview的构造函数参数和属性,如果想要帧在窗口中镜像,但不记录在文件中,可将shouldMirrorPreciew设置为True。Opencv不能为摄像头提供准确的帧速率。解决这个问题的方法是通过帧计数器和Python标准的time.time()函数来估计帧数率。创建一个名为managers.py,该文件包含了CaptureM的实现,这各实现结果很长分成几段,先导入包、构造函数和属性: import cv2 import numpy import time class CaptureManager(object): def __init_(self,capture,previewWindowManager=None,shouldMirrorPreview=False): self.previewWindowManager=previewWindowManager self.shouldMirrorPreview=shouldMirrorPreview self._capture=capture self._channel=0 self._enteredFrame=False self._frame=None self._imageFilename=None self._videoFilename=None self._videoEncoding=None self._videoWriter=None self._startTime=None self._framesElapsed=numpy.long(0) self._fpsEstimate=None def channel(self): return self._channel def frame(self): if self._enteredFrame and self._frame is None: _,self._frame=self._capture.retyieve() return self._frame def isWritingImage(self): return self._imageFilename is not None def isWritingVideo(self): return self._videoFilename is not None 大多数成员变量为非公有变量,这类变量名前会加一个下划线进行标识。这些非公有变量与当前帧的状态以及文件写入操作有关。Python没有石油成员变量的概念,通常在变量前面加单/双下划线来表示私有变量。通常在Python中,以单下划线开始的成员变量称为保护变量,而异双下划线开始的变量称为私有成员变量。 def enterFrame(self): assert not self._enteredFrame if self._capture is not None: self._enteredFrame=self._capture.grab() def exitFrame(self): if self.frame is None: self._enteredFrame=False return if self._enteredFrame==0: self._startTime=time.time() else: timeElapsed=time.time()-self._startTime self._fpsEstimate=self._framesElapsed/timeElapsed self._framesElapsed+=1 if self.previewWindowManager is not None: if self.shouldMirrorPreview: mirroredFrame=numpy.fliplr(self._frame).copy() self.previewWindowManager.show(mirroredFrame) else: self.previewWindowManager.show(self._frame) if self.isWritingImage: cv2.imwrite(self._imageFilename,self._frame) self._imageFilename=None self._videoWriter() self._frame=None self._enteredFrame=False enterFrame()的实现只能(同步)获取一帧,而且会推出从一个通道获取,以便随后能从变量frame中读取。exitFrame()函数可以从当前通道获取图像、估计帧速率、通过窗口管理器显示图像,执行暂停的请求,从而向文件中写入图像。 def writeImage(self,fileneme): self._imageFilename=fileneme def startWritingVideo(self,filename,encoding=cv2.VideoWriter_fourcc('I','4','2','0')): self._videoFilename=filename self._videoEncoding=encoding def stopWritingVideo(self): self._videoFilename=None self._videoEncoding=None self._videoWriter=None def _writeVideoFrame(self): if not self.isWritingVideo: return if self._videoWriter is None: fps=self._capture.get(cv2.CAP_PROP_FPS) if fps==0.0: if self._framesElapsed<20: return else: fps=self._fpsEstimate size=(int(self._capture.get(cv2.CAP_PROP_FRAME_WIDTH)), int(self._capture.get(cv2.CAP_PROP_FRAME_HEIGHT))) self._videoWriter=cv2.VideoWriter( self._videoFilename,self._videoEncoding,fps,size ) self._videoWriter.write(self._frame) writeImage(),startWritingVideo()和stopWritingVideo()是公有函数,简单地记录了文件的写入操作参数,实际写入会推迟到下一下exitFrame()函数。

优秀的个人博客,低调大师

python-opencv学习笔记(三)

Opencv提供了VideoCapture类和VideoWriter类来支持各种格式的视频文件。在到达视频文件末尾之前VideoCapture类可以通过read()函数来获取新的帧,每一帧是一幅BGR格式的图像。可将一幅传递给VideoWriter类的write()函数,该函数会将这幅图像加到VideoWriter类所指向的文件中下面是一个例子,读取MP4文件,并采用YUV颜色编码将其写入另一帧中: import cv2 videoCapture=cv2.VideoCapture('myvid.mp4') fps=videoCapture.get(cv2.CAP_PROP_FPS) size=(int(videoCapture.get(cv2.CAP_PROP_FRAME_WIDTH)), int(videoCapture.get(cv2.CAP_PROP_FRAME_HEIGHT))) videoWriter=cv2.VideoWriter( 'MyOutPut.avi',cv2.VideoWriter_fourcc('I','4','2','0'),fps,size ) success,frame=videoCapture.read() while success: videoWriter.write(frame) success,frame=videoCapture.read() 要注意:必须要为VideoWriter类的构造函数指定视频文件名,这个文件名对应的文件若存在,会被覆盖。也必须指定视频编解码器。编解码器的可能性根据系统不同而不同: cv2.VideoWriter_fourcc(‘I’,‘4’,‘2’,‘0’):该选项是一个未压缩的YUV颜色编码,是4:2:0色度子采集。这种编码兼容性较好,但文件较大,扩展名为.avi cv2.VideoWriter_foucc('P','I','M','I'):该选项是MPEG-1编码类型,扩展名为.avi cv2.VideoWriter_foucc('X','V','I','D'):该选项是MPEG-4编码类型,如果希望得到的视频大小为平均值,推荐使用此选项,文件扩展名.avi cv2.VideoWriter_foucc('T','H','E','O'):该选项Ogg Vorbis,文件扩展名应为.ogv。 cv2.VideoWriter_foucc('F','L','V','I'):该选项是一个Flash视频,文件扩展名应为.flv帧速率和帧大小也应该指定,因为需要从另一个视频复制视频帧,这些属性可以通过VideoCapture类的get()函数得到。 捕获摄像头帧:VideoCapture类可以获得摄像头的帧流。但对摄像头而言,通常不是用视频的文件名来构造VideoCapture类,而是需要传递摄像头的设备索引(device index)。 import cv2 cameraCapture=cv2.VideoCapture(0) fps=30 size=(int (cameraCapture.get(cv2.CAP_PROP_FRAME_WIDTH)), int (cameraCapture.get(cv2.CAP_PROP_FRAME_HEIGHT))) videoWriter=cv2.VideoWriter( 'MyOutPutVid.avi',cv2.VideoWriter_fourcc('I','4','2','0'), fps,size ) success,frame=cameraCapture.read() numFramesRemaining=10*fps-1 while success and numFramesRemaining>0: videoWriter.write(frame) success,frame=cameraCapture.read() numFramesRemaining -=1 cameraCapture.release() 但VideoCapture类的get()方法不能返回摄像头速率的准确值,总是返回0。为了针对摄像头创建合适的VideoWriter类,要么对帧数率做出假设,要么使用计时器来测量,后一种更加好一些。摄像头的数目和顺序系统决定。但OpenCV没有提供任何查询摄像头数目和属性的方法。如果使用无效索引构造了VideoCapture类,就不会得到帧,VideoCapture的read()函数会返回(false,None)。为了不让read()函数从没有正确打开的VideoCapture类中获取数据,可在执行该函数之后使用VideoCa.isOpened方法一个判断,该方法返回一个Boolean值。当需要同步一组摄像头或多头(multihead)摄像头(例如立体摄像头或kinect)时,read()不合适,可用grab()和retrive()代替,可使用以下代码: success0=cameraCaputer0.grad() success1=cameraCapture1.grad() if success0 and success1: frame0=cameraCapture0.retrive() frame1=cameraCapture1.retrive()

优秀的个人博客,低调大师

Python-OpenCV学习笔记(四)

用imshow()显示一幅图像: import cv2 import numpy as np img=cv2.imread('time.jpg') cv2.imshow('mytest',img) cv2.waitKey() cv2.destroyAllWindows() imshow()函数有两个参数:显示图像的窗口以及要显示的图像本身。在窗口显示摄像头帧:OpenCV的namedWindeow(),imshow()和DestrWindeow()函数允许指定函数名来创建,显示和销毁(destroy)窗口。通过waitKey()函数来获取键盘输入,通过setMouseCallback()函数获取鼠标输入:下面是获取摄像头图像的程序: import cv2 clicked=False def onMouse(event,x,y,flags,param): global clicked if event==cv2.EVENT_LBUTTONUP: clicked=True cameraCapture=cv2.VideoCapture(0) cv2.namedWindow('test') cv2.setMouseCallback('test',onMouse) print('Showing camera feed .Clike window or press any key to stop') success,frame=cameraCapture.read() while success and cv2.waitKey(1)==-1 and not clicked: cv2.imshow('test',frame) success,frame=cameraCapture.read() cv2.destroyWindow('test') cameraCapture.release() waitkey()的参数等待键盘触发时间,单位为毫秒,其返回值为-1(表示没有键被按下)或ASCII码。Python提供一个ord()函数可以将字符转换为ASCII码。例如,输入ord('a')会返回97。Opencv的窗口函数和waitKey()函数相互依赖。Opencv的窗口只有在调用waitKey()函数是才会更新,waitKey()函数只有在Opencv1窗口称为活动窗口时才能捕输入信息。鼠标毁掉函数setMouseCallback()有五个参数,param为可选参数,它是setMouseCallback()函数的第三个参数,默认下参数是0.回调事假参数时间可以如下取值,他们分别对应的鼠标事件: cv2.EVENT_MOUSEMOVE:鼠标移动 cv2.EVENT_LBUTTONDOWN:鼠标左键按下 cv2.EVENT_RBUTTONDOWN:鼠标右键按下 cv2.EVENT_MBUTTONDOWN:鼠标中间键按下 cv2.EVENT_LBUTTONUP:鼠标左键松开 cv2.EVENT_RBUTTONUP:鼠标右键松开 cv2.EVENT_MBUTTONUP:鼠标中间键松开 cv2.EVENT_LBUTTONDBLCLK:双击鼠标左键 cv2.EVENT_RBUTTONDBLCLK:双击鼠标右键 cv2.EVENT_MBUTTONDBLCLK:双击鼠标中间键 鼠标回调的标志参数可能是以下时间的按位组合: cv2.EVNET_FLAG_LBUTTON:事件对应按下鼠标左键 cv2.EVNET_FLAG_RBUTTON:事件对应按下鼠标右键 cv2.EVNET_FLAG_MBUTTON:事件对应按下鼠标中间键 cv2.EVNET_FLAG_CTRLKEY:事件对应按下Ctrl键 cv2.EVNET_FLAG_SHIFTKEY:事件对应按下Shift键 cv2.EVNET_FLAG_ALTKEY:事件对应按下Alt键 Opencv不提供任何处理窗口事件的方法,如单击窗口的关闭按钮时,并不能关闭程序。Cameo项目简介:针对不同场景,Opencv应用的一般套路:先创建一个抽象层,然后通过一个应用来构建学习OpenCV的框架,但每一步都会设计该应用的一个组件(component),以使该应用具有扩展性。Cameo——面向对象的设计在应用中将I/O代码与应用程序代码分离会变得更加方便。可创建CaptureManager类和WindowManager类作为高级的I/O流接口。在应用程序的代码中可以使用CaptureManager来读取新的帧,并将帧分派到一个或多个输出中,这些包括静止的图像文件,视频文件以及窗口(通过WindowManager类实现)WindowManager类使应用程序代码能以面对对象的形式处理窗口和事件。CaptureManager和WindowManager都具有可扩展性,实现不用依赖OpenCV的I/O。

优秀的个人博客,低调大师

学习笔记:Docker页面管理平台

Docker Shipyard是什么 ?shipyard是一个开源的docker管理平台,其特性主要包括: 支持节点动态集群,可扩展节点的规模(swarm、etcd方案) 支持镜像管理、容器管理、节点管理等功能 可视化的容器管理和监控管理 在线容器console终端 容器管理 镜像管理 节点管理 容器内部管理 还有很多很好的功能,安装完毕后可以自行探索发现 如何安装? 本文都是A,B节点为模型,A节点是管理节点,B节点只作为node节点 1.在A,B节点上安装docker yum install docker 2.在A,B节点上安装swarm docker pull swarm 3.A节点上安装shipyard curl -s https://shipyard-project.com/deploy | bash -s 注意会用到8080端口,形成页面的管理系统 Username: admin Password: shipyard 4.B节点安装Node curl -sSL https://shipyard-project.com/deploy | ACTION=node DISCOVERY=etcd://A节点IP地址:4001 bash -s 5.测试使用 登陆http://A节点IP地址:8080/ Username: admin Password: shipyard tips: 如果遇到了curl: (35) Peer reports incompatible or unsupported protocol version.的提示请更新下软件就可以解决 命令如下: yum update nss nss-util nspr

优秀的个人博客,低调大师

python-opencv学习笔记(一)

谷歌大热的深度学习框架tensorflow,虽然也有C的接口,但用的比较多而且较方便的还是基于python的接口,在图像处理时用的比较多的是opencv库,之前一直学的是C语言的接口,为了与tensorflow进行对接,还是有必要看一下opencv的python接口。基本的I/O脚本:大多数的CV需要以图像作为输入,同时也会以图像作为输出结果。一个交互式的CV应用程序会议摄像头作为输入源,其他的输入和输出还看是图像文件,视频文件和原始字节(raw byte)。图像的读写:OPENCV中的imread()函数和imwrite()函数能支持各种静态文件格式,支持BMP、PNG、JPEG和TIFF格式的文件。接下来是用Python和NumPy来表示一副图片:无论用那种格式,每一个像素都会有一个值,但不同格式表示像素的方式会不同,如用NumPy数组创建一个黑色的正方形图像: import cv2 import numpy as np img=np.zeros((3,3),dtype=np.uint8) print(img) 结果: [[0 0 0] [0 0 0] [0 0 0]] 每个像素都由一个8位整数老表示,即每个像素值得范围为0~255.现在用cv2.cvtColor函数将图像转换成RGB格式: import cv2 import numpy as np img=np.zeros((3,3),dtype=np.uint8) img=cv2.cvtColor(img,cv2.COLOR_GRAY2BGR) print(img) 结果: [[[0 0 0] [0 0 0] [0 0 0]] [[0 0 0] [0 0 0] [0 0 0]] [[0 0 0] [0 0 0] [0 0 0]]] 从几个中看出:现在每个像素由三元数组表示,并且每个整形(integer)向量分别表示一个B,G,R通道。其他色彩空间(如HSV)也以同样的表示方式来表示像素,只是取值范围不同(HSV模型表示方式不同),可以通过shape的属性来查看图像的结构,它会返回行和列。如果一个通道以上会返回通道数: import cv2 import numpy as np img=np.zeros((3,3),dtype=np.uint8) print(img.shape) img=cv2.cvtColor(img,cv2.COLOR_GRAY2BGR) print(img.shape) 结果: (3, 3) (3, 3, 3) BGR格式返回了3个通道;opencv库对图像的转换也非常方便: import cv2 img=cv2.imread('time.jpg') cv2.imwrite('mytime.png',img) 只需在imwrite()时改变图片的后缀就行了,在默认情况下,即使图像文件为灰度格式,imread()函数也会返回BGR格式的图像,BGR与RGB所表示的色彩空间相同,但字节顺序相反。下面是可作为imread()函数的参数: IMREAD_ANYCOLOR=4 IMREAD_ANYDEPTH=2 IMREAD_COLOR=1 IMREAD_GRAYSCALE=0 IMREAD_LOAD_GDAL=8 IMREAD_UNCHANGED=-1 下面例子是以灰度形式加载图片(这个过程会丢失所有的色彩信息),之后又保持为灰度的PNG图像: import cv2 img=cv2.imread('mytime.png',cv2.IMREAD_GRAYSCALE) cv2.imwrite('mytime2.png',img) 原图像:转换后的图片:无论采用哪种模式,imread()函数会删除所有alpha(透明度)通道的信息。iimwrite()函数要求图像为BGR或灰度格式,并且每个通道都要有一定bit,输出格式要支持这些通道,例如,bmp格式要求每个通道为8位,而PNG允许每个通道为8位或16位。

资源下载

更多资源
Mario

Mario

马里奥是站在游戏界顶峰的超人气多面角色。马里奥靠吃蘑菇成长,特征是大鼻子、头戴帽子、身穿背带裤,还留着胡子。与他的双胞胎兄弟路易基一起,长年担任任天堂的招牌角色。

Rocky Linux

Rocky Linux

Rocky Linux(中文名:洛基)是由Gregory Kurtzer于2020年12月发起的企业级Linux发行版,作为CentOS稳定版停止维护后与RHEL(Red Hat Enterprise Linux)完全兼容的开源替代方案,由社区拥有并管理,支持x86_64、aarch64等架构。其通过重新编译RHEL源代码提供长期稳定性,采用模块化包装和SELinux安全架构,默认包含GNOME桌面环境及XFS文件系统,支持十年生命周期更新。

Sublime Text

Sublime Text

Sublime Text具有漂亮的用户界面和强大的功能,例如代码缩略图,Python的插件,代码段等。还可自定义键绑定,菜单和工具栏。Sublime Text 的主要功能包括:拼写检查,书签,完整的 Python API , Goto 功能,即时项目切换,多选择,多窗口等等。Sublime Text 是一个跨平台的编辑器,同时支持Windows、Linux、Mac OS X等操作系统。

WebStorm

WebStorm

WebStorm 是jetbrains公司旗下一款JavaScript 开发工具。目前已经被广大中国JS开发者誉为“Web前端开发神器”、“最强大的HTML5编辑器”、“最智能的JavaScript IDE”等。与IntelliJ IDEA同源,继承了IntelliJ IDEA强大的JS部分的功能。

用户登录
用户注册