首页 文章 精选 留言 我的

精选列表

搜索[环境],共10000篇文章
优秀的个人博客,低调大师

CentOS7搭建lamp环境

Mysql安装 CentOS 7 版本将MySQL数据库软件从默认的程序列表中移除,用mariadb代替了。MariaDB数据库管理系统是MySQL的一个分支,主要由开源社区在维护,采用GPL授权许可。开发这个分支的原因之一是:甲骨文公司收购了MySQL后,有将MySQL闭源的潜在风险,因此社区采用分支的方式来避开这个风险。MariaDB的目的是完全兼容MySQL,包括API和命令行,使之能轻松成为MySQL的代替品。 [root@localhost ~]# yum install mariadb-server mariadb [root@localhost ~]# yum install mysql-devel [root@localhost ~]# systemctl restart mariadb#重启Mysql [root@localhost ~]# mysql#进入Mysql Welcome to the MariaDB monitor. Commands end with ; or \g. Your MariaDB connection id is 4 Server version: 5.5.56-MariaDB MariaDB Server Copyright (c) 2000, 2017, Oracle, MariaDB Corporation Ab and others. Type 'help;' or '\h' for help. Type '\c' to clear the current input statement. MariaDB [(none)]>set password for 'root'@'localhost' =password('password'); #设置密码 Query OK, 0 rows affected (0.00 sec) MariaDB [(none)]> quit#退出 Bye [root@localhost ~]# maraidb -u root -p123456#再次进入Mysql 123456为我设置的密码 [root@localhost ~]# mysql --version#查看版本信息 mariadb数据库的相关命令是: systemctl start mariadb #启动MariaDB systemctl stop mariadb #停止MariaDB systemctl restart mariadb #重启MariaDB systemctl enable mariadb #设置开机启动 安装Apache [root@localhost ~]# yum install httpd [root@localhost ~]# httpd -v#查看版本信息 安装php 一、删除旧版本 如果已经安装过php就先删除之前的版本。检查方法如下: yum list installed | grep php 然后将安装的包进行删除 比如 yum remove php.x86_64 php-cli.x86_64 php-common.x86_64 php-gd.x86_64 php-ldap.x86_64也可直接 yum remove php* 具体根据显示的安装列表的名称进行相应的删除 二、安装新版版 1. 更新yum安装包 CentOS 7.x rpm -Uvh https://mirror.webtatic.com/yum/el7/epel-release.rpm rpm -Uvh https://mirror.webtatic.com/yum/el7/webtatic-release.rpm CentOS 6.x rpm -Uvh http://mirror.webtatic.com/yum/el6/latest.rpm CentOS 5.x rpm -Uvh http://mirror.webtatic.com/yum/el5/latest.rpm 2. 通过云进行php和其他组件的安装 yum install php70w.x86_64 php70w-cli.x86_64 php70w-common.x86_64 php70w-gd.x86_64 php70w-ldap.x86_64 php70w-mbstring.x86_64 php70w-mcrypt.x86_64 php70w-mysql.x86_64 php70w-pdo.x86_64 yum install php70w-fpm 其他需要的组件在自行安装。 三、其他版本php安装 如果想安装php5.5或者5.6版本,将上面的php70w替换为php55w或者php56w就可以了。 查看版本信息 [root@localhost ~]# php -v PHP 7.0.24 (cli) (built: Sep 30 2017 10:10:28) ( NTS ) Copyright (c) 1997-2017 The PHP Group Zend Engine v3.0.0, Copyright (c) 1998-2017 Zend Technologies 四,添加配置信息 [root@localhost ~]# cd /var/www/html/ [root@localhost html]#vim index.php <?php phpinfo(); ?> 五,重启httpd [root@localhost ~]# systemctl restart httpd

优秀的个人博客,低调大师

elk单台环境搭建(1)

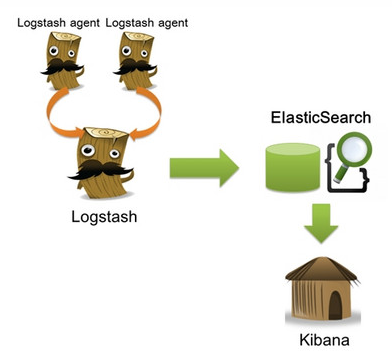
一、简介 1、核心组成 ELK由Elasticsearch、Logstash和Kibana三部分组件组成; Elasticsearch是个开源分布式搜索引擎,它的特点有:分布式,零配置,自动发现,索引自动分片,索引副本机制,restful风格接口,多数据源,自动搜索负载等。 Logstash是一个完全开源的工具,它可以对你的日志进行收集、分析,并将其存储供以后使用 Kibana是一个基于浏览器页面的Elasticsearch前端展示工具。Kibana全部使用HTML语言和Javascript编写的 2、组件作用 Logstash: logstash server端用来搜集日志; Elasticsearch: 存储各类日志; Kibana: web化接口用于查询和可视化日志; 3、ELK工作流程 在需要收集日志的所有服务上部署logstash,作为logstash agent(logstash shipper)用于监控并过滤收集日志,然后通过logstash indexer将日志收集在一起交给全文搜索服务ElasticSearch,可以用ElasticSearch进行自定义搜索通过Kibana 来结合自定义搜索进行页面展示。 二、下载所需软件 wgethttp://download.oracle.com/otn-pub/java/jdk/8u45-b14/jdk-8u45-linux-x64.tar.gz wgethttps://download.elastic.co/elasticsearch/elasticsearch/elasticsearch-1.7.2.tar.gz wgethttps://download.elastic.co/kibana/kibana/kibana-4.1.2-linux-x64.tar.gz wgethttps://download.elastic.co/logstash/logstash/logstash-1.5.4.tar.gz 三、安装步骤 1、首先安装jdk 安装jdk-8u45-linux-x64 root身份登录系统 将jdk-8u45-linux-x64.tar.gz拷贝到/opt下面 cd /opt tar zxvf jdk-8u45-linux-x64.tar.gz 解压后 生成的文件名字叫做jdk-8u45 vim /etc/profile 把如下代码放到文件的最后面 export JAVA_HOME=/opt/jdk-8u45 export JAVA_BIN=/opt/jdk-8u45/bin export JRE_HOME=$JAVA_HOME/jre export CLASSPATH=.:$JAVA_HOME/lib/dt.jar:$JAVA_HOME/lib/tools.jar:$JRE_HOME/lib/rt.jar export PATH=$PATH:$JAVA_HOME/bin:$JRE_HOME/bin export JAVA_HOME JAVA_BIN PATH CLASSPATH source /etc/profile 2、安装Logstash tar –zxf logstash-1.5.2.tar.gz -C /usr/local/ 安装完成后运行如下命令: /usr/local/logstash-1.5.2/bin/logstash agent -f logstash-test1.conf # /usr/local/logstash-1.5.2/bin/logstash -e 'input { stdin { } } output { stdout {} }' Logstash startup completed this is test! 2015-07-15T03:28:56.938Z dell-09 this is test! 我们可以看到,我们输入什么内容logstash按照某种格式输出,其中-e参数参数允许Logstash直接通过命令行接受设置。这点尤其快速的帮助我们反复的测试配置是否正确而不用写配置文件。使用CTRL-C命令可以退出之前运行的Logstash。 使用-e参数在命令行中指定配置是很常用的方式,不过如果需要配置更多设置则需要很长的内容。这种情况,我们首先创建一个简单的配置文件,并且指定logstash使用这个配置文件。例如:在logstash安装目录(/usr/local/logstash-1.5.2)下创建一个“基本配置”测试文件logstash-test.conf,文件内容如下: # cat logstash-test.conf input { stdin { } } output { stdout { codec=> rubydebug } } Logstash使用input和output定义收集日志时的输入和输出的相关配置,本例中input定义了一个叫"stdin"的input,output定义一个叫"stdout"的output。无论我们输入什么字符,Logstash都会按照某种格式来返回我们输入的字符,其中output被定义为"stdout"并使用了codec参数来指定logstash输出格式。 3、安装Elasticsearch # tar -zxf elasticsearch-1.6.0.tar.gz -C /usr/local/ 启动Elasticsearch两种方式: # /usr/local/elasticsearch-1.6.0/bin/elasticsearch # nohup /usr/local/elasticsearch-1.6.0/bin/elasticsearch >nohup & 后台启动 验证及确认elasticsearch的9200端口已监听,说明elasticsearch已成功运行 [root@dell-09 tmp]# ss -tunpl |grep 9200 tcp LISTEN 0 50 :::9200 :::* users:(("java",16633,99)) 接下来我们在logstash安装目录下创建一个用于测试logstash使用elasticsearch作为logstash的后端的测试文件logstash-test.conf,该文件中定义了stdout和elasticsearch作为output,这样的“多重输出”即保证输出结果显示到屏幕上,同时也输出到elastisearch中。 catlogstash-test-simple.conf input{stdin{}} output{ elasticsearch{host=>"localhost"} stdout{codec=>rubydebug} } /usr/local/logstash-1.5.2/bin/logstash agent -f logstash-test-simple.conf Logstash startup completed es logstash #手动添加 { "message" => "es logstash", "@version" => "1", "@timestamp" => "2016-12-06T01:58:49.672Z", "host" => "dell-09" } 验证 使用curl命令发送请求来查看ES是否接收到了数据: curl 'http://localhost:9200/_search?pretty' 如果看到上图内容说明已经可以用Elasticsearch和Logstash来收集日志数据了。 4、安装elasticsearch插件 Elasticsearch-kopf插件可以查询Elasticsearch中的数据,安装elasticsearch-kopf,只要在你安装Elasticsearch的目录中执行以下命令即可: # cd /usr/local/elasticsearch-1.7.2/bin # ./plugin -install lmenezes/elasticsearch-kopf 访问kopf: http://10.193.1.86:9200/_plugin/kopf/#!/nodes 5、安装Kibana # tar -zxf kibana-4.1.1-linux-x64.tar.gz -C /usr/local/ 启动kibana # /usr/local/kibana-4.1.1-linux-x64/bin/kibana 使用http://localhost:5601访问Kibana,登录后,首先,配置一个索引,默认,Kibana的数据被指向Elasticsearch,使用默认的logstash-*的索引名称,并且是基于时间的,点击“Create”即可。然后点击discover 如图: note: 碎碎念: ①单机的elk到这基本已经完成了,主要部署思路还是在需要收集日志的所有服务上部署logstash,作为logstash agent(logstash shipper)用于监控并过滤收集日志,然后logstash indexer将日志收集在一起交给全文搜索服务ElasticSearch,可以用ElasticSearch进行自定义搜索通过Kibana 来结合自定义搜索进行页面展示。 ②如果生产服务器过多,有很多日志处理的话建议用zookeeper+kafka+elk …… 本文转自卫庄的痛 51CTO博客,原文链接:http://blog.51cto.com/crfsz/1879858,如需转载请自行联系原作者

资源下载

更多资源
腾讯云软件源

腾讯云软件源

为解决软件依赖安装时官方源访问速度慢的问题,腾讯云为一些软件搭建了缓存服务。您可以通过使用腾讯云软件源站来提升依赖包的安装速度。为了方便用户自由搭建服务架构,目前腾讯云软件源站支持公网访问和内网访问。

Nacos

Nacos

Nacos /nɑ:kəʊs/ 是 Dynamic Naming and Configuration Service 的首字母简称,一个易于构建 AI Agent 应用的动态服务发现、配置管理和AI智能体管理平台。Nacos 致力于帮助您发现、配置和管理微服务及AI智能体应用。Nacos 提供了一组简单易用的特性集,帮助您快速实现动态服务发现、服务配置、服务元数据、流量管理。Nacos 帮助您更敏捷和容易地构建、交付和管理微服务平台。

Rocky Linux

Rocky Linux

Rocky Linux(中文名:洛基)是由Gregory Kurtzer于2020年12月发起的企业级Linux发行版,作为CentOS稳定版停止维护后与RHEL(Red Hat Enterprise Linux)完全兼容的开源替代方案,由社区拥有并管理,支持x86_64、aarch64等架构。其通过重新编译RHEL源代码提供长期稳定性,采用模块化包装和SELinux安全架构,默认包含GNOME桌面环境及XFS文件系统,支持十年生命周期更新。

WebStorm

WebStorm

WebStorm 是jetbrains公司旗下一款JavaScript 开发工具。目前已经被广大中国JS开发者誉为“Web前端开发神器”、“最强大的HTML5编辑器”、“最智能的JavaScript IDE”等。与IntelliJ IDEA同源,继承了IntelliJ IDEA强大的JS部分的功能。


用户登录
用户注册