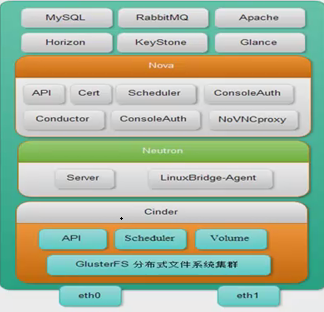
2-openstack基础环境准备
说明: linux-node1 控制节点 linux-node2 计算节点 2.1.两台centos7服务器 1 2 3 4 5 主机名: [root@linux-node1~] #hostname linux-node1 [root@linux-node2~] #hostname linux-node2 1 2 3 IP: linux-node1192.168.56.11 /24 linux-node2192.168.56.12 /24 1 2 3 4 5 6 host解析 cat /etc/hosts 127.0.0.1localhostlocalhost.localdomainlocalhost4localhost4.localdomain4 ::1localhostlocalhost.localdomainlocalhost6localhost6.localdomain6 192.168.56.11linux-node1linux-node1.oldboyedu.com 192.168.56.12linux-node2linux-node2.oldboyedu.com 2.2 selinux 和防火墙关闭 1 2 3 4 5 6 7 8 9 [root@linux-node2~] #getenforce Disabled [root@linux-node1~] #getenforce Disabled #可以用sed sed -i '/SELINUX/s/enforcing/disabled/' /etc/selinux/config 防火墙: systemctlstopfirewalld systemctldisablefirewalld 2.3 配置时间同步(两台都做) 1 2 3 4 5 6 yum–y install chrony grep "allow" /etc/chrony .conf #打开 allow192.168 /16 systemctl enable chronyd.service #设置开机自启 systemctlstartchronyd.service #启动 timedatectl set -timezoneAsia /Shanghai #同步时区 2.4 在linux-node1 上安装数据库 1 2 3 4 5 6 7 8 9 10 11 yum install -ymariadbmariadb-serverMySQl-python #安装数据库 \ cp /usr/share/mysql/my-medium .cnf /etc/my .cnf #拷贝配置文件 在 vi /etc/my .cnf添加如下几行 [mysqld] default-storage-engine=innodb #默认的存储引擎 innodb_file_per_table #使用独享的表空间 collation-server=utf8_general_ci #设置校对规则 init-connect= 'SETNAMESutf8' #设置链接的字符集 character- set -server=utf8 #设置默认的字符集 systemctl enable mariadb.service #开机启动数据库 systemctlstartmariadb.service #立马启动数据库 2.5 初始化数据库 2.6 为各个组件创建数据库并收授权 2.6.1 keystone 1 2 3 4 5 6 MariaDB[(none)]>createdatabasekeystone; QueryOK,1rowaffected(0.01sec) MariaDB[(none)]>grantallonkeystone.*to 'keystone' @ 'localhost' identifiedby 'keystonne' ; QueryOK,0rowsaffected(0.00sec) MariaDB[(none)]>grantallonkeystone.*to 'keystone' @ '%' identifiedby 'keystone' ; QueryOK,0rowsaffected(0.00sec) 2.6.2 glance 1 2 3 4 5 MariaDB[(none)]>createdatabaseglance; QueryOK,1rowaffected(0.00sec) MariaDB[(none)]>grantallonglance.*to 'glance' @ '%' identifiedby 'glance' ; QueryOK,0rowsaffected(0.00sec) MariaDB[(none)]>grantallonglance.*to 'glance' @ 'localhost' identifiedby 'glance' ; 2.6.3 nova和nova_api 1 2 3 4 5 6 7 8 9 10 11 MariaDB[(none)]>createdatabasenova; QueryOK,1rowaffected(0.00sec) MariaDB[(none)]>grantallonnova.*to 'nova' @ '%' identifiedby 'nova' ; QueryOK,0rowsaffected(0.00sec) MariaDB[(none)]>grantallonnova.*to 'nova' @ 'localhost' identifiedby 'nova' ; QueryOK,0rowsaffected(0.00sec) MariaDB[(none)]>createdatabasenova_api; QueryOK,1rowaffected(0.00sec) MariaDB[(none)]>grantallonnova_api.*to 'nova' @ 'localhost' identifiedby 'nova' ; QueryOK,0rowsaffected(0.00sec) MariaDB[(none)]>grantallonnova_api.*to 'nova' @ '%' identifiedby 'nova' ; 2.6.4 neutron 1 2 3 4 5 6 7 8 MariaDB[(none)]>createdatabaseneutron; QueryOK,1rowaffected(0.00sec) MariaDB[(none)]>grantallonneutron.*to 'neutron' @ '%' identifiedby 'neutron' ; QueryOK,0rowsaffected(0.00sec) MariaDB[(none)]>grantallonneutron.*to 'neutron' @ 'localhost' identifiedby 'neutron' ;; QueryOK,0rowsaffected(0.00sec) MariaDB[(none)]>flushprivileges; QueryOK,0rowsaffected(0.00sec) 2.6.5 检验数据库 1 2 3 4 5 6 7 8 9 10 11 12 13 14 15 16 MariaDB[(none)]>showdatabases; +--------------------+ |Database| +--------------------+ |information_schema| |glance| |keystone| |mysql| |neutron| |nova| |nova_api| |performance_schema| +--------------------+ 8rowsinset(0.00sec) MariaDB[(none)]> 2.7 安装消息队列(rabbitmq) 2.7.1 基本安装 1 2 3 4 5 6 7 8 9 10 11 yuminstallrabbitmq-server-y systemctl enable rabbitmq-server.service systemctlstartrabbitmq-server.service [root@linux-node1~] #rabbitmqctladd_useropenstackopenstack#创建消息队列认证用户 Creatinguser "openstack" ... ... done . [root@linux-node1~] # #创建的用户得授权才能使用 [root@linux-node1~] #rabbitmqctlset_permissionsopenstack".*"".*"".*"#授权用户才能使用 Settingpermissions for user "openstack" in vhost "/" ... ... done . 2.7.2 web界面安装 1 2 3 4 5 6 7 8 9 10 11 12 13 14 15 16 17 18 19 20 21 22 23 24 25 26 27 28 29 30 31 32 查看组件 [root@linux-node1~] #rabbitmq-pluginslist []amqp_client3.3.5 []cowboy0.5.0-rmq3.3.5-git4b93c2d []eldap3.3.5-gite309de4 []mochiweb2.7.0-rmq3.3.5-git680dba8 []rabbitmq_amqp1_03.3.5 []rabbitmq_auth_backend_ldap3.3.5 []rabbitmq_auth_mechanism_ssl3.3.5 []rabbitmq_consistent_hash_exchange3.3.5 []rabbitmq_federation3.3.5 []rabbitmq_federation_management3.3.5 []rabbitmq_management3.3.5 []rabbitmq_management_agent3.3.5 []rabbitmq_management_visualiser3.3.5 []rabbitmq_mqtt3.3.5 []rabbitmq_shovel3.3.5 []rabbitmq_shovel_management3.3.5 []rabbitmq_stomp3.3.5 []rabbitmq_test3.3.5 []rabbitmq_tracing3.3.5 []rabbitmq_web_dispatch3.3.5 []rabbitmq_web_stomp3.3.5 []rabbitmq_web_stomp_examples3.3.5 []sockjs0.3.4-rmq3.3.5-git3132eb9 []webmachine1.10.3-rmq3.3.5-gite9359c7 加载组件 rabbitmq-plugins enable rabbitmq_management systemctlrestartrabbitmq-server.service #重启消息队列 说明 rabbitmq监听的是5672 rabbitmq的管理界面监听的是15672 2.7.3 访问测试 默认是用户guest 密码是guest 让openstack用户拥有admistrator的权限进行登录 本文转自 小小三郎1 51CTO博客,原文链接:http://blog.51cto.com/wsxxsl/1883586,如需转载请自行联系原作者