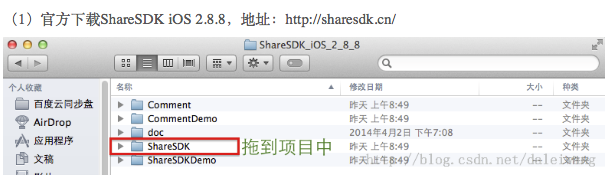
iOS:IOS项目集成ShareSDK实现第三方登录、分享、关注等功能。
原文链接:http://blog.csdn.net/daleiwang/article/details/34081231 (3)在项目的AppDelegate中一般情况下有三个操作,第一是注册ShareSDK,第二是注册各个平台的账号,第三是关于微信等应用的回调处理。 // // AppDelegate.m // ShareSDKTest // // Created by wangdalei on . // Copyright (c). All rights reserved. // #import "AppDelegate.h" #import "RootViewController.h" #import <ShareSDK/ShareSDK.h> #import "WeiboApi.h" #import <TencentOpenAPI/QQApiInterface.h> #import <TencentOpenAPI/TencentOAuth.h> #import "WXApi.h" #import <TencentOpenAPI/QQApiInterface.h> #import <TencentOpenAPI/TencentOAuth.h> @implementation AppDelegate @synthesize rootVC; - (BOOL)application:(UIApplication *)application didFinishLaunchingWithOptions:(NSDictionary *)launchOptions { self.window = [[UIWindow alloc] initWithFrame:[[UIScreen mainScreen] bounds]]; if (self.rootVC==nil) { self.rootVC = [[RootViewController alloc]initWithNibName:@"RootViewController" bundle:nil]; } UINavigationController *rootNav = [[UINavigationController alloc]initWithRootViewController:self.rootVC]; self.window.rootViewController = rootNav; self.window.backgroundColor = [UIColor whiteColor]; [self.window makeKeyAndVisible]; <span style="color:#ff0000;">[ShareSDK registerApp:@"1a2e7ab5fb6c"];</span> <span style="color:#3366ff;"> //添加新浪微博应用 注册网址 http://open.weibo.com wdl@pmmq.com 此处需要替换成自己应用的 [ShareSDK connectSinaWeiboWithAppKey:@"3201194191" appSecret:@"0334252914651e8f76bad63337b3b78f" redirectUri:@"http://appgo.cn"]; //添加腾讯微博应用 注册网址 http://dev.t.qq.com wdl@pmmq.com 此处需要替换成自己应用的 [ShareSDK connectTencentWeiboWithAppKey:@"801307650" appSecret:@"ae36f4ee3946e1cbb98d6965b0b2ff5c" redirectUri:@"http://www.sharesdk.cn" wbApiCls:[WeiboApi class]]; //添加QQ空间应用 注册网址 http://connect.qq.com/intro/login/ wdl@pmmq.com 此处需要替换成自己应用的 [ShareSDK connectQZoneWithAppKey:@"100371282" appSecret:@"aed9b0303e3ed1e27bae87c33761161d" qqApiInterfaceCls:[QQApiInterface class] tencentOAuthCls:[TencentOAuth class]]; //此参数为申请的微信AppID wdl@pmmq.com 此处需要替换成自己应用的 [ShareSDK connectWeChatWithAppId:@"wx4868b35061f87885" wechatCls:[WXApi class]]; //添加QQ应用 该参数填入申请的QQ AppId wdl@pmmq.com 此处需要替换成自己应用的 [ShareSDK connectQQWithQZoneAppKey:@"100371282" qqApiInterfaceCls:[QQApiInterface class] tencentOAuthCls:[TencentOAuth class]];</span> return YES; } - (void)applicationWillResignActive:(UIApplication *)application { // Sent when the application is about to move from active to inactive state. This can occur for certain types of temporary interruptions (such as an incoming phone call or SMS message) or when the user quits the application and it begins the transition to the background state. // Use this method to pause ongoing tasks, disable timers, and throttle down OpenGL ES frame rates. Games should use this method to pause the game. } - (void)applicationDidEnterBackground:(UIApplication *)application { // Use this method to release shared resources, save user data, invalidate timers, and store enough application state information to restore your application to its current state in case it is terminated later. // If your application supports background execution, this method is called instead of applicationWillTerminate: when the user quits. } - (void)applicationWillEnterForeground:(UIApplication *)application { // Called as part of the transition from the background to the inactive state; here you can undo many of the changes made on entering the background. } - (void)applicationDidBecomeActive:(UIApplication *)application { // Restart any tasks that were paused (or not yet started) while the application was inactive. If the application was previously in the background, optionally refresh the user interface. } - (void)applicationWillTerminate:(UIApplication *)application { // Called when the application is about to terminate. Save data if appropriate. See also applicationDidEnterBackground:. } <span style="color:#ff6600;">#pragma mark - WX回调 - (BOOL)application:(UIApplication *)application handleOpenURL:(NSURL *)url { return [ShareSDK handleOpenURL:url wxDelegate:self]; } - (BOOL)application:(UIApplication *)application openURL:(NSURL *)url sourceApplication:(NSString *)sourceApplication annotation:(id)annotation { return [ShareSDK handleOpenURL:url sourceApplication:sourceApplication annotation:annotation wxDelegate:self]; } #pragma mark - WXApiDelegate /*! @brief 收到一个来自微信的请求,第三方应用程序处理完后调用sendResp向微信发送结果 * * 收到一个来自微信的请求,异步处理完成后必须调用sendResp发送处理结果给微信。 * 可能收到的请求有GetMessageFromWXReq、ShowMessageFromWXReq等。 * @param req 具体请求内容,是自动释放的 */ -(void) onReq:(BaseReq*)req{ } /*! @brief 发送一个sendReq后,收到微信的回应 * * 收到一个来自微信的处理结果。调用一次sendReq后会收到onResp。 * 可能收到的处理结果有SendMessageToWXResp、SendAuthResp等。 * @param resp具体的回应内容,是自动释放的 */ -(void) onResp:(BaseResp*)resp{ } @end (4)信息分享。 -(IBAction)share:(id)sender{ NSString *imagePath = [[NSBundle mainBundle] pathForResource:@"card" ofType:@"png"]; //构造分享内容 id<ISSContent> publishContent = [ShareSDK content:@"分享内容测试" defaultContent:@"默认分享内容测试,没内容时显示" image:[ShareSDK imageWithPath:imagePath] title:@"pmmq" url:@"http://www.sharesdk.cn" description:@"这是一条测试信息" mediaType:SSPublishContentMediaTypeNews]; [ShareSDK showShareActionSheet:nil shareList:nil content:publishContent statusBarTips:YES authOptions:nil shareOptions: nil result:^(ShareType type, SSResponseState state, id<ISSPlatformShareInfo> statusInfo, id<ICMErrorInfo> error, BOOL end) { if (state == SSResponseStateSuccess) { NSLog(@"分享成功"); } else if (state == SSResponseStateFail) { NSLog(@"分享失败"); } }]; } (5)登录、登出、获取授权信息、关注制定微博 #import "LoginViewController.h" #import <ShareSDK/ShareSDK.h> @interface LoginViewController () -(IBAction)loginWithSina:(id)sender; -(IBAction)loginWithQQ:(id)sender; -(IBAction)loginoutWithSina:(id)sender; -(IBAction)loginoutWithQQ:(id)sender; -(IBAction)guanzhuUs:(id)sender; -(void)reloadStateWithType:(ShareType)type; @end @implementation LoginViewController - (id)initWithNibName:(NSString *)nibNameOrNil bundle:(NSBundle *)nibBundleOrNil { self = [super initWithNibName:nibNameOrNil bundle:nibBundleOrNil]; if (self) { } return self; } - (void)viewDidLoad { [super viewDidLoad]; } - (void)didReceiveMemoryWarning { [super didReceiveMemoryWarning]; } - (IBAction)loginWithSina:(id)sender { [ShareSDK getUserInfoWithType:ShareTypeSinaWeibo authOptions:nil result:^(BOOL result, id<ISSPlatformUser> userInfo, id<ICMErrorInfo> error) { NSLog(@"%d",result); if (result) { //成功登录后,判断该用户的ID是否在自己的数据库中。 //如果有直接登录,没有就将该用户的ID和相关资料在数据库中创建新用户。 [self reloadStateWithType:ShareTypeSinaWeibo]; } }]; } -(IBAction)loginWithQQ:(id)sender{ [ShareSDK getUserInfoWithType:ShareTypeQQSpace authOptions:nil result:^(BOOL result, id<ISSPlatformUser> userInfo, id<ICMErrorInfo> error) { NSLog(@"%d",result); if (result) { //成功登录后,判断该用户的ID是否在自己的数据库中。 //如果有直接登录,没有就将该用户的ID和相关资料在数据库中创建新用户。 [self reloadStateWithType:ShareTypeQQSpace]; } }]; } -(IBAction)loginoutWithSina:(id)sender{ [ShareSDK cancelAuthWithType:ShareTypeSinaWeibo]; [self reloadStateWithType:ShareTypeSinaWeibo]; } -(IBAction)loginoutWithQQ:(id)sender{ [ShareSDK cancelAuthWithType:ShareTypeQQSpace]; [self reloadStateWithType:ShareTypeQQSpace]; } -(void)reloadStateWithType:(ShareType)type{ //现实授权信息,包括授权ID、授权有效期等。 //此处可以在用户进入应用的时候直接调用,如授权信息不为空且不过期可帮用户自动实现登录。 id<ISSPlatformCredential> credential = [ShareSDK getCredentialWithType:type]; UIAlertView *alertView = [[UIAlertView alloc] initWithTitle:NSLocalizedString(@"TEXT_TIPS", @"提示") message:[NSString stringWithFormat: @"uid = %@\ntoken = %@\nsecret = %@\n expired = %@\nextInfo = %@", [credential uid], [credential token], [credential secret], [credential expired], [credential extInfo]] delegate:nil cancelButtonTitle:NSLocalizedString(@"TEXT_KNOW", @"知道了") otherButtonTitles:nil]; [alertView show]; } //关注用户 -(IBAction)guanzhuUs:(id)sender{ [ShareSDK followUserWithType:ShareTypeSinaWeibo //平台类型 field:@"ShareSDK" //关注用户的名称或ID fieldType:SSUserFieldTypeName //字段类型,用于指定第二个参数是名称还是ID authOptions:nil //授权选项 viewDelegate:nil //授权视图委托 result:^(SSResponseState state, id<ISSPlatformUser> userInfo, id<ICMErrorInfo> error) { if (state == SSResponseStateSuccess) { NSLog(@"关注成功"); } else if (state == SSResponseStateFail) { NSLog(@"%@", [NSString stringWithFormat:@"关注失败:%@", error.errorDescription]); } }]; } @end 5)你可能会看到一些应用需要第三方登录的,一种是弹出webView加载的新浪微博或者qq的网页授权,还有一种是跳转到本地的已经安装的新浪微博应用或者qq应用进行授权。第二种授权方式较SSO授权,体验会比较好一些,因为不需要用户输入新浪微博或QQ的用户名与密码。 第二种授权方式需要在plist中配置Scheme。SSO默认是打开的不需要配置。在AppDelegate中实现回调。 DEMO下载地址:http://download.csdn.net/download/daleiwang/7734321 程序猿神奇的手,每时每刻,这双手都在改变着世界的交互方式! 本文转自当天真遇到现实博客园博客,原文链接:http://www.cnblogs.com/XYQ-208910/p/5144477.html ,如需转载请自行联系原作者