首页 文章 精选 留言 我的

精选列表

搜索[快速入门],共10000篇文章
优秀的个人博客,低调大师

Hadoop MapReduce编程 API入门系列之分区和合并(十四)

代码 1 package zhouls.bigdata.myMapReduce.Star; 2 3 4 import java.io.IOException; 5 import org.apache.hadoop.conf.Configuration; 6 import org.apache.hadoop.conf.Configured; 7 import org.apache.hadoop.fs.FileSystem; 8 import org.apache.hadoop.fs.Path; 9 import org.apache.hadoop.io.Text; 10 import org.apache.hadoop.mapreduce.Job; 11 import org.apache.hadoop.mapreduce.Mapper; 12 import org.apache.hadoop.mapreduce.Partitioner; 13 import org.apache.hadoop.mapreduce.Reducer; 14 import org.apache.hadoop.mapreduce.lib.input.FileInputFormat; 15 import org.apache.hadoop.mapreduce.lib.output.FileOutputFormat; 16 import org.apache.hadoop.util.Tool; 17 import org.apache.hadoop.util.ToolRunner; 18 /** 19 * 20 * @function 统计分别统计出男女明星最大搜索指数 21 * @author 小讲 22 */ 23 24 /* 25 姓名 性别 搜索指数 26 李易峰 male 32670 27 朴信惠 female 13309 28 林心如 female 5242 29 黄海波 male 5505 30 成龙 male 7757 31 刘亦菲 female 14830 32 angelababy female 55083 33 王宝强 male 9472 34 郑爽 female 9279 35 周杰伦 male 42020 36 莫小棋 female 13978 37 朱一龙 male 10524 38 宋智孝 female 12494 39 吴京 male 6684 40 赵丽颖 female 24174 41 尹恩惠 female 5985 42 李金铭 female 5925 43 关之琳 female 7668 44 邓超 male 11532 45 钟汉良 male 8289 46 周润发 male 4808 47 甄子丹 male 5479 48 林妙可 female 5306 49 柳岩 female 8221 50 蔡琳 female 7320 51 张佳宁 female 6628 52 裴涩琪 female 5658 53 李晨 male 9559 54 周星驰 male 11483 55 杨紫 female 11094 56 全智贤 female 5336 57 张柏芝 female 9337 58 孙俪 female 7295 59 鲍蕾 female 5375 60 杨幂 female 20238 61 刘德华 male 19786 62 柯震东 male 6398 63 张国荣 male 5013 64 王阳 male 5169 65 李小龙 male 6859 66 林志颖 male 4512 67 林正英 male 5832 68 吴秀波 male 5668 69 陈伟霆 male 12817 70 陈奕迅 male 10472 71 赵又廷 male 5190 72 张馨予 female 35062 73 陈晓 male 17901 74 赵韩樱子 female 7077 75 乔振宇 male 8877 76 宋慧乔 female 5708 77 韩艺瑟 female 5426 78 张翰 male 7012 79 谢霆锋 male 6654 80 刘晓庆 female 5553 81 陈翔 male 7999 82 陈学冬 male 8829 83 秋瓷炫 female 6504 84 王祖蓝 male 6662 85 吴亦凡 male 16472 86 陈妍希 female 32590 87 倪妮 female 9278 88 高梓淇 male 7101 89 赵奕欢 female 7197 90 赵本山 male 12655 91 高圆圆 female 13688 92 陈赫 male 6820 93 鹿晗 male 32492 94 贾玲 female 5304 95 宋佳 female 6202 96 郭碧婷 female 5295 97 唐嫣 female 12055 98 杨蓉 female 10512 99 李钟硕 male 26278 100 郑秀晶 female 10479 101 熊黛林 female 26732 102 金秀贤 male 11370 103 古天乐 male 4954 104 黄晓明 male 10964 105 李敏镐 male 10512 106 王丽坤 female 5501 107 谢依霖 female 7000 108 陈冠希 male 9135 109 范冰冰 female 13734 110 姚笛 female 6953 111 彭于晏 male 14136 112 张学友 male 4578 113 谢娜 female 6886 114 胡歌 male 8015 115 古力娜扎 female 8858 116 黄渤 male 7825 117 周韦彤 female 7677 118 刘诗诗 female 16548 119 郭德纲 male 10307 120 郑恺 male 21145 121 赵薇 female 5339 122 李连杰 male 4621 123 宋茜 female 11164 124 任重 male 8383 125 李若彤 female 9968 126 127 128 得到: 129 angelababy female 55083 130 周杰伦 male 42020 131 */ 132 public class Star extends Configured implements Tool{ 133 /** 134 * @function Mapper 解析明星数据 135 * @input key=偏移量 value=明星数据 136 * @output key=gender value=name+hotIndex 137 */ 138 public static class ActorMapper extends Mapper<Object,Text,Text,Text>{ 139 //在这个例子里,第一个参数Object是Hadoop根据默认值生成的,一般是文件块里的一行文字的行偏移数,这些偏移数不重要,在处理时候一般用不上 140 public void map(Object key,Text value,Context context) throws IOException,InterruptedException{ 141 //拿:周杰伦 male 42020 142 //value=name+gender+hotIndex 143 String[] tokens = value.toString().split("\t");//使用分隔符\t,将数据解析为数组 tokens 144 String gender = tokens[1].trim();//性别,trim()是去除两边空格的方法 145 //tokens[0] tokens[1] tokens[2] 146 //周杰伦 male 42020 147 String nameHotIndex = tokens[0] + "\t" + tokens[2];//名称和关注指数 148 //输出key=gender value=name+hotIndex 149 context.write(new Text(gender), new Text(nameHotIndex));//写入gender是k2,nameHotIndex是v2 150 // context.write(gender,nameHotIndex);等价 151 //将gender和nameHotIndex写入到context中 152 } 153 } 154 155 156 157 /** 158 * @function Partitioner 根据sex选择分区 159 */ 160 public static class ActorPartitioner extends Partitioner<Text, Text>{ 161 @Override 162 public int getPartition(Text key, Text value, int numReduceTasks){ 163 String sex = key.toString();//按性别分区 164 165 // 默认指定分区 0 166 if(numReduceTasks==0) 167 return 0; 168 169 //性别为male 选择分区0 170 if(sex.equals("male")) 171 return 0; 172 //性别为female 选择分区1 173 if(sex.equals("female")) 174 return 1 % numReduceTasks; 175 //其他性别 选择分区2 176 else 177 return 2 % numReduceTasks; 178 179 } 180 } 181 182 183 184 /** 185 * @function 定义Combiner 合并 Mapper 输出结果 186 */ 187 public static class ActorCombiner extends Reducer<Text, Text, Text, Text>{ 188 private Text text = new Text(); 189 @Override 190 public void reduce(Text key, Iterable<Text> values, Context context)throws IOException, InterruptedException{ 191 int maxHotIndex = Integer.MIN_VALUE; 192 int hotIndex = 0; 193 String name=""; 194 for (Text val : values){//星型for循环,即把values的值传给Text val 195 String[] valTokens = val.toString().split("\\t"); 196 hotIndex = Integer.parseInt(valTokens[1]); 197 if(hotIndex>maxHotIndex){ 198 name = valTokens[0]; 199 maxHotIndex = hotIndex; 200 } 201 } 202 text.set(name+"\t"+maxHotIndex); 203 context.write(key, text); 204 } 205 } 206 207 208 209 /** 210 * @function Reducer 统计男、女明星最高搜索指数 211 * @input key=gender value=name+hotIndex 212 * @output key=name value=gender+hotIndex(max) 213 */ 214 public static class ActorReducer extends Reducer<Text,Text,Text,Text>{ 215 @Override 216 public void reduce(Text key, Iterable<Text> values, Context context)throws IOException, InterruptedException{ 217 int maxHotIndex = Integer.MIN_VALUE; 218 219 String name = " "; 220 int hotIndex = 0; 221 // 根据key,迭代 values 集合,求出最高搜索指数 222 for (Text val : values){//星型for循环,即把values的值传给Text val 223 String[] valTokens = val.toString().split("\\t"); 224 hotIndex = Integer.parseInt(valTokens[1]); 225 if (hotIndex > maxHotIndex){ 226 name = valTokens[0]; 227 maxHotIndex = hotIndex; 228 } 229 } 230 context.write(new Text(name), new Text(key + "\t"+ maxHotIndex));//写入name是k3,key + "\t"+ maxHotIndex是v3 231 // context.write(name,key + "\t"+ maxHotIndex);//等价 232 } 233 } 234 235 /** 236 * @function 任务驱动方法 237 * @param args 238 * @return 239 * @throws Exception 240 */ 241 242 public int run(String[] args) throws Exception{ 243 // TODO Auto-generated method stub 244 245 Configuration conf = new Configuration();//读取配置文件,比如core-site.xml等等 246 Path mypath = new Path(args[1]);//Path对象mypath 247 FileSystem hdfs = mypath.getFileSystem(conf);//FileSystem对象hdfs 248 if (hdfs.isDirectory(mypath)){ 249 hdfs.delete(mypath, true); 250 } 251 252 Job job = new Job(conf, "star");//新建一个任务 253 job.setJarByClass(Star.class);//主类 254 255 job.setNumReduceTasks(2);//reduce的个数设置为2 256 job.setPartitionerClass(ActorPartitioner.class);//设置Partitioner类 257 258 job.setMapperClass(ActorMapper.class);//Mapper 259 job.setMapOutputKeyClass(Text.class);//map 输出key类型 260 job.setMapOutputValueClass(Text.class);//map 输出value类型 261 262 job.setCombinerClass(ActorCombiner.class);//设置Combiner类 263 264 job.setReducerClass(ActorReducer.class);//Reducer 265 job.setOutputKeyClass(Text.class);//输出结果 key类型 266 job.setOutputValueClass(Text.class);//输出结果 value类型 267 268 FileInputFormat.addInputPath(job, new Path(args[0]));// 输入路径 269 FileOutputFormat.setOutputPath(job, new Path(args[1]));// 输出路径 270 job.waitForCompletion(true);//提交任务 271 return 0; 272 } 273 274 275 /** 276 * @function main 方法 277 * @param args 278 * @throws Exception 279 */ 280 public static void main(String[] args) throws Exception{ 281 // String[] args0 = { "hdfs://HadoopMaster:9000/star/star.txt", 282 // "hdfs://HadoopMaster:9000/out/star/" }; 283 String[] args0 = { "./data/star/star.txt", 284 "./out/star" }; 285 286 int ec = ToolRunner.run(new Configuration(), new Star(), args0); 287 System.exit(ec); 288 } 289 } 本文转自大数据躺过的坑博客园博客,原文链接:http://www.cnblogs.com/zlslch/p/6165047.html,如需转载请自行联系原作者

优秀的个人博客,低调大师

Hadoop HDFS编程 API入门系列之HDFS_HA(五)

代码 1 package zhouls.bigdata.myWholeHadoop.HDFS.hdfs3; 2 3 import java.io.FileInputStream; 4 import java.io.InputStream; 5 import java.io.OutputStream; 6 import java.net.URI; 7 8 import org.apache.hadoop.conf.Configuration; 9 import org.apache.hadoop.fs.FileSystem; 10 import org.apache.hadoop.fs.Path; 11 import org.apache.hadoop.io.IOUtils; 12 13 public class HDFS_HA { 14 15 16 public static void main(String[] args) throws Exception { 17 Configuration conf = new Configuration(); 18 conf.set("fs.defaultFS", "hdfs://ns1"); 19 conf.set("dfs.nameservices", "ns1"); 20 conf.set("dfs.ha.namenodes.ns1", "nn1,nn2"); 21 conf.set("dfs.namenode.rpc-address.ns1.nn1", "hadoop01:9000"); 22 conf.set("dfs.namenode.rpc-address.ns1.nn2", "hadoop02:9000"); 23 //conf.setBoolean(name, value); 24 conf.set("dfs.client.failover.proxy.provider.ns1", "org.apache.hadoop.hdfs.server.namenode.ha.ConfiguredFailoverProxyProvider"); 25 FileSystem fs = FileSystem.get(new URI("hdfs://ns1"), conf, "hadoop"); 26 InputStream in =new FileInputStream("D://eclipse.rar"); 27 OutputStream out = fs.create(new Path("/eclipse")); 28 IOUtils.copyBytes(in, out, 4096, true); 29 } 30 } 本文转自大数据躺过的坑博客园博客,原文链接:http://www.cnblogs.com/zlslch/p/6175601.html,如需转载请自行联系原作者

优秀的个人博客,低调大师

HBase编程 API入门系列之delete(管理端而言)(9)

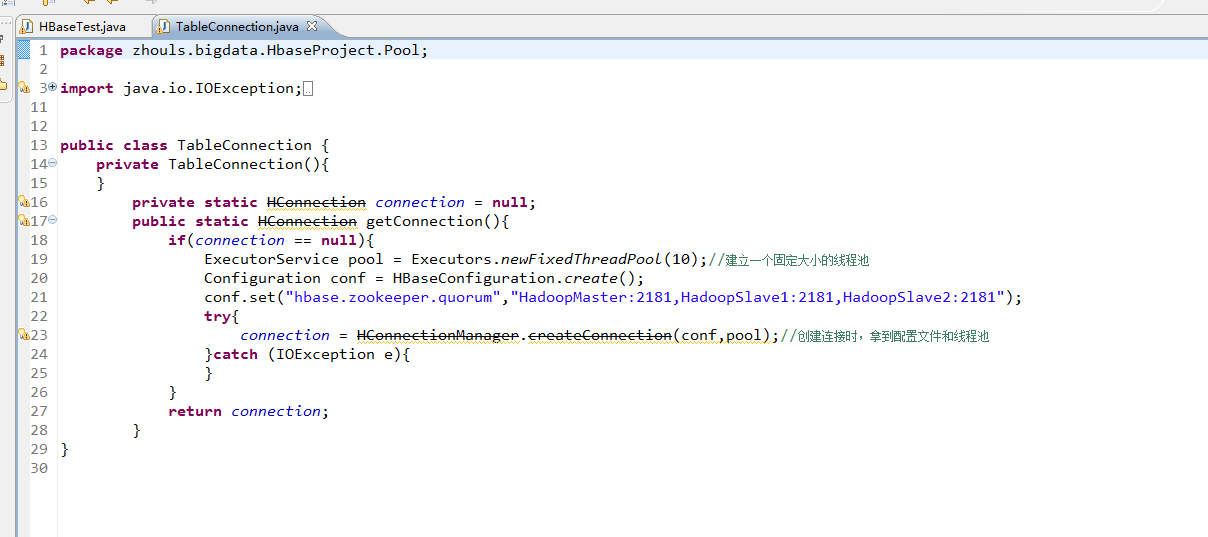
这里,我带领大家,学习更高级的,因为,在开发中,尽量不能客户端上删除表。 所以,在管理端来删除HBase表。采用线程池的方式(也是生产开发里首推的) package zhouls.bigdata.HbaseProject.Pool; import java.io.IOException; import java.util.concurrent.ExecutorService; import java.util.concurrent.Executors; import org.apache.hadoop.conf.Configuration; import org.apache.hadoop.hbase.HBaseConfiguration; import org.apache.hadoop.hbase.client.HConnection; import org.apache.hadoop.hbase.client.HConnectionManager; public class TableConnection { private TableConnection(){ } private static HConnection connection = null; public static HConnection getConnection(){ if(connection == null){ ExecutorService pool = Executors.newFixedThreadPool(10);//建立一个固定大小的线程池 Configuration conf = HBaseConfiguration.create(); conf.set("hbase.zookeeper.quorum","HadoopMaster:2181,HadoopSlave1:2181,HadoopSlave2:2181"); try{ connection = HConnectionManager.createConnection(conf,pool);//创建连接时,拿到配置文件和线程池 }catch (IOException e){ } } return connection; } } 1、删除不存在的HBase表 hbase(main):062:0> list TABLE test_table test_table2 test_table3 test_table4 4 row(s) in 0.1540 seconds => ["test_table", "test_table2", "test_table3", "test_table4"] hbase(main):063:0> package zhouls.bigdata.HbaseProject.Pool; import java.io.IOException; import zhouls.bigdata.HbaseProject.Pool.TableConnection; import javax.xml.transform.Result; import org.apache.hadoop.conf.Configuration; import org.apache.hadoop.hbase.Cell; import org.apache.hadoop.hbase.CellUtil; import org.apache.hadoop.hbase.HBaseConfiguration; import org.apache.hadoop.hbase.HColumnDescriptor; import org.apache.hadoop.hbase.HTableDescriptor; import org.apache.hadoop.hbase.MasterNotRunningException; import org.apache.hadoop.hbase.TableName; import org.apache.hadoop.hbase.ZooKeeperConnectionException; import org.apache.hadoop.hbase.client.Delete; import org.apache.hadoop.hbase.client.Get; import org.apache.hadoop.hbase.client.HBaseAdmin; import org.apache.hadoop.hbase.client.HTable; import org.apache.hadoop.hbase.client.HTableInterface; import org.apache.hadoop.hbase.client.Put; import org.apache.hadoop.hbase.client.ResultScanner; import org.apache.hadoop.hbase.client.Scan; import org.apache.hadoop.hbase.util.Bytes; public class HBaseTest { public static void main(String[] args) throws Exception { // HTable table = new HTable(getConfig(),TableName.valueOf("test_table"));//表名是test_table // Put put = new Put(Bytes.toBytes("row_04"));//行键是row_04 // put.add(Bytes.toBytes("f"),Bytes.toBytes("name"),Bytes.toBytes("Andy1"));//列簇是f,列修饰符是name,值是Andy0 // put.add(Bytes.toBytes("f2"),Bytes.toBytes("name"),Bytes.toBytes("Andy3"));//列簇是f2,列修饰符是name,值是Andy3 // table.put(put); // table.close(); // Get get = new Get(Bytes.toBytes("row_04")); // get.addColumn(Bytes.toBytes("f1"), Bytes.toBytes("age"));如现在这样,不指定,默认把所有的全拿出来 // org.apache.hadoop.hbase.client.Result rest = table.get(get); // System.out.println(rest.toString()); // table.close(); // Delete delete = new Delete(Bytes.toBytes("row_2")); // delete.deleteColumn(Bytes.toBytes("f1"), Bytes.toBytes("email")); // delete.deleteColumn(Bytes.toBytes("f1"), Bytes.toBytes("name")); // table.delete(delete); // table.close(); // Delete delete = new Delete(Bytes.toBytes("row_04")); //// delete.deleteColumn(Bytes.toBytes("f"), Bytes.toBytes("name"));//deleteColumn是删除某一个列簇里的最新时间戳版本。 // delete.deleteColumns(Bytes.toBytes("f"), Bytes.toBytes("name"));//delete.deleteColumns是删除某个列簇里的所有时间戳版本。 // table.delete(delete); // table.close(); // Scan scan = new Scan(); // scan.setStartRow(Bytes.toBytes("row_01"));//包含开始行键 // scan.setStopRow(Bytes.toBytes("row_03"));//不包含结束行键 // scan.addColumn(Bytes.toBytes("f"), Bytes.toBytes("name")); // ResultScanner rst = table.getScanner(scan);//整个循环 // System.out.println(rst.toString()); // for (org.apache.hadoop.hbase.client.Result next = rst.next();next !=null;next = rst.next() ) // { // for(Cell cell:next.rawCells()){//某个row key下的循坏 // System.out.println(next.toString()); // System.out.println("family:" + Bytes.toString(CellUtil.cloneFamily(cell))); // System.out.println("col:" + Bytes.toString(CellUtil.cloneQualifier(cell))); // System.out.println("value" + Bytes.toString(CellUtil.cloneValue(cell))); // } // } // table.close(); HBaseTest hbasetest =new HBaseTest(); // hbasetest.insertValue(); // hbasetest.getValue(); // hbasetest.delete(); // hbasetest.scanValue(); // hbasetest.createTable("test_table4", "f"); hbasetest.deleteTable("test_table5");//假如这里,删除不存在的表 } //生产开发中,建议这样用线程池做 // public void insertValue() throws Exception{ // HTableInterface table = TableConnection.getConnection().getTable(TableName.valueOf("test_table")); // Put put = new Put(Bytes.toBytes("row_01"));//行键是row_01 // put.add(Bytes.toBytes("f"),Bytes.toBytes("name"),Bytes.toBytes("Andy0")); // table.put(put); // table.close(); // } //生产开发中,建议这样用线程池做 // public void getValue() throws Exception{ // HTableInterface table = TableConnection.getConnection().getTable(TableName.valueOf("test_table")); // Get get = new Get(Bytes.toBytes("row_03")); // get.addColumn(Bytes.toBytes("f"), Bytes.toBytes("name")); // org.apache.hadoop.hbase.client.Result rest = table.get(get); // System.out.println(rest.toString()); // table.close(); // } // //生产开发中,建议这样用线程池做 // public void delete() throws Exception{ // HTableInterface table = TableConnection.getConnection().getTable(TableName.valueOf("test_table")); // Delete delete = new Delete(Bytes.toBytes("row_01")); // delete.deleteColumn(Bytes.toBytes("f"), Bytes.toBytes("name"));//deleteColumn是删除某一个列簇里的最新时间戳版本。 //// delete.deleteColumns(Bytes.toBytes("f"), Bytes.toBytes("name"));//delete.deleteColumns是删除某个列簇里的所有时间戳版本。 // table.delete(delete); // table.close(); // // } //生产开发中,建议这样用线程池做 // public void scanValue() throws Exception{ // HTableInterface table = TableConnection.getConnection().getTable(TableName.valueOf("test_table")); // Scan scan = new Scan(); // scan.setStartRow(Bytes.toBytes("row_02"));//包含开始行键 // scan.setStopRow(Bytes.toBytes("row_04"));//不包含结束行键 // scan.addColumn(Bytes.toBytes("f"), Bytes.toBytes("name")); // ResultScanner rst = table.getScanner(scan);//整个循环 // System.out.println(rst.toString()); // for (org.apache.hadoop.hbase.client.Result next = rst.next();next !=null;next = rst.next() ) // { // for(Cell cell:next.rawCells()){//某个row key下的循坏 // System.out.println(next.toString()); // System.out.println("family:" + Bytes.toString(CellUtil.cloneFamily(cell))); // System.out.println("col:" + Bytes.toString(CellUtil.cloneQualifier(cell))); // System.out.println("value" + Bytes.toString(CellUtil.cloneValue(cell))); // } // } // table.close(); // } // //生产开发中,建议这样用线程池做 // public void createTable(String tableName,String family) throws MasterNotRunningException, ZooKeeperConnectionException, IOException{ // Configuration conf = HBaseConfiguration.create(getConfig()); // HBaseAdmin admin = new HBaseAdmin(conf); // HTableDescriptor tableDesc = new HTableDescriptor(TableName.valueOf(tableName)); // HColumnDescriptor hcd = new HColumnDescriptor(family); // hcd.setMaxVersions(3); //// hcd.set//很多的带创建操作,我这里只抛砖引玉的作用 // tableDesc.addFamily(hcd); // admin.createTable(tableDesc); // admin.close(); // } public void deleteTable(String tableName)throws MasterNotRunningException, ZooKeeperConnectionException, IOException{ Configuration conf = HBaseConfiguration.create(getConfig()); HBaseAdmin admin = new HBaseAdmin(conf); admin.disableTable(tableName); admin.deleteTable(tableName); admin.close(); } public static Configuration getConfig(){ Configuration configuration = new Configuration(); // conf.set("hbase.rootdir","hdfs:HadoopMaster:9000/hbase"); configuration.set("hbase.zookeeper.quorum", "HadoopMaster:2181,HadoopSlave1:2181,HadoopSlave2:2181"); return configuration; } } 2016-12-11 16:04:48,141 INFO [org.apache.hadoop.hbase.zookeeper.RecoverableZooKeeper] - Process identifier=hconnection-0x1417e278 connecting to ZooKeeper ensemble=HadoopMaster:2181,HadoopSlave1:2181,HadoopSlave2:2181 2016-12-11 16:04:48,150 INFO [org.apache.zookeeper.ZooKeeper] - Client environment:zookeeper.version=3.4.6-1569965, built on 02/20/2014 09:09 GMT 2016-12-11 16:04:48,150 INFO [org.apache.zookeeper.ZooKeeper] - Client environment:host.name=WIN-BQOBV63OBNM 2016-12-11 16:04:48,150 INFO [org.apache.zookeeper.ZooKeeper] - Client environment:java.version=1.7.0_51 2016-12-11 16:04:48,150 INFO [org.apache.zookeeper.ZooKeeper] - Client environment:java.vendor=Oracle Corporation 2016-12-11 16:04:48,150 INFO [org.apache.zookeeper.ZooKeeper] - Client environment:java.home=C:\Program Files\Java\jdk1.7.0_51\jre 2016-12-11 16:04:48,150 INFO [org.apache.zookeeper.ZooKeeper] - Client environment:java.class.path=D:\Code\MyEclipseJavaCode\HbaseProject\bin;D:\SoftWare\hbase-1.2.3\lib\activation-1.1.jar;D:\SoftWare\hbase-1.2.3\lib\aopalliance-1.0.jar;D:\SoftWare\hbase-1.2.3\lib\apacheds-i18n-2.0.0-M15.jar;D:\SoftWare\hbase-1.2.3\lib\apacheds-kerberos-codec-2.0.0-M15.jar;D:\SoftWare\hbase-1.2.3\lib\api-asn1-api-1.0.0-M20.jar;D:\SoftWare\hbase-1.2.3\lib\api-util-1.0.0-M20.jar;D:\SoftWare\hbase-1.2.3\lib\asm-3.1.jar;D:\SoftWare\hbase-1.2.3\lib\avro-1.7.4.jar;D:\SoftWare\hbase-1.2.3\lib\commons-beanutils-1.7.0.jar;D:\SoftWare\hbase-1.2.3\lib\commons-beanutils-core-1.8.0.jar;D:\SoftWare\hbase-1.2.3\lib\commons-cli-1.2.jar;D:\SoftWare\hbase-1.2.3\lib\commons-codec-1.9.jar;D:\SoftWare\hbase-1.2.3\lib\commons-collections-3.2.2.jar;D:\SoftWare\hbase-1.2.3\lib\commons-compress-1.4.1.jar;D:\SoftWare\hbase-1.2.3\lib\commons-configuration-1.6.jar;D:\SoftWare\hbase-1.2.3\lib\commons-daemon-1.0.13.jar;D:\SoftWare\hbase-1.2.3\lib\commons-digester-1.8.jar;D:\SoftWare\hbase-1.2.3\lib\commons-el-1.0.jar;D:\SoftWare\hbase-1.2.3\lib\commons-httpclient-3.1.jar;D:\SoftWare\hbase-1.2.3\lib\commons-io-2.4.jar;D:\SoftWare\hbase-1.2.3\lib\commons-lang-2.6.jar;D:\SoftWare\hbase-1.2.3\lib\commons-logging-1.2.jar;D:\SoftWare\hbase-1.2.3\lib\commons-math-2.2.jar;D:\SoftWare\hbase-1.2.3\lib\commons-math3-3.1.1.jar;D:\SoftWare\hbase-1.2.3\lib\commons-net-3.1.jar;D:\SoftWare\hbase-1.2.3\lib\disruptor-3.3.0.jar;D:\SoftWare\hbase-1.2.3\lib\findbugs-annotations-1.3.9-1.jar;D:\SoftWare\hbase-1.2.3\lib\guava-12.0.1.jar;D:\SoftWare\hbase-1.2.3\lib\guice-3.0.jar;D:\SoftWare\hbase-1.2.3\lib\guice-servlet-3.0.jar;D:\SoftWare\hbase-1.2.3\lib\hadoop-annotations-2.5.1.jar;D:\SoftWare\hbase-1.2.3\lib\hadoop-auth-2.5.1.jar;D:\SoftWare\hbase-1.2.3\lib\hadoop-client-2.5.1.jar;D:\SoftWare\hbase-1.2.3\lib\hadoop-common-2.5.1.jar;D:\SoftWare\hbase-1.2.3\lib\hadoop-hdfs-2.5.1.jar;D:\SoftWare\hbase-1.2.3\lib\hadoop-mapreduce-client-app-2.5.1.jar;D:\SoftWare\hbase-1.2.3\lib\hadoop-mapreduce-client-common-2.5.1.jar;D:\SoftWare\hbase-1.2.3\lib\hadoop-mapreduce-client-core-2.5.1.jar;D:\SoftWare\hbase-1.2.3\lib\hadoop-mapreduce-client-jobclient-2.5.1.jar;D:\SoftWare\hbase-1.2.3\lib\hadoop-mapreduce-client-shuffle-2.5.1.jar;D:\SoftWare\hbase-1.2.3\lib\hadoop-yarn-api-2.5.1.jar;D:\SoftWare\hbase-1.2.3\lib\hadoop-yarn-client-2.5.1.jar;D:\SoftWare\hbase-1.2.3\lib\hadoop-yarn-common-2.5.1.jar;D:\SoftWare\hbase-1.2.3\lib\hadoop-yarn-server-common-2.5.1.jar;D:\SoftWare\hbase-1.2.3\lib\hbase-annotations-1.2.3.jar;D:\SoftWare\hbase-1.2.3\lib\hbase-annotations-1.2.3-tests.jar;D:\SoftWare\hbase-1.2.3\lib\hbase-client-1.2.3.jar;D:\SoftWare\hbase-1.2.3\lib\hbase-common-1.2.3.jar;D:\SoftWare\hbase-1.2.3\lib\hbase-common-1.2.3-tests.jar;D:\SoftWare\hbase-1.2.3\lib\hbase-examples-1.2.3.jar;D:\SoftWare\hbase-1.2.3\lib\hbase-external-blockcache-1.2.3.jar;D:\SoftWare\hbase-1.2.3\lib\hbase-hadoop2-compat-1.2.3.jar;D:\SoftWare\hbase-1.2.3\lib\hbase-hadoop-compat-1.2.3.jar;D:\SoftWare\hbase-1.2.3\lib\hbase-it-1.2.3.jar;D:\SoftWare\hbase-1.2.3\lib\hbase-it-1.2.3-tests.jar;D:\SoftWare\hbase-1.2.3\lib\hbase-prefix-tree-1.2.3.jar;D:\SoftWare\hbase-1.2.3\lib\hbase-procedure-1.2.3.jar;D:\SoftWare\hbase-1.2.3\lib\hbase-protocol-1.2.3.jar;D:\SoftWare\hbase-1.2.3\lib\hbase-resource-bundle-1.2.3.jar;D:\SoftWare\hbase-1.2.3\lib\hbase-rest-1.2.3.jar;D:\SoftWare\hbase-1.2.3\lib\hbase-server-1.2.3.jar;D:\SoftWare\hbase-1.2.3\lib\hbase-server-1.2.3-tests.jar;D:\SoftWare\hbase-1.2.3\lib\hbase-shell-1.2.3.jar;D:\SoftWare\hbase-1.2.3\lib\hbase-thrift-1.2.3.jar;D:\SoftWare\hbase-1.2.3\lib\htrace-core-3.1.0-incubating.jar;D:\SoftWare\hbase-1.2.3\lib\httpclient-4.2.5.jar;D:\SoftWare\hbase-1.2.3\lib\httpcore-4.4.1.jar;D:\SoftWare\hbase-1.2.3\lib\jackson-core-asl-1.9.13.jar;D:\SoftWare\hbase-1.2.3\lib\jackson-jaxrs-1.9.13.jar;D:\SoftWare\hbase-1.2.3\lib\jackson-mapper-asl-1.9.13.jar;D:\SoftWare\hbase-1.2.3\lib\jackson-xc-1.9.13.jar;D:\SoftWare\hbase-1.2.3\lib\jamon-runtime-2.4.1.jar;D:\SoftWare\hbase-1.2.3\lib\jasper-compiler-5.5.23.jar;D:\SoftWare\hbase-1.2.3\lib\jasper-runtime-5.5.23.jar;D:\SoftWare\hbase-1.2.3\lib\javax.inject-1.jar;D:\SoftWare\hbase-1.2.3\lib\java-xmlbuilder-0.4.jar;D:\SoftWare\hbase-1.2.3\lib\jaxb-api-2.2.2.jar;D:\SoftWare\hbase-1.2.3\lib\jaxb-impl-2.2.3-1.jar;D:\SoftWare\hbase-1.2.3\lib\jcodings-1.0.8.jar;D:\SoftWare\hbase-1.2.3\lib\jersey-client-1.9.jar;D:\SoftWare\hbase-1.2.3\lib\jersey-core-1.9.jar;D:\SoftWare\hbase-1.2.3\lib\jersey-guice-1.9.jar;D:\SoftWare\hbase-1.2.3\lib\jersey-json-1.9.jar;D:\SoftWare\hbase-1.2.3\lib\jersey-server-1.9.jar;D:\SoftWare\hbase-1.2.3\lib\jets3t-0.9.0.jar;D:\SoftWare\hbase-1.2.3\lib\jettison-1.3.3.jar;D:\SoftWare\hbase-1.2.3\lib\jetty-6.1.26.jar;D:\SoftWare\hbase-1.2.3\lib\jetty-sslengine-6.1.26.jar;D:\SoftWare\hbase-1.2.3\lib\jetty-util-6.1.26.jar;D:\SoftWare\hbase-1.2.3\lib\joni-2.1.2.jar;D:\SoftWare\hbase-1.2.3\lib\jruby-complete-1.6.8.jar;D:\SoftWare\hbase-1.2.3\lib\jsch-0.1.42.jar;D:\SoftWare\hbase-1.2.3\lib\jsp-2.1-6.1.14.jar;D:\SoftWare\hbase-1.2.3\lib\jsp-api-2.1-6.1.14.jar;D:\SoftWare\hbase-1.2.3\lib\junit-4.12.jar;D:\SoftWare\hbase-1.2.3\lib\leveldbjni-all-1.8.jar;D:\SoftWare\hbase-1.2.3\lib\libthrift-0.9.3.jar;D:\SoftWare\hbase-1.2.3\lib\log4j-1.2.17.jar;D:\SoftWare\hbase-1.2.3\lib\metrics-core-2.2.0.jar;D:\SoftWare\hbase-1.2.3\lib\netty-all-4.0.23.Final.jar;D:\SoftWare\hbase-1.2.3\lib\paranamer-2.3.jar;D:\SoftWare\hbase-1.2.3\lib\protobuf-java-2.5.0.jar;D:\SoftWare\hbase-1.2.3\lib\servlet-api-2.5.jar;D:\SoftWare\hbase-1.2.3\lib\servlet-api-2.5-6.1.14.jar;D:\SoftWare\hbase-1.2.3\lib\slf4j-api-1.7.7.jar;D:\SoftWare\hbase-1.2.3\lib\slf4j-log4j12-1.7.5.jar;D:\SoftWare\hbase-1.2.3\lib\snappy-java-1.0.4.1.jar;D:\SoftWare\hbase-1.2.3\lib\spymemcached-2.11.6.jar;D:\SoftWare\hbase-1.2.3\lib\xmlenc-0.52.jar;D:\SoftWare\hbase-1.2.3\lib\xz-1.0.jar;D:\SoftWare\hbase-1.2.3\lib\zookeeper-3.4.6.jar 2016-12-11 16:04:48,151 INFO [org.apache.zookeeper.ZooKeeper] - Client environment:java.library.path=C:\Program Files\Java\jdk1.7.0_51\bin;C:\Windows\Sun\Java\bin;C:\Windows\system32;C:\Windows;C:\ProgramData\Oracle\Java\javapath;C:\Python27\;C:\Python27\Scripts;C:\Windows\system32;C:\Windows;C:\Windows\System32\Wbem;C:\Windows\System32\WindowsPowerShell\v1.0\;D:\SoftWare\MATLAB R2013a\runtime\win64;D:\SoftWare\MATLAB R2013a\bin;C:\Program Files (x86)\IDM Computer Solutions\UltraCompare;C:\Program Files\Java\jdk1.7.0_51\bin;C:\Program Files\Java\jdk1.7.0_51\jre\bin;D:\SoftWare\apache-ant-1.9.0\bin;HADOOP_HOME\bin;D:\SoftWare\apache-maven-3.3.9\bin;D:\SoftWare\Scala\bin;D:\SoftWare\Scala\jre\bin;%MYSQL_HOME\bin;D:\SoftWare\MySQL Server\MySQL Server 5.0\bin;D:\SoftWare\apache-tomcat-7.0.69\bin;%C:\Windows\System32;%C:\Windows\SysWOW64;D:\SoftWare\SSH Secure Shell;. 2016-12-11 16:04:48,151 INFO [org.apache.zookeeper.ZooKeeper] - Client environment:java.io.tmpdir=C:\Users\ADMINI~1\AppData\Local\Temp\ 2016-12-11 16:04:48,151 INFO [org.apache.zookeeper.ZooKeeper] - Client environment:java.compiler=<NA> 2016-12-11 16:04:48,151 INFO [org.apache.zookeeper.ZooKeeper] - Client environment:os.name=Windows 7 2016-12-11 16:04:48,152 INFO [org.apache.zookeeper.ZooKeeper] - Client environment:os.arch=amd64 2016-12-11 16:04:48,152 INFO [org.apache.zookeeper.ZooKeeper] - Client environment:os.version=6.1 2016-12-11 16:04:48,152 INFO [org.apache.zookeeper.ZooKeeper] - Client environment:user.name=Administrator 2016-12-11 16:04:48,152 INFO [org.apache.zookeeper.ZooKeeper] - Client environment:user.home=C:\Users\Administrator 2016-12-11 16:04:48,152 INFO [org.apache.zookeeper.ZooKeeper] - Client environment:user.dir=D:\Code\MyEclipseJavaCode\HbaseProject 2016-12-11 16:04:48,153 INFO [org.apache.zookeeper.ZooKeeper] - Initiating client connection, connectString=HadoopMaster:2181,HadoopSlave1:2181,HadoopSlave2:2181 sessionTimeout=90000 watcher=hconnection-0x1417e2780x0, quorum=HadoopMaster:2181,HadoopSlave1:2181,HadoopSlave2:2181, baseZNode=/hbase 2016-12-11 16:04:48,199 INFO [org.apache.zookeeper.ClientCnxn] - Opening socket connection to server HadoopMaster/192.168.80.10:2181. Will not attempt to authenticate using SASL (unknown error) 2016-12-11 16:04:48,203 INFO [org.apache.zookeeper.ClientCnxn] - Socket connection established to HadoopMaster/192.168.80.10:2181, initiating session 2016-12-11 16:04:48,762 INFO [org.apache.zookeeper.ClientCnxn] - Session establishment complete on server HadoopMaster/192.168.80.10:2181, sessionid = 0x1582556e7c50027, negotiated timeout = 40000 2016-12-11 16:04:50,731 INFO [org.apache.hadoop.hbase.client.HBaseAdmin] - Started disable of test_table5 Exception in thread "main" org.apache.hadoop.hbase.TableNotFoundException: test_table5 at sun.reflect.NativeConstructorAccessorImpl.newInstance0(Native Method) at sun.reflect.NativeConstructorAccessorImpl.newInstance(NativeConstructorAccessorImpl.java:57) at sun.reflect.DelegatingConstructorAccessorImpl.newInstance(DelegatingConstructorAccessorImpl.java:45) at java.lang.reflect.Constructor.newInstance(Constructor.java:526) at org.apache.hadoop.ipc.RemoteException.instantiateException(RemoteException.java:106) at org.apache.hadoop.ipc.RemoteException.unwrapRemoteException(RemoteException.java:95) at org.apache.hadoop.hbase.util.ForeignExceptionUtil.toIOException(ForeignExceptionUtil.java:45) at org.apache.hadoop.hbase.client.HBaseAdmin$ProcedureFuture.convertResult(HBaseAdmin.java:4621) at org.apache.hadoop.hbase.client.HBaseAdmin$ProcedureFuture.waitProcedureResult(HBaseAdmin.java:4579) at org.apache.hadoop.hbase.client.HBaseAdmin$ProcedureFuture.get(HBaseAdmin.java:4512) at org.apache.hadoop.hbase.client.HBaseAdmin.disableTable(HBaseAdmin.java:1331) at org.apache.hadoop.hbase.client.HBaseAdmin.disableTable(HBaseAdmin.java:1352) at zhouls.bigdata.HbaseProject.Pool.HBaseTest.deleteTable(HBaseTest.java:164) at zhouls.bigdata.HbaseProject.Pool.HBaseTest.main(HBaseTest.java:82) Caused by: org.apache.hadoop.ipc.RemoteException(org.apache.hadoop.hbase.TableNotFoundException): test_table5 at org.apache.hadoop.hbase.master.procedure.DisableTableProcedure.prepareDisable(DisableTableProcedure.java:281) at org.apache.hadoop.hbase.master.procedure.DisableTableProcedure.executeFromState(DisableTableProcedure.java:133) at org.apache.hadoop.hbase.master.procedure.DisableTableProcedure.executeFromState(DisableTableProcedure.java:54) at org.apache.hadoop.hbase.procedure2.StateMachineProcedure.execute(StateMachineProcedure.java:119) at org.apache.hadoop.hbase.procedure2.Procedure.doExecute(Procedure.java:498) at org.apache.hadoop.hbase.procedure2.ProcedureExecutor.execProcedure(ProcedureExecutor.java:1061) at org.apache.hadoop.hbase.procedure2.ProcedureExecutor.execLoop(ProcedureExecutor.java:856) at org.apache.hadoop.hbase.procedure2.ProcedureExecutor.execLoop(ProcedureExecutor.java:809) at org.apache.hadoop.hbase.procedure2.ProcedureExecutor.access$400(ProcedureExecutor.java:75) at org.apache.hadoop.hbase.procedure2.ProcedureExecutor$2.run(ProcedureExecutor.java:495) 2、删除存在的HBase表 package zhouls.bigdata.HbaseProject.Pool; import java.io.IOException; import zhouls.bigdata.HbaseProject.Pool.TableConnection; import javax.xml.transform.Result; import org.apache.hadoop.conf.Configuration; import org.apache.hadoop.hbase.Cell; import org.apache.hadoop.hbase.CellUtil; import org.apache.hadoop.hbase.HBaseConfiguration; import org.apache.hadoop.hbase.HColumnDescriptor; import org.apache.hadoop.hbase.HTableDescriptor; import org.apache.hadoop.hbase.MasterNotRunningException; import org.apache.hadoop.hbase.TableName; import org.apache.hadoop.hbase.ZooKeeperConnectionException; import org.apache.hadoop.hbase.client.Delete; import org.apache.hadoop.hbase.client.Get; import org.apache.hadoop.hbase.client.HBaseAdmin; import org.apache.hadoop.hbase.client.HTable; import org.apache.hadoop.hbase.client.HTableInterface; import org.apache.hadoop.hbase.client.Put; import org.apache.hadoop.hbase.client.ResultScanner; import org.apache.hadoop.hbase.client.Scan; import org.apache.hadoop.hbase.util.Bytes; public class HBaseTest { public static void main(String[] args) throws Exception { // HTable table = new HTable(getConfig(),TableName.valueOf("test_table"));//表名是test_table // Put put = new Put(Bytes.toBytes("row_04"));//行键是row_04 // put.add(Bytes.toBytes("f"),Bytes.toBytes("name"),Bytes.toBytes("Andy1"));//列簇是f,列修饰符是name,值是Andy0 // put.add(Bytes.toBytes("f2"),Bytes.toBytes("name"),Bytes.toBytes("Andy3"));//列簇是f2,列修饰符是name,值是Andy3 // table.put(put); // table.close(); // Get get = new Get(Bytes.toBytes("row_04")); // get.addColumn(Bytes.toBytes("f1"), Bytes.toBytes("age"));如现在这样,不指定,默认把所有的全拿出来 // org.apache.hadoop.hbase.client.Result rest = table.get(get); // System.out.println(rest.toString()); // table.close(); // Delete delete = new Delete(Bytes.toBytes("row_2")); // delete.deleteColumn(Bytes.toBytes("f1"), Bytes.toBytes("email")); // delete.deleteColumn(Bytes.toBytes("f1"), Bytes.toBytes("name")); // table.delete(delete); // table.close(); // Delete delete = new Delete(Bytes.toBytes("row_04")); //// delete.deleteColumn(Bytes.toBytes("f"), Bytes.toBytes("name"));//deleteColumn是删除某一个列簇里的最新时间戳版本。 // delete.deleteColumns(Bytes.toBytes("f"), Bytes.toBytes("name"));//delete.deleteColumns是删除某个列簇里的所有时间戳版本。 // table.delete(delete); // table.close(); // Scan scan = new Scan(); // scan.setStartRow(Bytes.toBytes("row_01"));//包含开始行键 // scan.setStopRow(Bytes.toBytes("row_03"));//不包含结束行键 // scan.addColumn(Bytes.toBytes("f"), Bytes.toBytes("name")); // ResultScanner rst = table.getScanner(scan);//整个循环 // System.out.println(rst.toString()); // for (org.apache.hadoop.hbase.client.Result next = rst.next();next !=null;next = rst.next() ) // { // for(Cell cell:next.rawCells()){//某个row key下的循坏 // System.out.println(next.toString()); // System.out.println("family:" + Bytes.toString(CellUtil.cloneFamily(cell))); // System.out.println("col:" + Bytes.toString(CellUtil.cloneQualifier(cell))); // System.out.println("value" + Bytes.toString(CellUtil.cloneValue(cell))); // } // } // table.close(); HBaseTest hbasetest =new HBaseTest(); // hbasetest.insertValue(); // hbasetest.getValue(); // hbasetest.delete(); // hbasetest.scanValue(); // hbasetest.createTable("test_table4", "f"); hbasetest.deleteTable("test_table4");//删除存在的表 } //生产开发中,建议这样用线程池做 // public void insertValue() throws Exception{ // HTableInterface table = TableConnection.getConnection().getTable(TableName.valueOf("test_table")); // Put put = new Put(Bytes.toBytes("row_01"));//行键是row_01 // put.add(Bytes.toBytes("f"),Bytes.toBytes("name"),Bytes.toBytes("Andy0")); // table.put(put); // table.close(); // } //生产开发中,建议这样用线程池做 // public void getValue() throws Exception{ // HTableInterface table = TableConnection.getConnection().getTable(TableName.valueOf("test_table")); // Get get = new Get(Bytes.toBytes("row_03")); // get.addColumn(Bytes.toBytes("f"), Bytes.toBytes("name")); // org.apache.hadoop.hbase.client.Result rest = table.get(get); // System.out.println(rest.toString()); // table.close(); // } // //生产开发中,建议这样用线程池做 // public void delete() throws Exception{ // HTableInterface table = TableConnection.getConnection().getTable(TableName.valueOf("test_table")); // Delete delete = new Delete(Bytes.toBytes("row_01")); // delete.deleteColumn(Bytes.toBytes("f"), Bytes.toBytes("name"));//deleteColumn是删除某一个列簇里的最新时间戳版本。 //// delete.deleteColumns(Bytes.toBytes("f"), Bytes.toBytes("name"));//delete.deleteColumns是删除某个列簇里的所有时间戳版本。 // table.delete(delete); // table.close(); // // } //生产开发中,建议这样用线程池做 // public void scanValue() throws Exception{ // HTableInterface table = TableConnection.getConnection().getTable(TableName.valueOf("test_table")); // Scan scan = new Scan(); // scan.setStartRow(Bytes.toBytes("row_02"));//包含开始行键 // scan.setStopRow(Bytes.toBytes("row_04"));//不包含结束行键 // scan.addColumn(Bytes.toBytes("f"), Bytes.toBytes("name")); // ResultScanner rst = table.getScanner(scan);//整个循环 // System.out.println(rst.toString()); // for (org.apache.hadoop.hbase.client.Result next = rst.next();next !=null;next = rst.next() ) // { // for(Cell cell:next.rawCells()){//某个row key下的循坏 // System.out.println(next.toString()); // System.out.println("family:" + Bytes.toString(CellUtil.cloneFamily(cell))); // System.out.println("col:" + Bytes.toString(CellUtil.cloneQualifier(cell))); // System.out.println("value" + Bytes.toString(CellUtil.cloneValue(cell))); // } // } // table.close(); // } // //生产开发中,建议这样用线程池做 // public void createTable(String tableName,String family) throws MasterNotRunningException, ZooKeeperConnectionException, IOException{ // Configuration conf = HBaseConfiguration.create(getConfig()); // HBaseAdmin admin = new HBaseAdmin(conf); // HTableDescriptor tableDesc = new HTableDescriptor(TableName.valueOf(tableName)); // HColumnDescriptor hcd = new HColumnDescriptor(family); // hcd.setMaxVersions(3); //// hcd.set//很多的带创建操作,我这里只抛砖引玉的作用 // tableDesc.addFamily(hcd); // admin.createTable(tableDesc); // admin.close(); // } public void deleteTable(String tableName)throws MasterNotRunningException, ZooKeeperConnectionException, IOException{ Configuration conf = HBaseConfiguration.create(getConfig()); HBaseAdmin admin = new HBaseAdmin(conf); admin.disableTable(tableName); admin.deleteTable(tableName); admin.close(); } public static Configuration getConfig(){ Configuration configuration = new Configuration(); // conf.set("hbase.rootdir","hdfs:HadoopMaster:9000/hbase"); configuration.set("hbase.zookeeper.quorum", "HadoopMaster:2181,HadoopSlave1:2181,HadoopSlave2:2181"); return configuration; } } 3、先判断表是否存在,再来删除HBase表(生产开发首推) package zhouls.bigdata.HbaseProject.Pool; import java.io.IOException; import zhouls.bigdata.HbaseProject.Pool.TableConnection; import javax.xml.transform.Result; import org.apache.hadoop.conf.Configuration; import org.apache.hadoop.hbase.Cell; import org.apache.hadoop.hbase.CellUtil; import org.apache.hadoop.hbase.HBaseConfiguration; import org.apache.hadoop.hbase.HColumnDescriptor; import org.apache.hadoop.hbase.HTableDescriptor; import org.apache.hadoop.hbase.MasterNotRunningException; import org.apache.hadoop.hbase.TableName; import org.apache.hadoop.hbase.ZooKeeperConnectionException; import org.apache.hadoop.hbase.client.Delete; import org.apache.hadoop.hbase.client.Get; import org.apache.hadoop.hbase.client.HBaseAdmin; import org.apache.hadoop.hbase.client.HTable; import org.apache.hadoop.hbase.client.HTableInterface; import org.apache.hadoop.hbase.client.Put; import org.apache.hadoop.hbase.client.ResultScanner; import org.apache.hadoop.hbase.client.Scan; import org.apache.hadoop.hbase.util.Bytes; public class HBaseTest { public static void main(String[] args) throws Exception { // HTable table = new HTable(getConfig(),TableName.valueOf("test_table"));//表名是test_table // Put put = new Put(Bytes.toBytes("row_04"));//行键是row_04 // put.add(Bytes.toBytes("f"),Bytes.toBytes("name"),Bytes.toBytes("Andy1"));//列簇是f,列修饰符是name,值是Andy0 // put.add(Bytes.toBytes("f2"),Bytes.toBytes("name"),Bytes.toBytes("Andy3"));//列簇是f2,列修饰符是name,值是Andy3 // table.put(put); // table.close(); // Get get = new Get(Bytes.toBytes("row_04")); // get.addColumn(Bytes.toBytes("f1"), Bytes.toBytes("age"));如现在这样,不指定,默认把所有的全拿出来 // org.apache.hadoop.hbase.client.Result rest = table.get(get); // System.out.println(rest.toString()); // table.close(); // Delete delete = new Delete(Bytes.toBytes("row_2")); // delete.deleteColumn(Bytes.toBytes("f1"), Bytes.toBytes("email")); // delete.deleteColumn(Bytes.toBytes("f1"), Bytes.toBytes("name")); // table.delete(delete); // table.close(); // Delete delete = new Delete(Bytes.toBytes("row_04")); //// delete.deleteColumn(Bytes.toBytes("f"), Bytes.toBytes("name"));//deleteColumn是删除某一个列簇里的最新时间戳版本。 // delete.deleteColumns(Bytes.toBytes("f"), Bytes.toBytes("name"));//delete.deleteColumns是删除某个列簇里的所有时间戳版本。 // table.delete(delete); // table.close(); // Scan scan = new Scan(); // scan.setStartRow(Bytes.toBytes("row_01"));//包含开始行键 // scan.setStopRow(Bytes.toBytes("row_03"));//不包含结束行键 // scan.addColumn(Bytes.toBytes("f"), Bytes.toBytes("name")); // ResultScanner rst = table.getScanner(scan);//整个循环 // System.out.println(rst.toString()); // for (org.apache.hadoop.hbase.client.Result next = rst.next();next !=null;next = rst.next() ) // { // for(Cell cell:next.rawCells()){//某个row key下的循坏 // System.out.println(next.toString()); // System.out.println("family:" + Bytes.toString(CellUtil.cloneFamily(cell))); // System.out.println("col:" + Bytes.toString(CellUtil.cloneQualifier(cell))); // System.out.println("value" + Bytes.toString(CellUtil.cloneValue(cell))); // } // } // table.close(); HBaseTest hbasetest =new HBaseTest(); // hbasetest.insertValue(); // hbasetest.getValue(); // hbasetest.delete(); // hbasetest.scanValue(); // hbasetest.createTable("test_table4", "f"); hbasetest.deleteTable("test_table4");//先判断表是否存在,再来删除HBase表(生产开发首推) } //生产开发中,建议这样用线程池做 // public void insertValue() throws Exception{ // HTableInterface table = TableConnection.getConnection().getTable(TableName.valueOf("test_table")); // Put put = new Put(Bytes.toBytes("row_01"));//行键是row_01 // put.add(Bytes.toBytes("f"),Bytes.toBytes("name"),Bytes.toBytes("Andy0")); // table.put(put); // table.close(); // } //生产开发中,建议这样用线程池做 // public void getValue() throws Exception{ // HTableInterface table = TableConnection.getConnection().getTable(TableName.valueOf("test_table")); // Get get = new Get(Bytes.toBytes("row_03")); // get.addColumn(Bytes.toBytes("f"), Bytes.toBytes("name")); // org.apache.hadoop.hbase.client.Result rest = table.get(get); // System.out.println(rest.toString()); // table.close(); // } // //生产开发中,建议这样用线程池做 // public void delete() throws Exception{ // HTableInterface table = TableConnection.getConnection().getTable(TableName.valueOf("test_table")); // Delete delete = new Delete(Bytes.toBytes("row_01")); // delete.deleteColumn(Bytes.toBytes("f"), Bytes.toBytes("name"));//deleteColumn是删除某一个列簇里的最新时间戳版本。 //// delete.deleteColumns(Bytes.toBytes("f"), Bytes.toBytes("name"));//delete.deleteColumns是删除某个列簇里的所有时间戳版本。 // table.delete(delete); // table.close(); // // } //生产开发中,建议这样用线程池做 // public void scanValue() throws Exception{ // HTableInterface table = TableConnection.getConnection().getTable(TableName.valueOf("test_table")); // Scan scan = new Scan(); // scan.setStartRow(Bytes.toBytes("row_02"));//包含开始行键 // scan.setStopRow(Bytes.toBytes("row_04"));//不包含结束行键 // scan.addColumn(Bytes.toBytes("f"), Bytes.toBytes("name")); // ResultScanner rst = table.getScanner(scan);//整个循环 // System.out.println(rst.toString()); // for (org.apache.hadoop.hbase.client.Result next = rst.next();next !=null;next = rst.next() ) // { // for(Cell cell:next.rawCells()){//某个row key下的循坏 // System.out.println(next.toString()); // System.out.println("family:" + Bytes.toString(CellUtil.cloneFamily(cell))); // System.out.println("col:" + Bytes.toString(CellUtil.cloneQualifier(cell))); // System.out.println("value" + Bytes.toString(CellUtil.cloneValue(cell))); // } // } // table.close(); // } // //生产开发中,建议这样用线程池做 // public void createTable(String tableName,String family) throws MasterNotRunningException, ZooKeeperConnectionException, IOException{ // Configuration conf = HBaseConfiguration.create(getConfig()); // HBaseAdmin admin = new HBaseAdmin(conf); // HTableDescriptor tableDesc = new HTableDescriptor(TableName.valueOf(tableName)); // HColumnDescriptor hcd = new HColumnDescriptor(family); // hcd.setMaxVersions(3); //// hcd.set//很多的带创建操作,我这里只抛砖引玉的作用 // tableDesc.addFamily(hcd); // admin.createTable(tableDesc); // admin.close(); // } public void deleteTable(String tableName)throws MasterNotRunningException, ZooKeeperConnectionException, IOException{ Configuration conf = HBaseConfiguration.create(getConfig()); HBaseAdmin admin = new HBaseAdmin(conf); if (admin.tableExists(tableName)){ admin.disableTable(tableName); admin.deleteTable(tableName); }else{ System.out.println(tableName + "not exist"); } admin.close(); } public static Configuration getConfig(){ Configuration configuration = new Configuration(); // conf.set("hbase.rootdir","hdfs:HadoopMaster:9000/hbase"); configuration.set("hbase.zookeeper.quorum", "HadoopMaster:2181,HadoopSlave1:2181,HadoopSlave2:2181"); return configuration; } } 2016-12-11 16:27:50,172 INFO [org.apache.hadoop.hbase.zookeeper.RecoverableZooKeeper] - Process identifier=hconnection-0x75e56da connecting to ZooKeeper ensemble=HadoopMaster:2181,HadoopSlave1:2181,HadoopSlave2:2181 2016-12-11 16:27:50,187 INFO [org.apache.zookeeper.ZooKeeper] - Client environment:zookeeper.version=3.4.6-1569965, built on 02/20/2014 09:09 GMT 2016-12-11 16:27:50,187 INFO [org.apache.zookeeper.ZooKeeper] - Client environment:host.name=WIN-BQOBV63OBNM 2016-12-11 16:27:50,187 INFO [org.apache.zookeeper.ZooKeeper] - Client environment:java.version=1.7.0_51 2016-12-11 16:27:50,187 INFO [org.apache.zookeeper.ZooKeeper] - Client environment:java.vendor=Oracle Corporation 2016-12-11 16:27:50,187 INFO [org.apache.zookeeper.ZooKeeper] - Client environment:java.home=C:\Program Files\Java\jdk1.7.0_51\jre 2016-12-11 16:27:50,187 INFO [org.apache.zookeeper.ZooKeeper] - Client environment:java.class.path=D:\Code\MyEclipseJavaCode\HbaseProject\bin;D:\SoftWare\hbase-1.2.3\lib\activation-1.1.jar;D:\SoftWare\hbase-1.2.3\lib\aopalliance-1.0.jar;D:\SoftWare\hbase-1.2.3\lib\apacheds-i18n-2.0.0-M15.jar;D:\SoftWare\hbase-1.2.3\lib\apacheds-kerberos-codec-2.0.0-M15.jar;D:\SoftWare\hbase-1.2.3\lib\api-asn1-api-1.0.0-M20.jar;D:\SoftWare\hbase-1.2.3\lib\api-util-1.0.0-M20.jar;D:\SoftWare\hbase-1.2.3\lib\asm-3.1.jar;D:\SoftWare\hbase-1.2.3\lib\avro-1.7.4.jar;D:\SoftWare\hbase-1.2.3\lib\commons-beanutils-1.7.0.jar;D:\SoftWare\hbase-1.2.3\lib\commons-beanutils-core-1.8.0.jar;D:\SoftWare\hbase-1.2.3\lib\commons-cli-1.2.jar;D:\SoftWare\hbase-1.2.3\lib\commons-codec-1.9.jar;D:\SoftWare\hbase-1.2.3\lib\commons-collections-3.2.2.jar;D:\SoftWare\hbase-1.2.3\lib\commons-compress-1.4.1.jar;D:\SoftWare\hbase-1.2.3\lib\commons-configuration-1.6.jar;D:\SoftWare\hbase-1.2.3\lib\commons-daemon-1.0.13.jar;D:\SoftWare\hbase-1.2.3\lib\commons-digester-1.8.jar;D:\SoftWare\hbase-1.2.3\lib\commons-el-1.0.jar;D:\SoftWare\hbase-1.2.3\lib\commons-httpclient-3.1.jar;D:\SoftWare\hbase-1.2.3\lib\commons-io-2.4.jar;D:\SoftWare\hbase-1.2.3\lib\commons-lang-2.6.jar;D:\SoftWare\hbase-1.2.3\lib\commons-logging-1.2.jar;D:\SoftWare\hbase-1.2.3\lib\commons-math-2.2.jar;D:\SoftWare\hbase-1.2.3\lib\commons-math3-3.1.1.jar;D:\SoftWare\hbase-1.2.3\lib\commons-net-3.1.jar;D:\SoftWare\hbase-1.2.3\lib\disruptor-3.3.0.jar;D:\SoftWare\hbase-1.2.3\lib\findbugs-annotations-1.3.9-1.jar;D:\SoftWare\hbase-1.2.3\lib\guava-12.0.1.jar;D:\SoftWare\hbase-1.2.3\lib\guice-3.0.jar;D:\SoftWare\hbase-1.2.3\lib\guice-servlet-3.0.jar;D:\SoftWare\hbase-1.2.3\lib\hadoop-annotations-2.5.1.jar;D:\SoftWare\hbase-1.2.3\lib\hadoop-auth-2.5.1.jar;D:\SoftWare\hbase-1.2.3\lib\hadoop-client-2.5.1.jar;D:\SoftWare\hbase-1.2.3\lib\hadoop-common-2.5.1.jar;D:\SoftWare\hbase-1.2.3\lib\hadoop-hdfs-2.5.1.jar;D:\SoftWare\hbase-1.2.3\lib\hadoop-mapreduce-client-app-2.5.1.jar;D:\SoftWare\hbase-1.2.3\lib\hadoop-mapreduce-client-common-2.5.1.jar;D:\SoftWare\hbase-1.2.3\lib\hadoop-mapreduce-client-core-2.5.1.jar;D:\SoftWare\hbase-1.2.3\lib\hadoop-mapreduce-client-jobclient-2.5.1.jar;D:\SoftWare\hbase-1.2.3\lib\hadoop-mapreduce-client-shuffle-2.5.1.jar;D:\SoftWare\hbase-1.2.3\lib\hadoop-yarn-api-2.5.1.jar;D:\SoftWare\hbase-1.2.3\lib\hadoop-yarn-client-2.5.1.jar;D:\SoftWare\hbase-1.2.3\lib\hadoop-yarn-common-2.5.1.jar;D:\SoftWare\hbase-1.2.3\lib\hadoop-yarn-server-common-2.5.1.jar;D:\SoftWare\hbase-1.2.3\lib\hbase-annotations-1.2.3.jar;D:\SoftWare\hbase-1.2.3\lib\hbase-annotations-1.2.3-tests.jar;D:\SoftWare\hbase-1.2.3\lib\hbase-client-1.2.3.jar;D:\SoftWare\hbase-1.2.3\lib\hbase-common-1.2.3.jar;D:\SoftWare\hbase-1.2.3\lib\hbase-common-1.2.3-tests.jar;D:\SoftWare\hbase-1.2.3\lib\hbase-examples-1.2.3.jar;D:\SoftWare\hbase-1.2.3\lib\hbase-external-blockcache-1.2.3.jar;D:\SoftWare\hbase-1.2.3\lib\hbase-hadoop2-compat-1.2.3.jar;D:\SoftWare\hbase-1.2.3\lib\hbase-hadoop-compat-1.2.3.jar;D:\SoftWare\hbase-1.2.3\lib\hbase-it-1.2.3.jar;D:\SoftWare\hbase-1.2.3\lib\hbase-it-1.2.3-tests.jar;D:\SoftWare\hbase-1.2.3\lib\hbase-prefix-tree-1.2.3.jar;D:\SoftWare\hbase-1.2.3\lib\hbase-procedure-1.2.3.jar;D:\SoftWare\hbase-1.2.3\lib\hbase-protocol-1.2.3.jar;D:\SoftWare\hbase-1.2.3\lib\hbase-resource-bundle-1.2.3.jar;D:\SoftWare\hbase-1.2.3\lib\hbase-rest-1.2.3.jar;D:\SoftWare\hbase-1.2.3\lib\hbase-server-1.2.3.jar;D:\SoftWare\hbase-1.2.3\lib\hbase-server-1.2.3-tests.jar;D:\SoftWare\hbase-1.2.3\lib\hbase-shell-1.2.3.jar;D:\SoftWare\hbase-1.2.3\lib\hbase-thrift-1.2.3.jar;D:\SoftWare\hbase-1.2.3\lib\htrace-core-3.1.0-incubating.jar;D:\SoftWare\hbase-1.2.3\lib\httpclient-4.2.5.jar;D:\SoftWare\hbase-1.2.3\lib\httpcore-4.4.1.jar;D:\SoftWare\hbase-1.2.3\lib\jackson-core-asl-1.9.13.jar;D:\SoftWare\hbase-1.2.3\lib\jackson-jaxrs-1.9.13.jar;D:\SoftWare\hbase-1.2.3\lib\jackson-mapper-asl-1.9.13.jar;D:\SoftWare\hbase-1.2.3\lib\jackson-xc-1.9.13.jar;D:\SoftWare\hbase-1.2.3\lib\jamon-runtime-2.4.1.jar;D:\SoftWare\hbase-1.2.3\lib\jasper-compiler-5.5.23.jar;D:\SoftWare\hbase-1.2.3\lib\jasper-runtime-5.5.23.jar;D:\SoftWare\hbase-1.2.3\lib\javax.inject-1.jar;D:\SoftWare\hbase-1.2.3\lib\java-xmlbuilder-0.4.jar;D:\SoftWare\hbase-1.2.3\lib\jaxb-api-2.2.2.jar;D:\SoftWare\hbase-1.2.3\lib\jaxb-impl-2.2.3-1.jar;D:\SoftWare\hbase-1.2.3\lib\jcodings-1.0.8.jar;D:\SoftWare\hbase-1.2.3\lib\jersey-client-1.9.jar;D:\SoftWare\hbase-1.2.3\lib\jersey-core-1.9.jar;D:\SoftWare\hbase-1.2.3\lib\jersey-guice-1.9.jar;D:\SoftWare\hbase-1.2.3\lib\jersey-json-1.9.jar;D:\SoftWare\hbase-1.2.3\lib\jersey-server-1.9.jar;D:\SoftWare\hbase-1.2.3\lib\jets3t-0.9.0.jar;D:\SoftWare\hbase-1.2.3\lib\jettison-1.3.3.jar;D:\SoftWare\hbase-1.2.3\lib\jetty-6.1.26.jar;D:\SoftWare\hbase-1.2.3\lib\jetty-sslengine-6.1.26.jar;D:\SoftWare\hbase-1.2.3\lib\jetty-util-6.1.26.jar;D:\SoftWare\hbase-1.2.3\lib\joni-2.1.2.jar;D:\SoftWare\hbase-1.2.3\lib\jruby-complete-1.6.8.jar;D:\SoftWare\hbase-1.2.3\lib\jsch-0.1.42.jar;D:\SoftWare\hbase-1.2.3\lib\jsp-2.1-6.1.14.jar;D:\SoftWare\hbase-1.2.3\lib\jsp-api-2.1-6.1.14.jar;D:\SoftWare\hbase-1.2.3\lib\junit-4.12.jar;D:\SoftWare\hbase-1.2.3\lib\leveldbjni-all-1.8.jar;D:\SoftWare\hbase-1.2.3\lib\libthrift-0.9.3.jar;D:\SoftWare\hbase-1.2.3\lib\log4j-1.2.17.jar;D:\SoftWare\hbase-1.2.3\lib\metrics-core-2.2.0.jar;D:\SoftWare\hbase-1.2.3\lib\netty-all-4.0.23.Final.jar;D:\SoftWare\hbase-1.2.3\lib\paranamer-2.3.jar;D:\SoftWare\hbase-1.2.3\lib\protobuf-java-2.5.0.jar;D:\SoftWare\hbase-1.2.3\lib\servlet-api-2.5.jar;D:\SoftWare\hbase-1.2.3\lib\servlet-api-2.5-6.1.14.jar;D:\SoftWare\hbase-1.2.3\lib\slf4j-api-1.7.7.jar;D:\SoftWare\hbase-1.2.3\lib\slf4j-log4j12-1.7.5.jar;D:\SoftWare\hbase-1.2.3\lib\snappy-java-1.0.4.1.jar;D:\SoftWare\hbase-1.2.3\lib\spymemcached-2.11.6.jar;D:\SoftWare\hbase-1.2.3\lib\xmlenc-0.52.jar;D:\SoftWare\hbase-1.2.3\lib\xz-1.0.jar;D:\SoftWare\hbase-1.2.3\lib\zookeeper-3.4.6.jar 2016-12-11 16:27:50,188 INFO [org.apache.zookeeper.ZooKeeper] - Client environment:java.library.path=C:\Program Files\Java\jdk1.7.0_51\bin;C:\Windows\Sun\Java\bin;C:\Windows\system32;C:\Windows;C:\ProgramData\Oracle\Java\javapath;C:\Python27\;C:\Python27\Scripts;C:\Windows\system32;C:\Windows;C:\Windows\System32\Wbem;C:\Windows\System32\WindowsPowerShell\v1.0\;D:\SoftWare\MATLAB R2013a\runtime\win64;D:\SoftWare\MATLAB R2013a\bin;C:\Program Files (x86)\IDM Computer Solutions\UltraCompare;C:\Program Files\Java\jdk1.7.0_51\bin;C:\Program Files\Java\jdk1.7.0_51\jre\bin;D:\SoftWare\apache-ant-1.9.0\bin;HADOOP_HOME\bin;D:\SoftWare\apache-maven-3.3.9\bin;D:\SoftWare\Scala\bin;D:\SoftWare\Scala\jre\bin;%MYSQL_HOME\bin;D:\SoftWare\MySQL Server\MySQL Server 5.0\bin;D:\SoftWare\apache-tomcat-7.0.69\bin;%C:\Windows\System32;%C:\Windows\SysWOW64;D:\SoftWare\SSH Secure Shell;. 2016-12-11 16:27:50,188 INFO [org.apache.zookeeper.ZooKeeper] - Client environment:java.io.tmpdir=C:\Users\ADMINI~1\AppData\Local\Temp\ 2016-12-11 16:27:50,188 INFO [org.apache.zookeeper.ZooKeeper] - Client environment:java.compiler=<NA> 2016-12-11 16:27:50,188 INFO [org.apache.zookeeper.ZooKeeper] - Client environment:os.name=Windows 7 2016-12-11 16:27:50,188 INFO [org.apache.zookeeper.ZooKeeper] - Client environment:os.arch=amd64 2016-12-11 16:27:50,188 INFO [org.apache.zookeeper.ZooKeeper] - Client environment:os.version=6.1 2016-12-11 16:27:50,188 INFO [org.apache.zookeeper.ZooKeeper] - Client environment:user.name=Administrator 2016-12-11 16:27:50,188 INFO [org.apache.zookeeper.ZooKeeper] - Client environment:user.home=C:\Users\Administrator 2016-12-11 16:27:50,189 INFO [org.apache.zookeeper.ZooKeeper] - Client environment:user.dir=D:\Code\MyEclipseJavaCode\HbaseProject 2016-12-11 16:27:50,190 INFO [org.apache.zookeeper.ZooKeeper] - Initiating client connection, connectString=HadoopMaster:2181,HadoopSlave1:2181,HadoopSlave2:2181 sessionTimeout=90000 watcher=hconnection-0x75e56da0x0, quorum=HadoopMaster:2181,HadoopSlave1:2181,HadoopSlave2:2181, baseZNode=/hbase 2016-12-11 16:27:50,251 INFO [org.apache.zookeeper.ClientCnxn] - Opening socket connection to server HadoopSlave1/192.168.80.11:2181. Will not attempt to authenticate using SASL (unknown error) 2016-12-11 16:27:50,253 INFO [org.apache.zookeeper.ClientCnxn] - Socket connection established to HadoopSlave1/192.168.80.11:2181, initiating session 2016-12-11 16:27:50,269 INFO [org.apache.zookeeper.ClientCnxn] - Session establishment complete on server HadoopSlave1/192.168.80.11:2181, sessionid = 0x25872b4d2c50021, negotiated timeout = 40000test_table4not exist 2016-12-11 16:27:51,483 INFO [org.apache.hadoop.hbase.client.ConnectionManager$HConnectionImplementation] - Closing zookeeper sessionid=0x25872b4d2c50021 2016-12-11 16:27:51,725 INFO [org.apache.zookeeper.ZooKeeper] - Session: 0x25872b4d2c50021 closed 2016-12-11 16:27:51,735 INFO [org.apache.zookeeper.ClientCnxn] - EventThread shut down 本文转自大数据躺过的坑博客园博客,原文链接:http://www.cnblogs.com/zlslch/p/6159857.html,如需转载请自行联系原作者


优秀的个人博客,低调大师

HBase编程 API入门系列之modify(管理端而言)(10)

这里,我带领大家,学习更高级的,因为,在开发中,尽量不能去服务器上修改表。 所以,在管理端来修改HBase表。采用线程池的方式(也是生产开发里首推的) package zhouls.bigdata.HbaseProject.Pool; import java.io.IOException; import java.util.concurrent.ExecutorService; import java.util.concurrent.Executors; import org.apache.hadoop.conf.Configuration; import org.apache.hadoop.hbase.HBaseConfiguration; import org.apache.hadoop.hbase.client.HConnection; import org.apache.hadoop.hbase.client.HConnectionManager; public class TableConnection { private TableConnection(){ } private static HConnection connection = null; public static HConnection getConnection(){ if(connection == null){ ExecutorService pool = Executors.newFixedThreadPool(10);//建立一个固定大小的线程池 Configuration conf = HBaseConfiguration.create(); conf.set("hbase.zookeeper.quorum","HadoopMaster:2181,HadoopSlave1:2181,HadoopSlave2:2181"); try{ connection = HConnectionManager.createConnection(conf,pool);//创建连接时,拿到配置文件和线程池 }catch (IOException e){ } } return connection; } } 1、修改HBase表 暂时,有错误 package zhouls.bigdata.HbaseProject.Pool; import java.io.IOException; import zhouls.bigdata.HbaseProject.Pool.TableConnection; import javax.xml.transform.Result; import org.apache.hadoop.conf.Configuration; import org.apache.hadoop.hbase.Cell; import org.apache.hadoop.hbase.CellUtil; import org.apache.hadoop.hbase.HBaseConfiguration; import org.apache.hadoop.hbase.HColumnDescriptor; import org.apache.hadoop.hbase.HTableDescriptor; import org.apache.hadoop.hbase.MasterNotRunningException; import org.apache.hadoop.hbase.NamespaceDescriptor; import org.apache.hadoop.hbase.TableName; import org.apache.hadoop.hbase.ZooKeeperConnectionException; import org.apache.hadoop.hbase.client.Delete; import org.apache.hadoop.hbase.client.Get; import org.apache.hadoop.hbase.client.HBaseAdmin; import org.apache.hadoop.hbase.client.HTable; import org.apache.hadoop.hbase.client.HTableInterface; import org.apache.hadoop.hbase.client.Put; import org.apache.hadoop.hbase.client.ResultScanner; import org.apache.hadoop.hbase.client.Scan; import org.apache.hadoop.hbase.util.Bytes; public class HBaseTest { public static void main(String[] args) throws Exception { // HTable table = new HTable(getConfig(),TableName.valueOf("test_table"));//表名是test_table // Put put = new Put(Bytes.toBytes("row_04"));//行键是row_04 // put.add(Bytes.toBytes("f"),Bytes.toBytes("name"),Bytes.toBytes("Andy1"));//列簇是f,列修饰符是name,值是Andy0 // put.add(Bytes.toBytes("f2"),Bytes.toBytes("name"),Bytes.toBytes("Andy3"));//列簇是f2,列修饰符是name,值是Andy3 // table.put(put); // table.close(); // Get get = new Get(Bytes.toBytes("row_04")); // get.addColumn(Bytes.toBytes("f1"), Bytes.toBytes("age"));如现在这样,不指定,默认把所有的全拿出来 // org.apache.hadoop.hbase.client.Result rest = table.get(get); // System.out.println(rest.toString()); // table.close(); // Delete delete = new Delete(Bytes.toBytes("row_2")); // delete.deleteColumn(Bytes.toBytes("f1"), Bytes.toBytes("email")); // delete.deleteColumn(Bytes.toBytes("f1"), Bytes.toBytes("name")); // table.delete(delete); // table.close(); // Delete delete = new Delete(Bytes.toBytes("row_04")); //// delete.deleteColumn(Bytes.toBytes("f"), Bytes.toBytes("name"));//deleteColumn是删除某一个列簇里的最新时间戳版本。 // delete.deleteColumns(Bytes.toBytes("f"), Bytes.toBytes("name"));//delete.deleteColumns是删除某个列簇里的所有时间戳版本。 // table.delete(delete); // table.close(); // Scan scan = new Scan(); // scan.setStartRow(Bytes.toBytes("row_01"));//包含开始行键 // scan.setStopRow(Bytes.toBytes("row_03"));//不包含结束行键 // scan.addColumn(Bytes.toBytes("f"), Bytes.toBytes("name")); // ResultScanner rst = table.getScanner(scan);//整个循环 // System.out.println(rst.toString()); // for (org.apache.hadoop.hbase.client.Result next = rst.next();next !=null;next = rst.next() ) // { // for(Cell cell:next.rawCells()){//某个row key下的循坏 // System.out.println(next.toString()); // System.out.println("family:" + Bytes.toString(CellUtil.cloneFamily(cell))); // System.out.println("col:" + Bytes.toString(CellUtil.cloneQualifier(cell))); // System.out.println("value" + Bytes.toString(CellUtil.cloneValue(cell))); // } // } // table.close(); HBaseTest hbasetest =new HBaseTest(); // hbasetest.insertValue(); // hbasetest.getValue(); // hbasetest.delete(); // hbasetest.scanValue(); hbasetest.createTable("test_table3", "f");//先判断表是否存在,再来创建HBase表(生产开发首推) // hbasetest.deleteTable("test_table4");//先判断表是否存在,再来删除HBase表(生产开发首推) // hbasetest.modifyTable("test_table","row_02","f",'f:age'); } //生产开发中,建议这样用线程池做 // public void insertValue() throws Exception{ // HTableInterface table = TableConnection.getConnection().getTable(TableName.valueOf("test_table")); // Put put = new Put(Bytes.toBytes("row_01"));//行键是row_01 // put.add(Bytes.toBytes("f"),Bytes.toBytes("name"),Bytes.toBytes("Andy0")); // table.put(put); // table.close(); // } //生产开发中,建议这样用线程池做 // public void getValue() throws Exception{ // HTableInterface table = TableConnection.getConnection().getTable(TableName.valueOf("test_table")); // Get get = new Get(Bytes.toBytes("row_03")); // get.addColumn(Bytes.toBytes("f"), Bytes.toBytes("name")); // org.apache.hadoop.hbase.client.Result rest = table.get(get); // System.out.println(rest.toString()); // table.close(); // } // //生产开发中,建议这样用线程池做 // public void delete() throws Exception{ // HTableInterface table = TableConnection.getConnection().getTable(TableName.valueOf("test_table")); // Delete delete = new Delete(Bytes.toBytes("row_01")); // delete.deleteColumn(Bytes.toBytes("f"), Bytes.toBytes("name"));//deleteColumn是删除某一个列簇里的最新时间戳版本。 //// delete.deleteColumns(Bytes.toBytes("f"), Bytes.toBytes("name"));//delete.deleteColumns是删除某个列簇里的所有时间戳版本。 // table.delete(delete); // table.close(); // // } //生产开发中,建议这样用线程池做 // public void scanValue() throws Exception{ // HTableInterface table = TableConnection.getConnection().getTable(TableName.valueOf("test_table")); // Scan scan = new Scan(); // scan.setStartRow(Bytes.toBytes("row_02"));//包含开始行键 // scan.setStopRow(Bytes.toBytes("row_04"));//不包含结束行键 // scan.addColumn(Bytes.toBytes("f"), Bytes.toBytes("name")); // ResultScanner rst = table.getScanner(scan);//整个循环 // System.out.println(rst.toString()); // for (org.apache.hadoop.hbase.client.Result next = rst.next();next !=null;next = rst.next() ) // { // for(Cell cell:next.rawCells()){//某个row key下的循坏 // System.out.println(next.toString()); // System.out.println("family:" + Bytes.toString(CellUtil.cloneFamily(cell))); // System.out.println("col:" + Bytes.toString(CellUtil.cloneQualifier(cell))); // System.out.println("value" + Bytes.toString(CellUtil.cloneValue(cell))); // } // } // table.close(); // } // //生产开发中,建议这样用线程池做 public void createTable(String tableName,String family) throws MasterNotRunningException, ZooKeeperConnectionException, IOException{ Configuration conf = HBaseConfiguration.create(getConfig()); HBaseAdmin admin = new HBaseAdmin(conf); HTableDescriptor tableDesc = new HTableDescriptor(TableName.valueOf(tableName)); HColumnDescriptor hcd = new HColumnDescriptor(family); hcd.setMaxVersions(3); // hcd.set//很多的带创建操作,我这里只抛砖引玉的作用 tableDesc.addFamily(hcd); if (!admin.tableExists(tableName)){ admin.createTable(tableDesc); }else{ System.out.println(tableName + "exist"); } admin.close(); } public void modifyTable(String tableName,String rowkey,String family,HColumnDescriptor hColumnDescriptor) throws MasterNotRunningException, ZooKeeperConnectionException, IOException{ Configuration conf = HBaseConfiguration.create(getConfig()); HBaseAdmin admin = new HBaseAdmin(conf); // HTableDescriptor tableDesc = new HTableDescriptor(TableName.valueOf(tableName)); HColumnDescriptor hcd = new HColumnDescriptor(family); // NamespaceDescriptor nsd = admin.getNamespaceDescriptor(tableName); // nsd.setConfiguration("hbase.namespace.quota.maxregion", "10"); // nsd.setConfiguration("hbase.namespace.quota.maxtables", "10"); if (admin.tableExists(tableName)){ admin.modifyColumn(tableName, hcd); // admin.modifyTable(tableName, tableDesc); // admin.modifyNamespace(nsd); }else{ System.out.println(tableName + "not exist"); } admin.close(); } //生产开发中,建议这样用线程池做 // public void deleteTable(String tableName)throws MasterNotRunningException, ZooKeeperConnectionException, IOException{ // Configuration conf = HBaseConfiguration.create(getConfig()); // HBaseAdmin admin = new HBaseAdmin(conf); // if (admin.tableExists(tableName)){ // admin.disableTable(tableName); // admin.deleteTable(tableName); // }else{ // System.out.println(tableName + "not exist"); // } // admin.close(); // } public static Configuration getConfig(){ Configuration configuration = new Configuration(); // conf.set("hbase.rootdir","hdfs:HadoopMaster:9000/hbase"); configuration.set("hbase.zookeeper.quorum", "HadoopMaster:2181,HadoopSlave1:2181,HadoopSlave2:2181"); return configuration; } } 本文转自大数据躺过的坑博客园博客,原文链接:http://www.cnblogs.com/zlslch/p/6159995.html,如需转载请自行联系原作者

优秀的个人博客,低调大师

OpenStack入门修炼之Cinder服务的部署与测试(17)

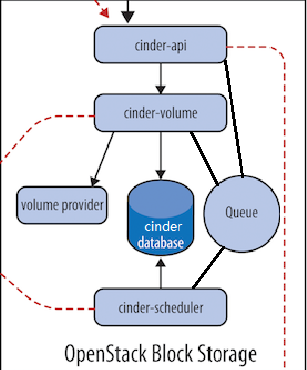
1.理解块存储服务 操作系统获得存储空间的方式一般有两种: 通过某种协议(SAS,SCSI,SAN,iSCSI 等)挂接裸硬盘,然后分区、格式化、创建文件系统;或者直接使用裸硬盘存储数据(数据库) 通过 NFS、CIFS 等 协议,mount 远程的文件系统 第一种裸硬盘的方式叫做 Block Storage(块存储),每个裸硬盘通常也称作 Volume(卷) 第二种叫做文件系统存储。NAS 和 NFS 服务器,以及各种分布式文件系统提供的都是这种存储。 OpenStack 提供 Block Storage Service 的是 Cinder,其具体功能是: ①提供 REST API 使用户能够查询和管理 volume、volume snapshot 以及 volume type ②提供 scheduler 调度 volume 创建请求,合理优化存储资源的分配 ③通过 driver 架构支持多种 back-end(后端)存储方式,包括 LVM,NFS,Ceph,GlusterFS 2.Cinder 架构以及块存储服务组件介绍 Cinder逻辑架构图: cinder不是一个存储软件,而是属于管理存储软件。块存储服务通常包含下列组件: cinder-api: 接受API请求,调用 cinder-volume 执行操作。 cinder-volume:与块存储服务和例如“cinder scheduler”的进程进行交互 cinder-scheduler守护进程:scheduler 通过调度算法选择最合适的存储节点创建 volume,和nova-scheduler类似 cinder-backup daemon:备份进程 消息队列:Cinder 各个子服务通过消息队列实现进程间通信和相互协作。因为有了消息队列,子服务之间实现了解耦,这种松散的结构也是分布式系统的重要特征。 Database:Cinder 有一些数据需要存放到数据库中,一般使用 MySQL。数据库是安装在控制节点上的,比如实验环境中,可以访问名称为“cinder”的数据库。 3.物理部署方案 Cinder 的服务会部署在两类节点上,控制节点和存储节点。 查看当前计算节点cinder的相关服务 [root@linux-node1 ~]# ps -e |grep cinder 1150 ? 01:19:09 cinder-api 2025 ? 00:02:15 cinder-api 3357 ? 00:17:16 cinder-schedule 24069 ? 00:27:01 cinder-volume 24089 ? 00:04:19 cinder-volume cinder-api和cinder-schedule都部署在控制节点上,这无可厚非,思考:但是cinder-volume是否应该部署在存储节点上呢? 实际上,OpenStack是一个分布式系统,其每个组件的子服务都可以部署在任何节点上,只需要网络可通,这也表明了OpenStack的灵活性。无论哪个节点,只要运行了cinder-volume,它就是一个存储节点。同时,存储节点也可以部署其他组件的子服务。 4.安装组件并配置 (1)安装软件包 [root@linux-node1 ~]# yum install -y openstack-cinder (2)修改配置:/etc/cinder/cinder.conf [root@linux-node1 ~]# vim /etc/cinder/cinder.conf [database] <==配置数据库访问 connection = mysql+pymysql://cinder:cinder@192.168.56.11/cinder [DEFAULT] transport_url = rabbit://openstack:openstack@192.168.56.11 <==配置RabbitMQ消息队列访问权限 auth_strategy = keystone <==启动用keystoen认证 [keystone_authtoken] <==配置认证服务访问 auth_uri = http://192.168.56.11:5000 auth_url = http://192.168.56.11:35357 memcached_servers = 192.168.56.11:11211 auth_type = password project_domain_name = default user_domain_name = default project_name = service username = cinder password = cinder [oslo_concurrency] <==配置锁路径 lock_path = /var/lib/cinder/tmp 查看配置: [root@linux-node1 ~]# grep "^[a-z]" /etc/cinder/cinder.conf auth_strategy = keystone transport_url = rabbit://openstack:openstack@192.168.56.11 connection = mysql+pymysql://cinder:cinder@192.168.56.11/cinder auth_uri = http://192.168.56.11:5000 auth_url = http://192.168.56.11:35357 memcached_servers = 192.168.56.11:11211 auth_type = password project_domain_name = default user_domain_name = default project_name = service username = cinder password = cinder lock_path = /var/lib/cinder/tmp 5.初始化块存储服务的数据库,并验证 [root@linux-node1 ~]# su -s /bin/sh -c "cinder-manage db sync" cinder [root@linux-node1 ~]# mysql -h 192.168.56.11 -ucinder -pcinder -e "use cinder;show tables;" 6.配置计算服务以使用块设备存储 [root@linux-node1 ~]# vim /etc/nova/nova.conf [cinder] os_region_name=RegionOne 7.完成安装 [root@linux-node1 ~]# systemctl restart openstack-nova-api.service [root@linux-node1 ~]# systemctl enable openstack-cinder-api.service openstack-cinder-scheduler.service [root@linux-node1 ~]# systemctl start openstack-cinder-api.service openstack-cinder-scheduler.service 8.创建cinder和cinderv2服务实体 [root@linux-node1 ~]# openstack service create --name cinder \ > --description "OpenStack Block Storage" volume +-------------+----------------------------------+ | Field | Value | +-------------+----------------------------------+ | description | OpenStack Block Storage | | enabled | True | | id | c63c93beff014724b036a811e2b0d591 | | name | cinder | | type | volume | +-------------+----------------------------------+ [root@linux-node1 ~]# openstack service create --name cinderv2 \ > --description "OpenStack Block Storage" volumev2 +-------------+----------------------------------+ | Field | Value | +-------------+----------------------------------+ | description | OpenStack Block Storage | | enabled | True | | id | 6829915c1f9745409ca9bda364fe26c4 | | name | cinderv2 | | type | volumev2 | +-------------+----------------------------------+ 9.创建块设备存储服务的API入口点 [root@linux-node1 ~]# openstack endpoint create --region RegionOne \ volume public http://192.168.56.11:8776/v1/%\(tenant_id\)s [root@linux-node1 ~]# openstack endpoint create --region RegionOne \ volume internal http://192.168.56.11:8776/v1/%\(tenant_id\)s [root@linux-node1 ~]# openstack endpoint create --region RegionOne \ volume admin http://192.168.56.11:8776/v1/%\(tenant_id\)s [root@linux-node1 ~]# openstack endpoint create --region RegionOne \ volumev2 public http://192.168.56.11:8776/v2/%\(tenant_id\)s [root@linux-node1 ~]# openstack endpoint create --region RegionOne \ volumev2 internal http://192.168.56.11:8776/v2/%\(tenant_id\)s [root@linux-node1 ~]# openstack endpoint create --region RegionOne \ volumev2 admin http://192.168.56.11:8776/v2/%\(tenant_id\)s [root@linux-node1 ~]# openstack service list +----------------------------------+----------+----------+ | ID | Name | Type | +----------------------------------+----------+----------+ | 18b41a6647e84ef68c5df6058c2f4eab | glance | image | | 436e446b475a46fa978349211d6c64eb | keystone | identity | | 613a3d7e61574fdbb7c330f6892a1b50 | neutron | network | | 6829915c1f9745409ca9bda364fe26c4 | cinderv2 | volumev2 | | 7347593df9034e369d27caf8f0240470 | nova | compute | | c63c93beff014724b036a811e2b0d591 | cinder | volume | +----------------------------------+----------+----------+ [root@linux-node1 ~]# openstack endpoint list +----------------------------------+-----------+--------------+--------------+---------+-----------+----------------------------------------------+ | ID | Region | Service Name | Service Type | Enabled | Interface | URL | +----------------------------------+-----------+--------------+--------------+---------+-----------+----------------------------------------------+ | 0ae3e6275b4c4c20a7e8619909726bd4 | RegionOne | cinder | volume | True | internal | http://192.168.56.11:8776/v1/%(tenant_id)s | | 1fba971a2dc6424eaa06ef61c910e739 | RegionOne | cinder | volume | True | admin | http://192.168.56.11:8776/v1/%(tenant_id)s | | 20222ecb6eeb4f378035e79c47810b08 | RegionOne | keystone | identity | True | public | http://192.168.56.11:5000/v3/ | | 45fd632b46684fdca9782a1e23b91f8c | RegionOne | glance | image | True | admin | http://192.168.56.11:9292 | | 64f9ee02b5d0489598f31e164d40e6df | RegionOne | nova | compute | True | public | http://192.168.56.11:8774/v2.1/%(tenant_id)s | | 6cc75ee06e5245059e106e89e1643a92 | RegionOne | keystone | identity | True | internal | http://192.168.56.11:35357/v3/ | | 77f141dede894dea877d505b60e60de7 | RegionOne | nova | compute | True | internal | http://192.168.56.11:8774/v2.1/%(tenant_id)s | | 7883d0f227a54ac5a0db3ad3a02606df | RegionOne | nova | compute | True | admin | http://192.168.56.11:8774/v2.1/%(tenant_id)s | | 7c7b33e8c2ac431aa7380ceeac80fb37 | RegionOne | keystone | identity | True | admin | http://192.168.56.11:35357/v3/ | | 84e4273b741148e2a2d9c71d2c62da1e | RegionOne | cinder | volume | True | public | http://192.168.56.11:8776/v1/%(tenant_id)s | | abd82401a31d453ca2e28fc17816fd6c | RegionOne | neutron | network | True | public | http://192.168.56.11:9696 | | af72b7e0d3824c1e82663d06c1bd0205 | RegionOne | glance | image | True | internal | http://192.168.56.11:9292 | | cb6a870ba8a543ee882afe4b07d3c087 | RegionOne | neutron | network | True | admin | http://192.168.56.11:9696 | | e27bccfa73984db889f9373f288b4c67 | RegionOne | cinderv2 | volumev2 | True | internal | http://192.168.56.11:8776/v2/%(tenant_id)s | | e3a7e437be8a4cf1968c82ceca932d57 | RegionOne | glance | image | True | public | http://192.168.56.11:9292 | | e54250bd44384b15b5bbf1bb6eb34337 | RegionOne | cinderv2 | volumev2 | True | admin | http://192.168.56.11:8776/v2/%(tenant_id)s | | eba3e70ff0a44ab28898169f4807145f | RegionOne | cinderv2 | volumev2 | True | public | http://192.168.56.11:8776/v2/%(tenant_id)s | | f5c7dad4452840d788ed59c905efb3e7 | RegionOne | neutron | network | True | internal | http://192.168.56.11:9696 | +----------------------------------+-----------+--------------+--------------+---------+-----------+----------------------------------------------+ 10.cinder-scheduler的调度 创建 Volume 时,cinder-scheduler 会基于容量、Volume Type 等条件选择出最合适的存储节点,然后让其创建 Volume。 Filter scheduler 是 cinder-scheduler 默认的调度器。 scheduler_driver = cinder.scheduler.filter_scheduler.FilterScheduler scheduler 调度过程如下: 通过过滤器(filter)选择满足条件的存储节点(运行 cinder-volume) 通过权重计算(weighting)选择最优(权重值最大)的存储节点。 本文转自 IT_外卖小哥 51CTO博客,原文链接:http://blog.51cto.com/jinlong/2049785

优秀的个人博客,低调大师

OpenStack入门修炼之Glance服务部署与测试(9)

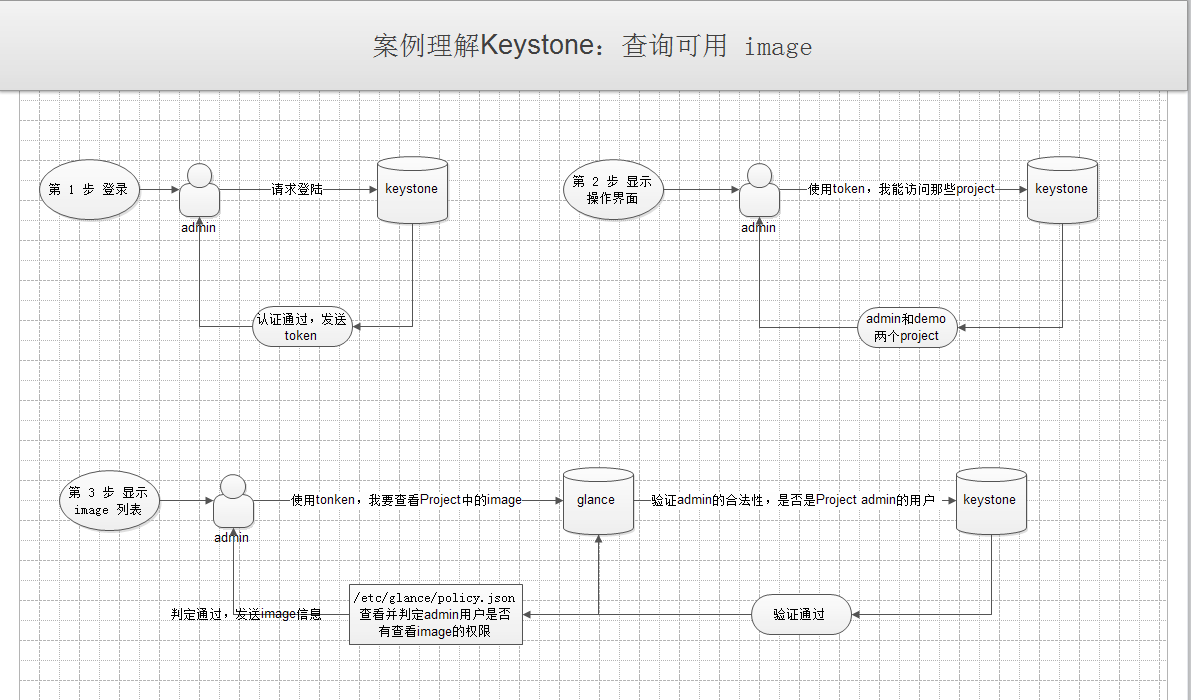
1.Glance服务的介绍 OpenStack镜像服务是IaaS的核心服务,它接受磁盘镜像或服务器镜像API请求,和来自终端用户或OpenStack计算组件的元数据定义。它也支持包括OpenStack对象存储在内的多种类型仓库上的磁盘镜像或服务器镜像存储。 大量周期性进程运行于OpenStack镜像服务上以支持缓存。同步复制(Replication)服务保证集群中的一致性和可用性。其它周期性进程包括auditors, updaters, 和 reapers。 OpenStack镜像服务包括以下组件: glance-api:接收镜像API的调用,诸如镜像发现、恢复、存储。 glance-registry:存储、处理和恢复镜像的元数据,元数据包括项诸如大小和类型。 数据库:存放镜像元数据,用户是可以依据个人喜好选择数据库的,多数的部署使用MySQL或SQLite。 镜像文件的存储仓库: 元数据定义服务:通用的API,是用于为厂商,管理员,服务,以及用户自定义元数据。这种元数据可用于不同的资源,例如镜像,工件,卷,配额以及集合。一个定义包括了新属性的键,描述,约束以及可以与之关联的资源的类型。 2.Glance需要配置的服务:glance-api、glance-registry Glance-api:接受云系统镜像的创建、删除、读取请求 Glance-registry:云系统镜像注册服务 ①Glance-api接收REST API的请求,类似nova-api ②Glance-api在功能上与nova-api十分类似,都是接收REST API请求,然后通过其他模块(glance-registry及Image Store)来完成诸如镜像的查找、‘获取、上传、删除等操作,api默认的监听端口为9292 ③Glance-registry用于与MySQL数据库交互,用于存储或获取镜像的元数据(metadata);提供镜像元数据相关的REST接口,通过glance-registry,可以向数据库写入或获取镜像的各种数据,glance-registry的监听端口为9191。glance的数据库中有两张表,一张是image表,另一张是imgage propetry表。image表保存了镜像的格式、大小等信息;而image propetry表则主要保存镜像的定制化信息。可以通过:mysql -h 192.168.56.11 -uglance -pglance -e "use glance;show tables;"查看表信息 ④image store是一个存储的接口层,通过这个接口,glance可以获取镜像,image store支持有Amazon的S3,OpenStack本身的swift,还有诸如ceph,GlusterFS等分布式存储。Image Store仅仅是一个接口处,具体的实现需要外部的存储支持。 总结: glance-api 是系统后台运行的服务进程。 对外提供 REST API,响应 image 查询、获取和存储的调用。 glance-api 不会真正处理请求。 如果是与 image metadata(元数据)相关的操作,glance-api 会把请求转发给 glance-registry; 如果是与 image 自身存取相关的操作,glance-api 会把请求转发给该 image 的 store 。 3.Glance的部署与测试(此处将glance服务配置在控制节点上) (1)创建“glance”服务实体 [root@linux-node1 ~]# openstack service create --name glance \ > --description "OpenStack Image" image (2)创建镜像服务的 API 端点: [root@linux-node1 ~]# openstack endpoint create --region RegionOne image public http://192.168.56.11:9292 [root@linux-node1 ~]# openstack endpoint create --region RegionOne image internal http://192.168.56.11:9292 [root@linux-node1 ~]# openstack endpoint create --region RegionOne image admin http://192.168.56.11:9292 (3)编辑文件 /etc/glance/glance-api.conf 并完成如下动作: 在 [database] 部分,配置数据库访问: [database] ... connection = mysql+pymysql://glance:glance@192.168.56.11/glance 同步修改/etc/glance/glance-registry.conf 在 [database] 部分,配置数据库访问: [database] ... connection = mysql+pymysql://glance:glance@192.168.56.11/glance (4)同步镜像服务数据库并查看创建是否成功(此处有WARNING可以忽略): [root@linux-node1 ~]# su -s /bin/sh -c "glance-manage db_sync" glance Option "verbose" from group "DEFAULT" is deprecated for removal. Its value may be silently ignored in the future. /usr/lib/python2.7/site-packages/oslo_db/sqlalchemy/enginefacade.py:1171: OsloDBDeprecationWarning: EngineFacade is deprecated; please use oslo_db.sqlalchemy.enginefacade expire_on_commit=expire_on_commit, _conf=conf) /usr/lib/python2.7/site-packages/pymysql/cursors.py:166: Warning: (1831, u"Duplicate index 'ix_image_properties_image_id_name' defined on the table 'glance.image_properties'. This is deprecated and will be disallowed in a future release.") result = self._query(query) [root@linux-node1 ~]# mysql -h 192.168.56.11 -uglance -pglance -e "use glance;show tables;" (5)编辑文件 /etc/glance/glance-api.conf 并完成如下动作: 在 [keystone_authtoken] 和 [paste_deploy] 部分,配置认证服务访问: [keystone_authtoken] ... auth_uri = http://192.168.56.11:5000 auth_url = http://192.168.56.11:35357 memcached_servers = 192.168.56.11:11211 auth_type = password project_domain_name = default user_domain_name = default project_name = service username = glance password = glance [paste_deploy] ... flavor = keystone 同步修改/etc/glance/glance-registry.conf 在 [keystone_authtoken] 和 [paste_deploy] 部分,配置认证服务访问: [keystone_authtoken] ... auth_uri = http://192.168.56.11:5000 auth_url = http://192.168.56.11:35357 memcached_servers = 192.168.56.11:11211 auth_type = password project_domain_name = default user_domain_name = default project_name = service username = glance password = glance [paste_deploy] ... flavor = keystone (6)编辑文件 /etc/glance/glance-api.conf 并完成如下动作: 在 [glance_store] 部分,配置本地文件系统存储和镜像文件位置:只需要打开注释 [glance_store] ... stores = file,http default_store = file filesystem_store_datadir = /var/lib/glance/images/ 到此,glance-api和glance-registry都已经配置完毕 查看glance-api和registry的所有配置 [root@linux-node1 ~]# grep "^[a-z]" /etc/glance/glance-api.conf connection = mysql+pymysql://glance:glance@192.168.56.11/glance stores = file,http \# 配置本地文件系统和镜像存储位置 default_store = file \#默认存储文件类型 filesystem_store_datadir = /var/lib/glance/images \#默认镜像存储位置 auth_uri = http://192.168.56.11:5000 auth_url = http://192.168.56.11:35357 memcached_servers = 192.168.56.11:11211 auth_type = password project_domain_name = default user_domain_name = default project_name = service username = glance password = glance flavor = keystone \#配置认证服务访问 [root@linux-node1 ~]# grep "^[a-z]" /etc/glance/glance-registry.conf connection = mysql+pymysql://glance:glance@192.168.56.11/glance auth_uri = http://192.168.56.11:5000 auth_url = http://192.168.56.11:35357 memcached_servers = 192.168.56.11:11211 auth_type = password project_domain_name = default user_domain_name = default project_name = service username = glance password = glance flavor = keystone (7)完成安装和配置,启动glance服务 [root@linux-node1 ~]# systemctl enable openstack-glance-api.service openstack-glance-registry.service [root@linux-node1 ~]# systemctl start openstack-glance-api.service openstack-glance-registry.service (8)验证操作 ①获得 admin 凭证来获取只有管理员能执行的命令的访问权限: [root@linux-node1 ~]# source admin-openstack ②下载源镜像 [root@linux-node1 ~]# wget http://download.cirros-cloud.net/0.3.4/cirros-0.3.4-x86_64-disk.img ③使用 QCOW2 磁盘格式, bare 容器格式上传镜像到镜像服务并设置公共可见,这样所有的项目都可以访问它: 注: 把镜像放到任意目录下,执行以下命令,进入那个目录,否则要加绝对路径 [root@linux-node1 ~]# openstack image create "cirros" --file cirros-0.3.4-x86_64-disk.img --disk-format qcow2 --container-format bare --public 检查上传结果: [root@linux-node1 ~]# openstack image list 配置总结: ①glance服务需要使用数据库,需要在配置文件中配置数据库连接; ②glance服务使用需要在keystone上进行注册认证,需要在配置文件中配置keystone的验证参数和方式,以及token的存储指定在memcache服务器上; ③glance服务的镜像需要配置存储的类型以及路径。 本文转自 IT_外卖小哥 51CTO博客,原文链接:http://blog.51cto.com/jinlong/2049631

优秀的个人博客,低调大师

Android GIS开发系列-- 入门季(15) 网络图层加载

一、首先我们来看一个网络图层: http://services.arcgisonline.com/arcgis/rest/services/World_Street_Map/MapServer,这是全球街道图。加载的代码也很简单: private static final String WORLD_STREETS_URL = "http://services.arcgisonline.com/ArcGIS/rest/services/World_Street_Map/MapServer"; private MapView mMapView = null; private ArcGISTiledMapServiceLayer mWorldStreetsLayer = null; @Override protected void onCreate(Bundle savedInstanceState) { super.onCreate(savedInstanceState); setContentView(R.layout.activity_main); mMapView = (MapView) findViewById(R.id.map_view); mWorldStreetsLayer = new ArcGISTiledMapServiceLayer(WORLD_STREETS_URL); mMapView.addLayer(mWorldStreetsLayer); mWorldStreetsLayer.setOnStatusChangedListener(new OnStatusChangedListener() { @Override public void onStatusChanged(Object o, STATUS status) { if (status==STATUS.INITIALIZED){ Log.i("huang","加载成功"); }else if(status==STATUS.INITIALIZATION_FAILED||status==STATUS.LAYER_LOADING_FAILED){ Log.i("huang","加载失败"); } } }); } 效果图 问:为什么用ArcGISTiledMapServiceLayer 加载而不用其他图层加载呢? 用浏览器打开http://services.arcgisonline.com/arcgis/rest/services/World_Street_Map/MapServer,可以看到详细信息。 它的子图层只有一个: 下面是坐标信息,注意Single Fused Map Cache: true,支持缓存。 与Tile Info信息, 通过信息说明这是一个TiledLayer,而ArcGISTiledMapServiceLayer是TiledLayer子类的子类,看一下ArcGISTiledMapServiceLayer的介绍。 点开World Street Map链接,http://services.arcgisonline.com/arcgis/rest/services/World_Street_Map/MapServer/0,这是它的唯一子图层。真正加载的也是这个图层 Type虽然说是FeatureLayer,但它得用ArcGISFeatureLayer加载。 ArcGISFeatureLayer arcGISFeatureLayer = new ArcGISFeatureLayer(WORLD_STREETS_URL+"/0", ArcGISFeatureLayer.MODE.ONDEMAND); SimpleFillSymbol simpleFillSymbol = new SimpleFillSymbol(Color.argb(0,0,0,0),SimpleFillSymbol.STYLE.SOLID); mMapView.addLayer(arcGISFeatureLayer); arcGISFeatureLayer.setRenderer(new SimpleRenderer(simpleFillSymbol)); arcGISFeatureLayer.setOnStatusChangedListener(new OnStatusChangedListener() { @Override public void onStatusChanged(Object o, STATUS status) { if (status==STATUS.INITIALIZED){ Log.i("huang","加载成功"); }else if(status==STATUS.INITIALIZATION_FAILED||status==STATUS.LAYER_LOADING_FAILED){ Log.i("huang","加载失败"); } } }); 上面虽然加载成功,但并看不到图层,而且报错: FeatureSetCallback.onError com.esri.core.io.EsriServiceException: Requested operation is not supported by this service. The requested capability is not supported. 仔细再看网络信息, 大体上知道为什么报 The requested capability is not supported。也就是不能用这种方法加载,而得用前面的代码加载!!! ArcGISDynamicMapServiceLayer 服务地址:http://sampleserver1.arcgisonline.com/ArcGIS/rest/services/Specialty/ESRI_StateCityHighway_USA/MapServer,这是美国的高铁图。 用浏览器打开,有三个子图层,Single Fused Map Cache: false! 下面是ArcGISDynamicMapServiceLayer的介绍: 加载代码 : private static final String DYNAMIC_USA_HIGHWAY_URL = "http://sampleserver1.arcgisonline.com/ArcGIS/rest/services/Specialty/ESRI_StateCityHighway_USA/MapServer"; private ArcGISDynamicMapServiceLayer usaHighwayLayer = null; private MapView mMapView = null; @Override protected void onCreate(Bundle savedInstanceState) { super.onCreate(savedInstanceState); setContentView(R.layout.activity_main); mMapView = (MapView) findViewById(R.id.map_view); usaHighwayLayer = new ArcGISDynamicMapServiceLayer(DYNAMIC_USA_HIGHWAY_URL); mMapView.addLayer(usaHighwayLayer); usaHighwayLayer.setOnStatusChangedListener(new OnStatusChangedListener() { @Override public void onStatusChanged(Object o, STATUS status) { if (status==STATUS.INITIALIZED){ Log.i("huang","加载成功"); }else if(status==STATUS.INITIALIZATION_FAILED||status==STATUS.LAYER_LOADING_FAILED){ Log.i("huang","加载失败"); } } });} 效果图 二、ArcGISFeatureLayer加载图层 服务地图http://sampleserver1.arcgisonline.com/ArcGIS/rest/services/Specialty/ESRI_StateCityHighway_USA/MapServer/0,也就是上面服务的子图层。 ArcGISFeatureLayer arcGISFeatureLayer = new ArcGISFeatureLayer("http://sampleserver1.arcgisonline.com/ArcGIS/rest/services/Specialty/ESRI_StateCityHighway_USA/MapServer/0", ArcGISFeatureLayer.MODE.ONDEMAND); mMapView.addLayer(arcGISFeatureLayer); arcGISFeatureLayer.setRenderer(new SimpleRenderer(new SimpleLineSymbol(Color.argb(250, 52, 17, 255),2))); arcGISFeatureLayer.setOnStatusChangedListener(new OnStatusChangedListener() { @Override public void onStatusChanged(Object o, STATUS status) { if (status==STATUS.INITIALIZED){ Log.i("huang","加载成功"); }else if(status==STATUS.INITIALIZATION_FAILED||status==STATUS.LAYER_LOADING_FAILED){ Log.i("huang","加载失败"); } } }); 注意要设置setRenderer,效果 ArcGISFeatureLayer 具有FeatureLayer的一些查询方法,与前面几讲里FeatureLayer查询相似,这里不再讲了。 //查询要素方法 queryIds(Query query, CallbackListener<int[]> callback) queryFeatures(Query query, CallbackListener<FeatureSet> callback) 在http://sampleserver1.arcgisonline.com/ArcGIS/rest/services/Specialty/ESRI_StateCityHighway_USA/MapServer/0,页面底部, 点击Query进入查询要素界面,可直接 查询要素 where 1=1,点击Query(GET),可得到以下结果集 没有整理与归纳的知识,一文不值!高度概括与梳理的知识,才是自己真正的知识与技能。 永远不要让自己的自由、好奇、充满创造力的想法被现实的框架所束缚,让创造力自由成长吧! 多花时间,关心他(她)人,正如别人所关心你的。理想的腾飞与实现,没有别人的支持与帮助,是万万不能的。 本文转自wenglabs博客园博客,原文链接:http://www.cnblogs.com/arxive/p/7752063.html ,如需转载请自行联系原作者

优秀的个人博客,低调大师

Hadoop MapReduce编程 API入门系列之wordcount版本3(七)

代码 1 package zhouls.bigdata.myMapReduce.wordcount3; 2 3 import java.io.IOException; 4 5 import org.apache.hadoop.io.IntWritable; 6 import org.apache.hadoop.io.LongWritable; 7 import org.apache.hadoop.io.Text; 8 import org.apache.hadoop.mapreduce.Mapper; 9 import org.apache.hadoop.util.StringUtils; 10 11 public class WordCountMapper extends Mapper<LongWritable, Text, Text, IntWritable>{ 12 13 //该方法循环调用,从文件的split中读取每行调用一次,把该行所在的下标为key,该行的内容为value 14 protected void map(LongWritable key, Text value, 15 Context context) 16 throws IOException, InterruptedException { 17 String[] words = StringUtils.split(value.toString(), ' '); 18 for(String w :words){ 19 context.write(new Text(w), new IntWritable(1)); 20 } 21 } 22 } 1 package zhouls.bigdata.myMapReduce.wordcount3; 2 3 import java.io.IOException; 4 5 import org.apache.hadoop.io.IntWritable; 6 import org.apache.hadoop.io.Text; 7 import org.apache.hadoop.mapreduce.Reducer; 8 9 public class WordCountReducer extends Reducer<Text, IntWritable, Text, IntWritable>{ 10 11 //每组调用一次,这一组数据特点:key相同,value可能有多个。 12 protected void reduce(Text arg0, Iterable<IntWritable> arg1, 13 Context arg2) 14 throws IOException, InterruptedException { 15 int sum =0; 16 for(IntWritable i: arg1){ 17 sum=sum+i.get(); 18 } 19 arg2.write(arg0, new IntWritable(sum)); 20 } 21 } 1 package zhouls.bigdata.myMapReduce.wordcount3; 2 3 4 import org.apache.hadoop.conf.Configuration; 5 import org.apache.hadoop.fs.FileSystem; 6 import org.apache.hadoop.fs.Path; 7 import org.apache.hadoop.io.IntWritable; 8 import org.apache.hadoop.io.Text; 9 import org.apache.hadoop.mapreduce.Job; 10 import org.apache.hadoop.mapreduce.lib.input.FileInputFormat; 11 import org.apache.hadoop.mapreduce.lib.output.FileOutputFormat; 12 13 public class RunJob { 14 15 public static void main(String[] args) { 16 Configuration config =new Configuration(); 17 18 try { 19 FileSystem fs =FileSystem.get(config); 20 21 Job job =Job.getInstance(config); 22 job.setJarByClass(RunJob.class); 23 24 job.setJobName("wc"); 25 26 job.setMapperClass(WordCountMapper.class); 27 job.setReducerClass(WordCountReducer.class); 28 29 job.setMapOutputKeyClass(Text.class); 30 job.setMapOutputValueClass(IntWritable.class); 31 32 FileInputFormat.addInputPath(job, new Path("./data/wc.txt")); 33 34 Path outpath =new Path("./out/WordCountout"); 35 if(fs.exists(outpath)){ 36 fs.delete(outpath, true); 37 } 38 FileOutputFormat.setOutputPath(job, outpath); 39 40 boolean f= job.waitForCompletion(true); 41 if(f){ 42 System.out.println("job任务执行成功"); 43 } 44 } catch (Exception e) { 45 e.printStackTrace(); 46 } 47 } 48 }

优秀的个人博客,低调大师

Android GIS开发系列-- 入门季(11) Callout气泡的显示

一、气泡的简单显示 首先我们要获取MapView中的气泡,通过MapView的getCallout()方法获取一个气泡。看一下Callout的简单介绍: 大体的意思是通过MapView获取Callout,可以设置它的内容View,大小,显示的方位等。 写一个简单的测试: public class MainActivity extends Activity { private MapView mapView; private static final String TILED_WORLD_STREETS_URL = "http://services.arcgisonline.com/ArcGIS/rest/services/World_Street_Map/MapServer"; private Callout callout; @Override protected void onCreate(Bundle savedInstanceState) { super.onCreate(savedInstanceState); setContentView(R.layout.activity_main); mapView = (MapView) findViewById(R.id.map_view); //添加一个基础的底图 mapView.addLayer(new ArcGISTiledMapServiceLayer(TILED_WORLD_STREETS_URL)); //地图点击事件 mapView.setOnSingleTapListener(new OnSingleTapListener() { @Override public void onSingleTap(float x, float y) { //屏幕坐标转地图坐标 Point point = mapView.toMapPoint(x,y); //设置显示位置 callout.show(point); } }); initCallout(); } private void initCallout() { //获取一个气泡 callout = mapView.getCallout(); //设置最大的长宽 callout.setMaxWidth(1200); callout.setMaxHeight(300); TextView tv = new TextView(this); tv.setText("这是一个气泡"); callout.setContent(tv); CalloutStyle calloutStyle = new CalloutStyle(); //设置尖尖角的位置,尖尖显示在气泡的左下角, calloutStyle.setAnchor(Callout.ANCHOR_POSITION_LOWER_LEFT_CORNER); callout.setStyle(calloutStyle); } } 显示的效果图如下: 二、通过xml方式设置Callout的Style 新建一个xml放在res/xml下,例如: <?xml version="1.0" encoding="utf-8"?> <resources> <calloutViewStyle anchor="5" backgroundAlpha="255" backgroundColor="#ffffff" cornerCurveDp="20" frameColor="#000000" maxHeightDp="300" maxWidthDp="500" /> </resources> 只需调用callout.setStyle方法来设置。 没有整理与归纳的知识,一文不值!高度概括与梳理的知识,才是自己真正的知识与技能。 永远不要让自己的自由、好奇、充满创造力的想法被现实的框架所束缚,让创造力自由成长吧! 多花时间,关心他(她)人,正如别人所关心你的。理想的腾飞与实现,没有别人的支持与帮助,是万万不能的。 本文转自wenglabs博客园博客,原文链接:http://www.cnblogs.com/arxive/p/7751976.html ,如需转载请自行联系原作者

优秀的个人博客,低调大师

Android中使用语音引擎入门七步曲

现在,随着移动应用的日益普及,移动语音应用越来越受到用户的重视和喜爱,本文将指导用户如何在Android SDK中使用语音引擎去创建简单的应用。在Android中使用语音引擎其实是很容易的事情,通过若干步骤就可以实现了,尽管其中有些地方在使用中要注意。在本教程中,将一步步直接教读者如何创建语音应用,具体的代码在文末有下载。 步骤一 创建Android工程 我们首先创建一个Android工程,选用的是Android 2.3以上SDK的。 步骤二 创建用户界面 由于我们的例子很简单,所以只需要往界面中增添若干控件就可以了,我们打开main.xml文件,写入如下代码,增加了一个本文框和一个按钮: <TextView android:id="@+id/intro" android:layout_width="fill_parent" android:layout_height="wrap_content" android:text="Enter some text:" /> <EditText android:id="@+id/enter" android:layout_width="fill_parent" android:layout_height="wrap_content" /> <Button android:id="@+id/speak" android:layout_width="wrap_content" android:layout_height="wrap_content" android:text="Speak" /> 其中文本框中是输入要发音朗读的文字内容。界面如下图: ▲ 步骤三 编写监听事件 接下来,我们为按钮添加事件处理,首先要获得用户输入的文字,代码如下: import android.view.View.OnClickListener; import android.widget.Button; import android.view.View; import android.widget.EditText; public class SpeakingAndroid extends Activity implements OnClickListener { //create the Activity public void onCreate(Bundle savedInstanceState) { super.onCreate(savedInstanceState); setContentView(R.layout.main); Button speakButton = (Button)findViewById(R.id.speak); //监听button事件 speakButton.setOnClickListener(this); } //onClick事件的响应代码 public void onClick(View v) { //获得用户输入的文字 EditText enteredText = (EditText)findViewById(R.id.enter); String words = enteredText.getText().toString(); //调用语音引擎的方法 speakWords(words); } } 步骤四 编写相关的语音方法 首先,要导入相关的语音引擎包,代码如下: import android.speech.tts.TextToSpeech; import android.speech.tts.TextToSpeech.OnInitListener; 接下来,为了能系统先对运行语音引擎的准备工作进行检查,因此先要对其运行前的数据进行就绪检查,所以首先声明一个成员变量,如下: private int MY_DATA_CHECK_CODE = 0; 并且在oncreate方法中,编写如下代码: Intent checkTTSIntent = new Intent(); checkTTSIntent.setAction(TextToSpeech.Engine.ACTION_CHECK_TTS_DATA); startActivityForResult(checkTTSIntent, MY_DATA_CHECK_CODE); 以上代码的目的为,创建一个Intent,去检查TTS所需要的数据是否准备好,如果准备好的话,则调用onActivityResult方法,这个方法在下文中会提到。 步骤五 创建TTS的实例 在onActivityResult方法中,可以开始创建其TTS语音引擎的实例,代码如下: protected void onActivityResult(int requestCode, int resultCode, Intent data) { if (requestCode == MY_DATA_CHECK_CODE) { if (resultCode == TextToSpeech.Engine.CHECK_VOICE_DATA_PASS) { myTTS = new TextToSpeech(this, this); } else { Intent installTTSIntent = new Intent(); installTTSIntent.setAction(TextToSpeech.Engine.ACTION_INSTALL_TTS_DATA); startActivity(installTTSIntent); } } } 当TTS的数据就绪数据检查完毕后,将调用这个方法,其中resultCode为TTS验证是否通过的标记,如果通过验证的话,则通过myTTS = new TextToSpeech(this, this); 创建一个语音TTS实例。如果没能通过TTS准备就绪的安装测试,则新声明一个Intent,将用户引导到这个安装TTS引擎的界面中去。 步骤六 初始化引擎的数据 由于在本程序中实现了OnInitListener接口,因此可以在oninit方法中,对语音引擎进行初始化设置,比如设置语言等,首先应该导入相关的类库,如下: import java.util.Locale; 在oninit方法中写入如下代码: public void onInit(int initStatus) { if (initStatus == TextToSpeech.SUCCESS) { myTTS.setLanguage(Locale.US); } else if (initStatus == TextToSpeech.ERROR) { Toast.makeText(this, "Sorry! Text To Speech failed...", Toast.LENGTH_LONG).show(); } } 这里判断如果TTS已经就绪成功,则调用setLanguage方法设置为使用对应的语言(这 里是英文),如果判断TTS不能准备就绪,则调用Toast的显示方法告知用户。 步骤七 让TTS说话 在准备好以上步骤后,最后一步就是让TTS开口说话了,在speakWords方法中,写入如下代码即可 private void speakWords(String speech) { myTTS.speak(speech, TextToSpeech.QUEUE_FLUSH, null); } 其中的speak方法中有很多参数可以选用,具体请参考Android文档,这里选用了 参数TextToSpeech.QUEUE_FLUSH,如果想让TTS语音引擎连续不断地朗读,可以使用 myTTS.speak(speech, TextToSpeech.QUEUE_ADD, null)的参数。如果要求应用不再进行朗读,则可以添加一句: myTTS.shutdown(); 但除非是明确用户不在需要应用进行朗读,否则如果要连续让系统朗读的话,则不应该添加这句代码。 小结 本文简单一步步地介绍了如何在Android SDK中使用语音引擎TTS,读者可以通过这个例子,创建更多丰富的语音应用。本文的代码在 本文转自 wws5201985 51CTO博客,原文链接:http://blog.51cto.com/wws5201985/754002,如需转载请自行联系原作者

优秀的个人博客,低调大师

Hadoop入门进阶课程11--Sqoop介绍、安装与操作

本文版权归作者和博客园共有,欢迎转载,但未经作者同意必须保留此段声明,且在文章页面明显位置给出原文连接,博主为石山园,博客地址为http://www.cnblogs.com/shishanyuan。该系列课程是应邀实验楼整理编写的,这里需要赞一下实验楼提供了学习的新方式,可以边看博客边上机实验,课程地址为https://www.shiyanlou.com/courses/237 【注】该系列所使用到安装包、测试数据和代码均可在百度网盘下载,具体地址为http://pan.baidu.com/s/10PnDs,下载该PDF文件 1、搭建环境 部署节点操作系统为CentOS,防火墙和SElinux禁用,创建了一个shiyanlou用户并在系统根目录下创建/app目录,用于存放Hadoop等组件运行包。因为该目录用于安装hadoop等组件程序,用户对shiyanlou必须赋予rwx权限(一般做法是root用户在根目录下创建/app目录,并修改该目录拥有者为shiyanlou(chown–R shiyanlou:shiyanlou /app)。 Hadoop搭建环境: l虚拟机操作系统:CentOS6.664位,单核,1G内存 lJDK:1.7.0_55 64位 lHadoop:1.1.2 2、Sqoop介绍 2.1Sqoop简介 Sqoop即SQL to Hadoop,是一款方便的在传统型数据库与Hadoop之间进行数据迁移的工具,充分利用MapReduce并行特点以批处理的方式加快数据传输,发展至今主要演化了二大版本,Sqoop1和Sqoop2。 Sqoop工具是hadoop下连接关系型数据库和Hadoop的桥梁,支持关系型数据库和hive、hdfs,hbase之间数据的相互导入,可以使用全表导入和增量导入。 那么为什么选择Sqoop呢? l高效可控的利用资源,任务并行度,超时时间。 l数据类型映射与转化,可自动进行,用户也可自定义 l支持多种主流数据库,MySQL,Oracle,SQL Server,DB2等等 2.2Sqoop1和Sqoop2比较 2.2.1Sqoop1和Sqoop2异同 l两个不同的版本,完全不兼容 l版本号划分区别,Apache版本:1.4.x(Sqoop1); 1.99.x(Sqoop2)CDH版本: Sqoop-1.4.3-cdh4(Sqoop1) ; Sqoop2-1.99.2-cdh4.5.0 (Sqoop2) lSqoop2比Sqoop1的改进 (1)引入Sqoop server,集中化管理connector等 (2)多种访问方式:CLI,Web UI,REST API (3)引入基于角色的安全机制 2.2.2Sqoop1与Sqoop2的架构图 Sqoop架构图1 Sqoop架构图2 2.2.3Sqoop1与Sqoop2的优缺点 比较 Sqoop1 Sqoop2 架构 仅仅使用一个Sqoop客户端 引入了Sqoop server集中化管理connector,以及rest api,web,UI,并引入权限安全机制 部署 部署简单,安装需要root权限,connector必须符合JDBC模型 架构稍复杂,配置部署更繁琐 使用 命令行方式容易出错,格式紧耦合,无法支持所有数据类型,安全机制不够完善,例如密码暴漏 多种交互方式,命令行,web UI,rest API,conncetor集中化管理,所有的链接安装在Sqoop server上,完善权限管理机制,connector规范化,仅仅负责数据的读写 3、安装部署Sqoop 3.1下载Sqoop 可以到apache基金sqoop官网http://hive.apache.org/,选择镜像下载地址:http://mirror.bit.edu.cn/apache/sqoop/下载一个稳定版本,如下图所示下载支持Hadoop1.X的1.4.5版本gz包: 也可以在/home/shiyanlou/install-pack目录中找到该安装包,解压该安装包并把该安装包复制到/app目录中 cd /home/shiyanlou/install-pack tar -xzf sqoop-1.4.5.bin__hadoop-1.0.0.tar.gz mv sqoop-1.4.5.bin__hadoop-1.0.0 /app/sqoop-1.4.5 ll /app 3.2设置/etc/profile参数 编辑/etc/profile文件,加入sqoop的Home路径和在PATH加入bin的路径: export SQOOP_HOME=/app/sqoop-1.4.5 export PATH=$PATH:$SQOOP_HOME/bin 编译配置文件/etc/profile,并确认生效 source /etc/profile echo $PATH 3.3设置bin/configure-sqoop配置文件 修改bin/configure-sqoop配置文件 cd /app/sqoop-1.4.5/bin sudo vi configure-sqoop 注释掉HBase和Zookeeper等检查(除非使用HBase和Zookeeper等HADOOP上的组件) 3.4设置conf/sqoop-env.sh配置文件 如果不存在sqoop-env.sh文件,复制sqoop-env-template.sh文件,然后修改sqoop-env.sh配置文件 cd /app/sqoop-1.4.5/conf cp sqoop-env-template.sh sqoop-env.sh sudo vi sqoop-env.sh 设置hadoop运行程序所在路径和hadoop-*-core.jar路径(Hadoop1.X需要配置) #Set path to where bin/hadoop is available export HADOOP_COMMON_HOME=/app/hadoop-1.1.2 #Set path to where hadoop-*-core.jar is available export HADOOP_MAPRED_HOME=/app/hadoop-1.1.2 编译配置文件sqoop-env.sh使之生效 3.5验证安装完成 输入如下命令验证是否正确安装sqoop,如果正确安装则出现sqoop提示 sqoop help 4、文件导入/导出 4.1MySql数据导入到HDFS中 如果没有安装MySql,请参照第8课3.1进行安装 4.1.1下载MySql驱动 到MySql官网进入下载页面:http://dev.mysql.com/downloads/connector/j/,选择所需要的版本进行下载,这里下载的zip格式的文件,然后在本地解压: 也可以在/home/shiyanlou/install-pack目录中找到该安装包,把MySql驱动包使用如下命令放到Sqoop的lib目录下 cd /home/shiyanlou/install-pack cp mysql-connector-java-5.1.22-bin.jar /app/sqoop-1.4.5/lib 4.1.2启动MySql服务 查看MySql服务并查看状态,如果没有启动则启动服务 sudo service mysql status sudo service mysql start 4.1.3查看MySql中的数据表 进入MySql数据库,选择有数据的一张表查看内容,比较导出结果是否正确,输入如下命令: mysql -uhive -phive mysql>show databases; mysql>use hive; mysql>show tables; mysql>select TBL_ID, CREATE_TIME, DB_ID, OWNER, TBL_NAME,TBL_TYPE from TBLS; 4.1.4把MySql数据导入到HDFS中 使用如下命令列出MySql中所有数据库: sqoop list-databases --connect jdbc:mysql://hadoop:3306/ --username hive --password hive 使用如下命令把hive数据库TBLS表数据导入到HDFS中: sqoop import --connect jdbc:mysql://hadoop:3306/hive --username hive --password hive --table TBLS -m 1 l--username数据库用户名 l--password连接数据库密码 l--table表名 l-m 1表示map数 4.1.5查看导出结果 使用如下命令查看导出到HDFS结果,文件路径在当前用户hadoop目录下增加了TBLS表目录,查看part-m-00000文件: hadoop fs -ls /user/shiyanlou/TBLS hadoop fs -cat /user/shiyanlou/TBLS/part-m-00000 4.2MySql数据导入到Hive中 4.2.1启动metastore和hiveserver 在使用hive之前需要启动metastore和hiveserver服务,通过如下命令启用: hive --service metastore & hive --service hiveserver & 启动用通过jps命令可以看到两个进行运行在后台 4.2.2从MySql导入表数据到Hive中 使用如下命令到把MySql中TBLS表数据导入到Hive中: sqoop import --connect jdbc:mysql://hadoop:3306/hive --username hive --password hive --table TBLS --hive-table MySql2Hive --hive-import -m 1 l-- username为mysql中的数据库连接用户名 l--password为mysql中的数据库连接密码 l--table为导出表 l--hive-table test1为导出表在Hive中的名称 l-m 1表示map数 从运行的日志可以看到,这个过程有两个阶段: 1.第一个阶段是从MySql中把数据到HDFS文件中 2.第二个阶段是从HDFS中把数据写入到MySql中 4.2.3查看导出结果 登录hive,在hive创建表并查看该表,命令如下: hive hive>show tables; hive>desc MySql2Hive; 本文转自shishanyuan博客园博客,原文链接:http://www.cnblogs.com/shishanyuan/p/4648275.html ,如需转载请自行联系原作者

优秀的个人博客,低调大师

OpenStack入门修炼之Keystone服务部署与测试(8)

1.Keystone的介绍 Keystone在N版已经是V3版本。在Keystone中主要涉及以下几个概念: User:使用服务的用户,可以是人,服务或者系统,只要是使用了openstack服务的对象都可以称为用户。当User对OpenStack进行访问时,Keystone会对其身份进行验证。 project(tenant)租户,可以理解为一个人,项目或者组织拥有的资源的合集。在一个租户中可以拥有很多个用户,这些用户可以根据权限的划分使用租户中的资源 Role:角色,用于分配操作的权限。角色可以被指定给用户,使得该用户获得角色对应的操作权限。 安全包含两部分:Authentication(认证)和 Authorization(鉴权) Authentication 解决的是“你是谁?”的问题 Authorization 解决的是“你能干什么?”的问题 Keystone 是借助 Role 来实现 Authorization 的: Token:认证成功后,keystone会生成一串比特值或者字符串,用来作为访问资源的令牌,token中有可访问资源的范围和有效时间 service:服务,nova,glance都是属于一个服务,需要在keystone上进行创建,指定类型。 创建服务有一个服务,就创建一个endpoint,会根据服务类型去查找那个服务。Service 决定每个 Role 能做什么事情 ,Service 通过各自的 policy.json 文件对 Role 进行访问控制 endpoint:端点,是一个服务暴露出来的访问点,如果需要访问一个服务,就必须知道他的endpoint。每个endpoint都有三个url访问地址(admin,internal,public)。public url可以被全局访问,private url只能被局域网访问,admin url被从常规的访问中分离。User 通过 Endpoint 访问资源和执行操作 2.Keystone V3 API 新特性 Keystone V3 做出了许多变化和改进,我们选取其中较为重要的进行阐述: 将 Tenant 改称为 Project 引入 Domain 的概念 引入 Group 的概念 将 Tenant 改为 Project 并在其上添加 Domain 的概念,这更加符合现实世界和云服务的映射。 V3 利用 Domain 实现真正的多租户(multi-tenancy)架构,Domain 担任 Project 的高层容器。云服务的客户是 Domain 的所有者,他们可以在自己的 Domain 中创建多个 Projects、Users、Groups 和 Roles。通过引入 Domain,云服务客户可以对其拥有的多个 Project 进行统一管理,而不必再向过去那样对每一个 Project 进行单独管理。 Group 是一组 Users 的容器,可以向 Group 中添加用户,并直接给 Group 分配角色,那么在这个 Group 中的所有用户就都拥有了 Group 所拥有的角色权限。通过引入 Group 的概念,Keystone V3 实现了对用户组的管理,达到了同时管理一组用户权限的目的。这与 V2 中直接向 User/Project 指定 Role 不同,使得对云服务进行管理更加便捷。 3.Keystone服务部署过程 (1)数据库各服务库的创建和授权 tips:配置 OpenStack 身份认证服务前,必须创建一个数据库和管理员令牌。由于其余服务也需要用到数据库,此处将所有的服务所需要的库都进行创建并授权 [root@linux-node1 ~]# mysql -uroot -p Enter password: Welcome to the MariaDB monitor. Commands end with ; or \g. Your MariaDB connection id is 10 Server version: 10.1.20-MariaDB MariaDB Server Copyright (c) 2000, 2016, Oracle, MariaDB Corporation Ab and others. Type 'help;' or '\h' for help. Type '\c' to clear the current input statement. MariaDB [(none)]> create database keystone; Query OK, 1 row affected (0.00 sec) MariaDB [(none)]> create database glance; Query OK, 1 row affected (0.00 sec) MariaDB [(none)]> create database nova; Query OK, 1 row affected (0.00 sec) MariaDB [(none)]> create database nova_api; Query OK, 1 row affected (0.00 sec) MariaDB [(none)]> create database neutron; Query OK, 1 row affected (0.00 sec) MariaDB [(none)]> create database cinder; Query OK, 1 row affected (0.00 sec) MariaDB [(none)]> grant all on keystone.* to 'keystone'@'localhost' identified by 'keystone'; Query OK, 0 rows affected (0.00 sec) MariaDB [(none)]> grant all on keystone.* to 'keystone'@'%' identified by 'keystone'; Query OK, 0 rows affected (0.00 sec) MariaDB [(none)]> grant all on glance.* to 'glance'@'localhost' identified by 'glance'; Query OK, 0 rows affected (0.00 sec) MariaDB [(none)]> grant all on glance.* to 'glance'@'%' identified by 'glance'; Query OK, 0 rows affected (0.00 sec) MariaDB [(none)]> grant all on nova.* to 'nova'@'localhost' identified by 'nova'; Query OK, 0 rows affected (0.00 sec) MariaDB [(none)]> grant all on nova.* to 'nova'@'%' identified by 'nova'; Query OK, 0 rows affected (0.00 sec) MariaDB [(none)]> grant all on nova_api.* to 'nova'@'localhost' identified by 'nova'; Query OK, 0 rows affected (0.00 sec) MariaDB [(none)]> grant all on nova_api.* to 'nova'@'%' identified by 'nova'; Query OK, 0 rows affected (0.00 sec) MariaDB [(none)]> grant all on neutron.* to 'neutron'@'localhost' identified by 'neutron'; Query OK, 0 rows affected (0.00 sec) MariaDB [(none)]> grant all on neutron.* to 'neutron'@'%' identified by 'neutron'; Query OK, 0 rows affected (0.00 sec) MariaDB [(none)]> grant all on cinder.* to 'cinder'@'localhost' identified by 'cinder'; Query OK, 0 rows affected (0.00 sec) MariaDB [(none)]> grant all on cinder.* to 'cinder'@'%' identified by 'cinder'; Query OK, 0 rows affected (0.00 sec) MariaDB [(none)]> show databases; +--------------------+ | Database | +--------------------+ | cinder | | glance | | information_schema | | keystone | | mysql | | neutron | | nova | | nova_api | | performance_schema | +--------------------+ 9 rows in set (0.00 sec) (2)keystone服务配置:/etc/keystone/keystone.conf 在 [database] 部分,配置数据库访问: [database] ... connection = mysql+pymysql://keystone:keystone@192.168.56.11/keystone 在``[token]``部分,配置Fernet UUID令牌的提供者。 [token] ... provider = fernet driver = memcache (3)初始化身份认证服务的数据库,并验证是否初始化成功: [root@linux-node1 ]# su -s /bin/sh -c "keystone-manage db_sync" keystone [root@linux-node1 ]# mysql -h 192.168.56.11 -ukeystone -pkeystone -e "use keystone;show tables;" (4)keystone服务配置:/etc/keystone/keystone.conf 在 [memcache] 部分,配置token缓存到memcache上: servers = 192.168.56.11:11211 设置memcached开机自启动,并设置监听ip地址 [root@linux-node1 ~]# systemctl enable memcached [root@linux-node1 ~]# systemctl start memcached [root@linux-node1 ~]# vim /etc/sysconfig/memcached PORT="11211" USER="memcached" MAXCONN="1024" CACHESIZE="64" OPTIONS="-l 192.168.56.11,::1" [root@linux-node1 ~]# systemctl restart memcached tips:openstack会经常使用driver驱动,更加灵活地选用多种方式。 (5)查看keystone服务所有的配置 [root@linux-node1 ~]# grep '^[a-z]' /etc/keystone/keystone.conf connection = mysql+pymysql://keystone:keystone@192.168.56.11/keystone servers = 192.168.56.11:11211 provider = fernet driver = memcache (6)初始化Fernet key: [root@linux-node1 ~]# keystone-manage fernet_setup --keystone-user keystone --keystone-group keystone [root@linux-node1 ~]# keystone-manage credential_setup --keystone-user keystone --keystone-group keystone [root@linux-node1 ~]# cd /etc/keystone/ [root@linux-node1 keystone]# ll 总用量 140 drwx------ 2 keystone keystone 22 12月 4 11:10 credential-keys -rw-r----- 1 root keystone 2303 7月 26 12:47 default_catalog.templates drwx------ 2 keystone keystone 22 12月 4 11:10 fernet-keys -rw-r----- 1 root keystone 113658 12月 4 11:07 keystone.conf -rw-r----- 1 root keystone 2639 7月 26 12:48 keystone-paste.ini -rw-r----- 1 root keystone 1046 7月 26 12:47 logging.conf -rw-r----- 1 keystone keystone 9742 7月 26 12:48 policy.json -rw-r----- 1 keystone keystone 665 7月 26 12:47 sso_callback_template.html (7)初始化命令bootstrap,初始化自动创建一个admin用户以及相关权限,直接在keystone上进行注册服务,创建endpoint。 [root@linux-node1 ~]# keystone-manage bootstrap --bootstrap-password admin \ --bootstrap-admin-url http://192.168.56.11:35357/v3/ \ --bootstrap-internal-url http://192.168.56.11:35357/v3/ \ --bootstrap-public-url http://192.168.56.11:5000/v3/ \ --bootstrap-region-id RegionOne [root@linux-node1 ~]# mysql -h 192.168.56.11 -ukeystone -pkeystone MariaDB [keystone]> use keystone; Database changed MariaDB [keystone]> select * from endpoint\G *************************** 1. row *************************** id: 20222ecb6eeb4f378035e79c47810b08 legacy_endpoint_id: NULL interface: public service_id: 436e446b475a46fa978349211d6c64eb url: http://192.168.56.11:5000/v3/ extra: {} enabled: 1 region_id: RegionOne *************************** 2. row *************************** id: 6cc75ee06e5245059e106e89e1643a92 legacy_endpoint_id: NULL interface: internal service_id: 436e446b475a46fa978349211d6c64eb url: http://192.168.56.11:35357/v3/ extra: {} enabled: 1 region_id: RegionOne *************************** 3. row *************************** id: 7c7b33e8c2ac431aa7380ceeac80fb37 legacy_endpoint_id: NULL interface: admin service_id: 436e446b475a46fa978349211d6c64eb url: http://192.168.56.11:35357/v3/ extra: {} enabled: 1 region_id: RegionOne 3 rows in set (0.00 sec) (8)配置apache http服务器 tips:kesytone是python写的,apache有一个wsgi模块,可以通过这个模块和python进行通信。端口为5000和35357,缺省情况下,Kestone服务仍然监听这些端口 ①编辑/etc/httpd/conf/httpd.conf文件,配置ServerName选项为控制节点: ServerName 192.168.56.11:80 ②创建一个链接到/usr/share/keystone/wsgi-keystone.conf文件 ln -s /usr/share/keystone/wsgi-keystone.conf /etc/httpd/conf.d/ ③设置apache开机自启动 [root@linux-node1 ~]# systemctl enable httpd.service [root@linux-node1 ~]# systemctl start httpd.service (9)开始使用keystone就需要进行验证,有两种方式连接Keystone:第一种方式使用参数,另外一种方式就通过环境变量方式进行连接。 [root@linux-node1 ~]# vim admin-openstack export OS_USERNAME=admin export OS_PASSWORD=admin export OS_PROJECT_NAME=admin export OS_USER_DOMAIN_NAME=default export OS_PROJECT_DOMAIN_NAME=default export OS_AUTH_URL=http://192.168.56.11:35357/v3 export OS_IDENTITY_API_VERSION=3 [root@linux-node1 ~]# openstack user list Missing value auth-url required for auth plugin password [root@linux-node1 ~]# source admin-openstack [root@linux-node1 ~]# openstack user list +----------------------------------+-------+ | ID | Name | +----------------------------------+-------+ | 5313b45a3c474c7ea18e7272fd037b7d | admin | +----------------------------------+-------+ (10)创建域、项目、用户、角色 为什么创建service项目?在前面已经概述到一个用户需要属于一个项目(用户组),并且要赋予一种角色(权限)进行管理服务。而其余服务需要连接keystone,需用使用用户名密码连接,那其他服务自然就需要有属于某一个项目,是什么用户,什么角色去连接Keystone。此处默认的域创建为为default,对域的概念不明白可以参考前文。 在这里:我们分别创建了service项目,并配置了默认的域为default。也创建了glance、nova、neutron、cinder用户,并赋予admin角色,使openstack的服务组件可以与Keystone进行通信。 [root@linux-node1 ~]# openstack project create --domain default \ > --description "Service Project" service [root@linux-node1 ~]# openstack project list 常规(非管理)任务应该使用无特权的项目和用户。作为例子,这里采用demo项目和demo用户 创建demo项目,demo用户密码,创建use角色并赋予demo用户user角色 [root@linux-node1 ~]# openstack project create --domain default \ > --description "Demo Project" demo [root@linux-node1 ~]# openstack user create --domain default \ > --password-prompt demo [root@linux-node1 ~]# openstack role create user [root@linux-node1 ~]# openstack role add --project demo --user demo user 创建glance、nova、neutron、cinder用户,并赋予admin角色 [root@linux-node1 ~]# openstack user create --domain default \ > --password-prompt glance [root@linux-node1 ~]# openstack role add --project service --user glance admin [root@linux-node1 ~]# openstack user create --domain default \ > --password-prompt nova [root@linux-node1 ~]# openstack role add --project service --user nova admin [root@linux-node1 ~]# openstack user create --domain default \ > --password-prompt neutron [root@linux-node1 ~]# openstack role add --project service --user neutron admin [root@linux-node1 ~]# openstack user create --domain default \ > --password-prompt cinder [root@linux-node1 ~]# openstack role add --project service --user cinder admin [root@linux-node1 ~]# openstack user list +----------------------------------+---------+ | ID | Name | +----------------------------------+---------+ | 23aefbc43cd24bcd8e6a78d527cb1002 | nova | | 3c24e5584ce447a0b80c659d6daecd13 | demo | | 5313b45a3c474c7ea18e7272fd037b7d | admin | | 666df293c18541fcafffffac3b8587fe | glance | | cb278a7d54a4470387fe4bd88a64ee95 | neutron | | d628cec48ab8407494605aa0022dd953 | cinder | +----------------------------------+---------+ [root@linux-node1 ~]# openstack project list +----------------------------------+---------+ | ID | Name | +----------------------------------+---------+ | 02aaf7ba97114238b1d8169fedabb9be | demo | | 21a45d59913d4c05b46ad3ec92e61656 | admin | | 56e253935a6049b69140f4aebac8bb6a | service | +----------------------------------+---------+ (11)验证操作:在安装其他服务之前确认身份认证服务操作 在控制节点(192.168.56.11)上操作这些命令 ①撤销临时环境变量OS_AUTH_URL和OS_PASSWORD [root@linux-node1 ~]# unset OS_AUTH_URL OS_PASSWORD ②作为 admin 用户,请求认证令牌: [root@linux-node1 ~]# openstack --os-auth-url http://192.168.56.11:35357/v3 --os-project-domain-name default --os-user-domain-name default --os-project-name admin --os-username admin token issue ③作为demo用户,请求认证令牌: [root@linux-node1 ~]# openstack --os-auth-url http://192.168.56.11:5000/v3 --os-project-domain-name default --os-user-domain-name default --os-project-name demo --os-username demo token issue tips:能够正常获取到tonken,说明keystone服务是正常。 (12)创建 OpenStack 客户端环境脚本 ① 创建 admin 和demo项目和用户创建客户端环境变量脚本 [root@linux-node1 ~]# cat admin-openstack export OS_USERNAME=admin export OS_PASSWORD=admin export OS_PROJECT_NAME=admin export OS_USER_DOMAIN_NAME=default export OS_PROJECT_DOMAIN_NAME=default export OS_AUTH_URL=http://192.168.56.11:35357/v3 export OS_IDENTITY_API_VERSION=3 [root@linux-node1 ~]# cat demo-openstack export OS_USERNAME=demo export OS_PASSWORD=demo export OS_PROJECT_NAME=demo export OS_USER_DOMAIN_NAME=default export OS_PROJECT_DOMAIN_NAME=default export OS_AUTH_URL=http://192.168.56.11:5000/v3 export OS_IDENTITY_API_VERSION=3 export OS_IMAGE_API_VERSION=2 ②加载admin-openrc文件来身份认证服务的环境变量位置和admin项目和用户证书: [root@linux-node1 ~]# source admin-openstack ③ 请求认证令牌: [root@linux-node1 ~]# openstack token issue 到此,Keystone服务就算配置完成了。 OpenStack 排查问题的方法主要是通过日志。 每个 Service 都有自己的日志文件。 Keystone 主要有两个日志: keystone.log 和 keystone_access.log 保存在 /var/log/apache2/ 目录里。 如果需要得到最详细的日志信息,可以在 /etc/keystone/keystone.conf 中打开 debug 选项 总结Keystone常见的错误: 401 #验证失败,keystone相关用户账户密码设置错误,时间不同步,或者输入的项目名称不对 403 #可能未初始化OS_token变量,需要使用source命令使其生效,也可能是配置的配置文件未生效,需要重启相关服务 409 #keystone创建用户,用户已存在 500 #服务器内部错误,服务配置有问题,看日志,检查配置 503 #keystone相关账户密码设置有问题,请将相关的glance账户删除,重新创建即可 服务故障 #相关服务没有起来 Keystone的配置/etc/keystone/keystone.conf总结: ①由于Keystone需要使用数据库,需要配置数据库的连接 ②由于需要将token存储到memcache,减少对数据库的访问,需要配置memcached服务器地址和端口 ③由于tonken的生成是基于某种算法,此处选用的是fernet方式,需要配置令牌提供者为fernet ④在选用memcache作为缓存token的方式,需要配置驱动方式(driver) 版权声明:原创作品,谢绝转载。否则将追究法律责任 本文转自 IT_外卖小哥 51CTO博客,原文链接:http://blog.51cto.com/jinlong/2049477

优秀的个人博客,低调大师

Android JNI入门第六篇——C调用Java

本篇将介绍在JNI编程中C调用Java实现。 源码下载地址:http://download.csdn.net/detail/xyz_lmn/4868265 关键代码: java: publicclassCCallJava{ publicstaticStringgetTime(){ Log.d("CCallJava","CallFromCJavaStaticMethod"+String.valueOf(System.currentTimeMillis())); returnString.valueOf(System.currentTimeMillis()); } publicvoidsayHello(Stringmsg){ Log.d("CCallJava","CallFromCJavavoidMethod"+String.valueOf(System.currentTimeMillis())); } } C: #include"TestCCallJava.h" #include<android/log.h> externJNIEnv*jniEnv; jclassTestCCallJava; jobjectmTestCCallJava; jmethodIDgetTime; jmethodIDsayHello; intGetTestCCallJavaInstance(jclassobj_class); /** *初始化类、对象、方法 */ intInitTestCCallJava(){ __android_log_print(ANDROID_LOG_INFO,"JNIMsg","InitTestCCallJavaBegin1"); if(jniEnv==NULL){ return0; } if(TestCCallJava==NULL){ TestCCallJava=(*jniEnv)->FindClass(jniEnv,"com/trunkbow/ccalljava/CCallJava"); if(TestCCallJava==NULL){ return-1; } __android_log_print(ANDROID_LOG_INFO,"JNIMsg","InitTestCCallJavaBegin2ok"); } if(mTestCCallJava==NULL){ if(GetTestCCallJavaInstance(TestCCallJava)!=1){ (*jniEnv)->DeleteLocalRef(jniEnv,TestCCallJava); return-1; } __android_log_print(ANDROID_LOG_INFO,"JNIMsg","InitTestCCallJavaBegin3ok"); } if(getTime==NULL){ getTime=(*jniEnv)->GetStaticMethodID(jniEnv,TestCCallJava,"getTime","()Ljava/lang/String;"); if(getTime==NULL){ (*jniEnv)->DeleteLocalRef(jniEnv,TestCCallJava); (*jniEnv)->DeleteLocalRef(jniEnv,mTestCCallJava); return-2; } __android_log_print(ANDROID_LOG_INFO,"JNIMsg","InitTestCCallJavaBegin4ok"); } if(sayHello==NULL){ sayHello=(*jniEnv)->GetMethodID(jniEnv,TestCCallJava,"sayHello","(Ljava/lang/String;)V"); if(sayHello==NULL){ (*jniEnv)->DeleteLocalRef(jniEnv,TestCCallJava); (*jniEnv)->DeleteLocalRef(jniEnv,mTestCCallJava); (*jniEnv)->DeleteLocalRef(jniEnv,getTime); return-3; } __android_log_print(ANDROID_LOG_INFO,"JNIMsg","InitTestCCallJavaBegin5ok"); } __android_log_print(ANDROID_LOG_INFO,"JNIMsg","InitTestCCallJavaBegin6"); return1; } intGetTestCCallJavaInstance(jclassobj_class){ if(obj_class==NULL){ return0; } jmethodIDconstruction_id=(*jniEnv)->GetMethodID(jniEnv,obj_class, "<init>","()V"); if(construction_id==0){ return-1; } mTestCCallJava=(*jniEnv)->NewObject(jniEnv,obj_class, construction_id); if(mTestCCallJava==NULL){ return-2; } return1; } /** *获取时间----调用Java方法 */ voidGetTime(){ if(TestCCallJava==NULL||getTime==NULL){ intresult=InitTestCCallJava(); if(result!=1){ return; } } jstringjstr=NULL; char*cstr=NULL; __android_log_print(ANDROID_LOG_INFO,"JNIMsg","GetTimeBegin"); jstr=(*jniEnv)->CallStaticObjectMethod(jniEnv,TestCCallJava,getTime); cstr=(char*)(*jniEnv)->GetStringUTFChars(jniEnv,jstr,0); __android_log_print(ANDROID_LOG_INFO,"JNIMsg","SuccessGetTimefromJava,Value=%s",cstr); __android_log_print(ANDROID_LOG_INFO,"JNIMsg","GetTimeEnd"); (*jniEnv)->ReleaseStringUTFChars(jniEnv,jstr,cstr); (*jniEnv)->DeleteLocalRef(jniEnv,jstr); } /** *SayHello----调用Java方法 */ voidSayHello(){ if(TestCCallJava==NULL||mTestCCallJava==NULL||sayHello==NULL){ intresult=InitTestCCallJava(); if(result!=1){ return; } } jstringjstrMSG=NULL; jstrMSG=(*jniEnv)->NewStringUTF(jniEnv,"Hi,I'mFromC"); __android_log_print(ANDROID_LOG_INFO,"JNIMsg","SayHelloBegin"); (*jniEnv)->CallVoidMethod(jniEnv,mTestCCallJava,sayHello,jstrMSG); __android_log_print(ANDROID_LOG_INFO,"JNIMsg","SayHelloEnd"); (*jniEnv)->DeleteLocalRef(jniEnv,jstrMSG); } 关键代码说明: C中定义映射的类、方法、对象 jclassTestCCallJava; jobjectmTestCCallJava; jmethodIDgetTime; jmethodIDsayHello; InitTestCCallJava()方法初始化类、方法、对象 初始化类: [html] view plain copy TestCCallJava=(*jniEnv)->FindClass(jniEnv,"com/trunkbow/ccalljava/CCallJava"); 初始化对象: [html] view plain copy mTestCCallJava=(*jniEnv)->NewObject(jniEnv,obj_class,construction_id); 初始化方法: 静态方法: [html] view plain copy getTime=(*jniEnv)->GetStaticMethodID(jniEnv,TestCCallJava,"getTime","()Ljava/lang/String;"); 非静态方法: [html] view plain copy sayHello=(*jniEnv)->GetMethodID(jniEnv,TestCCallJava,"sayHello","(Ljava/lang/String;)V"); C中调用Java的方法 调用静态方法: [html] view plain copy jstringjstr=NULL; char*cstr=NULL; __android_log_print(ANDROID_LOG_INFO,"JNIMsg","GetTimeBegin"); jstr=(*jniEnv)->CallStaticObjectMethod(jniEnv,TestCCallJava,getTime); cstr=(char*)(*jniEnv)->GetStringUTFChars(jniEnv,jstr,0); __android_log_print(ANDROID_LOG_INFO,"JNIMsg","SuccessGetTimefromJava,Value=%s",cstr); __android_log_print(ANDROID_LOG_INFO,"JNIMsg","GetTimeEnd"); 调用非静态方法 [html] view plain copy jstringjstrMSG=NULL; jstrMSG=(*jniEnv)->NewStringUTF(jniEnv,"Hi,I'mFromC"); __android_log_print(ANDROID_LOG_INFO,"JNIMsg","SayHelloBegin"); (*jniEnv)->CallVoidMethod(jniEnv,mTestCCallJava,sayHello,jstrMSG); __android_log_print(ANDROID_LOG_INFO,"JNIMsg","SayHelloEnd"); 注意GetXXXMethodID和CallXXXMethod。 第一个XXX表示的是映射方法的类型,如:静态跟非静态 第二个XXX表示调用方法的返回值,如:Void,Object,等等。(调用静态方法的时候Call后面要加Static) 详细映射方法和调用方法请参考JNI文档,这个很重要! 本文转自xyz_lmn51CTO博客,原文链接:http://blog.51cto.com/xyzlmn/1087657,如需转载请自行联系原作者

资源下载

更多资源
Mario

Mario

马里奥是站在游戏界顶峰的超人气多面角色。马里奥靠吃蘑菇成长,特征是大鼻子、头戴帽子、身穿背带裤,还留着胡子。与他的双胞胎兄弟路易基一起,长年担任任天堂的招牌角色。

腾讯云软件源

腾讯云软件源

为解决软件依赖安装时官方源访问速度慢的问题,腾讯云为一些软件搭建了缓存服务。您可以通过使用腾讯云软件源站来提升依赖包的安装速度。为了方便用户自由搭建服务架构,目前腾讯云软件源站支持公网访问和内网访问。

Nacos

Nacos

Nacos /nɑ:kəʊs/ 是 Dynamic Naming and Configuration Service 的首字母简称,一个易于构建 AI Agent 应用的动态服务发现、配置管理和AI智能体管理平台。Nacos 致力于帮助您发现、配置和管理微服务及AI智能体应用。Nacos 提供了一组简单易用的特性集,帮助您快速实现动态服务发现、服务配置、服务元数据、流量管理。Nacos 帮助您更敏捷和容易地构建、交付和管理微服务平台。

Sublime Text

Sublime Text

Sublime Text具有漂亮的用户界面和强大的功能,例如代码缩略图,Python的插件,代码段等。还可自定义键绑定,菜单和工具栏。Sublime Text 的主要功能包括:拼写检查,书签,完整的 Python API , Goto 功能,即时项目切换,多选择,多窗口等等。Sublime Text 是一个跨平台的编辑器,同时支持Windows、Linux、Mac OS X等操作系统。

用户登录
用户注册