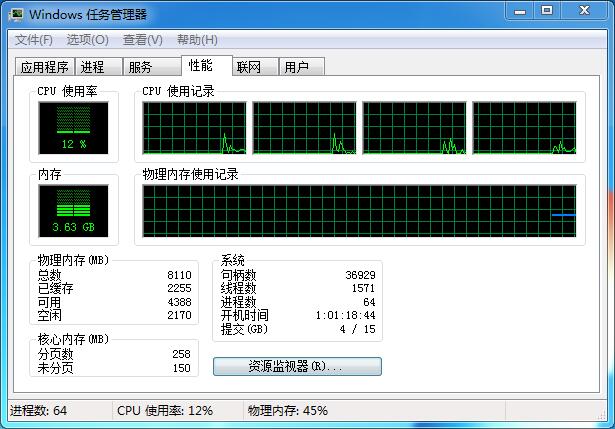
使用aliyun提供的迁移工具把本地的虚拟机或主机迁移到阿里云上去
概述 这个工具说真的挺神奇的,具体流程是下面这样的,你现在本地安装这个工具,之后进行简单的配置就可以把本地的应用迁移到云上去,默认直接会在阿里云上开一台按量付费的云服务器,迁移完成制作镜像之后会释放掉 windows 下 我是在windows下安装的,因为是做测试,所以才安装了windows,不然谁会用这破玩意,我用的系统是windows server 2012r2首先打开浏览器然后输入链接下载http://p2v-tools.oss-cn-hangzhou.aliyuncs.com/Alibaba_Cloud_Migration_Tool.zip?spm=a2c4g.11186623.2.13.yjPQON&file=Alibaba_Cloud_Migration_Tool.zip如果是linux下直接使用wget工具搞定,真的事多接着进入对应的文件夹首先配置user_config.json { "access_id": "", "secret_key": "", "region_id": "", "image_name": "", "system_disk_size": 40, "platform": "", "architecture": "", "data_disks": [], "bandwidth_limit": 0 } 前两个不解释,region_id就是迁移中转的ecs地域可以在下面这个链接看https://help.aliyun.com/document_detail/53289.html?spm=a2c4g.11186623.2.4.8JaHveimage_name就是你上云镜像的名字system_disk_size就是系统盘大小,这个是迁移的时候做中转的ecs的系统盘大小platform就是平台,详细的在下面,名字要一样,不然不起作用 CentOS Ubuntu SUSE OpenSUSE Debian RedHat Others Linux Windows Server 2003 Windows Server 2008 Windows Server 2012 Windows Server 2016 architecture就是平台的架构,是i386还是x86_64的data_disks就是迁移数据盘时候使用的,就是本地除了系统盘之外的盘,如果没有就空着,如果有,有三个参数要写data_disk_index 数据盘序号data_disk_size 数据盘大小src_path 目录,如果是windows就是D,E,F或者其他,如果是linux就是mnt,disk,media或者其他,具体配置就像下面这样 [ { "data_disk_index": 1, "data_disk_size": 100, "src_path": "/mnt/disk1" }, { "data_disk_index": 2, "data_disk_size": 150, "src_path": "/mnt/disk2" }, { "data_disk_index": 3, "data_disk_size": 200, "src_path": "/mnt/disk3" } ], bandwidth_limit 数据传输的带宽限制,使用默认0就好了,速度快点 接着按住shift加鼠标右键打开cmd之后运行go2aliyun_client.exe这个文件 C:\Users\Administrator\Desktop\Alibaba_Cloud_Migration_Tool\go2aliyun_client1.2. 3_windows\go2aliyun_client1.2.3_windows\go2aliyun_client1.2.3_windows_x86_64>go2 aliyun_client.exe [2018-03-13 12:18:05] [Info] ========= Goto Aliyun Client 1.2.3. ========= [2018-03-13 12:18:05] [Info] Goto Aliyun Begin... [2018-03-13 12:18:05] [Info] Check User Config... [2018-03-13 12:18:05] [Info] Load Client Config... [2018-03-13 12:18:05] [Info] Get OS Info... [2018-03-13 12:18:05] [Info] Client Check... [2018-03-13 12:18:05] [Info] Prepare ECS... [2018-03-13 12:18:05] [Info] Check Resource... [2018-03-13 12:18:06] [Info] Query Vpc... [2018-03-13 12:18:07] [Info] Vpc Found! [2018-03-13 12:18:07] [Info] Wait For Vpc... [2018-03-13 12:18:07] [Info] Query VSwitch... [2018-03-13 12:18:07] [Info] VSwitch Found! [2018-03-13 12:18:07] [Info] Wait For VSwitch... [2018-03-13 12:18:07] [Info] Query Security Group... [2018-03-13 12:18:07] [Info] Security Group Found! [2018-03-13 12:18:07] [Info] Create Server Instance [ecs.n1.small]... [2018-03-13 12:18:12] [Info] Wait For Server ECS... ECS Status: Stopped, time: 5s [2018-03-13 12:18:17] [Info] Allocate Public Ip Address... [2018-03-13 12:18:18] [Info] Check Server ECS Status... [2018-03-13 12:18:18] [Info] Start Server Instance... [2018-03-13 12:18:18] [Info] Query Server ECS Status... ECS Status: Running, time: 57s [2018-03-13 12:19:15] [Info] Server ECS Is Running! [2018-03-13 12:19:15] [Info] Connect to Server Testing, please wait (600s max )... Connect Test count: 3, time: 60s [2018-03-13 12:20:15] [Info] Connect to Server Successfully! [2018-03-13 12:20:15] [Info] Disks Detecting, please wait (600s max)... Disks Detect count: 2, time: 13s [2018-03-13 12:20:28] [Info] Init Disk 0... [2018-03-13 12:20:31] [Info] Do Rsync Disk 0... [2018-03-13 12:20:31] [Info] Prepare for Rsync Disk 0... [2018-03-13 12:20:40] [Info] Rsync Testing, please wait (600s max)... Rsync Test count: 1, time: 2s [2018-03-13 12:20:42] [Info] Rsync Test Successfully! Rsync Size: 11.32GB, progress: 109.34%, time: 1608s [2018-03-13 12:47:48] [Info] Do Rsync Disk 0 Successfully! [2018-03-13 12:47:50] [Info] Do Grub... [2018-03-13 12:47:53] [Info] Stop Server Instance... [2018-03-13 12:47:55] [Info] Query Server ECS Status... ECS Status: Stopped, time: 19s [2018-03-13 12:48:14] [Info] Server ECS Is Ready To Create Image! [2018-03-13 12:48:14] [Info] Prepare To Create Image... [2018-03-13 12:48:14] [Info] Query Disk 0... [2018-03-13 12:48:14] [Info] Create Snapshot 0... [2018-03-13 12:48:15] [Info] Create Snapshot 0 Successfully! [2018-03-13 12:48:17] [Info] Query Snapshots Progress... Snapshots accomplished, total: 100%, time: 1024s [2018-03-13 13:05:21] [Info] Create Image... [2018-03-13 13:05:22] [Done] Create Image Successfully! [2018-03-13 13:05:22] [Info] Server ECS Is Released! [2018-03-13 13:05:22] [Done] Goto Aliyun Finished! Enter any key to Exit... 迁移过程差不多就是这个样子,先是会在阿里云上创建一个云主机,默认的系统我看了一下是2008,配置挺低的,然后是上传,上传完成之后关闭ecs制作镜像最后释放ecs linux下 linux下我使用的centos 7.4 上云的话有几个要求 确保您已经安装了 Rsync 库: 确保系统安装了 Xen 或者 KVM(Kernerl Virtual Machine) 驱动 确保系统已关闭 SELinux。您可以运行 setenforce 0 临时关闭 SELinux。 您需要以 root 身份运行迁云工具。 如果您的源服务器系统是 CentOS 5 或者 Debian 7 等内核版本比较低并且自带 GRUB 程序版本低于 1.99 时。您可以预先 安装 1.9 以上版本的系统引导程序 GRUB 建议为源服务器安装cloud-init,以确保迁云后所有的实例配置成功生效。 因为我使用的zstack的系统模版,所以cloud-init我是安装好了的,还有qemu-guest-agent也是安装好了的,selinux默认也是关闭了的,如果没有可以看我下面 首先安装cloud-inityum install cloud-init -y接着安装qemu-guest-agentyum install qemu-guest-agen之后设置开机启动chkconfig qemu-guest-agent on使用下面这个命令getenforce来检查selinux是不是开启的如果返回Enforcing,那么是开启的,否则修改下面这个配置文件vi /etc/selinux/config把SELINUX改为disable接着你要安装rsync同步工具yum install rsync –y关于grub的话centos7是使用grub2的,所以是符合的最后就是下载迁移工具了wget 'http://p2v-tools.oss-cn-hangzhou.aliyuncs.com/Alibaba_Cloud_Migration_Tool.zip?spm=a2c4g.11186623.2.13.N4K0Db&file=Alibaba_Cloud_Migration_Tool.zip'解压unzip Alibaba_Cloud_Migration_Tool.zip\?spm\=a2c4g.11186623.2.13.N4K0Db\&file\=Alibaba_Cloud_Migration_Tool.zipunzip go2aliyun_client1.2.3_linux.zipcd go2aliyun_client1.2.3_linux/go2aliyun_client1.2.3_linux_x86_64/修改文件权限chmod +x ./go2aliyun_client修改json配置文件 { "access_id": "", "secret_key": "", "region_id": "", "image_name": "", "system_disk_size": 40, "platform": "", "architecture": "", "data_disks": [], "bandwidth_limit": 0 } 配置方法和windows的一样,没什么可说的,接着执行这个命令就好了,执行之前最好安装screen,用screen创建一个会话去执行screen -S goto./go2aliyun_client和windows一样等着就好了 欢迎关注Bboysoul的博客www.bboysoul.comHave Fun