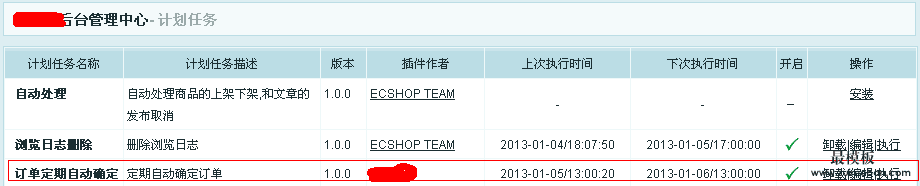
首页 文章 精选 留言 我的

精选列表

搜索[网站开发],共10000篇文章
优秀的个人博客,低调大师

40条ASP.NET开发Tip

欢迎拍砖,共同进步!!! 1、在compilation 下,请设置debug=false ,如下: defaultLanguage="c#"debug="false"> 2、请使用Server.Transfer代替Response.Redirect。 3、使用Validator控件,请要经常检查Page.IsValid。 4、请使用foreach循环,而不是为字符串迭代循环。 5、请使用客户端验证方式(不要每次都在服务端验证)。 6、为了避免重复代码执行,请检查“Page.IsPostBack”。 7、GIF 和PNG类似,但是PNG通常产生一个较小体积的文件。(当然,有些浏览器不支持PNG格式) 8、更新二进制文件时,请使用AppOffline.htm 。 9、除非需要,否则请关闭跟踪。 < trace enabled ="false" requestLimit ="10" pageOutput ="false" traceMode ="SortByTime" localOnly ="true" /> 10、编译页面,请禁用AutoEventWireup。在Machine.config文件中请设置AutoEventWireup为false。 11、如果不需要,请关闭Session会话。 < sessionstate timeout ="20" cookieless ="false" mode ="Off" stateconnectionstring ="tcpip=127.0.0.1:42424" sqlconnectionstring ="datasource=127.0.0.1;Trusted_Connection=no" > 12、在你生成最终版本的应用程序之前,请选择Release模式。默认是Debug。 13、如果不需要请禁用ViewState 。 EnableViewState="false" 14、请避免频繁的访问数据库。 15、使用缓存提高你的应用程序的性能。 16、验证所有的用户输入。 17、请最后释放所有资源。 18、String 和Stringbuilder。 修改字符串时,使用Stringbuilder而不是String ,在每次字符串修改的时候,String都会占据不同的内存空间,而Stringbuilder只使用同一个内存空间 19、切勿直接使用对象的值,先从本地变量获取对象的值,然后再使用。因为直接读取对象的值比读取变量更花时间。 20、避免异常:使用if。 21、代码优化:避免使用:x = x +1,而是使用x+=1比较好。 22、数据访问技术:DataReaders提供快速有效的数据检索方法。在性能方面,DataReader是速度远远超过DataSets 。 23、在做一个笨重的ASP代码的处理之前,你进行检查以确保Response.IsClientConnected。 24、避免session变量,因为每个ASP页面是在不同的线程运行和session调用将会被逐一序列化。这样会降低应用程序。你可以使用QueryString集合或者表单上面的hidden变量来保存值。 25、使buffer有效,能提高性能,如: <% response.buffer = true %> 接着使用: <% response.flush = true %> 26、使用Repeater控件代替DataGrid,DataList,因为它是高效的,可定制的,和可编程的。 27、在数据库中检索大量数据,数据列表消耗更多的时间。 分页将显示特定的数据,但是要考虑所有数据负载。只取当前页需要的数据。 28、避免内嵌JavaScript和CSS。 29、使用单个的css文件,而不是多个css文件。 请尽量将您所有的css合并成一个css的类文件,不管文件大小,大量的.css文件会造成大量的请求。.css文件通常是由浏览器缓存,这样一个单一的沉重的.css文件不会导致在每个页面请求时会有漫长的等待。 内嵌.CSS类导致HTML沉重,因此我觉得:首先考虑一个single.css文件。 30、减少cookie的大小。 31、压缩CSS, JavaScript 和Images。 可以使用在线的压缩,压缩文件,将下列网页和优化的代码替换为您的文件内容。 http://iceyboard.no-ip.org/projects/css_compressor[^] CSS 压缩www.xtreeme.com/javascript-optimizer/[^] . JS 压缩 32、适当地使用缓存。 i、页面输出缓存: <% @OutputCacheDuration = " 3600 " VaryByParam = " none " %> ii、页片段缓存: 在每个用户控件中写页面输出缓存 iii、数据缓存: 33、服务器端使用诸如Port80s压缩软件http://www.port80software.com/products/httpzip/[^]。 34、使用了“using”。 35、不要声明成员变量为public 或者proteted,尽量使用private 成员变量和public/protected 属性。 36、使用strString=string.Empty代替 strString="" 。 37、请尽可能减轻你的页面文件,尽量避免不必要的标签,例如使用div代替table。 38、在div中写静态的消息,必要的时候才显示出来。这比你设置服务端的label和div的text属性快。 39、如果可能的话,一次性检索数据库中的数据。尽可能不要添加数据库的访问。因此,整合来自不同表datafields和选择它们。 40、给WebControl取个简短的名字。 本文转自麒麟博客园博客,原文链接:http://www.cnblogs.com/zhuqil/archive/2010/01/16/40-ASP_NET-Tip.html,如需转载请自行联系原作者

优秀的个人博客,低调大师

Android开发中的Intent和Activity

周末撸了几次代码, 舍不得扔, 立此为照! mainActivity.java package com.tw.flag.ch08_memo; import android.content.Intent; import android.support.v7.app.AppCompatActivity; import android.os.Bundle; import android.view.View; import android.widget.AdapterView; import android.widget.ArrayAdapter; import android.widget.ListView; public class MainActivity extends AppCompatActivity implements AdapterView.OnItemClickListener, AdapterView.OnItemLongClickListener { String[] aMemo = { "1.单击可以编辑备忘", "2.长按可以清除备忘", "3.", "4.", "5.", "6" }; ListView lv; ArrayAdapter<String> aa; @Override protected void onCreate(Bundle savedInstanceState) { super.onCreate(savedInstanceState); setContentView(R.layout.activity_main); lv = (ListView)findViewById(R.id.listView); aa = new ArrayAdapter<String>(this, android.R.layout.simple_list_item_1, aMemo); lv.setAdapter(aa); lv.setOnItemClickListener(this); lv.setOnItemLongClickListener(this); } @Override public void onItemClick(AdapterView<?> parent, View view, int position, long id) { Intent it = new Intent(this, Edit.class); it.putExtra("备忘", aMemo[position]); startActivityForResult(it, position); } protected void onActivityResult(int requestCode, int resultCode, Intent it) { if (resultCode == RESULT_OK) { aMemo[requestCode] = it.getStringExtra("备忘"); aa.notifyDataSetChanged(); } } @Override public boolean onItemLongClick(AdapterView<?> parent, View view, int position, long id) { aMemo[position] = (position+1) + "."; aa.notifyDataSetChanged(); return true; } } Edit.java package com.tw.flag.ch08_memo; import android.content.Intent; import android.support.v7.app.AppCompatActivity; import android.os.Bundle; import android.view.View; import android.widget.EditText; import android.widget.TextView; public class Edit extends AppCompatActivity { TextView txv; EditText edt; @Override protected void onCreate(Bundle savedInstanceState) { super.onCreate(savedInstanceState); setContentView(R.layout.activity_edit); Intent it = getIntent(); String s = it.getStringExtra("备忘"); txv = (TextView)findViewById(R.id.textView); txv.setText(s.substring(0, 2)); edt = (EditText)findViewById(R.id.editText); if (s.length() > 3) edt.setText(s.substring(3)); } public void onCancel(View v) { setResult(RESULT_CANCELED); finish(); } public void onSave(View v) { Intent it2 = new Intent(); it2.putExtra("备忘", txv.getText() + " " + edt.getText()); setResult(RESULT_OK, it2); finish(); } } 你的样子:

优秀的个人博客,低调大师

android移动开发环境搭建与配置

1、下载android sdk http://developer.android.com/sdk/index.html 然后解压到指定目录即可,目录结构如下 2、进入eclipse目录,启动eclipse,先check of update下 依次window》sdk manager安装更新必要的插件 3、再到window》preferences里查看sdk是否有效,无效则会报错 5、创建一个android project,然后run config里配置下 6、点击window》android vdm》new一个新的出来,然后点击start,如下图 PS: 如果这个选项出不来,那么先执行如下的步骤: 6、当上一步完全启动后,右键工程名上,run as》 android app即可运行 7、配置环境变量PATH,在我自己的电脑上如下 F:\adt-bundle-windows-x86-20130219\sdk\platform-tools;F:\adt-bundle-windows-x86-20130219\sdk\tools; 这个是用于以后使用adb和emulator命令(http://developer.android.com/tools/help/adb.html) PS:安装包下载地址: http://pan.baidu.com/share/link?shareid=445649&uk=1495773032 本文转自 小强测试帮 51CTO博客,原文链接:http://blog.51cto.com/xqtesting/1147868,如需转载请自行联系原作者

优秀的个人博客,低调大师

Android开发者指南(6) —— AIDL

正文 使用AIDL设计远程接口(Designing a Remote Interface Using AIDL) 由于每个应用程序都运行在自己的进程空间,并且可以从应用程序UI运行另一个服务进程,而且经常会在不同的进程间传递对象。在Android平台,一个进程通常不能访问另一个进程的内存空间,所以要想对话,需要将对象分解成操作系统可以理解的基本单元,并且有序的通过进程边界。 通过代码来实现这个数据传输过程是冗长乏味的,Android提供了AIDL工具来处理这项工作。 AIDL (Android Interface Definition Language)是一种IDL语言,用于生成可以在Android设备上两个进程之间进行进程间通信(IPC)的代码。如果在一个进程中(例如Activity)要调用另一个进程中(例如Service)对象的操作,就可以使用AIDL生成可序列化的参数。 AIDL IPC机制是面向接口的,像COM或Corba一样,但是更加轻量级。它是使用代理类在客户端和实现端传递数据。 使用AIDL实现IPC(Implementing IPC Using AIDL) 使用AIDL实现IPC服务的步骤是: 1.创建.aidl文件-该文件(YourInterface.aidl)定义了客户端可用的方法和数据的接口。 2.在makefile文件中加入.aidl文件-(Eclipse中的ADT插件提供管理功能)Android包括名为AIDL的编译器,位于tools/文件夹。 3.实现接口-AIDL编译器从AIDL接口文件中利用Java语言创建接口,该接口有一个继承的命名为Stub的内部抽象类(并且实现了一些IPC调用的附加方法),要做的就是创建一个继承于YourInterface.Stub的类并且实现在.aidl文件中声明的方法。 4.向客户端公开接口-如果是编写服务,应该继承Service并且重载Service.onBind(Intent)以返回实现了接口的对象实例 创建.aidl文件(Create an .aidl File) AIDL使用简单的语法来声明接口,描述其方法以及方法的参数和返回值。这些参数和返回值可以是任何类型,甚至是其他AIDL生成的接口。重要的是必须导入所有非内置类型,哪怕是这些类型是在与接口相同的包中。下面是AIDL能支持的数据类型: *Java编程语言的主要类型(int, boolean等)—不需要import语句。 *以下的类(不需要import语句): String List-列表中的所有元素必须是在此列出的类型,包括其他AIDL生成的接口和可打包类型。List可以像一般的类(例如List<String>)那样使用,另一边接收的具体类一般是一个ArrayList,这些方法会使用List接口。 Map- Map中的所有元素必须是在此列出的类型,包括其他AIDL生成的接口和可打包类型。一般的maps(例如Map<String,Integer>)不被支持,另一边接收的具体类一般是一个HashMap,这些方法会使用Map接口。 CharSequence-该类是被TextView和其他控件对象使用的字符序列。 *通常引引用方式传递的其他AIDL生成的接口,必须要import语句声明 *实现了Parcelable protocol以及按值传递的自定义类,必须要import语句声明。 以下是基本的AIDL语法: 实现接口(Implementing the Interface) AIDL生成了与.aidl文件同名的接口,如果使用Eclipse插件,AIDL会做为编译过程的一部分自动运行(不需要先运行AIDL再编译项目),如果没有插件,就要先运行AIDL。 生成的接口包含一个名为Stub的抽象的内部类,该类声明了所有.aidl中描述的方法,Stub还定义了少量的辅助方法,尤其是asInterface(),通过它或以获得IBinder(当applicationContext.bindService()成功调用时传递到客户端的onServiceConnected())并且返回用于调用IPC方法的接口实例,更多细节参见Calling an IPC Method。 要实现自己的接口,就从YourInterface.Stub类继承,然后实现相关的方法(可以创建.aidl文件然后实现stub方法而不用在中间编译,Android编译过程会在.java文件之前处理.aidl文件)。 这个例子实现了对 IRemoteService 接口的调用,这里使用了匿名对象并且只有一个 getPid() 接口。 这里是实现接口的几条说明: *不会有返回给调用方的异常 *默认IPC调用是同步的。如果已知IPC服务端会花费很多毫秒才能完成,那就不要在Activity或View线程中调用,否则会引起应用程序挂起(Android可能会显示“应用程序未响应”对话框),可以试着在独立的线程中调用。 *AIDL接口中只支持方法,不能声明静态成员。 向客户端暴露接口(Exposing Your Interface to Clients) 在完成了接口的实现后需要向客户端暴露接口了,也就是发布服务,实现的方法是继承Service,然后实现以Service.onBind(Intent)返回一个实现了接口的类对象。下面的代码片断表示了暴露IRemoteService接口给客户端的方式。 public class RemoteService extends Service{ ... @Override public IBinderonBind(Intentintent){ // Selecttheinterfacetoreturn.Ifyourserviceonlyimplements // asingleinterface,youcanjustreturnitherewithoutchecking // theIntent. if (IRemoteService. class .getName().equals(intent.getAction())){ return mBinder; } if (ISecondary. class .getName().equals(intent.getAction())){ return mSecondaryBinder; } return null ; } /** *TheIRemoteInterfaceisdefinedthroughIDL */ private final IRemoteService.StubmBinder = new IRemoteService.Stub(){ public void registerCallback(IRemoteServiceCallbackcb){ if (cb != null )mCallbacks.register(cb); } public void unregisterCallback(IRemoteServiceCallbackcb){ if (cb != null )mCallbacks.unregister(cb); } }; /** *Asecondaryinterfacetotheservice. */ private final ISecondary.StubmSecondaryBinder = new ISecondary.Stub(){ public int getPid(){ return Process.myPid(); } public void basicTypes( int anInt, long aLong, boolean aBoolean, float aFloat, double aDouble,StringaString){ } }; } 使用可打包接口传递参数Pass by value Parameters using Parcelables 如果有类想要能过AIDL在进程之间传递,这一想法是可以实现的,必须确保这个类在IPC的两端的有效性,通常的情形是与一个启动的服务通信。 这里列出了使类能够支持Parcelable的4个步骤:【译者注:原文为5,但列表为4项,疑为作者笔误】 1.使该类实现Parcelabel接口。 2.实现public void writeToParcel(Parcel out)方法,以便可以将对象的当前状态写入包装对象中。 3.增加名为CREATOR的构造器到类中,并实现Parcelable.Creator接口。 4.最后,但同样重要的是,创建AIDL文件声明这个可打包的类(见下文),如果使用的是自定义的编译过程,那么不要编译此AIDL文件,它像C语言的头文件一样不需要编译。 AIDL会使用这些方法的成员序列化和反序列化对象。 这个例子演示了如何让Rect类实现Parcelable接口。 import android.os.Parcel; import android.os.Parcelable; public final class Rect implements Parcelable{ public int left; public int top; public int right; public int bottom; public static final Parcelable.Creator < Rect > CREATOR = new Parcelable.Creator < Rect > (){ public RectcreateFromParcel(Parcelin){ return new Rect(in); } public Rect[]newArray( int size){ return new Rect[size]; } }; public Rect(){ } private Rect(Parcelin){ readFromParcel(in); } public void writeToParcel(Parcelout){ out.writeInt(left); out.writeInt(top); out.writeInt(right); out.writeInt(bottom); } public void readFromParcel(Parcelin){ left = in.readInt(); top = in.readInt(); right = in.readInt(); bottom = in.readInt(); } } 这个是Rect.aidl文件。 序列化Rect类的工作相当简单,对可打包的其他类型的数据可以参见Parcel类。 警告 :不要忘了对从其他进程接收到的数据进行安全检查。在上面的例子中, rect 要从数据包中读取 4 个数值,需要确认无论调用方想要做什么,这些数值都是在可接受的范围之内。想要了解更多的关于保持应用程序安全的内容,可参见 Security and Permissions 。 调用IPC方法(Calling an IPC Method) 这里给出了调用远端接口的步骤: 1.声明.aidl文件中定义的接口类型的变量。 2.实现ServiceConnection 3.调用Context.bindService(),传递ServiceConnection的实现 4.在ServiceConnection.onServiceConnected()方法中会接收到IBinder对象,调用YourInterfaceName.Stub.asInterface((IBinder)service)将返回值转换为YourInterface类型 5.调用接口中定义的方法。应该总是捕获连接被打断时抛出的DeadObjectException异常,这是远端方法唯一的异常。 6.调用Context.unbindService()断开连接 这里是几个调用IPC服务的提示: *对象是在进程间进行引用计数 *可以发送匿名对象作为方法参数 以下是演示调用 AIDL 创建的服务,可以在 ApiDemos 项目中获取远程服务的示例。 public static class Binding extends Activity{ /** Theprimaryinterfacewewillbecallingontheservice. */ IRemoteServicemService = null ; /** Anotherinterfaceweuseontheservice. */ ISecondarymSecondaryService = null ; ButtonmKillButton; TextViewmCallbackText; private boolean mIsBound; /** *Standardinitializationofthisactivity.SetuptheUI,thenwait *fortheusertopokeitbeforedoinganything. */ @Override protected void onCreate(BundlesavedInstanceState){ super .onCreate(savedInstanceState); setContentView(R.layout.remote_service_binding); // Watchforbuttonclicks. Buttonbutton = (Button)findViewById(R.id.bind); button.setOnClickListener(mBindListener); button = (Button)findViewById(R.id.unbind); button.setOnClickListener(mUnbindListener); mKillButton = (Button)findViewById(R.id.kill); mKillButton.setOnClickListener(mKillListener); mKillButton.setEnabled( false ); mCallbackText = (TextView)findViewById(R.id.callback); mCallbackText.setText( " Notattached. " ); } /** *Classforinteractingwiththemaininterfaceoftheservice. */ private ServiceConnectionmConnection = new ServiceConnection(){ public void onServiceConnected(ComponentNameclassName,IBinderservice){ // Thisiscalledwhentheconnectionwiththeservicehasbeen // established,givingustheserviceobjectwecanuseto // interactwiththeservice.Wearecommunicatingwithour // servicethroughanIDLinterface,sogetaclient-side // representationofthatfromtherawserviceobject. mService = IRemoteService.Stub.asInterface(service); mKillButton.setEnabled( true ); mCallbackText.setText( " Attached. " ); // Wewanttomonitortheserviceforaslongasweare // connectedtoit. try { mService.registerCallback(mCallback); } catch (RemoteExceptione){ // Inthiscasetheservicehascrashedbeforewecouldeven // doanythingwithit;wecancountonsoonbeing // disconnected(andthenreconnectedifitcanberestarted) // sothereisnoneedtodoanythinghere. } // Aspartofthesample,telltheuserwhathappened. Toast.makeText(Binding. this ,R.string.remote_service_connected, Toast.LENGTH_SHORT).show(); } public void onServiceDisconnected(ComponentNameclassName){ // Thisiscalledwhentheconnectionwiththeservicehasbeen // unexpectedlydisconnected--thatis,itsprocesscrashed. mService = null ; mKillButton.setEnabled( false ); mCallbackText.setText( " Disconnected. " ); // Aspartofthesample,telltheuserwhathappened. Toast.makeText(Binding. this ,R.string.remote_service_disconnected, Toast.LENGTH_SHORT).show(); } }; /** *Classforinteractingwiththesecondaryinterfaceoftheservice. */ private ServiceConnectionmSecondaryConnection = new ServiceConnection(){ public void onServiceConnected(ComponentNameclassName,IBinderservice){ // Connectingtoasecondaryinterfaceisthesameasany // otherinterface. mSecondaryService = ISecondary.Stub.asInterface(service); mKillButton.setEnabled( true ); } public void onServiceDisconnected(ComponentNameclassName){ mSecondaryService = null ; mKillButton.setEnabled( false ); } }; private OnClickListenermBindListener = new OnClickListener(){ public void onClick(Viewv){ // Establishacoupleconnectionswiththeservice,binding // byinterfacenames.Thisallowsotherapplicationstobe // installedthatreplacetheremoteservicebyimplementing // thesameinterface. bindService( new Intent(IRemoteService. class .getName()), mConnection,Context.BIND_AUTO_CREATE); bindService( new Intent(ISecondary. class .getName()), mSecondaryConnection,Context.BIND_AUTO_CREATE); mIsBound = true ; mCallbackText.setText( " Binding. " ); } }; private OnClickListenermUnbindListener = new OnClickListener(){ public void onClick(Viewv){ if (mIsBound){ // Ifwehavereceivedtheservice,andhenceregisteredwith // it,thennowisthetimetounregister. if (mService != null ){ try { mService.unregisterCallback(mCallback); } catch (RemoteExceptione){ // Thereisnothingspecialweneedtodoiftheservice // hascrashed. } } // Detachourexistingconnection. unbindService(mConnection); unbindService(mSecondaryConnection); mKillButton.setEnabled( false ); mIsBound = false ; mCallbackText.setText( " Unbinding. " ); } } }; private OnClickListenermKillListener = new OnClickListener(){ public void onClick(Viewv){ // Tokilltheprocesshostingourservice,weneedtoknowits // PID.Convenientlyourservicehasacallthatwillreturn // tousthatinformation. if (mSecondaryService != null ){ try { int pid = mSecondaryService.getPid(); // Notethat,thoughthisAPIallowsustorequestto // killanyprocessbasedonitsPID,thekernelwill // stillimposestandardrestrictionsonwhichPIDsyou // areactuallyabletokill.Typicallythismeansonly // theprocessrunningyourapplicationandanyadditional // processescreatedbythatappasshownhere;packages // sharingacommonUIDwillalsobeabletokilleach // other'sprocesses. Process.killProcess(pid); mCallbackText.setText( " Killedserviceprocess. " ); } catch (RemoteExceptionex){ // Recovergracefullyfromtheprocesshostingthe // serverdying. // Justforpurposesofthesample,putupanotification. Toast.makeText(Binding. this , R.string.remote_call_failed, Toast.LENGTH_SHORT).show(); } } } }; // ---------------------------------------------------------------------- // Codeshowinghowtodealwithcallbacks. // ---------------------------------------------------------------------- /** *Thisimplementationisusedtoreceivecallbacksfromtheremote *service. */ private IRemoteServiceCallbackmCallback = new IRemoteServiceCallback.Stub(){ /** *Thisiscalledbytheremoteserviceregularlytotellusabout *newvalues.NotethatIPCcallsaredispatchedthroughathread *poolrunningineachprocess,sothecodeexecutingherewill *NOTberunninginourmainthreadlikemostotherthings--so, *toupdatetheUI,weneedtouseaHandlertohopoverthere. */ public void valueChanged( int value){ mHandler.sendMessage(mHandler.obtainMessage(BUMP_MSG,value, 0 )); } }; private static final int BUMP_MSG = 1 ; private HandlermHandler = new Handler(){ @Override public void handleMessage(Messagemsg){ switch (msg.what){ case BUMP_MSG: mCallbackText.setText( " Receivedfromservice: " + msg.arg1); break ; default : super .handleMessage(msg); } } }; } 本文转自over140 51CTO博客,原文链接:http://blog.51cto.com/over140/582282,如需转载请自行联系原作者

优秀的个人博客,低调大师

Android开发技巧:动态创建UI界面

Android的基本UI界面一般都是在xml文件中定义好,然后通过activity的setContentView来显示在界面上,这是Android UI的最简单的构建方式。其实,为了实现更加复杂和更加灵活的UI界面,往往需要动态生成UI界面,甚至根据用户的点击或者配置,动态地改变UI,本文即介绍该技巧。 假设Android工程的一个xml文件名为activity_main.xml,定义如下: 1 2 3 4 5 6 7 8 9 10 < LinearLayout xmlns:android = "http://schemas.android.com/apk/res/android" xmlns:tools = "http://schemas.android.com/tools" android:layout_width = "match_parent" android:layout_height = "match_parent" tools:context = ".MainActivity" > < TextView android:id = "@+id/DynamicText" android:layout_width = "wrap_content" android:layout_height = "wrap_content" /> </ LinearLayout > 在 MainActivity 中,希望显示这个简单的界面有三种方式(注:下面的代码均在 MainActivity 的 onCreate() 函数中实现 )。 (1) 第一种方式,直接通过传统的 setContentView(R.layout.*) 来加载,即: 1 2 3 4 setContentView(R.layout.activity_main); TextViewtext=(TextView) this .findViewById(R.id.DynamicText); text.setText( "HelloWorld" ); (2) 第二种方式,通过 LayoutInflater 来间接加载,即: 1 2 3 4 5 6 7 LayoutInflatermInflater=LayoutInflater.from(this); ViewcontentView=mInflater.inflate(R.layout.activity_main,null); TextViewtext=(TextView)contentView.findViewById(R.id.DynamicText); text.setText("HelloWorld"); setContentView(contentView); 注: LayoutInflater 相当于一个“布局加载器”,有三种方式可以从系统中获取到该布局加载器对象,如: 方法一: LayoutInflater.from(this); 方法二: (LayoutInflater)this.getSystemService(this.LAYOUT_INFLATER_SERVICE); 方法三: this.getLayoutInflater(); 通过该对象的 inflate方法,可以将指定的xml文件加载转换为View类对象,该xml文件中的控件的对象,都可以通过该View对象的findViewById方法获取。 (3)第三种方式,纯粹地手工创建 UI 界面 xml 文件中的任何标签,都是有相应的类来定义的,因此,我们完全可以不使用xml 文件,纯粹地动态创建所需的UI界面,示例如下: 1 2 3 4 5 6 7 8 9 LinearLayoutlayout= new LinearLayout( this ); TextViewtext= new TextView( this ); text.setText( "HelloWorld" ); text.setLayoutParams( new ViewGroup.LayoutParams(LayoutParams.WRAP_CONTENT,LayoutParams.WRAP_CONTENT)); layout.addView(text); setContentView(layout); Android动态UI创建的技巧就说到这儿了,在本示例中,为了方便理解,都是采用的最简单的例子,因此可能看不出动态创建UI的优点和用途,但是不要紧,先掌握基本技巧,后面的文章中,会慢慢将这些技术应用起来,到时侯就能理解其真正的应用场景了。 本文转自 Jhuster 51CTO博客,原文链接:http://blog.51cto.com/ticktick/1256593,如需转载请自行联系原作者

资源下载

更多资源
腾讯云软件源

腾讯云软件源

为解决软件依赖安装时官方源访问速度慢的问题,腾讯云为一些软件搭建了缓存服务。您可以通过使用腾讯云软件源站来提升依赖包的安装速度。为了方便用户自由搭建服务架构,目前腾讯云软件源站支持公网访问和内网访问。

Nacos

Nacos

Nacos /nɑ:kəʊs/ 是 Dynamic Naming and Configuration Service 的首字母简称,一个易于构建 AI Agent 应用的动态服务发现、配置管理和AI智能体管理平台。Nacos 致力于帮助您发现、配置和管理微服务及AI智能体应用。Nacos 提供了一组简单易用的特性集,帮助您快速实现动态服务发现、服务配置、服务元数据、流量管理。Nacos 帮助您更敏捷和容易地构建、交付和管理微服务平台。

Rocky Linux

Rocky Linux

Rocky Linux(中文名:洛基)是由Gregory Kurtzer于2020年12月发起的企业级Linux发行版,作为CentOS稳定版停止维护后与RHEL(Red Hat Enterprise Linux)完全兼容的开源替代方案,由社区拥有并管理,支持x86_64、aarch64等架构。其通过重新编译RHEL源代码提供长期稳定性,采用模块化包装和SELinux安全架构,默认包含GNOME桌面环境及XFS文件系统,支持十年生命周期更新。

Sublime Text

Sublime Text

Sublime Text具有漂亮的用户界面和强大的功能,例如代码缩略图,Python的插件,代码段等。还可自定义键绑定,菜单和工具栏。Sublime Text 的主要功能包括:拼写检查,书签,完整的 Python API , Goto 功能,即时项目切换,多选择,多窗口等等。Sublime Text 是一个跨平台的编辑器,同时支持Windows、Linux、Mac OS X等操作系统。

用户登录
用户注册