前言
本篇博客主要讲解ScrollView和HorizontalScrollView两个容器的使用。它们分别代表了垂直滚动以及水平滚动,滚动的内容是它其中包含的View。在本篇会简单介绍ScrollView和HorizontalScrollView的使用以及注意事项,最后以一个简单的Demo来演示一下这两个容器的使用。
ScrollView
ScrollView,通过官方文档的继承关系可以看出,它继承自FrameLayout,所以它是一种特殊类型的FrameLayout,因为它可以使用用户滚动显示一个占据的空间大于物理显示的视图列表。值得注意的是,ScrollView只能包含一个子视图或视图组,在实际项目中,通常包含的是一个垂直的LinearLayout。
值得注意的是,ScrollView不能和ListView一起使用,因为ListView已经对垂直方向的滚动做了处理,它会迫使如果ListView的内容大于物理视图的内容的时候,强制垂直滚动的效果,所以这里使用ScrollView和ListView混合使用是没有意义的,对于ListView的讲解,可以参见我的另外一篇博客:Android--UI之ListView。ScrollView还需要注意EditText自带的多行输入的滚动效果,也是不可以混合使用的,如果在ScrollView中包含了多行的EditText,那EditText中自带的滚动效果将失效。其中心思想就是ScrollView是一个滚动视图的容器,对于一些自带了滚动效果的控件,是无法和它一起被混合使用的。
在Android平台下,与ScrollView类似的还有一个HorizontalScrollView容器,这个容器与ScrollView的作用相反,主要适用于水平滚动,了解了ScrollView就基本上了解了HorizontalScrollView,所以这里着重讲解ScrollView的使用。
示例Demo
ScrollView其实就是一个布局,所以基本上没有什么太多的自己的方法或者属性需要特别讲解。这里直接展示一个Demo来讲解一下使用以及效果即可,这里提供了十张图片,需要放置在res/drawable-hdpi目录下。
布局代码:
![复制代码]()
 1 <?xml version="1.0" encoding="utf-8"?>
 2 <ScrollView xmlns:android="http://schemas.android.com/apk/res/android"
 3     android:layout_width="match_parent"
 4     android:layout_height="match_parent" >
 5
 6     <LinearLayout
 7         android:layout_width="match_parent"
 8         android:layout_height="wrap_content"
 9         android:orientation="vertical" >
10
11         <TextView
12             android:layout_width="match_parent"
13             android:layout_height="wrap_content"
14             android:text="垂直滚动视图"
15             android:textSize="30dp" />
16
17         <ImageView
18             android:layout_width="match_parent"
19             android:layout_height="wrap_content"
20             android:src="@drawable/bmp1" />
21
22         <ImageView
23             android:layout_width="match_parent"
24             android:layout_height="wrap_content"
25             android:src="@drawable/bmp2" />
26
27         <ImageView
28             android:layout_width="match_parent"
29             android:layout_height="wrap_content"
30             android:src="@drawable/bmp3" />
31
32         <EditText
33             android:maxLines="2"
34             android:layout_width="match_parent"
35             android:layout_height="40dp" />
36
37         <ImageView
38             android:layout_width="match_parent"
39             android:layout_height="wrap_content"
40             android:src="@drawable/bmp4" />
41
42         <ImageView
43             android:layout_width="match_parent"
44             android:layout_height="wrap_content"
45             android:src="@drawable/bmp5" />
46
47         <ImageView
48             android:layout_width="match_parent"
49             android:layout_height="wrap_content"
50             android:src="@drawable/bmp6" />
51
52         <ImageView
53             android:layout_width="match_parent"
54             android:layout_height="wrap_content"
55             android:src="@drawable/bmp7" />
56
57         <ImageView
58             android:layout_width="match_parent"
59             android:layout_height="wrap_content"
60             android:src="@drawable/bmp8" />
61
62         <ImageView
63             android:layout_width="match_parent"
64             android:layout_height="wrap_content"
65             android:src="@drawable/bmp9" />
66
67         <ImageView
68             android:layout_width="match_parent"
69             android:layout_height="wrap_content"
70             android:src="@drawable/bmp10" />
71     </LinearLayout>
72
73 </ScrollView>
![复制代码]()
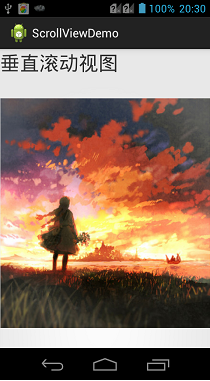
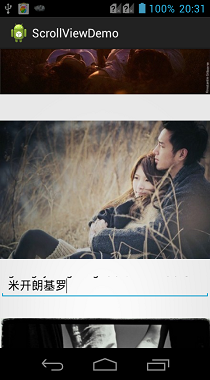
效果展示:
![]()
![]()
HorizontalScrollView
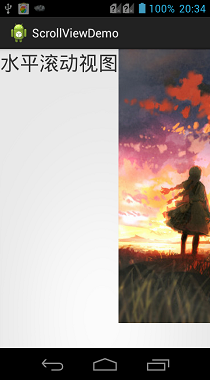
对于HorizontalScrollView而言,其实所有的思想都与ScrollView类似,唯一的区别是HorizontalScrollView是支持水平滚动的。在上面的实例中,只需要改变一下外围的ScrollView为HorizontalScrollView,再把其中包裹的LinearLayout的android:orientation属性设置为horizontal即可实现水平滚动的效果。因为没有什么新的技术含量,这里就不再展示Demo代码了。
效果展示:
![]()
![]()
源码下载
总结
对于现在的Android开发,大部分应用中,需要用到滚动效果的时候,比如说滑动的展示新闻的效果,都会直接使用ListView来装载数据。但是ScrollView还是有一定用处的,比如一些软件的属性的设置,就可以放在一个ScrollView中。核心思想就是对于一些动态的效果展示,就使用ListView,对于固定的一些效果展示,就使用ScrollView包裹即可。
本文转自承香墨影博客园博客,原文链接:http://www.cnblogs.com/plokmju/p/android_ScrollView.html,如需转载请自行联系原作者