SpringCloud 是利用SpringBoot的开发便利性巧妙的简化了分布式系统基础设施的开发 ,如服务注册与发现,配置中心,网关服务,负载均衡,熔断器,消息总线,数据监控等,如果想了学习以下内容请先对SpringBoot有一定的了解 ,本简书主要从SpringCloud的入门到SpringCloud的项目实战作为学习路线 如没有SpringBoot的基础请先关注 暂时不要阅读
在介绍SpringCloud之前很多人都会将SpringCloud与Dubbo进行对比
首先要承认Dubbo的性能确实比SpringCloud的性能好 因为SpringCloud是基于Http协议每次都要创建连接传输的也是文本内容 而Dubbo是基于Netty的TCP协议及二进制的传输协议 更接近底层,所以在性能方面不用质疑的
SpringCloud的相关模块
Eureka:服务注册与发现,用于服务管理
Ribbon:基于客户端的负载均衡组件
Hystrix:容错框架,能够防止服务的雪崩效应
Feign:Web服务客户端,能够简化Http接口的调用
Zuul:API网关提供路由转发,请求过滤等功能
Config:分布式配置管理
Sleuth:服务链路跟踪
Stream:构建消息驱动的微服务应用程序的框架
Bus :消息代理的集群消息总线(集成消息中间件Kafka ,RabbitMQ)
. . . . . .
1.Eureka 服务注册与发现中心
注册中心在微服务架构中是必不可少的一部分,主要是用来实现服务的治理功能.
常见的注册中心有Eureka和Zookeeper 在分布式系统领域有个CAP定理 C:数据一致性 A:服务可用性 P: 服务对网络分区故障的容错性
这三个特性在任何分布式系统中都不能同时满足,最多同时满足两个
Eureka是基于AP原则构建 Zookeeper是基于CP原则构建
如果要保证AP就要用Eureka 想要保证CP就要用Zookeeper
Dubbo大部分都是基于Zookeeper作为注册中心 ,SpringCloud都是使用Eureka作为注册中心
使用Eureka编写注册中心服务
首先创建一个maven项目 spring-eureka-registry 在pom.xml里添加相关依赖
<dependencies>
        <dependency>
            <groupId>org.springframework.cloud</groupId>
            <artifactId>spring-cloud-starter-eureka</artifactId>
        </dependency>
        <dependency>
            <groupId>org.springframework.cloud</groupId>
            <artifactId>spring-cloud-starter-eureka-server</artifactId>
        </dependency>
        <dependency>
            <groupId>org.springframework.boot</groupId>
            <artifactId>spring-boot-actuator</artifactId>
        </dependency>

        <dependency>
            <groupId>org.springframework.boot</groupId>
            <artifactId>spring-boot-starter-test</artifactId>
            <scope>test</scope>
        </dependency>
        <dependency>
            <groupId>org.jolokia</groupId>
            <artifactId>jolokia-core</artifactId>
        </dependency>
    </dependencies>
创建一个启动类EurekaRegistryMsApplication
@EnableEurekaServer
@SpringBootApplication
public class EurekaRegistryMsApplication {

    public static void main(String[] args) {
        new SpringApplicationBuilder(EurekaRegistryMsApplication.class).web(true).run(args);
    }

}
@EnableEurekaServer注解表示开启EurekaServer
接下来创建一个application.yml 我们这里使用yml格式的
server:
  port: ${port:${PORT:8763}}
management:
  port: 9274
  context-path: '/55395018-70b7-47c3-8fef-5bf24c9da9af'
eureka:
  instance:
    hostname: eureka1
    prefer-ip-address: false
    instance-id: ${spring.application.name}:${spring.cloud.client.ipAddress}:${spring.application.instance_id:${server.port}}
    metadata-map:
      cluster: prontera
      management:
        port: ${management.port}
        context-path: ${management.context-path}
      health:
        path: ${management.context-path}/health
    status-page-url-path: ${management.context-path}/info
    health-check-url-path: ${management.context-path}/health
  client:
    service-url:
      defaultZone: 'http://${eureka.instance.hostname}:${server.port}/eureka/'
    fetch-registry: false
    register-with-eureka: false
  server:
    renewal-percent-threshold: '0.8'
spring:
  application:
    name: 'registry'
这里需要注意的是register-with-eureka: false 属性 不需要注册自己
接下来就可以直接运行EurekaRegistryMsApplication启动类了
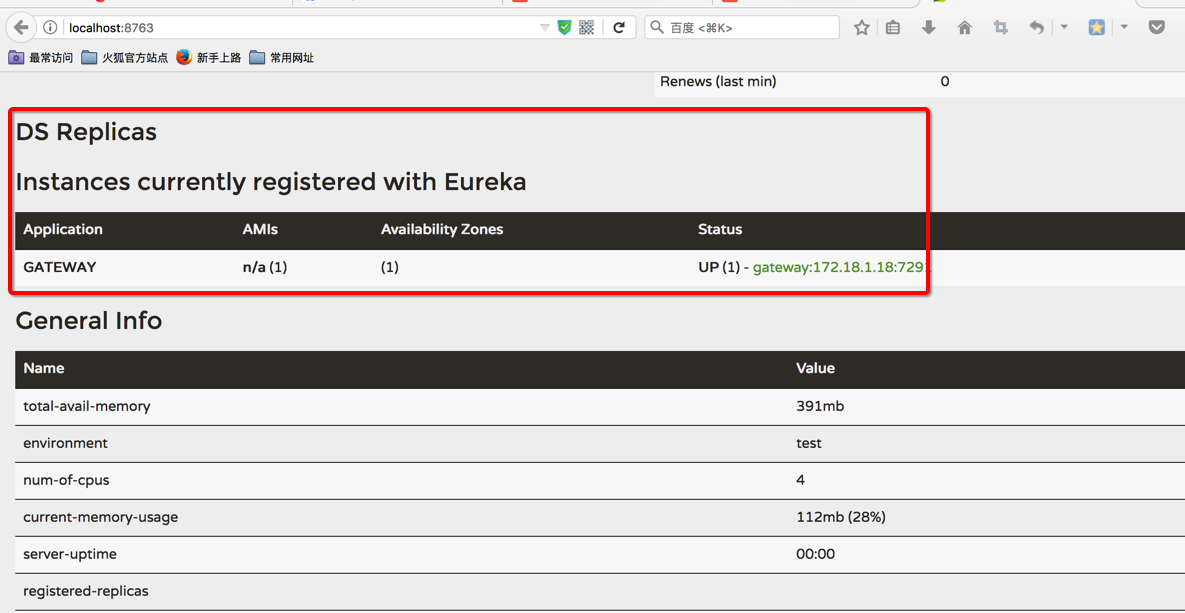
然后访问http://localhost:8763/ 就可以看到Eureka提供的Web控制台了
在这里我们注册的服务端口为8763
这里用了@SpringCloudApplication注解,它整合了@SpringBootApplication、@EnableDiscoveryClient、@EnableCircuitBreaker,主要目的还是简化配置。
2.Ribbon 客户端负载均衡
目前主流的负载方案有两种:一是集中式负载均衡,在消费者和服务提供方中间使用独立的代理方式进行负载,有硬件的(F5),也有软件的(Nginx).另一种就是客户端自己做负载均衡,根据自己的请求做负载,Ribbon就属于客户端自己做负载均衡.
通过Spring Cloud Ribbon的封装,我们在微服务架构中使用客户端负载均衡调用非常简单,只需要如下两步:
- 服务提供者只需要启动多个服务实例并注册到一个注册中心或是多个相关联的服务注册中心.
- 服务消费者直接通过调用被@LoadBalanced注解修饰过的RestTemplate来实现面向服务的接口调用.
这样我们就可以将服务提供者的高可用以及服务消费者的负载均衡调用一起实现了.
Spring Cloud整合Ribbon只需要在pom.xml中加入依赖即可 其他的可以不用配置 因为Eureka中已经中已经引用了Ribbon
<dependency>
    <groupId>org.springframework.cloud</groupId>
    <artifactId>spring-cloud-starter-ribbon</artifactId>
</dependency>
添加负载均衡支持
@SpringBootApplication
@EnableEurekaClient
public class SpringbootRestTemplateApplication {

    @Autowired
    private RestTemplateBuilder builder;

    @Bean
    @LoadBalanced  // 添加负载均衡支持,很简单,只需要在RestTemplate上添加@LoadBalanced注解,那么RestTemplate即具有负载均衡的功能,如果不加@LoadBalanced注解的话,会报java.net.UnknownHostException:springboot-h2异常,此时无法通过注册到Eureka Server上的服务名来调用服务,因为RestTemplate是无法从服务名映射到ip:port的,映射的功能是由LoadBalancerClient来实现的。
    public RestTemplate restTemplate() {
        return builder.build();
    }

    public static void main(String[] args) {
        SpringApplication.run(SpringbootRestTemplateApplication.class, args);
    }
}
修改调用微服务的URL
@RestController
public class RestTemplateController {
    @Autowired
    private RestTemplate restTemplate;

    @GetMapping("/hello/{id}")
    public User findById(@PathVariable Long id) {// 将原来的ip:port的形式,改成注册到Eureka Server上的应用名即可
        User u = this.restTemplate.getForObject("http://SERVICE-HELLO/hello" + id, User.class);
        System.out.println(u);
        return u;
    }
}
除了使用@LoadBalanced注解外,我们还可以直接使用Ribbon所提供的LoadBalancerClient来实现负载均衡:
application.yml
stores:
  ribbon:
    listOfServers: www.baidu.com,www.jianshu.com,www.163.com
@RestController
public class HelloController { protected Logger logger = LoggerFactory.getLogger(HelloController.class);
@Autowired private RestTemplate restTemplate;
@Autowired private LoadBalancerClient loadBalancerClient;
@RequestMapping(value = "/hello", method = RequestMethod.GET) public String hello() {
return restTemplate.getForEntity("http://SERVICE-HELLO/hello", String.class).getBody();
 }

@RequestMapping(value = "/helloEx", method = RequestMethod.GET)
public String helloEx() {
ServiceInstance instance = this.loadBalancerClient.choose("SERVICE-HELLO");
URI helloUri = URI.create(String.format("http://%s:%s/hello", instance.getHost(), instance.getPort()));
logger.info("Target service uri = {}. ", helloUri.toString());
return new RestTemplate().getForEntity(helloUri,String.class).getBody(); } }
3.API网关服务:Spring Cloud Zuul
API网关是对外服务的一个入口,隐藏了内部的实现,是微服务架构中必不可少的一个组件.API网关可以为我们管理大量的API接口,还可以对接客户,适配协议,进行安全认证,路由转发,限制流量,日志监控,防止爬虫,进行灰度发布等,
Zuul能够与Eureka,Ribbon,Hystrix等组件配合使用.
使用Zuul构建网关服务
创建一个项目命名application-gateway
加入依赖
<dependency>
      <groupId>org.springframework.cloud</groupId>
      <artifactId>spring-cloud-starter-zuul</artifactId>
</dependency>
为了最后的实战演练 下面是需要添加的全部依赖
 <dependencies>
        <dependency>
            <groupId>org.springframework.cloud</groupId>
            <artifactId>spring-cloud-starter-zuul</artifactId>
        </dependency>
        <dependency>
            <groupId>org.springframework.cloud</groupId>
            <artifactId>spring-cloud-netflix-sidecar</artifactId>
        </dependency>
        <dependency>
            <groupId>org.springframework.cloud</groupId>
            <artifactId>spring-cloud-starter-eureka</artifactId>
        </dependency>
        <dependency>
            <groupId>org.springframework.boot</groupId>
            <artifactId>spring-boot-starter-actuator</artifactId>
        </dependency>
        <dependency>
            <groupId>org.springframework.boot</groupId>
            <artifactId>spring-boot-starter-test</artifactId>
        </dependency>
        <dependency>
            <groupId>org.jolokia</groupId>
            <artifactId>jolokia-core</artifactId>
        </dependency>
        <dependency>
            <groupId>org.springframework.cloud</groupId>
            <artifactId>spring-cloud-starter-sleuth</artifactId>
        </dependency>
        <dependency>
            <groupId>org.springframework.cloud</groupId>
            <artifactId>spring-cloud-sleuth-zipkin</artifactId>
        </dependency>
    </dependencies>
spring-cloud-starter-zuul依赖中还包含了:
spring-cloud-start-hystrix:该依赖用来在网关服务中实现对微服务转发时候的保护机制,通过线程隔离和断路器,防止微服务的故障引发API网关资源无法释放,从而影响其他应用的对外服务
spring-cloud-starter-ribbon:该依赖用来实现在网关服务进行路由转发时候的客户端负载均衡以及请求重试.
spring-boot-starter-actuator:该依赖用来提供常规的微服务管理端点.另外 在Spring Cloud Zuul 中还提供了 /routes端点来返回当前的所有路由规则
创建启动类ApiGatewayMsApplication 使用@EnableZuulProxy注解开启Zuul的API网关服务功能
@EnableZuulProxy
@SpringCloudApplication
public class ApiGatewayMsApplication {

    public static void main(String[] args) {
        SpringApplication.run(ApiGatewayMsApplication.class, args);
    }
}
配置文件bootstrap.yml
server:
port: 7291
management:
port: 10211
context-path: '/fb83deee-dd46-472b-99a9-f0ebffe20d0e'
eureka:
client:
service-url:
defaultZone: 'http://eureka1:8763/eureka/,http://eureka2:8762/eureka/'
instance:
instance-id: ${spring.application.name}:${spring.cloud.client.ipAddress}:${spring.application.instance_id:${server.port}}
metadata-map:
cluster: prontera
management:
port: ${management.port}
context-path: ${management.context-path}
health:
path: ${management.context-path}/health
status-page-url-path: ${management.context-path}/info
health-check-url-path: ${management.context-path}/health
prefer-ip-address: false
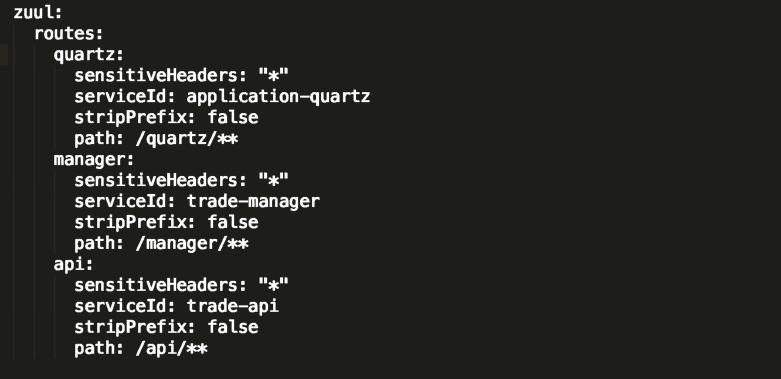
zuul:
routes:
quartz:
sensitiveHeaders: "*"
serviceId: application-quartz
stripPrefix: false
path: /quartz/**
manager:
sensitiveHeaders: "*"
serviceId: trade-manager
stripPrefix: false
path: /manager/**
api:
sensitiveHeaders: "*"
serviceId: trade-api
stripPrefix: false
path: /api/**
spring:
application:
name: gateway
cloud:
loadbalancer:
retry:
enabled: false #关闭重试
zipkin:
base-url: 'http://zipkin_server:9411/'
ribbon:
MaxAutoRetries: 0
MaxAutoRetriesNextServer: 0
OkToRetryOnAllOperations: false
ConnectTimeout: 6500
ReadTimeout: 60000
hystrix:
command:
default:
execution:
isolation:
thread:
timeoutInMilliseconds: 65000
完成上面的工作后 启动网关服务 就通过Zuul实现了API网关服务
我们此时可以通过Eureka查看注册的服务
在这里读者需要看一下我的配置文件
在这里是面向服务的路由,简单的说就是让路由的path不是映射具体的url而是让他映射到具体的服务 而具体的url则交给Eureka的服务发现机制去自动维护
举个栗子:
http://localhost:7291/manager/hello: 改url符合/manager/**规则 由manager路由负责转发 ,该路由映射的serviceId为trade-manager,所以最终 /hello 请求会被发送到trade-manager服务的一个实例上去
这个服务会在实战中介绍给大家 先附一张图理解一下
到这里简单的把SpringCloud的API网关服务Zuul简单介绍就结束了
4.Hystrix服务容错处理
在微服务架构中存在多个可直接调用的服务.这些服务若在调用时出现故障会导致连锁效应,也就是可能会让整个系统变得不可用,这种情况我们称之为服务雪崩效应,这里我们通过Hystrix来实现服务容错处理.
简单使用
添加依赖
 <dependency>
            <groupId>org.springframework.cloud</groupId>
            <artifactId>spring-cloud-starter-hystrix</artifactId>
 </dependency>
在启动类上添加@EnableHystrix或者@EnableCircuitBreaker
@GetMapping("/callHello")
@HystrixCommand(fallbackMethod = "defaultCallHello")
public String callHello(){
      String result = restTemplate.getForObject(
"http://loan/hello",String.class);
return result;
}
当调用失败触发熔断时会调用defaultCallHello方法来回退具体内容
public String defaultCallHello(){
     return "fail";
}
熔断简单的介绍这里 后面我们会针对每一个接口都做熔断处理
正在努力分享中. . . . . . .