原文:
ASP.NET Core 2 学习笔记(三)中间件
之前ASP.NET中使用的HTTP Modules及HTTP Handlers,在ASP.NET Core中已不复存在,取而代之的是Middleware。Middleware除了简化了HTTP Modules/Handlers的使用方式,还带入了Pipeline的概念。
本篇将介绍ASP.NET Core的Middleware概念及用法。
Middleware 概念
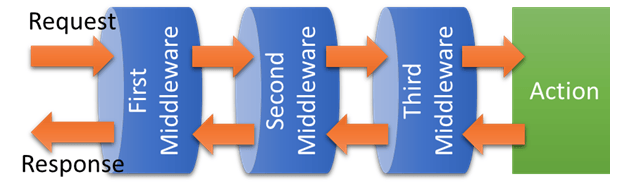
ASP.NET Core在Middleware的官方说明中,使用了Pipeline这个名词,意指Middleware像水管一样可以串联在一起,所有的Request及Response都会层层经过这些水管。
用图例可以很容易理解,如下图:
![]()
App.Use
Middleware的注册方式是在Startup.cs的Configure对IApplicationBuilder使用Use方法注册。
大部分扩展的Middleware也都是以Use开头的方法注册,例如:
- UseMvc():MVC的Middleware
- UseRewriter():URL rewriting的Middleware
一个简单的Middleware 范例。如下:
Startup.cs
using System;
using System.Collections.Generic;
using System.Linq;
using System.Threading.Tasks;
using Microsoft.AspNetCore.Builder;
using Microsoft.AspNetCore.Hosting;
using Microsoft.AspNetCore.Http;
using Microsoft.Extensions.DependencyInjection;

namespace MyWebsite
{
    public class Startup
    {
        // This method gets called by the runtime. Use this method to add services to the container.
        // For more information on how to configure your application, visit https://go.microsoft.com/fwlink/?LinkID=398940
        public void ConfigureServices(IServiceCollection services)
        {
        }

        // This method gets called by the runtime. Use this method to configure the HTTP request pipeline.
        public void Configure(IApplicationBuilder app, IHostingEnvironment env)
        {
            if (env.IsDevelopment())
            {
                app.UseDeveloperExceptionPage();
            }

            app.Use(async (context, next) =>
            {
                await context.Response.WriteAsync("First Middleware in. \r\n");
                await next.Invoke();
                await context.Response.WriteAsync("First Middleware out. \r\n");
            });

            app.Use(async (context, next) =>
            {
                await context.Response.WriteAsync("Second Middleware in. \r\n");
                await next.Invoke();
                await context.Response.WriteAsync("Second Middleware out. \r\n");
            });

            app.Use(async (context, next) =>
            {
                await context.Response.WriteAsync("Third Middleware in. \r\n");
                await next.Invoke();
                await context.Response.WriteAsync("Third Middleware out. \r\n");
            });

            app.Run(async (context) =>
            {
                await context.Response.WriteAsync("Hello World! \r\n");
            });
        }
    }
}
用浏览器打开网站任意连结,输出结果:
First Middleware in.
Second Middleware in.
Third Middleware in.
Hello World!
Third Middleware out.
Second Middleware out.
First Middleware out.
在Pipeline的概念中,注册顺序是很重要的事情。请求经过的顺序一定是先进后出。
Request 流程如下图:
![]()
Middleware 也可以作为拦截使用,如下:
Startup.cs
using System;
using System.Collections.Generic;
using System.Linq;
using System.Threading.Tasks;
using Microsoft.AspNetCore.Builder;
using Microsoft.AspNetCore.Hosting;
using Microsoft.AspNetCore.Http;
using Microsoft.Extensions.DependencyInjection;

namespace MyWebsite
{
    public class Startup
    {
        // This method gets called by the runtime. Use this method to add services to the container.
        // For more information on how to configure your application, visit https://go.microsoft.com/fwlink/?LinkID=398940
        public void ConfigureServices(IServiceCollection services)
        {
        }

        // This method gets called by the runtime. Use this method to configure the HTTP request pipeline.
        public void Configure(IApplicationBuilder app, IHostingEnvironment env)
        {
            if (env.IsDevelopment())
            {
                app.UseDeveloperExceptionPage();
            }

            app.Use(async (context, next) =>
            {
                await context.Response.WriteAsync("First Middleware in. \r\n");
                await next.Invoke();
                await context.Response.WriteAsync("First Middleware out. \r\n");
            });

            app.Use(async (context, next) =>
            {
                await context.Response.WriteAsync("Second Middleware in. \r\n");

                // 水管阻塞,封包不往后送
                var condition = false;
                if (condition)
                {
                    await next.Invoke();
                }
                await context.Response.WriteAsync("Second Middleware out. \r\n");
            });

            app.Use(async (context, next) =>
            {
                await context.Response.WriteAsync("Third Middleware in. \r\n");
                await next.Invoke();
                await context.Response.WriteAsync("Third Middleware out. \r\n");
            });

            app.Run(async (context) =>
            {
                await context.Response.WriteAsync("Hello World! \r\n");
            });
        }
    }
}
输出结果:
First Middleware in.
Second Middleware in.
Second Middleware out.
First Middleware out.
在Second Middleware 中,因为没有达成条件,所以封包也就不在往后面的水管传送。流程如图:
![]()
App.Run
Run是Middleware的最后一个行为,以上面图例来说,就是最末端的Action。
它不像Use能串联其他Middleware,但Run还是能完整的使用Request及Response。
App.Map
Map是能用来处理一些简单路由的Middleware,可依照不同的URL指向不同的Run及注册不同的Use。
新增一个路由如下:
Startup.cs
using System;
using System.Collections.Generic;
using System.Linq;
using System.Threading.Tasks;
using Microsoft.AspNetCore.Builder;
using Microsoft.AspNetCore.Hosting;
using Microsoft.AspNetCore.Http;
using Microsoft.Extensions.DependencyInjection;

namespace MyWebsite
{
    public class Startup
    {
        // This method gets called by the runtime. Use this method to add services to the container.
        // For more information on how to configure your application, visit https://go.microsoft.com/fwlink/?LinkID=398940
        public void ConfigureServices(IServiceCollection services)
        {
        }

        // This method gets called by the runtime. Use this method to configure the HTTP request pipeline.
        public void Configure(IApplicationBuilder app, IHostingEnvironment env)
        {
            if (env.IsDevelopment())
            {
                app.UseDeveloperExceptionPage();
            }

            app.Use(async (context, next) =>
            {
                await context.Response.WriteAsync("First Middleware in. \r\n");
                await next.Invoke();
                await context.Response.WriteAsync("First Middleware out. \r\n");
            });

            // app.Use(async (context, next) =>
            // {
            //     await context.Response.WriteAsync("Second Middleware in. \r\n");

            //     // 水管阻塞,封包不往后送
            //     var condition = false;
            //     if (condition)
            //     {
            //         await next.Invoke();
            //     }
            //     await context.Response.WriteAsync("Second Middleware out. \r\n");
            // });

            app.Map("/second", mapApp =>
            {
                mapApp.Use(async (context, next) =>
                {
                    await context.Response.WriteAsync("Second Middleware in. \r\n");
                    await next.Invoke();
                    await context.Response.WriteAsync("Second Middleware out. \r\n");
                });
                mapApp.Run(async context =>
                {
                    await context.Response.WriteAsync("Second. \r\n");
                });
            });


            app.Use(async (context, next) =>
            {
                await context.Response.WriteAsync("Third Middleware in. \r\n");
                await next.Invoke();
                await context.Response.WriteAsync("Third Middleware out. \r\n");
            });

            app.Run(async (context) =>
            {
                await context.Response.WriteAsync("Hello World! \r\n");
            });
        }
    }
}
开启网站任意连结,会显示:
First Middleware in.
Third Middleware in.
Hello World!
Third Middleware out.
First Middleware out.
开启网站http://localhost:5000/second,则会显示:
First Middleware in.
Second Middleware in.
Second.
Second Middleware out.
First Middleware out.
创建Middleware 类
如果Middleware全部都写在Startup.cs,代码将很难维护,所以应该把自定义的Middleware逻辑独立出来。
建立Middleware类不需要额外继承其它类或接口,一般的类即可,例子如下:
FirstMiddleware.cs
using System.Threading.Tasks;
using Microsoft.AspNetCore.Http;

namespace MyWebsite
{
    public class FirstMiddleware
    {
        private readonly RequestDelegate _next;

        public FirstMiddleware(RequestDelegate next)
        {
            _next = next;
        }

        public async Task Invoke(HttpContext context)
        {
            await context.Response.WriteAsync($"{nameof(FirstMiddleware)} in. \r\n");

            await _next(context);

            await context.Response.WriteAsync($"{nameof(FirstMiddleware)} out. \r\n");
        }
    }
}
全局注册
在Startup.Configure注册Middleware就可以套用到所有的Request。如下:
Startup.cs
// ...
public class Startup
{
    // ...
    public void Configure(IApplicationBuilder app)
    {
        app.UseMiddleware<FirstMiddleware>();
        // ...
    }
}
局部注册
Middleware 也可以只套用在特定的Controller 或Action。注册方式如下:
Controllers\HomeController.cs
// ..
[MiddlewareFilter(typeof(FirstMiddleware))]
public class HomeController : Controller
{
    // ...

    [MiddlewareFilter(typeof(SecondMiddleware))]
    public IActionResult Index()
    {
        // ...
    }
}
Extensions
大部分扩展的Middleware都会用一个静态方法包装,如:UseMvc()、UseRewriter()等。
自定义的Middleware当然也可以透过静态方法包,范例如下:
Extensions\CustomMiddlewareExtensions.cs
using Microsoft.AspNetCore.Builder;

namespace MyWebsite
{
    public static class CustomMiddlewareExtensions
    {
        public static IApplicationBuilder UseFirstMiddleware(this IApplicationBuilder builder)
        {
            return builder.UseMiddleware<FirstMiddleware>();
        }
    }
}
注册Extension Middleware 的方式如下:
Startup.cs
// ...
public class Startup
{
    // ...
    public void Configure(IApplicationBuilder app)
    {
        app.UseFirstMiddleware();
        // ...
    }
}
参考
ASP.NET Core Middleware Fundamentals
Creating Custom Middleware In ASP.Net Core
老司机发车啦:https://github.com/SnailDev/SnailDev.NETCore2Learning