上期回顾
上一篇文章《Tomcat在SpringBoot中是如何启动的》从main方法启动说起,窥探了SpringBoot是如何启动Tomcat的,在分析Tomcat中我们重点提到了,Tomcat主要包括2个组件,连接器(Connector)和容器(Container)以及他们的内部结构图,那么今天我们来分析下Tomcat中的连接器是怎么设计的以及它的作用是什么。
说明:本文tomcat版本是9.0.21,不建议零基础读者阅读。
从连接器(Connector)源码说起
既然是来解析连接器(Connector),那么我们直接从源码入手,后面所有源码我会剔除不重要部分,所以会忽略大部分源码细节,只关注流程。源码如下(高能预警,大量代码):
public class Connector extends LifecycleMBeanBase  {
    public Connector() {
        this("org.apache.coyote.http11.Http11NioProtocol");
    }


    public Connector(String protocol) {
        boolean aprConnector = AprLifecycleListener.isAprAvailable() &&
                AprLifecycleListener.getUseAprConnector();

        if ("HTTP/1.1".equals(protocol) || protocol == null) {
            if (aprConnector) {
                protocolHandlerClassName = "org.apache.coyote.http11.Http11AprProtocol";
            } else {
                protocolHandlerClassName = "org.apache.coyote.http11.Http11NioProtocol";
            }
        } else if ("AJP/1.3".equals(protocol)) {
            if (aprConnector) {
                protocolHandlerClassName = "org.apache.coyote.ajp.AjpAprProtocol";
            } else {
                protocolHandlerClassName = "org.apache.coyote.ajp.AjpNioProtocol";
            }
        } else {
            protocolHandlerClassName = protocol;
        }

        // Instantiate protocol handler
        ProtocolHandler p = null;
        try {
            Class<?> clazz = Class.forName(protocolHandlerClassName);
            p = (ProtocolHandler) clazz.getConstructor().newInstance();
        } catch (Exception e) {
            log.error(sm.getString(
                    "coyoteConnector.protocolHandlerInstantiationFailed"), e);
        } finally {
            this.protocolHandler = p;
        }

        // Default for Connector depends on this system property
        setThrowOnFailure(Boolean.getBoolean("org.apache.catalina.startup.EXIT_ON_INIT_FAILURE"));
    }
我们来看看Connector的构造方法,其实只做了一件事情,就是根据协议设置对应的ProtocolHandler,根据名称我们知道,这是协议处理类,所以连接器内部的一个重要子模块就是ProtocolHandler。
关于生命周期
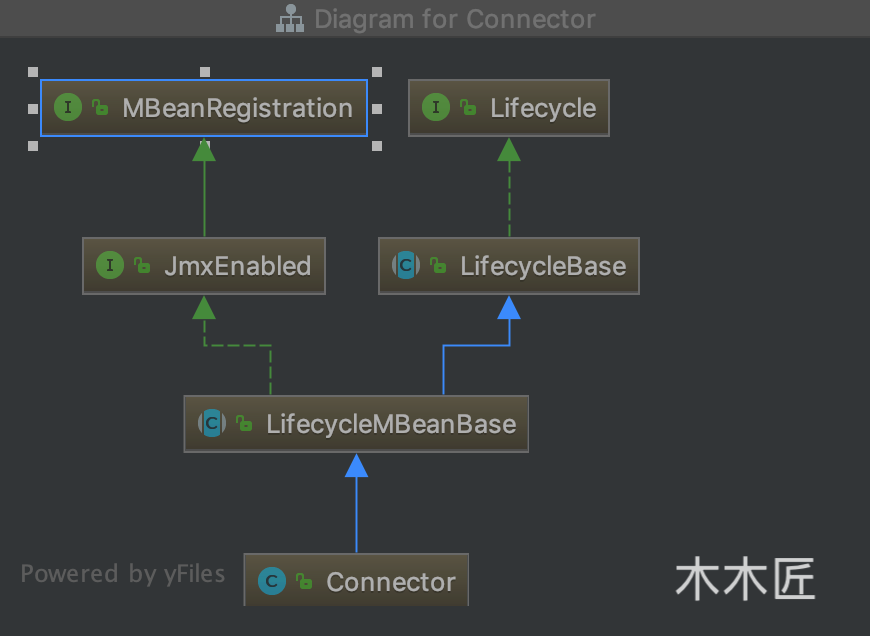
我们看到Connector继承了LifecycleMBeanBase,我们来看看Connector的最终继承关系:
![]()
我们看到最终实现的是Lifecycle接口,我们看看这个接口是何方神圣。我把其接口的注释拿下来解释下
/**
 * Common interface for component life cycle methods.  Catalina components
 * may implement this interface (as well as the appropriate interface(s) for
 * the functionality they support) in order to provide a consistent mechanism
 * to start and stop the component.
 *            start()
 *  -----------------------------
 *  |                           |
 *  | init()                    |
 * NEW -»-- INITIALIZING        |
 * | |           |              |     ------------------«-----------------------
 * | |           |auto          |     |                                        |
 * | |          \|/    start() \|/   \|/     auto          auto         stop() |
 * | |      INITIALIZED --»-- STARTING_PREP --»- STARTING --»- STARTED --»---  |
 * | |         |                                                            |  |
 * | |destroy()|                                                            |  |
 * | --»-----«--    ------------------------«--------------------------------  ^
 * |     |          |                                                          |
 * |     |         \|/          auto                 auto              start() |
 * |     |     STOPPING_PREP ----»---- STOPPING ------»----- STOPPED -----»-----
 * |    \|/                               ^                     |  ^
 * |     |               stop()           |                     |  |
 * |     |       --------------------------                     |  |
 * |     |       |                                              |  |
 * |     |       |    destroy()                       destroy() |  |
 * |     |    FAILED ----»------ DESTROYING ---«-----------------  |
 * |     |                        ^     |                          |
 * |     |     destroy()          |     |auto                      |
 * |     --------»-----------------    \|/                         |
 * |                                 DESTROYED                     |
 * |                                                               |
 * |                            stop()                             |
 * ----»-----------------------------»------------------------------
 *
 * Any state can transition to FAILED.
 *
 * Calling start() while a component is in states STARTING_PREP, STARTING or
 * STARTED has no effect.
 *
 * Calling start() while a component is in state NEW will cause init() to be
 * called immediately after the start() method is entered.
 *
 * Calling stop() while a component is in states STOPPING_PREP, STOPPING or
 * STOPPED has no effect.
 *
 * Calling stop() while a component is in state NEW transitions the component
 * to STOPPED. This is typically encountered when a component fails to start and
 * does not start all its sub-components. When the component is stopped, it will
 * try to stop all sub-components - even those it didn't start.
 *
 * Attempting any other transition will throw {@link LifecycleException}.
 *
 * </pre>
 * The {@link LifecycleEvent}s fired during state changes are defined in the
 * methods that trigger the changed. No {@link LifecycleEvent}s are fired if the
 * attempted transition is not valid.
这段注释翻译就是,这个接口是提供给组件声明周期管理的,并且提供了声明周期流转图。这里我们只需要知道正常流程即可:
New--->Init()---->Start()---->Stop()--->Destory()
从生命周期探索连接器
根据上面的生命周期说明,我们可以知道连接器(Connector)就是按照如此的声明周期管理的,所以我们找到了线索,所以连接器肯定会先初始化然后再启动。我们查看其initInternal()方法可以知道连接器初始化做了什么事情,源码如下:
    @Override
    protected void initInternal() throws LifecycleException {

        super.initInternal();

        if (protocolHandler == null) {
            throw new LifecycleException(
                    sm.getString("coyoteConnector.protocolHandlerInstantiationFailed"));
        }

        // Initialize adapter
        adapter = new CoyoteAdapter(this);
        protocolHandler.setAdapter(adapter);
        if (service != null) {
            protocolHandler.setUtilityExecutor(service.getServer().getUtilityExecutor());
        }

        // Make sure parseBodyMethodsSet has a default
        if (null == parseBodyMethodsSet) {
            setParseBodyMethods(getParseBodyMethods());
        }

        if (protocolHandler.isAprRequired() && !AprLifecycleListener.isInstanceCreated()) {
            throw new LifecycleException(sm.getString("coyoteConnector.protocolHandlerNoAprListener",
                    getProtocolHandlerClassName()));
        }
        if (protocolHandler.isAprRequired() && !AprLifecycleListener.isAprAvailable()) {
            throw new LifecycleException(sm.getString("coyoteConnector.protocolHandlerNoAprLibrary",
                    getProtocolHandlerClassName()));
        }
        if (AprLifecycleListener.isAprAvailable() && AprLifecycleListener.getUseOpenSSL() &&
                protocolHandler instanceof AbstractHttp11JsseProtocol) {
            AbstractHttp11JsseProtocol<?> jsseProtocolHandler =
                    (AbstractHttp11JsseProtocol<?>) protocolHandler;
            if (jsseProtocolHandler.isSSLEnabled() &&
                    jsseProtocolHandler.getSslImplementationName() == null) {
                // OpenSSL is compatible with the JSSE configuration, so use it if APR is available
                jsseProtocolHandler.setSslImplementationName(OpenSSLImplementation.class.getName());
            }
        }

        try {
            protocolHandler.init();
        } catch (Exception e) {
            throw new LifecycleException(
                    sm.getString("coyoteConnector.protocolHandlerInitializationFailed"), e);
        }
    }
}
根据上面源码,我们发现主要是处理protocolHandler并初始化它,同时我们注意到了protocolHandler 设置了一个适配器,我们看看这个适配器是做啥的,跟踪源码如下:
   /**
     * The adapter, used to call the connector.
     *
     * @param adapter The adapter to associate
     */
    public void setAdapter(Adapter adapter);
这个注释已经说的很直白了,这个适配器就是用来调用连接器的。我们再继续看看protocolHandler的初始化方法
 /**
     * Endpoint that provides low-level network I/O - must be matched to the
     * ProtocolHandler implementation (ProtocolHandler using NIO, requires NIO
     * Endpoint etc.).
     */
private final AbstractEndpoint<S,?> endpoint;

public void init() throws Exception {
        if (getLog().isInfoEnabled()) {
            getLog().info(sm.getString("abstractProtocolHandler.init", getName()));
            logPortOffset();
        }

        if (oname == null) {
            // Component not pre-registered so register it
            oname = createObjectName();
            if (oname != null) {
                Registry.getRegistry(null, null).registerComponent(this, oname, null);
            }
        }

        if (this.domain != null) {
            rgOname = new ObjectName(domain + ":type=GlobalRequestProcessor,name=" + getName());
            Registry.getRegistry(null, null).registerComponent(
                    getHandler().getGlobal(), rgOname, null);
        }

        String endpointName = getName();
        endpoint.setName(endpointName.substring(1, endpointName.length()-1));
        endpoint.setDomain(domain);

        endpoint.init();
    }
这里出现了一个新的对象,endpoint,根据注释我们可以知道endpoint是用来处理网络IO的,而且必须匹配到指定的子类(比如Nio,就是NioEndPoint处理)。endpoint.init()实际上就是做一些网络的配置,然后就是初始化完毕了。根据我们上面的周期管理,我们知道init()后就是start(),所以我们查看Connector的start()源码:
 protected void startInternal() throws LifecycleException {

        // Validate settings before starting
        if (getPortWithOffset() < 0) {
            throw new LifecycleException(sm.getString(
                    "coyoteConnector.invalidPort", Integer.valueOf(getPortWithOffset())));
        }

        setState(LifecycleState.STARTING);

        try {
            protocolHandler.start();
        } catch (Exception e) {
            throw new LifecycleException(
                    sm.getString("coyoteConnector.protocolHandlerStartFailed"), e);
        }
    }
其实就是主要调用 protocolHandler.start()方法,继续跟踪,为了方便表述,我会把接下来的代码统一放在一起说明,代码如下:
//1.类:AbstractProtocol implements ProtocolHandler,
        MBeanRegistration
 public void start() throws Exception {
     // 省略部分代码
    endpoint.start();
    }

//2. 类:AbstractEndPoint
public final void start() throws Exception {
       // 省略部分代码
        startInternal();
    }
 /**3.类:NioEndPoint extends AbstractJsseEndpoint<NioChannel,SocketChannel>
     * Start the NIO endpoint, creating acceptor, poller threads.
     */
    @Override
    public void startInternal() throws Exception {
        //省略部分代码

            // Start poller thread
            poller = new Poller();
            Thread pollerThread = new Thread(poller, getName() + "-ClientPoller");
            pollerThread.setPriority(threadPriority);
            pollerThread.setDaemon(true);
            pollerThread.start();

            startAcceptorThread();
        }
    }
到这里,其实整个启动代码就完成了,我们看到最后是在NioEndPoint创建了一个Poller,并且启动它,这里需要补充说明下,这里只是以NioEndPoint为示列,其实Tomcat 主要提供了三种实现,分别是AprEndPoint,NioEndPoint,Nio2EndPoint,这里表示了tomcat支持的I/O模型:
APR:采用 Apache 可移植运行库实现,它根据不同操作系统,分别用c重写了大部分IO和系统线程操作模块,据说性能要比其他模式要好(未实测)。
NIO:非阻塞 I/O
NIO.2:异步 I/O
上述代码主要是开启两个线程,一个是Poller,一个是开启Acceptor,既然是线程,核心的代码肯定是run方法,我们来查看源码,代码如下:
//4.类:Acceptor<U> implements Runnable
 public void run() {
 //省略了部分代码
                U socket = null;
                    socket = endpoint.serverSocketAccept();
                // Configure the socket
                if (endpoint.isRunning() && !endpoint.isPaused()) {
                    // setSocketOptions() will hand the socket off to
                    // an appropriate processor if successful
                    //核心逻辑
                    if (!endpoint.setSocketOptions(socket)) {
                        endpoint.closeSocket(socket);
                    }
                } else {
                    endpoint.destroySocket(socket);
                }

        state = AcceptorState.ENDED;
}
//5.类:NioEndpoint
protected boolean setSocketOptions(SocketChannel socket) {
        // Process the connection
        //省略部分代码
        try {
            // Disable blocking, polling will be used
            socket.configureBlocking(false);
            Socket sock = socket.socket();
            socketProperties.setProperties(sock);


            NioSocketWrapper socketWrapper = new NioSocketWrapper(channel, this);
            channel.setSocketWrapper(socketWrapper);
            socketWrapper.setReadTimeout(getConnectionTimeout());
            socketWrapper.setWriteTimeout(getConnectionTimeout());
            socketWrapper.setKeepAliveLeft(NioEndpoint.this.getMaxKeepAliveRequests());
            socketWrapper.setSecure(isSSLEnabled());
            //核心逻辑
            poller.register(channel, socketWrapper);
            return true;

    }
这里可以发现Acceptor主要就是接受socket,然后把它注册到poller中,我们继续看看是如何注册的。
/**6.类NioEndpoint
         * Registers a newly created socket with the poller.
         *
         * @param socket    The newly created socket
         * @param socketWrapper The socket wrapper
         */
        public void register(final NioChannel socket, final NioSocketWrapper socketWrapper) {
            socketWrapper.interestOps(SelectionKey.OP_READ);//this is what OP_REGISTER turns into.
            PollerEvent r = null;
            if (eventCache != null) {
                r = eventCache.pop();
            }
            if (r == null) {
                r = new PollerEvent(socket, OP_REGISTER);
            } else {
                r.reset(socket, OP_REGISTER);
            }
            addEvent(r);
        }
/** 7.类:PollerEvent implements Runnable
 public void run() {
    //省略部分代码
    socket.getIOChannel().register(socket.getSocketWrapper().getPoller().getSelector(), SelectionKey.OP_READ, socket.getSocketWrapper());
        }
这里发现最终就是采用NIO模型把其注册到通道中。(这里涉及NIO网络编程知识,不了解的同学可以传送这里)。那么注册完毕后,我们看看Poller做了什么事情。
*/
  /**8.类:NioEndPoint内部类 Poller implements Runnable
  **/
  @Override
        public void run() {
            // Loop until destroy() is called
            while (true) {
                //省略部分代码

                Iterator<SelectionKey> iterator =
                    keyCount > 0 ? selector.selectedKeys().iterator() : null;
                // Walk through the collection of ready keys and dispatch
                // any active event.
                while (iterator != null && iterator.hasNext()) {
                    SelectionKey sk = iterator.next();
                    NioSocketWrapper socketWrapper = (NioSocketWrapper) sk.attachment();
                    // Attachment may be null if another thread has called
                    // cancelledKey()
                    if (socketWrapper == null) {
                        iterator.remove();
                    } else {
                        iterator.remove();
                        //sock处理
                        processKey(sk, socketWrapper);
                    }
                }
        //省略部分代码
        }
这个就是通过selector把之前注册的事件取出来,从而完成了调用。
//9.类: NioEndPoint内部类 Poller  implements Runnable
protected void processKey(SelectionKey sk, NioSocketWrapper socketWrapper) {
         //省略大部分代码
           processSocket(socketWrapper, SocketEvent.OPEN_WRITE, true)

}

//10.类:AbstractEndPoint
public boolean processSocket(SocketWrapperBase<S> socketWrapper,
           SocketEvent event, boolean dispatch) {
       //省略部分代码
           Executor executor = getExecutor();
           if (dispatch && executor != null) {
               executor.execute(sc);
           } else {
               sc.run();
           }

       return true;
   }
//11.类:SocketProcessorBase  implements Runnable
public final void run() {
       synchronized (socketWrapper) {
           // It is possible that processing may be triggered for read and
           // write at the same time. The sync above makes sure that processing
           // does not occur in parallel. The test below ensures that if the
           // first event to be processed results in the socket being closed,
           // the subsequent events are not processed.
           if (socketWrapper.isClosed()) {
               return;
           }
           doRun();
       }
   }

//类:12.NioEndPoint   extends AbstractJsseEndpoint<NioChannel,SocketChannel>
protected void doRun() {
       //省略部分代码
               if (handshake == 0) {
                   SocketState state = SocketState.OPEN;
                   // Process the request from this socket
                   if (event == null) {
                       state = getHandler().process(socketWrapper, SocketEvent.OPEN_READ);
                   } else {
                       state = getHandler().process(socketWrapper, event);
                   }
                   if (state == SocketState.CLOSED) {
                       poller.cancelledKey(key, socketWrapper);
                   }
               }

       }
Poller调用的run方法或者用Executor线程池去执行run(),最终调用都是各个子EndPoint中的doRun()方法,最终会取一个Handler去处理socketWrapper。继续看源码:
//类:13.AbstractProtocol内部类ConnectionHandler implements AbstractEndpoint.Handler<S>
 public SocketState process(SocketWrapperBase<S> wrapper, SocketEvent status) {
            //省略部分代码

            state = processor.process(wrapper, status);

            return SocketState.CLOSED;
        }

//类:14.AbstractProcessorLight implements Processor
public SocketState process(SocketWrapperBase<?> socketWrapper, SocketEvent status)
            throws IOException {
            //省略部分代码

            state = service(socketWrapper);

        return state;
    }
这部分源码表明最终调用的process是通过一个Processor接口的实现类来完成的,这里最终也是会调用到各个子类中,那么这里的处理器其实就是处理应用协议,我们可以查看AbstractProcessorLight的实现类,分别有AjpProcessor、Http11Processor、StreamProcessor,分别代表tomcat支持三种应用层协议,分别是:
这里我们以常用的HTTP1.1为例,继续看源码:
//类:15. Http11Processor extends AbstractProcessor
public SocketState service(SocketWrapperBase<?> socketWrapper)
        throws IOException {
        //省略大部分代码
             getAdapter().service(request, response);
        //省略大部分代码
        }
//类:16   CoyoteAdapter implements Adapter
public void service(org.apache.coyote.Request req, org.apache.coyote.Response res)
            throws Exception {

        Request request = (Request) req.getNote(ADAPTER_NOTES);
        Response response = (Response) res.getNote(ADAPTER_NOTES);
        postParseSuccess = postParseRequest(req, request, res, response);
            if (postParseSuccess) {
                //check valves if we support async
                request.setAsyncSupported(
                        connector.getService().getContainer().getPipeline().isAsyncSupported());
                // Calling the container
                connector.getService().getContainer().getPipeline().getFirst().invoke(
                        request, response);
            }

    }
这里我们发现协议处理器最终会调用适配器(CoyoteAdapter),而适配器最终的工作是转换Request和Response对象为HttpServletRequest和HttpServletResponse,从而可以去调用容器,到这里整个连接器的流程和作用我们就已经分析完了。
小结
那么我们来回忆下整个流程,我画了一张时序图来说明:
![]()
这张图包含了两个流程,一个是组件的初始化,一个是调用的流程。连接器(Connector)主要初始化了两个组件,ProtcoHandler和EndPoint,但是我们从代码结构发现,他们两个是父子关系,也就是说ProtcoHandler包含了EndPoint。后面的流程就是各个子组件的调用链关系,总结来说就是Acceptor负责接收请求,然后注册到Poller,Poller负责处理请求,然后调用processor处理器来处理,最后把请求转成符合Servlet规范的request和response去调用容器(Container)。
我们流程梳理清楚了,接下来我们来结构化的梳理下:
回到连接器(Connector)是源码,我们发现,上述说的模块只有ProtocolHandler和Adapter两个属于连接器中,也就是说,连接器只包含了这两大子模块,那么后续的EndPoint、Acceptor、Poller、Processor都是ProtocolHandler的子模块。 而Acceptor和Poller两个模块的核心功能都是在EndPoint 中完成的,所以是其子模块,而Processor比较独立,所以它和EndPoint是一个级别的子模块。
我们用图来说明下上述的关系:
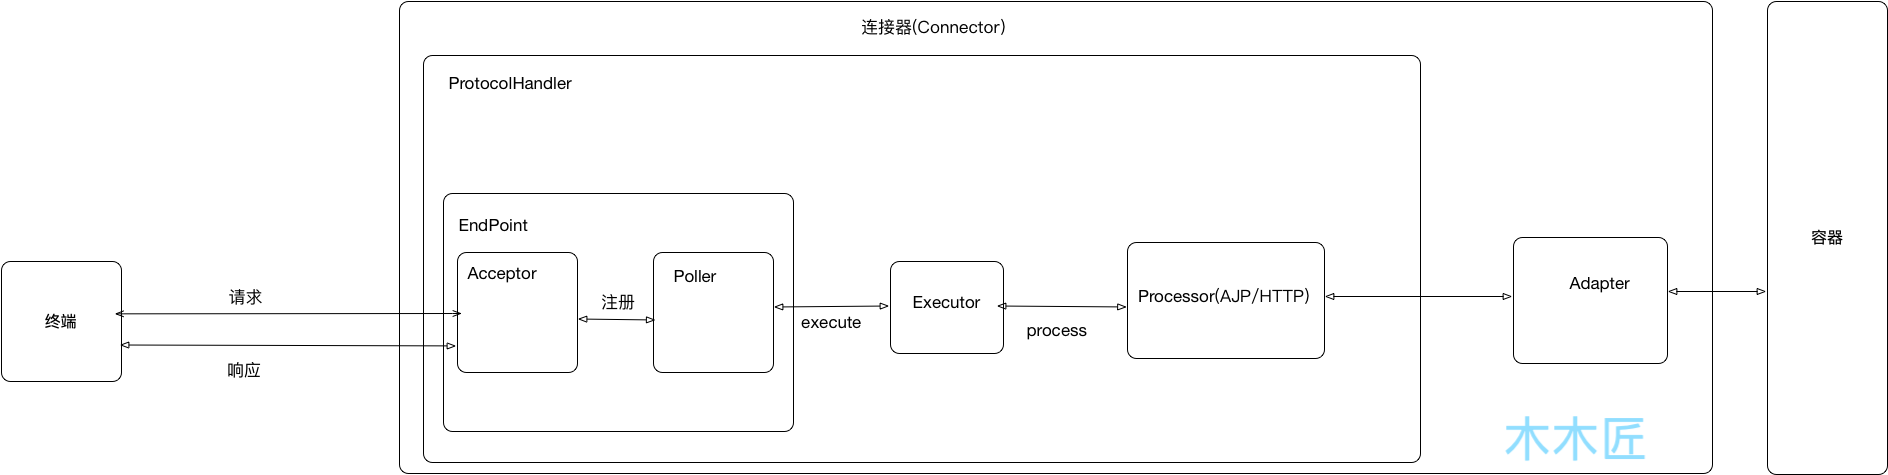
![]()
根据上图我们可以知道,连接器主要负责处理连接请求,然后通过适配器调用容器。那么具体流程细化可以如下:
Acceptor监听网络请求,获取请求。Poller获取到监听的请求提交线程池进行处理。Processor根据具体的应用协议(HTTP/AJP)来生成Tomcat Request对象。Adapter把Request对象转换成Servlet标准的Request对象,调用容器。
总结
我们从连接器的源码,一步一步解析,分析了连接器主要包含了两大模块,ProtocolHandler和Adapter。ProtocolHandler主要包含了Endpoint模块和Processor模块。Endpoint模块主要的作用是连接的处理,它委托了Acceptor子模块进行连接的监听和注册,委托子模块Poller进行连接的处理;而Processor模块主要是应用协议的处理,最后提交给Adapter进行对象的转换,以便可以调用容器(Container)。另外我们也在分析源码的过程中补充了一些额外知识点:
- 当前Tomcat版本支持的IO模型为:APR模型、NIO模型、NIO.2模型
- Tomcat支持的协议是AJP和HTTP,其中HTTP又分为HTTP1.1和HTTP2.0
版权声明:原创文章,转载请注明出处。