前言
在现代的Web应用开发中,Excel文件的处理和展示是一项常见的需求。为了提供更好的用户体验和功能,经常需要在Web应用中添加一个JavaScript Excel查看器,小编今天将为大家展示如何借助葡萄城公司的纯前端表格控件——SpreadJS来创建一个Excel查看器。
项目结构
本项目将由三个文件构成:一个HTML文件、一个JavaScript文件以及一个CSS文件。
1.引入SpreadJS
(1)本地文件引入
SpreadJS可以从我们的网站下载并导入到程序中。下载后,我们可以解压ZIP包并将JS和CSS文件复制到代码包中,特别是这些文件。
- gc.spread.sheets.all.xx.x.x.min.js
- gc.spread.sheets.io.xx.x.x.min.js
- gc.spread.sheets.excel2013white.xx.x.x.css
将它们放入我们程序的文件夹后,我们可以在代码中引用它们:
<link rel="stylesheet" type="text/css" href="./styles/gc.spread.sheets.excel2013white.css">
<script src="./scripts/gc.spread.sheets.all.min.js" type="text/javascript"></script>
<script src="./scripts/gc.spread.sheets.charts.min.js" type="text/javascript"></script>
<script src="./scripts/gc.spread.sheets.shapes.min.js" type="text/javascript"></script>
<script src="./scripts/gc.spread.sheets.io.min.js" type="text/javascript"></script>
下载的示例中,默认就是这种方式,不需要作出修改。
(2)NPM引用
另一种方式是通过NPM的方式有引用SpreadJS。可以用如下命令安装依赖:
npm install @grapecity/spread-sheets @grapecity/spread-sheets-io @grapecity/spread-sheets-charts @grapecity/spread-sheets-shapes
然后,就可以在代码中这样引用这些文件:
<link rel= "stylesheet" type= "text/css" href= "./node_modules/@grapecity/spread-sheets/styles/gc.spread.sheets.excel2013white.css" >
<script src="./node_modules/ @grapecity/spread-sheets/dist/gc.spread.sheets.all.min.js" type="text/javascript"></script>
<script src="./node_modules/@grapecity/spread-sheets-io /dist/gc.spread.sheets.io.min.js" type="text/javascript"></script>
<script src="./node_modules/@grapecity/spread-sheets-charts/dist/gc.spread .sheets.charts.min.js" type="text/javascript"></script>
<script src="./node_modules/@grapecity/spread-sheets-shapes/dist/gc.spread.sheets.shapes.min .js" type="text/javascript"></script>
2.创建HTML内容
一旦引用了这些文件,我们就可以组合HTML页面和CSS样式。对于样式,已经提前创建好了:
body {
    position: absolute;
    top: 0;
    bottom: 0;
    left: 0;
    right: 0;
}

.sample-tutorial {
    position: relative;
    height: 100%;
    overflow: hidden;
}

.sample-container {
    width: calc(100% - 280px);
    height: 100%;
    float: left;
}

.sample-spreadsheets {
    width: 100%;
    height: calc(100% - 25px);
    overflow: hidden;
}

.options-container {
    float: right;
    width: 280px;
    height: 100%;
    box-sizing: border-box;
    background: #fbfbfb;
    overflow: auto;
}

.sample-options {
    z-index: 1000;
}

.inputContainer {
    width: 100%;
    height: auto;
    border: 1px solid #eee;
    padding: 6px 12px;
    margin-bottom: 10px;
    box-sizing: border-box;
}

.settingButton {
    color: #fff;
    background: #82bc00;
    outline: 0;
    line-height: 1.5715;
    position: relative;
    display: inline-block;
    font-weight: 400;
    white-space: nowrap;
    text-align: center;
    height: 32px;
    padding: 4px 15px;
    font-size: 14px;
    border-radius: 2px;
    user-select: none;
    cursor: pointer;
    border: 1px solid #82bc00;
    box-sizing: border-box;
    margin-bottom: 10px;
    margin-top: 10px;
}

.settingButton:hover {
    color: #fff;
    border-color: #88b031;
    background: #88b031;
}

.settingButton:disabled {
    background: #e2dfdf;
    border-color: #ffffff;
}

.options-title {
    font-weight: bold;
    margin: 4px 2px;
}

#selectedFile {
    display: none;
}

select, input[type="text"], input[type="number"] {
    display: inline-block;
    margin-left: auto;
    width: 120px;
    font-weight: 400;
    outline: 0;
    line-height: 1.5715;
    border-radius: 2px;
    border: 1px solid #F4F8EB;
    box-sizing: border-box;
}

.passwordIpt {
    margin-top: 10px;
    height: 25px;
}

.passwordIpt[warning="true"] {
    border-color: red;
}

.passwordIpt[warning="true"]::placeholder {
    color: red;
    opacity: 0.8;
}

@keyframes shake {
    0% { transform: translate(1px, 1px) rotate(0deg); }
    10% { transform: translate(-1px, -2px) rotate(-1deg); }
    20% { transform: translate(-3px, 0px) rotate(1deg); }
    30% { transform: translate(3px, 2px) rotate(0deg); }
    40% { transform: translate(1px, -1px) rotate(1deg); }
    50% { transform: translate(-1px, 2px) rotate(-1deg); }
    60% { transform: translate(-3px, 1px) rotate(0deg); }
    70% { transform: translate(3px, 1px) rotate(-1deg); }
    80% { transform: translate(-1px, -1px) rotate(1deg); }
    90% { transform: translate(1px, 2px) rotate(0deg); }
    100% { transform: translate(1px, 1px) rotate(0deg); }
}

#warningBox {
    color: red;
}
接下来,我们可以添加这个网页需要的按钮和UI,主要包括:
- SpreadJS的容器
- 状态栏
- 导入区域
- 密码输入框
- 文件选择按钮
- 导入按钮
- 导出区域
- 密码输入框
- 导出按钮
添加HTML标签时,我们可以对每个元素使用合适的样式:
<body>
    <div class="sample-tutorial">
        <div class="sample-container">
            <div id="ss" class="sample-spreadsheets"></div>
            <div id="statusBar"></div>
        </div>
        <div class="options-container">
            <div class="option-row">
                <div class="inputContainer">
                    <div class="options-title">Import:</div>
                    <input class="passwordIpt" id="importPassword" type="password" placeholder="Password" disabled>
                    <br>
                    <div id="warningBox"></div>
                    <input id="selectedFile" type="file" accept=".xlsx" />
                    <button class="settingButton" id="selectBtn">Select</button>
                    <button class="settingButton" id="importBtn" disabled>Import</button>
                </div>
                <div class="inputContainer">
                    <div class="options-title">Export:</div>
                    <input class="passwordIpt" id="exportPassword" type="password" placeholder="Password">
                    <br>
                    <button class="settingButton" id="exportBtn">Export</button>
                </div>
            </div>
        </div>
    </div>
</body>
3.初始化
现在已经准备好了HTML内容和SpreadJS引用,可以开始初始化SpreadJS实例并在app.js文件中添加Excel导入的代码了。
window.onload = function () {
  let spread = new GC.Spread.Sheets.Workbook(document.getElementById("ss"));
}
4.添加按钮和功能
为了实现这个应用的目标,可以添加以下变量:
const $ = selector => document.querySelector(selector);
const listen = (host, type, handler) => host.addEventListener(type, handler);
在window.onload函数中创建变量,引用不同的HTML元素:
const importPassword = $('#importPassword');
const selectBtn = $('#selectBtn');
const fileSelect = $('#selectedFile');
const importBtn = $('#importBtn');
const warningBox = $('#warningBox');
const exportPassword = $('#exportPassword');
const exportBtn = $('#exportBtn');
为文件选择按钮和按钮输入框添加事件和监听函数以及密码错误的提示:
listen(selectBtn, "click", () => fileSelect.click());

const fileSelectedHandler = () => {
    importPassword.disabled = false;
    importBtn.disabled = false;
}

listen(fileSelect, 'change', fileSelectedHandler);

const wrongPasswordHandler = message => {
    importPassword.setAttribute('warning', true);
    importPassword.style.animation = "shake 0.5s";
    setTimeout(() => importPassword.style.animation = "", 500);
    warningBox.innerText = message;
    importPassword.value = '';
};

listen(importPassword, 'focus', () => {
    warningBox.innerText = '';
    importPassword.removeAttribute('warning');
});
5.导入Excel文件
现在可以写导入Excel文件到SpreadJS实例的代码了。因为我们可能会导入被密码保护的文件,因此在调用SpreadJS的import函数时需要考虑到这一点。我们可以在写import时添加事件处理程序:
const importFileHandler = () => {
    let file = fileSelect.files[0];
    if (!file) return ;
    spread.import(file, console.log, error => {
        if (error.errorCode === GC.Spread.Sheets.IO.ErrorCode.noPassword || error.errorCode === GC.Spread.Sheets.IO.ErrorCode.invalidPassword) {
            wrongPasswordHandler(error.errorMessage);
        }
    }, {
        fileType: GC.Spread.Sheets.FileType.excel,
        password: importPassword.value
    });
};
listen(importBtn, 'click', importFileHandler);
6.导出Excel文件
与导入类似,我们可以支持用户在导出Excel时输入保护密码,所以我们只需要将密码传入SpreadJS的export函数。我们同样为它添加事件处理程序:
const exportFileHandler = () => {
    let password = exportPassword.value;
    spread.export(blob => saveAs(blob, (password ? 'encrypted-' : '') + 'export.xlsx'), console.log, {
        fileType: GC.Spread.Sheets.FileType.excel,
        password: password
    });
};
listen(exportBtn, 'click', exportFileHandler);
7.数据保护
我们同样可以保护数据,阻止用户改变它。为了实现这一点,我们可以添加一个按钮来保护工作簿当前的表单。稍作修改,此功能就可以适配于多种不同的需求,但对于此示例,我们仅保护活动表单。与其他按钮类似,我们需要添加点击按钮的事件处理程序,对于SpreadJS,我们可以添加保护的选项:
const protectHandler = () => {
    var option = {
        allowSelectLockedCells:true,
        allowSelectUnlockedCells:true,
        allowFilter: true,
        allowSort: false,
        allowResizeRows: true,
        allowResizeColumns: false,
        allowEditObjects: false,
        allowDragInsertRows: false,
        allowDragInsertColumns: false,
        allowInsertRows: false,
        allowInsertColumns: false,
        allowDeleteRows: false,
        allowDeleteColumns: false,
        allowOutlineColumns: false,
        allowOutlineRows: false
    };
    spread.getActiveSheet().options.protectionOptions = option;
    spread.getActiveSheet().options.isProtected = true;
};
listen(protectBtn, 'click', protectHandler);
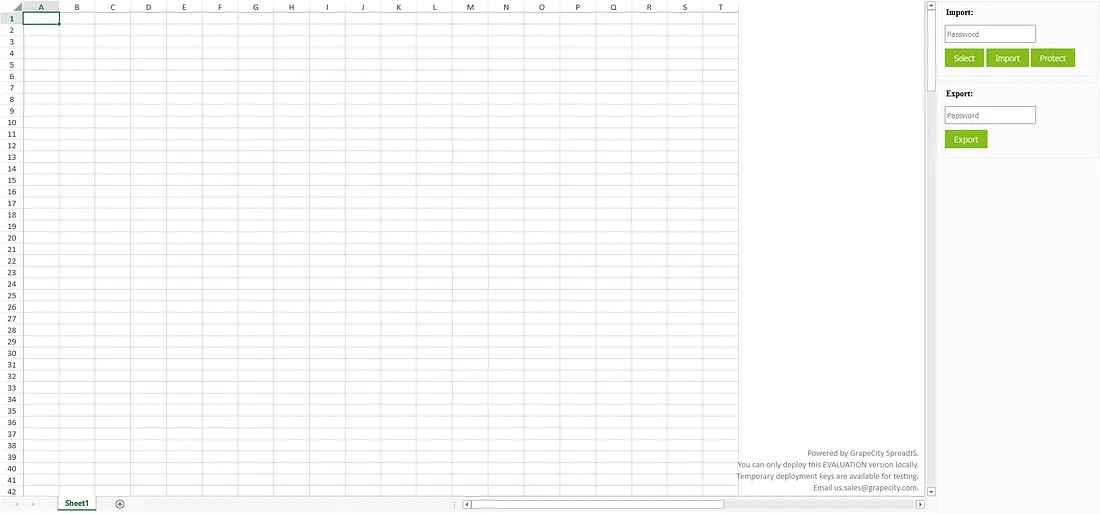
8.运行程序
现在剩下的就是运行程序了。因为我们是用纯JS和HTML写的,我们可以直接在浏览器打开HTML文件: ![]()
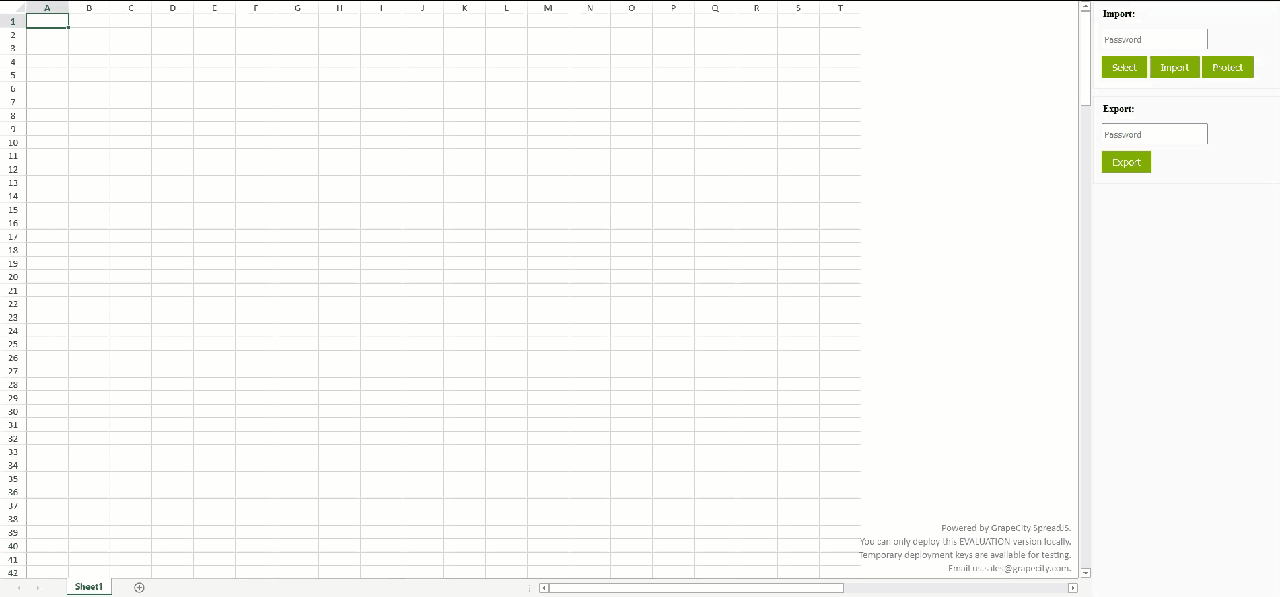
我们可以点击"Select"按钮来选择Excel文件来加载,然后点击"Import"按钮将其导入到SpreadJS: ![]()
接下来,我们可以在导出的密码输入框键入密码,点击"Export"按钮: ![]()
如果您想查看完整的源码,可以点击这个Gitee地址。
总结
以上就是如何在Web应用中添加一个JavaScript Excel查看器的全过程,如果您想了解跟多信息,欢迎查看产品文档和在线demo。