项目背景
MAUI的出现,赋予了广大Net开发者开发多平台应用的能力,MAUI 是Xamarin.Forms演变而来,但是相比Xamarin性能更好,可扩展性更强,结构更简单。但是MAUI对于平台相关的实现并不完整。所以MASA团队开展了一个实验性项目,意在对微软MAUI的补充和扩展
项目地址 https://github.com/BlazorComponent/MASA.Blazor/tree/main/src/Masa.Blazor.Maui.Plugin
每个功能都有单独的demo演示项目,考虑到app安装文件体积(虽然MAUI已经集成裁剪功能,但是该功能对于代码本身有影响),届时每一个功能都会以单独的nuget包的形式提供,方便测试,现在项目才刚刚开始,但是相信很快就会有可以交付的内容啦。
前言
本系列文章面向移动开发小白,从零开始进行平台相关功能开发,演示如何参考平台的官方文档使用MAUI技术来开发相应功能。
介绍
上一篇文章我们实现了蓝牙BLE的扫描功能,这里我们继续实现通讯功能。 本文JAVA相关代码均来自安卓开发者官网
开发步骤
连接到 GATT 服务器
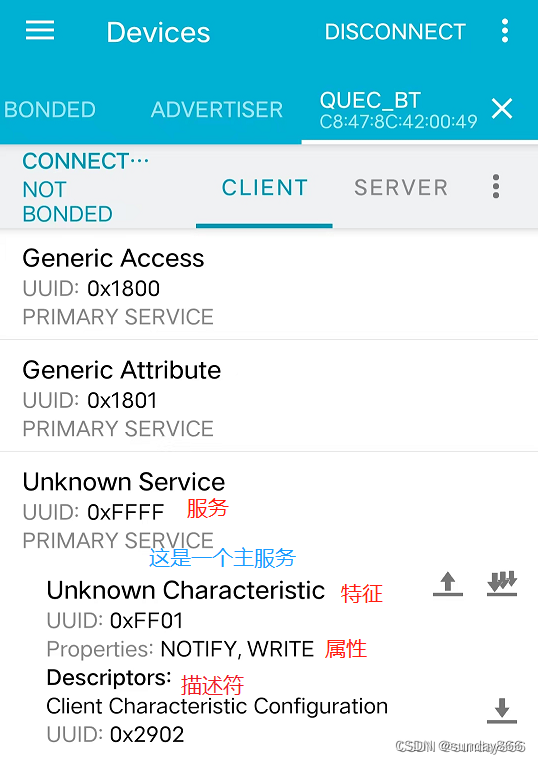
通用属性配置文件Generic Attribute Profile简称GATT。 GATT定义了属性类型并规定了如何使用,包括了一个数据传输和存储的框架和一些基本操作。中间包含了一些概念如特性characteristics,服务services等。同时还定义了发现服务,特性和服务间的连接的处理过程,也包括读写特性值。 我们使用移远的FC410举例 ![在这里插入图片描述]()
通过nRF connect工具可以查看设备的配置,该设备有一个前缀为FFFF的主服务,该服务下有一个前缀为FF01的特征,该特征具有通知Notify 和写入Write两种属性(如果有Notify,那么就会有描述符)。换句话说我们可以通过这个特征给设备发送数据,而且可以通过订阅该特征值变化事件,来获取设备通过蓝牙的返回信息。 与 BLE 设备交互的第一步便是连接到 GATT 服务器。更具体地说,是连接到设备上的 GATT 服务器。 我们先看一下JAVA的实现方式
JAVA代码
bluetoothGatt = device.connectGatt(this, false, gattCallback);
连接到 BLE 设备上的 GATT 服务器,需要使用 connectGatt() 方法。此方法采用三个参数:一个 Context 对象、autoConnect(布尔值,指示是否在可用时自动连接到 BLE 设备),以及对 BluetoothGattCallback 的引用。该方法 BluetoothGatt 实例,然后可使用该实例执行 GATT 客户端操作。调用方(Android 应用)是 GATT 客户端。BluetoothGattCallback 用于向客户端传递结果(例如连接状态),以及任何进一步的 GATT 客户端操作。 我们再看一下BluetoothGattCallback 的JAVA实现
JAVA 代码
// Various callback methods defined by the BLE API.
    private final BluetoothGattCallback gattCallback =
            new BluetoothGattCallback() {
        @Override
        public void onConnectionStateChange(BluetoothGatt gatt, int status,
                int newState) {
            String intentAction;
            if (newState == BluetoothProfile.STATE_CONNECTED) {
                intentAction = ACTION_GATT_CONNECTED;
                connectionState = STATE_CONNECTED;
                broadcastUpdate(intentAction);
                Log.i(TAG, "Connected to GATT server.");
                Log.i(TAG, "Attempting to start service discovery:" +
                        bluetoothGatt.discoverServices());

            } else if (newState == BluetoothProfile.STATE_DISCONNECTED) {
                intentAction = ACTION_GATT_DISCONNECTED;
                connectionState = STATE_DISCONNECTED;
                Log.i(TAG, "Disconnected from GATT server.");
                broadcastUpdate(intentAction);
            }
        }

        @Override
        // New services discovered
        public void onServicesDiscovered(BluetoothGatt gatt, int status) {
            if (status == BluetoothGatt.GATT_SUCCESS) {
                broadcastUpdate(ACTION_GATT_SERVICES_DISCOVERED);
            } else {
                Log.w(TAG, "onServicesDiscovered received: " + status);
            }
        }

        @Override
        // Result of a characteristic read operation
        public void onCharacteristicRead(BluetoothGatt gatt,
                BluetoothGattCharacteristic characteristic,
                int status) {
            if (status == BluetoothGatt.GATT_SUCCESS) {
                broadcastUpdate(ACTION_DATA_AVAILABLE, characteristic);
            }
        }
     ...
因为日后还需要实现其他平台的功能,我们的想法是所有公共部分都放到项目根目录,平台相关的实现,放到对应Platforms目录下对应平台的文件夹内,然后通过分部类的方式组织类结构。平台相关的方法起名以Platform为前缀。 我们先在Masa.Blazor.Maui.Plugin.Bluetooth项目Platforms->Android目录新建一个名称为RemoteGattServer.android.cs的分部类,然后添加初始化方法和BluetoothGattCallback
    partial class RemoteGattServer
    {
        private Android.Bluetooth.BluetoothGatt _gatt;
        private Android.Bluetooth.BluetoothGattCallback _gattCallback;

        private void PlatformInit()
        {
            _gattCallback = new GattCallback(this);
            _gatt = ((Android.Bluetooth.BluetoothDevice)Device).ConnectGatt(Android.App.Application.Context, false, _gattCallback);
        }

        public static implicit operator Android.Bluetooth.BluetoothGatt(RemoteGattServer gatt)
        {
            return gatt._gatt;
        }
        internal event EventHandler<CharacteristicEventArgs> CharacteristicRead;
        internal event EventHandler<GattEventArgs> ServicesDiscovered;
        private bool _servicesDiscovered = false;
...

        internal class GattCallback : Android.Bluetooth.BluetoothGattCallback
        {
            private readonly RemoteGattServer _remoteGattServer;

            internal GattCallback(RemoteGattServer remoteGattServer)
            {
                _remoteGattServer = remoteGattServer;
            }
...
            public override void OnCharacteristicWrite(Android.Bluetooth.BluetoothGatt gatt, Android.Bluetooth.BluetoothGattCharacteristic characteristic, Android.Bluetooth.GattStatus status)
            {
                System.Diagnostics.Debug.WriteLine($"CharacteristicWrite {characteristic.Uuid} Status:{status}");
                _remoteGattServer.CharacteristicWrite?.Invoke(_remoteGattServer, new CharacteristicEventArgs { Characteristic = characteristic, Status = status });
            }
        }
    }
    ...
    internal class ConnectionStateEventArgs : GattEventArgs
    {
        public Android.Bluetooth.ProfileState State
        {
            get; internal set;
        }
    }

    internal class CharacteristicEventArgs : GattEventArgs
    {
        public Android.Bluetooth.BluetoothGattCharacteristic Characteristic
        {
            get; internal set;
        }
    }
在PlatformInit方法中连接到 GATT 服务器。自定义的GattCallback 集成自 Android.Bluetooth.BluetoothGattCallback,篇幅问题,这里只展示CharacteristicWrite一个方法的重写,要实现完整功能还至少需要额外重写ServicesDiscovered、ConnectionStateChanged、CharacteristicChanged、CharacteristicRead、DescriptorRead、DescriptorWrite四个方法,详细请参考源代码。在我们向设备特征值发送数据时,会触发OnCharacteristicWrite方法,方法内部触发我们自定义的CharacteristicWrite。
写入蓝牙指令
官方文档示例中没有给出特征值写入的示例,这里我们自己实现。 我们新建GattCharacteristic类,在项目根目录新建GattCharacteristic.cs,在Android目录新建GattCharacteristic.android.cs 在GattCharacteristic.android.cs中添加PlatformWriteValue方法。
        Task PlatformWriteValue(byte[] value, bool requireResponse)
        {
            TaskCompletionSource<bool> tcs = null;

            if (requireResponse)
            {
                tcs = new TaskCompletionSource<bool>();

                void handler(object s, CharacteristicEventArgs e)
                {
                    if (e.Characteristic == _characteristic)
                    {
                        Service.Device.Gatt.CharacteristicWrite -= handler;

                        if (!tcs.Task.IsCompleted)
                        {
                            tcs.SetResult(e.Status == Android.Bluetooth.GattStatus.Success);
                        }
                    }
                };

                Service.Device.Gatt.CharacteristicWrite += handler;
            }

            bool written = _characteristic.SetValue(value);
            _characteristic.WriteType = requireResponse ? Android.Bluetooth.GattWriteType.Default : Android.Bluetooth.GattWriteType.NoResponse;
            written = ((Android.Bluetooth.BluetoothGatt)Service.Device.Gatt).WriteCharacteristic(_characteristic);

            if (written && requireResponse)
                return tcs.Task;

            return Task.CompletedTask;
        }
通过_characteristic.SetValue将需要发送的字节数组存储到该特征值的本地存储中,然后通过WriteCharacteristic发送到远程Gatt服务器。 这里用到了TaskCompletionSource,主要还是起到异步转同步作用。安卓蓝牙的写特征属性分为WRITE_TYPE_DEFAULT(写入)和WRITE_TYPE_NO_RESPONSE(写入无返回),参数requireResponse就表示是否需要设备返回,如果需要返回,就将TaskCompletionSource存储的结果以Task形式返回调用者。 我们在GattCharacteristic中添加WriteValueWithResponseAsync方法,表示写入并等待返回。
        public Task WriteValueWithResponseAsync(byte[] value)
        {
            ThrowOnInvalidValue(value);
            return PlatformWriteValue(value, true);
        }

        private void ThrowOnInvalidValue(byte[] value)
        {
            if (value is null)
                throw new ArgumentNullException("value");

            if (value.Length > 512)
                throw new ArgumentOutOfRangeException("value", "Attribute value cannot be longer than 512 bytes");
        }
因为蓝牙限制单次写入的长度最大为512,所以我们这里做一下长度检查。 这样的组织结构,当我们再添加其他平台的实现代码时,就可以直接通过调用PlatformWriteValue来调用具体平台的实现代码了。 想对蓝牙进行写入操作,当然需要先找到蓝牙设备的服务id和特征值id才行。所以我们继续在GattCallback中添加一个OnConnectionStateChange的重写
internal event EventHandler<GattEventArgs> ServicesDiscovered;
...
internal class GattCallback : Android.Bluetooth.BluetoothGattCallback
        {
        ...
           public override void OnConnectionStateChange(Android.Bluetooth.BluetoothGatt gatt, Android.Bluetooth.GattStatus status, Android.Bluetooth.ProfileState newState)
            {
                System.Diagnostics.Debug.WriteLine($"ConnectionStateChanged Status:{status} NewState:{newState}");
                _remoteGattServer.ConnectionStateChanged?.Invoke(_remoteGattServer, new ConnectionStateEventArgs { Status = status, State = newState });
                if (newState == Android.Bluetooth.ProfileState.Connected)
                {
                    if (!_remoteGattServer._servicesDiscovered)
                        gatt.DiscoverServices();
                }
                else
                {
                    _remoteGattServer.Device.OnGattServerDisconnected();
                }
            }
        }
     private async Task<bool> WaitForServiceDiscovery()
        {
            if (_servicesDiscovered)
                return true;

            TaskCompletionSource<bool> tcs = new TaskCompletionSource<bool>();

            void handler(object s, GattEventArgs e)
            {
                ServicesDiscovered -= handler;

                if (!tcs.Task.IsCompleted)
                {
                    tcs.SetResult(true);
                }
            };

            ServicesDiscovered += handler;
            return await tcs.Task;
        }

        Task PlatformConnect()
        {
            TaskCompletionSource<bool> tcs = new TaskCompletionSource<bool>();

            void handler(object s, ConnectionStateEventArgs e)
            {
                ConnectionStateChanged -= handler;

                switch (e.Status)
                {
                    case Android.Bluetooth.GattStatus.Success:
                        tcs.SetResult(e.State == Android.Bluetooth.ProfileState.Connected);
                        break;

                    default:
                        tcs.SetResult(false);
                        break;
                }
            }

            ConnectionStateChanged += handler;
            bool success = _gatt.Connect();
            if (success)
            {
                if (IsConnected)
                    return Task.FromResult(true);

                return tcs.Task;
            }
            else
            {
                ConnectionStateChanged -= handler;
                return Task.FromException(new OperationCanceledException());
            }
        }

        async Task<List<GattService>> PlatformGetPrimaryServices(BluetoothUuid? service)
        {
            var services = new List<GattService>();

            await WaitForServiceDiscovery();

            foreach (var serv in _gatt.Services)
            {
                // if a service was specified only add if service uuid is a match
                if (serv.Type == Android.Bluetooth.GattServiceType.Primary && (!service.HasValue || service.Value == serv.Uuid))
                {
                    services.Add(new GattService(Device, serv));
                }
            }

            return services;
        }
        ...
    }
    ...
    internal class GattEventArgs : EventArgs
    {
        public Android.Bluetooth.GattStatus Status
        {
            get; internal set;
        }
    }
当设备连接或断开与某个设备的连接时,会触发我们重写的OnConnectionStateChange方法,然后我们在方法内部,判断如果是连接的状态(ProfileState.Connected),就去通过gatt服务的DiscoverServices来查找设备的服务及特征值信息等。 PlatformGetPrimaryServices方法用来找到BLE设备的所有主服务(通过GattServiceType.Primary来判断是否为主服务),返回一个GattService列表,GattService类是我们自定义的一个类,鉴于篇幅问题这里不全部展示
  public sealed partial class GattService
    {
        public Task<IReadOnlyList<GattCharacteristic>> GetCharacteristicsAsync()
        {
            return PlatformGetCharacteristics();
        }
        ...
PlatformGetCharacteristics的具体实现在该类平台对应的部分类中
    partial class GattService
    {
        private Task<IReadOnlyList<GattCharacteristic>> PlatformGetCharacteristics()
        {
            List<GattCharacteristic> characteristics = new List<GattCharacteristic>();
            foreach (var characteristic in NativeService.Characteristics)
            {
                characteristics.Add(new GattCharacteristic(this, characteristic));
            }
            return Task.FromResult((IReadOnlyList<GattCharacteristic>)characteristics.AsReadOnly());
        }
        ...
打开蓝牙监听
以上一系列操作我们已经可以拿到具体的这个设备的服务和具体的特征值了,对于BLE设备,大部分都是通过Notify属性进行广播的。我们需要开启一个广播监听 我看参考一下JAVA代码
JAVA 代码
private BluetoothGatt bluetoothGatt;
BluetoothGattCharacteristic characteristic;
boolean enabled;
...
bluetoothGatt.setCharacteristicNotification(characteristic, enabled);
...
BluetoothGattDescriptor descriptor = characteristic.getDescriptor(
        UUID.fromString(SampleGattAttributes.CLIENT_CHARACTERISTIC_CONFIG));
descriptor.setValue(BluetoothGattDescriptor.ENABLE_NOTIFICATION_VALUE);
bluetoothGatt.writeDescriptor(descriptor);
开启广播监听的方式是向对应描述符写入一个指令(BluetoothGattDescriptor.ENABLE_NOTIFICATION_VALUE)即可开启广播。 我们在GattCharacteristic.android.cs添加PlatformStartNotifications方法
  private async Task PlatformStartNotifications()
        {
            byte[] data;

            if (_characteristic.Properties.HasFlag(Android.Bluetooth.GattProperty.Notify))
                data = Android.Bluetooth.BluetoothGattDescriptor.EnableNotificationValue.ToArray();
            else if (_characteristic.Properties.HasFlag(Android.Bluetooth.GattProperty.Indicate))
                data = Android.Bluetooth.BluetoothGattDescriptor.EnableIndicationValue.ToArray();
            else
                return;

            ((Android.Bluetooth.BluetoothGatt)Service.Device.Gatt).SetCharacteristicNotification(_characteristic, true);
            var descriptor = await GetDescriptorAsync(GattDescriptorUuids.ClientCharacteristicConfiguration);
            await descriptor.WriteValueAsync(data);
        }
这里判断是否支持Notify,然后调用EnableNotificationValue构造一个打开监听的指令data,然后通过GetDescriptorAsync拿到这个特征值对应的描述符,这里很简单只要调用安卓对应特征值的GetDescriptor即可,这里就不展示代码了。一个BLE设备如果有通知的属性,那么他一定会有描述符,打开或者关闭通知都需要通过描述符写入指令来控制,所有对特征值的操作然后通过WriteValueAsync->PlatformWriteValue来实现。
        Task PlatformWriteValue(byte[] value)
        {
            TaskCompletionSource<bool> tcs = new TaskCompletionSource<bool>();

            void handler(object s, DescriptorEventArgs e)
            {
                if (e.Descriptor == _descriptor)
                {
                    Characteristic.Service.Device.Gatt.DescriptorWrite -= handler;

                    if (!tcs.Task.IsCompleted)
                    {
                        tcs.SetResult(e.Status == Android.Bluetooth.GattStatus.Success);
                    }
                }
            };

            Characteristic.Service.Device.Gatt.DescriptorWrite += handler;
            bool written = _descriptor.SetValue(value);
            written = ((Android.Bluetooth.BluetoothGatt)Characteristic.Service.Device.Gatt).WriteDescriptor(_descriptor);
            if (written)
                return tcs.Task;

            return Task.FromException(new OperationCanceledException());
        }
接收 GATT 通知
到此我们已经实现了连接设备、获取主服务和特征值、写入数据、打开通知监听,最后还剩一个就是监听特征值的变化,为某个特征启用通知后,如果远程设备上的特征发生更改(我们收到消息),则会触发 onCharacteristicChanged() 回调:
JAVA代码
@Override
// Characteristic notification
public void onCharacteristicChanged(BluetoothGatt gatt,
        BluetoothGattCharacteristic characteristic) {
    broadcastUpdate(ACTION_DATA_AVAILABLE, characteristic);
}
在GattCharacteristic.cs中添加
        void OnCharacteristicValueChanged(GattCharacteristicValueChangedEventArgs args)
        {
            characteristicValueChanged?.Invoke(this, args);
        }
        public event EventHandler<GattCharacteristicValueChangedEventArgs> CharacteristicValueChanged
        {
            add
            {
                characteristicValueChanged += value;
                AddCharacteristicValueChanged();

            }
            remove
            {
                characteristicValueChanged -= value;
                RemoveCharacteristicValueChanged();
            }
        }
        ...
       public sealed class GattCharacteristicValueChangedEventArgs : EventArgs
    	{
	        internal GattCharacteristicValueChangedEventArgs(byte[] newValue)
	        {
	            Value = newValue;
	        }
        public byte[] Value { get; private set; }
    }
在平台对应的GattCharacteristic.android.cs添加
        void AddCharacteristicValueChanged()
        {
            Service.Device.Gatt.CharacteristicChanged += Gatt_CharacteristicChanged;
        }
        void RemoveCharacteristicValueChanged()
        {
            Service.Device.Gatt.CharacteristicChanged -= Gatt_CharacteristicChanged;
        }
        private void Gatt_CharacteristicChanged(object sender, CharacteristicEventArgs e)
        {
            if (e.Characteristic == _characteristic)
                OnCharacteristicValueChanged(new GattCharacteristicValueChangedEventArgs(e.Characteristic.GetValue()));
        }
这里的实现思路和之前是一样的。
测试
我们在MasaMauiBluetoothService添加一个发送数据的方法
        public async Task SendDataAsync(string deviceName,Guid servicesUuid,Guid? characteristicsUuid, byte[] dataBytes, EventHandler<GattCharacteristicValueChangedEventArgs> gattCharacteristicValueChangedEventArgs)
        {
            BluetoothDevice blueDevice = _discoveredDevices.FirstOrDefault(o => o.Name == deviceName);

            var primaryServices = await blueDevice.Gatt.GetPrimaryServicesAsync();
            var primaryService = primaryServices.First(o => o.Uuid.Value == servicesUuid);

            var characteristics = await primaryService.GetCharacteristicsAsync();
            var characteristic = characteristics.FirstOrDefault(o => (o.Properties & GattCharacteristicProperties.Write) != 0);
            if (characteristicsUuid != null)
            {
                characteristic = characteristics.FirstOrDefault(o => o.Uuid.Value == characteristicsUuid);
            }

            await characteristic.StartNotificationsAsync();
            characteristic.CharacteristicValueChanged += gattCharacteristicValueChangedEventArgs;
            await characteristic.WriteValueWithResponseAsync(dataBytes);
        }
在Masa.Blazor.Maui.Plugin.BlueToothSample项目的Index.razor.cs添加测试代码
 public partial class Index
    {
        private string SelectedDevice;
        private List<string> _allDeviceResponse = new List<string>();
        [Inject]
        private MasaMauiBluetoothService BluetoothService { get; set; }
...
        private async Task SendDataAsync(string cmd= "AT+QVERSION")
        {
            var byteData = System.Text.Encoding.Default.GetBytes(cmd);
            await SendDataAsync(SelectedDevice, byteData);
        }

        private async Task SendDataAsync(string deviceSerialNo, byte[] byteData)
        {
            if (byteData.Any())
            {
                _allDeviceResponse = new List<string>();
#if ANDROID
                await BluetoothService.SendDataAsync(deviceSerialNo,Guid.Parse("0000ffff-0000-1000-8000-00805f9b34fb"),null, byteData, onCharacteristicChanged);
#endif
            }
        }

        void onCharacteristicChanged(object sender, GattCharacteristicValueChangedEventArgs e)
        {
            var deviceResponse = System.Text.Encoding.Default.GetString(e.Value);
            _allDeviceResponse.Add(deviceResponse);
            InvokeAsync(() => { StateHasChanged(); });
        }
    }
向设备发送查询版本号的指令“AT+QVERSION”,设备返回通过onCharacteristicChanged方法获取,设备返回的是二进制数组,所以需要转成字符串显示出来。 简单在写个界面修改Index.razor Masa Blazor组件: Masa Blazor
@page "/"
<MButton OnClick="ScanBLEDeviceAsync">扫描蓝牙设备</MButton>

<div class="text-center">
    <MDialog @bind-Value="ShowProgress" Width="500">
        <ChildContent>
            <MCard>
                <MCardTitle>
                    正在扫描蓝牙设备
                </MCardTitle>
                <MCardText>
                    <MProgressCircular Size="40" Indeterminate Color="primary"></MProgressCircular>
                </MCardText>
            </MCard>
        </ChildContent>
    </MDialog>
</div>


@if (BluetoothDeviceList.Any())
{
    <MSelect style="margin-top:10px"
                 Outlined
                 Items="BluetoothDeviceList"
                 ItemText="u=>u"
                 ItemValue="u=>u"
                 TItem="string"
                 TValue="string"
                 TItemValue="string"
                 @bind-Value="SelectedDevice"
                 OnSelectedItemUpdate="item => SelectedDevice = item">
        </MSelect>
}
@if (!string.IsNullOrEmpty(SelectedDevice))
{
    <MButton OnClick="() => SendDataAsync()">发送查询版本指令</MButton>
}

@if (_allDeviceResponse.Any())
{
    <MCard>
        <MTextarea Value="@string.Join(' ',_allDeviceResponse)"></MTextarea>
    </MCard>
}
我们看一下效果
![在这里插入图片描述]()
本文到此结束
如果你对我们MASA感兴趣,无论是代码贡献、使用、提 Issue,欢迎联系我们
- WeChat:MasaStackTechOps
- QQ:7424099