一、环境准备
• Python 2.7.5 PyODPS支持Python2.6以上版本
• Airflow apache-airflow-1.10.7
1.安装MaxCompute需要的包
pip install setuptools>=3.0
pip install requests>=2.4.0
pip install greenlet>=0.4.10  # 可选,安装后能加速Tunnel上传。
pip install cython>=0.19.0  # 可选,不建议Windows用户安装。
pip install pyodps
注意:如果requests包冲突,先卸载再安装对应的版本
2.执行如下命令检查安装是否成功
python -c "from odps import ODPS"
二、开发步骤
1.在Airflow家目录编写python调度脚本Airiflow_MC.py
#-*- coding: UTF-8 -*-
import sys
from odps import ODPS
from odps import options
from airflow import DAG
from airflow.operators.python_operator import PythonOperator
from datetime import datetime, timedelta
import time
#修改系统默认编码。
reload(sys)
sys.setdefaultencoding('utf8')

default_args = {
    'owner': 'airflow',
    'depends_on_past': False,
    'start_date':datetime(2020,1,15),
    'retry_delay': timedelta(minutes=5),
}
dag = DAG(
    'Airiflow_MC', default_args=default_args, schedule_interval=timedelta(seconds=30))
#打印时间
def get_time():
    print '当前时间是{}'.format(time.time())
    return time.time()
#执行MaxCompute的查询任务
def mc_job ():
    #MaxCompute参数设置
    options.sql.settings = {'options.tunnel.limit_instance_tunnel': False, 'odps.sql.allow.fullscan': True}

    odps = ODPS('**your-access-id**', '**your-secret-access-key**', '**your-default-project**',endpoint='**your-end-point**')
    # project = odps.get_project('my_project')  # 取到某个项目。
    project = odps.get_project()  # 取到默认项目。
    # 获取表。
    # t = odps.get_table('tableName')
    # 接受传入的分区参数。
    with odps.execute_sql('select * from tableName').open_reader() as reader:
        count = reader.count
    print("查询表数据条数:{}".format(count))
    for record in reader:
        print record
    return count
t1 = PythonOperator (
    task_id = 'get_time' ,
    provide_context = False ,
    python_callable = get_Time ,
    dag = dag )

t2 = PythonOperator (
    task_id = 'mc_job' ,
    provide_context = False ,
    python_callable = mc_job ,
    dag = dag )
t2.set_upstream(t1)
2.提交
python Airiflow_MC.py
3.进行测试
# print the list of active DAGs
airflow list_dags

# prints the list of tasks the "tutorial" dag_id
airflow list_tasks Airiflow_MC

# prints the hierarchy of tasks in the tutorial DAG
airflow list_tasks Airiflow_MC --tree
#测试task
airflow test Airiflow_MC get_time 2010-01-16
airflow test Airiflow_MC mc_job 2010-01-16
4.运行调度任务
登录到web界面点击按钮运行
5.查看任务运行结果
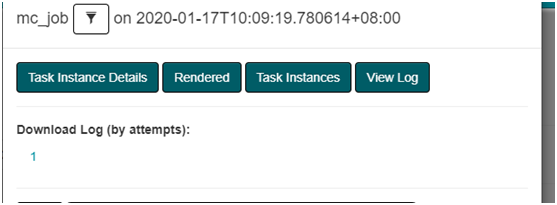
1.点击view log
![image.png image.png]()
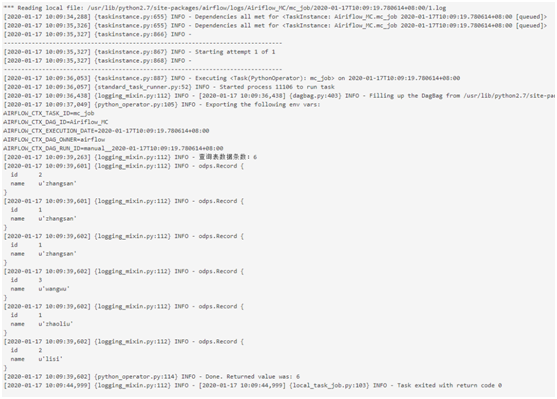
2.查看结果
![image.png image.png]()


