简介
定时任务是后端开发中常见的需求,主要应用场景有定期数据报表、定时消息通知、异步的后台业务逻辑处理、日志分析处理、垃圾数据清理、定时更新缓存等等。
Spring Boot 集成了一整套的定时任务工具,让我们专注于完成逻辑,剩下的基础调度工作将自动完成。
通用实现方式
| 实现方式 |
描述 |
| java.util.Timer |
Timer 提供了一个 java.util.TimerTask 任务支持任务调度。该方式只能按指定频率执行,不能在指定时间运行。由于功能过于单一,使用较少。 |
| Quartz |
Quartz 是一个功能比较强大的调度器,支持在指定时间运行,也可以按照指定频率执行。缺点是使用起来相对麻烦。 |
| Spring 框架自带的 Schedule 模块 |
可以看做是轻量级的 Quartz |
静态定时任务
@Component
@EnableScheduling
public class StaticScheduleJob {

    /**
     * 上次开始执行时间点后5秒再次执行
     */
    @Scheduled(fixedRate = 5000)
    public void job3() {
        System.out.println("执行任务job3:"+DateUtil.formatDateTime(new Date()));
    }

    /**
     * 上次执行完毕时间点后3秒再次执行
     */
    @Scheduled(fixedDelay = 3000)
    public void job2() {
        System.out.println("执行任务job2:"+DateUtil.formatDateTime(new Date()));
    }

    /**
     * 每隔10秒执行一次(按照 corn 表达式规则执行)
     */
    @Scheduled(cron = "0/10 * * * * ?")
    public void job1() {
        System.out.println("执行任务job1:"+DateUtil.formatDateTime(new Date()));
    }


}
@EnableScheduling 注解启用定时调动功能
@Scheduled 参数说明:
- @Scheduled(fixedRate = 5000):上次开始执行时间点后5秒再次执行
- @Scheduled(fixedDelay = 3000):上次执行完毕时间点后3秒再次执行
- @Scheduled(cron = "0/10 ?"):每隔10秒执行一次(按照 corn 表达式规则执行)
Cron 表达式
1.Cron表达式格式
{秒} {分} {时} {日} {月} {周} {年(可选)}
2.Cron 表达式字段取值范围及说明
| 字段 |
取值范围 |
允许的特殊字符 |
| Seconds(秒) |
0 ~ 59 |
, - * / |
| Minutes(分) |
0 ~ 59 |
, - * / |
| Hours(时) |
0 ~ 23 |
, - * / |
| Day-of-Month(天) |
可以用数字 1 ~ 31 中的任意一个值,但要注意特殊月份 |
, - * ? / L W C |
| Month(月) |
可以用 0 ~ 11 或者字符串 “JAN、FEB、MAR、APR、MAY、JUN、JUL、AUG、SEP、OCT、NOV、DEC” 表示 |
, - * / |
| Day-of-Week(每周) |
可以用数字 1 ~ 7 表示(1=星期日)或者用字符串 “SUN、MON、TUE、WED、THU、FRI、SAT” 表示 |
, - * ? / L C # |
| Year(年) |
取值范围(1970-2099),允许为空值 |
, - * / |
3.Cron 表达式中特殊字符的意义
- | 表示可以匹配该域的所有值
?| 主要用于日和星期,可以匹配域的任意值,但实际不会。当2个子表达式其中之一被指定了值以后,为了避免冲突,需要将另一个子表达式的值设为?
/ | 表示为每隔一段时间。如 0 0/10 * ? 其中的 0/10表示从0分钟开始,每隔10分钟执行一次
- | 表示范围。如 0 0-5 14 ? 表示在每天14:00到14:05期间每1分钟执行一次
, | 表示枚举多个值,这些值之间是"或"的关系。如 0 10,30 14 * 3 ? 表示每个星期二14点10分或者14点30分执行一次
L | 表示每月或者每周的最后一天。如 0 0 0 L ? 表示每月的最后一天执行
W | 表示最近工作日。如 0 0 0 15W ? 表示每月15号最近的那个工作日执行
| 用来指定具体的周数,"#"前面代表星期,"#"后面代表本月的第几周。如"2#1"表示本月第二周的星期日
4.Cron 在线生成工具
http://www.bejson.com/othertools/cron/
动态定时任务
1.实现 SchedulingConfigurer 接口
@Configuration
public class CustomScheduleConfig implements SchedulingConfigurer {

    @Autowired
    private CronTriggerDao cronTriggerDao;

    @Override
    public void configureTasks(ScheduledTaskRegistrar taskRegistrar) {
        // 上次开始执行时间点后5秒再执行
        taskRegistrar.addFixedRateTask(() -> System.out.println("CustomScheduleConfig执行任务job1=>"
                + DateUtil.formatDateTime(new Date()) + ",线程:" + Thread.currentThread().getName()), 5000);
        // 上次执行完毕时间点后3秒再执行
        taskRegistrar.addFixedDelayTask(() -> System.out.println("CustomScheduleConfig执行任务job2=>"
                + DateUtil.formatDateTime(new Date()) + ",线程:" + Thread.currentThread().getName()), 3000);
        // 添加一个配合数据库动态执行的定时任务
        TriggerTask triggerTask = new TriggerTask(
                // 任务内容.拉姆达表达式
                () -> {
                    // 1)添加任务 Runnable
                    System.out.println("CustomScheduleConfig执行动态任务job3=>" + DateUtil.formatDateTime(new Date()) + ",线程:"
                            + Thread.currentThread().getName());
                    // 2)设置执行周期
                }, triggerContext -> {
                    // 3)从数据库获取执行周期
                    String cron = cronTriggerDao.getCronTriggerById(1L);
                    if (cron != null) {
                        // 4)返回执行周期(Date)
                        return new CronTrigger(cron).nextExecutionTime(triggerContext);
                    } else {
                        return null;
                    }

                });
        taskRegistrar.addTriggerTask(triggerTask);

    }

}
2.数据库中初始化数据
这边为了测试简单初始化两行数据:
SET NAMES utf8mb4;
SET FOREIGN_KEY_CHECKS = 0;

-- ----------------------------
-- Table structure for t_cron_trigger
-- ----------------------------
DROP TABLE IF EXISTS `t_cron_trigger`;
CREATE TABLE `t_cron_trigger` (
  `id` int(8) NOT NULL AUTO_INCREMENT COMMENT '任务id',
  `cron` varchar(20) COLLATE utf8_bin DEFAULT NULL COMMENT 'cron表达式',
  `create_time` datetime DEFAULT NULL COMMENT '创建时间',
  `update_time` datetime DEFAULT NULL COMMENT '更新时间',
  `is_deleted` int(1) DEFAULT '0' COMMENT '作废状态 0-否 1-是',
  PRIMARY KEY (`id`)
) ENGINE=InnoDB AUTO_INCREMENT=3 DEFAULT CHARSET=utf8 COLLATE=utf8_bin;

-- ----------------------------
-- Records of t_cron_trigger
-- ----------------------------
BEGIN;
INSERT INTO `t_cron_trigger` VALUES (1, '0/10 * * * * ?', '2019-10-30 13:40:14', NULL, 0);
INSERT INTO `t_cron_trigger` VALUES (2, '0/7 * * * * ?', '2019-10-30 13:40:34', NULL, 0);
COMMIT;

SET FOREIGN_KEY_CHECKS = 1;
3.从数据库中读取 cron 表达式值
CronTrigger 实体类
public class CronTrigger implements Serializable{

    /**
     *
     */
    private static final long serialVersionUID = 880141459783509786L;

    private Long id;//任务id
    private String cron;//cron表达式
    private String createTime;//创建时间
    private String updateTime;//更新时间
    private boolean isDeleted=false;//删除状态

    public Long getId() {
        return id;
    }
    public void setId(Long id) {
        this.id = id;
    }
    public String getCron() {
        return cron;
    }
    public void setCron(String cron) {
        this.cron = cron;
    }
    public String getCreateTime() {
        return createTime;
    }
    public void setCreateTime(String createTime) {
        this.createTime = createTime;
    }
    public String getUpdateTime() {
        return updateTime;
    }
    public void setUpdateTime(String updateTime) {
        this.updateTime = updateTime;
    }
    public boolean isDeleted() {
        return isDeleted;
    }
    public void setDeleted(boolean isDeleted) {
        this.isDeleted = isDeleted;
    }
}
CronTriggerDao
public interface CronTriggerDao {
    /**
     * 根据id获取cron表达式
     * @param id
     * @return
     */
    String getCronTriggerById(Long id);

}
CronTriggerMapper.xml
<?xml version="1.0" encoding="UTF-8"?>
<!DOCTYPE mapper PUBLIC "-//mybatis.org//DTD Mapper 3.4//EN"
"http://mybatis.org/dtd/mybatis-3-mapper.dtd">
<mapper namespace="cn.zwqh.springboot.dao.CronTriggerDao">
    <resultMap type="cn.zwqh.springboot.model.CronTrigger" id="cronTrigger">
        <id property="id" column="id"/>
        <result property="cron" column="cron"/>
        <result property="createTime" column="create_time"/>
        <result property="updateTime" column="update_time"/>
        <result property="isDeleted" column="is_deleted"/>
    </resultMap>
    <!-- 根据id获取cron表达式 -->
    <select id="getCronTriggerById" resultType="String">
        select cron from t_cron_trigger where is_deleted=0 and id=#{id}
    </select>
</mapper>
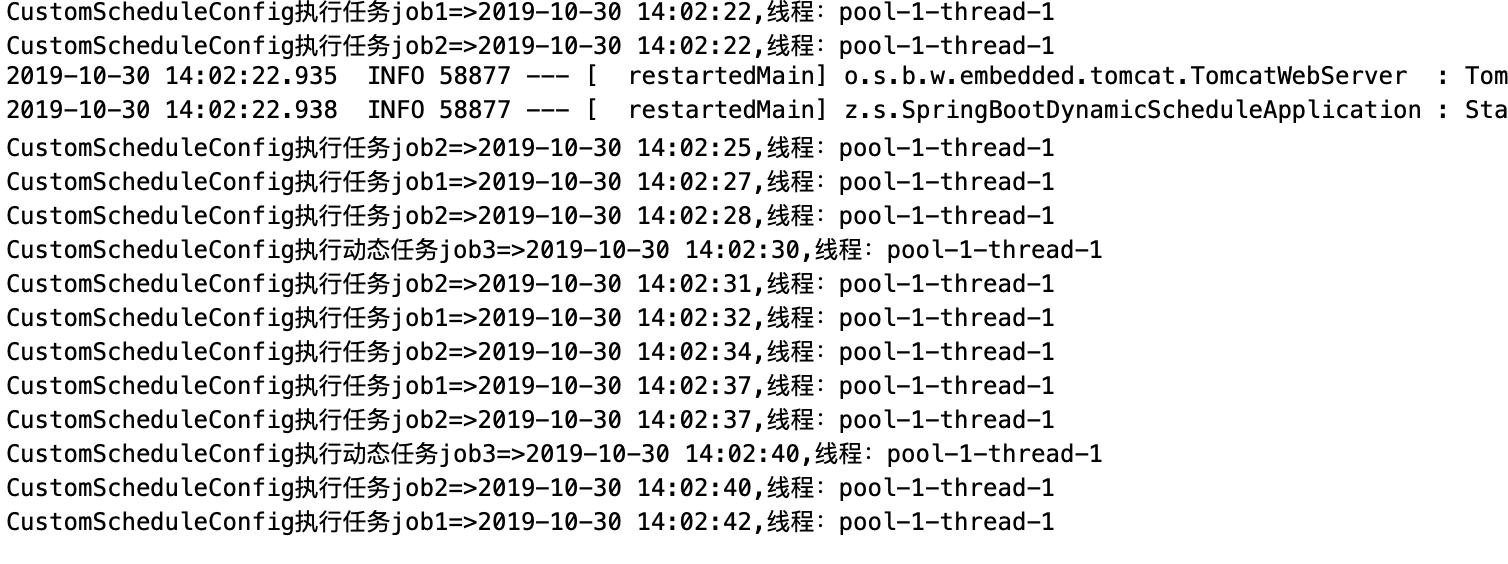
4.测试
启动前记得在启动类上加上 @EnableScheduling
打印日志如下:
![]()
多线程定时任务
通过上面的日志我们可以看到任务执行都是单线程的。如果要实现多线程执行任务,我们可以通过在 SchedulingConfigurer 接口的 configureTasks方法中添加线程池即可。
1.CustomScheduleConfig
@Configuration
public class CustomScheduleConfig implements SchedulingConfigurer {

    @Autowired
    private CronTriggerDao cronTriggerDao;

    @Override
    public void configureTasks(ScheduledTaskRegistrar taskRegistrar) {

        //设定一个长度为10的定时任务线程池
        taskRegistrar.setScheduler(Executors.newScheduledThreadPool(10));

        // 上次开始执行时间点后5秒再执行
        taskRegistrar.addFixedRateTask(() -> System.out.println("CustomScheduleConfig执行任务job1=>"
                + DateUtil.formatDateTime(new Date()) + ",线程:" + Thread.currentThread().getName()), 5000);
        // 上次执行完毕时间点后3秒再执行
        taskRegistrar.addFixedDelayTask(() -> System.out.println("CustomScheduleConfig执行任务job2=>"
                + DateUtil.formatDateTime(new Date()) + ",线程:" + Thread.currentThread().getName()), 3000);
        // 添加第一个配合数据库动态执行的定时任务
        TriggerTask triggerTask = new TriggerTask(
                // 任务内容.拉姆达表达式
                () -> {
                    // 1)添加任务 Runnable
                    System.out.println("CustomScheduleConfig执行动态任务job3=>" + DateUtil.formatDateTime(new Date()) + ",线程:"
                            + Thread.currentThread().getName());
                    // 2)设置执行周期
                }, triggerContext -> {
                    // 3)从数据库获取执行周期
                    String cron = cronTriggerDao.getCronTriggerById(1L);
                    if (cron != null) {
                        // 4)返回执行周期(Date)
                        return new CronTrigger(cron).nextExecutionTime(triggerContext);
                    } else {
                        return null;
                    }

                });
        taskRegistrar.addTriggerTask(triggerTask);
        // 添加第二个配合数据库动态执行的定时任务
        TriggerTask triggerTask2 = new TriggerTask(
                // 任务内容.拉姆达表达式
                () -> {
                    // 1)添加任务 Runnable
                    System.out.println("CustomScheduleConfig执行动态任务job4=>" + DateUtil.formatDateTime(new Date()) + ",线程:"
                            + Thread.currentThread().getName());
                    // 2)设置执行周期
                }, triggerContext -> {
                    // 3)从数据库获取执行周期
                    String cron = cronTriggerDao.getCronTriggerById(2L);
                    if (cron != null) {
                        // 4)返回执行周期(Date)
                        return new CronTrigger(cron).nextExecutionTime(triggerContext);
                    } else {
                        return null;
                    }

                });
        taskRegistrar.addTriggerTask(triggerTask2);

    }

}
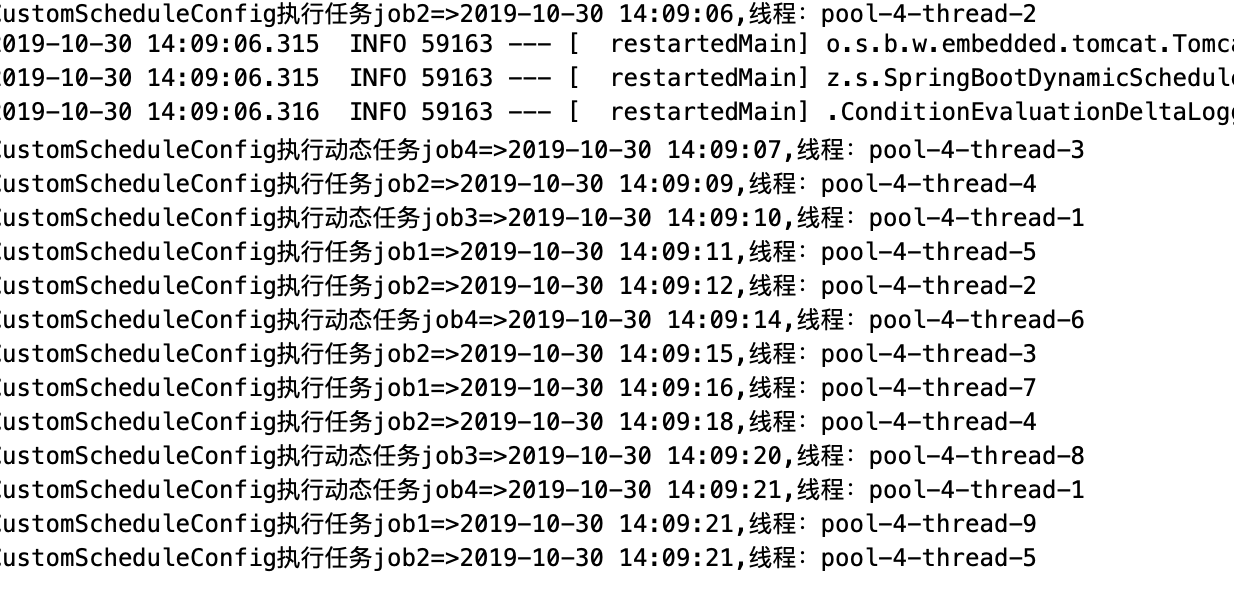
2.测试
打印日志如下:
![]()
示例代码
github
码云
非特殊说明,本文版权归 朝雾轻寒 所有,转载请注明出处.
原文标题:Spring Boot 2.X(十二):定时任务
原文地址: https://www.zwqh.top/article/info/21
如果文章对您有帮助,请扫码关注下我的公众号,文章持续更新中...
![]()