Android 8.0 以发布很长时间了,基于用户设备和市场要求等迟迟没有适配升级;如今适配时遇到一些问题,整理记录一下!官网 对 Android 8.0 新特性以及适配相关的介绍非常清楚,小菜根据官方要求逐步进行适配升级;
升级 SDK
首先要处理的是 targetSDK = 26 compileSDK >= 26,同步之后要注意项目中三方 SDK 是否需要升级适配,若需要升级请认真参考三方 SDK 文档进行升级,之后小菜建议分别对 debug 和 release 进行测试是否可以进行正常打包;这一步可能简单到只需更改一个版本号而已,也可能牵连很多复杂的三方包的升级等,需认真对待;
targetSdkVersion = 26
推送通知
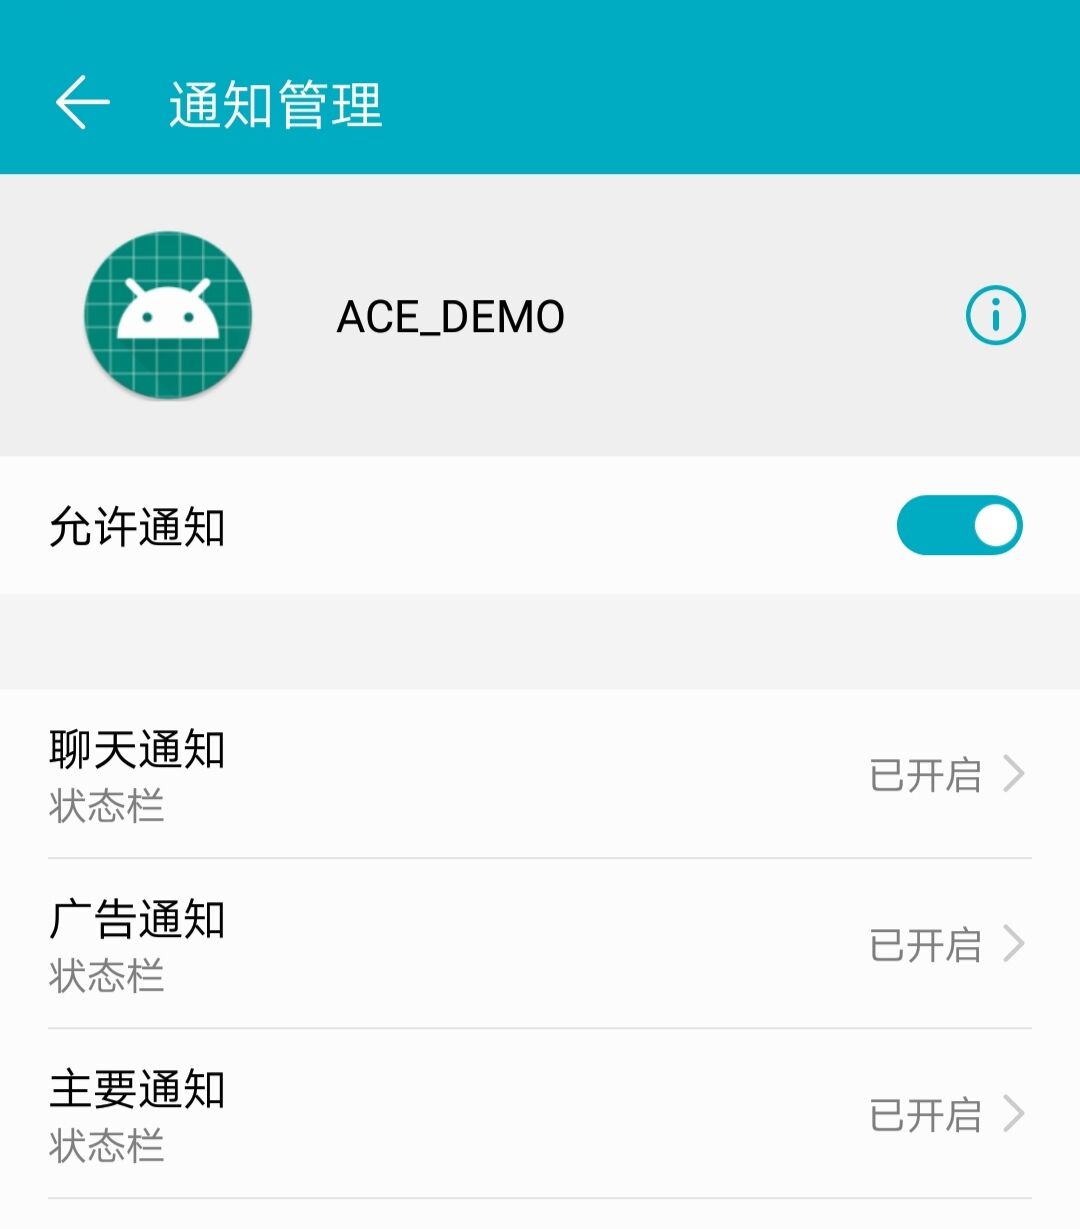
小菜在升级 SDK 之后测试推送消息,部分消息无法正常展示,原因在于 Android 8.0 添加了通知渠道,允许建立不同的通知渠道类型,我们可以创建不同类型的通知渠道,用户方可以选择性的关闭不感兴趣或低优先级的推送消息,优势是不会因为推送消息过多而整体取消;
创建通知渠道需要 ChannelID / ChannelName / importance 三个参数,ChannelID 为唯一的,ChannelName 会展示在系统设置说明中,importance 为通知重要程度;
- IMPORTANCE_HIGH 可在任何地方显示,有声音
- IMPORTANCE_DEFAULT 可任何地方显示,有声音但不会在视觉上干扰
- IMPORTANCE_MIN 无声音,只出现在状态栏中,不能与 startForeground 一起用
// Android8.0 将各个通知放入特定渠道中
NotificationManager notificationManager =
    (NotificationManager) context.getSystemService(android.content.Context.NOTIFICATION_SERVICE);
if (Build.VERSION.SDK_INT >= Build.VERSION_CODES.O) {
    NotificationChannel channel = new NotificationChannel(PUSH_CHANNEL_ID, PUSH_CHANNEL_NAME, NotificationManager.IMPORTANCE_HIGH);
    if (notificationManager != null) {
        notificationManager.createNotificationChannel(channel);
    }
}
// 需要传入 ChannelID
NotificationCompat.Builder notificationBuilder = new NotificationCompat.Builder(context, PUSH_CHANNEL_ID);
...
notificationBuilder.build();
![]()
小菜的项目中推送相对简单,官网提供了很多丰富的样式和细节,需要的请官网查阅;
Apk 下载安装
自从 Android N 开始,Android 便加大了对文件管理的限制;Android 7.0 之后弃用了 Uri.fromFile 方式采用 FileProvider 方式处理本地文件路径;
Uri.fromFile 方式文件路径:
file:/storage/emulated/0/Android/data/包名/files/downloaded_app.apk

FileProvider 方式文件路径:
content:/storage/emulated/0/Android/data/包名/files/downloaded_app.apk
- 在 AndroidManifest.xml 中声明 Provider;
<provider
    android:name="android.support.v4.content.FileProvider"
    android:authorities="${applicationId}.fileprovider"
    android:exported="false"
    android:grantUriPermissions="true">
  <meta-data
      android:name="android.support.FILE_PROVIDER_PATHS"
      android:resource="@xml/file_path" />
</provider>
- 在 res 下新建 xml 文件夹,之后新建与 Provider 中对应的 file_path 文件;
<?xml version="1.0" encoding="utf-8"?>
<paths>
  <external-files-path
      name="external_files_path"
      path="Download" />
</paths>
- 使用隐式意图安装 Apk;
private void installApk(File apk) {
    Uri uri = null;
    if (Build.VERSION.SDK_INT < Build.VERSION_CODES.N) {
        uri = Uri.fromFile(apk);
    } else {
        uri = FileProvider.getUriForFile(mContext, mContext.getPackageName() +  ".fileprovider", apk);
    }
    Intent intent = new Intent(Intent.ACTION_VIEW);
    intent.setDataAndType(uri, "application/vnd.android.package-archive");
    intent.addFlags(Intent.FLAG_ACTIVITY_NEW_TASK);
    intent.addFlags(Intent.FLAG_GRANT_READ_URI_PERMISSION);
    mContext.startActivity(intent);
}
- Android O 的新权限要求;
<uses-permission android:name="android.permission.REQUEST_INSTALL_PACKAGES"/>
注意事项
- android:name 默认为 android.support.v4.content.FileProvider 但有时需要集成三方 SDK 时已经占用,使用新的 Provider 时可以新建 Provider 防止冲突;
public class MyFileProvider extends FileProvider {}
- android:authorities 一般为 Uri 域名,具有唯一性,与安装 Apk 时路径相同;
android:authorities="${applicationId}.fileprovider"

FileProvider.getUriForFile(mContext, mContext.getPackageName() +  ".fileprovider", apk);
- android:exported="false":FileProvider 默认为私有的不可导出;
- android:grantUriPermissions="true":允许获取文件的临时访问权限;
- android:resource="@xml/file_path": 设置 FileProvider 访问的文件路径,可自由定义;
- file_path.xml 中为文件路径,可自由设置,Android 默认提供了如下几种;
【files-path】 -> "/data/data/包名/files"
【external-path】 -> "/storage/emulated/0"
【cache-path】 -> "/data/data/包名/cache"
【external-files-path】 -> "/storage/emulated/0/Android/data/包名/files"
【external-cache-path】 -> "/storage/emulated/0/Android/data/包名/cache"
后台广播限制
Android 8.0 之后,系统对后台操作增加了更多的限制,App 应用无法使用 AndroidManifest 中注册大部分隐式广播;尤其是 "android.net.conn.CONNECTIVITY_CHANGE",但对于 如下广播 例外;
// 开机广播
Intent.ACTION_LOCKED_BOOT_COMPLETED
Intent.ACTION_BOOT_COMPLETED

// 用户增删
Intent.ACTION_USER_INITIALIZE

// 时区广播
Intent.ACTION_TIMEZONE_CHANGED

// 语言区域
Intent.ACTION_LOCALE_CHANGED

// USB
UsbManager.ACTION_USB_ACCESSORY_ATTACHED
UsbManager.ACTION_USB_ACCESSORY_DETACHED
UsbManager.ACTION_USB_DEVICE_ATTACHED
UsbManager.ACTION_USB_DEVICE_DETACHED

// 蓝牙
BluetoothHeadset.ACTION_CONNECTION_STATE_CHANGED
BluetoothA2dp.ACTION_CONNECTION_STATE_CHANGED
BluetoothDevice.ACTION_ACL_CONNECTED
BluetoothDevice.ACTION_ACL_DISCONNECTED

// 电话
CarrierConfigManager.ACTION_CARRIER_CONFIG_CHANGED
TelephonyIntents.ACTION_*_SUBSCRIPTION_CHANGED
TelephonyIntents.SECRET_CODE_ACTION
TelephonyManager.ACTION_PHONE_STATE_CHANGED
TelecomManager.ACTION_PHONE_ACCOUNT_REGISTERED
TelecomManager.ACTION_PHONE_ACCOUNT_UNREGISTERED

// 登录账号
AccountManager.LOGIN_ACCOUNTS_CHANGED_ACTION

// 数据清除
Intent.ACTION_PACKAGE_DATA_CLEARED
适配方式则是把不能使用的隐式广播动态注册;注意:要在同一个上下文环境下【注册和销毁】;
TestReceiver testReceiver;

public void initTestReceiver() {
    testReceiver = new TestReceiver();
    IntentFilter intentFilter = new IntentFilter();
    intentFilter.addAction("android.intent.action.NEW_OUTGOING_CALL");
    intentFilter.addAction("android.net.conn.CONNECTIVITY_CHANGE");
    context.registerReceiver(testReceiver, intentFilter);
}

public void destroyTestReceiver() {
    if (testReceiver != null) {
        context.unregisterReceiver(testReceiver);
    }
}
后台服务限制
Android 8.0 对于服务的限制也增强了,不能直接用 startService 启动后台服务;
方案一:
由后台服务转为前台服务,根据版本判断,使用 startForegroundService(),但是应用必须在创建服务后的五秒内调用该服务的 startForeground();若不调用,日志会提示没有调用 startForeground,甚至会出现 ANR 应用崩溃;
// 启动 Service
if (Build.VERSION.SDK_INT >= Build.VERSION_CODES.O) {
    startForegroundService(new Intent(MainActivity.this, TestService.class));
} else {
    startService(new Intent(MainActivity.this, TestService.class));
}

public class TestService extends Service {
    @Override
    public IBinder onBind(Intent intent) {
        return null;
    }

    @Override
    public void onCreate() {
        initNotification();
        super.onCreate();
    }

    @Override
    public int onStartCommand(Intent intent, int flags, int startId) {
        initNotification();
        return super.onStartCommand(intent, flags, startId);
    }

    private void initNotification() {
        if (Build.VERSION.SDK_INT >= Build.VERSION_CODES.O) {
            NotificationManager notificationManager =
                (NotificationManager) getSystemService(android.content.Context.NOTIFICATION_SERVICE);
            NotificationChannel channel =
                new NotificationChannel("push", "push_name", NotificationManager.IMPORTANCE_HIGH);
            notificationManager.createNotificationChannel(channel);
            Notification notification =
                new NotificationCompat.Builder(this, "push").setContentTitle("ACE_DEMO").setContentText("前台服务").build();
            startForeground(1, notification);
        }
    }
}
服务转为前台需要手动开启一个 Notification,对于部分 Android O 设备,若没有创建 Channel 或 Notification 内容不填充默认在切到后台时,系统会提示通知 XX在后台消耗电量;若 Notification 正常同样会提示后台进行,只是内容为填充内容;小菜尝试了很多方式均不能正常取消通知,所以官网推荐了方案二来启动后台服务;
![]()
方案二:
官方提供了另一种解决方案 JobScheduler 可以用计划作业替代后台服务,即使用 JobService 替代 Service;JobService 是从 Android 5.0 之后引入的,小菜为了适配兼容性,低版本依旧采用普通的 Service 高版本采用 JobService;
JobService 中通过 onStartJob 处理业务逻辑,通过 onStopJob 结束作业;调用是借助 JobInfo.Builder 构造器来启动;
@RequiresApi(api = Build.VERSION_CODES.LOLLIPOP)
public class TestJobService extends JobService {
    @Override
    public boolean onStartJob(JobParameters params) {
        // do something
        return false;
    }

    @Override
    public boolean onStopJob(JobParameters params) {
        return false;
    }
}

public static void startTestService(Context context) {
    if (Build.VERSION.SDK_INT >= Build.VERSION_CODES.O) {
        JobScheduler scheduler = context.getSystemService(JobScheduler.class);
        JobInfo.Builder builder = new JobInfo.Builder(Constants.JOB_ALARM_SERVICE_ID, new ComponentName(context, TestJobService.class));
        builder.setOverrideDeadline(5000);
        scheduler.schedule(builder.build());
    } else {
        context.startService(new Intent(context, TestJobService.class));
    }
}
方案三:
为了简便的使用 JobService 和 Service,小菜尝试了三方的 android-job,无需区分版本,最低支持到 API 14,基本满足日常版本;
Job 中通过 onRunJob 处理业务逻辑,通过 JobRequest.Builder 构造器来调用;且 Job 提供了包括立即启动/延迟启动/循环启动等多种方式,详细方法请参照官网;
public class TestJobCreator implements JobCreator {
    @Override
    @Nullable
    public Job create(@NonNull String tag) {
        switch (tag) {
            case TestSyncJob.TAG:
                return new TestSyncJob();
            default:
                return null;
        }
    }
}

public class TestSyncJob extends Job {
    public static final String TAG = "job_test_tag";

    @Override
    @NonNull
    protected Result onRunJob(Params params) {
        // run your job here
        return Result.SUCCESS;
    }

    public static void scheduleJob() {
        new JobRequest.Builder(TestSyncJob.TAG)
                .setExecutionWindow(30_000L, 40_000L)
                .build()
                .schedule();
    }
}

JobManager.create(this).addJobCreator(new TestJobCreator());
Android 8.0 的适配还包括 蓝牙/后台定位 等限制,小菜在实际中并未应用,详细内容请查阅官方文档;小菜仅记录一下实际适配中遇到的问题难点;若有错误请多多指导!
来源:阿策小和尚