首页 文章 精选 留言 我的

精选列表

搜索[学习],共10000篇文章
优秀的个人博客,低调大师

ceph之openstack存储解决方案学习路线

ceph分布式存储搭建经历 http://strongit.blog.51cto.com/10020534/1739488 Ceph作为OpenStack后端存储 http://linuxnote.blog.51cto.com/9876511/1789924 eph常用命令 http://linuxnote.blog.51cto.com/9876511/1788361 Ceph使用块设备完整操作流程 http://linuxnote.blog.51cto.com/9876511/1788682 本文转自heavenseahill 51CTO博客,原文链接:http://blog.51cto.com/shower/1973642,如需转载请自行联系原作者

优秀的个人博客,低调大师

CentOS 6.5 LVM磁盘管理学习笔记

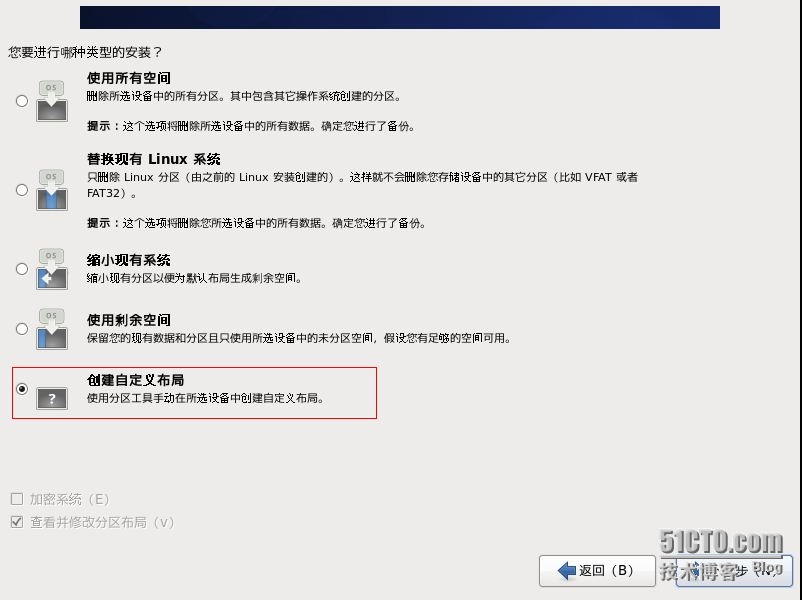
在系统运维和服务器管理过程中,经常遇到服务器磁盘容量不足,需要在线扩容的情况。普通磁盘分区的管理方式在逻辑分区划好之后就无法改变其大小。而LVM可以实现Linux服务器下面磁盘空间的在线扩容和动态管理,相对于普通的磁盘分区有很大的灵活性。 一、LVM简介 LVM是Logical VolumeManager(逻辑卷管理)的简写,它是Linux环境下对磁盘分区进行管理的一种机制,它由Heinz Mauelshagen在Linux 2.4内核上实现。LVM将一个或多个硬盘的分区在逻辑上进行组合,做为一个大的硬盘空间来使用,当硬盘的剩余空间不够的时候,可以将其它的硬盘加入到分区当中,这样可以实现磁盘空间的动态管理。 二、LVM基本术语 物理卷(physical volume,PV):物理卷就是指硬盘分区,也可以是整个硬盘或已创建的RAID,是LVM的基本存储设备,与普通物理存储介质的区别是该设备包含有LVM相关的管理参数。 卷组(volume group,VG):卷组是由一个或多个物理卷所组成的存储池,在卷组上能创建一个或多个“LVM分区”(逻辑卷)。 逻辑卷(logical volume,LV):LVM的逻辑卷类似于非LVM系统中的硬盘分区,它建立在卷组之上,是一个标准的块设备,在逻辑卷之上可以建立文件系统。 物理块(physical extent,PE):物理卷以大小相等的物理块为存储的基本单位,同时也是LVM寻址的最小单元。 逻辑块(logical extent,LE):逻辑卷以大小相等的逻辑块为存储的基本单位,在同一个卷组中,LE的大小和PE是相等的,并且一一对应。 三、通过LVM分区方式安装Centos 1.选择安装类型,选择最后一个复选框,即创建自定义布局。 2.首先划分/boot分区,/boot分区建议使用物理分区。 3.将剩余空间划分为一个物理卷(PV)。 4.创建一个卷组(VG)。默认卷组名为VolGroup00,修改卷组名为vg51cto_lv。 5.在VG上面创建逻辑卷(LV)。逻辑卷默认为LogVol00,LogVol01……末两位由00开始依次递增。 6.LVM分区完成。 7.df -h查看磁盘空间。 1 2 3 4 5 6 7 8 [root@hadoop01~] #df-h FilesystemSizeUsedAvailUse%Mountedon /dev/mapper/vg51cto_lv-LogVol01 9.9G1.2G8.2G13%/ tmpfs495M0495M0% /dev/shm /dev/sda1 194M29M155M16% /boot /dev/mapper/vg51cto_lv-LogVol03 20G172M19G1% /data /dev/mapper/vg51cto_lv-LogVol02 5.0G138M4.6G3% /home /dev/mapper/vg51cto_lv-LogVol04 23G173M22G1% /usr/local 四、LVM管理 第一部分:卷组(volume group,VG)相关的操作。 1.查看卷组(VG)名,卷组名为vg51cto_lv。 1 2 3 [root@hadoop01~] #vgscan Readingallphysicalvolumes.Thismaytakeawhile... Foundvolumegroup "vg51cto_lv" usingmetadata type lvm2 2.查看卷组(VG)包含的PV、LV信息。 1 2 3 4 5 6 7 8 9 10 11 12 13 14 15 16 17 18 19 20 21 22 23 24 25 26 27 28 29 30 31 32 33 34 35 36 37 38 39 40 41 42 43 44 45 46 47 48 49 50 51 52 53 54 55 56 57 58 59 60 61 62 63 64 65 66 67 68 69 70 71 72 73 74 75 76 77 78 79 80 81 82 83 84 85 86 87 88 89 90 91 92 93 94 95 96 97 98 99 100 101 102 103 104 105 106 107 108 109 110 111 112 113 114 [root@hadoop01~] #vgdisplay-vvg51cto_lv Usingvolumegroup(s)on command line Findingvolumegroup "vg51cto_lv" ---Volumegroup--- VGNamevg51cto_lv SystemID Formatlvm2 MetadataAreas1 MetadataSequenceNo6 VGAccess read /write VGStatusresizable MAXLV0 CurLV5 OpenLV5 MaxPV0 CurPV1 ActPV1 VGSize59.80GiB PESize4.00MiB TotalPE15309 AllocPE /Size 15309/59.80GiB FreePE/Size0/0 VGUUIDuF4S1y-21AZ-KOfs-rNIF-lFmN-wQ75-2sX7F1 ---Logicalvolume--- LVPath /dev/vg51cto_lv/LogVol04 LVNameLogVol04 VGNamevg51cto_lv LVUUIDrvOZeO-Oz2G-wx7Z-u0b6-CvXj-FKEj-RwCLXO LVWriteAccess read /write LVCreationhost, time hadoop01,2015-11-0517:30:51+0800 LVStatusavailable #open1 LVSize22.80GiB CurrentLE5837 Segments1 Allocationinherit Readaheadsectorsauto -currentlysetto256 Blockdevice253:2 ---Logicalvolume--- LVPath /dev/vg51cto_lv/LogVol01 LVNameLogVol01 VGNamevg51cto_lv LVUUIDd6YKrd-fWMJ-x61I-cfWG-v2me-Hn8V-xdm96L LVWriteAccess read /write LVCreationhost, time hadoop01,2015-11-0517:30:56+0800 LVStatusavailable #open1 LVSize10.00GiB CurrentLE2560 Segments1 Allocationinherit Readaheadsectorsauto -currentlysetto256 Blockdevice253:0 ---Logicalvolume--- LVPath /dev/vg51cto_lv/LogVol00 LVNameLogVol00 VGNamevg51cto_lv LVUUIDhSyH2r-mvMV-th7q-geKg-sVpm-O1zJ-D6DwT8 LVWriteAccess read /write LVCreationhost, time hadoop01,2015-11-0517:30:58+0800 LVStatusavailable #open1 LVSize2.00GiB CurrentLE512 Segments1 Allocationinherit Readaheadsectorsauto -currentlysetto256 Blockdevice253:1 ---Logicalvolume--- LVPath /dev/vg51cto_lv/LogVol03 LVNameLogVol03 VGNamevg51cto_lv LVUUIDgKHLfz-O5Lm-TGMq-2LcF-xcH1-ASea-QCVVNc LVWriteAccess read /write LVCreationhost, time hadoop01,2015-11-0517:30:58+0800 LVStatusavailable #open1 LVSize20.00GiB CurrentLE5120 Segments1 Allocationinherit Readaheadsectorsauto -currentlysetto256 Blockdevice253:3 ---Logicalvolume--- LVPath /dev/vg51cto_lv/LogVol02 LVNameLogVol02 VGNamevg51cto_lv LVUUIDlkqKmO-Dt0u-3CnB-UqeD-d6gc-2rmP-gWtKVp LVWriteAccess read /write LVCreationhost, time hadoop01,2015-11-0517:31:00+0800 LVStatusavailable #open1 LVSize5.00GiB CurrentLE1280 Segments1 Allocationinherit Readaheadsectorsauto -currentlysetto256 Blockdevice253:4 ---Physicalvolumes--- PVName /dev/sda2 PVUUIDpKC6SA-fkfe-OAl2-scVr-tq0h-EAXD-AWpwgX PVStatusallocatable TotalPE /Free PE15309/0 3.修改卷组名,由vg51cto_lv修改成vg51cto。 1)修改卷组名的命令为vgrename,语法如下: vgrename OldVolumeGroupNameNew VolumeGroupName 1 2 [root@hadoop01~] #vgrenamevg51cto_lvvg51cto Volumegroup "vg51cto_lv" successfullyrenamedto "vg51cto" 2)修改/etc/fstab配置文件,把vg51cto_lv修改成vg51cto。 1 2 3 4 5 6 7 8 9 10 11 12 13 14 15 16 17 18 [root@hadoop01~] #vim/etc/fstab # #/etc/fstab #CreatedbyanacondaonThuNov517:33:462015 # #Accessiblefilesystems,byreference,aremaintainedunder'/dev/disk' #Seemanpagesfstab(5),findfs(8),mount(8)and/orblkid(8)formoreinfo # /dev/mapper/vg51cto-LogVol01 /ext4defaults11 UUID=9c02e519-3b85-4918-b9fd-395535cab496 /boot ext4defaults12 /dev/mapper/vg51cto-LogVol03 /data ext4defaults12 /dev/mapper/vg51cto-LogVol02 /home ext4defaults12 /dev/mapper/vg51cto-LogVol04 /usr/local ext4defaults12 /dev/mapper/vg51cto-LogVol00 swapswapdefaults00 tmpfs /dev/shm tmpfsdefaults00 devpts /dev/pts devptsgid=5,mode=62000 sysfs /sys sysfsdefaults00 proc /proc procdefaults00 3)修改grub.conf配置文件,把vg51cto_lv修改成vg51cto。 1 2 3 4 5 6 7 8 9 10 11 12 13 14 15 16 17 18 [root@hadoop01~] #vim/etc/grub.conf #grub.confgeneratedbyanaconda # #Notethatyoudonothavetorerungrubaftermakingchangestothisfile #NOTICE:Youhavea/bootpartition.Thismeansthat #allkernelandinitrdpathsarerelativeto/boot/,eg. #root(hd0,0) #kernel/vmlinuz-versionroroot=/dev/mapper/vg51cto_lv-LogVol01 #initrd/initrd-[generic-]version.img #boot=/dev/sda default=0 timeout=5 splashimage=(hd0,0) /grub/splash .xpm.gz hiddenmenu titleCentOS(2.6.32-431.el6.x86_64) root(hd0,0) kernel /vmlinuz-2 .6.32-431.el6.x86_64roroot= /dev/mapper/vg51cto-LogVol01 rd_NO_LUKSrd_LVM_LV=vg51cto /LogVol01 rd_LVM_LV=vg51cto /LogVol00 rd_NO_MDcrashkernel=autoLANG=zh_CN.UTF-8KEYBOARDTYPE=pcKEYTABLE=usrd_NO_DMrhgbquiet initrd /initramfs-2 .6.32-431.el6.x86_64.img 4)reboot重启后用df -h查看。 1 2 3 4 5 6 7 8 [root@hadoop01~] #df-h FilesystemSizeUsedAvailUse%Mountedon /dev/mapper/vg51cto-LogVol01 9.9G1.2G8.2G13%/ tmpfs495M0495M0% /dev/shm /dev/sda1 194M29M155M16% /boot /dev/mapper/vg51cto-LogVol03 20G172M19G1% /data /dev/mapper/vg51cto-LogVol02 5.0G138M4.6G3% /home /dev/mapper/vg51cto-LogVol04 23G173M22G1% /usr/local 第二部分:逻辑卷(logical volume,LV)相关的操作。 1.查看逻辑卷(LV)名。 使用LVM安装系统时,默认的卷组名为VolGroup00,卷组内的逻辑卷为LogVol00,LogVol01……末两位由00开始依次递增。 1 2 3 4 5 6 [root@hadoop01~] #lvscan ACTIVE '/dev/vg51cto/LogVol04' [22.80GiB]inherit ACTIVE '/dev/vg51cto/LogVol01' [10.00GiB]inherit ACTIVE '/dev/vg51cto/LogVol00' [2.00GiB]inherit ACTIVE '/dev/vg51cto/LogVol03' [20.00GiB]inherit ACTIVE '/dev/vg51cto/LogVol02' [5.00GiB]inherit 2.查看逻辑卷详细信息 lvdisplay命令查看所有逻辑卷的详细信息 lvdisplay 逻辑卷名称 1 2 3 4 5 6 7 8 9 10 11 12 13 14 15 16 17 [root@hadoop01~] #lvdisplay/dev/vg51cto/LogVol00 ---Logicalvolume--- LVPath /dev/vg51cto/LogVol00 LVNameLogVol00 VGNamevg51cto LVUUIDhSyH2r-mvMV-th7q-geKg-sVpm-O1zJ-D6DwT8 LVWriteAccess read /write LVCreationhost, time hadoop01,2015-11-0517:30:58+0800 LVStatusavailable #open1 LVSize2.00GiB CurrentLE512 Segments1 Allocationinherit Readaheadsectorsauto -currentlysetto256 Blockdevice253:1 3.修改逻辑卷名 1)修改逻辑卷命令为lvrename,语法如下: 1 2 3 4 5 6 7 8 9 10 11 lvrenameOldLogicalVolumePathNewLogicalVolumePath [root@hadoop01~] #lvrename/dev/vg51cto/LogVol00/dev/vg51cto/lv_swap Renamed "LogVol00" to "lv_swap" in volumegroup "vg51cto" [root@hadoop01~] #lvrename/dev/vg51cto/LogVol01/dev/vg51cto/lv_root Renamed "LogVol01" to "lv_root" in volumegroup "vg51cto" [root@hadoop01~] #lvrename/dev/vg51cto/LogVol02/dev/vg51cto/lv_home Renamed "LogVol02" to "lv_home" in volumegroup "vg51cto" [root@hadoop01~] #lvrename/dev/vg51cto/LogVol03/dev/vg51cto/lv_data Renamed "LogVol03" to "lv_data" in volumegroup "vg51cto" [root@hadoop01~] #lvrename/dev/vg51cto/LogVol04/dev/vg51cto/lv_usr Renamed "LogVol04" to "lv_usr" in volumegroup "vg51cto" 2)修改/etc/fstab配置文件。 1 2 3 4 5 6 7 8 9 10 11 12 13 14 15 16 17 18 [root@hadoop01~] #vim/etc/fstab # #/etc/fstab #CreatedbyanacondaonThuNov517:33:462015 # #Accessiblefilesystems,byreference,aremaintainedunder'/dev/disk' #Seemanpagesfstab(5),findfs(8),mount(8)and/orblkid(8)formoreinfo # /dev/mapper/vg51cto-lv_root /ext4defaults11 UUID=9c02e519-3b85-4918-b9fd-395535cab496 /boot ext4defaults12 /dev/mapper/vg51cto-lv_data /data ext4defaults12 /dev/mapper/vg51cto-lv_home /home ext4defaults12 /dev/mapper/vg51cto-lv_usr /usr/local ext4defaults12 /dev/mapper/vg51cto-lv_swap swapswapdefaults00 tmpfs /dev/shm tmpfsdefaults00 devpts /dev/pts devptsgid=5,mode=62000 sysfs /sys sysfsdefaults00 proc /proc procdefaults00 3)修改grub.conf配置文件。 1 2 3 4 5 6 7 8 9 10 11 12 13 14 15 16 17 18 [root@hadoop01~] #vim/etc/grub.conf #grub.confgeneratedbyanaconda # #Notethatyoudonothavetorerungrubaftermakingchangestothisfile #NOTICE:Youhavea/bootpartition.Thismeansthat #allkernelandinitrdpathsarerelativeto/boot/,eg. #root(hd0,0) #kernel/vmlinuz-versionroroot=/dev/mapper/vg51cto_lv-LogVol01 #initrd/initrd-[generic-]version.img #boot=/dev/sda default=0 timeout=5 splashimage=(hd0,0) /grub/splash .xpm.gz hiddenmenu titleCentOS(2.6.32-431.el6.x86_64) root(hd0,0) kernel /vmlinuz-2 .6.32-431.el6.x86_64roroot= /dev/mapper/vg51cto-lv_root rd_NO_LUKSrd_LVM_LV=vg51cto /lv_root rd_LVM_LV=vg51cto /lv_swap rd_NO_MDcrashkernel=autoLANG=zh_CN.UTF-8KEYBOARDTYPE=pcKEYTABLE=usrd_NO_DMrhgbquiet initrd /initramfs-2 .6.32-431.el6.x86_64.img 第三部分:物理卷(physical volume,PV)相关操作。 1.查看物理卷(PV)名,这里为/dev/sda2,linux中SCSI的第1块硬盘为/dev/sda,第2块硬盘为/dev/sdb,依此类推。 1 2 3 [root@hadoop01~] #pvscan PV /dev/sda2 VGvg51ctolvm2[59.80GiB/0 free ] Total:1[59.80GiB]/ in use:1[59.80GiB]/ in noVG:0[0] 2.查看物理卷详细信息。 1 2 3 4 5 6 7 8 9 10 11 [root@hadoop01~] #pvdisplay ---Physicalvolume--- PVName /dev/sda2 VGNamevg51cto PVSize59.80GiB/notusable3.00MiB Allocatable yes (butfull) PESize4.00MiB TotalPE15309 FreePE0 AllocatedPE15309 PVUUIDpKC6SA-fkfe-OAl2-scVr-tq0h-EAXD-AWpwgX 四、LVM空间管理 1.LVM减少LV空间 举例:减少/data空间,从20G减少到10G。 1)卸载设备(Unmount thefilesystem) 1 [root@hadoop01~] #umount/data/ 2)e2fsck命令检查文件系统(Checkthe filesystem) 1 2 3 4 5 6 7 8 [root@hadoop01~] #e2fsck-f/dev/mapper/vg51cto-lv_data e2fsck1.41.12(17-May-2010) 第一步:检查inode,块,和大小 第二步:检查目录结构 第3步:检查目录连接性 Pass4:Checkingreferencecounts 第5步:检查簇概要信息 /dev/mapper/vg51cto-lv_data :11 /1310720files (0.0%non-contiguous),126289 /5242880 blocks 3)resize2fs命令调整lv大小,10G表示调整后/data剩余空间。 1 2 3 4 [root@hadoop01~] #resize2fs/dev/mapper/vg51cto-lv_data10G resize2fs1.41.12(17-May-2010) Resizingthefilesystemon /dev/mapper/vg51cto-lv_data to2621440(4k)blocks. Thefilesystemon /dev/mapper/vg51cto-lv_data isnow2621440blockslong. 4)lvreduce命令减少文件系统大小(Resizethe filesystem),表示将/data的空间减少9G。 1 2 3 4 5 6 [root@hadoop01~] #lvreduce-L-9G/dev/mapper/vg51cto-lv_data WARNING:Reducingactivelogicalvolumeto11.00GiB THISMAYDESTROYYOURDATA(filesystemetc.) Doyoureallywanttoreducelv_data?[y /n ]:y Reducinglogicalvolumelv_datato11.00GiB Logicalvolumelv_datasuccessfullyresized 5)vgs命令查看卷组剩余空间为9G。 6)mount文件系统并查看磁盘空间剩余空间。 2.LVM增加LV空间 举例:将刚才9G空间增加到/home分区。 1)vgs命令查看是否有空闲空间可以扩容。 1 2 3 [root@hadoop01~] #vgs VG #PV#LV#SNAttrVSizeVFree vg51cto150wz--n-59.80g9.00g 2)df -h查看当前磁盘空间 3)lvextend命令将home分区空间增加9G。 1 2 3 4 5 6 7 8 [root@hadoop01~] #lvextend-L+9G-f-r/dev/mapper/vg51cto-lv_home Extendinglogicalvolumelv_hometo14.00GiB Logicalvolumelv_homesuccessfullyresized resize2fs1.41.12(17-May-2010) Filesystemat /dev/mapper/vg51cto-lv_homeis mountedon /home ;on-lineresizingrequired olddesc_blocks=1,new_desc_blocks=1 Performinganon-lineresizeof /dev/mapper/vg51cto-lv_home to3670016(4k)blocks. Thefilesystemon /dev/mapper/vg51cto-lv_home isnow3670016blockslong. 4)查看分区是否增加成功。 五、LVM在线扩容 服务器磁盘空间不足,添加新的硬盘后,需要把空间添加当前分区当中。 linux中SCSI的第1个硬盘/dev/sda,第2个硬盘/dev/sdb依此类推。其中服务器第一块硬盘/dev/sda已经划分为LVM分区。/dev/sdb是新加的硬盘。 1)用pvcreate /dev/sdb命令初始化分区sdb为物理卷(PV)。 1 2 [root@hadoop01~] #pvcreate/dev/sdb Physicalvolume "/dev/sdb" successfullycreated 2)pvdisplay命令显示物理卷的信息 1 2 3 4 5 6 7 8 9 10 11 12 13 14 15 16 17 18 19 20 21 22 23 [root@hadoop01~] #pvdisplay ---Physicalvolume--- PVName /dev/sda2 VGNamevg51cto PVSize59.80GiB/notusable3.00MiB Allocatable yes (butfull) PESize4.00MiB TotalPE15309 FreePE0 AllocatedPE15309 PVUUIDpKC6SA-fkfe-OAl2-scVr-tq0h-EAXD-AWpwgX "/dev/sdb" isanewphysicalvolumeof "40.00GiB" ---NEWPhysicalvolume--- PVName /dev/sdb VGName PVSize40.00GiB AllocatableNO PESize0 TotalPE0 FreePE0 AllocatedPE0 PVUUIDdMeOLS-Sks3-8k3q-pVWp-Iuz2-0Hh2-8njjhY 3)vgextend命令将pv加入到vg,vgcreate命令为新创建vg(vgcreate vg51cto /dev/sdb),这里的vg51cto已经存在,只需要用vgextend加入即可。 1 2 [root@hadoop01~] #vgextendvg51cto/dev/sdb Volumegroup "vg51cto" successfullyextended 4)用vgdisplay命令查看vg信息,看到已经有40G空闲PE。 5)lvextend命令扩展分区,将40G空间全部添加到/data分区。 直接增加40G空间不足,报下面的错误,因此添加39.9G的空间。 Insufficient free space:10240 extents needed, but only 10239 available 1 2 3 4 [root@hadoop01~] #lvextend-L+39.99G/dev/mapper/vg51cto-lv_data Roundingsizetoboundarybetweenphysicalextents:39.99GiB Extendinglogicalvolumelv_datato50.99GiB Logicalvolumelv_datasuccessfullyresized 6)上一步操作只是增加了逻辑卷的大小,用resize2fs命令重新定义文件系统的大小。 1 2 3 4 5 6 [root@hadoop01~] #resize2fs/dev/mapper/vg51cto-lv_data resize2fs1.41.12(17-May-2010) Filesystemat /dev/mapper/vg51cto-lv_datais mountedon /data ;on-lineresizingrequired olddesc_blocks=1,new_desc_blocks=4 Performinganon-lineresizeof /dev/mapper/vg51cto-lv_data to13367296(4k)blocks. Thefilesystemon /dev/mapper/vg51cto-lv_data isnow13367296blockslong. 7)查看磁盘在线扩容是否正常。 总结: 1)/分区不能umount,说明/分区只能扩容,不能减少/分区的空间。 2)减少分区的时候需要卸载分区,进行umount操作。 3)扩容的分区的时候不需要卸载分区。 4)重命名vg,lv命名后,需要修改/etc/fstab和/etc/grub.conf引导文件。 本文转自 sfzhang 51CTO博客,原文链接:http://blog.51cto.com/sfzhang88/1710059,如需转载请自行联系原作者

优秀的个人博客,低调大师

Text-to-speech 入门与进阶学习笔记(android)

1,入门:让TEXT朗读起来 //1,先写一个用来检查tts是否安装的方法privatefinalstaticintCHECK_CODE=1; publicvoidcheckTts(){ IntentcheckIntent=newIntent();checkIntent.setAction(TextToSpeech.Engine.ACTION_CHECK_TTS_DATA); startActivityForResult(checkIntent,CHECK_CODE);} //创建一个TTS privateTextToSpeechmTts; //这个自己先去了解下onActivityResult是怎么回事,这里不作详解 @OverrideprotectedvoidonActivityResult(intrequestCode,intresultCode,Intentdata){ //TODOAuto-generatedmethodstubsuper.onActivityResult(requestCode,resultCode,data); if(requestCode==CHECK_CODE){ if(resultCode==TextToSpeech.Engine.CHECK_VOICE_DATA_PASS){ //成功创建一个TTS mTts=newTextToSpeech(this,this); }else{ //否则安装一个 IntentinstallIntent=newIntent();installIntent.setAction(TextToSpeech.Engine.ACTION_INSTALL_TTS_DATA);startActivity (installIntent);}}} //2,让TTS朗读起来 //onCreate方法中 //检查TTS是否正常checkTts(); //创建用组件privatespeakValue=(EditText) findViewById(R.id.speakValue); privatespeakButton=(Button) findViewById(R.id.sayHello); speakButton.setOnClickListener(newOnClickListener(){ @Override publicvoidonClick(Viewv){ //TODOAuto-generatedmethodstub Stringtext=speakValue.getText().toString(); Log.d("result","text--&gt;"+text);sayTts(text);}}); //TTs朗读用privatevoidsayTts(Stringtext){ //最简单的例子mTts.speak(text,TextToSpeech.QUEUE_FLUSH,null); } //补充,使用TTS朗读,一定要实现OnInitListener 接口 //TTs对象创建后初始化 @OverridepublicvoidonInit(intstatus){ if(status==TextToSpeech.SUCCESS){ //设置语言区域intresult=mTts.setLanguage(Locale.US); //如果是不支持语言 if(result==TextToSpeech.LANG_MISSING_DATA||result==TextToSpeech.LANG_NOT_SUPPORTED){ Log.e("error","不支持");}}} 就这么点代码就可以正常运行了… 2,进阶使用:改变我们朗读播放的类型,回调函数的使用与自定义文字发音 1,更改播放的流类型(暂且这样说,希望,有人解释一下) //更改播放使用的流类型 //在sayTts作以下修改 //TTs朗读用privatevoidsayTts(Stringtext){HashMap<String,String>myAlarm=newHashMap(); //把播放类型,通过闹钟流实现myHashAlarm.put(TextToSpeech.Engine.KEY_PARAM_STREAM,String.valueOf(AudioManager.STREAM_ALARM)); //你播放的tts在音频播放的闹钟类型流中mTts.speak(text,TextToSpeech.QUEUE_FLUSH,myAlarm); //英语原文是这样,我了解的就是以上我注释的内容 //我感觉不是很了解,希望有人帮帮 //OnAndroid,eachaudiostreamthatisplayedisassociatedwithone //streamtype,asdefinedinandroid.media.AudioManager.Foratalking //alarmclock,wewouldlikeourtexttobeplayedonthe //AudioManager.STREAM_ALARMstreamtypesothatitrespectsthealarm //settingstheuserhaschosenonthedevice. } 2,回调函数的使用 //在sayTts()中实现.. //需要实现OnUtteranceCompletedListener这个接口 //TTs朗读用 privateToasttoast;prvateContextcontext=getApplicationContext(); privatevoidsayTts(Stringtext){HashMap<String,String>myAlarm=newHashMap();mTts.setOnUtteranceCompletedListener(this); myAlarm.put(TextToSpeech.Engine.KEY_PARAM_UTTERANCE_ID,"metoo"); toast=Toast.makeText(context,"metoo",Toast.LENGTH_LONG); //最简单的例子mTts.speak(text,TextToSpeech.QUEUE_FLUSH,myAlarm);} //回调函数@OverridepublicvoidonUtteranceCompleted(StringutteranceId){speakPlayBack(utteranceId);} privatevoidspeakPlayBack(Stringstr){Log.d("result","playBack-->"+str);toast.show();} 3,录制TTS朗读保存到SD卡中 //把TTS朗读结果保存 privatevoidsayTofile(Stringtext){ HashMap<String,String>ttsRender=newHashMap<String,String>(); StringdestFileName="/sdcard/tts/"+text+".wav";ttsRender.put(TextToSpeech.Engine.KEY_PARAM_UTTERANCE_ID,text);mTts.synthesizeToFile(text,ttsRender,destFileName); } //在 你就可以看到你刚才朗读的Text被保存了 4,自定义Text发音 //自定义文字播放 privatevoidsayTrue(Stringtext){ StringdestFileName="/sdcard/tts/"+text+".wav";mTts.addSpeech(text,destFileName); mTts.speak(text,TextToSpeech.QUEUE_FLUSH,null);} //在onclick方法中运行sayTrue(); 亲测,MP3也可以播放… 5,销毁 @OverrideprotectedvoidonDestroy(){super.onDestroy(); if(mTts!=null){ mTts.stop(); mTts.shutdown();}}

优秀的个人博客,低调大师

Android开发学习笔记:数据存取之Preference浅析

一.Preference的简介 Preference(配置)提供了一种轻量级的数据存取方法,主要应用于数据比较少的配置信息。它以“key-value”(是一个Map)对的方式将数据保存在一个XML配置文件中,例如,手机的开机问候语,可以将其以Preference方式来进行配置。也可以保存一些用户个性化设置的字体、颜色、位置等参数信息。 二.Preference存取数据的方法 使用到的接口: SharedPreferences接口和SharedPreferences.Editor接口,它们都是来自于andorid.content包。 ①SharedPreferences接口提供保存数据的方法 我们可以调用Context.getSharedPreferences(String name,int mode)方法得到SharedPreferences接口。该方法的第一个参数是文件名称,第二个参数是操作模式。操作模式有三种: MODE_PRIVATE(私有) MODE_WORLD_READABLE(可读) MODE_WORLD_WRITEABLE(可写) SharedPreferences接口的常用方法 方法名称 方法描述 edit() 返回SharedPreferences的内部接口SharedPreferences.Editor contains(String key) 判断是否包含该键值 getAll() 返回所有配置信息Map getBoolean(String key,Boolean defValue) 获得一个boolean值 getFloat(String key,float defValue) 获得一个float值 getInt(String key,int defValue) 获得一个int值 getLong(String key,long defValue) 获得一个long值 getString(String key,String defValue) 获得一个String值 ②SharedPreferences.Editor接口提供获得数据的方法 SharedPreferences.Editor接口中的getString(String key,String defValue)、getInt(String key,int defValue)等。调用SharedPreferences的edit()方法返回SharedPreferences.Editor内部接口,该接口中提供了保存数据的方法,如putString(String key,String value)、pubInt(String key,int value)等,调用该接口的commit方法可以将数据进行保存。 SharedPreferences.Editor接口常用的方法 方法名称 方法描述 clear() 清楚所有值 commit() 保存 getAll() 返回所有配置信息Map putBoolean(String key,Boolean value) 保存一个boolean值 putFloat(String key,float value) 保存一个float值 putInt(String key,int value) 保存一个int值 putLong(String key,long value) 保存一个long值 putString(String key,String value) 保存一个String值 remove(String key) 删除该键对应的键 下面是保存临时记事本内容的例子 当我们在手机上用记事本编写备忘录,日志的时候,突然要返回接电话,看短信的时候。我们就要停止编写,退出去听接电话,看短信。然而,当我们打完电话或者看完短信回来的时候,发现刚刚编写的内容还在记事本上,这就是Preference的作用了。 创建一个Activity,在其中放置一个EditText保存短信内容,放置一个Button用于发送信息。在onCreate()中通过getSharedPreferences()方法获得SharedPreferences接口,调用接口的getString()方法,获得保存内容,将内容设置到EditText中。 在onStop()方法中保存内容,使用getSharedPreferences().edit()方法获得SharedPreferences.Editor接口,调用SharedPreferences.Editor的putString()方法保存短信内容,调用commit()方法提交内容。 MainActivity.java packagecom.android.preference; importandroid.app.Activity; importandroid.content.SharedPreferences; importandroid.os.Bundle; importandroid.widget.Button; importandroid.widget.EditText; publicclassMainActivityextendsActivity{ privateEditTextmyEditText; privateButtonbtn; privatestaticfinalStringTEMP_INFO="temp_info"; @Override publicvoidonCreate(BundlesavedInstanceState){ super.onCreate(savedInstanceState); setContentView(R.layout.main); myEditText=(EditText)findViewById(R.id.EditText1); btn=(Button)findViewById(R.id.Button1); //获得SharedPreferences实例 SharedPreferencessp=getSharedPreferences(TEMP_INFO,MODE_WORLD_READABLE); //从SharedPreferences获得备忘录的内容 Stringcontent=sp.getString("info_content",""); //在EditText中显示备忘录内容 myEditText.setText(content); } @Override protectedvoidonStop(){ super.onStop(); //获得编辑器 SharedPreferences.Editoreditor=getSharedPreferences(TEMP_INFO,MODE_WORLD_WRITEABLE).edit(); //将EditText中的文本内容添加到编辑器 editor.putString("info_content",myEditText.getText().toString()); //提交编辑器内容 editor.commit(); } } main.xml <?xml version="1.0" encoding="utf-8"?> <LinearLayout xmlns:android="http://schemas.android.com/apk/res/android" android:orientation="vertical" android:layout_width="fill_parent" android:layout_height="fill_parent" > <TextView android:layout_width="fill_parent" android:layout_height="wrap_content" android:text="备忘录" /> <EditText android:text="" android:id="@+id/EditText1" android:layout_width="fill_parent" android:layout_height="wrap_content" /> <Button android:id="@+id/Button1" android:layout_width="wrap_content" android:layout_height="wrap_content" android:text="保存" /> </LinearLayout> 效果图: 当我们退出屏幕再返回的时候,发现原来备忘录里编辑了一半的内容还在那里,其实它是把要保存的内容做诶XML文件保存在/data/data/package/shsared_prefs/下面了。 本文转自 lingdududu 51CTO博客,原文链接:http://blog.51cto.com/liangruijun/658521

优秀的个人博客,低调大师

Android开发学习笔记:5大布局方式详解

Android中常用的5大布局方式有以下几种: 线性布局(LinearLayout):按照垂直或者水平方向布局的组件。 帧布局(FrameLayout):组件从屏幕左上方布局组件。 表格布局(TableLayout):按照行列方式布局组件。 相对布局(RelativeLayout):相对其它组件的布局方式。 绝对布局(AbsoluteLayout):按照绝对坐标来布局组件。 1. 线性布局 线性布局是Android开发中最常见的一种布局方式,它是按照垂直或者水平方向来布局,通过“android:orientation”属性可以设置线性布局的方向。属性值有垂直(vertical)和水平(horizontal)两种。 常用的属性: android:orientation:可以设置布局的方向 android:gravity:用来控制组件的对齐方式 layout_weight:控制各个组件在布局中的相对大小 第一个实例 ①效果图: ②核心代码如下: main.xml <?xmlversion="1.0"encoding="utf-8"?> <LinearLayoutxmlns:android="http://schemas.android.com/apk/res/android" android:orientation="vertical" android:layout_width="fill_parent" android:layout_height="fill_parent" > <LinearLayout android:layout_width="fill_parent" android:layout_height="wrap_content" android:orientation="vertical" > <EditText android:layout_width="fill_parent" android:layout_height="wrap_content" /> </LinearLayout> <LinearLayout android:layout_width="fill_parent" android:layout_height="wrap_content" android:orientation="horizontal" android:gravity="right" > <!--android:gravity="right"表示Button组件向右对齐--> <Button android:layout_height="wrap_content" android:layout_width="wrap_content" android:text="确定" /> <Button android:layout_height="wrap_content" android:layout_width="wrap_content" android:text="取消" /> </LinearLayout> </LinearLayout> 第二个实例 ①效果图: ②核心代码: mian.xml <?xmlversion="1.0"encoding="utf-8"?> <LinearLayoutxmlns:android="http://schemas.android.com/apk/res/android" android:orientation="vertical"android:layout_width="fill_parent" android:layout_height="fill_parent"> <LinearLayout android:orientation="horizontal" android:layout_width="fill_parent" android:layout_height="fill_parent" android:layout_weight="1"> <TextView android:text="red" android:gravity="center_horizontal" android:background="#aa0000" android:layout_width="wrap_content" android:layout_height="fill_parent" android:layout_weight="1" /> <!--android:gravity="center_horizontal"水平居中--> <!--layout_weight属性以控制各个控件在布局中的相对大小。layout_weight属性是一个非负整数值。 线性布局会根据该控件layout_weight值与其所处布局中所有控件layout_weight值之和的比值为该控件分配占用的区域。 例如,在水平布局的LinearLayout中有两个Button,这两个Button的layout_weight属性值都为1, 那么这两个按钮都会被拉伸到整个屏幕宽度的一半。如果layout_weight指为0,控件会按原大小显示,不会被拉伸; 对于其余layout_weight属性值大于0的控件,系统将会减去layout_weight属性值为0的控件的宽度或者高度, 再用剩余的宽度或高度按相应的比例来分配每一个控件显示的宽度或高度--> <TextView android:text="Teal" android:gravity="center_horizontal" android:background="#008080" android:layout_width="wrap_content" android:layout_height="fill_parent" android:layout_weight="1"/> <TextView android:text="blue" android:gravity="center_horizontal" android:background="#0000aa" android:layout_width="wrap_content" android:layout_height="fill_parent" android:layout_weight="1" /> <TextView android:text="orange" android:gravity="center_horizontal" android:background="#FFA500" android:layout_width="wrap_content" android:layout_height="fill_parent" android:layout_weight="1" /> </LinearLayout> <LinearLayout android:orientation="vertical" android:layout_width="fill_parent" android:layout_height="fill_parent" android:layout_weight="1"> <TextView android:text="rowone" android:textSize="15pt" android:background="#aa0000" android:layout_width="fill_parent" android:layout_height="wrap_content" android:layout_weight="1" /> <!----> <TextView android:text="rowtwo" android:textSize="15pt" android:background="#DDA0DD" android:layout_width="fill_parent" android:layout_height="wrap_content" android:layout_weight="1" /> <TextView android:text="rowthree" android:textSize="15pt" android:background="#008080" android:layout_width="fill_parent" android:layout_height="wrap_content" android:layout_weight="1" /> <TextView android:text="rowfour" android:textSize="15pt" android:background="#FFA500" android:layout_width="fill_parent" android:layout_height="wrap_content" android:layout_weight="1" /> </LinearLayout> </LinearLayout> 2. 帧布局 帧布局是从屏幕的左上角( 0,0)坐标开始布局,多个组件层叠排列,第一个添加的组件放到最底层,最后添加到框架中的视图显示在最上面。上一层的会覆盖下一层的控件。 简单的例子 ①效果图: ②核心代码: main.xml <?xmlversion="1.0"encoding="utf-8"?> <FrameLayoutxmlns:android="http://schemas.android.com/apk/res/android" android:layout_width="fill_parent" android:layout_height="fill_parent" > <TextView android:layout_width="300dp" android:layout_height="300dp" android:background="#00BFFF" /> <TextView android:layout_width="260dp" android:layout_height="260dp" android:background="#FFC0CB" /> <TextView android:layout_width="220dp" android:layout_height="220dp" android:background="#0000FF" /> </FrameLayout> 3. 表格布局 表格布局是一个 ViewGroup以表格显示它的子视图(view)元素,即行和列标识一个视图的位置。 表格布局常用的属性如下: android:collapseColumns:隐藏指定的列 android:shrinkColumns:收缩指定的列以适合屏幕,不会挤出屏幕 android:stretchColumns:尽量把指定的列填充空白部分 android:layout_column:控件放在指定的列 android:layout_span:该控件所跨越的列数 简单的列子: ①效果图: ②核心代码: main.xml <?xmlversion="1.0"encoding="utf-8"?> <TableLayoutxmlns:android="http://schemas.android.com/apk/res/android" android:layout_width="fill_parent" android:layout_height="fill_parent" > <TableRow> <Button android:text="Button1" /> <Button android:text="Button2" /> <Button android:text="Button3" /> </TableRow> <TableRow> <Button android:text="Button4" /> <Button android:layout_span="2" android:text="Button5" /> </TableRow> </TableLayout> 4. 相对布局 相对布局是按照组件之间的相对位置来布局,比如在某个组件的左边,右边,上面和下面等。 相对布局常用属性请参考我博客的: http://liangruijun.blog.51cto.com/3061169/631816 简单的例子 ①效果图: ②核心代码: main.xml <?xmlversion="1.0"encoding="utf-8"?> <RelativeLayoutxmlns:android="http://schemas.android.com/apk/res/android" android:layout_width="fill_parent" android:layout_height="wrap_content" android:padding="10px" > <TextView android:id="@+id/tev1" android:layout_width="wrap_content" android:layout_height="wrap_content" android:layout_marginBottom="30dp" android:text="PleaseTypeHere:" /> <EditText android:id="@+id/tx1" android:layout_width="match_parent" android:layout_height="wrap_content" android:layout_below="@id/tev1" /> <Button android:id="@+id/btn1" android:layout_height="wrap_content" android:layout_width="wrap_content" android:layout_below="@id/tx1" android:layout_alignParentRight="true" android:text="确定" /> <Button android:id="@+id/btn2" android:layout_height="wrap_content" android:layout_width="wrap_content" android:layout_below="@id/tx1" android:layout_toLeftOf="@id/btn1" android:layout_marginRight="30dp" android:text="取消" /> </RelativeLayout> 5. 绝对布局 绝对布局通过指定子组件的确切 X,Y坐标来确定组件的位置,在Android2.0 API文档中标明该类已经过期,可以使用FrameLayout或者RelativeLayout来代替。所以这里不再详细介绍。 本文转自 lingdududu 51CTO博客,原文链接:http://blog.51cto.com/liangruijun/632532

优秀的个人博客,低调大师

Android Service学习之AIDL, Parcelable和远程服务

AIDL的作用 由于每个应用程序都运行在自己的进程空间,并且可以从应用程序UI运行另一个服务进程,而且经常会在不同的进程间传递对象。在Android平台,一个进程通常不能访问另一个进程的内存空间,所以要想对话,需要将对象分解成操作系统可以理解的基本单元,并且有序的通过进程边界。 通过代码来实现这个数据传输过程是冗长乏味的,Android提供了AIDL工具来处理这项工作。 AIDL (Android Interface Definition Language) 是一种IDL 语言,用于生成可以在Android设备上两个进程之间进行进程间通信(interprocess communication, IPC)的代码。如果在一个进程中(例如Activity)要调用另一个进程中(例如Service)对象的操作,就可以使用AIDL生成可序列化的参数。 AIDL IPC机制是面向接口的,像COM或Corba一样,但是更加轻量级。它是使用代理类在客户端和实现端传递数据。 选择AIDL的使用场合 官方文档特别提醒我们何时使用AIDL是必要的: 只有你允许客户端从不同的应用程序为了进程间的通信而去访问你的service,以及想在你的service处理多线程。 如果不需要进行不同应用程序间的并发通信(IPC),you should create your interface by implementing a Binder;或者你想进行IPC,但不需要处理多线程的,则implement your interface using a Messenger。无论如何,在使用AIDL前,必须要理解如何绑定service——bindService。 在设计AIDL接口前,要提醒的是,调用AIDL接口是直接的方法调用的,不是我们所想象的调用是发生在线程里。而调用(call)来自local进程或者remote进程,有什么区别呢?尤其是以下情况(引用原文,不作翻译了,以免翻译有误): Calls made from the local process are executed in the same thread that is making the call. If this is your main UI thread, that thread continues to execute in the AIDL interface. If it is another thread, that is the one that executes your code in the service. Thus, if only local threads are accessing the service, you can completely control which threads are executing in it (but if that is the case, then you shouldn't be using AIDL at all, but should instead create the interface byimplementing a Binder). Calls from a remote process are dispatched from a thread pool the platform maintains inside of your own process. You must be prepared for incoming calls from unknown threads, with multiple calls happening at the same time. In other words, an implementation of an AIDL interface must be completely thread-safe. Theonewaykeyword modifies the behavior of remote calls. When used, a remote call does not block; it simply sends the transaction data and immediately returns. The implementation of the interface eventually receives this as a regular call from theBinderthread pool as a normal remote call. Ifonewayis used with a local call, there is no impact and the call is still synchronous. 定义AIDL接口 AIDL接口文件,和普通的接口内容没有什么特别,只是它的扩展名为.aidl。保存在src目录下。 如果其他应用程序需要IPC,则那些应用程序的src也要带有这个文件。Android SDK tools就会在gen目录自动生成一个IBinder接口文件。service必须适当地实现这个IBinder接口。那么客户端程序就能绑定这个service并在IPC时从IBinder调用方法。 每个aidl文件只能定义一个接口,而且只能是接口的声明和方法的声明。 1.创建.aidl文件 AIDL使用简单的语法来声明接口,描述其方法以及方法的参数和返回值。这些参数和返回值可以是任何类型,甚至是其他AIDL生成的接口。 其中对于Java编程语言的基本数据类型 (int, long, char, boolean等),String和CharSequence,集合接口类型List和Map,不需要import 语句。 而如果需要在AIDL中使用其他AIDL接口类型,需要import,即使是在相同包结构下。AIDL允许传递实现Parcelable接口的类,需要import. 需要特别注意的是, 对于非基本数据类型,也不是String和CharSequence类型的,需要有方向指示,包括in、out和inout,in表示由客户端设置,out表示由服务端设置,inout是两者均可设置。 AIDL只支持接口方法,不能公开static变量。 例如 (IMyService.aidl): packagecom.demo; importcom.demo.Person; interfaceIMyService { voidsavePersonInfo(in Person person); List<Person> getAllPerson(); } 2.实现接口 创建一个类实现刚才那个aidl的接口: public classRemoteService extendsService { privateLinkedList<Person> personList = newLinkedList<Person>(); @Override publicIBinder onBind(Intent intent) { returnmBinder; } privatefinalIMyService.Stub mBinder =newIMyService.Stub(){ @Override public voidsavePersonInfo(Person person) throwsRemoteException { if(person != null){ personList.add(person); } } @Override publicList<Person> getAllPerson() throwsRemoteException { returnpersonList; } }; } 这里会看到有一个名为IMyService.Stub类,查看aidl文件生成的Java文件源代码就能发现有这么一段代码: /** Local-side IPC implementation stub class. */ public static abstract classStub extendsandroid.os.Binder implementscom.demo.IMyService 原来Stub类就是继承于Binder类,也就是说RemoteService类和普通的Service类没什么不同,只是所返回的IBinder对象比较特别,是一个实现了AIDL接口的Binder。 接下来就是关于所传递的数据Bean——Person类,是一个序列化的类,这里使用Parcelable 接口来序列化,是Android提供的一个比Serializable 效率更高的序列化类。 Parcelable需要实现三个函数: 1) void writeToParcel(Parcel dest, int flags)将需要序列化存储的数据写入外部提供的Parcel对象dest。而看了网上的代码例子,个人猜测,读取Parcel数据的次序要和这里的write次序一致,否则可能会读错数据。具体情况我没试验过! 2) describeContents()没搞懂有什么用,反正直接返回0也可以 3) static final Parcelable.Creator对象CREATOR这个CREATOR命名是固定的,而它对应的接口有两个方法: createFromParcel(Parcel source) 实现从source创建出JavaBean实例的功能 newArray(int size) 创建一个类型为T,长度为size的数组,仅一句话(return new T[size])即可。估计本方法是供外部类反序列化本类数组使用。 仔细观察Person类的代码和上面所说的内容: public classPerson implementsParcelable { privateString name; privateString telNumber; private intage; publicPerson() {} publicPerson(Parcel pl){ name = pl.readString(); telNumber = pl.readString(); age = pl.readInt(); } publicString getName() { returnname; } public voidsetName(String name) { this.name = name; } publicString getTelNumber() { returntelNumber; } public voidsetTelNumber(String telNumber) { this.telNumber = telNumber; } public intgetAge() { returnage; } public voidsetAge( intage) { this.age = age; } @Override publicintdescribeContents() { return0; } @Override publicvoidwriteToParcel(Parcel dest,intflags) { dest.writeString(name); dest.writeString(telNumber); dest.writeInt(age); } publicstaticfinalParcelable.Creator<Person> CREATOR =newParcelable.Creator<Person>(){ @Override publicPerson createFromParcel(Parcel source) { returnnewPerson(source);} @Override publicPerson[] newArray( intsize) { returnnewPerson[size];} }; } 然后创建Person.aidl文件,注意这里的parcelable和原来实现的Parcelable 接口,开头的字母p一个小写一个大写: packagecom.demo; parcelable Person; 对于实现AIDL接口,官方还提醒我们: 1. 调用者是不能保证在主线程执行的,所以从一调用的开始就需要考虑多线程处理,以及确保线程安全; 2. IPC调用是同步的。如果你知道一个IPC服务需要超过几毫秒的时间才能完成地话,你应该避免在Activity的主线程中调用。也就是IPC调用会挂起应用程序导致界面失去响应,这种情况应该考虑单独开启一个线程来处理。 3. 抛出的异常是不能返回给调用者(跨进程抛异常处理是不可取的)。 3. 客户端获取接口 客户端如何获取AIDL接口呢?通过IMyService.Stub.asInterface(service)来得到IMyService对象: privateIMyService mRemoteService; privateServiceConnection mRemoteConnection = newServiceConnection() { public voidonServiceConnected(ComponentName className, IBinder service) { mRemoteService = IMyService.Stub.asInterface(service); } public voidonServiceDisconnected(ComponentName className) { mRemoteService = null; } }; 在生成的IMyService.java里面会找到这样的代码: /** * Cast an IBinder object into an com.demo.IMyService interface, * generating a proxy if needed. */ public staticcom.demo.IMyService asInterface(android.os.IBinder obj) {...} 而service的绑定没有什么不同: if(mIsRemoteBound) { unbindService(mRemoteConnection); } else{ bindService( newIntent( "com.demo.IMyService"), mRemoteConnection, Context.BIND_AUTO_CREATE); } mIsRemoteBound = !mIsRemoteBound; 通过IPC调用/传递数据 客户端绑定service后就能通过IPC来调用/传递数据了,直接调用service对象的接口方法: addPersonButton.setOnClickListener( newView.OnClickListener(){ private intindex = 0; @Override public voidonClick(View view) { Person person = newPerson(); index = index + 1; person.setName( "Person"+ index); person.setAge(20); person.setTelNumber( "123456"); try{ mRemoteService.savePersonInfo(person); }catch(RemoteException e) { e.printStackTrace(); }} }); listPersonButton.setOnClickListener( newView.OnClickListener(){ @Override public voidonClick(View view) { List<Person> list = null; try{ list = mRemoteService.getAllPerson(); }catch(RemoteException e) { e.printStackTrace(); } if(list != null){ StringBuilder text = newStringBuilder(); for(Person person : list){ text.append( "\nPerson name:"); text.append(person.getName()); text.append( "\n age :"); text.append(person.getAge()); text.append( "\n tel number:"); text.append(person.getTelNumber()); } inputPersonEdit.setText(text); } else{ Toast.makeText(ServiceActivity. this, "get data error", Toast.LENGTH_SHORT).show(); } } }); Permission权限 如果Service在AndroidManifest.xml中声明了全局的强制的访问权限,其他引用必须声明权限才能来start,stop或bind这个service. 另外,service可以通过权限来保护她的IPC方法调用,通过调用checkCallingPermission(String)方法来确保可以执行这个操作。 AndroidManifest.xml的Service元素 < service android:name =".RemoteService" android:process=":remote" > < intent-filter > < action android:name ="com.demo.IMyService" /> </ intent-filter > </ service > 这里的android:process=":remote",一开始我没有添加的,在同一个程序里使用IPC,即同一个程序作为客户端/服务器端,结果运行mRemoteService = IMyService.Stub.asInterface(service);时提示空指针异常。观察了人家的在不同程序里进行IPC的代码,也是没有这个android:process=":remote"的。后来在官方文档 http://androidappdocs.appspot.com/guide/topics/manifest/service-element.html里了解到(留意第二段文字): android:processThe name of the process where the service is to run. Normally, all components of an application run in the default process created for the application. It has the same name as the application package. The <application> element's process attribute can set a different default for all components. But component can override the default with its own process attribute, allowing you to spread your application across multiple processes. If the name assigned to this attribute begins with a colon (':'), a new process, private to the application, is created when it's needed and the service runs in that process. If the process name begins with a lowercase character, the service will run in a global process of that name, provided that it has permission to do so. This allows components in different applications to share a process, reducing resource usage. 也就是说android:process=":remote",代表在应用程序里,当需要该service时,会自动创建新的进程。而如果是android:process="remote",没有“:”分号的,则创建全局进程,不同的应用程序共享该进程。 以上内容结合了不少网络文章,包括来自 http://blog.csdn.net/caowenbin的译文, http://terryblog.blog.51cto.com/1764499/382457, http://4225953-163-com.iteye.com/blog/792997以及Android的官方网站文档。 本文转自 Icansoft 51CTO博客,原文链接:http://blog.51cto.com/android/537684

优秀的个人博客,低调大师

Hadoop HDFS概念学习系列之DataNode(六)

HDFS的管理节点是NameNode,用于存储并管理元数据。那么具体的文件数据存储在哪里呢?DataNode就是负责存储数据的组件,一个数据块Block会在多个DataNode中进行冗余备份;而一个DataNode对于一个块最多只包含一个备份。所以可以简单地认为DataNode上存储了数据块ID和数据块内容,以及它们的映射关系。一个HDFS集群可能包含上千个DataNode节点,这些DataNode定时和NameNode进行通信,接受NameNode的指令,为了减轻NameNode的负担,NameNode上并不永久保存哪个DataNode上有哪些数据块的信息,而是通过DataNode启动时的上报来更新NameNode上的映射表。DataNode和NameNode建立连接后,就会不断地和NameNode保持联系,反馈信息中也包含了NameNode对DataNode的一些命令,如删除数据库或者把数据块复制到另一个DataNode。应该注意的是:NameNode不会发起到DataNode的请求,在这个通信过程中,它们严格遵从客户端/服务器架构。 当然DataNode也作为服务器接受来自客户端的i方问,处理数据块读/写请求。DataNode之间还会相互通信,执行数据块复制任务,同时,在客户端执行写操作的时候,DataNode之间需要相互配合,以保证写操作的一致性。 HDFS体系结构中有两类节点,一类是NameNode,另一类是DataNode。这两类节点分别承担Master和Worker的任务。NameNode就是Master管理集群中的执行调度,DataNode就是Worker具体任务的执行节点。NameNode管理文件系统的命名空间,维护整个文件系统的文件目录树及这些文件的索引目录(本质上还是名字)。这些信息以两种形式存储在本地文件系统中,一种是命名空间镜像(Namespaee image );一种是编辑日志(Edit log )。从NameNode中你可以获得每个文件的每个块所在的DataNode。有一点需要注意的是,这些信息不是永久保存的,NameNode会在每次启动系统时动态地重建这些信息。当运行任务时,客户端通过NameNode获取元数据信息,和DataNode进行交互以访问整个文件系统。系统会提供一个类似于POSIX的文件接口,这样用户在编程时无须考虑NameNode和DataNode的具体功能。 DataNode是文件系统Worker中的节点,用来执行具体的任务:存储文件块,被客户端和NameNode调用。同时,它会通过心跳(Heartbeat)定时向NameNode发送所存储的文件块信息。 本文转自大数据躺过的坑博客园博客,原文链接:http://www.cnblogs.com/zlslch/p/5081183.html,如需转载请自行联系原作者

优秀的个人博客,低调大师

Hadoop HDFS概念学习系列之NameNode(五)

HDFS采用Master/Slave架构。NameNode就是HDFS的Master架构。HDFS系统包括一个NameNode组件,主要负责HDFS文件系统的管理工作,具体包括名称空间(namespace)管理,文件Block管理。 NameNode提供的是始终被动接收服务的server。 NameNode主要有三类协议接口: ClientProtocol接口,提供给客户端,用于访问NameNode。它包含了文件的HDFS功能。和GFS一样. HDFS不提供POSIX形式的接口,而使用了一个私有接口。DataNodeProtocol接口,用于从DataNode向NameNode通信。NameNodeProtocol接口,用于从NameNode到NameNode的通信。 在HDFS内部,一个文件被分成一个或多个Block,这些Block存储在DataNode集合里,NameNode就负责管理文件Block的所有元数据信息, 这些元数据信息主要为:“文件名 -> 数据块‘’映射 “数据块 -> DataNode列表”映射 其中,"文件名 -> 数据块"保存在磁盘上进行持久化存储,需要注意的是NameNode上不保存‘’数据块 -> DataNode列表”映射,该列表是通过DataNode上报给NameNode建立起来的。NameNode执行文件系统的名称空间(namespace)操作,例如打开、关闭、重命名文件和目录,同时决定文件数据块到具体DataNode节点的映射。 和NameNode最相关的还有一个概念就是Secondary NameNode,其主要是定时对NameNode的数据snapshots进行备份,这样可尽量降低NameNode崩溃之后导致数据丢失的风险,其所做的工作就是从NameNode获得fsimage和edits后把两者重新合并发给NameNode,这样,既能减轻NameNode的负担又能安全地备份,一旦HDFS的Master架构失效,就可以借助Secondary NameNode进行数据恢复。 本文转自大数据躺过的坑博客园博客,原文链接:http://www.cnblogs.com/zlslch/p/5081112.html,如需转载请自行联系原作者

优秀的个人博客,低调大师

[Android学习笔记六] Toast 更长时间显示

Android Toast是一种比较特殊的显示信息的机制,其没有焦点,并且显示一段时间之后就自动消失。Android 中提供的显示时长通过Toast.LENGHT_LONG和Toast.LENGTH_SHORT来指定,底层具体代表的时间长度分别是3.5s和2.0s。 本文介绍如何使得Toast显示的时间更长或者指定显示时间长度。 1. 基本用法代码示例 1 2 3 4 5 6 7 8 9 10 11 12 13 14 15 /** *Toast默认的长时间显示3.5s */ @OnClick (R.id.one_button) public void onClickOneButton(){ Toast.makeText( this , "HelloWorld" ,Toast.LENGTH_LONG).show(); } /** *Toast默认的短时间显示2.0s */ @OnClick (R.id.two_button) public void onClickTwoButton(){ Toast.makeText( this , "HelloWorld" ,Toast.LENGTH_SHORT).show(); } 2. 通过android.os.CountDownTimer类实现Toast的显示和消失 通过点击下图中的底端左Button使得Toast显示,右Button使得Toast消失。 代码示例: 1 2 3 4 5 6 7 8 9 10 11 12 13 14 15 16 17 18 19 20 21 22 23 24 25 26 27 28 29 30 31 32 33 34 35 36 37 38 39 40 /** *使用CountDownTimer实现Toast自定义时间显示 */ @Bind (R.id.three_textView) public TextViewthreeTextView; private ToastmCountDownTimeToast; public CountDownTimercdt= new CountDownTimer( 60 * 1000 , 1000 ){ @Override public void onTick( long millisUntilFinished){ threeTextView.setText( "Time剩余:" +(millisUntilFinished/ 1000 )+ "s" ); if ( null !=mCountDownTimeToast){ mCountDownTimeToast.show(); } } @Override public void onFinish(){ threeTextView.setText( "显示完成" ); if ( null !=mCountDownTimeToast){ mCountDownTimeToast.cancel(); } } }; @OnClick ({R.id.three_button_start,R.id.three_button_cancel}) public void onClickThreeButton(Viewv){ if ( null ==mCountDownTimeToast){ mCountDownTimeToast=makeToast( this ); mCountDownTimeToast.setGravity(Gravity.TOP|Gravity.LEFT, 30 , 30 ); } if (v.getId()==R.id.three_button_start){ cdt.start(); Log.d(TAG, "CountDownTimerstartshow" ); } if (v.getId()==R.id.three_button_cancel){ cdt.cancel(); threeTextView.setText( "取消" ); Log.d(TAG, "CountDownTimercancel" ); } } Toast对象的View布局文件(view_toast.xml) 1 2 3 4 5 6 7 8 9 <? xml version = "1.0" encoding = "utf-8" ?> < TextView xmlns:android = "http://schemas.android.com/apk/res/android" android:layout_width = "wrap_content" android:layout_height = "wrap_content" android:background = "#ef3939" android:orientation = "vertical" style = "@android:style/TextAppearance.DeviceDefault.Medium" android:gravity = "center_vertical|center_horizontal" android:padding = "10dp" android:text = "&quot;HelloWorld&quot;" android:textColor = "#f7f9fb" > </ TextView > 创建Toast对象(下文中创建Toast对象使用该方法) 1 2 3 4 5 6 7 public static ToastmakeToast(Contextcontext){ Toasttoast= new Toast(context); toast.setDuration(Toast.LENGTH_SHORT); TextViewview=(TextView)LayoutInflater.from(context).inflate(R.layout.view_toast, null ); toast.setView(view); return toast; } 上述代码通过CountDownTimer实现指定Toast显示时长和控制Toast显示与消失,重构之后代码如下: 1 2 3 4 5 6 7 8 9 10 11 12 13 14 15 16 17 18 public void showToast1( final Toasttoast, long duration){ final long SHORT= 2000 ; final long LONG= 3500 ; final long ONE_SECOND= 1000 ; final long d=duration<=SHORT?SHORT:duration>LONG?duration:LONG; new CountDownTimer(Math.max(d,duration),ONE_SECOND){ @Override public void onTick( long millisUntilFinished){ toast.show(); } @Override public void onFinish(){ toast.cancel(); } }.start(); } 3.通过Handler消息机制实现 1 2 3 4 5 6 7 8 9 10 11 12 13 14 15 16 17 18 19 20 21 22 23 24 public void showToast2( final Toasttoast, long duration){ final long SHORT= 2000 ; final long LONG= 3500 ; final long ONE_SECOND= 1000 ; final long d=duration<=SHORT?SHORT:duration>LONG?duration:LONG; final int what= 1 ; final Handlerhandler= new Handler(){ long remainder=d; @Override public void handleMessage(Messagemsg){ if (msg.what==what){ toast.show(); if (remainder>=ONE_SECOND){ remainder-=ONE_SECOND; sendEmptyMessageDelayed(what,ONE_SECOND); } else { removeMessages(what); } } } }; handler.sendEmptyMessage(what); } 其实这种实现和CountDownTimer实现的机制一样的。 4. Toast的指定时长显示其实就是不断的调用Toast的show()方法,其中show()方法中实现了将Toast对象添加到INotificationManager的Toast队列中去。具体细节可参见Toast(android.widget.Toast)源码。 5. 为什么要给Toast指定显示时长呢? 这或许不是个好主意。Toast的无焦点短时间自动消失机制就是为了给用户显示信息而不会产生较大干扰。如果长时间显示并且具有更多交互和事件处理,这就背离了Toast的本意,这样的场景可以考虑使用Notification,Dialog来实现。 使用Toast场景中更多的是关注其View和显示的位置,这可以实现更多有意思的东西,比如冒泡提示,使用向导等。在实践中则需要根据具体情况慎重选择和合理应用。 本文转自 secondriver 51CTO博客,原文链接:http://blog.51cto.com/aiilive/1717222,如需转载请自行联系原作者

优秀的个人博客,低调大师

[Android学习十一]Android开发单元测试

自从投入到Android Studio IDE之后基本上就赖着不走了。这里仅讨论AS(Android Studio)中Android单元测试。 开发一个Android应用单元测试这种程序员的自我修养和基本道德测试是必不可少的。其单元测试分为两块,一块是依赖Android API(平台)的单元测试,一块是不依赖Android API的单元测试。 1.不依赖AndroidAPI的单元测试 这一块就和通常开发JavaSE,EE应用的单元测试一样,测试框架更加需要自行选择即可。在通过AS创建Android应用模块时,默认在build.gradle文件中添加了测试库junit依赖。 如果在AS中使用不依赖AndroidAPI的单元测试,一图顶万言: 图一 图二 如图二所示,在Build Variants的Test Artifact设置为Unit tests之后,test源码目录呈现出IDEA风格的绿色目录。 这是就可以运行测试类或测试套件,比较容易就不多解释了。 2. 依赖Android API的单元测试 2.1 AS中配置Android单元测试 Android基于junit3框架提供了Android的单元测试框架,要在Android中使用单元测试就需要依赖android.test包下的具体类。下面是AS中配置Android单元测试的方法: 图三 2.2 Android单元测试示例 2.2.1 一个单元测试类: 1 2 3 4 5 6 7 8 9 10 11 12 13 14 15 16 17 18 19 20 21 22 23 24 25 26 27 28 29 package secondriver.heathfood.test; import android.test.InstrumentationTestCase; import com.orhanobut.logger.Logger; import secondriver.heathfood.App; import secondriver.heathfood.logic.TianGou; import secondriver.heathfood.pojo.FoodClassResult; import secondriver.heathfood.pojo.FoodDetail; import secondriver.heathfood.pojo.FoodDetailResult; /** *Author:secondriver *Created:2016/1/20 */ public class TestTianGou extends InstrumentationTestCase{ public TianGoutianGou; public void setUp(){ tianGou= new TianGou(App.restTemplate()); } public void test_queryFoodClassByParentId1(){ FoodClassResultresult=tianGou.queryFoodClassByParentId( 0 ); assertTrue(result.isStatus()); } } 关于Android的单元测试基类参见: http://www.oschina.net/question/54100_27061?fromerr=NydwIvQR。 http://www.uml.org.cn/mobiledev/201306074.asp 注意:Android单元测试的测试类写法遵循的是Junit3. 2.2.2 执行单元测试 在执行单元测试之前,讲Build Variant的Test Artifact设置为图一所示值。 执行Android Tester之后,输出截图: 图四 从截图上得知未授网络访问权权限。 2.2.3 AS中Android单元测试控制台 图五 在网上找关于Android单元测试的案例时,比较杂乱,遂作此文予以整理,Android单元测试如何去做当是另外的主题,需要参考android.test包中提供的具体类。 文中的android测试类的包直接创建在了main代码目录下,比较好的方式如下Android测试代码目录结构图: 图 六 本文转自 secondriver 51CTO博客,原文链接:http://blog.51cto.com/aiilive/1737254,如需转载请自行联系原作者

资源下载

更多资源
Mario

Mario

马里奥是站在游戏界顶峰的超人气多面角色。马里奥靠吃蘑菇成长,特征是大鼻子、头戴帽子、身穿背带裤,还留着胡子。与他的双胞胎兄弟路易基一起,长年担任任天堂的招牌角色。

腾讯云软件源

腾讯云软件源

为解决软件依赖安装时官方源访问速度慢的问题,腾讯云为一些软件搭建了缓存服务。您可以通过使用腾讯云软件源站来提升依赖包的安装速度。为了方便用户自由搭建服务架构,目前腾讯云软件源站支持公网访问和内网访问。

Rocky Linux

Rocky Linux

Rocky Linux(中文名:洛基)是由Gregory Kurtzer于2020年12月发起的企业级Linux发行版,作为CentOS稳定版停止维护后与RHEL(Red Hat Enterprise Linux)完全兼容的开源替代方案,由社区拥有并管理,支持x86_64、aarch64等架构。其通过重新编译RHEL源代码提供长期稳定性,采用模块化包装和SELinux安全架构,默认包含GNOME桌面环境及XFS文件系统,支持十年生命周期更新。

Sublime Text

Sublime Text

Sublime Text具有漂亮的用户界面和强大的功能,例如代码缩略图,Python的插件,代码段等。还可自定义键绑定,菜单和工具栏。Sublime Text 的主要功能包括:拼写检查,书签,完整的 Python API , Goto 功能,即时项目切换,多选择,多窗口等等。Sublime Text 是一个跨平台的编辑器,同时支持Windows、Linux、Mac OS X等操作系统。

用户登录
用户注册