首页 文章 精选 留言 我的

精选列表

搜索[cloud],共10000篇文章
优秀的个人博客,低调大师

[Spring cloud 一步步实现广告系统] 18. 查询返回广告创意

根据三个维度继续过滤 在上一节中我们实现了根据流量信息过滤的代码,但是我们的条件有可能是多条件一起传给我们的检索服务的,本节我们继续实现根据推广单元的三个维度条件的过滤。 在SearchImpl类中添加过滤方法 public class SearchImpl implements ISearch { @Override public SearchResponse fetchAds(SearchRequest request) { ... // 根据三个维度过滤 if (featureRelation == FeatureRelation.AND) { filterKeywordFeature(adUnitIdSet, keywordFeature); filterHobbyFeature(adUnitIdSet, hobbyFeatrue); filterDistrictFeature(adUnitIdSet, districtFeature); targetUnitIdSet = adUnitIdSet; } else { getOrRelationUnitIds(adUnitIdSet, keywordFeature, hobbyFeatrue, districtFeature); } } return null; } 定义三个方法实现过滤 /** * 获取三个维度各自满足时的广告id */ private Set<Long> getOrRelationUnitIds(Set<Long> adUnitIdsSet, KeywordFeature keywordFeature, HobbyFeatrue hobbyFeatrue, DistrictFeature districtFeature) { if (CollectionUtils.isEmpty(adUnitIdsSet)) return Collections.EMPTY_SET; // 我们在处理的时候,需要对副本进行处理,大家可以考虑一下为什么需要这么做? Set<Long> keywordUnitIdSet = new HashSet<>(adUnitIdsSet); Set<Long> hobbyUnitIdSet = new HashSet<>(adUnitIdsSet); Set<Long> districtUnitIdSet = new HashSet<>(adUnitIdsSet); filterKeywordFeature(keywordUnitIdSet, keywordFeature); filterHobbyFeature(hobbyUnitIdSet, hobbyFeatrue); filterDistrictFeature(districtUnitIdSet, districtFeature); // 返回它们的并集 return new HashSet<>( CollectionUtils.union( CollectionUtils.union(keywordUnitIdSet, hobbyUnitIdSet), districtUnitIdSet ) ); } /** * 根据传递的关键词过滤 */ private void filterKeywordFeature(Collection<Long> adUnitIds, KeywordFeature keywordFeature) { if (CollectionUtils.isEmpty(adUnitIds)) return; if (CollectionUtils.isNotEmpty(keywordFeature.getKeywords())) { // 如果存在需要过滤的关键词,查找索引实例对象进行过滤处理 CollectionUtils.filter( adUnitIds, adUnitId -> IndexDataTableUtils.of(UnitKeywordIndexAwareImpl.class) .match(adUnitId, keywordFeature.getKeywords()) ); } } /** * 根据传递的兴趣信息过滤 */ private void filterHobbyFeature(Collection<Long> adUnitIds, HobbyFeatrue hobbyFeatrue) { if (CollectionUtils.isEmpty(adUnitIds)) return; // 如果存在需要过滤的兴趣,查找索引实例对象进行过滤处理 if (CollectionUtils.isNotEmpty(hobbyFeatrue.getHobbys())) { CollectionUtils.filter( adUnitIds, adUnitId -> IndexDataTableUtils.of(UnitHobbyIndexAwareImpl.class) .match(adUnitId, hobbyFeatrue.getHobbys()) ); } } /** * 根据传递的地域信息过滤 */ private void filterDistrictFeature(Collection<Long> adUnitIds, DistrictFeature districtFeature) { if (CollectionUtils.isEmpty(adUnitIds)) return; // 如果存在需要过滤的地域信息,查找索引实例对象进行过滤处理 if (CollectionUtils.isNotEmpty(districtFeature.getProvinceAndCities())) { CollectionUtils.filter( adUnitIds, adUnitId -> { return IndexDataTableUtils.of(UnitDistrictIndexAwareImpl.class) .match(adUnitId, districtFeature.getProvinceAndCities()); } ); } } 根据推广单元id获取推广创意 我们知道,推广单元和推广创意的关系是多对多,从上文我们查询到了推广单元ids,接下来我们实现根据推广单元id获取推广创意的代码,let's code.首先,我们需要在com.sxzhongf.ad.index.creative_relation_unit.CreativeRelationUnitIndexAwareImpl 关联索引中查到推广创意的ids /** * 通过推广单元id获取推广创意id */ public List<Long> selectAdCreativeIds(List<AdUnitIndexObject> unitIndexObjects) { if (CollectionUtils.isEmpty(unitIndexObjects)) return Collections.emptyList(); //获取要返回的广告创意ids List<Long> result = new ArrayList<>(); for (AdUnitIndexObject unitIndexObject : unitIndexObjects) { //根据推广单元id获取推广创意 Set<Long> adCreativeIds = unitRelationCreativeMap.get(unitIndexObject.getUnitId()); if (CollectionUtils.isNotEmpty(adCreativeIds)) result.addAll(adCreativeIds); } return result; } 然后得到了推广创意的id list后,我们在创意索引实现类com.sxzhongf.ad.index.creative.CreativeIndexAwareImpl中定义根据ids查询创意的方法。 /** * 根据ids获取创意list */ public List<CreativeIndexObject> findAllByIds(Collection<Long> ids) { if (CollectionUtils.isEmpty(ids)) return Collections.emptyList(); List<CreativeIndexObject> result = new ArrayList<>(); for (Long id : ids) { CreativeIndexObject object = get(id); if (null != object) result.add(object); } return result; } 自此,我们已经得到了想要的推广单元和推广创意,因为推广单元包含了推广计划,所以我们想要的数据已经全部可以获取到了,接下来,我们还得过滤一次当前我们查询到的数据的状态,因为有的数据,我们可能已经进行过逻辑删除了,因此还需要判断获取的数据是否有效。在SearchImpl类中实现。 /** * 根据状态信息过滤数据 */ private void filterAdUnitAndPlanStatus(List<AdUnitIndexObject> unitIndexObjects, CommonStatus status) { if (CollectionUtils.isEmpty(unitIndexObjects)) return; //同时判断推广单元和推广计划的状态 CollectionUtils.filter( unitIndexObjects, unitIndexObject -> unitIndexObject.getUnitStatus().equals(status.getStatus()) && unitIndexObject.getAdPlanIndexObject().getPlanStatus().equals(status.getStatus()) ); } 在SearchImpl中我们实现广告创意的查询. ... //获取 推广计划 对象list List<AdUnitIndexObject> unitIndexObjects = IndexDataTableUtils.of(AdUnitIndexAwareImpl.class).fetch(adUnitIdSet); //根据状态过滤数据 filterAdUnitAndPlanStatus(unitIndexObjects, CommonStatus.VALID); //获取 推广创意 id list List<Long> creativeIds = IndexDataTableUtils.of(CreativeRelationUnitIndexAwareImpl.class) .selectAdCreativeIds(unitIndexObjects); //根据 推广创意ids获取推广创意 List<CreativeIndexObject> creativeIndexObjects = IndexDataTableUtils.of(CreativeIndexAwareImpl.class) ... 根据广告位adslot 实现对创意数据的过滤 因为我们的广告位是有不同的大小,不同的类型,因此,我们在获取到所有符合我们查询维度以及流量类型的条件后,还需要针对不同的广告位来展示不同的广告创意信息。 /** * 根据广告位类型以及参数获取展示的合适广告信息 * * @param creativeIndexObjects 所有广告创意 * @param width 广告位width * @param height 广告位height */ private void filterCreativeByAdSlot(List<CreativeIndexObject> creativeIndexObjects, Integer width, Integer height, List<Integer> type) { if (CollectionUtils.isEmpty(creativeIndexObjects)) return; CollectionUtils.filter( creativeIndexObjects, creative -> { //审核状态必须是通过 return creative.getAuditStatus().equals(CommonStatus.VALID.getStatus()) && creative.getWidth().equals(width) && creative.getHeight().equals(height) && type.contains(creative.getType()); } ); } 组建搜索返回对象 正常业务场景中,同一个广告位可以展示多个广告信息,也可以只展示一个广告信息,这个需要根据具体的业务场景来做不同的处理,本次为了演示方便,会从返回的创意列表中随机选择一个创意广告信息进行展示,当然大家也可以根据业务类型,设置不同的优先级或者权重值来进行广告选择。 /** * 从创意列表中随机获取一条创意广告返回出去 * * @param creativeIndexObjects 创意广告list */ private List<SearchResponse.Creative> buildCreativeResponse(List<CreativeIndexObject> creativeIndexObjects) { if (CollectionUtils.isEmpty(creativeIndexObjects)) return Collections.EMPTY_LIST; //随机获取一个广告创意,也可以实现优先级排序,也可以根据权重值等等,具体根据业务 CreativeIndexObject randomObject = creativeIndexObjects.get( Math.abs(new Random().nextInt()) % creativeIndexObjects.size() ); //List<SearchResponse.Creative> result = new ArrayList<>(); //result.add(SearchResponse.convert(randomObject)); return Collections.singletonList( SearchResponse.convert(randomObject) ); } 完整的请求过滤实现方法: @Service @Slf4j public class SearchImpl implements ISearch { @Override public SearchResponse fetchAds(SearchRequest request) { //获取请求广告位信息 List<AdSlot> adSlotList = request.getRequestInfo().getAdSlots(); //获取三个Feature信息 KeywordFeature keywordFeature = request.getFeatureInfo().getKeywordFeature(); HobbyFeatrue hobbyFeatrue = request.getFeatureInfo().getHobbyFeatrue(); DistrictFeature districtFeature = request.getFeatureInfo().getDistrictFeature(); //Feature关系 FeatureRelation featureRelation = request.getFeatureInfo().getRelation(); //构造响应对象 SearchResponse response = new SearchResponse(); Map<String, List<SearchResponse.Creative>> adSlotRelationAds = response.getAdSlotRelationAds(); for (AdSlot adSlot : adSlotList) { Set<Long> targetUnitIdSet; //根据流量类型从缓存中获取 初始 广告信息 Set<Long> adUnitIdSet = IndexDataTableUtils.of( AdUnitIndexAwareImpl.class ).match(adSlot.getPositionType()); // 根据三个维度过滤 if (featureRelation == FeatureRelation.AND) { filterKeywordFeature(adUnitIdSet, keywordFeature); filterHobbyFeature(adUnitIdSet, hobbyFeatrue); filterDistrictFeature(adUnitIdSet, districtFeature); targetUnitIdSet = adUnitIdSet; } else { targetUnitIdSet = getOrRelationUnitIds(adUnitIdSet, keywordFeature, hobbyFeatrue, districtFeature); } //获取 推广计划 对象list List<AdUnitIndexObject> unitIndexObjects = IndexDataTableUtils.of(AdUnitIndexAwareImpl.class) .fetch(targetUnitIdSet); //根据状态过滤数据 filterAdUnitAndPlanStatus(unitIndexObjects, CommonStatus.VALID); //获取 推广创意 id list List<Long> creativeIds = IndexDataTableUtils.of(CreativeRelationUnitIndexAwareImpl.class) .selectAdCreativeIds(unitIndexObjects); //根据 推广创意ids获取推广创意 List<CreativeIndexObject> creativeIndexObjects = IndexDataTableUtils.of(CreativeIndexAwareImpl.class) .fetch(creativeIds); //根据 广告位adslot 实现对创意数据的过滤 filterCreativeByAdSlot(creativeIndexObjects, adSlot.getWidth(), adSlot.getHeight(), adSlot.getType()); //一个广告位可以展示多个广告,也可以仅展示一个广告,具体根据业务来定 adSlotRelationAds.put( adSlot.getAdSlotCode(), buildCreativeResponse(creativeIndexObjects) ); } return response; } ... 检索服务对外提供 暴露API接口上文中,我们实现了检索服务的核心逻辑,接下来,我们需要对外暴露我们的广告检索服务接口,在SearchController中提供: @PostMapping("/fetchAd") public SearchResponse fetchAdCreative(@RequestBody SearchRequest request) { log.info("ad-serach: fetchAd ->{}", JSON.toJSONString(request)); return search.fetchAds(request); } 实现API网关配置 zuul: routes: sponsor: #在路由中自定义服务路由名称 path: /ad-sponsor/** serviceId: mscx-ad-sponsor #微服务name strip-prefix: false search: #在路由中自定义服务路由名称 path: /ad-search/** serviceId: mscx-ad-search #微服务name strip-prefix: false prefix: /gateway/api strip-prefix: true #不对 prefix: /gateway/api 设置的路径进行截取,默认转发会截取掉配置的前缀

优秀的个人博客,低调大师

[Spring cloud 一步步实现广告系统] 17. 根据流量类型查询广告

广告检索服务 功能介绍 媒体方(手机APP打开的展示广告,走在路上看到的大屏幕广告等等) 请求数据对象实现 从上图我们可以看出,在媒体方向我们的广告检索系统发起请求的时候,请求中会有很多的请求参数信息,他们分为了三个部分,我们来编码封装这几个参数对象信息以及我们请求本身的信息。Let's code. 创建广告检索请求接口 /** * ISearch for 请求接口, * 根据广告请求对象,获取广告响应信息 * * @author <a href="mailto:magicianisaac@gmail.com">Isaac.Zhang | 若初</a> */ @FunctionalInterface public interface ISearch { /** * 根据请求返回广告结果 */ SearchResponse fetchAds(SearchRequest request); } 创建SearchRequest,包含三部分:mediaId,RequestInfo,FeatureInfo @Data @NoArgsConstructor @AllArgsConstructor public class SearchRequest { //媒体方请求标示 private String mediaId; //请求基本信息 private RequestInfo requestInfo; //匹配信息 private FeatureInfo featureInfo; @Data @NoArgsConstructor @AllArgsConstructor public static class RequestInfo { private String requestId; private List<AdSlot> adSlots; private App app; private Geo geo; private Device device; } @Data @NoArgsConstructor @AllArgsConstructor public static class FeatureInfo { private KeywordFeature keywordFeature; private DistrictFeature districtFeature; private HobbyFeatrue hobbyFeatrue; private FeatureRelation relation = FeatureRelation.AND; } } 其他的对象大家可以去github传送门 & gitee传送门 下载源码。 检索响应对象定义 /** * SearchResponse for 检索API响应对象 * * @author <a href="mailto:magicianisaac@gmail.com">Isaac.Zhang | 若初</a> */ @Data @Builder @NoArgsConstructor @AllArgsConstructor public class SearchResponse { //一个广告位,可以展示多个广告 //Map key为广告位 AdSlot#adSlotCode public Map<String, List<Creative>> adSlotRelationAds = new HashMap<>(); @Data @Builder @NoArgsConstructor @AllArgsConstructor public static class Creative { private Long adId; private String adUrl; private Integer width; private Integer height; private Integer type; private Integer materialType; //展示监控url private List<String> showMonitorUrl = Arrays.asList("www.life-runner.com", "www.babydy.cn"); //点击监控url private List<String> clickMonitorUrl = Arrays.asList("www.life-runner.com", "www.babydy.cn"); } /** * 我们的检索服务针对的是内存中的索引检索,那么我们就需要一个转换方法 */ public static Creative convert(CreativeIndexObject object) { return Creative.builder() .adId(object.getAdId()) .adUrl(object.getAdUrl()) .width(object.getWidth()) .height(object.getHeight()) .type(object.getType()) .materialType(object.getMaterialType()) .build(); } } 根据流量类型广告过滤 流量类型本身属于推广单元下的类目,有很多种类贴片广告,开屏广告等等,这些类型需要同步到媒体方,媒体方会根据不同的流量类型发起不同的广告请求,我们需要先定义一个流量类型的信息类。 public class AdUnitConstants { public static class PositionType{ //App启动时展示的、展示时间短暂的全屏化广告形式。 private static final int KAIPING = 1; //电影开始之前的广告 private static final int TIEPIAN = 2; //电影播放中途广告 private static final int TIEPIAN_MIDDLE = 4; //暂停视频时候播放的广告 private static final int TIEPIAN_PAUSE = 8; //视频播放完 private static final int TIEPIAN_POST = 16; } } 从上述类型的数字,我们可以看出是2的倍数,这是为了使用位运算提升性能。 在com.sxzhongf.ad.index.adunit.AdUnitIndexObject中,我们添加类型校验方法: public static boolean isAdSlotType(int adSlotType, int positionType) { switch (adSlotType) { case AdUnitConstants.PositionType.KAIPING: return isKaiPing(positionType); case AdUnitConstants.PositionType.TIEPIAN: return isTiePian(positionType); case AdUnitConstants.PositionType.TIEPIAN_MIDDLE: return isTiePianMiddle(positionType); case AdUnitConstants.PositionType.TIEPIAN_PAUSE: return isTiePianPause(positionType); case AdUnitConstants.PositionType.TIEPIAN_POST: return isTiePianPost(positionType); default: return false; } } /** * 与运算,低位取等,高位补零。 * 如果 > 0,则为开屏 */ private static boolean isKaiPing(int positionType) { return (positionType & AdUnitConstants.PositionType.KAIPING) > 0; } private static boolean isTiePianMiddle(int positionType) { return (positionType & AdUnitConstants.PositionType.TIEPIAN_MIDDLE) > 0; } private static boolean isTiePianPause(int positionType) { return (positionType & AdUnitConstants.PositionType.TIEPIAN_PAUSE) > 0; } private static boolean isTiePianPost(int positionType) { return (positionType & AdUnitConstants.PositionType.TIEPIAN_POST) > 0; } private static boolean isTiePian(int positionType) { return (positionType & AdUnitConstants.PositionType.TIEPIAN) > 0; } 无所如何,我们都是需要根据positionType进行数据查询过滤,我们在之前的com.sxzhongf.ad.index.adunit.AdUnitIndexAwareImpl中添加2个方法来实现过滤: /** * 过滤当前是否存在满足positionType的UnitIds */ public Set<Long> match(Integer positionType) { Set<Long> adUnitIds = new HashSet<>(); objectMap.forEach((k, v) -> { if (AdUnitIndexObject.isAdSlotType(positionType, v.getPositionType())) { adUnitIds.add(k); } }); return adUnitIds; } /** * 根据UnitIds查询AdUnit list */ public List<AdUnitIndexObject> fetch(Collection<Long> adUnitIds) { if (CollectionUtils.isEmpty(adUnitIds)) { return Collections.EMPTY_LIST; } List<AdUnitIndexObject> result = new ArrayList<>(); adUnitIds.forEach(id -> { AdUnitIndexObject object = get(id); if (null == object) { log.error("AdUnitIndexObject does not found:{}", id); return; } result.add(object); }); return result; } 实现Search服务接口 上述我们准备了一系列的查询方法,都是为了根据流量类型查询广告单元信息,我们现在开始实现我们的查询接口,查询接口中,我们可以获取到媒体方的请求对象信息,它带有一系列查询所需要的过滤参数: /** * SearchImpl for 实现search 服务 * * @author <a href="mailto:magicianisaac@gmail.com">Isaac.Zhang | 若初</a> */ @Service @Slf4j public class SearchImpl implements ISearch { @Override public SearchResponse fetchAds(SearchRequest request) { //获取请求广告位信息 List<AdSlot> adSlotList = request.getRequestInfo().getAdSlots(); //获取三个Feature信息 KeywordFeature keywordFeature = request.getFeatureInfo().getKeywordFeature(); HobbyFeatrue hobbyFeatrue = request.getFeatureInfo().getHobbyFeatrue(); DistrictFeature districtFeature = request.getFeatureInfo().getDistrictFeature(); //Feature关系 FeatureRelation featureRelation = request.getFeatureInfo().getRelation(); //构造响应对象 SearchResponse response = new SearchResponse(); Map<String, List<SearchResponse.Creative>> adSlotRelationAds = response.getAdSlotRelationAds(); for (AdSlot adSlot : adSlotList) { Set<Long> targetUnitIdSet; //根据流量类型从缓存中获取 初始 广告信息 Set<Long> adUnitIdSet = IndexDataTableUtils.of( AdUnitIndexAwareImpl.class ).match(adSlot.getPositionType()); } return null; } }

优秀的个人博客,低调大师

[Spring cloud 一步步实现广告系统] 14. 全量索引代码实现

上一节我们实现了索引基本操作的类以及索引缓存工具类,本小节我们开始实现加载全量索引数据,在加载全量索引数据之前,我们需要先将数据库中的表数据导出到一份文件中。Let's code. 1.首先定义一个常量类,用来存储导出文件存储的目录和文件名称 因为我们导出的文件需要在搜索服务中使用到,因此,我们将文件名 & 目录以及导出对象的信息编写在mscx-ad-commom项目中。 public class FileConstant { public static final String DATA_ROOT_DIR = "/Users/xxx/Documents/promotion/data/mysql/"; //各个表数据的存储文件名 public static final String AD_PLAN = "ad_plan.data"; public static final String AD_UNIT = "ad_unit.data"; public static final String AD_CREATIVE = "ad_creative.data"; public static final String AD_CREATIVE_RELARION_UNIT = "ad_creative_relation_unit.data"; public static final String AD_UNIT_HOBBY = "ad_unit_hobby.data"; public static final String AD_UNIT_DISTRICT = "ad_unit_district.data"; public static final String AD_UNIT_KEYWORD = "ad_unit_keyword.data"; } 2.定义索引对象导出的字段信息,依然用Ad_Plan为例。 /** * AdPlanTable for 需要导出的表字段信息 => 是搜索索引字段一一对应 * * @author <a href="mailto:magicianisaac@gmail.com">Isaac.Zhang | 若初</a> */ @Data @AllArgsConstructor @NoArgsConstructor public class AdPlanTable { private Long planId; private Long userId; private Integer planStatus; private Date startDate; private Date endDate; } 3.导出文件服务实现 同样,最好的实现方式就是将导出服务作为一个子工程来独立运行,我这里直接实现在了mscx-ad-db项目中 定义一个空接口,为了符合我们的编码规范 /** * IExportDataService for 导出数据库广告索引初始化数据 * * @author <a href="mailto:magicianisaac@gmail.com">Isaac.Zhang | 若初</a> */ public interface IExportDataService { } 实现service @Slf4j @Service public class ExportDataServiceImpl implements IExportDataService { @Autowired private AdPlanRepository planRepository; /** * 导出 {@code AdPlan} from DB to File * * @param fileName 文件名称 */ public void exportAdPlanTable(String fileName) { List<AdPlan> planList = planRepository.findAllByPlanStatus(CommonStatus.VALID.getStatus()); if (CollectionUtils.isEmpty(planList)) { return; } List<AdPlanTable> planTables = new ArrayList<>(); planList.forEach(item -> planTables.add( new AdPlanTable( item.getPlanId(), item.getUserId(), item.getPlanStatus(), item.getStartDate(), item.getEndDate() ) )); //将数据写入文件 Path path = Paths.get(fileName); try (BufferedWriter writer = Files.newBufferedWriter(path)) { for (AdPlanTable adPlanTable : planTables) { writer.write(JSON.toJSONString(adPlanTable)); writer.newLine(); } writer.close(); } catch (IOException e) { e.printStackTrace(); log.error("export AdPlanTable Exception!"); } } } 实现Controller,提供操作入口 @Slf4j @Controller @RequestMapping("/export") public class ExportDataController { private final ExportDataServiceImpl exportDataService; @Autowired public ExportDataController(ExportDataServiceImpl exportDataService) { this.exportDataService = exportDataService; } @GetMapping("/export-plan") public CommonResponse exportAdPlans() { exportDataService.exportAdPlanTable(String.format("%s%s", FileConstant.DATA_ROOT_DIR, FileConstant.AD_PLAN)); return new CommonResponse(); } } 结果文件内容如下,每一行都代表了一个推广计划 {"endDate":1561438800000,"planId":10,"planStatus":1,"startDate":1561438800000,"userId":10} {"endDate":1561438800000,"planId":11,"planStatus":1,"startDate":1561438800000,"userId":10} 根据文件内容构建索引 我们在之前编写索引服务的时候,创建了一些索引需要使用的实体对象类,比如构建推广计划索引的时候,需要使用到的实体对象com.sxzhongf.ad.index.adplan.AdPlanIndexObject,可是呢,我们在上一节实现索引导出的时候,实体对象又是common 包中的com.sxzhongf.ad.common.export.table.AdPlanTable,读取出来文件中的数据只能反序列化为JSON.parseObject(p, AdPlanTable.class),我们需要将2个对象做相互映射才能创建索引信息。 1.首先我们定义一个操作类型枚举,代表我们每一次的操作类型(也需要对应到后期binlog监听的操作类型) public enum OperationTypeEnum { ADD, UPDATE, DELETE, OTHER; public static OperationTypeEnum convert(EventType type) { switch (type) { case EXT_WRITE_ROWS: return ADD; case EXT_UPDATE_ROWS: return UPDATE; case EXT_DELETE_ROWS: return DELETE; default: return OTHER; } } } 2.因为全量索引的加载和增量索引加载的本质是一样的,全量索引其实就是一种特殊的增量索引,为了代码的可复用,我们创建统一的类来操作索引。 /** * AdLevelDataHandler for 通用处理索引类 * 1. 索引之间存在层级划分,也就是相互之间拥有依赖关系的划分 * 2. 加载全量索引其实是增量索引 "添加"的一种特殊实现 * * @author <a href="mailto:magicianisaac@gmail.com">Isaac.Zhang | 若初</a> */ @Slf4j public class AdLevelDataHandler { /** * 实现广告推广计划的第二层级索引实现。 * (第一级为用户层级,但是用户层级不参与索引,所以从level 2开始) * 第二层级的索引是表示 不依赖于其他索引,但是可被其他索引所依赖 */ public static void handleLevel2Index(AdPlanTable adPlanTable, OperationTypeEnum type) { // 对象转换 AdPlanIndexObject planIndexObject = new AdPlanIndexObject( adPlanTable.getPlanId(), adPlanTable.getUserId(), adPlanTable.getPlanStatus(), adPlanTable.getStartDate(), adPlanTable.getEndDate() ); //调用通用方法处理,使用IndexDataTableUtils#of来获取索引的实现类bean handleBinlogEvent( // 在前一节我们实现了一个索引工具类,来获取注入的bean对象 IndexDataTableUtils.of(AdPlanIndexAwareImpl.class), planIndexObject.getPlanId(), planIndexObject, type ); } /** * 处理全量索引和增量索引的通用处理方式 * K,V代表索引的键和值 * * @param index 索引实现代理类父级 * @param key 键 * @param value 值 * @param type 操作类型 */ private static <K, V> void handleBinlogEvent(IIndexAware<K, V> index, K key, V value, OperationTypeEnum type) { switch (type) { case ADD: index.add(key, value); break; case UPDATE: index.update(key, value); break; case DELETE: index.delete(key, value); break; default: break; } } } 3.读取文件实现全量索引加载。 因为我们文件加载之前需要依赖另一个组件,也就是我们的索引工具类,需要添加上@DependsOn("indexDataTableUtils"),全量索引在系统启动的时候就需要加载,我们需要添加@PostConstruct来实现初始化加载,被@PostConstruct修饰的方法会在服务器加载Servlet的时候运行,并且只会被服务器调用一次。 @Component @DependsOn("indexDataTableUtils") public class IndexFileLoader { /** * 服务启动时,执行全量索引加载 */ @PostConstruct public void init() { //加载 推广计划 List<String> adPlanStrings = loadExportedData(String.format("%s%s", FileConstant.DATA_ROOT_DIR, FileConstant.AD_PLAN )); adPlanStrings.forEach(p -> AdLevelDataHandler.handleLevel2Index( JSON.parseObject(p, AdPlanTable.class), OperationTypeEnum.ADD )); } /** * <h3>读取全量索引加载需要的文件</h3> * * @param fileName 文件名称 * @return 文件行数据 */ private List<String> loadExportedData(String fileName) { try (BufferedReader reader = Files.newBufferedReader(Paths.get(fileName))) { return reader.lines().collect(Collectors.toList()); } catch (IOException e) { throw new RuntimeException(e.getMessage()); } } } Tips 在实现初始化加载全量索引的过程中,一定要保证数据加载的顺序问题,因为不同的数据有可能存在着相互依赖的关联关系,一旦顺序写错,会造成程序报错问题。

优秀的个人博客,低调大师

[Spring cloud 一步步实现广告系统] 6. Service&Zuul配置

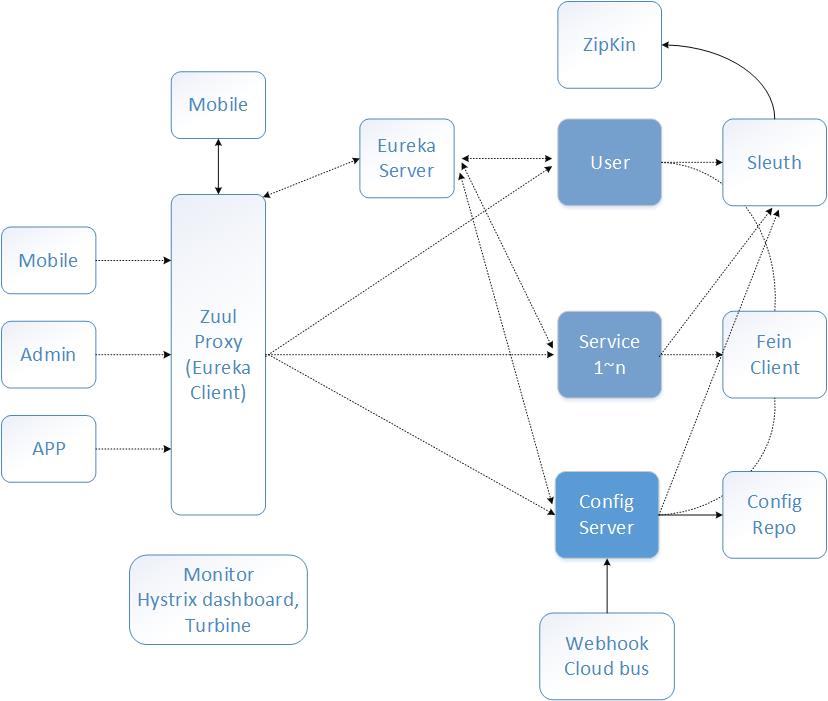
DAO层设计实现 这里我们使用Spring DATA JPA来实现数据库操作,当然大家也可以使用Mybatis,都是一样的,我们依然以用户表操作为例: /** * AdUserRepository for 用户数据库操作接口 * 继承自JpaRepository<AdUser, Long>,第一个参数AdUser代表当前要操作的实体类的class定义,第二个参数Long表示该类的主键类型 * * @author <a href="mailto:magicianisaac@gmail.com">Isaac.Zhang</a> */ public interface AdUserRepository extends JpaRepository<AdUser, Long> { /** * 根据用户名称获取用户 * * @param username 名称 * @return 用户对象 */ AdUser findByUserName(String username); List<AdUser> findAllByUserName(String userName); } JPARepository 的默认实现方法,如果我们只是继承了JpaRepository而没有实现具体的操作方法,我们也是可以通过使用它的默认方法来做CRUD操作的,如下: 功能Service实现 创建service package,依然以用户操作为例,创建com.sxzhongf.ad.service.IUserService和com.sxzhongf.ad.service.impl.UserServiceImpl,UserServiceImpl实现了IUserService。 创建 IUserService 接口 /** * IUserService for 用户service * * @author <a href="mailto:magicianisaac@gmail.com">Isaac.Zhang | 若初</a> */ public interface IUserService { /** * 创建用户接口 * * @param userRequestVO {@link UserRequestVO} * @return {@link UserResponseVO} * @throws AdException 错误 */ UserResponseVO createUser(UserRequestVO userRequestVO) throws AdException; List<AdUser> findAllByUserName(String userName); } 使用IUserService接口 /** * UserServiceImpl for 用户service * * @author <a href="mailto:magicianisaac@gmail.com">Isaac.Zhang | 若初</a> */ @Slf4j @Service public class UserServiceImpl implements IUserService { private final AdUserRepository userRepository; @Autowired public UserServiceImpl(AdUserRepository userRepository) { this.userRepository = userRepository; } /** * 创建用户 * * @param userRequestVO {@link UserRequestVO} * @return result {@link UserResponseVO} */ @Override @Transactional public UserResponseVO createUser(UserRequestVO userRequestVO) throws AdException { if (!userRequestVO.validate()) { log.error("Request params error: {}", userRequestVO); throw new AdException(Constants.ErrorMessage.REQUEST_PARAM_ERROR); } //查重 AdUser existUser = userRepository.findByUserName(userRequestVO.getUserName()); if (existUser != null) { log.error("{} user is not exist.", userRequestVO.getUserName()); throw new AdException(Constants.ErrorMessage.USER_EXIST); } AdUser user = userRepository.save(new AdUser(userRequestVO.getUserName(), CommonUtils.md5(userRequestVO.getUserName()))); log.info("current user is : {}", user); return new UserResponseVO(user.getUserId(), user.getUserName(), user.getToken(), user.getCreateTime(), user.getUpdateTime()); } @Override public List<AdUser> findAllByUserName(String userName) { return userRepository.findAllByUserName(userName); } } 创建数据传输对象(dto/vo) 其实好多人在这里都会特别郁闷,搞不清楚这些命名有什么区别,个人建议是大家不用纠结,dto(data transfer object),就是表示我们在各个层传递的对象,vo在展示层操作的对象。但是这个只是个命名,它的本质就是一个object, 你传递到DAO层可以吗?当然可以,你传单独字段都是可以的。所以,没必要过分纠结这种信息,咬文嚼字有时候反而会适得其反。 /** * UserRequestVO for 创建用户请求对象VO * * @author <a href="mailto:magicianisaac@gmail.com">Isaac.Zhang | 若初</a> */ @Data @AllArgsConstructor @NoArgsConstructor public class UserRequestVO { private String userName; public boolean validate() { return !StringUtils.isEmpty(userName); } } --- /** * UserResponseVO for 用户响应VO * * @author <a href="mailto:magicianisaac@gmail.com">Isaac.Zhang | 若初</a> */ @Data @AllArgsConstructor @NoArgsConstructor public class UserResponseVO { private Long userId; private String userName; private String token; private Date createTime; private Date updateTime; } 因为报错信息有可能是相同的,那我们抽取一个常量类来封装。 /** * Constants for TODO * * @author <a href="mailto:magicianisaac@gmail.com">Isaac.Zhang | 若初</a> */ public class Constants { /** * 通用错误信息异常类 */ public static class ErrorMessage { public static final String REQUEST_PARAM_ERROR = "请求参数异常"; public static final String USER_EXIST = "用户已存在"; public static final String USER_NOT_EXIST = "用户不存在"; } } 在Common Project 下面创建一个工具类com.sxzhongf.ad.common.utils.CommonUtils,用来对用户username进行md5加密来获取token信息。 /** * CommonUtils for 工具类 * * @author <a href="mailto:magicianisaac@gmail.com">Isaac.Zhang | 若初</a> */ @Slf4j public class CommonUtils { /** * md5 加密 */ public static String md5(String value) { return DigestUtils.md5Hex(value).toUpperCase(); } } 参考创建用户的实现,依次实现其他表操作。 Controller实现 依然以用户功能实现为例: /** * UserController for 用户controller * * @author <a href="mailto:magicianisaac@gmail.com">Isaac.Zhang | 若初</a> */ @RestController @Slf4j @RequestMapping("/user") public class UserController { @Autowired private IUserService userService; @PostMapping(path = "/create") public UserResponseVO createUser(@RequestBody UserRequestVO requestVO) throws AdException { log.info("ad-sponsor: createUser -> {}", JSON.toJSONString(requestVO)); return userService.createUser(requestVO); } @GetMapping(path = "/get") public CommonResponse getUserList(@Param(value = "username") String username) throws AdException { log.info("ad-sponsor: getUserList -> {}", JSON.toJSONString(username)); return new CommonResponse(userService.findAllByUserName(username)); } } 在网关中配置广告投放系统 我们在投放系统的配置中,配置了server.servlet.context-path:/ad-sponsor这么一个路径,意味着所有请求当前系统的路径都需要带有ad-sponsor, 例如:http://xxx/ad-sponsor/user/get?username=yyy,这是网关请求所必需的。根据上述,我们在网关服务中配置我们当前的投放系统: spring: application: name: ad-gateway-zuul server: port: 1111 eureka: client: service-url: defaultZone: http://server1:7777/eureka/,http://server2:8888/eureka/,http://server3:9999/eureka/ instance: hostname: ad-gateway-zuul ############################################## # 以下为重要信息 zuul: ignored-services: '*' # 过滤所有请求,除了下面routes中声明过的服务 # 配置网关路由规则 routes: sponsor: #在路由中自定义服务路由名称 path: /ad-sponsor/** serviceId: mscx-ad-sponsor #微服务name strip-prefix: false search: #在路由中自定义服务路由名称 path: /ad-search/** serviceId: mscx-ad-search #微服务name strip-prefix: false prefix: /gateway/api strip-prefix: false #不对 prefix: /gateway/api 设置的路径进行截取,默认转发会截取掉配置的前缀 Test 直接访问投放系统 调用curl -G http://localhost:7000/ad-sponsor/user/get?username=Isaac%20Zhang,返回结果: { code: 0, // 统一成功标示 message: "success", // 统一处理结果message data: [ // 具体的对象信息 { userId: 10, userName: "Isaac Zhang", token: "2D3ABB6F2434109A105170FB21D00453", userStatus: 1, createTime: 1561118873000, updateTime: 1561118873000 } ] } 通过网关调用 因为我在网关配置中加了前缀prefix: /gateway/api,因此,我们访问的时候需要添加上这个前缀信息,否则会报404错误。 curl -G http://localhost:1111/gateway/api/ad-sponsor/user/get?username=Isaac%20Zhang,我们发现结果并没有按照我们想象的展示出来。 bogon:~ zhangpan$ http://localhost:1111/gateway/api/ad-sponsor/user/get?username=Isaac%20Zhang -bash: http://localhost:1111/gateway/api/ad-sponsor/user/get?username=Isaac%20Zhang: No such file or directory 为什么呢?我们来查看一下日志: 2019-07-27 20:44:19.093 INFO 4766 --- [nio-1111-exec-4] c.s.a.g.filter.ValidateTokenFilter : GET request to http://localhost:1111/gateway/api/ad-sponsor/user/get 2019-07-27 20:44:19.093 WARN 4766 --- [nio-1111-exec-4] c.s.a.g.filter.ValidateTokenFilter : access token is empty 2019-07-27 20:44:19.098 INFO 4766 --- [nio-1111-exec-4] c.s.ad.gateway.filter.AccessLogFilter : Request "/gateway/api/ad-sponsor/user/get" spent : 0 seconds. 2019-07-27 20:48:37.801 INFO 4766 --- [trap-executor-0] c.n.d.s.r.aws.ConfigClusterResolver : Resolving eureka endpoints via configuration 我们可以清晰的看到,ValidateTokenFilter : access token is empty,为什么会有这么一个报错呢?那是因为我在配置网关的时候,添加了一次拦截: /** * ValidateTokenFilter for 服务token校验 * * @author <a href="mailto:magicianisaac@gmail.com">Isaac.Zhang</a> */ @Slf4j @Component public class ValidateTokenFilter extends ZuulFilter { ... @Override public Object run() throws ZuulException { RequestContext ctx = RequestContext.getCurrentContext(); HttpServletRequest request = ctx.getRequest(); log.info(String.format("%s request to %s", request.getMethod(), request.getRequestURL().toString())); Object accessToken = request.getHeader("accessToken"); //.getParameter("accessToken"); if (accessToken == null) { log.warn("access token is empty"); ctx.setSendZuulResponse(false); ctx.setResponseStatusCode(401); // ctx.setResponseBody(body)对返回body内容进行编辑 return null; } log.info("access token ok"); return null; } } 观察代码我们发现,会从RequestHeader中获取accessToken参数,我们没有提供,当然就会报错了呀。接下来,我们提供上该参数再试: bogon:~ zhangpan$ curl -H "accessToken:true" http://localhost:1111/gateway/api/ad-sponsor/user/get?username=Isaac%20Zhang ---返回 {"code":0,"message":"success","data":[{"userId":10,"userName":"Isaac Zhang","token":"2D3ABB6F2434109A105170FB21D00453","userStatus":1,"createTime":1561118873000,"updateTime":1561118873000}]} 至此,我们的广告投放系统简单功能已经全部实现完毕,并且可以通过网关进行转发。

资源下载

更多资源
优质分享App

优质分享App

近一个月的开发和优化,本站点的第一个app全新上线。该app采用极致压缩,本体才4.36MB。系统里面做了大量数据访问、缓存优化。方便用户在手机上查看文章。后续会推出HarmonyOS的适配版本。

Nacos

Nacos

Nacos /nɑ:kəʊs/ 是 Dynamic Naming and Configuration Service 的首字母简称,一个易于构建 AI Agent 应用的动态服务发现、配置管理和AI智能体管理平台。Nacos 致力于帮助您发现、配置和管理微服务及AI智能体应用。Nacos 提供了一组简单易用的特性集,帮助您快速实现动态服务发现、服务配置、服务元数据、流量管理。Nacos 帮助您更敏捷和容易地构建、交付和管理微服务平台。

Spring

Spring

Spring框架(Spring Framework)是由Rod Johnson于2002年提出的开源Java企业级应用框架,旨在通过使用JavaBean替代传统EJB实现方式降低企业级编程开发的复杂性。该框架基于简单性、可测试性和松耦合性设计理念,提供核心容器、应用上下文、数据访问集成等模块,支持整合Hibernate、Struts等第三方框架,其适用范围不仅限于服务器端开发,绝大多数Java应用均可从中受益。

Sublime Text

Sublime Text

Sublime Text具有漂亮的用户界面和强大的功能,例如代码缩略图,Python的插件,代码段等。还可自定义键绑定,菜单和工具栏。Sublime Text 的主要功能包括:拼写检查,书签,完整的 Python API , Goto 功能,即时项目切换,多选择,多窗口等等。Sublime Text 是一个跨平台的编辑器,同时支持Windows、Linux、Mac OS X等操作系统。

用户登录
用户注册