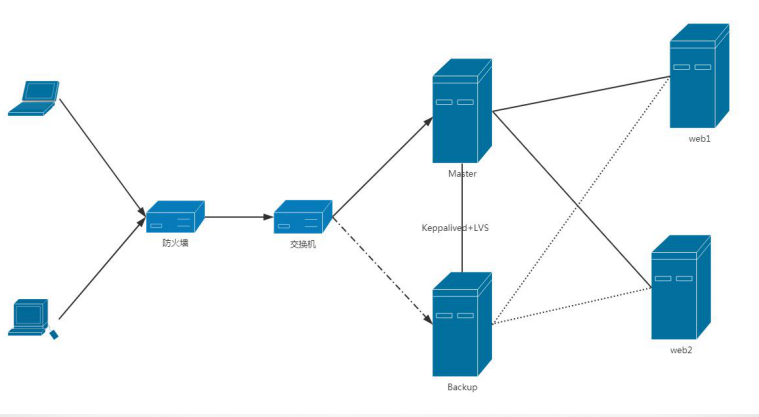
PostgreSQL 数据库HAProxy和PgBouncer配置高可用架构
一.OS Packages CentOS 7.2 X64 pcre-devel openssl-devel zlib-devel 二.编译安装haproxy 1.编译安装 haproxy-1.7.1.tar.gz # make TARGET=linux2628 USE_PCRE=1 USE_OPENSSL=1 USE_ZLIB=1 PREFIX=/usr/local/haproxy ...... ...... ...... oto_http.o src/raw_sock.o src/backend.o src/tcp_rules.o src/lb_chash.o src/lb_fwlc.o src/lb_fwrr.o src/lb_map.o src/lb_fas.o src/stream_interface.o src/stats.o src/proto_tcp.o src/applet.o src/session.o src/stream.o src/hdr_idx.o src/ev_select.o src/signal.o src/acl.o src/sample.o src/memory.o src/freq_ctr.o src/auth.o src/proto_udp.o src/compression.o src/payload.o src/hash.o src/pattern.o src/map.o src/namespace.o src/mailers.o src/dns.o src/vars.o src/filters.o src/flt_http_comp.o src/flt_trace.o src/flt_spoe.o src/cli.o src/ev_poll.o src/ev_epoll.o src/ssl_sock.o src/shctx.o ebtree/ebtree.o ebtree/eb32tree.o ebtree/eb64tree.o ebtree/ebmbtree.o ebtree/ebsttree.o ebtree/ebimtree.o ebtree/ebistree.o -lcrypt -lz -ldl -lssl -lcrypto -ldl -L/usr/lib -lpcreposix -lpcre gcc -Iinclude -Iebtree -Wall -O2 -g -fno-strict-aliasing -Wdeclaration-after-statement -DCONFIG_HAP_LINUX_SPLICE -DTPROXY -DCONFIG_HAP_LINUX_TPROXY -DCONFIG_HAP_CRYPT -DUSE_ZLIB -DENABLE_POLL -DENABLE_EPOLL -DUSE_CPU_AFFINITY -DASSUME_SPLICE_WORKS -DUSE_ACCEPT4 -DNETFILTER -DUSE_GETSOCKNAME -DUSE_OPENSSL -DUSE_SYSCALL_FUTEX -DUSE_PCRE -I/usr/include -DCONFIG_HAPROXY_VERSION=\"1.7.1\" -DCONFIG_HAPROXY_DATE=\"2016/12/13\" \ -DSBINDIR='"/usr/local/haproxy/sbin"' \ -c -o src/haproxy-systemd-wrapper.o src/haproxy-systemd-wrapper.c gcc -g -o haproxy-systemd-wrapper src/haproxy-systemd-wrapper.o -lcrypt -lz -ldl -lssl -lcrypto -ldl -L/usr/lib -lpcreposix -lpcre # # make install PREFIX=/usr/local/haproxy install -d "/usr/local/haproxy/sbin" install haproxy "/usr/local/haproxy/sbin" install -d "/usr/local/haproxy/share/man"/man1 install -m 644 doc/haproxy.1 "/usr/local/haproxy/share/man"/man1 install -d "/usr/local/haproxy/doc/haproxy" for x in configuration management architecture cookie-options lua WURFL-device-detection proxy-protocol linux-syn-cookies network-namespaces DeviceAtlas-device-detection 51Degrees-device-detection netscaler-client-ip-insertion-protocol close-options SPOE intro; do \ install -m 644 doc/$x.txt "/usr/local/haproxy/doc/haproxy" ; \ done # 2.配置文件 # pwd /usr/local/haproxy # mkdir etc # vi ha_proxy.conf global log 127.0.0.1 local0 info maxconn 40960 user haproxy group haproxy daemon nbproc 1 chroot /usr/local/haproxy pidfile /usr/local/haproxy/haproxy.pid defaults log global mode tcp option tcplog option dontlognull option redispatch retries 3 maxconn 2000 timeout connect 5s timeout client 360s timeout server 360s frontend postgres-front bind 192.168.199.201:5432 default_backend postgresql backend postgresql mode tcp option pgsql-check user haproxy balance roundrobin server postgresql_01 192.168.199.201:5430 weight 1 check inter 5s rise 2 fall 3 server postgresql_02 192.168.199.201:5431 weight 1 check inter 5s rise 2 fall 3 listen admin-stats mode http option httplog bind 0.0.0.0:8888 stats enable stats refresh 30s stats uri /dbs stats realm welcome login\ Haproxy stats auth admin:admin stats admin if TRUE # # 3.配置PATH变量 # vi /etc/profile unset -f pathmunge export PATH=/usr/local/haproxy/sbin:$PATH 三、安装pgbouncer 1.安装libevent libevent-2.0.22-stable.tar.gz # ./configure # make # make install ln -s /usr/local/lib/libevent-2.0.so.5 /usr/lib64/libevent-2.0.so.5 2.安装pgbouncer # ./configure --prefix=/opt/pgbouncer/1.17.2 ...... ...... Results c-ares = no evdns = yes udns = no tls = yes # make # make install # cd /opt/pgbouncer/1.17.2/ # mkdir etc log # 配置文件 # cd /opt/pgbouncer/1.17.2/share/doc/pgbouncer # cp pgbouncer.ini userlist.txt /opt/pgbouncer/1.17.2/etc/ # cd /opt/pgbouncer/1.17.2/etc/ vi pgbouncer.ini [root@localhost etc]# more pgbouncer.ini ;; database name = connect string ;; ;; connect string params: ;; dbname= host= port= user= password= ;; client_encoding= datestyle= timezone= ;; pool_size= connect_query= [databases] ;; * indicate testdb, haproxy * = port=6432 dbname=testdb user=postgres password=111111 ; foodb over unix socket ;foodb = ; redirect bardb to bazdb on localhost ;bardb = host=localhost dbname=bazdb ; access to dest database will go with single user ;forcedb = host=127.0.0.1 port=300 user=baz password=foo client_encoding=UNICODE datestyle=ISO connect_query='SELECT 1' ; use custom pool sizes ;nondefaultdb = pool_size=50 reserve_pool_size=10 ; fallback connect string ;* = host=testserver ;; Configuration section [pgbouncer] ;;; ;;; Administrative settings ;;; logfile = /opt/pgbouncer/1.17.2/log/pgbouncer.log pidfile = /opt/pgbouncer/1.17.2/bin/pgbouncer.pid ;;; ;;; Where to wait for clients ;;; ; ip address or * which means all ip-s listen_addr = * listen_port = 5430 ; unix socket is also used for -R. ; On debian it should be /var/run/postgresql ;unix_socket_dir = /tmp ;unix_socket_mode = 0777 ;unix_socket_group = ;;; ;;; TLS settings for accepring clients ;;; ;; disable, allow, require, verify-ca, verify-full ;client_tls_sslmode = disable ;; Path to file that contains trusted CA certs ;client_tls_ca_file = <system default> ;; Private key and cert to present to clients. ;; Required for accepting TLS connections from clients. ;client_tls_key_file = ;client_tls_cert_file = ;; fast, normal, secure, legacy, <ciphersuite string> ;client_tls_ciphers = fast ;; all, secure, tlsv1.0, tlsv1.1, tlsv1.2 ;client_tls_protocols = all ;; none, auto, legacy ;client_tls_dheparams = auto ;; none, auto, <curve name> ;client_tls_ecdhcurve = auto ;;; ;;; TLS settings for connecting to backend databases ;;; ;; disable, allow, require, verify-ca, verify-full ;server_tls_sslmode = disable ;; Path to that contains trusted CA certs ;server_tls_ca_file = <system default> ;; Private key and cert to present to backend. ;; Needed only if backend server require client cert. ;server_tls_key_file = ;server_tls_cert_file = ;; all, secure, tlsv1.0, tlsv1.1, tlsv1.2 ;server_tls_protocols = all ;; fast, normal, secure, legacy, <ciphersuite string> ;server_tls_ciphers = fast ;;; ;;; Authentication settings ;;; ; any, trust, plain, crypt, md5 auth_type = md5 ;auth_file = /8.0/main/global/pg_auth auth_file = /opt/pgbouncer/1.17.2/etc/userlist.txt ;; Path to HBA-style auth config ;auth_hba_file = ;; Query to use to fetch password from database. Result ;; must have 2 columns - username and password hash. ;auth_query = SELECT usename, passwd FROM pg_shadow WHERE usename=$1 ;;; ;;; Users allowed into database 'pgbouncer' ;;; ; comma-separated list of users, who are allowed to change settings ;admin_users = user2, someadmin, otheradmin admin_users = pgbadmin ; comma-separated list of users who are just allowed to use SHOW command ;stats_users = stats, root ;;; ;;; Pooler personality questions ;;; ; When server connection is released back to pool: ; session - after client disconnects ; transaction - after transaction finishes ; statement - after statement finishes pool_mode = transaction ; ; Query for cleaning connection immediately after releasing from client. ; No need to put ROLLBACK here, pgbouncer does not reuse connections ; where transaction is left open. ; ; Query for 8.3+: ; DISCARD ALL; ; ; Older versions: ; RESET ALL; SET SESSION AUTHORIZATION DEFAULT ; ; Empty if transaction pooling is in use. ; server_reset_query = ; Whether server_reset_query should run in all pooling modes. ; If it is off, server_reset_query is used only for session-pooling. ;server_reset_query_always = 0 ; ; Comma-separated list of parameters to ignore when given ; in startup packet. Newer JDBC versions require the ; extra_float_digits here. ; ;ignore_startup_parameters = extra_float_digits ; ; When taking idle server into use, this query is ran first. ; SELECT 1 ; server_check_query = select 1 ; If server was used more recently that this many seconds ago, ; skip the check query. Value 0 may or may not run in immediately. server_check_delay = 10 ;; Use <appname - host> as application_name on server. ;application_name_add_host = 0 ;;; ;;; Connection limits ;;; ; total number of clients that can connect max_client_conn = 10240 ; default pool size. 20 is good number when transaction pooling ; is in use, in session pooling it needs to be the number of ; max clients you want to handle at any moment default_pool_size = 100 ;; Minimum number of server connections to keep in pool. min_pool_size = 80 ; how many additional connection to allow in case of trouble ;reserve_pool_size = 5 ; if a clients needs to wait more than this many seconds, use reserve pool ;reserve_pool_timeout = 3 ; how many total connections to a single database to allow from all pools ;max_db_connections = 50 ;max_user_connections = 50 ; If off, then server connections are reused in LIFO manner ;server_round_robin = 0 ;;; ;;; Logging ;;; ;; Syslog settings ;syslog = 0 ;syslog_facility = daemon ;syslog_ident = pgbouncer ; log if client connects or server connection is made ;log_connections = 1 ; log if and why connection was closed ;log_disconnections = 1 ; log error messages pooler sends to clients ;log_pooler_errors = 1 ;; Period for writing aggregated stats into log. ;stats_period = 60 ;; Logging verbosity. Same as -v switch on command line. ;verbose=0 ;;; ;;; Timeouts ;;; ;; Close server connection if its been connected longer. server_lifetime = 300 ;; Close server connection if its not been used in this time. ;; Allows to clean unnecessary connections from pool after peak. ;server_idle_timeout = 60 ;; Cancel connection attempt if server does not answer takes longer. server_connect_timeout = 10 ;; If server login failed (server_connect_timeout or auth failure) ;; then wait this many second. server_login_retry = 3 ;; Dangerous. Server connection is closed if query does not return ;; in this time. Should be used to survive network problems, ;; _not_ as statement_timeout. (default: 0) ;query_timeout = 0 ;; Dangerous. Client connection is closed if the query is not assigned ;; to a server in this time. Should be used to limit the number of queued ;; queries in case of a database or network failure. (default: 120) ;query_wait_timeout = 120 ;; Dangerous. Client connection is closed if no activity in this time. ;; Should be used to survive network problems. (default: 0) ;client_idle_timeout = 0 ;; Disconnect clients who have not managed to log in after connecting ;; in this many seconds. ;client_login_timeout = 60 ;; Clean automatically created database entries (via "*") if they ;; stay unused in this many seconds. ; autodb_idle_timeout = 3600 ;; How long SUSPEND/-R waits for buffer flush before closing connection. ;suspend_timeout = 10 ;; Close connections which are in "IDLE in transaction" state longer than ;; this many seconds. idle_transaction_timeout = 300 ;;; ;;; Low-level tuning options ;;; ;; buffer for streaming packets ;pkt_buf = 4096 ;; man 2 listen listen_backlog = 2048 ;; Max number pkt_buf to process in one event loop. ;sbuf_loopcnt = 5 ;; Maximum Postgres protocol packet size. ;max_packet_size = 2147483647 ;; networking options, for info: man 7 tcp ;; Linux: notify program about new connection only if there ;; is also data received. (Seconds to wait.) ;; On Linux the default is 45, on other OS'es 0. ;tcp_defer_accept = 0 ;; In-kernel buffer size (Linux default: 4096) ;tcp_socket_buffer = 0 ;; whether tcp keepalive should be turned on (0/1) ;tcp_keepalive = 1 ;; following options are Linux-specific. ;; they also require tcp_keepalive=1 ;; count of keepaliva packets ;tcp_keepcnt = 0 ;; how long the connection can be idle, ;; before sending keepalive packets ;tcp_keepidle = 0 ;; The time between individual keepalive probes. ;tcp_keepintvl = 0 ;; DNS lookup caching time ;dns_max_ttl = 15 ;; DNS zone SOA lookup period ;dns_zone_check_period = 0 ;; DNS negative result caching time ;dns_nxdomain_ttl = 15 ;;; ;;; Random stuff ;;; ;; Hackish security feature. Helps against SQL-injection - when PQexec is disabled, ;; multi-statement cannot be made. ;disable_pqexec=0 ;; Config file to use for next RELOAD/SIGHUP. ;; By default contains config file from command line. ;conffile ;; Win32 service name to register as. job_name is alias for service_name, ;; used by some Skytools scripts. ;service_name = pgbouncer ;job_name = pgbouncer ;; Read additional config from the /etc/pgbouncer/pgbouncer-other.ini file ;%include /etc/pgbouncer/pgbouncer-other.ini # # vi userlist.txt "pgbadmin" "pgbouncer123" "haproxy" "haproxy" # 3.修改数据库访问端口'6432' # netstat -ltnp Active Internet connections (only servers) Proto Recv-Q Send-Q Local Address Foreign Address State PID/Program name tcp 0 0 0.0.0.0:22 0.0.0.0:* LISTEN 844/sshd tcp 0 0 127.0.0.1:25 0.0.0.0:* LISTEN 1572/master tcp 0 0 0.0.0.0:6432 0.0.0.0:* LISTEN 14974/postmaster # 设置PATH # vi /etc/profile export PATH=/opt/pgbouncer/1.17.2/bin:/usr/local/haproxy/sbin:$PATH 4.初始化数据库 建立数据库role haproxy postgres=# CREATE ROLE haproxy LOGIN ENCRYPTED PASSWORD 'md53b4da8c0b2ce93c288203e3d363895a6' SUPERUSER INHERIT CREATEDB CREATEROLE REPLICATION; 建立数据库 postgres=# \c postgres haproxy; postgres=# create database testdb; 建立表 testdb=# create table t1(id int, name varchar(20)); CREATE TABLE testdb=# 数据库访问控制 # vi pg_hba.conf host all all 192.168.199.0/24 trust 5.启动pgbouncer # chown postgres.postgres -R /opt/pgbouncer/ # su - postgres 1)pgbouncer01 $ pgbouncer -d /opt/pgbouncer/1.17.2/etc/pgbouncer.ini 2016-12-20 15:09:52.182 15013 LOG File descriptor limit: 1024 (H:4096), max_client_conn: 10240, max fds possible: 10350 $ 2) pgbouncer02 配置文件 ; ip address or * which means all ip-s listen_addr = * listen_port = 5431 ;;; ;;; Administrative settings ;;; logfile = /opt/pgbouncer/1.17.2/log/pgbouncer02.log pidfile = /opt/pgbouncer/1.17.2/bin/pgbouncer02.pid $ pgbouncer -d /opt/pgbouncer/1.17.2/etc/pgbouncer02.ini 2016-12-20 15:12:06.964 15020 LOG File descriptor limit: 1024 (H:4096), max_client_conn: 10240, max fds possible: 10350 $ 启动ha-proxy # haproxy -f /usr/local/haproxy/etc/ha_proxy.conf # netstat -lntp Active Internet connections (only servers) Proto Recv-Q Send-Q Local Address Foreign Address State PID/Program name tcp 0 0 0.0.0.0:5430 0.0.0.0:* LISTEN 16497/pgbouncer tcp 0 0 0.0.0.0:22 0.0.0.0:* LISTEN 844/sshd tcp 0 0 0.0.0.0:5431 0.0.0.0:* LISTEN 16500/pgbouncer tcp 0 0 0.0.0.0:8888 0.0.0.0:* LISTEN 16510/haproxy tcp 0 0 192.168.199.201:5432 0.0.0.0:* LISTEN 16510/haproxy tcp 0 0 127.0.0.1:25 0.0.0.0:* LISTEN 1572/master tcp 0 0 0.0.0.0:6432 0.0.0.0:* LISTEN 14974/postmaster tcp6 0 0 :::5430 :::* LISTEN 16497/pgbouncer tcp6 0 0 :::22 :::* LISTEN 844/sshd tcp6 0 0 :::5431 :::* LISTEN 16500/pgbouncer tcp6 0 0 ::1:25 :::* LISTEN 1572/master tcp6 0 0 :::6432 :::* LISTEN 14974/postmaster # 使用pgadmin客户端访问DB:testdb, user:haproxy, password:haproxy,IP:192.168.199.201, port:5432 测试连接 insert into t1 select generate_series(1,10000),'name'; $ more test.conf SELECT id FROM t1 WHERE id = 50; pgbench -h 192.168.199.201 -U haproxy -c 25 -j 25 -M prepared -n -s 500 -T 60 testdb -f ./test.conf 本文转自 pgmia 51CTO博客,原文链接:http://blog.51cto.com/heyiyi/1884440