首页 文章 精选 留言 我的

精选列表

搜索[融合分析],共10000篇文章
优秀的个人博客,低调大师

docker1.12-containerd源码分析

从原openstack转型至docker已有一段时间。更稳定的使用docker了解docker的各流程,从源代码层面了解下containerd。本文基于docker 1.12版本,从1.11开始docker已拆分docker daemon containerd源码流程图 源码接口调用详情 A)第一步从ctr入口至API接口 checkpoint(用于快照,docker目前该功能不完善) 1 2 3 list--> /types .API /ListCheckpoint create--> /types .API /CreateCheckpoint delete--> /types .API /DeleteCheckpoint containers 1 2 3 4 5 6 7 8 9 list、state--> /types .API /State pause、resume、update--> /types .API /UpdateContainer create--> /types .API /CreateContainer stats--> /types .API /Stats watch --> /types .API /State 、 /types .API /Events exec --> /types .API /Events 、 /types .API /AddProcess 、 /types .API /UpdateProcess kill --> /types .API /Signal start--> /types .API /Events 、 /types .API /CreateContainer 、 /types .API /UpdateProcess update--> /types .API /UpdateContainer events 1 /types .API /Events state 1 /types .API /State version 1 /types .API /GetServerVersion -- return result B)第二步从API接口至supervisor任务处理 1 注:API--server.go-->daemon–supervisor.go(handleTaskfunc) checkpoint 1 2 3 /types .API /ListCheckpoint (supervisor.GetContainersTask)-->getContainers /types .API /CreateCheckpoint -->createCheckpoint /types .API /DeleteCheckpoint -->deleteCheckpoint containers 1 2 3 4 5 6 7 /types .API /State /types .API /Stats (supervisor.GetContainersTask)-->getContainers /types .API /UpdateContainer (supervisor.UpdateTask)-->updateContainer /types .API /CreateContainer (supervisor.StartTask)-->start /types .API /Events -->Events-- return result /types .API /AddProcess -->addProcess /types .API /UpdateProcess -->updateProcess /types .API /Signal -->signal C)第三步从任务队列至runtime至runc checkpoint 1 2 3 getContainers-- return result createCheckpoint-->(runtime)CheckPoint--> exec .Command(c.runtime,arg....) deleteCheckpoint-->(runtime)DeleteCheckpoint-- return result containers 1 2 3 4 5 6 getContainers-- return result updateContainer-->(runtime)ResumePauseUpdateResources--> exec .Command(c.runtime,arg....) start-->(runtimesupervisor /worker .go)Start--> exec .Command(c.shim,c. id ,c.bundle,c.runtime) addProcess-->(runtime) exec --> exec .Command(c.shim,c. id ,c.bundle,c.runtime) updateProcess--> return result signal--> return result createContainer示例 deamon启动监听tasks及startTasks进程 a)进入main.go main方法调用daemon方法 1 2 3 4 5 6 7 app.Action=func(context*cli.Context){ if err:=daemon(context);err!=nil{ logrus.Fatal(err) } } b)进入main.go daemon方法 1 2 3 4 5 6 7 8 for i:=0;i<10;i++{ wg.Add(1) w:=supervisor.NewWorker(sv,wg) gow.Start() } if err:=sv.Start();err!=nil{ return err } c)初始化supervisor/worker.go NewWorker并启动监听startTask并处理 1 2 3 4 5 6 7 8 9 10 11 12 13 14 15 16 17 18 19 20 21 22 23 24 25 26 27 28 funcNewWorker(s*Supervisor,wg* sync .WaitGroup)Worker{ return &worker{ s:s, wg:wg, } } func(w*worker)Start(){ deferw.wg.Done() for t:=rangew.s.startTasks{ started:= time .Now() process,err:=t.Container.Start(t.CheckpointPath,runtime.NewStdio(t.Stdin,t.Stdout,t.Stderr)) if err!=nil{ logrus.WithFields(logrus.Fields{ "error" :err, "id" :t.Container.ID(), }).Error( "containerd:startcontainer" ) t.Err<-err evt:=&DeleteTask{ ID:t.Container.ID(), NoEvent: true , Process:process, } w.s.SendTask(evt) continue } d)启动supervisor/supervisor.go task监听task并处理 1 2 3 4 5 6 7 8 9 10 11 12 13 func(s*Supervisor)Start()error{ logrus.WithFields(logrus.Fields{ "stateDir" :s.stateDir, "runtime" :s.runtime, "runtimeArgs" :s.runtimeArgs, "memory" :s.machine.Memory, "cpus" :s.machine.Cpus, }).Debug( "containerd:supervisorrunning" ) gofunc(){ for i:=ranges.tasks{ s.handleTask(i) } containers容器创建示例 Ctl控制台命令入口 ctr/main.go containersCommand 1 2 3 4 5 6 7 8 9 10 11 execCommand, killCommand, listCommand, pauseCommand, resumeCommand, startCommand, stateCommand, statsCommand, watchCommand, updateCommand, ctr/container.go 1 2 3 4 5 6 7 8 9 10 11 12 13 14 15 16 17 18 19 20 21 22 23 24 25 26 27 28 29 30 31 32 33 34 35 36 37 38 39 40 41 42 varstartCommand=cli.Command{ Name: "start" , Usage: "startacontainer" , ArgsUsage:"IDBundlePath”,————…... events,err:=c.Events(netcontext.Background(),&types.EventsRequest{})/*事件创建*/ if err!=nil{ fatal(err.Error(),1) } if _,err:=c.CreateContainer(netcontext.Background(),r);err!=nil{/*容器创建*/ fatal(err.Error(),1) } if context.Bool( "attach" ){ gofunc(){ io.Copy(stdin,os.Stdin) if _,err:=c.UpdateProcess(netcontext.Background(),&types.UpdateProcessRequest{/*更新进程*/ Id: id , Pid: "init" , CloseStdin: true , });err!=nil{ fatal(err.Error(),1) } restoreAndCloseStdin() }() if tty { resize( id , "init" ,c) gofunc(){ s:= make (chanos.Signal,64) signal.Notify(s,syscall.SIGWINCH) for ranges{ if err:=resize( id , "init" ,c);err!=nil{ log.Println(err) } } }() } waitForExit(c,events, id , "init" ,restoreAndCloseStdin) } }, api处理 api/grpc/types/api.pb.go 1 2 3 4 5 6 7 8 9 10 11 12 13 14 15 16 17 18 19 20 21 22 23 24 25 26 27 28 29 30 31 32 33 34 35 36 func(c*aPIClient)Events(ctxcontext.Context, in *EventsRequest,opts...grpc.CallOption)(API_EventsClient,error){ stream,err:=grpc.NewClientStream(ctx,&_API_serviceDesc.Streams[0],c.cc, "/types.API/Events" ,opts...) if err!=nil{ return nil,err } x:=&aPIEventsClient{stream} if err:=x.ClientStream.SendMsg( in );err!=nil{ return nil,err } if err:=x.ClientStream.CloseSend();err!=nil{ return nil,err } return x,nil } func(c*aPIClient)CreateContainer(ctxcontext.Context, in *CreateContainerRequest,opts...grpc.CallOption)(*CreateContainerResponse,error){ out:=new(CreateContainerResponse) err:=grpc.Invoke(ctx, "/types.API/CreateContainer" , in ,out,c.cc,opts...) if err!=nil{ return nil,err } return out,nil } func(c*aPIClient)UpdateProcess(ctxcontext.Context, in *UpdateProcessRequest,opts...grpc.CallOption)(*UpdateProcessResponse,error){ out:=new(UpdateProcessResponse) err:=grpc.Invoke(ctx, "/types.API/UpdateProcess" , in ,out,c.cc,opts...) if err!=nil{ return nil,err } return out,nil } api/grpc/types/api.pb.go 1 2 3 4 5 6 7 8 9 10 11 12 13 14 15 16 17 18 19 20 21 22 23 24 25 26 27 28 29 30 31 32 33 34 35 36 37 38 39 40 41 42 43 44 45 func_API_Events_Handler(srvinterface{},streamgrpc.ServerStream)error{ m:=new(EventsRequest) if err:=stream.RecvMsg(m);err!=nil{ return err } return srv.(APIServer).Events(m,&aPIEventsServer{stream}) } func_API_CreateContainer_Handler(srvinterface{},ctxcontext.Context,decfunc(interface{})error,interceptorgrpc.UnaryServerInterceptor)(interface{},error){ in :=new(CreateContainerRequest) if err:=dec( in );err!=nil{ return nil,err } if interceptor==nil{ return srv.(APIServer).CreateContainer(ctx, in ) } info:=&grpc.UnaryServerInfo{ Server:srv, FullMethod: "/types.API/CreateContainer" , } handler:=func(ctxcontext.Context,reqinterface{})(interface{},error){ return srv.(APIServer).CreateContainer(ctx,req.(*CreateContainerRequest)) } return interceptor(ctx, in ,info,handler) } func_API_UpdateProcess_Handler(srvinterface{},ctxcontext.Context,decfunc(interface{})error,interceptorgrpc.UnaryServerInterceptor)(interface{},error){ in :=new(UpdateProcessRequest) if err:=dec( in );err!=nil{ return nil,err } if interceptor==nil{ return srv.(APIServer).UpdateProcess(ctx, in ) } info:=&grpc.UnaryServerInfo{ Server:srv, FullMethod: "/types.API/UpdateProcess" , } handler:=func(ctxcontext.Context,reqinterface{})(interface{},error){ return srv.(APIServer).UpdateProcess(ctx,req.(*UpdateProcessRequest)) } return interceptor(ctx, in ,info,handler) api/grpc/server/server.go进入第一步中的tasks及sendTasks处理队列 1 2 3 4 5 6 7 8 9 10 11 12 13 14 15 16 17 18 19 20 21 22 23 24 25 26 27 func(s*apiServer)Events(r*types.EventsRequest,streamtypes.API_EventsServer)error{ events:=s.sv.Events(t,r.StoredOnly,r.Id) func(s*apiServer)CreateContainer(ctxcontext.Context,c*types.CreateContainerRequest)(*types.CreateContainerResponse,error){ s.sv.SendTask(e) apiC,err:=createAPIContainer(r.Container, false ) func(s*apiServer)UpdateProcess(ctxcontext.Context,r*types.UpdateProcessRequest)(*types.UpdateProcessResponse,error){ e:=&supervisor.UpdateProcessTask{} e.ID=r.Id e.PID=r.Pid e.Height=int(r.Height) e.Width=int(r.Width) e.CloseStdin=r.CloseStdin s.sv.SendTask(e) if err:=<-e.ErrorCh();err!=nil{ return nil,err } return &types.UpdateProcessResponse{},nil } supervisor/create.go 1 2 func(s*Supervisor)start(t*StartTask)error{ s.startTasks<-task supervisor/worker.go 1 2 3 func(w*worker)Start(){ deferw.wg.Done() for t:=rangew.s.startTasks{ runtime/container.go 1 2 3 4 5 6 7 8 9 10 11 12 13 14 15 16 17 18 19 20 21 22 23 24 25 26 27 28 29 30 31 32 33 34 35 36 func(c*container)Start(checkpointPathstring,sStdio)(Process,error){ processRoot:=filepath.Join(c.root,c. id ,InitProcessID) if err:=os.Mkdir(processRoot,0755);err!=nil{ return nil,err } cmd:= exec .Command(c.shim, c. id ,c.bundle,c.runtime, )---执行docker-containerd-shim命令 cmd.Dir=processRoot cmd.SysProcAttr=&syscall.SysProcAttr{ Setpgid: true , } spec,err:=c.readSpec() if err!=nil{ return nil,err } config:=&processConfig{ checkpoint:checkpointPath, root:processRoot, id :InitProcessID, c:c, stdio:s, spec:spec, processSpec:specs.ProcessSpec(spec.Process), } p,err:=newProcess(config) if err!=nil{ return nil,err } if err:=c.createCmd(InitProcessID,cmd,p);err!=nil{ return nil,err } return p,nil } containerd-shim接收后处理 containerd-shim/main.go 1 2 3 4 5 6 7 8 9 10 11 12 13 14 15 16 17 funcstart(log*os.File)error{ p,err:=newProcess(flag.Arg(0),flag.Arg(1),flag.Arg(2)) if err!=nil{ return err } deferfunc(){ if err:=p.Close();err!=nil{ writeMessage(log, "warn" ,err) } }() if err:=p.create();err!=nil{ p.delete() return err } containerd-shim/process.go跳转执行runc命令 1 2 3 func(p*process)create()error{ cmd:= exec .Command(p.runtime,args...) 本文转自 qwjhq 51CTO博客,原文链接:http://blog.51cto.com/bingdian/1893470

优秀的个人博客,低调大师

hive的shims相关类分析

在hive的源码中经常可以看到shims相关的类,shims相关类是用来兼容不同的hadoop和hive版本的,以HadoopShims为例org.apache.hadoop.hive.shims.HadoopShims是一个接口,具体的实现类为 1 2 3 org.apache.hadoop.hive.shims.Hadoop20Shims org.apache.hadoop.hive.shims.Hadoop20SShims org.apache.hadoop.hive.shims.Hadoop23Shims 具体对应的那个shims类在ShimLoader类(org.apache.hadoop.hive.shims.ShimLoader)中有所定义,以HADOOP_SHIM_CLASSES为例: 1 2 3 4 5 6 7 8 9 10 /** *ThenamesoftheclassesforshimmingHadoopforeachmajorversion. */ private static final HashMap<String,String>HADOOP_SHIM_CLASSES= new HashMap<String,String>(); //首先定义了一个hashmap static { HADOOP_SHIM_CLASSES.put( "0.20" , "org.apache.hadoop.hive.shims.Hadoop20Shims" ); //0.20 HADOOP_SHIM_CLASSES.put( "0.20S" , "org.apache.hadoop.hive.shims.Hadoop20SShims" ); //1.x和0.20security版本的hadoop HADOOP_SHIM_CLASSES.put( "0.23" , "org.apache.hadoop.hive.shims.Hadoop23Shims" ); //2.x版本的hadoop } //向hashmap中插入对应的项,key为version信息,value为实际对应的类 ShimLoader类通过getHadoopShims方法返回具体的HadoopShims 1 2 3 4 5 6 7 8 private static HadoopShimshadoopShims; ...... public static synchronized HadoopShimsgetHadoopShims(){ if (hadoopShims== null ){ hadoopShims=loadShims(HADOOP_SHIM_CLASSES,HadoopShims. class ); //调用loadShims方法 } return hadoopShims; } 而loadShims方法通过判断hadoop的版本,来获取hashmap中对应的设置类 1 2 3 4 5 private static <T>TloadShims(Map<String,String>classMap,Class<T>xface){ Stringvers=getMajorVersion(); //获取hadoop的版本 StringclassName=classMap.get(vers); return createShim(className,xface); } 具体哪个hadoop版本是由getMajorVersion获取,比如我们线上使用的是2.0.0-cdh4.6.0,那么getMajorVersion返回的值为0.23,对应的HadoopShims实现类为org.apache.hadoop.hive.shims.Hadoop23Shims 1 2 3 4 5 6 7 8 9 10 11 12 13 14 15 16 17 18 19 20 21 22 23 24 25 26 27 28 29 30 public static StringgetMajorVersion(){ Stringvers=VersionInfo.getVersion(); //org.apache.hadoop.util.VersionInfo类的getVersion方法比如2.0.0-cdh4.6.0 String[]parts=vers.split( "\\." ); if (parts.length< 2 ){ throw new RuntimeException( "IllegalHadoopVersion:" +vers+ "(expectedA.B.*format)" ); } //SpecialhandlingforHadoop1.xand2.x switch (Integer.parseInt(parts[ 0 ])){ case 0 : break ; case 1 : return "0.20S" ; case 2 : return "0.23" ; default : throw new IllegalArgumentException( "UnrecognizedHadoopmajorversionnumber:" +vers); } StringmajorVersion=parts[ 0 ]+ "." +parts[ 1 ]; //Ifwearerunningasecurityrelease,wewon'thaveUnixUserGroupInformation //(removedbyHADOOP-6299whenswitchingtoJAASforLogin) try { Class.forName( "org.apache.hadoop.security.UnixUserGroupInformation" ); } catch (ClassNotFoundExceptioncnf){ if ( "0.20" .equals(majorVersion)){ majorVersion+= "S" ; } } return majorVersion; } 而不同的shims中规定了不同版本下的属性和方法等,比如判断是否localmode: 1).Hadoop20SShims类(Hadoop0.20 with Security和1.x版本) 1 2 3 4 5 6 7 8 @Override public boolean isLocalMode(Configurationconf){ return "local" .equals(getJobLauncherRpcAddress(conf)); } @Override public StringgetJobLauncherRpcAddress(Configurationconf){ //通过判断mapred.job.tracker的设置 return conf.get( "mapred.job.tracker" ); } 2).Hadoop20Shims类(Hadoop0.20版本) 同上3).Hadoop23Shims(Hadoop2.x版本) 1 2 3 4 @Override public boolean isLocalMode(Configurationconf){ return "local" .equals(conf.get( "mapreduce.framework.name" )); //根据mapreduce.framework.name设置 } 本文转自菜菜光 51CTO博客,原文链接:http://blog.51cto.com/caiguangguang/1564601,如需转载请自行联系原作者

优秀的个人博客,低调大师

ELK日志分析平台搭建全程

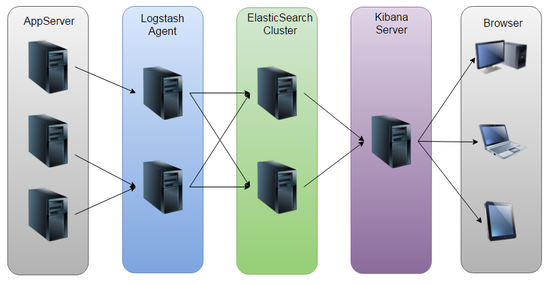
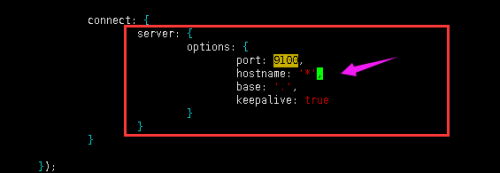
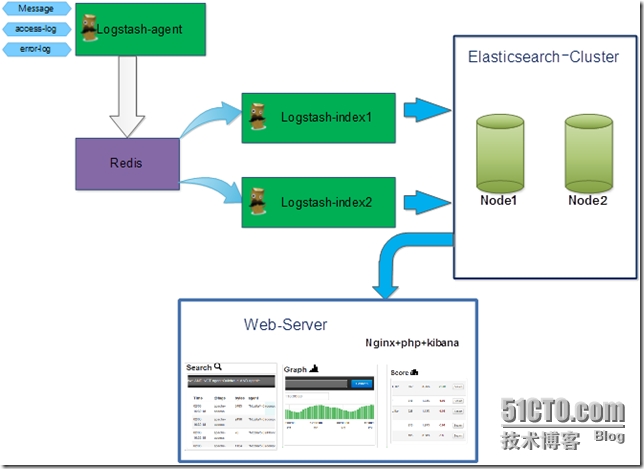
环境: OS:Centos 6.6 elasticsearch-5.6.3.tar.gz jdk-8u151-linux-x64.tar.gz kibana-5.6.3-linux-x86_64.tar.gz logstash-5.6.3.tar.gz node-v6.11.4-linux-x64.tar.xz 一、准备环境: 1、创建用户,并给安装目录设置权限 1 2 3 4 [root@1inux~]#groupaddelk [root@1inux~]#useradd-gelkelk [root@1inux~]#mkdir/elk [root@1inux~]#chown-Relk:elk/elk 修改系统某些参数值:【如不修改启动时会报错】 1 2 3 4 5 6 7 8 9 10 11 12 13 14 15 16 17 18 19 [root@1inux~]#vim/etc/security/limits.conf //添加一下内容 --------------------------- *softnofile 65536 *hardnofile 65536 *softnproc 2048 *hardnproc 4096 ---------------------------- [root@bogonelk]#vim/etc/security/limits.d/ 90 -nproc.conf //添加如下内容 *softnproc 2048 [root@1inux~]#vim/etc/sysctl.conf //添加以下内容 ------------------ fs.file- max = 65536 vm.max_map_count= 655360 ---------------------- [root@1inux~]#sysctl-p //查看vm.max_map_count值是否修改成功 修改进程数: [root@1inux~]#ulimit-u 2048 安装Java [root@1inux elk]# mkdir /usr/local/Java [root@1inux elk]# tar -zxvf jdk-8u151-linux-x64.tar.gz -C /usr/local/Java 添加环境变量: [root@1inux jdk1.8.0_151]# vim /etc/profile 添加如下: 1 2 3 exportJAVA_HOME=/usr/local/Java/jdk1.8.0_151 exportPATH=$PATH:$JAVA_HOME/bin exportCLASSPATH=.:$JAVA_HOME/lib/tools.jar:$JAVA_HOME/lib/dt.jar:$CLASSPAT 重新加载 [root@1inux jdk1.8.0_151]# source /etc/profile 查看是否安装成功: 1 2 3 4 [root@1inuxjdk1 .8. 0_151]#java-version javaversion" 1.8. 0_151" Java(TM)SERuntimeEnvironment(build 1.8. 0_151-b12) JavaHotSpot(TM) 64 -BitServerVM(build 25.151 -b12,mixedmode) 二:安装ELK 1、安装elasticsearch 1 2 3 4 5 6 #tar-zxvfelasticsearch-5.6.3.tar.gz 修改配置文件: vim./elasticsearch-5.6.3/config/elasticsearch.yml //设置监听IP及监听端口: network.host:0.0.0.0//设置监听IP http.port:9200//设置监听端口 注:elasticsearch不能使用root用户启动 启动elasticsearch//第一次启动有点慢: 1 2 3 4 5 6 7 [elk@1inuxroot]$cd/elk/elasticsearch-5.6.3/bin [elk@1inuxbin]$./elasticsearch 然后查看端口: [root@1inux~]#ss-tnl|grep9200 LISTEN0128::ffff:192.168.159.130:9200:::* [root@1inux~]# 1.1安装部署head 编辑elasticsearch配置文件做如下修改: 1 2 3 4 5 6 #vim/elk/elasticsearch-5.6.3/config/elasticsearch.yml node.name:node-1inux//修改集群名字 cluster.name:my-1inux//修改节点名字 //增加新的参数,这样head插件可以访问es http.cors.enabled:true http.cors.allow-origin: "*" 1)安装git 1 [root@ 1 inux/]#yum-yinstallgit 下载代码: 1 [root@ 1 inuxelk]#gitclonegit://github.com/mobz/elasticsearch-head.git 修改head目录权限: 1 [root@1inuxelk]#chown-Relk:elkelasticsearch-head 2)下载安装node https://nodejs.org/en/download/ 然后下载xz进行解压 1 2 3 #yum-yinstallxz [root@1inuxelk]#xz-dnode-v6.11.4-linux-x64.tar.xz [root@1inuxelk]#tar-xvfnode-v6.11.4-linux-x64.tar 添加node的环境变量 1 2 3 4 5 6 7 [root@ 1 inuxnode-v 6.11 . 4 -linux-x 64 ]#vim/etc/profile 添加如下: exportNODE_HOME=/elk/node-v 6.11 . 4 -linux-x 64 exportPATH=$PATH:$NODE_HOME/bin 重新加载 [root@ 1 inuxnode-v 6.11 . 4 -linux-x 64 ]#source/etc/profile 查看是否生效: 1 2 3 4 5 6 [root@1inuxnode-v6.11.4-linux-x64]#echo$NODE_HOME /elk/node-v6.11.4-linux-x64 [root@1inuxnode-v6.11.4-linux-x64]#node-v v6.11.4 [root@1inuxnode-v6.11.4-linux-x64]#npm-v 3.10.10 1 2 3 切换国内镜像源: npmconfig set registryhttps: //registry.npm.taobao.org npmconfig set disturlhttps: //npm.taobao.org/dist 3)安装grunt 1 2 [root@1inuxnode_modules]#npminstall-ggrunt [root@1inuxnode-v6.11.4-linux-x64]#npminstallgrunt-cli-g 查看是否安装成功: 1 2 [root@1inuxnode-v6 .11.4 -linux-x64]#grunt-version grunt-cliv1 .2.0 修改服务器监听地址 1 2 [root@1inuxelk]#vim/elk/elasticsearch-head/Gruntfile.js hostname:'*', 修改链接地址: 1 2 3 4 [root@1inuxelk]#vim/elk/elasticsearch-head/_site/app.js this .base_uri= this .config.base_uri|| this .prefs.get( "app-base_uri" )||" 修改为: this .base_uri= this .config.base_uri|| this .prefs.get( "app-base_uri" )|| "http://192.168.159.130:9200" ; 运行head 1 2 3 4 在head目录中执行 [root@1inuxelasticsearch-head]#npminstall 启动: [root@1inuxelasticsearch-head]#gruntserver 2、安装kibana [root@1inux elk]# tar -zxvf kibana-5.6.3-linux-x86_64.tar.gz 1 2 3 4 5 6 7 解压后编辑配置文件; [root@ 1 inuxbin]#vim../config/kibana.yml//修改为elasticsearch的访问地址及端口如下 #server.host: "localhost" server.host: "192.168.159.130" #elasticsearch.url: "http://localhost:9200" elasticsearch.url:" 然后保存启动如下; 1 2 3 4 5 6 7 8 [root@1inuxbin]#./kibana log [15:45:26.952][info][status][plugin:kibana@5.6.3]Statuschangedfromuninitializedtogreen-Ready log [15:45:27.067][info][status][plugin:elasticsearch@5.6.3]Statuschangedfromuninitializedtoyellow-WaitingforElasticsearch log [15:45:27.118][info][status][plugin:console@5.6.3]Statuschangedfromuninitializedtogreen-Ready log [15:45:27.136][info][status][plugin:metrics@5.6.3]Statuschangedfromuninitializedtogreen-Ready log [15:45:27.566][info][status][plugin:timelion@5.6.3]Statuschangedfromuninitializedtogreen-Ready log [15:45:27.697][info][listening]Serverrunningathttp://localhost:5601 log [15:45:27.699][info][status][uisettings]Statuschangedfromuninitializedtoyellow-Elasticsearchpluginisyellow 3、安装logstash-5.6.3.tar.gz 1 2 3 [root@ 1 inuxelk]#tar-zxvflogstash -5.6 . 3 .tar.gz 解压后编辑配置文件,然后就可以使用了 编写文件 1 2 3 4 5 6 7 8 9 10 11 12 13 14 15 16 17 18 编辑文件#vim/config/test.conf input{ file{ type=> "nginx_log" path=> "/var/log/nginx/access.log" start_position=> "beginning" } } output{ elasticsearch{ hosts=> "192.168.159.130" index=> "1inux" } stdout{codec=>rubydebug} } 启动: root@1inuxbin]#./logstash-f../config/test.conf 报错: 1、 1 2 3 [root@bogonelk]#./elasticsearch- 5.6.3 /bin/elasticsearch [ 2017 - 10 -25T06: 29 : 04 , 996 ][WARN][o . e . b . ElasticsearchUncaughtExceptionHandler][]uncaughtexception in thread[main] org . elasticsearch . bootstrap . StartupException:java . lang . RuntimeException:can not runelasticsearch as root 解决方案:使用elk用户启动 问题二、 1 2 3 4 5 6 ERROR:[4]bootstrapchecksfailed [1]:maxfiledescriptors[4096] for elasticsearchprocess is toolow,increasetoatleast[65536] [2]:maxnumberofthreads[1024] for user[elk] is toolow,increasetoatleast[2048] [3]:max virtual memoryareasvm.max_map_count[65530] is toolow,increasetoatleast[262144] 参考上面系统修改 问题三、 1 2 3 4 编辑elasticsearch配置文件 [ 4 ]:systemcallfiltersfailedtoinstall;checkthelogsandfixyourconfigurationordisablesystemcallfiltersatyourownrisk 在bootstrap.memory_lock下面添加: bootstrap.system_call_filter:false 本文转自 1inux 51CTO博客,原文链接:http://blog.51cto.com/1inux/1976229

优秀的个人博客,低调大师

Java反编译代码分析(一)

浅析如何读懂这种反编译过来的文件,不喜勿喷。 赋值 Node node; Node node1 = _$3.getChildNodes().item(0); node1; node1; JVM INSTR swap ; node; getChildNodes(); 0; item(); getChildNodes(); 0; item(); getNodeValue(); String s; s; 原始语句: Node node; Node node1 = currDocument.getChildNodes().item(0); node = node1; String s = node.getChildNodes().item(0).getChildNodes().item(0).getNodeValue(); //赋值语句 // JVM INSTR swap ; 不带参数创建对象 JVM INSTR new #244 <Class CrossTable>; JVM INSTR dup ; JVM INSTR swap ; CrossTable(); CrossTable crosstable; crosstable; CrossTable crosstable = new CrossTable(); 带参数创建对象 JVM INSTR new #262 <Class StringBuffer>; JVM INSTR dup ; JVM INSTR swap ; String.valueOf(s2); StringBuffer(); s.substring(j, i); append(); s6; append(); toString(); s2; s2 = (new StringBuffer(String.valueOf(s2))).append(s.substring(j, i)).append(s6).toString(); //s2 += s.substring(j, i) + s6; for循环 int k = 0; goto _L4 _L8: ... k++; _L4: if(k < as.length) goto _L8; else goto _L7 for(int k=0;k < as.length;k++) { ... } while循环 String s1 = ""; goto _L1 _L3: JVM INSTR new #262 <Class StringBuffer>; JVM INSTR dup ; JVM INSTR swap ; String.valueOf(s1); StringBuffer(); _$2(resultset, s, l); append(); toString(); s1; _L1: if(resultset.next()) goto _L3; else goto _L2 String s1 = ""; while(resultset.next()) { s1 = s1 + resultSetToString(resultset, s, l); } 我是天王盖地虎的分割线 本文转自我爱物联网博客园博客,原文链接:http://www.cnblogs.com/yydcdut/p/4314546.html,如需转载请自行联系原作者

资源下载

更多资源
腾讯云软件源

腾讯云软件源

为解决软件依赖安装时官方源访问速度慢的问题,腾讯云为一些软件搭建了缓存服务。您可以通过使用腾讯云软件源站来提升依赖包的安装速度。为了方便用户自由搭建服务架构,目前腾讯云软件源站支持公网访问和内网访问。

Nacos

Nacos

Nacos /nɑ:kəʊs/ 是 Dynamic Naming and Configuration Service 的首字母简称,一个易于构建 AI Agent 应用的动态服务发现、配置管理和AI智能体管理平台。Nacos 致力于帮助您发现、配置和管理微服务及AI智能体应用。Nacos 提供了一组简单易用的特性集,帮助您快速实现动态服务发现、服务配置、服务元数据、流量管理。Nacos 帮助您更敏捷和容易地构建、交付和管理微服务平台。

Spring

Spring

Spring框架(Spring Framework)是由Rod Johnson于2002年提出的开源Java企业级应用框架,旨在通过使用JavaBean替代传统EJB实现方式降低企业级编程开发的复杂性。该框架基于简单性、可测试性和松耦合性设计理念,提供核心容器、应用上下文、数据访问集成等模块,支持整合Hibernate、Struts等第三方框架,其适用范围不仅限于服务器端开发,绝大多数Java应用均可从中受益。

Rocky Linux

Rocky Linux

Rocky Linux(中文名:洛基)是由Gregory Kurtzer于2020年12月发起的企业级Linux发行版,作为CentOS稳定版停止维护后与RHEL(Red Hat Enterprise Linux)完全兼容的开源替代方案,由社区拥有并管理,支持x86_64、aarch64等架构。其通过重新编译RHEL源代码提供长期稳定性,采用模块化包装和SELinux安全架构,默认包含GNOME桌面环境及XFS文件系统,支持十年生命周期更新。

用户登录
用户注册