运维编排系列场景-----快速生成模版shell命令
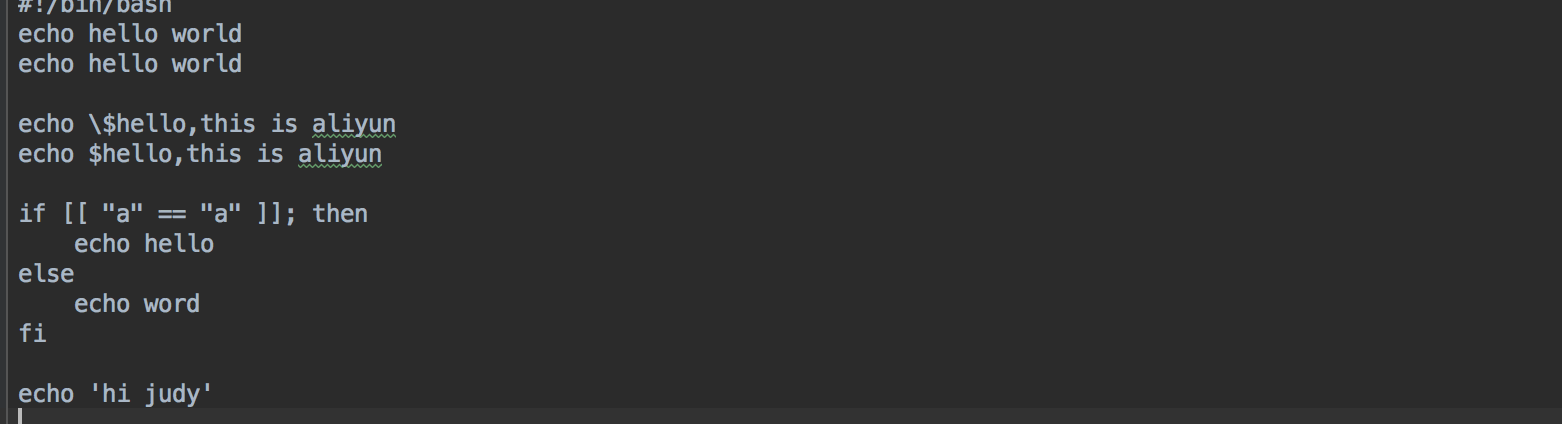
应用场景 当通过模版的方式在一台机器上运行shell文件时,需要在模版中把当前的所有shell命令都需要手动操作写进模版中,并添加需要写入的shell文件,尤其是遇到一些需要转译的特殊字符时,还需要手改,操作较为浪费时间。 解决方案 把当前需要修改的shell命令写入一个本地shell文件,通过python脚本的方式来实现把此文件内的所有命令转化为某一种特定的形式,及解决转化后的脚本特殊字符写进模版中转译的问题,转化的脚本可以直接输入到模版中运行,并保留格式。 一、转化shell脚本下面为用python实现的转化脚本,并将脚本命名为:oos_convert import re import sys commands = sys.argv # 要翻译的shell 脚本 file_path = '' or commands[1] def translate(): with open(file_path, 'r+', encoding='utf-8') as f: lines = f.readlines() for index, line in enumerate(lines): if index == 0: continue # print() new_line = repr(line).replace('\\t', ' ').replace('\\n', '').strip("'") if new_line.startswith('"'): print(new_line + ',') else: rep_line = new_line.replace('"', '\\"') print('"' + rep_line + '",') translate() Python脚本的运行方式:运行命令:pythonoos_convert.pyxxx.sh (例如:pythonoos_convert.py~/command.sh)或者在pycharm等编辑工具中直接运行,在编辑工具中需要将file_path根据实际需求来补充。 如下所示为一个shell文件内的命令 将以上python代码写入到一个自定义命名的py的文件中,在命令行中用python运行此文件,其运行结果如下所示,并将运行出来的结果复制到JSON格式的模版中。 二、打开控制台,找到运维编排三、创建模版 按如下所示编辑模版,并将python脚本转化的内容,复制到下面的模版中。注意:此脚本转化的内容仅支持JSON格式。 { "FormatVersion": "OOS-2019-06-01", "Description": "Creates a cloud assistant command and triggers it on one ECS instance.", "Parameters": { "instanceId": { "Description": "The ID of ECS instance that will invoke command.", "Type": "String", "AllowedPattern": "i-[A-Za-z0-9]*", "MinLength": 1, "MaxLength": 30 }, "regionId": { "Type": "String" }, "OOSAssumeRole": { "Description": "The RAM role to be assumed by OOS.", "Type": "String", "Default": "OOSServiceRole" } }, "RamRole": "{{ OOSAssumeRole }}", "Tasks": [ { "Name": "createCommand", "Action": "ACS::ExecuteAPI", "Description": "Creates a cloud assistant command.", "Properties": { "Service": "ECS", "API": "CreateCommand", "Parameters": { "CommandContent": { "Fn::Base64Encode": { "Fn::Join": [ "\n", [ "echo hello world", "echo hello world", "", "echo \\$hello,this is aliyun", "echo $hello,this is aliyun", "", "if [[ \"a\" == \"a\" ]]; then", " echo hello", "else", " echo word", "fi", "", "echo 'hi judy'" ] ] } }, "RegionId": "{{ regionId }}", "Name": "{{ ACS::ExecutionId }}", "Type": "RunShellScript", "WorkingDir": "/root", "Timeout": 30 } }, "Outputs": { "CommandId": { "Type": "String", "ValueSelector": "CommandId" } } }, { "Name": "invokeCommand", "Action": "ACS::ExecuteAPI", "Description": "Triggers a cloud assistant command on one ECS instances.", "Properties": { "Service": "ECS", "API": "InvokeCommand", "Parameters": { "CommandId": "{{ createCommand.CommandId }}", "InstanceIds": [ "{{ instanceId }}" ], "RegionId": "{{regionId}}" } }, "Outputs": { "InvokeId": { "Type": "String", "ValueSelector": "InvokeId" } } }, { "Name": "untilInvocationReady", "Action": "ACS::WaitFor", "Description": "Waits for the command to be completed.", "Delay": 20, "Retries": 30, "DelayType": "Constant", "Properties": { "Service": "ECS", "API": "DescribeInvocations", "Parameters": { "RegionId": "{{regionId}}", "InvokeId": "{{ invokeCommand.InvokeId }}" }, "DesiredValues": [ "Finished" ], "StopRetryValues": [ "Failed" ], "PropertySelector": "Invocations.Invocation[].InvokeStatus" }, "OnError": "deleteCommand" }, { "Name": "describeInvocationResults", "Action": "ACS::ExecuteAPI", "Description": "Views the command output of a cloud assistant command in the specified ECS instance.", "Properties": { "Service": "ECS", "API": "DescribeInvocationResults", "Parameters": { "RegionId": "{{regionId}}", "InvokeId": "{{ invokeCommand.InvokeId }}" } }, "Outputs": { "InvocationResult": { "Type": "String", "ValueSelector": "Invocation.InvocationResults.InvocationResult[].Output" } } }, { "Name": "checkInvocationResult", "Action": "ACS::CheckFor", "Description": "Views the command output of a cloud assistant command in the specified ECS instance.", "Properties": { "Service": "ECS", "API": "DescribeInvocationResults", "Parameters": { "RegionId": "{{regionId}}", "InvokeId": "{{ invokeCommand.InvokeId }}" }, "PropertySelector": "Invocation.InvocationResults.InvocationResult[].ExitCode", "DesiredValues": [ 0 ] } }, { "Name": "deleteCommand", "Action": "ACS::ExecuteAPI", "Description": "Deletes a cloud assistant command.", "Properties": { "Service": "ECS", "API": "DeleteCommand", "Parameters": { "RegionId": "{{ regionId}}", "CommandId": "{{ createCommand.CommandId }}" } } } ], "Outputs": { "InvocationOutput": { "Type": "String", "Value": { "Fn::Base64Decode": "{{ describeInvocationResults.InvocationResult }}" } } } } 四、校验模版,并格式化模版脚本转化完的模版格式如下所示,转化的脚本,如果格式没有对齐,点击鼠标右键,选择Format Doucument,来使模版格式化。注意:需要手动删除脚本最后一句的逗号。 五、创建执行找到创建好的模版,点击创建执行 六、点击创建执行模版开始正式执行,在输入的实例上执行想要运行的shell命令。 总结 由以上举例可见,此脚本的作用为手动操作节省了时间,并把在模版中解决了特殊字符转译的问题。此脚本还有很多不完善的地方,欢迎提出意见。 欢迎使用OOS OOS客户支持钉钉群:23330931OOS管理控制台的链接OOS帮助文档的链接