首页 文章 精选 留言 我的

精选列表

搜索[手动],共10007篇文章
优秀的个人博客,低调大师

SpreadJS 的 Table手动新增数据后获取完整字段的方法

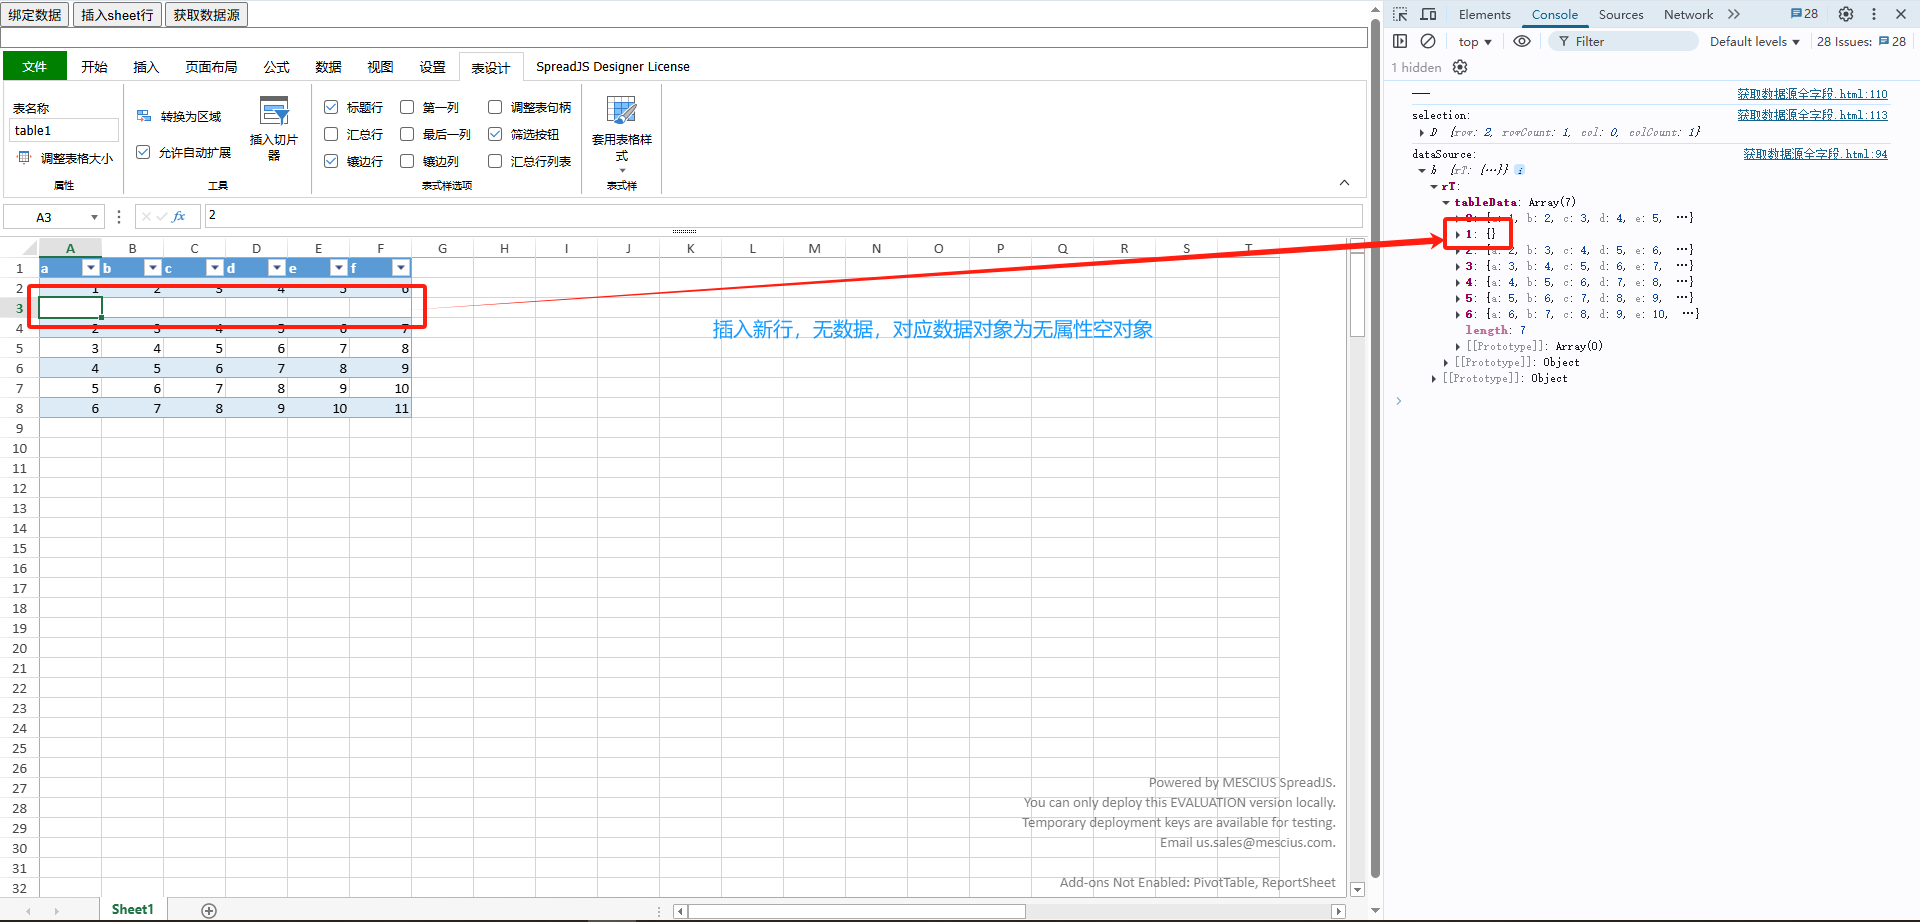
问题背景 在 SpreadJS 表格控件中,当Table数据绑定后,对Table插入行,新行内填充部分单元格。在getDataSource()返回值中,关于新增行的数据对象,仅有被填充单元格对应的字段。如何获取完整字段,不论对应单元格是否填充了数据。 数据绑定使用的数据是一个JavaScript对象,在代码运行期间,这个对象被创建后即存在于内存中。这也是为什么把文件导出时虽然携带了绑定的数据源,但是导入至新应用的Workbook中再调用Worksheet:getDataSource()得到的结果为null的原因。即在新应用运行时的内存空间中没有原本的数据源对象。 解决方法 回到问题背景,虽然新增行在Table区域内,但是没有数据,意味着这行数据在数据源对象中是一个各字段属性均不存在的空对象,如图1所示。 (图1. 新行对应空数据对象) 紧接着,如果对新增行内的个别单元格写入数据,数据绑定功能的双向绑定特性将单元格值和相关字段对应起来,组成一个对象。对于没被填充数据的单元格,不做类似处理。因此,Worksheet:getDataSource()获取到新增行中的数据对象仅包含被填充单元格对应的字段属性,如图2所示。 (图2. 新行数据对象包含被填充字段属性) 那如何获取完整字段呢?即,无论填充了哪些字段,都能获取到这一行对应的完整字段。Worksheet:getDataSource()应该是做不到了,因为接口并未提供可回调操作的参数,所以需要在接口外想办法了。 回顾下对Table执行数据绑定的准备工作,对Table列设置绑定路径,而每个列的绑定路径实际上对应为数据源中的一个字段,也就是说数据源模型可知。那么,在代码上下文中存储数据源模型为元数据,同时为每个字段设置数据类型和默认值,后面会用到。如图3所示,这个元数据定义了数据源对象的各个字段,名称分别为a、b、c、d、e和f,为简单起见,定义类型均为string,且默认值为空字符串。 (图3. 数据源模型元数据) 在Worksheet:getDataSource()后,结合数据源模型元数据遍历每行单元格对应的数据对象,检查当前数据对象中是否包含元数据中的每项字段。对于未包含的字段项,在当前数据对象中扩充,并且根据元数据中该字段项的数据类型和默认值设置其值,如图4所示代码片段。由于数据源对象存在于内存空间中,因此这一修改动作会直接影响数据源对象状态。 (图4. 数据对象默认值设置代码) 最终效果如下图所示: 附上Html: <!DOCTYPE html> <html lang="zh"> <head> <meta charset="UTF-8"> <title>获取数据源全字段</title> <meta name="spreadjs culture" content="zh-cn"/> <link href="http://cdn.grapecity.com/spreadjs/hosted/css/gc.spread.sheets.excel2013white.18.1.3.css" rel="stylesheet" type="text/css"/> <link href="http://cdn.grapecity.com/spreadjs/hosted/css/gc.spread.sheets.designer.18.1.3.min.css" rel="stylesheet" type="text/css"/> <script src="http://cdn.grapecity.com/spreadjs/hosted/scripts/gc.spread.sheets.all.18.1.3.min.js"></script> <script src="http://cdn.grapecity.com/spreadjs/hosted/scripts/plugins/gc.spread.sheets.shapes.18.1.3.min.js"></script> <script src="http://cdn.grapecity.com/spreadjs/hosted/scripts/plugins/gc.spread.sheets.charts.18.1.3.min.js"></script> <script src="http://cdn.grapecity.com/spreadjs/hosted/scripts/plugins/gc.spread.sheets.slicers.18.1.3.min.js"></script> <script src="http://cdn.grapecity.com/spreadjs/hosted/scripts/plugins/gc.spread.sheets.print.18.1.3.min.js"></script> <script src="http://cdn.grapecity.com/spreadjs/hosted/scripts/plugins/gc.spread.sheets.barcode.18.1.3.min.js"></script> <script src="http://cdn.grapecity.com/spreadjs/hosted/scripts/plugins/gc.spread.sheets.pdf.18.1.3.min.js"></script> <script src="http://cdn.grapecity.com/spreadjs/hosted/scripts/plugins/gc.spread.pivot.pivottables.18.1.3.min.js"></script> <script src="http://cdn.grapecity.com/spreadjs/hosted/scripts/plugins/gc.spread.sheets.tablesheet.18.1.3.min.js"></script> <script src="http://cdn.grapecity.com/spreadjs/hosted/scripts/plugins/gc.spread.sheets.ganttesheet.18.1.3.min.js"></script> <script src="http://cdn.grapecity.com/spreadjs/hosted/scripts/plugins/gc.spread.report.reportsheet.18.1.3.min.js"></script> <script src="http://cdn.grapecity.com/spreadjs/hosted/scripts/plugins/gc.spread.sheets.formulapanel.18.1.3.min.js"></script> <script src="http://cdn.grapecity.com/spreadjs/hosted/scripts/plugins/gc.spread.sheets.io.18.1.3.min.js"></script> <script src="http://cdn.grapecity.com/spreadjs/hosted/scripts/interop/gc.spread.excelio.18.1.3.min.js"></script> <script src="http://cdn.grapecity.com/spreadjs/hosted/scripts/resources/zh/gc.spread.sheets.resources.zh.18.1.3.min.js"></script> <script src="http://cdn.grapecity.com/spreadjs/hosted/scripts/gc.spread.sheets.designer.resource.cn.18.1.3.min.js"></script> <script src="http://cdn.grapecity.com/spreadjs/hosted/scripts/gc.spread.sheets.designer.all.18.1.3.min.js"></script> <style> .sample-tutorial { position: relative; height: 100%; overflow: hidden; } body { position: absolute; margin: 0; top: 0; bottom: 0; left: 0; right: 0; } .gc-across-sheet-ftb { z-index: -1 !important; } .gc-across-sheet-func-popup { z-index: -1 !important; } </style> </head> <body> <!-- <button id="readyBtn">绑定事件</button> --> <button id="bindingBtn">绑定数据</button> <button id="copyToBtn">插入sheet行</button> <button id="getDataSourceBtn">获取数据源</button> <div class="sample-tutorial"> <div class="demo-options"> <div class="option-row"> <div id="formulaBar" contenteditable="true" spellcheck="false" style="font-family: Calibri;border: 1px solid #808080;width:100%;box-sizing: border-box;"></div> </div> </div> <div id="ss" style="width:100%; height: calc(100% - 20px)"></div> </div> </body> <script> window.onload = function () { var designer = new GC.Spread.Sheets.Designer.Designer(document.getElementById('ss')); var spread = designer.getWorkbook(); init(spread); } function init(spread) { var sheet = spread.getActiveSheet(); var table = sheet.tables.add('table1', 0, 0, 7, 6); document.getElementById('bindingBtn').addEventListener('click', function() { tableBinding(spread.getActiveSheet()); }); document.getElementById('getDataSourceBtn').addEventListener('click', function() { var dataSource = spread.getActiveSheet().getDataSource(); console.log('dataSource: ', dataSource); var metaData = { 'a': {type: 'string', defaultValue: ''}, 'b': {type: 'string', defaultValue: ''}, 'c': {type: 'string', defaultValue: ''}, 'd': {type: 'string', defaultValue: ''}, 'd': {type: 'string', defaultValue: ''}, 'f': {type: 'string', defaultValue: ''} }; setDefaultValues(dataSource.rT.tableData, metaData); console.log('after data process: ', dataSource); }); document.getElementById('copyToBtn').addEventListener('click', function() { var sheet = spread.getActiveSheet(); var selection = sheet.getSelections()[0]; console.log('selection: ', selection); sheet.addRows(selection.row, 1); sheet.copyTo(selection.row - 1, 1, selection.row, 1, 1, 6, GC.Spread.Sheets.CopyToOptions.span); }); } /** * 数据对象属性默认值设置 */ function setDefaultValues(objArray, metaData) { if (objArray) { objArray.forEach(obj => { for (const key in metaData) { if (metaData.hasOwnProperty(key)) { const {defaultValue} = metaData[key]; if (!obj.hasOwnProperty(key) || obj[key] == undefined) { obj[key] = defaultValue; } } } }); } return objArray; } function tableBinding(sheet) { var table = sheet.tables.all()[0]; var tableColmn1 = new GC.Spread.Sheets.Tables.TableColumn(); tableColmn1.dataField('a'); tableColmn1.name('a字段'); var tableColmn2 = new GC.Spread.Sheets.Tables.TableColumn(); tableColmn2.dataField('c '); tableColmn2.name('b字段'); var tableColmn3 = new GC.Spread.Sheets.Tables.TableColumn(); tableColmn3.dataField('b'); tableColmn3.name('c字段'); var tableColmn4 = new GC.Spread.Sheets.Tables.TableColumn(); tableColmn4.dataField('d'); tableColmn4.name('d字段'); var tableColmn5 = new GC.Spread.Sheets.Tables.TableColumn(); tableColmn5.dataField('e'); tableColmn5.name('e字段'); var tableColmn6 = new GC.Spread.Sheets.Tables.TableColumn(); tableColmn6.dataField('f'); tableColmn6.name('f字段'); table.bindColumns([tableColmn1, tableColmn2, tableColmn3, tableColmn4, tableColmn5, tableColmn6]); table.bindingPath('tableData'); table.expandBoundRows(true); var data = { 'tableData': [ { 'a': 1, 'b': 2, 'c': 3, 'd': 4, 'e': 5, 'f': 6 }, { 'a': 2, 'b': 3, 'c': 4, 'd': 5, 'e': 6, 'f': 7 }, { 'a': 3, 'b': 4, 'c': 5, 'd': 6, 'e': 7, 'f': 8 }, { 'a': 4, 'b': 5, 'c': 6, 'd': 7, 'e': 8, 'f': 9 }, { 'a': 5, 'b': 6, 'c': 7, 'd': 8, 'e': 9, 'f': 10 }, { 'a': 6, 'b': 7, 'c': 8, 'd': 9, 'e': 10, 'f': 11 }, ] }; var dataSource = new GC.Spread.Sheets.Bindings.CellBindingSource(data); sheet.setDataSource(dataSource); } </script> </html>

优秀的个人博客,低调大师

Centos0S7手动安装OpenStack Pike版--(glance)

#Configure Glance mysql -uroot -ppasswd123 -e "CREATE DATABASE glance" mysql -uroot -ppasswd123 -e "GRANT ALL PRIVILEGES ON glance.TO 'glance'@'localhost' IDENTIFIED BY 'passwd123'" mysql -uroot -ppasswd123 -e "GRANT ALL PRIVILEGES ON glance.TO 'glance'@'%' IDENTIFIED BY 'passwd123'" openstack user create --domain default --password passwd123 glance openstack role add --project service --user glance admin openstack service create --name glance --description "OpenStack Image" image openstack endpoint create --region RegionOne image publichttp://controller:9292 openstack endpoint create --region RegionOne image internalhttp://controller:9292 openstack endpoint create --region RegionOne image adminhttp://controller:9292 openstack-config --set /etc/glance/glance-api.conf database connection mysql+pymysql://glance:passwd123@controller/glance openstack-config --set /etc/glance/glance-api.conf keystone_authtoken auth_urihttp://controller:5000 openstack-config --set /etc/glance/glance-api.conf keystone_authtoken auth_urlhttp://controller:35357 openstack-config --set /etc/glance/glance-api.conf keystone_authtoken memcached_servers controller:11211 openstack-config --set /etc/glance/glance-api.conf keystone_authtoken auth_type password openstack-config --set /etc/glance/glance-api.conf keystone_authtoken project_domain_name Default openstack-config --set /etc/glance/glance-api.conf keystone_authtoken user_domain_name Default openstack-config --set /etc/glance/glance-api.conf keystone_authtoken project_name service openstack-config --set /etc/glance/glance-api.conf keystone_authtoken username glance openstack-config --set /etc/glance/glance-api.conf keystone_authtoken password passwd123 openstack-config --set /etc/glance/glance-api.conf paste_deploy flavor keystone openstack-config --set /etc/glance/glance-api.conf glance_store stores file,http openstack-config --set /etc/glance/glance-api.conf glance_store default_store file openstack-config --set /etc/glance/glance-api.conf glance_store filesystem_store_datadir /var/lib/glance/images/ /etc/glance/glance-registry.conf openstack-config --set /etc/glance/glance-registry.conf database connection mysql+pymysql://glance:passwd123@controller/glance openstack-config --set /etc/glance/glance-registry.conf keystone_authtoken auth_urihttp://controller:5000 openstack-config --set /etc/glance/glance-registry.conf keystone_authtoken auth_urlhttp://controller:35357 openstack-config --set /etc/glance/glance-registry.conf keystone_authtoken memcached_servers controller:11211 openstack-config --set /etc/glance/glance-registry.conf keystone_authtoken auth_type password openstack-config --set /etc/glance/glance-registry.conf keystone_authtoken project_domain_name Default openstack-config --set /etc/glance/glance-registry.conf keystone_authtoken user_domain_name Default openstack-config --set /etc/glance/glance-registry.conf keystone_authtoken project_name service openstack-config --set /etc/glance/glance-registry.conf keystone_authtoken username glance openstack-config --set /etc/glance/glance-registry.conf keystone_authtoken password passwd123 openstack-config --set /etc/glance/glance-registry.conf paste_deploy flavor keystone su -s /bin/sh -c "glance-manage db_sync" glance systemctl enable openstack-glance-api.service openstack-glance-registry.service systemctl start openstack-glance-api.service openstack-glance-registry.service systemctl status openstack-glance-api.service openstack-glance-registry.service source admin-openrc openstack image create "centos7" --file CentOS-7-x86_64-GenericCloud.qcow2 --disk-format qcow2 --container-format bare --public openstack image list 本文转自 OpenStack2015 博客,原文链接: http://blog.51cto.com/andyliu/2069164 如需转载请自行联系原作者

优秀的个人博客,低调大师

Centos0S7手动安装OpenStack Pike版--(keystone)

OpenStack安装指南_Mitakahttp://down.51cto.com/data/2331199 Openstack管理手册-Newton版-CentOS7.2http://down.51cto.com/data/2331201 #Configure Keystone mysql -uroot -ppasswd123 -e "CREATE DATABASE keystone" mysql -uroot -ppasswd123 -e "GRANT ALL PRIVILEGES ON keystone.TO 'keystone'@'localhost' IDENTIFIED BY 'passwd123'" mysql -uroot -ppasswd123 -e "GRANT ALL PRIVILEGES ON keystone.TO 'keystone'@'%' IDENTIFIED BY 'passwd123'" vim /etc/keystone/keystone.conf [database] connection = mysql+pymysql://keystone:passwd123@controller/keystone [token] provider = fernet su -s /bin/sh -c "keystone-manage db_sync" keystone keystone-manage fernet_setup --keystone-user keystone --keystone-group keystone keystone-manage credential_setup --keystone-user keystone --keystone-group keystone keystone-manage bootstrap --bootstrap-password ADMIN_PASS \ --bootstrap-admin-urlhttp://controller:35357/v3/\ --bootstrap-internal-urlhttp://controller:5000/v3/\ --bootstrap-public-urlhttp://controller:5000/v3/\ --bootstrap-region-id RegionOne Configure the Apache HTTP server vim /etc/httpd/conf/httpd.conf ServerName controller ln -s /usr/share/keystone/wsgi-keystone.conf /etc/httpd/conf.d/ systemctl start httpd.service systemctl enable httpd.service systemctl status httpd.service export OS_USERNAME=admin export OS_PASSWORD=passwd123 export OS_PROJECT_NAME=admin export OS_USER_DOMAIN_NAME=Default export OS_PROJECT_DOMAIN_NAME=Default export OS_AUTH_URL=http://controller:35357/v3 export OS_IDENTITY_API_VERSION=3 openstack project create --domain default --description "Service Project" service openstack project create --domain default --description "Demo Project" demo openstack user create --domain default --password passwd123 demo openstack role create user openstack role add --project demo --user demo user unset OS_AUTH_URL OS_PASSWORD openstack --os-auth-urlhttp://controller:35357/v3\ --os-project-domain-name Default --os-user-domain-name Default \ --os-project-name admin --os-username admin token issue openstack --os-auth-urlhttp://controller:5000/v3\ --os-project-domain-name Default --os-user-domain-name Default \ --os-project-name demo --os-username demo token issue vim admin-openrc export OS_PROJECT_DOMAIN_NAME=Default export OS_USER_DOMAIN_NAME=Default export OS_PROJECT_NAME=admin export OS_USERNAME=admin export OS_PASSWORD=passwd123 export OS_AUTH_URL=http://controller:35357/v3 export OS_IDENTITY_API_VERSION=3 export OS_IMAGE_API_VERSION=2 source admin-openrc openstack token issue 本文转自 OpenStack2015 博客,原文链接: http://blog.51cto.com/andyliu/2069163 如需转载请自行联系原作者

优秀的个人博客,低调大师

Centos0S7手动安装OpenStack Pike版--(Evironment)

OpenStack安装指南_Mitakahttp://down.51cto.com/data/2331199 Openstack管理手册-Newton版-CentOS7.2http://down.51cto.com/data/2331201 [root@controller ~]# cat /etc/hosts 127.0.0.1 localhost localhost.localdomain localhost4 localhost4.localdomain4 192.168.137.145 controller 192.168.137.146 compute 192.168.137.149 storage #Install ALL Packages and Configure Evironment yum install centos-release-openstack-pike -y yum install python-openstackclient -y yum install openstack-selinux -y yum install mariadb mariadb-server python2-PyMySQL -y yum install rabbitmq-server -y yum install memcached python-memcached -y yum install etcd -y yum install openstack-keystone httpd mod_wsgi -y yum install openstack-glance -y yum install -y openstack-nova-api openstack-nova-conductor \ openstack-nova-console openstack-nova-novncproxy \ openstack-nova-scheduler openstack-nova-placement-api yum install -y openstack-neutron openstack-neutron-ml2 \ openstack-neutron-linuxbridge ebtables #Configure RabbitMQ systemctl enable rabbitmq-server.service systemctl start rabbitmq-server.service systemctl status rabbitmq-server.service rabbitmqctl add_user openstack passwd123 rabbitmqctl set_permissions openstack "." "." ".*" #Configure Memcached vim /etc/sysconfig/memcached OPTIONS="-l 127.0.0.1,::1,controller" systemctl enable memcached.service systemctl start memcached.service OpenStack服务可以使用户可靠,分布式键值存储的分布式密钥锁定,存储配置,跟踪服务活性等情况。 #Configure Etcd vim /etc/etcd/etcd.conf [root@controller ~]# vim /etc/etcd/etcd.conf #[Member] ETCD_DATA_DIR="/var/lib/etcd/default.etcd" ETCD_LISTEN_PEER_URLS="http://192.168.137.145:2380" ETCD_LISTEN_CLIENT_URLS="http://192.168.137.145:2379" ETCD_NAME="controller" #[Clustering] ETCD_INITIAL_ADVERTISE_PEER_URLS="http://192.168.137.145:2380" ETCD_ADVERTISE_CLIENT_URLS="http://192.168.137.145:2379" ETCD_INITIAL_CLUSTER="controller=http://192.168.137.145:2380" ETCD_INITIAL_CLUSTER_TOKEN="etcd-cluster-01" ETCD_INITIAL_CLUSTER_STATE="new" systemctl enable etcd systemctl start etcd systemctl status etcd 本文转自 OpenStack2015 博客,原文链接:http://blog.51cto.com/andyliu/2069162 如需转载请自行联系原作者

优秀的个人博客,低调大师

Centos0S7手动安装OpenStack Pike版--(nova)

OpenStack安装指南_Mitakahttp://down.51cto.com/data/2331199 Openstack管理手册-Newton版-CentOS7.2http://down.51cto.com/data/2331201 #Configure Nova mysql -uroot -ppasswd123 -e "CREATE DATABASE nova_api" mysql -uroot -ppasswd123 -e "CREATE DATABASE nova" mysql -uroot -ppasswd123 -e "CREATE DATABASE nova_cell0" mysql -uroot -ppasswd123 -e "GRANT ALL PRIVILEGES ON nova_api.TO 'nova'@'localhost' IDENTIFIED BY 'passwd123'" mysql -uroot -ppasswd123 -e "GRANT ALL PRIVILEGES ON nova_api.TO 'nova'@'%' IDENTIFIED BY 'passwd123'" mysql -uroot -ppasswd123 -e "GRANT ALL PRIVILEGES ON nova.TO 'nova'@'localhost' IDENTIFIED BY 'passwd123'" mysql -uroot -ppasswd123 -e "GRANT ALL PRIVILEGES ON nova.TO 'nova'@'%' IDENTIFIED BY 'passwd123'" mysql -uroot -ppasswd123 -e "GRANT ALL PRIVILEGES ON nova_cell0.TO 'nova'@'localhost' IDENTIFIED BY 'passwd123'" mysql -uroot -ppasswd123 -e "GRANT ALL PRIVILEGES ON nova_cell0.TO 'nova'@'%' IDENTIFIED BY 'passwd123'" source admin-openrc openstack user create --domain default --password passwd123 nova openstack role add --project service --user nova admin openstack service create --name nova --description "OpenStack Compute" compute openstack endpoint create --region RegionOne compute publichttp://controller:8774/v2.1 openstack endpoint create --region RegionOne compute internalhttp://controller:8774/v2.1 openstack endpoint create --region RegionOne compute adminhttp://controller:8774/v2.1 openstack user create --domain default --password paswd123 placement openstack role add --project service --user placement admin openstack service create --name placement --description "Placement API" placement openstack endpoint create --region RegionOne placement publichttp://controller:8778 openstack endpoint create --region RegionOne placement internalhttp://controller:8778 openstack endpoint create --region RegionOne placement adminhttp://controller:8778 Edit the /etc/nova/nova.conf openstack-config --set /etc/nova/nova.conf DEFAULT enabled_apis osapi_compute,metadata openstack-config --set /etc/nova/nova.conf api_database connection mysql+pymysql://nova:passwd123@controller/nova_api openstack-config --set /etc/nova/nova.conf database connection mysql+pymysql://nova:passwd123@controller/nova openstack-config --set /etc/nova/nova.conf DEFAULT transport_url rabbit://openstack:passwd123@controller openstack-config --set /etc/nova/nova.conf api auth_strategy keystone openstack-config --set /etc/nova/nova.conf keystone_authtoken auth_urihttp://controller:5000 openstack-config --set /etc/nova/nova.conf keystone_authtoken auth_urlhttp://controller:35357 openstack-config --set /etc/nova/nova.conf keystone_authtoken memcached_servers controller:11211 openstack-config --set /etc/nova/nova.conf keystone_authtoken auth_type password openstack-config --set /etc/nova/nova.conf keystone_authtoken project_domain_name default openstack-config --set /etc/nova/nova.conf keystone_authtoken user_domain_name default openstack-config --set /etc/nova/nova.conf keystone_authtoken project_name service openstack-config --set /etc/nova/nova.conf keystone_authtoken username nova openstack-config --set /etc/nova/nova.conf keystone_authtoken password passwd123 openstack-config --set /etc/nova/nova.conf DEFAULT my_ip 192.168.137.145 openstack-config --set /etc/nova/nova.conf DEFAULT use_neutron True openstack-config --set /etc/nova/nova.conf DEFAULT firewall_driver nova.virt.firewall.NoopFirewallDriver openstack-config --set /etc/nova/nova.conf vnc enabled true openstack-config --set /etc/nova/nova.conf vnc vncserver_listen 192.168.137.145 openstack-config --set /etc/nova/nova.conf vnc vncserver_proxyclient_address 192.168.137.145 openstack-config --set /etc/nova/nova.conf glance api_servershttp://controller:9292 openstack-config --set /etc/nova/nova.conf oslo_concurrency lock_path /var/lib/nova/tmp openstack-config --set /etc/nova/nova.conf placement os_region_name RegionOne openstack-config --set /etc/nova/nova.conf placement project_domain_name Default openstack-config --set /etc/nova/nova.conf placement project_name service openstack-config --set /etc/nova/nova.conf placement auth_type password openstack-config --set /etc/nova/nova.conf placement user_domain_name Default openstack-config --set /etc/nova/nova.conf placement auth_urlhttp://controller:35357/v3 openstack-config --set /etc/nova/nova.conf placement username placement openstack-config --set /etc/nova/nova.conf placement password passwd123 vim /etc/httpd/conf.d/00-nova-placement-api.conf <Directory /usr/bin> <IfVersion >= 2.4> Require all granted </IfVersion> <IfVersion < 2.4> Order allow,deny Allow from all </IfVersion> </Directory> systemctl restart httpd systemctl status httpd su -s /bin/sh -c "nova-manage api_db sync" nova su -s /bin/sh -c "nova-manage cell_v2 map_cell0" nova su -s /bin/sh -c "nova-manage cell_v2 create_cell --name=cell1 --verbose" nova su -s /bin/sh -c "nova-manage db sync" nova nova-manage cell_v2 list_cells systemctl enable openstack-nova-api.service openstack-nova-consoleauth.service openstack-nova-scheduler.service \ openstack-nova-conductor.service openstack-nova-novncproxy.service systemctl start openstack-nova-api.service openstack-nova-consoleauth.service openstack-nova-scheduler.service \ openstack-nova-conductor.service openstack-nova-novncproxy.service systemctl status openstack-nova-api.service openstack-nova-consoleauth.service openstack-nova-scheduler.service \ openstack-nova-conductor.service openstack-nova-novncproxy.service openstack service list 本文转自 OpenStack2015 博客,原文链接: http://blog.51cto.com/andyliu/2069165 如需转载请自行联系原作者

优秀的个人博客,低调大师

Python 的“怪异”设计:bool 竟是 int 的子类,垃圾回收还能手动关闭

波兰开发者 Maciej Kowalski 近日在其个人博客整理了一系列关于 Python 的"怪异"设计。这些特性看似反直觉,实则反映了 Python 作为一门纯面向对象语言的核心哲学——一切皆对象。 Python 比俄罗斯联邦还老。这是文章给出的第一个冷知识。Python 诞生于 1991 年 2 月 20 日,而苏联解体发生在同年 12 月 26 日。这意味着 Python 实际上比俄罗斯联邦还要"年长"近 10 个月。尽管近年来 Python 因人工智能和数据科学的爆发而风靡全球,甚至波兹南工业大学都已用 Python 取代 Delphi 作为教学语言,但它本质上是一门有着 30 多年历史的成熟语言。 更让人感到意外的是,在 Python 中 bool 竟然是 int 的子类。查看 CPython 的 builtins.pyi 定义可以清楚地看到 class bool(int) 这样的继承关系。因此 True + True 的结果是 2,而不是报错。这与 Java 等语言形成鲜明对比——Java 中 true + true 会直接触发编译错误。Python 的设计者认为这种多态更加优雅,而且它允许开发者通过继承 int 来创建自定义数值类型。例如,作者展示了一个 modulo10 类,继承自 int 并对加法运算取模,可以直接赋值给 int 类型的变量而不会触发类型检查错误。 class modulo10(int): def __add__(self, other): return super().__add__(other) % 10 x: int = modulo10(5) # no errors, types match assert x + 6 == 1 # pas Python 中的 None、True、False 都是单例对象(singleton),在解释器启动时就被创建,垃圾回收器永远不会触碰它们。反复调用 id(None) 会得到完全相同的内存地址。更实用的是小整数缓存机制:CPython 会预先分配 -5 到 256 之间的整数对象。这本质上是计算机科学中经典的 interning 模式,可以显著减少内存分配开销。 文章还提到了一个容易被忽视的"陷阱"——Python 的循环垃圾回收是可选的。只需四行代码就能人为制造内存泄漏:导入 gc 模块,调用 gc.disable() 禁用循环垃圾回收器,然后创建一个自引用的列表 a = []; a.append(a)。由于 Python 主要依赖引用计数来管理内存,而循环引用会导致引用计数永远无法归零,如果同时关闭了循环垃圾回收器,这段内存就真的泄漏了。 import gc gc.disable() a = [] a.append(a) 此外,文章还提到了 GIL(全局解释器锁)这一老生常谈的话题。由于 GIL 的存在,Python 的多线程程序在任意时刻只有一个线程在执行 Python 字节码,无论你的 CPU 有多少核心。对于 I/O 密集型任务,多线程依然有意义;但对于 CPU 密集型任务,多线程不仅无益,甚至可能适得其反。值得庆幸的是,Python 3.13 已经引入了实验性的自由线程模式,未来 GIL 有望被彻底移除。 文章还简要提及了 slots 内存优化、可变对象作为默认参数的经典陷阱,以及元类(metaclass)等高级特性。这些设计共同构成了 Python"一切皆对象"的语言哲学——函数是对象、类型是对象、甚至类本身也是对象。 参考来源:https://kowal.dev/blog/python-is-weird/

资源下载

更多资源
Mario

Mario

马里奥是站在游戏界顶峰的超人气多面角色。马里奥靠吃蘑菇成长,特征是大鼻子、头戴帽子、身穿背带裤,还留着胡子。与他的双胞胎兄弟路易基一起,长年担任任天堂的招牌角色。

腾讯云软件源

腾讯云软件源

为解决软件依赖安装时官方源访问速度慢的问题,腾讯云为一些软件搭建了缓存服务。您可以通过使用腾讯云软件源站来提升依赖包的安装速度。为了方便用户自由搭建服务架构,目前腾讯云软件源站支持公网访问和内网访问。

Spring

Spring

Spring框架(Spring Framework)是由Rod Johnson于2002年提出的开源Java企业级应用框架,旨在通过使用JavaBean替代传统EJB实现方式降低企业级编程开发的复杂性。该框架基于简单性、可测试性和松耦合性设计理念,提供核心容器、应用上下文、数据访问集成等模块,支持整合Hibernate、Struts等第三方框架,其适用范围不仅限于服务器端开发,绝大多数Java应用均可从中受益。

Sublime Text

Sublime Text

Sublime Text具有漂亮的用户界面和强大的功能,例如代码缩略图,Python的插件,代码段等。还可自定义键绑定,菜单和工具栏。Sublime Text 的主要功能包括:拼写检查,书签,完整的 Python API , Goto 功能,即时项目切换,多选择,多窗口等等。Sublime Text 是一个跨平台的编辑器,同时支持Windows、Linux、Mac OS X等操作系统。

用户登录
用户注册