Android自定义柱状图表效果
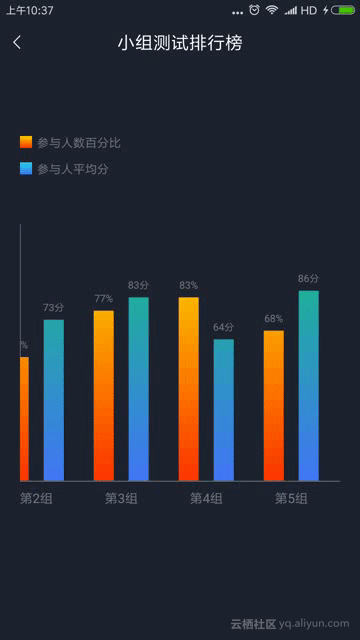
本文通过示例代码介绍如何自定义简单的直方图表,此图表并非常见的直方图表,而是可以分组的。此文不会过多涉及原理,比较简单,示例图片如下(gif图片没有制作好,有闪烁,请见谅): 对于该示例的代码实现,其实重点在于坐标轴、文字、直方图的位置控制,需要随滑动距离而动态更新。注意事项会在示例代码中标注。下面贴出示例代码 public class MultiGroupHistogramView extends View { private int width; private int height; // 坐标轴线宽度 private int coordinateAxisWidth; // 组名称字体大小 private int groupNameTextSize; // 小组之间间距 private int groupInterval; // 组内子直方图间距 private int histogramInterval; private int histogramValueTextSize; // 图表数值小数点位数 private int histogramValueDecimalCount; private int histogramHistogramWidth; private int chartPaddingTop; private int histogramPaddingStart; private int histogramPaddingEnd; // 各组名称到X轴的距离 private int distanceFormGroupNameToAxis; // 直方图上方数值到直方图的距离 private int distanceFromValueToHistogram; // 直方图最大高度 private int maxHistogramHeight; // 轴线画笔 private Paint coordinateAxisPaint; // 组名画笔 private Paint groupNamePaint; private Paint.FontMetrics groupNameFontMetrics; private Paint.FontMetrics histogramValueFontMetrics; // 直方图数值画笔 private Paint histogramValuePaint; // 直方图画笔 private Paint histogramPaint; // 直方图绘制区域 private Rect histogramPaintRect; // 直方图表视图总宽度 private int histogramContentWidth; // 存储组内直方图shader color,例如,每组有3个直方图,该SparseArray就存储3个相对应的shader color private SparseArray<int[]> histogramShaderColorArray; private List<MultiGroupHistogramGroupData> dataList; private SparseArray<Float> childMaxValueArray; private Scroller scroller; private int minimumVelocity; private int maximumVelocity; private VelocityTracker velocityTracker; public MultiGroupHistogramView(Context context) { this(context, null); } public MultiGroupHistogramView(Context context, @Nullable AttributeSet attrs) { this(context, attrs, 0); } public MultiGroupHistogramView(Context context, @Nullable AttributeSet attrs, int defStyleAttr) { super(context, attrs, defStyleAttr); init(attrs); } private void init(AttributeSet attrs) { setLayerType(View.LAYER_TYPE_HARDWARE, null); TypedArray typedArray = getContext().obtainStyledAttributes(attrs, R.styleable.MultiGroupHistogramView); coordinateAxisWidth = typedArray.getDimensionPixelSize(R.styleable.MultiGroupHistogramView_coordinateAxisWidth, DisplayUtil.dp2px(2)); // 坐标轴线颜色 int coordinateAxisColor = typedArray.getColor(R.styleable.MultiGroupHistogramView_coordinateAxisColor, Color.parseColor("#434343")); // 底部小组名称字体颜色 int groupNameTextColor = typedArray.getColor(R.styleable.MultiGroupHistogramView_groupNameTextColor, Color.parseColor("#CC202332")); groupNameTextSize = typedArray.getDimensionPixelSize(R.styleable.MultiGroupHistogramView_groupNameTextSize, DisplayUtil.dp2px(15)); groupInterval = typedArray.getDimensionPixelSize(R.styleable.MultiGroupHistogramView_groupInterval, DisplayUtil.dp2px(30)); histogramInterval = typedArray.getDimensionPixelSize(R.styleable.MultiGroupHistogramView_histogramInterval, DisplayUtil.dp2px(10)); // 直方图数值文本颜色 int histogramValueTextColor = typedArray.getColor(R.styleable.MultiGroupHistogramView_histogramValueTextColor, Color.parseColor("#CC202332")); histogramValueTextSize = typedArray.getDimensionPixelSize(R.styleable.MultiGroupHistogramView_histogramValueTextSize, DisplayUtil.dp2px(12)); histogramValueDecimalCount = typedArray.getInt(R.styleable.MultiGroupHistogramView_histogramValueDecimalCount, 0); histogramHistogramWidth = typedArray.getDimensionPixelSize(R.styleable.MultiGroupHistogramView_histogramHistogramWidth, DisplayUtil.dp2px(20)); chartPaddingTop = typedArray.getDimensionPixelSize(R.styleable.MultiGroupHistogramView_chartPaddingTop, DisplayUtil.dp2px(10)); histogramPaddingStart = typedArray.getDimensionPixelSize(R.styleable.MultiGroupHistogramView_histogramPaddingStart, DisplayUtil.dp2px(15)); histogramPaddingEnd = typedArray.getDimensionPixelSize(R.styleable.MultiGroupHistogramView_histogramPaddingEnd, DisplayUtil.dp2px(15)); distanceFormGroupNameToAxis = typedArray.getDimensionPixelSize(R.styleable.MultiGroupHistogramView_distanceFormGroupNameToAxis, DisplayUtil.dp2px(15)); distanceFromValueToHistogram = typedArray.getDimensionPixelSize(R.styleable.MultiGroupHistogramView_distanceFromValueToHistogram, DisplayUtil.dp2px(10)); typedArray.recycle(); coordinateAxisPaint = new Paint(Paint.ANTI_ALIAS_FLAG); coordinateAxisPaint.setStyle(Paint.Style.FILL); coordinateAxisPaint.setStrokeWidth(coordinateAxisWidth); coordinateAxisPaint.setColor(coordinateAxisColor); groupNamePaint = new Paint(Paint.ANTI_ALIAS_FLAG); groupNamePaint.setTextSize(groupNameTextSize); groupNamePaint.setColor(groupNameTextColor); groupNameFontMetrics = groupNamePaint.getFontMetrics(); histogramValuePaint = new Paint(Paint.ANTI_ALIAS_FLAG); histogramValuePaint.setTextSize(histogramValueTextSize); histogramValuePaint.setColor(histogramValueTextColor); histogramValueFontMetrics = histogramValuePaint.getFontMetrics(); histogramPaintRect = new Rect(); histogramPaint = new Paint(Paint.ANTI_ALIAS_FLAG); scroller = new Scroller(getContext(), new LinearInterpolator()); ViewConfiguration configuration = ViewConfiguration.get(getContext()); minimumVelocity = configuration.getScaledMinimumFlingVelocity(); maximumVelocity = configuration.getScaledMaximumFlingVelocity(); } @Override protected void onMeasure(int widthMeasureSpec, int heightMeasureSpec) { super.onMeasure(widthMeasureSpec, heightMeasureSpec); width = getMeasuredWidth(); height = getMeasuredHeight(); maxHistogramHeight = height - groupNameTextSize - coordinateAxisWidth - distanceFormGroupNameToAxis - distanceFromValueToHistogram - histogramValueTextSize - chartPaddingTop; } /** * 判断是否可以水平滑动 * @param direction 标识滑动方向 正数:右滑(手指从右至左移动);负数:左滑(手指由左向右移动) * 您可参考ScaollView或HorizontalScrollView理解滑动方向 */ @Override public boolean canScrollHorizontally(int direction) { if (direction > 0) { return histogramContentWidth - getScrollX() - width + histogramPaddingStart + histogramPaddingEnd > 0; } else { return getScrollX() > 0; } } /** * 根据滑动方向获取最大可滑动距离 * @param direction 标识滑动方向 正数:右滑(手指从右至左移动);负数:左滑(手指由左向右移动) * 您可参考ScaollView或HorizontalScrollView理解滑动方向 */ private int getMaxCanScrollX(int direction) { if (direction > 0) { return histogramContentWidth - getScrollX() - width + histogramPaddingStart + histogramPaddingEnd > 0 ? histogramContentWidth - getScrollX() - width + histogramPaddingStart + histogramPaddingEnd : 0; } else if (direction < 0) { return getScrollX(); } return 0; } private float lastX; @Override public boolean onTouchEvent(MotionEvent event) { initVelocityTrackerIfNotExists(); velocityTracker.addMovement(event); switch (event.getAction()) { case MotionEvent.ACTION_DOWN: { if (!scroller.isFinished()) { scroller.abortAnimation(); } lastX = event.getX(); return true; } case MotionEvent.ACTION_MOVE: { int deltaX = (int) (event.getX() - lastX); lastX = event.getX(); // 滑动处理 if (deltaX > 0 && canScrollHorizontally(-1)) { scrollBy(-Math.min(getMaxCanScrollX(-1), deltaX), 0); } else if (deltaX < 0 && canScrollHorizontally(1)) { scrollBy(Math.min(getMaxCanScrollX(1), -deltaX), 0); } break; } case MotionEvent.ACTION_UP: { velocityTracker.computeCurrentVelocity(1000, maximumVelocity); int velocityX = (int) velocityTracker.getXVelocity(); fling(velocityX); recycleVelocityTracker(); break; } case MotionEvent.ACTION_CANCEL: { recycleVelocityTracker(); break; } } return super.onTouchEvent(event); } private void initVelocityTrackerIfNotExists() { if (velocityTracker == null) { velocityTracker = VelocityTracker.obtain(); } } private void recycleVelocityTracker() { if (velocityTracker != null) { velocityTracker.recycle(); velocityTracker = null; } } // ACTION_UP事件触发 private void fling(int velocityX) { if (Math.abs(velocityX) > minimumVelocity) { if (Math.abs(velocityX) > maximumVelocity) { velocityX = maximumVelocity * velocityX / Math.abs(velocityX); } scroller.fling(getScrollX(), getScrollY(), -velocityX, 0, 0, histogramContentWidth + histogramPaddingStart - width, 0, 0); } } @Override public void computeScroll() { if (scroller.computeScrollOffset()) { scrollTo(scroller.getCurrX(), 0); } } public void setDataList(@NonNull List<MultiGroupHistogramGroupData> dataList) { this.dataList = dataList; if (childMaxValueArray == null) { childMaxValueArray = new SparseArray<>(); } else { childMaxValueArray.clear(); } histogramContentWidth = 0; for (MultiGroupHistogramGroupData groupData : dataList) { List<MultiGroupHistogramChildData> childDataList = groupData.getChildDataList(); if (childDataList != null && childDataList.size() > 0) { for (int i = 0; i < childDataList.size(); i++) { histogramContentWidth += histogramHistogramWidth + histogramInterval; MultiGroupHistogramChildData childData = childDataList.get(i); Float childMaxValue = childMaxValueArray.get(i); if (childMaxValue == null || childMaxValue < childData.getValue()) { childMaxValueArray.put(i, childData.getValue()); } } histogramContentWidth += groupInterval - histogramInterval; } } histogramContentWidth += -groupInterval; postInvalidate(); } /** * 设置组内直方图颜色(并不是设置所有直方图颜色,而是根据每组数据内直方图数量设置) */ public void setHistogramColor(int[]... colors) { if (colors != null && colors.length > 0) { if (histogramShaderColorArray == null) { histogramShaderColorArray = new SparseArray<>(); } else { histogramShaderColorArray.clear(); } for (int i = 0; i < colors.length; i++) { histogramShaderColorArray.put(i, colors[i]); } } } @Override protected void onDraw(Canvas canvas) { if (width == 0 || height == 0) { return; } int scrollX = getScrollX(); int axisBottom = height - groupNameTextSize - distanceFormGroupNameToAxis - coordinateAxisWidth / 2; canvas.drawLine(coordinateAxisWidth / 2 + scrollX, 0, coordinateAxisWidth / 2 + scrollX, axisBottom, coordinateAxisPaint); canvas.drawLine(scrollX, axisBottom, width + scrollX, axisBottom, coordinateAxisPaint); if (dataList != null && dataList.size() > 0) { int xAxisOffset = histogramPaddingStart; // 每个直方图在x轴的偏移量 for (MultiGroupHistogramGroupData groupData : dataList) { List<MultiGroupHistogramChildData> childDataList = groupData.getChildDataList(); if (childDataList != null && childDataList.size() > 0) { int groupWidth = 0; for (int i = 0; i < childDataList.size(); i++) { MultiGroupHistogramChildData childData = childDataList.get(i); histogramPaintRect.left = xAxisOffset; histogramPaintRect.right = histogramPaintRect.left + histogramHistogramWidth; int childHistogramHeight; if (childData.getValue() <= 0 || childMaxValueArray.get(i) <= 0) { childHistogramHeight = 0; } else { childHistogramHeight = (int) (childData.getValue() / childMaxValueArray.get(i) * maxHistogramHeight); } histogramPaintRect.top = height - childHistogramHeight - coordinateAxisWidth - distanceFormGroupNameToAxis - groupNameTextSize; histogramPaintRect.bottom = histogramPaintRect.top + childHistogramHeight; int[] histogramShaderColor = histogramShaderColorArray.get(i); LinearGradient shader = null; if (histogramShaderColor != null && histogramShaderColor.length > 0) { shader = getHistogramShader(histogramPaintRect.left, chartPaddingTop + distanceFromValueToHistogram + histogramValueTextSize, histogramPaintRect.right, histogramPaintRect.bottom, histogramShaderColor); } histogramPaint.setShader(shader); canvas.drawRect(histogramPaintRect, histogramPaint); String childHistogramHeightValue = StringUtil.NumericScaleByFloor(String.valueOf(childData.getValue()), histogramValueDecimalCount) + childData.getSuffix(); float valueTextX = xAxisOffset + (histogramHistogramWidth - histogramValuePaint.measureText(childHistogramHeightValue)) / 2; // 数值绘制Y轴位置特别处理 float valueTextY = histogramPaintRect.top - distanceFormGroupNameToAxis + (histogramValueFontMetrics.bottom) / 2; canvas.drawText(childHistogramHeightValue, valueTextX, valueTextY, histogramValuePaint); int deltaX = i < childDataList.size() - 1 ? histogramHistogramWidth + histogramInterval : histogramHistogramWidth; groupWidth += deltaX; // 注意此处偏移量累加 xAxisOffset += i == childDataList.size() - 1 ? deltaX + groupInterval : deltaX; } String groupName = groupData.getGroupName(); float groupNameTextWidth = groupNamePaint.measureText(groupName); float groupNameTextX = xAxisOffset - groupWidth - groupInterval + (groupWidth - groupNameTextWidth) / 2; // 组名绘制Y轴位置特别处理 float groupNameTextY = (height - groupNameFontMetrics.bottom / 2); canvas.drawText(groupName, groupNameTextX, groupNameTextY, groupNamePaint); } } } } private LinearGradient getHistogramShader(float x0, float y0, float x1, float y1, int[] colors) { return new LinearGradient(x0, y0, x1, y1, colors, null, Shader.TileMode.CLAMP); } } 代码就这一点,阅读起来应该不难,如有疑问欢迎留言自定义属性如下: <declare-styleable name="MultiGroupHistogramView"> <attr name="coordinateAxisWidth" format="dimension" /> <attr name="coordinateAxisColor" format="color" /> <attr name="groupNameTextColor" format="color" /> <attr name="groupNameTextSize" format="dimension" /> <attr name="groupInterval" format="dimension" /> <attr name="histogramInterval" format="dimension" /> <attr name="histogramValueTextColor" format="color" /> <attr name="histogramValueTextSize" format="dimension" /> <attr name="histogramHistogramWidth" format="dimension" /> <attr name="histogramPaddingStart" format="dimension" /> <attr name="histogramPaddingEnd" format="dimension" /> <attr name="chartPaddingTop" format="dimension" /> <attr name="distanceFormGroupNameToAxis" format="dimension" /> <attr name="distanceFromValueToHistogram" format="dimension" /> <!--图表数值小数点位数--> <attr name="histogramValueDecimalCount"> <enum name="ZERO" value="0" /> <enum name="ONE" value="1" /> <enum name="TWO" value="2" /> </attr> </declare-styleable> 下面贴出使用方法: private void initMultiGroupHistogramView() { Random random = new Random(); int groupSize = random.nextInt(5) + 10; List<MultiGroupHistogramGroupData> groupDataList = new ArrayList<>(); // 生成测试数据 for (int i = 0; i < groupSize; i++) { List<MultiGroupHistogramChildData> childDataList = new ArrayList<>(); MultiGroupHistogramGroupData groupData = new MultiGroupHistogramGroupData(); groupData.setGroupName("第" + (i + 1) + "组"); MultiGroupHistogramChildData childData1 = new MultiGroupHistogramChildData(); childData1.setSuffix("分"); childData1.setValue(random.nextInt(50) + 51); childDataList.add(childData1); MultiGroupHistogramChildData childData2 = new MultiGroupHistogramChildData(); childData2.setSuffix("%"); childData2.setValue(random.nextInt(50) + 51); childDataList.add(childData2); groupData.setChildDataList(childDataList); groupDataList.add(groupData); } multiGroupHistogramView.setDataList(groupDataList); int[] color1 = new int[]{getResources().getColor(R.color.color_orange), getResources().getColor(R.color.colorPrimary)}; int[] color2 = new int[]{getResources().getColor(R.color.color_supper_tip_normal), getResources().getColor(R.color.bg_supper_selected)}; // 设置直方图颜色 multiGroupHistogramView.setHistogramColor(color1, color2); } 完整示例:https://github.com/670832188/TestApp 原文发布时间为:2019-1-3本文作者:乱世白衣本文来自云栖社区合作伙伴“ 安卓巴士Android开发者门户”,了解相关信息可以关注“anzhuobashi”微信公众号