首页 文章 精选 留言 我的

精选列表

搜索[windows],共10000篇文章
优秀的个人博客,低调大师

在Windows上安装Elasticsearch v5.4.2

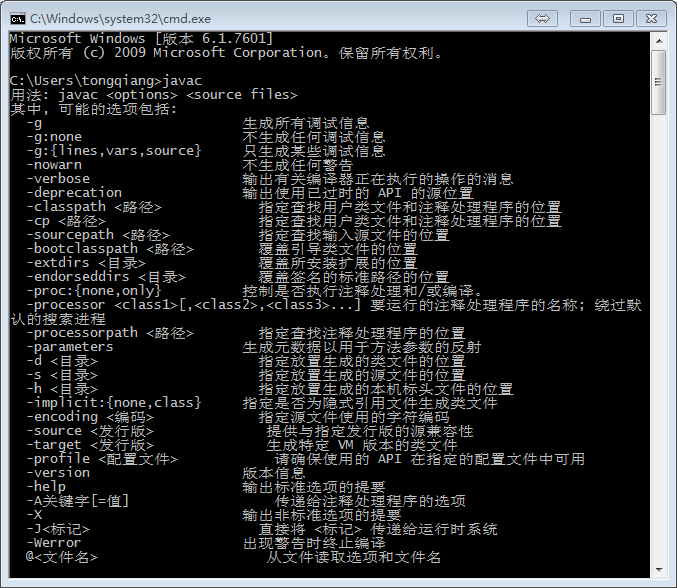
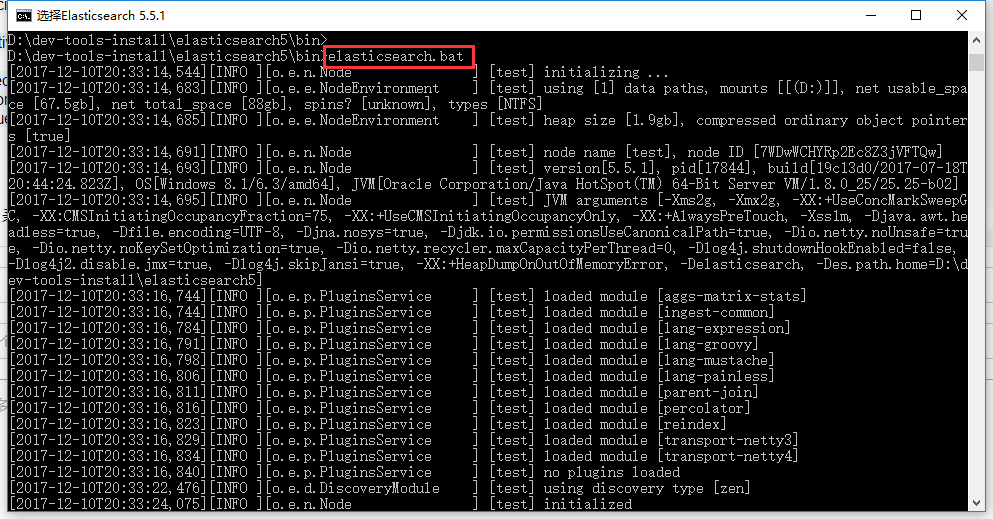
最近项目里为了加快后台系统的搜索速度,决定接入开源的搜索引擎,于是大家都在对比较常用的几个开源做技术调研,比如Lucene+盘龙分词,Solr,还有本篇要介绍的Elasticsearch。话不多提,直接进入主题。 一、安装JDK 由于Elasticsearch v5.4.2需要Java 8或者更新版本的java,我们可以去Oracle官网下载,也可以选择使用OpenJDK。 设置Java环境变量 JAVA_HOME=C:\Program Files (x86)\Java\jdk1.8.0_131 CLASSPATH=.;%JAVA_HOME%\lib;%JAVA_HOME%\lib\tools.jar PATH= 原PATH+;%JAVA_HOME%\bin; 验证Java环境是否安装成功,以及环境变量是否设置正确。在cmd窗口执行javac命令,若结果如下图,则说明Java环境已经安装正确。 二、安装Elasticsearch 下载。从官网下载Elasticsearch zip4.入2.zip。 解压文件。将下载的zip文件解压到C:\elasticsearch\elasticsearch-5.4.2/,目录结构如下图: 启动Elasticsearch 。打开cmd窗口,进入C:\elasticsearch\elasticsearch-5.4.2\bin,执行脚本elasticsearch.bat,若结果如下图,则Elasticsearch 启动成功。 验证Elasticsearch是否安装成功。如上图,Elasticsearch 默认使用的是9200端口,接下来在浏览器中打开链接http://localhost:9200,返回如下结果则说明安装成功。 { "name":"KPIXVlC", "cluster_name":"elasticsearch", "cluster_uuid":"uCSF389FQISmiuK3__BSHA", "version":{ "number":"5.4.2", "build_hash":"929b078", "build_date":"2017-06-15T02:29:28.122Z", "build_snapshot":false, "lucene_version":"6.5.1" }, "tagline":"YouKnow,forSearch"} 三、安装Elasticsearch-Head 如下图,Elasticsearch Head在5.x版本中已经不再以插件的形式存在,而是作为了一个独立的web了。 安装 //从GitHug下载Headgitclonegit://github.com/mobz/elasticsearch-head.git//进入下载好的目录cdelasticsearch-head//还原nmp包npminstall//运行npmrunstart 验证。在浏览器中打开链接http://localhost:9100,如出现下图,则说明安装成功 四、安装ik分词器 下载。ik分词链接GitHub。由于ik分词器要求与Elasticsearch的版本高度匹配,所以我们需要下载相应的版本为5.4.2。 gitclone--branchv5.4.2https://github.com/medcl/elasticsearch-analysis-ik.git 打包。在下载好的文件夹中执行命令 mvnpackage 解压。在Elasticsearch安装目录下的文件夹plugins中新建文件夹ik,将上一步中生成的elasticsearch-analysis-ik-5.4.2.zip解压到这里,如下图: 检验ik安装结果。重启Elasticsearch,在Sense插件中输入如下内容 GETdefault-index/_analyze?analyzer=ik_smart&pretty=true{"text":"我的家乡是武汉,我爱美丽的江城"} 如安装正常,结果如下 { "tokens":[ { "token":"我", "start_offset":0, "end_offset":1, "type":"CN_CHAR", "position":0 }, { "token":"家乡", "start_offset":2, "end_offset":4, "type":"CN_WORD", "position":1 }, { "token":"武汉", "start_offset":5, "end_offset":7, "type":"CN_WORD", "position":2 }, { "token":"我", "start_offset":8, "end_offset":9, "type":"CN_CHAR", "position":3 }, { "token":"爱美丽", "start_offset":9, "end_offset":12, "type":"CN_WORD", "position":4 }, { "token":"江城", "start_offset":13, "end_offset":15, "type":"CN_WORD", "position":5 } ]} 到此Elasticsearch,Elasticsearch Head, ik分词器都已经安装成功。 注意:安装ik分词器过程中发现与老版本2.x.x有两点不同: 不需要修改Elasticsearch配置文件。Elasticsearch的配置文件路径为elasticsearch.yml,在文件最后加入如下内容:index.analysis.analyzer.ik.type : "ik" 测试ik分词是否安装成功时,使用的是ik_smart而不是ik。查看文档,现在支持ik_smart与ik_max_word。 本文转自zsdnr 51CTO博客,原文链接:http://blog.51cto.com/12942149/1949769 ,如需转载请自行联系原作者


优秀的个人博客,低调大师

windows 下xampp集成环境安装mongodb扩展

http://www.thegeekstuff.com/2015/10/php-mongodb-for-xampp 见这文章,写的很详细。 1、打开PHPINFO界面查看PHP版本,编译器版本,还有架构,线程安全。 2、然后去官网下载对应的dll文件。 3、复制到xampp/php/ext文件夹下 4、到xampp/php/php.in下加上extension=刚添加的dll文件 5、去修改环境变量PATH,把php的路径加上 6、重启Apache,查看PHPinfo有没有mongodb扩展 本文转自 努力的C 51CTO博客,原文链接:http://blog.51cto.com/fulin0532/1920341

优秀的个人博客,低调大师

Windows Server 2012正式版RDS系列⑾

大家好,终于到了介绍我们RDS的最后一个角色了,也是我们发布公网必不可少的角色呦,这个角色的发布架构大家还记得吗?我们来看下: 我们的RDG就是我们的网关了,今天我就带着大家搭建下这样一个网关角色,还是之前的拓扑,我们点击绿色的RD 网关,记得之前要把网关服务器添加到我们可以管控的范围里哦,不然又找不到了 把RDG添加进来 输入公网注册的域名为证书名字 点击添加,就开始创建了 完成以后我们可以直接点击下面配置证书或者网关属性 网关的属性就默认了,没什么改的 在RDG服务器上出现了刚才创建的自签名证书,这里我会把这个证书删除掉,然后重新申请一个企业域内的CA颁发的证书! 然后导出到我的RDS控制台服务器上,然后进行导入即可! OK,我们的拓扑图终于圆满了 接下来我开始配置RDG网关,我们登陆到RDG网关服务器,然后打开 远程桌面网关管理器打开以后我需要重新选择导入CA申请颁发的证书 导入即可!接下来修改下发布的端口吧 在服务器场里把RDG添加进来,点击应用会提示要求重启RDG服务,确定下就可以了 在公网上有2个IP我分别注册了rds(rdweb).xxxx.com和rdg.xxxx.com的域名 然后我再TMG做了公网IP1的TCP443映射到rds服务器的TCP443上,把公网IP2的TCP443和TCP3389和UDP3391映射到RDG服务器上! 然后公网测试,打开RDWEB然后点击连接我的虚拟桌面 提示出现网关服务器了,连接进去就可以看到对于网络不怎么好的,自动启用了UDP连接哦 此虚拟桌面同时是我的RemoteFX的虚拟桌面哦,测试下高清视频吧 OK,没问题,那我们的设备重定向呢? 有图有真相,一样Ok,我还是在虚拟桌面的情况下插上我的数码相机,然后虚拟桌面自动识别并重定向进来了,我很满意! 同时在我们的RDG服务器上可以看到正在连接使用的实时监控数据哦: 本文转自 ZJUNSEN 51CTO博客,原文链接:http://blog.51cto.com/rdsrv/1038713,如需转载请自行联系原作者

优秀的个人博客,低调大师

windows目录\在实际开发中使用/代替

#include <boost\shared_ptr.hpp>尽量不要使用\,而是使用/,这样子方面移植代码到Linux 环境下 代码如下: #include "stdafx.h" #include <iostream> #include <fstream> #include <string> using namespace std; int _tmain(int argc, _TCHAR* argv[]) { char utfBuffer[256] = {0}; ifstream utffile("E:/doc/Android/Makefile");//OK //ifstream utffile("E:\doc\Android\Makefile");//ERROR //ifstream utffile("E:\\doc\\Android\\Makefile");//OK utffile.getline(utfBuffer, 100); size_t inLen = strlen(utfBuffer); return 0; } 总结: 第一种方案采用和Unix系统一样的斜杠,方便在以后的开发中移植到Linux平台,毕竟头文件include中斜杠的修改比较麻烦。 第三种方法采用双反斜杠,告诉编译器前面的反斜杠不是用来屏蔽转义的,而是实实在在存在的。 第二种错误方案,详细分析: 拆分字符串: char utfBuffer[256] = {0}; char szPathName[256] ={"E:\doc\Android\Makefile"}; ifstream utffile(szPathName); utffile.getline(utfBuffer, 100); size_t inLen = strlen(utfBuffer); return 0; 通过单步调试szPathName的实际内容变成:"E:docAndroidMakefile" 编译器认为\是用来禁止转义用的,而没有想到用户实际上是作为反斜杠,因此将其清除,导致读取文件路径失败 本文转自fengyuzaitu 51CTO博客,原文链接:http://blog.51cto.com/fengyuzaitu/1953537,如需转载请自行联系原作者

优秀的个人博客,低调大师

Hadoop on Windows with Eclipse -04- Setup SSH daemon

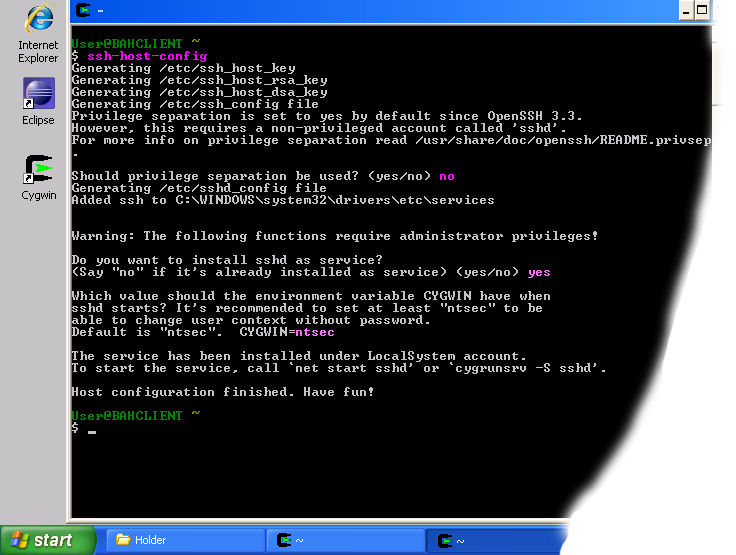
Setup SSH daemon Both Hadoop scripts and Eclipse plug-in need password-less SSH to operate. This section describes how to set it up in the Cygwin environment. Configure ssh daemon Open the Cygwin command prompt. Execute the following command: ssh-host-config When asked if privilege separation should be used, answerno. When asked if sshd should be installed as a service, answeryes. When asked about the value of CYGWIN environment variable, enterntsec. Here is an example session of this command. Note that the input typed by the user is shown in pink and output from the system is shown in gray. Example of using ssh-host-config Start SSH daemon here FindMy Computericon either on your desktop or in the start-up menu, right-click on it and selectManagefrom the context menu. OpenServices and Applicationsin the left-hand panel then select theServicesitem. Find theCYGWIN sshditem in the main section and right-click on it. SelectStartfrom the context menu. Start SSHD service A small window should pop-up indicating the progress of the service start-up. After that window disappears the status of CYGWIN sshd service should change toStarted. Setup authorization keys Eclipse plug-in and Hadoop scripts require ssh authentication to be performed through authorization keys rather than passwords. The following steps describe how authorization keys are set up. here Open cygwin command prompt Execute the following command to generate keys ssh-keygen When prompted for filenames and pass phrases press ENTER to accept default values. After the command has finished generating keys, enter the following command to change into your .ssh directory: cd ~/.ssh Check if the keys were indeed generated by executing the following command: ls -l You should see two filesid_rsa.pubandid_rsawith recent creation dates.These files contain authorization keys. To register the new authorization keys enter the following command (note the sharply-angled double brackets -- they are very important): cat id_rsa.pub >> authorized_keys Setting up authorization keys Now check if the keys were set up correctly by executing the following command: ssh localhost Since it is a new ssh installation, you will be warned that authenticity of the host could not be established and will be asked whether you really want to connect. Answeryesand press ENTER. You should see the Cygwin prompt again, which means that you have successfully connected. Now execute the command again: ssh localhost This time you should not be prompted for anything.

优秀的个人博客,低调大师

Hadoop on Windows with Eclipse -06- Unpack Hadoop Installation

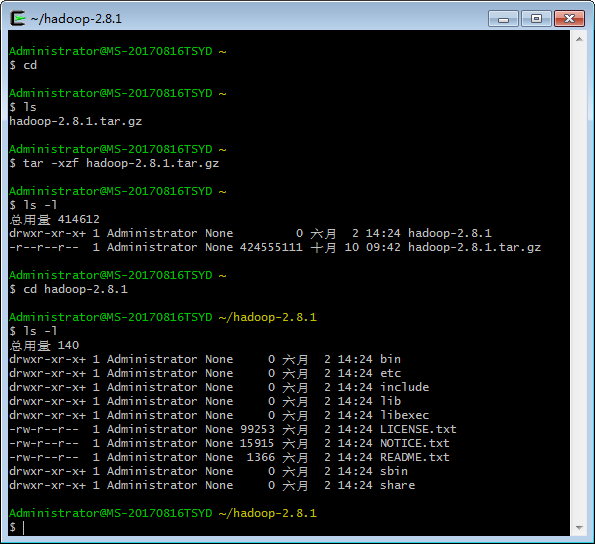
Unpack Hadoop Installation The next step is to unpack the downloaded and copied package. here To unpack the package follow these steps: Open a new Cygwin window. After the new Cygwin window appears, execute the following command: tar -xzf hadoop-0.19.1.tar.gz This will start unpacking the Hadoop distribution. After several minutes you should see a new Cygwin prompt again as shown in the screenshot below: When you see the new prompt, execute the following command: ls -l This command will list the contents of your home directory. You should see a newly created directory calledhadoop-0.19.1 Next execute the following commands: cd hadoop-0.19.1 ls -l If you get output similar to the following, everything was unpacked correctly and you can go to the next step.

优秀的个人博客,低调大师

Hadoop on Windows with Eclipse -03- Set Environment Variables

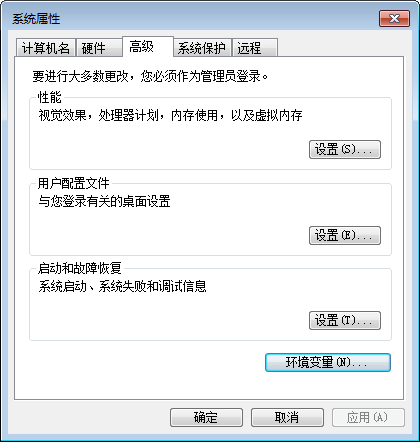
Set Environment Variables The next step is to set up the PATH environment variable so that Eclipse IDE can access Cygwin commands here To set environment variables follow these steps: Find "My Computer" icon either on the desktop or in the start menu, right-click on it and selectPropertiesitem from the menu. When you see the Properties dialog box, click on theEnvironment Variablesbutton as shown below WhenEnvironment Variablesdialog shows up, click on thePathvariable located in theSystem Variablesbox and then click theEditbutton. WhenEditdialog appears append the following text to the end of theVariable valuefield: ;c:\cygwin64\bin;c:\cygwin64\usr\sbin Note: If you installed cygwin in the non-standard location, correct the above value accordingly. Close all three dialog boxes by pressing OK button of each dialog box.

资源下载

更多资源
Mario

Mario

马里奥是站在游戏界顶峰的超人气多面角色。马里奥靠吃蘑菇成长,特征是大鼻子、头戴帽子、身穿背带裤,还留着胡子。与他的双胞胎兄弟路易基一起,长年担任任天堂的招牌角色。

腾讯云软件源

腾讯云软件源

为解决软件依赖安装时官方源访问速度慢的问题,腾讯云为一些软件搭建了缓存服务。您可以通过使用腾讯云软件源站来提升依赖包的安装速度。为了方便用户自由搭建服务架构,目前腾讯云软件源站支持公网访问和内网访问。

Spring

Spring

Spring框架(Spring Framework)是由Rod Johnson于2002年提出的开源Java企业级应用框架,旨在通过使用JavaBean替代传统EJB实现方式降低企业级编程开发的复杂性。该框架基于简单性、可测试性和松耦合性设计理念,提供核心容器、应用上下文、数据访问集成等模块,支持整合Hibernate、Struts等第三方框架,其适用范围不仅限于服务器端开发,绝大多数Java应用均可从中受益。

Sublime Text

Sublime Text

Sublime Text具有漂亮的用户界面和强大的功能,例如代码缩略图,Python的插件,代码段等。还可自定义键绑定,菜单和工具栏。Sublime Text 的主要功能包括:拼写检查,书签,完整的 Python API , Goto 功能,即时项目切换,多选择,多窗口等等。Sublime Text 是一个跨平台的编辑器,同时支持Windows、Linux、Mac OS X等操作系统。

用户登录
用户注册