首页 文章 精选 留言 我的

精选列表

搜索[监督学习],共10000篇文章
优秀的个人博客,低调大师

Docker Toolbox 学习教程【转载】

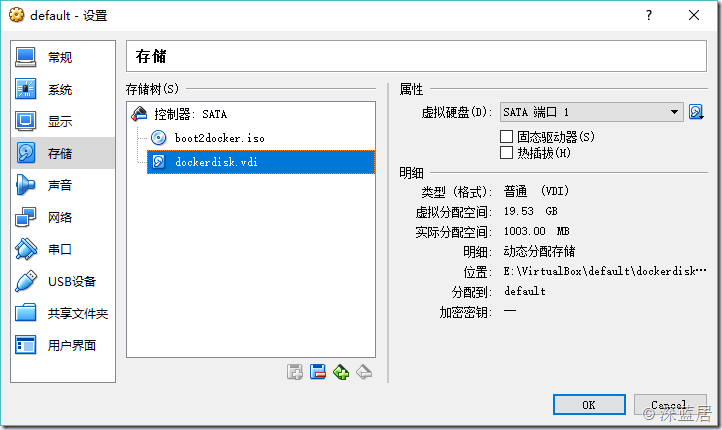
最近在研究虚拟化,容器和大数据,所以从Docker入手,下面介绍一下在Windows下怎么玩转Docker。Docker本身在Windows下有两个软件,一个就是Docker,另一个是Docker Toolbox。这里我选择的是Docker Toolbox,为什么呢?参见官方文档:https://blog.docker.com/2015/08/docker-toolbox/首先我们从官网下载最新版的Windows Docker Toolbox。安装后会安装一个VirtualBox虚拟机,一个Kitematic,这是GUI管理Docker的工具,没有发布正式版,不推荐使用,另外还有就是我们在命令行下用到的docker-machine和docker命令了。 基本使用 安装完成Toolbox后会有一个Docker Quickstart Terminal的快捷方式,双击运行如果报错,那可能是因为你已经安装了Hyper-v,所以VirtualBox无法用64位的虚拟机。需要卸载Hyper-v。 运行后会在Virtualbox中创建一个叫做default的虚拟机,然后很有可能会卡在waiting for an IP的命令下,然后就死活不动了。我的做法是彻底放弃Docker Quickstart Terminal,根本不用这玩意儿,关掉,我们用PowerShell进行虚拟机的管理。 打开PowerShell,输入: docker-machine ls 我们可以看到我们当前的Docker虚拟机的状态。如果什么都没有的话,那么我们可以使用以下命令创建一个Docker虚拟机。 docker-machine create --driver=virtualbox default 创建完毕后,我们在用docker-machine ls确认我们的Docker虚拟机在运行中。 然后使用以下命令获得虚拟机的环境变量: docker-machine env default 然后再输入: docker-machine env default | Invoke-Expression 这样我们就把当前的PowerShell和虚拟机里面的Docker Linux建立的连接,接下来就可以在PowerShell中使用docker命令了。 比如我们要查看当前有哪些镜像: docker images 当前有哪些容器: docker ps –a 其他各种docker命令我就不在这里累述了。 Docker虚拟机文件地址修改 默认情况下,docker-machine创建的虚拟机文件,是保存在C盘的C:\Users\用户名\.docker\machine\machines\default 目录下的,如果下载和使用的镜像过多,那么必然导致该文件夹膨胀过大,如果C盘比较吃紧,那么我们就得考虑把该虚拟机移到另一个盘上。具体操作如下: 1.使用docker-machine stop default停掉Docker的虚拟机。 2.打开VirtualBox,选择“管理”菜单下的“虚拟介质管理”,我们可以看到Docker虚拟机用的虚拟硬盘的文件disk。 3.选中“disk”,然后点击菜单中的“复制”命令,根据向导,把当前的disk复制到另一个盘上面去。 4.回到VirtualBox主界面,右键“default”这个虚拟机,选择“设置”命令,在弹出的窗口中选择“存储”选项。 5.把disk从“控制器SATA”中删除,然后重新添加我们刚才复制到另外一个磁盘上的那个文件。 这是我设置好后的界面,可以看到我在步骤3复制的时候,复制到E:\VirtualBox\default\dockerdisk.vdi文件去了。 6.确定,回到PowerShell,我们使用docker-machine start default就可以启动新地址的Docker虚拟机了。确保新磁盘的虚拟机没有问题。就可以把C盘那个disk文件删除了。 【注意:不要在Window中直接去复制粘贴disk文件,这样会在步骤5的时候报错的,报错的内容如下,所以一定要在VirtualBox中去复制!】 Failed to open the hard disk file D:\Docker\boot2docker-vm\boot2docker-vm.vmdk. Cannot register the hard disk 'D:\Docker\boot2docker-vm\boot2docker-vm.vmdk' {9a4ed2ae-40f7-4445-8615-a59dccb2905c} because a hard disk C:\Users\用户名\.docker\machine\machines\default\disk.vmdk' with UUID {9a4ed2ae-40f7-4445-8615-a59dccb2905c} already exists. Result Code: E_INVALIDARG (0x80070057) Component: VirtualBox Interface: IVirtualBox {fafa4e17-1ee2-4905-a10e-fe7c18bf5554} Callee RC: VBOX_E_OBJECT_NOT_FOUND (0x80BB0001) 镜像加速 在国内使用Docker Hub的话就特别慢,为此,我们可以给Docker配置国内的加速地址。我看了一下,DaoCloud和阿里云的镜像加速还不错,另外还有网易的蜂巢。选一个就行了。以DaoClound为例,注册账号,然后在https://www.daocloud.io/mirror就可以看到DaoClound提供给您的镜像加速的URL。然后到PowerShell中去依次执行: docker-machine ssh default sudo sed -i "s|EXTRA_ARGS='|EXTRA_ARGS='--registry-mirror=加速地址 |g" /var/lib/boot2docker/profile exit docker-machine restart default 这样重启Docker后就可以用国内的镜像来加速下载了。 试一下下载一个mysql看看快不快: docker pull mysql 下载完镜像,我们运行一个容器: docker run -d -p 3306:3306 --name mysql -e MYSQL_ROOT_PASSWORD=123 mysql:latest 接下来我们打开windows下的mysql客户端,服务器地址填docker虚拟机的IP地址,通过docker-machine env可以看到,我这里是192.168.99.100,然后用户名root,密码123,这样我们就可以连接到docker容器里面的mysql了。 【注意,Docker容器是在VirtualBox的虚拟机里面,不是在Windows里面,所以不能用127.0.0.1访问】

优秀的个人博客,低调大师

contentprovider的学习实例总结

工作中遇到了contentprovider数据共享机制,下面来总结一下: 一、ContentProvider简介 当应用继承ContentProvider类,并重写该类用于提供数据和存储数据的方法,就可以向其他应用共享其数据。虽然使用其他方法也可以对外共享数据,但数据访问方式会因数据存储的方式而不同,如:采用文件方式对外共享数据,需要进行文件操作读写数据;采用sharedpreferences共享数据,需要使用sharedpreferencesAPI读写数据。而使用ContentProvider共享数据的好处是统一了数据访问方式。 二、Uri类简介 Uri代表了要操作的数据,Uri主要包含了两部分信息:1.需要操作的ContentProvider,2.对ContentProvider中的什么数据进行操作,一个Uri由以下几部分组成: 1.scheme:ContentProvider(内容提供者)的scheme已经由Android所规定为:content://。 2.主机名(或Authority):用于唯一标识这个ContentProvider,外部调用者可以根据这个标识来找到它。 3.路径(path):可以用来表示我们要操作的数据,路径的构建应根据业务而定,如下: •要操作contact表中id为10的记录,可以构建这样的路径:/contact/10 •要操作contact表中id为10的记录的name字段,contact/10/name •要操作contact表中的所有记录,可以构建这样的路径:/contact 要操作的数据不一定来自数据库,也可以是文件等他存储方式,如下: 要操作xml文件中contact节点下的name节点,可以构建这样的路径:/contact/name 如果要把一个字符串转换成Uri,可以使用Uri类中的parse()方法,如下: Uriuri=Uri.parse("content://com.changcheng.provider.contactprovider/contact") 三、UriMatcher、ContentUrist和ContentResolver简介 因为Uri代表了要操作的数据,所以我们很经常需要解析Uri,并从Uri中获取数据。Android系统提供了两个用于操作Uri的工具类,分别为UriMatcher和ContentUris。掌握它们的使用,会便于我们的开发工作。 UriMatcher:用于匹配Uri,它的用法如下: 1.首先把你需要匹配Uri路径全部给注册上,如下: //常量UriMatcher.NO_MATCH表示不匹配任何路径的返回码(-1)。 UriMatcheruriMatcher=newUriMatcher(UriMatcher.NO_MATCH); //如果match()方法匹配content://com.changcheng.sqlite.provider.contactprovider/contact路径,返回匹配码为1 uriMatcher.addURI(“com.changcheng.sqlite.provider.contactprovider”,“contact”,1);//添加需要匹配uri,如果匹配就会返回匹配码 //如果match()方法匹配content://com.changcheng.sqlite.provider.contactprovider/contact/230路径,返回匹配码为2 uriMatcher.addURI(“com.changcheng.sqlite.provider.contactprovider”,“contact/#”,2);//#号为通配符 2.注册完需要匹配的Uri后,就可以使用uriMatcher.match(uri)方法对输入的Uri进行匹配,如果匹配就返回匹配码,匹配码是调用addURI()方法传入的第三个参数,假设匹配content://com.changcheng.sqlite.provider.contactprovider/contact路径,返回的匹配码为1。 ContentUris:用于获取Uri路径后面的ID部分,它有两个比较实用的方法: •withAppendedId(uri,id)用于为路径加上ID部分 •parseId(uri)方法用于从路径中获取ID部分 ContentResolver:当外部应用需要对ContentProvider中的数据进行添加、删除、修改和查询操作时,可以使用ContentResolver类来完成,要获取ContentResolver对象,可以使用Activity提供的getContentResolver()方法。ContentResolver使用insert、delete、update、query方法,来操作数据。 四、ContentProvider示例程序 Manifest.xml中的代码: ? 1 2 3 4 5 6 7 8 9 10 11 12 13 14 15 16 <applicationandroid:icon= "@drawable/icon"android:label="@string/app_name"> <activityandroid:name= ".TestWebviewDemo"android:label="@string/app_name"> <intent-filter> <actionandroid:name= "android.intent.action.MAIN"/> <categoryandroid:name= "android.intent.category.LAUNCHER"/> </intent-filter> <intent-filter> <dataandroid:mimeType= "vnd.android.cursor.dir/vnd.ruixin.login"/> </intent-filter> <intent-filter> <dataandroid:mimeType= "vnd.android.cursor.item/vnd.ruixin.login"/> </intent-filter> </activity> <providerandroid:name= "MyProvider"android:authorities="com.ruixin.login"/> </application> 需要在<application></application>中为provider进行注册!!!! 首先定义一个数据库的工具类: ? 1 2 3 4 5 6 7 8 9 10 11 12 13 14 15 16 17 18 19 20 21 22 publicclassRuiXin{ publicstaticfinalStringDBNAME="ruixinonlinedb"; publicstaticfinalStringTNAME="ruixinonline"; publicstaticfinalintVERSION=3; publicstaticStringTID="tid"; publicstaticfinalStringEMAIL="email"; publicstaticfinalStringUSERNAME="username"; publicstaticfinalStringDATE="date"; publicstaticfinalStringSEX="sex"; publicstaticfinalStringAUTOHORITY="com.ruixin.login"; publicstaticfinalintITEM=1; publicstaticfinalintITEM_ID=2; publicstaticfinalStringCONTENT_TYPE="vnd.android.cursor.dir/vnd.ruixin.login"; publicstaticfinalStringCONTENT_ITEM_TYPE="vnd.android.cursor.item/vnd.ruixin.login"; publicstaticfinalUriCONTENT_URI=Uri.parse( "content://" +AUTOHORITY+"/ruixinonline"); } 然后创建一个数据库: ? 1 2 3 4 5 6 7 8 9 10 11 12 13 14 15 16 17 18 19 20 21 22 23 24 25 26 27 28 29 publicclassDBliteextendsSQLiteOpenHelper{ publicDBlite(Contextcontext){ super(context,RuiXin.DBNAME,null,RuiXin.VERSION); //TODOAuto-generatedconstructorstub } @Override publicvoidonCreate(SQLiteDatabasedb){ //TODOAuto-generatedmethodstub db.execSQL( "createtable"+RuiXin.TNAME+"("+ RuiXin.TID+"integerprimarykeyautoincrementnotnull,"+ RuiXin.EMAIL+ "textnotnull,"+ RuiXin.USERNAME+ "textnotnull,"+ RuiXin.DATE+"intergernotnull,"+ RuiXin.SEX+"textnotnull);"); } @Override publicvoidonUpgrade(SQLiteDatabasedb,intoldVersion,intnewVersion){ //TODOAuto-generatedmethodstub } publicvoidadd(Stringemail,Stringusername,Stringdate,Stringsex){ SQLiteDatabasedb=getWritableDatabase(); ContentValuesvalues= newContentValues(); values.put(RuiXin.EMAIL,email); values.put(RuiXin.USERNAME,username); values.put(RuiXin.DATE,date); values.put(RuiXin.SEX,sex); db.insert(RuiXin.TNAME,"",values); } } 接着创建一个Myprovider.java对数据库的接口进行包装: ? 1 2 3 4 5 6 7 8 9 10 11 12 13 14 15 16 17 18 19 20 21 22 23 24 25 26 27 28 29 30 31 32 33 34 35 36 37 38 39 40 41 42 43 44 45 46 47 48 49 50 51 52 53 54 55 56 57 58 59 60 61 62 63 64 65 66 67 68 69 70 71 72 73 74 75 76 77 78 79 80 81 82 83 84 85 86 87 88 89 90 91 92 93 94 95 96 97 98 99 100 101 102 publicclassMyProviderextendsContentProvider{ DBlitedBlite; SQLiteDatabasedb; privatestaticfinalUriMatchersMatcher; static{ sMatcher= newUriMatcher(UriMatcher.NO_MATCH); sMatcher.addURI(RuiXin.AUTOHORITY,RuiXin.TNAME,RuiXin.ITEM); sMatcher.addURI(RuiXin.AUTOHORITY,RuiXin.TNAME+"/#",RuiXin.ITEM_ID); } @Override publicintdelete(Uriuri,Stringselection,String[]selectionArgs){ //TODOAuto-generatedmethodstub db=dBlite.getWritableDatabase(); intcount=0; switch(sMatcher.match(uri)){ caseRuiXin.ITEM: count=db.delete(RuiXin.TNAME,selection,selectionArgs); break; caseRuiXin.ITEM_ID: Stringid=uri.getPathSegments().get(1); count=db.delete(RuiXin.TID,RuiXin.TID+"="+id+(!TextUtils.isEmpty(RuiXin.TID="?")?"AND("+selection+')':""),selectionArgs); break; default: thrownewIllegalArgumentException("UnknownURI"+uri); } getContext().getContentResolver().notifyChange(uri,null); returncount; } @Override publicStringgetType(Uriuri){ //TODOAuto-generatedmethodstub switch(sMatcher.match(uri)){ caseRuiXin.ITEM: returnRuiXin.CONTENT_TYPE; caseRuiXin.ITEM_ID: returnRuiXin.CONTENT_ITEM_TYPE; default: thrownewIllegalArgumentException("UnknownURI"+uri); } } @Override publicUriinsert(Uriuri,ContentValuesvalues){ //TODOAuto-generatedmethodstub db=dBlite.getWritableDatabase(); longrowId; if(sMatcher.match(uri)!=RuiXin.ITEM){ thrownewIllegalArgumentException("UnknownURI"+uri); } rowId=db.insert(RuiXin.TNAME,RuiXin.TID,values); if(rowId>0){ UrinoteUri=ContentUris.withAppendedId(RuiXin.CONTENT_URI,rowId); getContext().getContentResolver().notifyChange(noteUri,null); returnnoteUri; } thrownewIllegalArgumentException("UnknownURI"+uri); } @Override publicbooleanonCreate(){ //TODOAuto-generatedmethodstub this.dBlite=newDBlite(this.getContext()); //db=dBlite.getWritableDatabase(); //return(db==null)?false:true; returntrue; } @Override publicCursorquery(Uriuri,String[]projection,Stringselection, String[]selectionArgs,StringsortOrder){ //TODOAuto-generatedmethodstub db=dBlite.getWritableDatabase(); Cursorc; Log.d("-------",String.valueOf(sMatcher.match(uri))); switch(sMatcher.match(uri)){ caseRuiXin.ITEM: c=db.query(RuiXin.TNAME,projection,selection,selectionArgs,null,null,null); break; caseRuiXin.ITEM_ID: Stringid=uri.getPathSegments().get(1); c=db.query(RuiXin.TNAME,projection,RuiXin.TID+"="+id+(!TextUtils.isEmpty(selection)?"AND("+selection+')':""),selectionArgs,null,null,sortOrder); break; default: Log.d("!!!!!!","UnknownURI"+uri); thrownewIllegalArgumentException("UnknownURI"+uri); } c.setNotificationUri(getContext().getContentResolver(),uri); returnc; } @Override publicintupdate(Uriuri,ContentValuesvalues,Stringselection, String[]selectionArgs){ //TODOAuto-generatedmethodstub return0; } } 最后创建测试类: ? 1 2 3 4 5 6 7 8 9 10 11 12 13 14 15 16 17 18 19 20 21 22 23 24 25 26 27 28 29 30 publicclassTestextendsActivity{ /**Calledwhentheactivityisfirstcreated.*/ privateDBlitedBlite1=newDBlite(this);; privateContentResolvercontentResolver; publicvoidonCreate(BundlesavedInstanceState){ super.onCreate(savedInstanceState); setContentView(R.layout.main); //先对数据库进行添加数据 dBlite1.add(email,username,date,sex); //通过contentResolver进行查找 contentResolver=TestWebviewDemo.this.getContentResolver(); Cursorcursor=contentResolver.query( RuiXin.CONTENT_URI, newString[]{ RuiXin.EMAIL,RuiXin.USERNAME, RuiXin.DATE,RuiXin.SEX},null,null,null); while(cursor.moveToNext()){ Toast.makeText( TestWebviewDemo.this, cursor.getString(cursor.getColumnIndex(RuiXin.EMAIL)) +"" +cursor.getString(cursor.getColumnIndex(RuiXin.USERNAME)) +"" +cursor.getString(cursor.getColumnIndex(RuiXin.DATE)) +"" +cursor.getString(cursor.getColumnIndex(RuiXin.SEX)), Toast.LENGTH_SHORT).show(); } startManagingCursor(cursor);//查找后关闭游标 } } 注:上面是在一个程序中进行的测试,也可以再新建一个工程来模拟一个新的程序,然后将上面查询的代码加到新的程序当中!这样就模拟了contentprovider的数据共享功能了! 新建个工程:TestProvider 创建一个测试的activity ? 1 2 3 4 5 6 7 8 9 10 11 12 13 14 15 16 17 18 19 20 21 22 23 24 25 26 27 publicclassTestextendsActivity{ /**Calledwhentheactivityisfirstcreated.*/ privateContentResolvercontentResolver; publicvoidonCreate(BundlesavedInstanceState){ super.onCreate(savedInstanceState); setContentView(R.layout.main); //通过contentResolver进行查找 contentResolver=TestWebviewDemo.this.getContentResolver(); Cursorcursor=contentResolver.query( RuiXin.CONTENT_URI, newString[]{ RuiXin.EMAIL,RuiXin.USERNAME, RuiXin.DATE,RuiXin.SEX},null,null,null); while(cursor.moveToNext()){ Toast.makeText(TestWebviewDemo.this, cursor.getString(cursor.getColumnIndex(RuiXin.EMAIL)) +"" +cursor.getString(cursor.getColumnIndex(RuiXin.USERNAME)) +"" +cursor.getString(cursor.getColumnIndex(RuiXin.DATE)) +"" +cursor.getString(cursor.getColumnIndex(RuiXin.SEX)), Toast.LENGTH_SHORT).show(); } startManagingCursor(cursor);//查找后关闭游标 } } 运行此程序就能实现共享数据查询了! 注:新建的程序中的manifest.xml中不需要对provider进行注册,直接运行就行,否则会报错! 摘自:http://www.cnblogs.com/chenglong/articles/1892029.html 本文转自 wbb827 51CTO博客,原文链接:http://blog.51cto.com/wbb827/1243322
优秀的个人博客,低调大师

Mycat学习实战-Mycat初识

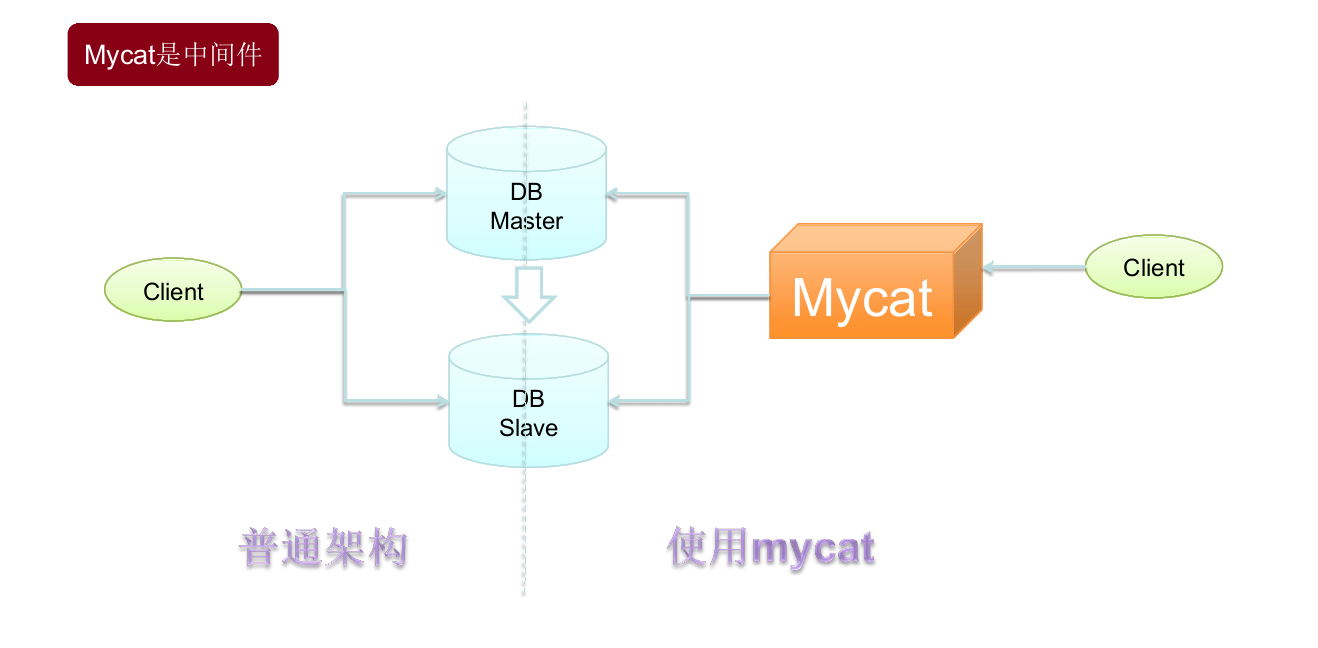
1. Mycat是什么 Mycat是一个彻底开源的面向企业应用开发的大数据库集群,支持事务、ACID,是可以替代MySQL的加强版数据库。Mycat被视为MySQL集群的企业级数据库,用来替代昂贵的Oracle集群,它是融合了内存缓存技术、NoSQL技术、HDFS大数据的新型SQL Server,是结合了传统数据库和新型分布式数据仓库的新一代的企业级数据库产品,也是一个优秀的数据库中间件。 2. Mycat与其他中间件的区别 目前的数据库中间件有很多。 2.1 Mango Mango的中文名是“芒果”,它是一个轻量级的极速数据层访问框架,目前已有十多个大型线上项目在使用它。据称,某一支付系统利用Mango承载了每秒12万的支付下单请求,其超高的性能及超快的响应速度几乎相当于直接使用JDBC。它采用接口与注解的形式定义DAO,完美地结合了db与cache操作;支持动态SQL,可以构造任意复杂的SQL语句;支持多数据源、分表、分库、事务;内嵌“函数式调用”功能,能将任意复杂的对象映射到数据库的表中。但是从整体上看Mango是一个Java Dao Framework,是一个jar包,它的运行依赖于应用系统的项目代码和服务器,采用了JDBC Shard思想,与TDDL是同款产品。 2.2 Cobar Cobar是阿里巴巴研发的关系型数据的分布式处理系统(Amoeba的升级版,该产品成功替代了原先基于Oracle的数据存储方案,目前已经接管了3000多个MySQL数据库的scheme,平均每天处理近50亿次的SQL执行请求。 2.3 Heisenberg Heisenberg源于Cobar,结合了Cobar和TDDL的优势,让其分片策略变为分库分表策略,节约了大量的连接。优点是分库分表与应用脱离,分库分表如同使用单库表一样,减少了db连接数的压力,采用热重启配置,可水平扩容,并遵循 MySQL原生协议,采用读写分离,无语言限制。MySQL Client、C、Java等都可以使用Heisenberg服务器通过管理命令查看和调整连接数、线程池、节点等。Heisenberg采用velocity的分库分表脚本进行自定义分库分表,相当灵活。 2.4 Atlas Atlas是由奇虎360的Web平台部基础架构团队开发维护的一个基于MySQL协议的数据库中间层项目。它在MySQL-proxy 0.8.2版本的基础上进行了优化,增加了一些新的功能和特性。奇虎360内部使用Atlas运行的MySQL业务,每天承载的读写请求数达几十亿条。Atlas位于应用程序与MySQL之间,实现了MySQL的客户端与服务端协议,作为服务端与应用程序通信,同时作为客户端与MySQL通信。它对应用程序屏蔽了db的细节,同时为了降低MySQL的负担,维护了连接池。 2.5 Ameoba Ameoba是一个以MySQL为底层数据存储,并对应用提供MySQL协议接口的Proxy。它集中响应应用的请求,依据用户事先设置的规则,将SQL请求发送到特定的数据库上执行,基于此可以实现负载均衡、读写分离、高可用性等需求。与MySQL官方的MySQL Proxy相比,Ameoba的作者强调的是Amoeba配置的便捷性(基于XML的配置文件,用SQLJEP语法书写规则,比基于Lua脚本的MySQL Proxy简单)。 Mycat与以上中间件的对比如下表所示。 对比项目 Mycat Mango Coba Heisenberg Atlas Amoeba 数据切片 支持 支持 支持 支持 支持 支持 读写分离 支持 支持 支持 支持 支持 支持 宕机自动切换 支持 不支持 支持 不支持 半支持,影响写 不支持 MySQL协议 前后端支持 JDBC 前端支持 前后端支持 前后端支持 JDBC 支持的数据库 MySQL、Oracle、MongoDB、PostgreSQL MySQL MySQL MySQL MySQL MySQL、MongoDB 社区活跃度 高 活跃 停滞 低 中等 停滞 文档资料 极丰富 较齐全 较齐全 缺少 中等 缺少 是否开源 开源 开源 开源 开源 开源 开源 是否支持事务 弱XA 支持 单库强一致、分布式弱事务 单库强一致、多库弱事务 单库强一致、分布式弱事务 不支持 3. Mycat能解决的问题 4. Mycat核心概念 4.1 逻辑库(schema) 业务开发人员通常在实际应用中并不需要知道中间件的存在,只需要关注数据库,所以数据库中间件可以被当作一个或多个数据库集群构成的逻辑库。 在云计算时代,数据库中间件可以以多租户的形式为一个或多个应用提供服务,每个应用访问的可能是一个独立或者共享的物理库。 4.2 逻辑表(table) 4.2.1 分片表 分片表是将指数据量很大的表切分到多个数据库实例中,所有分片组合起来构成了一张完整的表。 4.2.2 非分片表 并非所有的表在数据量很大时都需要进行分片,某些表可以不用分片。非分片表是相对于分片表而言的不需要进行数据切片的表。 4.2.3 ER表 关系型数据库是基于实体关系模型(Entity Relationship Model)的,Mycat中的ER表便来源于此。基于此思想,Mycat提出了基于E-R关系的数据分片策略,子表的记录与其所关系的父表的记录存放在同一个数据分片上,即子表依赖于父表,通过表分组(Table Group)保证数据关联查询不会跨库操作。 表分组(Table Group)是解决跨分片数据关联查询的一种很好的思路,也是数据切分的一条重要规则。 4.2.4 全局表 在一个真实的业务场景中往往存在大量类似的字典表,这些字典表中的数据变动不频繁,而且数据规模不大,很少有超过数十万条的记录。 当业务表因为规模进行分片后,业务表这些附属的字典表之间的关联查询就成了比较棘手的问题,所以在Mycat中通过数据冗余来解决这类表的关联查询,即所有分片都复制了一份数据,我们把这些冗余数据的表定义为全局表。 数据冗余是解决跨分片数据关联查询的一种很好的思路,也是数据切分规划的另一条重要规则。 4.3 分片节点(dataNode) 将数据切分后,一个多大个被分到不同的分片数据 库上,每个表分片所在的数据库就是分片节点。 4.4 节点主机(dataHost) 将数据切分后,每个分片节点不一定会独占一台机器,同一台机器上可以有多个分片数据库,这样一个或多个分片节点所在的机器就是节点主机。为了规避单节点主机并发数量的限制,尽量将读写压力高的分片节点均匀地放在不同的节点主机上。 5. Mycat文件夹以及文件介绍 本文转自 ygqygq2 51CTO博客,原文链接:http://blog.51cto.com/ygqygq2/1973653,如需转载请自行联系原作者

优秀的个人博客,低调大师

Docker学习笔记之compose

一、compose compose 作用 你的应用可能需要很多个服务,比如web服务,数据库服务,缓存服务等等。我们可以把这些服务放到单独的容器里面,如果手工去配置这些服务会有些麻烦,docker compose可以帮我们解决这个问题。 我们可以创建一个compose文件,在这个文件上面描述你都需要哪些服务,服务使用什么镜像、数据卷、网络等等,然后再用一条命令就可以管理、启动所有的服务。 compose 文件 compose文件用的yml格式,docker规定了一些指令,使用它们可以去设置对应的东西,它主要分为了3个区域: services:是服务,在它下面可以定义应用需要的一些服务,每个服务都有自己的名字、使用的镜像、挂载的数据卷、所属的网络、依赖哪些其他服务等等; networks:是应用的网络,在它下面可以定义应用的名字、使用的网络类型等等; volumes:是数据卷,在它下面可以定义的数据卷(名字等等),然后挂载到不同的服务下去使用; 二、Services 先创建一个文件夹beck-docker,并在里面新建docker-compose.yml文件,然后使用version指定一下compose使用的版本号。 定义服务 在应用里需要定义的服务,可以放到services下面。比如,我们去定义一个dog的服务,使用nginx镜像,指定主机上的8080端口映射到容器中得80端口,也就是nginx的http的访问端口。 version:'2' services: dog: image:nginx ports: -"8080:80" 以同样的方式,定义一个cat的服务,同样使用nginx镜像,然后指8081端口对应80端口。 version:'2' services: dog: image:nginx ports: -"8080:80" cat: image:nginx ports: -"8081:80" 需要注意的是,cat与dog要在同一个级别,还有ports是个数组,可以指定多个端口映射关系。 启动服务 定义好服务以后,在项目的目录启动这些服务,可以执行: docker-composeup 这样会启动,在compose文件下定义的所有服务。由于这是第一次启动这个服务,所以可以看到它是creating,也就是去创建相关的东西。首先会创建这个服务使用的网络,这里是叫做「beckdocker_default」的网络,然后是dog和cat的服务,这些网络和服务的名字,默认会加上一个前缀,由于在创建应用的时候没有指定名字,所以会默认使用项目目录的名字,后面还有一个数字的后缀。最后会有一个「Attaching to …」,将网络应用到服务上。 启动成功后,在浏览器访问一下。8080对应的是dog的服务,8081是cat的服务。 回到终端,可以看到服务的访问日志,日志的开头会有服务的名字,标志着日志是从哪个服务来的: 如果希望服务在后台运行,可以使用-d选项(也就是detach): docker-composeup-d 服务的生命周期 查看正在运行的服务 docker-composeps 停止一个服务 docker-composestop[服务名] 如果后面不加服务名,会停止所有的服务。 启动某一个服务 docker-composestart[服务名] 如果后面不加服务名,会启动所有的服务。 查看服务运行的log docker-composelogs-f 加上-f选项,可以持续跟中服务产生的log。 进入服务容器中 docker-composeexecdogbash 删除服务 docker-composerm 注意这个docker-compose rm不会删除应用的网络和数据卷。查看一下网络,可以看到应用创建的网络「beckdocker_default」,如果要删除所有的这些,可以使用: docker-composedown 会提示我们删除网络 beckdocker_default。 三、Networks 网络决定了服务之间以及服务和外界之间如何去通信,在执行docker-compose up的时候,docker会默认创建一个默认的网络,创建的服务也会默认地属于这个默认网络。服务和服务之间,可以使用服务的名字进行通信。也可以自己创建网络,并将服务属于到这个网络之中,这样服务之间可以相互通信,而外界就不能够与这个网络中的服务通信,可以保持隔离性。 下面登录dog服务去连接cat服务,登录到cat服务连接dog服务: 可以通过服务的名称进行连接。 自定义网络 1、在networks中先定义一个名为animal,类型为bridge的网络: version:'2' services: dog: image:nginx ports: -"8080:80" cat: image:nginx ports: -"8081:80" networks: animal: driver:bridge 2、让dog和cat服务使用这个网络: **version:'2' services: dog: image:nginx ports: -"8080:80" networks: -"animal" cat: image:nginx ports: -"8081:80" networks: -"animal" networks: animal: driver:bridge 3、再增加一个叫pig的服务,使用默认网络,来体现于自定义网络的隔离性: version:'2' services: dog: image:nginx ports: -"8080:80" networks: -"animal" cat: image:nginx ports: -"8081:80" networks: -"animal" pig: image:nginx ports: -"8082:80" networks: -"default" networks: animal: driver:bridge 4、重新启动应用 5、登录cat服务,尝试去连接dog服务和pig服务: 因为cat与dog同在animal网络,所以可以通过名字连接,而pig在default网络中,所以不能。 四、Volumes 在compose文件中,还可以指定一些有名字的数据卷,让服务去使用。方法是:在与networks同级的地方,添加volumes,接着是数据卷的名字,下面使用driver去指定数据卷的类型。 定义好数据卷后,就将这个数据卷交给一个服务去使用。可以用volumes给服务指定需要使用的数据卷: dog: ... volumes: -nest:/mnt 以dog服务为例,volumes下指定使用的数据卷,冒号左边是数据卷名称,冒号右边是挂载到的docker对应目录位置。接着给cat服务也添加同样的数据卷。 回到终端,执行docker-compose up -d,下面测试一下数据卷: 因为cat与dog服务都使用nest的数据卷,所以在dog中/mnt目录下创建的data1,在cat服务的/mnt目录下可以看到。 指定位置的数据卷 dog和cat都是一个web服务,现在我想将主机的某一个位置当做是服务的一个内容,那么我们可以去创一个指定位置的数据卷。首先可以在当前目录,创建./app/web文件夹,在里面创建个index.html。 编辑内容: 内容编辑好后,就给dog与cat服务指定数据卷,冒号左边是主机上的目录,冒号右边是服务内挂载的目录: 说明:/usr/share/nginx/html 目录是nginx默认主机的根目录,也就是nginx欢迎界面的目录。 本文转自 dengaosky 51CTO博客,原文链接:http://blog.51cto.com/dengaosky/1854570,如需转载请自行联系原作者

优秀的个人博客,低调大师

Android UI学习 - 用户通知

本文是在网上的文章《Android开发指南-用户界面-用户通知》的基础上添加内容的。里面的相同内容,版权归原翻译作者所有。 通知用户Notifying the User 某些情况下需要通知用户你的应用程序中发生了一个事件。一些事件请求用户应答而另外一些则不需要。比如: 当一个事件比如保存文件结束时,应该出现一条消息确认保存成功。(Toast适用) 如果一个后台运行的应用程序需要用户关注,这个应用程序应该创建一个通知来允许用户在方便时进行应答。(后台程序,状态栏通知适用) 如果这个应用程序在执行一个用户必须等待的任务(比如加载一个文件),那么应用程序应该显示一个盘旋的进度轮或进度条。(进度条Dialog适用) 所有这些通知任务可以通过一个不同的技术获取到: 一个消息条通知Toast Notification, 用于从后台出现的简短信息。for brief messages that come from the background. 一个状态条通知A Status Bar Notification, 用于来自后台的持续提醒并请求用户应答。 一个对话框通知A Dialog Notification, 用于活动相关的通知。 消息条通知Toast Notification 一个消息条通知是一个在窗口表面弹出的信息。它只填充内容所需的空间并且用户当前活动仍然保持可见和可交互。这个通知自动渐入渐出,而且不接受交互事件。因为消息条可以从一个后台服务Service中创建,即便应用程序不可见,它也将呈现出来。 默认的Toast 自定义的Toast Toast的创建和显示都很简单,如果不使用自定义的view,只是显示文字,makeText函数就能做到了: Toast.makeText(getApplicationContext(), // Context context "This is a simple toast!", //显示的text或者引用resource.string的id Toast.LENGTH_LONG) //显示的时间长度, //LENGTH_LONG - 时间长些,>1s; //LENGTH_SHORT- 时间短 .show(); //显示出来 自定义Toast 而如果想使用custom view,首先要写个custom Layout xml文件(toastlayout.xml): <?xml version="1.0" encoding="utf-8"?> <LinearLayout xmlns:android="http://schemas.android.com/apk/res/android" android:id="@+id/toast_layout" android:orientation="horizontal" android:layout_width="fill_parent" android:layout_height="fill_parent" android:padding="10dp" android:background="#DAAA" > <ImageView android:id="@+id/toast_icon" android:layout_width="wrap_content" android:layout_height="fill_parent" android:layout_marginRight="10dp" android:src="@drawable/icon" /> <TextView android:id="@+id/toast_text" android:layout_width="wrap_content" android:layout_height="fill_parent" android:textColor="#FFF" /> </LinearLayout> 注意:TextView的layout_height设置为wrap_content的话,发现左边的图片会跟随文字内容的高度而变化,就是说当文字只有一行的时候,图片的高度就变得只有一行的高度,不好看!图片的src可以不在xml文件里面定义,可以在真正显示时用以下语句来设置: ImageView image = (ImageView) layout.findViewById(R.id.image); image.setImageResource(R.drawable.android); 以下是显示custom toast view: //加载Layout View view = getLayoutInflater().inflate( R.layout.toastlayout, //resource id (ViewGroup) findViewById(R.id.toast_layout)); //ViewGroup对象 //设置Text ((TextView) view.findViewById(R.id.toast_text)) .setText("This is a custom toast!"); //创建Toast Toast toast = new Toast(getApplicationContext()); // 设置显示的位置 toast.setGravity( Gravity.CENTER_VERTICAL, //垂直居中 0, //xOffset 0 //yOffset ); toast.setDuration(Toast.LENGTH_LONG); toast.setView(view); // ** 这个很重要 toast.show(); **官方提示:只有使用custom view,setView(View)的时候,才使用new Toast(Content content)来得到Toast对象,否则必须用makeText(Context, int, int)方法来创建toast对象。 消息条Toast是用来显示简短文本信息的最好方法,比如“文件已保存”,当你很确信用户正在关注屏幕时。一个消息条不能接受用户交互事件;如果你希望用户应答并采取相应动作,请考虑使用一个状态条通知Status Bar Notification。 状态条通知Status Bar Notification 一个状态条通知添加一个图标到系统状态栏上(以及一个可选的滚动条文本信息)以及在这个“通知”窗口中的一个扩展消息。当用户选择这个扩展消息时,Android发出这个通知所定义的一个意图(通常是启动一个活动)。你也可以配置这个通知来通过一个声音,震动和设备上的闪烁灯来警告用户。 当你的应用程序以后台服务运行并需要通知用户事件时,这类通知是一个理想的方式。如果你需要在活动仍处于焦点下时警告用户一个发生的事件,请考虑使用对话框通知Dialog Notification 。 自定义View和默认的Notification 状态栏Notification的创建流程大概是这样的: // 获取NotificationManager mNotificationManager = (NotificationManager) getSystemService(Context.NOTIFICATION_SERVICE); // 创建PendingIntent, 明确响应后转向的Activity contentIntent = PendingIntent.getActivity( getApplicationContext(), 0, new Intent(getApplicationContext(), FrameDemo.class), //响应Notification转向的Activity 0); //实例化一个Notification,并指定其图标和标题(在提示栏上显示) mNotification = new Notification( R.drawable.icon, // icon "Notification", // 状态栏上显示的滚动提示文字tickerText System.currentTimeMillis());//Notification计划执行的开始时间 //设置Notification的Title和详细内容(打开提示栏后在通知列表中显示) mNotification.setLatestEventInfo( getApplicationContext(), "Notification open", // Title "This is a simple notification", //content contentIntent); //PendingIntent是在这时候用的 //100 毫秒延迟后,震动 250 毫秒,暂停 100 毫秒后,再震动 500 毫秒 mNotification.vibrate = new long[] { 100, 250, 100, 500 }; //mNotification.defaults |= Notification.DEFAULT_VIBRATE; //或者设置默认的震动效果 //设置闪灯绿光,也可以设置默认的效果,请参考API DOC mNotification.ledARGB = 0xff00ff00; mNotification.ledOnMS = 300; mNotification.ledOffMS = 1000; mNotification.flags |= Notification.FLAG_SHOW_LIGHTS; //设置声音,可以选择以下任一方式,但要注意,当defaults已经包含了DEFAULT_SOUND,将覆盖之前指定的音频文件的设置 mNotification.defaults |= Notification.DEFAULT_SOUND; //系统默认的通知声音 //mNotification.sound = Uri.parse("file:///sdcard/notification/ringer.mp3"); //或者指定某个音频文件 //设置声音持续重复,直至用户点击或者清除通知 mNotification.flags |= Notification.FLAG_INSISTENT; //最后一步: NotificationManager发出通知 mNotificationManager.notify( R.id.notice1, //该Notification的ID mNotification); 清除通知Clear 如果需要把Notification清除(clear),则调用NotificationManager.cancel(Notification的ID),或者直接NotificationManager.clearAll()清除所有。也可以添加Notification对象的FLAG_AUTO_CANCEL属性来自动清除。 更新通知Update the notification 可以通过notification对象的setLatestEventInfo()方法来修改/更新信息,也可以通过其他函数来修改notification对象的属性,最后是调用NotificationManager.notify(原来的ID, 修改/更新后的notification对象)完成的。 //修改Title & content mNotification.setLatestEventInfo( getApplicationContext(), "Notification update", // Title "This is the second notification", //content contentIntent); //修改Icon mNotification.icon = R.drawable.robot; //设置自动清除 mNotification.flags |= Notification.FLAG_AUTO_CANCEL; //重新发出通知 mNotificationManager.notify(R.id.notice1, mNotification); 自定义view的Notification 首先定义Layout xml文件(notifylayout.xml): <?xml version="1.0" encoding="utf-8"?> <LinearLayout xmlns:android="http://schemas.android.com/apk/res/android" android:id="@+id/notify_layout" android:orientation="horizontal" android:layout_width="fill_parent" android:layout_height="fill_parent" android:padding="3dp" > <ImageView android:id="@+id/notify_image" android:layout_width="wrap_content" android:layout_height="fill_parent" android:layout_marginRight="10dp" /> <TextView android:id="@+id/notify_text" android:layout_width="wrap_content" android:layout_height="fill_parent" android:textColor="#000" /> </LinearLayout> 然后使用RemoteView加载Layout,并设置Image,Text: RemoteViews contentView = new RemoteViews(getPackageName(), R.layout.notifylayout); contentView.setImageViewResource(R.id.notify_image, R.drawable.robot); contentView.setTextViewText(R.id.notify_text, "Hello, this message is in a custom expanded view"); Notification notification = new Notification( R.drawable.icon, //icon "Notification", // 状态栏上显示的提示文字 System.currentTimeMillis()); notification.contentIntent = contentIntent; notification.contentView = contentView; //就是这里不同,set view // 以R.layout.notify_layout为ID mNotificationManager.notify(R.layout.notifylayout, notification); 官方提示,使用custom view的Notification要注意在不同规格的屏幕下的显示效果。个人认为,Notification的自定义View用途不大。更详细的内容可以查阅http://androidappdocs.appspot.com/guide/topics/ui/notifiers/notifications.html 对话框通知Dialog Notification 一个对话框通常是出现在当前活动前面的一个小窗口。背后的活动丢失焦点而由这个对话框接受所有的用户交互。对话框通常用做和运行中应用程序直接相关的通知和短暂活动。 你应该使用对话框来显示一个进度条或者一个需要用户确认的短消息(比如带有“确认”和“取消”按钮的一个警告)。你也可以把对话框作为构成应用程序界面整体的组件以及用于除了通知之外的其它目的。 如何使用对话框通知,请参考对话框Dialoghttp://android.blog.51cto.com/268543/333769。 本文转自 Icansoft 51CTO博客,原文链接: http://blog.51cto.com/android/333573

优秀的个人博客,低调大师

openstack学习笔记十一 Nova

计算节点 跑虚拟机 1 2 3 4 5 6 7 8 9 10 11 12 13 14 15 16 17 18 19 20 21 22 23 24 25 26 27 28 29 30 31 32 33 34 35 36 37 38 39 [root@hequan~] #yuminstallopenstack-nova.noarchopenstack-nova-api.noarchopenstack-nova-conductor.noarch openstack-nova-novncproxy.noarchopenstack-nova-scheduler.noarchopenstack-nova-console.noarch ##控制节点 [root@hequan~] #yuminstallopenstack-nova-compute.noarch##计算节点 keystoneuser-create--namenova--passhequan keystoneuser-role-add--usernova--roleadmin--tenantservices keystoneservice-create--namenova-- type compute--descriptionnova |7708b5c40aec4cf3b59d6d84596a5f6b|nova|compute|OpenstackComputeService| |017bdbf9f335436cbd7f65fe74089b28|nova_ec2|ec2|EC2Service| |4f7b60427d304fd89658f4f8c23dd708|novav3|computev3|OpenstackComputeServicev3| +----------------------------------+-----------+-------------------------------------------------+-------------------------------------------------+--------------------------------------------+----------------------------------+ | id |region|publicurl|internalurl|adminurl|service_id| +----------------------------------+-----------+-------------------------------------------------+-------------------------------------------------+--------------------------------------------+----------------------------------+ |0bda7145ebc944a99112c53e97362fa1|RegionOne|http: //115 .29.107.17:8774 /v2/ %(tenant_id)s|http: //115 .29.107.17:8774 /v2/ %(tenant_id)s|http: //115 .29.107.17:8774 /v2/ %(tenant_id)s|7708b5c40aec4cf3b59d6d84596a5f6b| |731be711c3be4497b57c8751ce111986|RegionOne|http: //115 .29.107.17:8773 /services/Cloud |http: //115 .29.107.17:8773 /services/Cloud |http: //115 .29.107.17:8773 /services/Admin |017bdbf9f335436cbd7f65fe74089b28| |7ec9cb12959f4bedb7e0757c79b636fd|RegionOne|http: //127 .0.0.1:8774 /v3 |http: //127 .0.0.1:8774 /v3 |http: //127 .0.0.1:8774 /v3 |4f7b60427d304fd89658f4f8c23dd708| keystoneendpoint-create--service- id --publicul '' --internalurl '' --adminurl '' openstack-db--init--servicenova--passwordhequan--root123456 [root@hequan~] #ls-ld/var/log/nova/ drwxr-x---2novaroot40967月2300:08 /var/log/nova/ [root@hequan~] #chownnova.nova/var/log/nova/-R [root@hequannova(keystone_admin)] #mvnova.confnova.conf.bak [root@hequannova(keystone_admin)] #systemctllist-unit-files|grepnova openstack-nova-api.serviceenabled openstack-nova-cert.serviceenabled openstack-nova-compute.serviceenabled openstack-nova-conductor.serviceenabled openstack-nova-console.servicedisabled openstack-nova-consoleauth.serviceenabled openstack-nova-metadata-api.servicedisabled openstack-nova-novncproxy.serviceenabled openstack-nova-scheduler.serviceenabled openstack-nova-xvpvncproxy.servicedisabled vncserver_proxyclient_address=115.29.107.17 ##改成本机的IP vim nova.conf 1 2 3 4 5 6 7 8 9 10 11 12 13 14 15 16 17 18 19 20 21 22 23 24 25 26 27 28 29 30 31 32 33 34 35 36 37 38 39 40 41 42 43 44 45 46 47 48 49 50 51 52 53 54 55 56 57 58 59 60 61 62 63 64 65 66 67 68 69 70 71 72 73 74 75 76 77 78 79 80 81 82 83 84 85 86 87 88 89 90 91 92 93 94 95 96 97 98 99 100 101 102 103 104 105 106 107 108 109 110 111 112 113 114 115 116 117 118 119 120 121 122 123 124 125 126 127 128 129 130 131 132 133 134 135 136 137 [DEFAULT] internal_service_availability_zone=internal default_availability_zone=nova novncproxy_host=0.0.0.0 novncproxy_port=6080 notify_api_faults=False state_path= /var/lib/nova report_interval=10 enabled_apis=ec2,osapi_compute,metadata ec2_listen=0.0.0.0 ec2_listen_port=8773 ec2_workers=1 osapi_compute_listen=0.0.0.0 osapi_compute_listen_port=8774 osapi_compute_workers=1 metadata_listen=0.0.0.0 metadata_listen_port=8775 metadata_workers=1 compute_manager=nova.compute.manager.ComputeManager service_down_time=60 rootwrap_config= /etc/nova/rootwrap .conf volume_api_class=nova.volume.cinder.API auth_strategy=keystone use_forwarded_for=False heal_instance_info_cache_interval=60 reserved_host_memory_mb=512 cpu_allocation_ratio=16.0 ram_allocation_ratio=1.5 network_api_class=nova.network.neutronv2.api.API default_floating_pool=public force_snat_range=0.0.0.0 /0 metadata_host=115.29.107.17 dhcp_domain=novalocal security_group_api=neutron scheduler_default_filters=RetryFilter,AvailabilityZoneFilter,RamFilter,ComputeFilter,ComputeCapabilitiesFilter,ImagePropertiesFilter,CoreFilter scheduler_driver=nova.scheduler.filter_scheduler.FilterScheduler compute_driver=libvirt.LibvirtDriver vif_plugging_is_fatal=True ##修改False如果有报错实例执行请求失败 vif_plugging_timeout=300 ##修改为0 firewall_driver=nova.virt.firewall.NoopFirewallDriver force_raw_images=True debug=False verbose=True log_dir= /var/log/nova use_syslog=False syslog_log_facility=LOG_USER use_stderr=True notification_topics=notifications rpc_backend=rabbit amqp_durable_queues=False sql_connection=mysql: //nova :hequan@115.29.107.17 /nova image_service=nova.image.glance.GlanceImageService lock_path= /var/lib/nova/tmp osapi_volume_listen=0.0.0.0 vncserver_proxyclient_address=115.29.107.17 ##修改本机地址 vnc_keymap=en-us vnc_enabled=True vncserver_listen=0.0.0.0 novncproxy_base_url=http: //115 .29.107.17:6080 /vnc_auto .html [api_database] [barbican] [cells] [cinder] catalog_info=volumev2:cinderv2:publicURL [conductor] [cors] [cors.subdomain] [database] [ephemeral_storage_encryption] [glance] api_servers=115.29.107.17:9292 [guestfs] [hyperv] [image_file_url] [ironic] [keymgr] [keystone_authtoken] auth_uri=http: //115 .29.107.17:5000 /v2 .0 identity_uri=http: //115 .29.107.17:35357 admin_user=nova admin_password=hequan admin_tenant_name=services [libvirt] virt_type=qemu inject_password=False inject_key=False inject_partition=-1 live_migration_uri=qemu+tcp: //nova @%s /system cpu_mode=none vif_driver=nova.virt.libvirt.vif.LibvirtGenericVIFDriver [matchmaker_redis] [matchmaker_ring] [metrics] [neutron] service_metadata_proxy=True metadata_proxy_shared_secret=hequan url=http: //115 .29.107.17:9696 admin_username=neutron admin_password=hequan admin_tenant_name=services region_name=RegionOne admin_auth_url=http: //115 .29.107.17:5000 /v2 .0 auth_strategy=keystone ovs_bridge=br-int extension_sync_interval=600 timeout=30 default_tenant_id=default [osapi_v21] [oslo_concurrency] [oslo_messaging_amqp] [oslo_messaging_qpid] [oslo_messaging_rabbit] kombu_reconnect_delay=1.0 rabbit_host=115.29.107.17 rabbit_port=5672 rabbit_hosts=115.29.107.17:5672 rabbit_use_ssl=False rabbit_userid=guest rabbit_password=guest rabbit_virtual_host=/ rabbit_ha_queues=False heartbeat_timeout_threshold=0 heartbeat_rate=2 [oslo_middleware] [rdp] [serial_console] [spice] [ssl] [trusted_computing] [upgrade_levels] [vmware] [vnc] [workarounds] [xenserver] [zookeeper] [osapi_v3] enabled=False 1 2 3 4 5 6 7 8 9 10 11 12 [root@hequan~] #nova-manageservicelist [root@hequan~(keystone_admin)] #novahost-list +---------------+-------------+----------+ |host_name|service|zone| +---------------+-------------+----------+ |hequan.lol|consoleauth|internal| |hequan.lol|scheduler|internal| |hequan.lol|conductor|internal| |hequan.lol|compute|nova| |hequan.lol|cert|internal| [root@hequan~] #systemctlis-activelibvirtd.service active 本文转自 295631788 51CTO博客,原文链接:http://blog.51cto.com/hequan/1832697,如需转载请自行联系原作者

优秀的个人博客,低调大师

Elasticsearch学习概念之curl

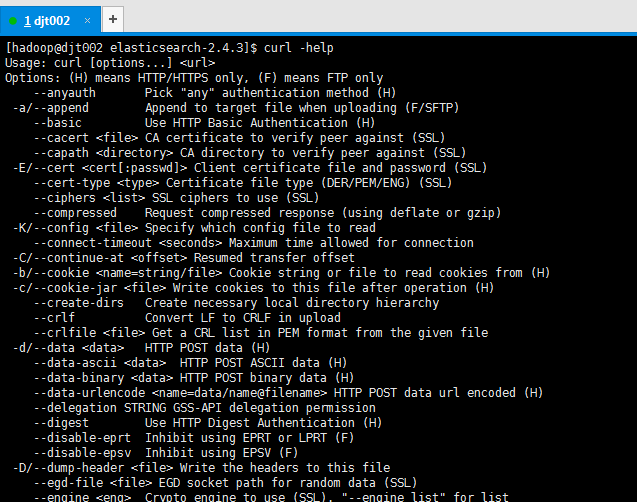
curl,简单认为是可以在命令行下访问url的一个工具。即增删改查。 curl是利用URL语法在命令行方式下工作的开源文件传输工具,使用curl可以简单实现常见的get/post请求。 查看curl的help文档 [hadoop@djt002 elasticsearch-2.4.3]$curl -help Usage: curl [options...] <url> Options: (H) means HTTP/HTTPS only, (F) means FTP only --anyauth Pick "any" authentication method (H) -a/--append Append to target file when uploading (F/SFTP) --basic Use HTTP Basic Authentication (H) --cacert <file> CA certificate to verify peer against (SSL) --capath <directory> CA directory to verify peer against (SSL) -E/--cert <cert[:passwd]> Client certificate file and password (SSL) --cert-type <type> Certificate file type (DER/PEM/ENG) (SSL) --ciphers <list> SSL ciphers to use (SSL) --compressed Request compressed response (using deflate or gzip) -K/--config <file> Specify which config file to read --connect-timeout <seconds> Maximum time allowed for connection -C/--continue-at <offset> Resumed transfer offset -b/--cookie <name=string/file> Cookie string or file to read cookies from (H) -c/--cookie-jar <file> Write cookies to this file after operation (H) --create-dirs Create necessary local directory hierarchy --crlf Convert LF to CRLF in upload --crlfile <file> Get a CRL list in PEM format from the given file -d/--data <data> HTTP POST data (H) --data-ascii <data> HTTP POST ASCII data (H) --data-binary <data> HTTP POST binary data (H) --data-urlencode <name=data/name@filename> HTTP POST data url encoded (H) --delegation STRING GSS-API delegation permission --digest Use HTTP Digest Authentication (H) --disable-eprt Inhibit using EPRT or LPRT (F) --disable-epsv Inhibit using EPSV (F) -D/--dump-header <file> Write the headers to this file --egd-file <file> EGD socket path for random data (SSL) --engine <eng> Crypto engine to use (SSL). "--engine list" for list -f/--fail Fail silently (no output at all) on HTTP errors (H) -F/--form <name=content> Specify HTTP multipart POST data (H) --form-string <name=string> Specify HTTP multipart POST data (H) --ftp-account <data> Account data to send when requested by server (F) --ftp-alternative-to-user <cmd> String to replace "USER [name]" (F) --ftp-create-dirs Create the remote dirs if not present (F) --ftp-method [multicwd/nocwd/singlecwd] Control CWD usage (F) --ftp-pasv Use PASV/EPSV instead of PORT (F) -P/--ftp-port <address> Use PORT with address instead of PASV (F) --ftp-skip-pasv-ip Skip the IP address for PASV (F) --ftp-ssl Try SSL/TLS for ftp transfer (F) --ftp-ssl-ccc Send CCC after authenticating (F) --ftp-ssl-ccc-mode [active/passive] Set CCC mode (F) --ftp-ssl-control Require SSL/TLS for ftp login, clear for transfer (F) --ftp-ssl-reqd Require SSL/TLS for ftp transfer (F) -G/--get Send the -d data with a HTTP GET (H) -g/--globoff Disable URL sequences and ranges using {} and [] -H/--header <line> Custom header to pass to server (H) -I/--head Show document info only -h/--help This help text --hostpubmd5 <md5> Hex encoded MD5 string of the host public key. (SSH) -0/--http1.0 Use HTTP 1.0 (H) --ignore-content-length Ignore the HTTP Content-Length header -i/--include Include protocol headers in the output (H/F) -k/--insecure Allow connections to SSL sites without certs (H) --interface <interface> Specify network interface/address to use -4/--ipv4 Resolve name to IPv4 address -6/--ipv6 Resolve name to IPv6 address -j/--junk-session-cookies Ignore session cookies read from file (H) --keepalive-time <seconds> Interval between keepalive probes --key <key> Private key file name (SSL/SSH) --key-type <type> Private key file type (DER/PEM/ENG) (SSL) --krb <level> Enable Kerberos with specified security level (F) --libcurl <file> Dump libcurl equivalent code of this command line --limit-rate <rate> Limit transfer speed to this rate -l/--list-only List only names of an FTP directory (F) --local-port <num>[-num] Force use of these local port numbers -L/--location Follow Location: hints (H) --location-trusted Follow Location: and send auth to other hosts (H) -M/--manual Display the full manual --max-filesize <bytes> Maximum file size to download (H/F) --max-redirs <num> Maximum number of redirects allowed (H) -m/--max-time <seconds> Maximum time allowed for the transfer --negotiate Use HTTP Negotiate Authentication (H) -n/--netrc Must read .netrc for user name and password --netrc-optional Use either .netrc or URL; overrides -n -N/--no-buffer Disable buffering of the output stream --no-keepalive Disable keepalive use on the connection --no-sessionid Disable SSL session-ID reusing (SSL) --noproxy Comma-separated list of hosts which do not use proxy --ntlm Use HTTP NTLM authentication (H) -o/--output <file> Write output to <file> instead of stdout --pass <pass> Pass phrase for the private key (SSL/SSH) --post301 Do not switch to GET after following a 301 redirect (H) --post302 Do not switch to GET after following a 302 redirect (H) -#/--progress-bar Display transfer progress as a progress bar -x/--proxy <host[:port]> Use HTTP proxy on given port --proxy-anyauth Pick "any" proxy authentication method (H) --proxy-basic Use Basic authentication on the proxy (H) --proxy-digest Use Digest authentication on the proxy (H) --proxy-negotiate Use Negotiate authentication on the proxy (H) --proxy-ntlm Use NTLM authentication on the proxy (H) -U/--proxy-user <user[:password]> Set proxy user and password --proxy1.0 <host[:port]> Use HTTP/1.0 proxy on given port -p/--proxytunnel Operate through a HTTP proxy tunnel (using CONNECT) --pubkey <key> Public key file name (SSH) -Q/--quote <cmd> Send command(s) to server before file transfer (F/SFTP) --random-file <file> File for reading random data from (SSL) -r/--range <range> Retrieve only the bytes within a range --raw Pass HTTP "raw", without any transfer decoding (H) -e/--referer Referer URL (H) -O/--remote-name Write output to a file named as the remote file --remote-name-all Use the remote file name for all URLs -R/--remote-time Set the remote file's time on the local output -X/--request <command> Specify request command to use --retry <num> Retry request <num> times if transient problems occur --retry-delay <seconds> When retrying, wait this many seconds between each --retry-max-time <seconds> Retry only within this period -S/--show-error Show error. With -s, make curl show errors when they occur -s/--silent Silent mode. Don't output anything --socks4 <host[:port]> SOCKS4 proxy on given host + port --socks4a <host[:port]> SOCKS4a proxy on given host + port --socks5 <host[:port]> SOCKS5 proxy on given host + port --socks5-hostname <host[:port]> SOCKS5 proxy, pass host name to proxy --socks5-gssapi-service <name> SOCKS5 proxy service name for gssapi --socks5-gssapi-nec Compatibility with NEC SOCKS5 server -Y/--speed-limit Stop transfer if below speed-limit for 'speed-time' secs -y/--speed-time Time needed to trig speed-limit abort. Defaults to 30 -2/--sslv2 Use SSLv2 (SSL) -3/--sslv3 Use SSLv3 (SSL) --stderr <file> Where to redirect stderr. - means stdout --tcp-nodelay Use the TCP_NODELAY option -t/--telnet-option <OPT=val> Set telnet option -z/--time-cond <time> Transfer based on a time condition -1/--tlsv1 Use TLSv1 (SSL) --trace <file> Write a debug trace to the given file --trace-ascii <file> Like --trace but without the hex output --trace-time Add time stamps to trace/verbose output -T/--upload-file <file> Transfer <file> to remote site --url <URL> Set URL to work with -B/--use-ascii Use ASCII/text transfer -u/--user <user[:password]> Set server user and password -A/--user-agent <string> User-Agent to send to server (H) -v/--verbose Make the operation more talkative -V/--version Show version number and quit -w/--write-out <format> What to output after completion -q If used as the first parameter disables .curlrc [hadoop@djt002 elasticsearch-2.4.3]$ 比如, curl -x 指定http请求的方法 GET POST PUT DELETE -d 指定要传递的参数 本文转自大数据躺过的坑博客园博客,原文链接:http://www.cnblogs.com/zlslch/p/6420132.html,如需转载请自行联系原作者

优秀的个人博客,低调大师

MyBatis For .NET学习笔记:开篇

本来打算在年前好好研究一下这个MyBatis 的ORM框架. 可是中间临时另有安排而不得已中断.目前开源的ORM框架已经太多了.其实在开源社区OSChina上可以看到已经成列各个语言/平台. 以前做过一段Java. 在.NET平台项目中叶也曾使用NHibernate和Spring.NET. 但大都是随着项目的完善提交而没有深入研究. 本篇作为MyBatis For .Net一个开篇.虽然使用过相关的ORM框架但对这个MyBatis了解甚少.. 也不知下面关于 MyBatis FOr .NEt这个主题上能写多少. 开源项目iBATIS一词来源于“internet”和“abatis”的组合,是一个由Clinton Begin在2001年发起的开放源代码项目。最初侧重于密码软件的开发,现在是一个基于Java的持久层框架。iBATIS提供的持久层框架包括SQLMaps和Data Access Objects(DAO),同时还提供一个利用这个框架开发的JPetStore实例. 现在我们能从IBATIS项目中能分别看到衍生出来两个不同的版本.Net和Java. 当然这也是得益于开源社区的力量: 在Google of Code代码托管库中 MyBatis 官网: MyBatis Web Site MyBatis For JAva on Google Code MyBatis For .NEt On Google Code 我大概Google一下相关的关于MyBatis中文资料相对比较少. 另外当你找到官方给你提供的相关Code Of Google上文档和代码实例你会发现Java和.Net版本之间的巨大差别. Java中Wiki文档提供相关源代码实例 已经相关文档说明.可惜的.NET上除了几句毫无意义的说明 基本上什么都没有了. 这对E文来说是一个”小挑战”. 相比我曾经用过的比较熟悉的NHibernate,MyBatis还是有自己突出的特点. 相信熟悉Nhibernate都应该知道, NHibernate对数据库结构提供了较为完整的一站式封装,代码自动生成,减少代码和sql的开发量,使开发人员摆脱开sql,ado.net和事务、缓存等底层. 而MyBatis相对Nhibernate 则体现 是在一种对ORM半自动化封装. 为何? MyBATIS需要开发人员自己来写sql语句,这可以增加了程序的灵活性,在一定程度上可以作为ORM的一种补充.其实这样封装模式在实际项目需求下对ORM本身来说灵活性更强. 架构设计人员应该结合自己的项目的实际情况,来选择使用不同的策略。MyiBATIS和NHibernate都做了映射,但iBATIS是把实体类和sql语句之间建立了映射关系,这种策略可以允许开发人员自己来写合适的sql语句,而NHibernate在实体类和数据库之间建立了映射关系,sql对于开发人员是不可见的,对于那些数据量非常大的应用,无法去优化sql语句. 类似 现在项目团队中正在开发一个项目CodeExplorer.采用Nhibernate.做数据访问层映射. 当没过一天我们提交自己代码进行测试,项目DBA会立马过来说:"哪个谁谁谁? 把一个PageFrom页面list数据检索修改一下 关联表太多. 性能参数太低." 你回应道:"这没法改! Nhibernate代码自动生成 SQL语句封装更是不可见的. 怎么改? " 这种情景其实在Nhibernate架构项目中几位常见. 这也是完整一站式封装所不能适应项目需求的地方 就是灵活性. 这点给我映像最深的是在一些信息查询系统 NhiberNate表现在对于多表连接查询,复杂的sql实现如果本身满足不了需求有可能需要借助其他方案来解决性能问题. 另外值得注意 的是我们往往在追究性能问题过多关注数据体现上.其实问题真正原因是在数据库结构设计上是否合理也是有很大关系. 可见对数据库模式有较高的要求.NHibernate需要数据库有良好的设计和比较完善的约束. 才能体现出Nhiernate完整封装的优势.而MyBaTis把SQL语句操作权从Nbiernate完整封装中重新交给了我们. 不知道还有人记得James Elliott的那句话, As good object-oriented developers got tired of this repetitive work, their typical tendency towards enlightened laziness started to manifest itself in the creation of tools to help automate the process. When working with relational databases, the culmination of such efforts were object/relational mapping tools. 本文转自chenkaiunion 51CTO博客,原文链接:http://blog.51cto.com/chenkai/763806

优秀的个人博客,低调大师

SpringCloud学习之soa基础

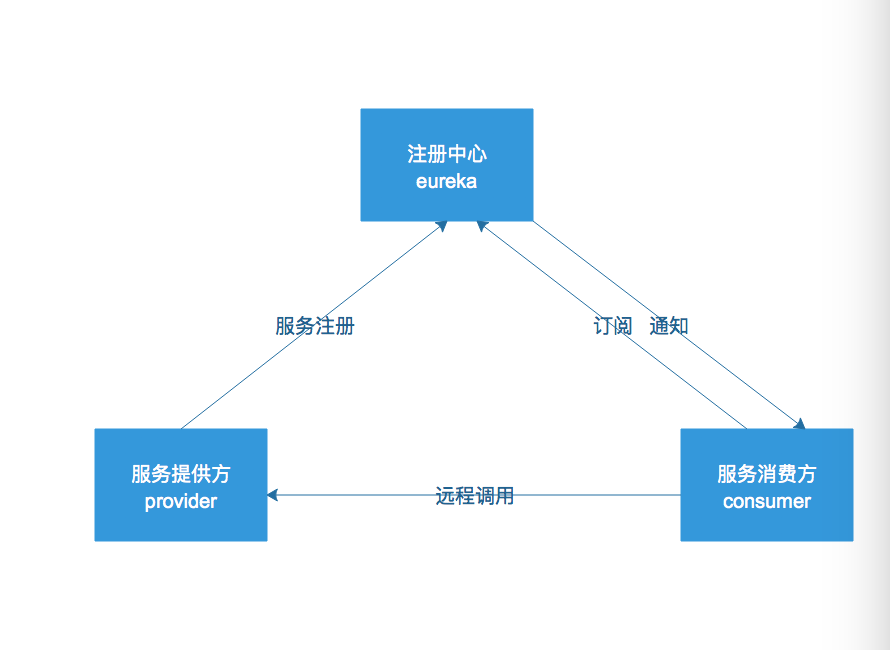
一、soa简单介绍 1)面向服务的架构(SOA)是一个组件模型,它将应用程序的不同功能单元(称为服务)通过这些服务之间定义良好的接口和契约联系起来。SOA是解决复杂业务模块,提高扩展性,维护性,可伸缩性的最基本方案。我们的业务服务可以根据需求通过网络对松散耦合的粗粒度应用组件进行分布式部署、组合和使用。服务层是SOA的基础,可以直接被应用调用,不同的服务通过不同的团队来维护。 有效的业务分割是soa基础中的基础 2)对于大型网站常见的架构模式: 分层:便于维护,各个模块之间有一定的独立性,属于横向切分,常见的为三层架构 分割:属于纵向切分,当项目业务复杂,功能越来越多时,可以将业务功能进行拆分,常见的是拆分成项目,部署在不同的服务器上,每个模块由独立的团队进行维护 分布式:分割与分层一个主要目的就是将切分后的模块进行分布式部署,分布式意味着使用更多机器完成相同的功能,机器多意味着cpu,内存也多,处理计算的能力与并发能力也就越大 集群:集群为了使用更多的机器来处理相同的服务,用以提高性能。 3)常用的分布式方案: 分布式应用和服务:最常见的方式,即将不同的业务服务部署到不同的机器上 分布式静态资源:动静分离。将css资源或者图片独立进行分布式部署 分布式存储:最常见的是数据库分布式部署,来分割海量的数据 分布式计算:比如说hadoop等大数据处理方案 4)分布式带来的问题: 分布式意味着服务调用必须通过网络,网络带宽的问题是服务之间调用必不可免的问题 多台服务器会存在数据一致性的问题以及分布式事务问题 服务器越多宕机的概率也就越大 维护成本以及开发成本的增加 5)注意分布式一定是根据需求及业务量而定的,切不可为了分布式而分布式 6)注册中心:管理服务地址,并提供调用者访问的组件,常见的有zookeeper eureka redis等 二、soa基本架构图(以spring-cloud为例) 1.注册中心: 保存服务提供方暴露的服务信息,常见的注册中心有zookeeper eureka 2.服务提供方:提供服务者 3.消费方:当需要调用远程服务接口时,必须在注册中心发现服务找到服务提供者,从而进行远程方法调用 三、SpringCloud项目构建 Spring Cloud为开发人员提供了快速构建分布式系统中一些常见模式的工具(例如配置管理,服务发现,断路器,智能路由,微代理,控制总线)。使用Spring Cloud开发人员可以快速地支持实现这些模式的服务和应用程序。 1、通过访问http://start.spring.io来构建spring-cloud项目 注意:在Search for dependencies里添加最基本的soa依赖项: web EurekaServer Eureka Discovery 2、通过IDEA工具导入下载好的项目并依次创建一下几个项目模块: 这里说明一下: register-center:注册中心 service-api:接口契约 service-provider:服务提供方 service-consumer:服务消费方 四.实现步骤 1、实现注册中心 application.yml配置: server: port: 8000 eureka: client: register-with-eureka: false fetch-registry: false service-url: defaultZone: http://localhost:8000/eureka/ View Code 注意:在默认设置下,Eureka服务注册中心也会将自己作为客户端来尝试注册它自己,所以我们需要禁用它的客户端注册行为。 register-with-eureka: 代表是否向eureka服务注册 fetch-registry: 是否从eureka注册中心拉取信息 service-url: eureka的服务地址 编写程序入口类,通过@EnableEurekaServer激活Eureka服务器相关配置: package com.bdqn.springcloud.study.provider; import org.springframework.boot.SpringApplication; import org.springframework.boot.autoconfigure.SpringBootApplication; import org.springframework.cloud.netflix.eureka.server.EnableEurekaServer; @EnableEurekaServer @SpringBootApplication public class RegisterCenterProvider { public static void main(String[] args) { SpringApplication.run(RegisterCenterProvider.class, args); } } View Code 2 实现service-api 定义暴露服务的接口契约 package com.bdqn.springcloud.study.api; import com.bdqn.springcloud.study.dto.UserDTO; /** * UserService测试接口 * * @author chen.nie * @date 2017/11/13 */ public interface UserService { UserDTO findUser(); } View Code 定义DTO package com.bdqn.springcloud.study.dto; public class UserDTO { private Integer id; private String name; public Integer getId() { return id; } public void setId(Integer id) { this.id = id; } public String getName() { return name; } public void setName(String name) { this.name = name; } } View Code 3 实现服务提供方: gradle配置:先依赖service-api dependencies{ compile project(":service-api") } View Code application-yml的配置: server: port: 8001 spring: application: name: "service-provider-demo" eureka: instance: prefer-ip-address: true client: service-url: defaultZone: http://localhost:8000/eureka/ View Code 注意:这里面要配置应用名称 注册中心的服务地址 接口实现类: package com.bdqn.springcloud.study.provider.impl; import com.bdqn.springcloud.study.api.UserService; import com.bdqn.springcloud.study.dto.UserDTO; import org.springframework.stereotype.Service; @Service("userService") public class UserServiceImpl implements UserService { @Override public UserDTO findUser() { UserDTO userDTO = new UserDTO(); userDTO.setName("张三丰"); userDTO.setId(10); return userDTO; } } View Code Controller: package com.bdqn.springcloud.study.provider.controller; import com.bdqn.springcloud.study.api.UserService; import com.bdqn.springcloud.study.dto.UserDTO; import org.springframework.web.bind.annotation.GetMapping; import org.springframework.web.bind.annotation.RestController; import javax.annotation.Resource; @RestController public class UserController { @Resource private UserService userService; @GetMapping("/user") public UserDTO getUser() { return this.userService.findUser(); } } View Code 启动类: package com.bdqn.springcloud.study.provider; import org.springframework.boot.SpringApplication; import org.springframework.boot.autoconfigure.SpringBootApplication; import org.springframework.cloud.client.discovery.EnableDiscoveryClient; @EnableDiscoveryClient @SpringBootApplication public class ServiceProvider { public static void main(String[] args) { SpringApplication.run(ServiceProvider.class, args); } } View Code @EnableDiscoveryClient:用于启用发现客户端实现的注释打来浏览器访问:http://localhost:8000 我们看到刚才的接口服务已经成功注册至Eureka中心 4.实现服务消费方 gradle配置:先依赖service-api dependencies{ compile project(":service-api") compile 'org.springframework.cloud:spring-cloud-starter-eureka' } View Code application.yml配置: server: port: 8002 spring: application: name: "service-consumer-demo" eureka: instance: prefer-ip-address: true client: service-url: defaultZone: http://localhost:8000/eureka/ View Code 编写Controller: package com.bdqn.springcloud.study.consumer.controller; import com.bdqn.springcloud.study.dto.UserDTO; import org.springframework.beans.factory.annotation.Autowired; import org.springframework.cloud.client.loadbalancer.LoadBalancerClient; import org.springframework.http.ResponseEntity; import org.springframework.web.bind.annotation.GetMapping; import org.springframework.web.bind.annotation.RestController; import org.springframework.web.client.RestTemplate; @RestController public class ConsumerController { @Autowired private RestTemplate restTemplate; @Autowired private LoadBalancerClient loadBalancerClient; @GetMapping("/getUser") public String getUser() { ResponseEntity<UserDTO> responseEntity = restTemplate.getForEntity("http://SERVICE-PROVIDER-DEMO/user", UserDTO.class); UserDTO userDTO = responseEntity.getBody(); return userDTO.getName(); } } View Code 注意我们通过http://service-provider-demo/user/ 指定service-provider的application name,让系统从注册中心去发现服务。 5.编写启动项: package com.bdqn.springcloud.study.consumer; import org.springframework.boot.SpringApplication; import org.springframework.boot.autoconfigure.SpringBootApplication; import org.springframework.cloud.client.discovery.EnableDiscoveryClient; import org.springframework.cloud.client.loadbalancer.LoadBalanced; import org.springframework.cloud.netflix.eureka.EnableEurekaClient; import org.springframework.context.annotation.Bean; import org.springframework.web.client.RestTemplate; @SpringBootApplication @EnableDiscoveryClient public class ServiceConsumer { @Bean @LoadBalanced RestTemplate restTemplate() { return new RestTemplate(); } public static void main(String[] args) { SpringApplication.run(ServiceConsumer.class, args); } } View Code 在启动项里,我们配置了一个RestTemplate 主意@LoadBalanced注解修饰的restTemplate,具备负载均衡能力的restTemplate,即每次都会用负载均衡算法,从可用服务列表中,挑一个进行调用。 启动完毕时,我们发现注册中心中多了一个服务: 当我们访问http://localhost:8002/getUser得到如下显示就说明我们的服务运行成功了: 当停止register-center时,我们发现该访问地址依然能够拿到结果,说明消费端本地是有缓存的

优秀的个人博客,低调大师

mysql学习之-逻辑架构

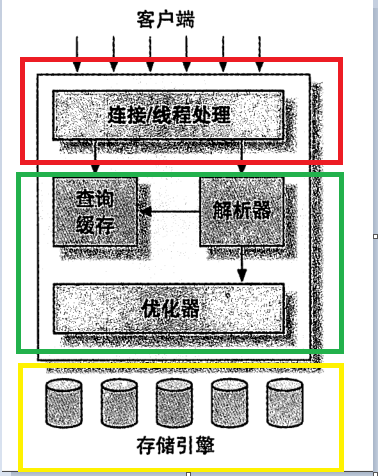
mysql逻辑架构图: 第一层,服务层(为客户端服务):为请求做连接处理,授权认证,安全等。 1. 每个连接的查询都在一个进程中的线程完成。 2. 服务器负责缓存线程,所以服务层不需要为每个连接新建线程。 注:mysql5.5或者更新的版本提供了一个API,支持线程池(thread-pooling)插件,可以使用池中少量线程来服务大量的连接。 (类似于oracle中的共享连接方式) 第二层,核心层:查询解析,分析,优化,缓存,提供内建函数;存储过程,触发器,视图。 1.优化器不关心使用的是什么存储引擎,但是存储引擎对优化查询有影响。 2.在解析查询之前,服务器会“询问”是否进行了查询缓存(只能缓存SELECT语句和相应结果)。缓存过的直接返回结果,未缓存的就需要进行解析查询,优化,重新执行返回结果。 3.解析查询时会创建一个内部数据结构(解析树),然后对其进行各种优化。 第三层,存储引擎层,不光做存储和提取数据,而且针对特殊数据引擎还要做事务处理。 1.服务器通过API与存储引擎通信,接口屏蔽了不同存储引擎之间的差异,使得上层查询透明。 2.不同存储引擎之间不会通信,只会简单相应上层服务的请求。 本文转自 张冲andy 博客园博客,原文链接:http://www.cnblogs.com/andy6/p/6178977.html ,如需转载请自行联系原作者

优秀的个人博客,低调大师

Android学习笔记--广播机制

MicrosoftInternetExplorer402DocumentNotSpecified7.8Normal0 1.Adnroid的广播机制 2.BroadcastReceiver的作用 事件触发之后的一种解决方法 3.BroadcasrReceiver的编写方法 在AndroidManifest.xml中注册广播 <receiverandroid:name=".TextReceiver"> <intent-filter> <actionandroid:name="android.intent.action.EDIT"> </intent-filter> <receiver> 例://BroadcasrReceiver PublicclassTestReceiverextendsBroadcastReceiver{ PublicTestReceiver(){ System.out.println("TestReceiver"); } @override PublcvoidonReceive(Contextcontext,Intentintent){ System.out.println("OnReceiver"); //对象会被销毁TestReceiver } } Activity中的写法例: 1.声明控件对象(略) 2.获得控件对象(略) 3.绑定事件(略) 4.创建监听器对象 PublicvoidonClick(Viewv){ TestReceivertr=newTestReceiver(); Intentintent=newIntent(); intent.setAction(Intent.ACTION_EDIT);//与AndroidManifest中的过滤内容对比 TestActivity.this.sendBroadcast(intent); } 4.BroadcastReceiver的生命周期 5. 注册BroadcastReceiver的方法 BroadcastReceiver用于监听被广播的事件(Intent)为了达到这个目的,BroadcastReceiver必须进行注册,以下是注册的两种方法 在应用程序的代码当中进行注册 注册BroadcastReceiver registerReceiver(receiver,filter) 取消注册 UnregisterReceiver(receiver); Activity中代码例: 1.声明控件对象(略) 2.获得控件对象(略) 3.绑定事件(略) 4.创建监听器对象 //绑定广播事件 PublicvoidonClick(Viewv){ //生成receiver对象 smsReceiver=newSMSReceiver(); IntentFilterfilter=newIntentFilter(); filter.addAction(" android.provider.Telephony.SMS_RECEIVED" ); //注册广播事件 TestActivity.this.registerReceiver(smsReceiver,filter); } //接触广播事件 PublicvoidonClick(Viewv){ TextActicity.this.unregisterReceiver(smsReceiver); } PublicclassSMSReceiverextendsBroadcastReceiver{ @override PublicvoidonReceive(Contextcontext,Intentintent){ System.out,println("receivemessage"); //对接受的短消息进行处理 //接受Intent对象中的数据 Bundlebundle=Intent.getExtras(); //在Bundle对象当中有一个属性名为pdus,这个属性的值是一个Object数组 Object[]myObjects=(Object[])bundle.get("pdus"); //创建一个SmsMessage类型的数组 SmsMessage[]message=newSmsMessage(myObjects.length); System.out,println(message.length); For(inti=0;i<myObjects.length;i++){ //使用Object数组当中的对象创建SmsMessage对象 Message=SmsMessage.createFromPdu((byte[])myObjects); System.out,println(message.getDisplayMessageBody()); } } } 在AndroidManifest.xml中进行注册(不论应用程序的开启或关闭) <receiverandroid:name=".TestReceiver"> <intent-filter> <actionandroid:name="android,intent.action.PICK"> </intent-filter> <receiver> 6.Android内置的BroadcastActions 本文转自My_King1 51CTO博客,原文链接:http://blog.51cto.com/apprentice/1360565,如需转载请自行联系原作者

优秀的个人博客,低调大师

Jenkins学习笔记 系列1

首先说下Jenkins能干什么?说下两个典型的应用场景。 Git/Repo + Gerrit + Jenkins 打造强大的Android持续集成环境。用户上传代码到Gerrit进行code review和入库,用户上传代码操作和入库都可以触发Jenkins获取代码进行自动构建。Jenkins也可以定时构建,构建结果可以通过邮件自动发 送给相关人员。当然用户提交代码到Gerrit时,Gerrit也会自动发邮件给具有代码检视权限的人员。 ##备注: repo介绍: Android使用Git作为代码管理工具,开发了Gerrit进行代码审核以便更好的对代码进行集中式管理,还开发了Repo命令行工具,对Git部分命令封装,将百多个Git库有效的进行组织。 Gerrit介绍: 一种免费、开放源代码的代码审查软件,使用网页界面。利用网页浏览器,同一个团队的软件程序员,可以相互审阅彼此修改后的程序代码,决定是否能够提交,退回或者继续修改。它使用Git作为底层版本控制系统。 关于git操作代码的一些操作: git add git commit 若需要将代码向本地仓库递交,则通过git add将文件加入索引区,再通过git commit方法可真正的将代码递交入库。 git push 若功能开发好后,需要将本地代码共享给项目组中的其他成员,若通过git push命令将本地已入库的代码向远程仓库合入 2. SVN/Git + Jenkins 以apk代码为例,Jenkins可以监测SVN/Git等代码配置库,一旦有人提交代码,就会自动获取代码进行构建,构建结果可以通过邮件在内的多种方式通知人员。 本文转自Tenderrain 51CTO博客,原文链接:http://blog.51cto.com/tenderrain/1597340,如需转载请自行联系原作者

资源下载

更多资源
腾讯云软件源

腾讯云软件源

为解决软件依赖安装时官方源访问速度慢的问题,腾讯云为一些软件搭建了缓存服务。您可以通过使用腾讯云软件源站来提升依赖包的安装速度。为了方便用户自由搭建服务架构,目前腾讯云软件源站支持公网访问和内网访问。

Rocky Linux

Rocky Linux

Rocky Linux(中文名:洛基)是由Gregory Kurtzer于2020年12月发起的企业级Linux发行版,作为CentOS稳定版停止维护后与RHEL(Red Hat Enterprise Linux)完全兼容的开源替代方案,由社区拥有并管理,支持x86_64、aarch64等架构。其通过重新编译RHEL源代码提供长期稳定性,采用模块化包装和SELinux安全架构,默认包含GNOME桌面环境及XFS文件系统,支持十年生命周期更新。

Sublime Text

Sublime Text

Sublime Text具有漂亮的用户界面和强大的功能,例如代码缩略图,Python的插件,代码段等。还可自定义键绑定,菜单和工具栏。Sublime Text 的主要功能包括:拼写检查,书签,完整的 Python API , Goto 功能,即时项目切换,多选择,多窗口等等。Sublime Text 是一个跨平台的编辑器,同时支持Windows、Linux、Mac OS X等操作系统。

WebStorm

WebStorm

WebStorm 是jetbrains公司旗下一款JavaScript 开发工具。目前已经被广大中国JS开发者誉为“Web前端开发神器”、“最强大的HTML5编辑器”、“最智能的JavaScript IDE”等。与IntelliJ IDEA同源,继承了IntelliJ IDEA强大的JS部分的功能。

用户登录
用户注册