首页 文章 精选 留言 我的

精选列表

搜索[图片显示],共10000篇文章
优秀的个人博客,低调大师

iOS: 首次使用App时,显示半透明新手指引

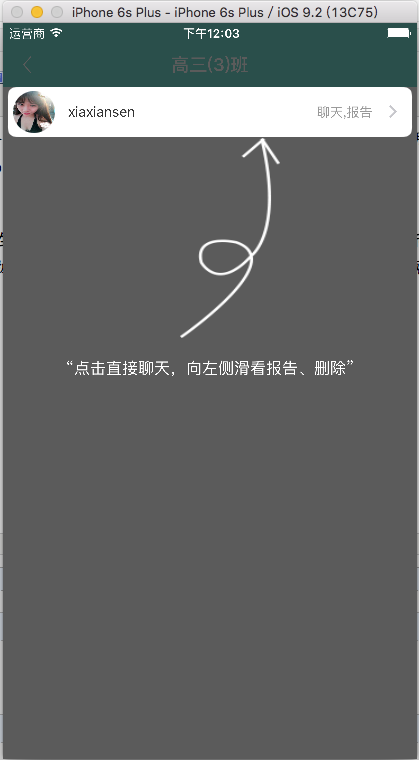
在很多的app,我们都会发现这样一个功能:就是app启动后进入主界面时,会有一个半透明的指引图,它会提示用户如何一步步进行操作,快速的熟悉app的使用规则,极大地方便了用户的使用,也加快了app的推广,优点不言而喻。 我主要介绍一下思路: 首先创建一个半透明的蒙版覆盖在当前整个屏幕上,然后用贝塞尔曲线绘制白色的提示框(矩形或者圆形),接着给出带箭头图标的文字提示,也即在蒙版上添加自定义的子视图控件。当然,最后给整个蒙版添加一个触摸手势,只要轻轻点击就移除蒙版、子视图、手势,恢复正常界面。 注意:新手引导只需要出现一次就够了,可以通过偏好设置来控制器只出现一次。 演示截图如下: 出现指引 点击指引消失,按照提示操作 代码如下: 颜色宏定义 // 颜色RGB #define XYQColorRGB(r, g, b) [UIColor colorWithRed:(r)/255.0 green:(g)/255.0 blue:(b)/255.0 alpha:1.0] #define XYQColorRGBA(r, g, b, a) [UIColor colorWithRed:(r)/255.0 green:(g)/255.0 blue:(b)/255.0 alpha:a] 新手指引 #pragma mark - 新手引导 - (void)newUserGuide { // 这里创建指引在这个视图在window上(蒙版、手势) CGRect frame = [UIScreen mainScreen].bounds; UIView * bgView = [[UIView alloc]initWithFrame:frame]; bgView.backgroundColor = XYQColorRGBA(50, 50, 50, 0.8); UITapGestureRecognizer * tap = [[UITapGestureRecognizer alloc]initWithTarget:self action:@selector(sureTapClick:)]; [bgView addGestureRecognizer:tap]; //添加子视图控件 UILabel *textLabel = [[UILabel alloc]initWithFrame:CGRectMake(5, 320, frame.size.width-10, 50)]; textLabel.backgroundColor = [UIColor clearColor]; textLabel.text = @"“点击直接聊天,向左侧滑看报告、删除”"; textLabel.textColor = [UIColor whiteColor]; textLabel.textAlignment = NSTextAlignmentCenter; textLabel.font = fontSize_16; [bgView addSubview:textLabel]; UIImageView * imageView = [[UIImageView alloc]initWithFrame:CGRectMake(frame.size.width/2-30,115,100, 200)];; imageView.image = [UIImage imageNamed:@"CouponBoard_guid"]; [bgView addSubview:imageView]; [[UIApplication sharedApplication].keyWindow addSubview:bgView]; //create path 重点来了(这里需要添加第一个路径) UIBezierPath *path = [UIBezierPath bezierPathWithRect:frame]; // 这里添加第二个路径 (这个是矩形) [path appendPath:[[UIBezierPath bezierPathWithRoundedRect:CGRectMake(5, 64, frame.size.width-10, 50) cornerRadius:8] bezierPathByReversingPath]]; //渲染 CAShapeLayer *shapeLayer = [CAShapeLayer layer]; shapeLayer.path = path.CGPath; [bgView.layer setMask:shapeLayer]; } /** * 新手指引确定 */ - (void)sureTapClick:(UITapGestureRecognizer *)tap { UIView *guidevView = tap.view; [guidevView removeFromSuperview]; //移除蒙版 [guidevView.subviews makeObjectsPerformSelector:@selector(removeFromSuperview)];//移除所有子视图 [guidevView removeGestureRecognizer:tap]; //移除手势 } 参考资料: http://www.jianshu.com/p/00d4fe5a3c1a http://www.jianshu.com/p/b83aefdc9519 欢迎关注我的github:https://github.com/xiayuanquan 程序猿神奇的手,每时每刻,这双手都在改变着世界的交互方式! 本文转自当天真遇到现实博客园博客,原文链接:http://www.cnblogs.com/XYQ-208910/p/5714352.html ,如需转载请自行联系原作者


优秀的个人博客,低调大师

iOS开发技巧 - 使用Alerts和Action Sheets显示弹出框

解决方案: (Swift) 使用UIAlertController类 (Objective-C) 使用UIAlertView类 代码: (Swift) import UIKit class ViewController: UIViewController { // 1. define the variable that will hold our alert controller var controller:UIAlertController? override func viewDidLoad() { super.viewDidLoad() // 2. start constructing a simple alert view controller using the alert view style controller = UIAlertController(title: "Title", message: "Message", preferredStyle: .Alert) // 3. simply print out a text to the console when pressed let action = UIAlertAction(title: "Done", style: UIAlertActionStyle.Default, handler: { (paramAction:UIAlertAction!) in println("The Done button was tapped") }) // 4. add the action that we created to the alert controller controller!.addAction(action) } override func viewDidAppear(animated: Bool) { super.viewDidAppear(animated) // 5. present the alert controller self.presentViewController(controller!, animated: true, completion: nil) } } (Objective-C) #import "ViewController.h" @interface ViewController () <UIAlertViewDelegate> @end @implementation ViewController ... - (void)viewDidAppear:(BOOL)animated { [super viewDidAppear:animated]; self.view.backgroundColor = [UIColor whiteColor]; NSString *message = @"Are you sure you want to open this link in Safari?"; UIAlertView *alertView = [[UIAlertView alloc] initWithTitle:@"Open Link" message:message delegate:self cancelButtonTitle:@"No" otherButtonTitles:@"Yes", nil]; [alertView show]; } - (void) alertView:(UIAlertView *)alertView clickedButtonAtIndex:(NSInteger)buttonIndex { NSString *buttonTitle = [alertView buttonTitleAtIndex:buttonIndex]; if ([buttonTitle isEqualToString:@"Yes"]){ NSLog(@"User pressed the Yes button."); } else if ([buttonTitle isEqualToString:@"No"]){ NSLog(@"User pressed the No button."); } }

资源下载

更多资源
Mario

Mario

马里奥是站在游戏界顶峰的超人气多面角色。马里奥靠吃蘑菇成长,特征是大鼻子、头戴帽子、身穿背带裤,还留着胡子。与他的双胞胎兄弟路易基一起,长年担任任天堂的招牌角色。

Spring

Spring

Spring框架(Spring Framework)是由Rod Johnson于2002年提出的开源Java企业级应用框架,旨在通过使用JavaBean替代传统EJB实现方式降低企业级编程开发的复杂性。该框架基于简单性、可测试性和松耦合性设计理念,提供核心容器、应用上下文、数据访问集成等模块,支持整合Hibernate、Struts等第三方框架,其适用范围不仅限于服务器端开发,绝大多数Java应用均可从中受益。

Rocky Linux

Rocky Linux

Rocky Linux(中文名:洛基)是由Gregory Kurtzer于2020年12月发起的企业级Linux发行版,作为CentOS稳定版停止维护后与RHEL(Red Hat Enterprise Linux)完全兼容的开源替代方案,由社区拥有并管理,支持x86_64、aarch64等架构。其通过重新编译RHEL源代码提供长期稳定性,采用模块化包装和SELinux安全架构,默认包含GNOME桌面环境及XFS文件系统,支持十年生命周期更新。

WebStorm

WebStorm

WebStorm 是jetbrains公司旗下一款JavaScript 开发工具。目前已经被广大中国JS开发者誉为“Web前端开发神器”、“最强大的HTML5编辑器”、“最智能的JavaScript IDE”等。与IntelliJ IDEA同源,继承了IntelliJ IDEA强大的JS部分的功能。

用户登录
用户注册