Elasticsearch-1.7.0安装部署
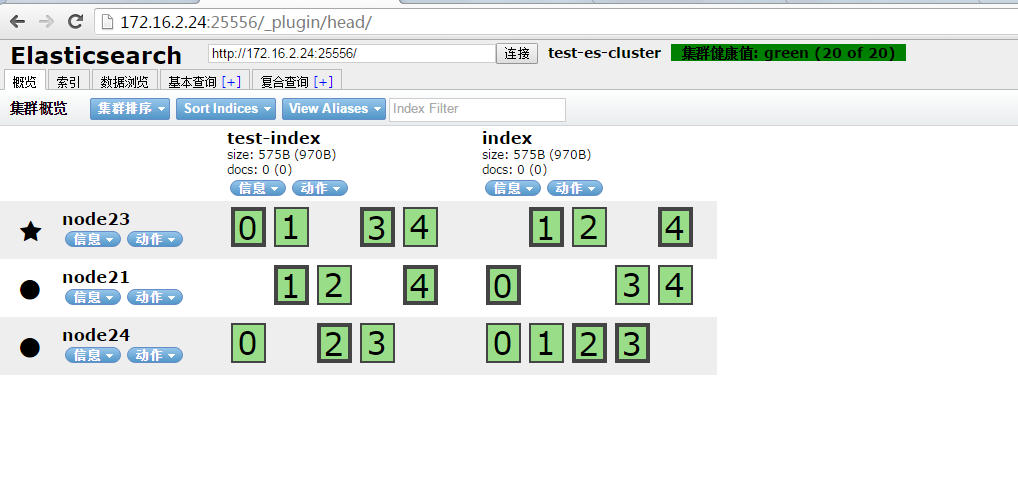
1、首先去elasticsearch官网下载软件包版本1.7.0版本. 1 #wgethttps://download.elastic.co/elasticsearch/elasticsearch/elasticsearch-1.7.0.tar.gz 2、解压elasticsearch-1.7.0.tar.gz 软件包. 1 #tarzxfelasticsearch-1.7.0.tar.gz 3、es配置文件参数解释(真正配置不全用的到): #集群名称标识了你的集群,自动探查会用到它。 #如果你在同一个网络中运行多个集群,那就要确保你的集群名称是独一无二的. 1 cluster.name: test -elasticsearch #节点名称会在启动的时候自动生成,所以你可以不用手动配置。你也可以给节点指定一个特定的名称. 1 node.name: "elsearch1" #允许这个节点被选举为一个主节点(默认为允许) 1 #node.master:true #允许这个节点存储数据(默认为允许) 1 #node.data:true #You can exploit these settings to design advanced cluster topologies. # 你可以利用这些设置设计高级的集群拓扑 # # 1. You want this node to never become a master node, only to hold data. # This will be the "workhorse" of your cluster. # 1. 你不想让这个节点成为一个主节点,只想用来存储数据。 # 这个节点会成为你的集群的“负载器” # 1 2 #node.master:false #node.data:true #You want this node to only serve as a master: to not store any data and # to have free resources. This will be the "coordinator" of your cluster. # 2. 你想让这个节点成为一个主节点,并且不用来存储任何数据,并且拥有空闲资源。 # 这个节点会成为你集群中的“协调器” 1 2 #node.master:true #node.data:false # Use the Cluster Health API [http://localhost:9200/_cluster/health], the # Node Info API [http://localhost:9200/_nodes] or GUI tools #使用集群体检API[http://localhost:9200/_cluster/health] , # 节点信息API[http://localhost:9200/_cluster/nodes] 或者GUI工具例如: # A node can have generic attributes associated with it, which can later be used # for customized shard allocation filtering, or allocation awareness. An attribute # is a simple key value pair, similar to node.key: value, here is an example: # 一个节点可以附带一些普通的属性,这些属性可以在后面的自定义分片分配过滤或者allocation awareness中使用。 # 一个属性就是一个简单的键值对,类似于node.key: value, 这里有一个例子: 1 #node.rack:rack314 # By default, multiple nodes are allowed to start from the same installation location # to disable it, set the following: # 默认的,多个节点允许从同一个安装位置启动。若想禁止这个特性,按照下面所示配置: 1 #node.max_local_storage_nodes:1 # Set the number of shards (splits) of an index (5 by default): # 设置一个索引的分片数量(默认为5) 1 #index.number_of_shards:5 # Set the number of replicas (additional copies) of an index (1 by default): # 设置一个索引的副本数量(默认为1) 1 #index.number_of_replicas:1 # Note, that for development on a local machine, with small indices, it usually # makes sense to "disable" the distributed features: # 注意,为了使用小的索引在本地机器上开发,禁用分布式特性是合理的做法。 1 2 #index.number_of_shards:1 #index.number_of_replicas:0 # Path to directory containing configuration (this file and logging.yml): # 包含配置(这个文件和logging.yml)的目录的路径 1 #path.conf:/path/to/conf # Path to directory where to store index data allocated for this node. # 存储这个节点的索引数据的目录的路径 1 #path.data:/path/to/data # Can optionally include more than one location, causing data to be striped across # the locations (a la RAID 0) on a file level, favouring locations with most free # space on creation. For example: # 可以随意的包含不止一个位置,这样数据会在文件层跨越多个位置(a la RAID 0),创建时会 # 优先选择大的剩余空间的位置 1 #path.data:/path/to/data1,/path/to/data2 # Path to temporary files: # 临时文件的路径 1 #path.work:/path/to/work # Path to log files: # 日志文件的路径 1 #path.logs:/path/to/logs # Path to where plugins are installed: # 插件安装路径 1 #path.plugins:/path/to/plugins # If a plugin listed here is not installed for current node, the node will not start. # 如果当前结点没有安装下面列出的插件,结点不会启动 1 #plugin.mandatory:mapper-attachments,lang-groovy # ElasticSearch performs poorly when JVM starts swapping: you should ensure that # it _never_ swaps. # 当JVM开始swapping(换页)时ElasticSearch性能会低下,你应该保证它不会换页 # Set this property to true to lock the memory: # 设置这个属性为true来锁定内存 1 #bootstrap.mlockall:true # Make sure that the ES_MIN_MEM and ES_MAX_MEM environment variables are set # to the same value, and that the machine has enough memory to allocate # for ElasticSearch, leaving enough memory for the operating system itself. # 确保ES_MIN_MEM和ES_MAX_MEM环境变量设置成了同一个值,确保机器有足够的内存来分配 # 给ElasticSearch,并且保留足够的内存给操作系统 # You should also make sure that the ElasticSearch process is allowed to lock # the memory, eg. by using `ulimit -l unlimited`. # 你应该确保ElasticSearch的进程可以锁定内存,例如:使用`ulimit -l unlimited` # ElasticSearch, by default, binds itself to the 0.0.0.0 address, and listens # on port [9200-9300] for HTTP traffic and on port [9300-9400] for node-to-node # communication. (the range means that if the port is busy, it will automatically # try the next port). # 默认的ElasticSearch把自己和0.0.0.0地址绑定,HTTP传输的监听端口在[9200-9300],节点之间 # 通信的端口在[9300-9400]。(范围的意思是说如果一个端口已经被占用,它将会自动尝试下一个端口) # Set the bind address specifically (IPv4 or IPv6): # 设置一个特定的绑定地址(IPv4 or IPv6): 1 #network.bind_host:192.168.0.1 # Set the address other nodes will use to communicate with this node. If not # set, it is automatically derived. It must point to an actual IP address. # 设置其他节点用来与这个节点通信的地址。如果没有设定,会自动获取。 # 必须是一个真实的IP地址。 1 #network.publish_host:192.168.0.1 # Set both 'bind_host' and 'publish_host': # 'bind_host'和'publish_host'都设置 1 #network.host:192.168.0.1 # Set a custom port for the node to node communication (9300 by default): # 为节点之间的通信设置一个自定义端口(默认为9300) 1 #transport.tcp.port:9300 # Enable compression for all communication between nodes (disabled by default): # 为所有的节点间的通信启用压缩(默认为禁用) 1 #transport.tcp.compress:true # Set a custom port to listen for HTTP traffic: # 设置一个监听HTTP传输的自定义端口 1 #http.port:9200 # Set a custom allowed content length: # 设置一个自定义的允许的内容长度 1 #http.max_content_length:100mb # Disable HTTP completely: # 完全禁用HTTP 1 #http.enabled:false 3、操作系统配置 1.文件描述符 1 2 3 vim /etc/security/limits .conf添加 *softnofile655350 *hardnofile655350 退出当前用户重新login就会生效,使用ulimit -n验证下。 2.最大内存映射区数量,禁用swap交换分区 1 2 3 4 5 vim /etc/sysctl .conf增加 vm.max_map_count=262144 vm.swappiness=1 修改完成后sysctl-p jvm参数配置 ES_HOME的bin目录下有一个elasticsearch.in.sh文件,修改 1 2 ES_MIN_MEM=256m ES_MAX_MEM=1g 为合适的值 4、es的插件安装: Marvel是Elasticsearch的管理和监控工具,对于开发使用免费的。它配备了一个叫做Sense的交互式控制台,方便通过浏览器直接与Elasticsearch交互。 Marvel是一个插件,在Elasticsearch目录中运行以下代码来下载和安装: 1 . /plugin -ielasticsearch /marvel/latest elasticsearch-head是一个elasticsearch的集群管理工具,它是完全由html5编写的独立网页程序,你可以通过插件把它集成到es。 1 #./plugin-installmobz/elasticsearch-head 地址:http://172.16.2.24:25556/_plugin/head/ elasticsearch插件bigdesk安装: bigdesk是elasticsearch的一个集群监控工具,可以通过它来查看es集群的各种状态,如:cpu、内存使用情况,索引数据、搜索情况,http连接数等。 在cmd命令行中进入安装目录,再进入 bin目录,运行以下命令: 1 #./plugin-installlukas-vlcek/bigdesk 在浏览器中输入:http://172.16.2.24:25556/_plugin/bigdesk可以看到效果 注意:elasticsearch 分词ik的安装,如果不安装分词ik插件,根本建不了索引,并且让访问http://172.16.2.24:25556/_plugin/head/ 集群一片空白,点击web 创建索引页没有反应。 注意:github https://github.com/medcl/elasticsearch-analysis-ik 给出了对应的es的ik版本,1.7.0的es对应的1.2.6的版本,开始我这块装了1.8的ik,创建索引失败,后台也是报ik的错误。 ik:1.2.6版本的下载:https://github.com/medcl/elasticsearch-analysis-ik/releases?after=v1.6.1 安装操作: 下载zip包解压到一个目录解压缩: 1 #unzipelasticsearch-analysis-ik-master.zip 安装mavne环境,apache 官网下载软件包设置环境变量: 1 #exportPATH=$PATH:/usr/local/maven/bin 因为是源代码,此处需要使用maven打包,进入解压文件夹中,执行命令: 1 2 #cdelasticsearch-analysis-ik-master #mvncleanpackage #在es的plugin目录下创建ik目录,并将target目录下的elasticsearch-analysis-ik-1.2.6.jar copy 到ik目录下。 1 2 3 4 5 6 7 8 9 [root@localhosttarget] #cd/data/elasticsearch-1.7.0 [root@localhostelasticsearch-1.7.0] #ls binconfigdatalibLICENSE.txtlogsNOTICE.txtpluginsREADME.textile [root@localhostelasticsearch-1.7.0] #cdplugins/ [root@localhostplugins] #ls bigdesk head ikmarvel [root@localhostplugins] #cdik/ [root@localhostik] #ls elasticsearch-analysis-ik-1.2.6.jar 注意:如果是集群,可以将jar分别copy至其他几台机器。 es配置文件需要添加入下行: 1 2 3 4 5 6 7 8 9 10 11 12 13 index: analysis: analyzer: ik: alias :[ik_analyzer] type :org.elasticsearch.index.analysis.IkAnalyzerProvider ik_max_word: type :ik use_smart: false ik_smart: type :ik use_smart: true marvel.agent.enabled: false 完整的es配置文件如下,三台同样的配置,除了hostip和node.name外. 1 2 3 4 5 6 7 8 9 10 11 12 13 14 15 16 17 18 19 20 21 22 23 24 25 26 #catelasticsearch.yml cluster.name: test -es-cluster network.host:172.16.2.24 node.name: "node24" discovery.zen. ping .unicast.hosts:[ "172.16.2.24:25555" , "172.16.2.21:25555" , "172.16.2.23:25555" ] index.number_of_shards:5 discovery.zen.minimum_master_nodes:2 script.groovy.sandbox.enabled: false transport.tcp.port:25555 http.port:25556 script.inline:off script.indexed:off script. file :off index: analysis: analyzer: ik: alias :[ik_analyzer] type :org.elasticsearch.index.analysis.IkAnalyzerProvider ik_max_word: type :ik use_smart: false ik_smart: type :ik use_smart: true marvel.agent.enabled: false 后台启动es服务: 1 2 3 [root@localhostbin] #pwd /data/elasticsearch-1 .7.0 /bin [root@localhostbin] #./elasticsearch-d 三台集群的机器中找其中一台创建索引: 创建索引: 1 2 curl-XPUT 'http://172.16.2.24:25556/index' { "acknowledged" : true } 注意:返回结果为acknowledged":true 为成功. 通过浏览器访问:http://172.16.2.24:25556/_plugin/head/测试效果. 本文转自青衫解衣 51CTO博客,原文链接:http://blog.51cto.com/215687833/1927264