在Asp.Net Core中使用中间件保护非公开文件
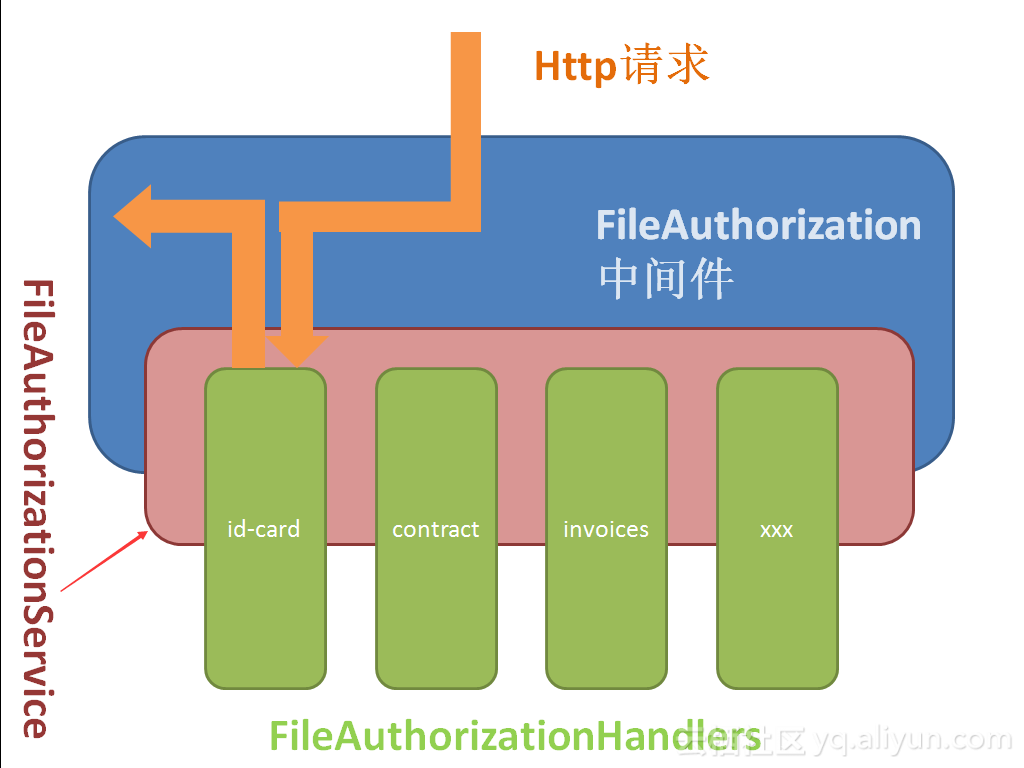
在企业开发中,我们经常会遇到由用户上传文件的场景,比如某OA系统中,由用户填写某表单并上传身份证,由身份管理员审查,超级管理员可以查看。 就这样一个场景,用户上传的文件只能有三种人看得见(能够访问) 上传文件的人 身份审查人员 超级管理员 那么,这篇博客中我们将一起学习如何设计并实现一款文件授权中间件 问题分析 如何判断文件属于谁 要想文件能够被授权,文件的命名就要有规律,我们可以从文件命名中确定文件是属于谁的,例如本文例可以设计文件名为这样 工号-GUID-[Front/Back] 例如: 100211-4738B54D3609410CBC785BCD1963F3FA-Front,这代表由100211上传的身份证正面 判断文件属于哪个功能 一个企业系统中上传文件的功能可能有很多: 某个功能中上传身份证 某个功能中上传合同 某个功能上传发票 我们的区分方式是使用路径,例如本文例使用 /id-card /contract /invoices 不能通过StaticFile中间件访问 由StaticFile中间件处理的文件都是公开的,由这个中间件处理的文件只能是公开的js、css、image等等可以由任何人访问的文件 设计与实现 为什么使用中间件实现 对于我们的需求,我们还可以使用Controller/Action直接实现,这样比较简单,但是难以复用,想要在其它项目中使用只能复制代码。 使用独立的文件存储目录 在本文例中我们将所有的文件(无论来自哪个上传功能)都放在一个根目录下例如:C:xxx-uploads(windows),这个目录不由StaticFile中间件管控 中间件结构设计 这是一个典型的 Service-Handler模式,当请求到达文件授权中间件时,中间件让FileAuthorizationService根据请求特征确定该请求属于的Handler,并执行授权授权任务,获得授权结果,文件授权中间件根据授权结果来确定向客户端返回文件还是返回其它未授权结果。 请求特征设计 只有请求是特定格式时才会进入到文件授权中间件,例如我们将其设计为这样 host/中间件标记/handler标记/文件标记 那么对应的请求就可能是: https://localhost:8080/files/id-card/100211-4738B54D3609410CBC785BCD1963F3FA-Front.jpg 这里面 files是作用于中间件的标记,id-card用于确认由IdCardHandler处理,后面的内容用于确认上传者的身份 IFileAuthorizationService设计 public interface IFileAuthorizationService { string AuthorizationScheme { get; } string FileRootPath { get; } Task<FileAuthorizeResult> AuthorizeAsync(HttpContext context, string path); 这里的 AuthorizationScheme 对应,上文中的中间件标记,FileRootPath 代表文件根目录的绝对路径,AuthorizeAsync方法则用于切实的认证,并返回一个认证的结果 FileAuthorizeResult 设计 public class FileAuthorizeResult { public bool Succeeded { get; } public string RelativePath { get; } public string FileDownloadName { get; set; } public Exception Failure { get; } Succeeded 指示授权是否成功 RelativePath 文件的相对路径,请求中的文件可能会映射成完全不同的文件路径,这样更加安全例如将Uri /files/id-card/4738B54D3609410CBC785BCD1963F3FA.jpg映射到/xxx-file/abc/100211-4738B54D3609410CBC785BCD1963F3FA-Front.jpg,这样做可以混淆请求中的文件名,更加安全 FileDownloadName 文件下载的名称,例如上例中文件命中可能包含工号,而下载时可以仅仅是一个GUID Failure 授权是发生的错误,或者错误原因 IFileAuthorizeHandler 设计 public interface IFileAuthorizeHandler { Task<FileAuthorizeResult> AuthorizeAsync(HttpContext context,string path); 略... IFileAuthorizeHandler 只要求有一个方法,即授权的方法 IFileAuthorizationHandlerProvider 设计 public interface IFileAuthorizationHandlerProvider { Type GetHandlerType (string scheme); bool Exist(string scheme); 略... GetHandlerType 用于获取指定 AuthorizeHandler的实际类型,在AuthorizationService中会使用此方法 Exist方法用于确认是否含有指定的处理器 FileAuthorizationOptions 设计 public class FileAuthorizationOptions { private List<FileAuthorizationScheme> _schemes = new List<FileAuthorizationScheme>(20); public string FileRootPath { get; set; } public string AuthorizationScheme { get; set; } public IEnumerable<FileAuthorizationScheme> Schemes { get => _schemes; } public void AddHandler<THandler>(string name) where THandler : IFileAuthorizeHandler { _schemes.Add(new FileAuthorizationScheme(name, typeof(THandler))); } public Type GetHandlerType(string scheme) { return _schemes.Find(s => s.Name == scheme)?.HandlerType; 略... FileAuthorizationOptions的主要责任是确认相关选项,例如:FileRootPath和AuthorizationScheme。以及存储 handler标记与Handler类型的映射。 上一小节中IFileAuthorizationHandlerProvider 是用于提供Handler的,那么为什么要将存储放在Options里呢? 原因如下: Provider只负责提供,而存储可能不由它负责 未来存储可能更换,但是调用Provider的组件或代码并不关心 就现在的需求来说这样实现比较方便,且没有什么问题 FileAuthorizationScheme设计 public class FileAuthorizationScheme { public FileAuthorizationScheme(string name, Type handlerType) { if (string.IsNullOrEmpty(name)) { throw new ArgumentException("name must be a valid string.", nameof(name)); } Name = name; HandlerType = handlerType ?? throw new ArgumentNullException(nameof(handlerType)); } public string Name { get; } public Type HandlerType { get; } 略... 这个类的功能就是存储 handler标记与Handler类型的映射 FileAuthorizationService实现 第一部分是AuthorizationScheme和FileRootPath public class FileAuthorizationService : IFileAuthorizationService { public FileAuthorizationOptions Options { get; } public IFileAuthorizationHandlerProvider Provider { get; } public string AuthorizationScheme => Options.AuthorizationScheme; public string FileRootPath => Options.FileRootPath; 最重要的部分是 授权方法的实现: public async Task<FileAuthorizeResult> AuthorizeAsync(HttpContext context, string path) { var handlerScheme = GetHandlerScheme(path); if (handlerScheme == null || !Provider.Exist(handlerScheme)) { return FileAuthorizeResult.Fail(); } var handlerType = Provider.GetHandlerType(handlerScheme); if (!(context.RequestServices.GetService(handlerType) is IFileAuthorizeHandler handler)) { throw new Exception($"the required file authorization handler of '{handlerScheme}' is not found "); } // start with slash var requestFilePath = GetRequestFileUri(path, handlerScheme); return await handler.AuthorizeAsync(context, requestFilePath); } 授权过程总共分三步: 获取当前请求映射的handler 类型 向Di容器获取handler的实例 由handler进行授权 这里给出代码片段中用到的两个私有方法: private string GetHandlerScheme(string path) { var arr = path.Split('/'); if (arr.Length < 2) { return null; } // arr[0] is the Options.AuthorizationScheme return arr[1]; } private string GetRequestFileUri(string path, string scheme) { return path.Remove(0, Options.AuthorizationScheme.Length + scheme.Length + 1); } FileAuthorization中间件设计与实现 由于授权逻辑已经提取到 IFileAuthorizationService和IFileAuthorizationHandler中,所以中间件所负责的功能就很少,主要是接受请求和向客户端写入文件。 理解接下来的内容需要中间件知识,如果你并不熟悉中间件那么请先学习中间件 你可以参看ASP.NET Core 中间件文档进行学习 接下来我们先贴出完整的Invoke方法,再逐步解析: public async Task Invoke(HttpContext context) { // trim the start slash var path = context.Request.Path.Value.TrimStart('/'); if (!BelongToMe(path)) { await _next.Invoke(context); return; } var result = await _service.AuthorizeAsync(context, path); if (!result.Succeeded) { _logger.LogInformation($"request file is forbidden. request path is: {path}"); Forbidden(context); return; } if (string.IsNullOrWhiteSpace(_service.FileRootPath)) { throw new Exception("file root path is not spicificated"); } string fullName; if (Path.IsPathRooted(result.RelativePath)) { fullName = result.RelativePath; } else { fullName = Path.Combine(_service.FileRootPath, result.RelativePath); } var fileInfo = new FileInfo(fullName); if (!fileInfo.Exists) { NotFound(context); return; } _logger.LogInformation($"{context.User.Identity.Name} request file :{fileInfo.FullName} has beeb authorized. File sending"); SetResponseHeaders(context, result, fileInfo); await WriteFileAsync(context, result, fileInfo); } 第一步是获取请求的Url并且判断这个请求是否属于当前的文件授权中间件 var path = context.Request.Path.Value.TrimStart('/'); if (!BelongToMe(path)) { await _next.Invoke(context); return; } 判断的方式是检查Url中的第一段是不是等于AuthorizationScheme(例如:files) private bool BelongToMe(string path) { return path.StartsWith(_service.AuthorizationScheme, true, CultureInfo.CurrentCulture); } 第二步是调用IFileAuthorizationService进行授权 var result = await _service.AuthorizeAsync(context, path); 第三步是对结果进行处理,如果失败了就阻止文件的下载: if (!result.Succeeded) { _logger.LogInformation($"request file is forbidden. request path is: {path}"); Forbidden(context); return; } 阻止的方式是返回 403,未授权的HttpCode private void Forbidden(HttpContext context) { HttpCode(context, 403); } private void HttpCode(HttpContext context, int code) { context.Response.StatusCode = code; } 如果成功则,向响应中写入文件:写入文件相对前面的逻辑稍稍复杂一点,但其实也很简单,我们一起来看一下 第一步,确认文件的完整路径: string fullName; if (Path.IsPathRooted(result.RelativePath)) { fullName = result.RelativePath; } else { fullName = Path.Combine(_service.FileRootPath, result.RelativePath); } 前文提到,我们设计的是将文件全部存储到一个目录下,但事实上我们不这样做也可以,只要负责授权的handler将请求映射成完整的物理路径就行,这样,在未来就有更多的扩展性,比如某功能的文件没有存储在统一的目录下,那么也可以。 这一步就是判断和确认最终的文件路径 第二步,检查文件是否存在: var fileInfo = new FileInfo(fullName); if (!fileInfo.Exists) { NotFound(context); return; } private void NotFound(HttpContext context) { HttpCode(context, 404); } 最后一步写入文件: await WriteFileAsync(context, result, fileInfo); 完整方法如下: private async Task WriteFileAsync(HttpContext context, FileAuthorizeResult result, FileInfo fileInfo) { var response = context.Response; var sendFile = response.HttpContext.Features.Get<IHttpSendFileFeature>(); if (sendFile != null) { await sendFile.SendFileAsync(fileInfo.FullName, 0L, null, default(CancellationToken)); return; } using (var fileStream = new FileStream( fileInfo.FullName, FileMode.Open, FileAccess.Read, FileShare.ReadWrite, BufferSize, FileOptions.Asynchronous | FileOptions.SequentialScan)) { try { await StreamCopyOperation.CopyToAsync(fileStream, context.Response.Body, count: null, bufferSize: BufferSize, cancel: context.RequestAborted); } catch (OperationCanceledException) { // Don't throw this exception, it's most likely caused by the client disconnecting. // However, if it was cancelled for any other reason we need to prevent empty responses. context.Abort(); 首先我们是先请求了IHttpSendFileFeature,如果有的话直接使用它来发送文件 var sendFile = response.HttpContext.Features.Get<IHttpSendFileFeature>(); if (sendFile != null) { await sendFile.SendFileAsync(fileInfo.FullName, 0L, null, default(CancellationToken)); return; } 这是Asp.Net Core中的另一重要功能,如果你不了解它你可以不用太在意,因为此处影响不大,不过如果你想学习它,那么你可以参考ASP.NET Core 中的请求功能文档 如果,不支持IHttpSendFileFeature 那么就使用原始的方法将文件写入请求体: using (var fileStream = new FileStream( fileInfo.FullName, FileMode.Open, FileAccess.Read, FileShare.ReadWrite, BufferSize, FileOptions.Asynchronous | FileOptions.SequentialScan)) { try { await StreamCopyOperation.CopyToAsync(fileStream, context.Response.Body, count: null, bufferSize: BufferSize, cancel: context.RequestAborted); } catch (OperationCanceledException) { // Don't throw this exception, it's most likely caused by the client disconnecting. // However, if it was cancelled for any other reason we need to prevent empty responses. context.Abort(); 到此处,我们的中间件就完成了。 中间件的扩展方法 虽然我们的中间件和授权服务都写完了,但是似乎还不能直接用,所以接下来我们来编写相关的扩展方法,让其切实的运行起来 最终的使用效果类似这样: // 在di配置中 services.AddFileAuthorization(options => { options.AuthorizationScheme = "file"; options.FileRootPath = CreateFileRootPath(); }) .AddHandler<TestHandler>("id-card"); // 在管道配置中 app.UseFileAuthorization(); 要达到上述效果要编写三个类: FileAuthorizationBuilder FileAuthorizationAppBuilderExtentions FileAuthorizationServiceCollectionExtensions 地二个用于实现app.UseFileAuthorization(); 第三个用于实现services.AddFileAuthorization(options =>... 第一个用于实现.AddHandler<TestHandler>("id-card"); FileAuthorizationBuilder public class FileAuthorizationBuilder { public FileAuthorizationBuilder(IServiceCollection services) { Services = services; } public IServiceCollection Services { get; } public FileAuthorizationBuilder AddHandler<THandler>(string name) where THandler : class, IFileAuthorizeHandler { Services.Configure<FileAuthorizationOptions>(options => { options.AddHandler<THandler>(name ); }); Services.AddTransient<THandler>(); return this; 这部分主要作用是实现添加handler的方法,添加的handler是瞬时的 FileAuthorizationAppBuilderExtentions public static class FileAuthorizationAppBuilderExtentions { public static IApplicationBuilder UseFileAuthorization(this IApplicationBuilder app) { if (app == null) { throw new ArgumentNullException(nameof(app)); } return app.UseMiddleware<FileAuthenticationMiddleware>(); 这个主要作用是将中间件放入管道,很简单 FileAuthorizationServiceCollectionExtensions public static class FileAuthorizationServiceCollectionExtensions { public static FileAuthorizationBuilder AddFileAuthorization(this IServiceCollection services) { return AddFileAuthorization(services, null); } public static FileAuthorizationBuilder AddFileAuthorization(this IServiceCollection services, Action<FileAuthorizationOptions> setup) { services.AddSingleton<IFileAuthorizationService, FileAuthorizationService>(); services.AddSingleton<IFileAuthorizationHandlerProvider, FileAuthorizationHandlerProvider>(); if (setup != null) { services.Configure(setup); } return new FileAuthorizationBuilder(services); 这部分是注册服务,将IFileAuthorizationService和IFileAuthorizationService注册为单例 到这里,所有的代码就完成了 测试 我们来编写个简单的测试来测试中间件的运行效果 要先写一个测试用的Handler,这个Handler允许任何用户访问文件: public class TestHandler : IFileAuthorizeHandler { public const string TestHandlerScheme = "id-card"; public Task<FileAuthorizeResult> AuthorizeAsync(HttpContext context, string path) { return Task.FromResult(FileAuthorizeResult.Success(GetRelativeFilePath(path), GetDownloadFileName(path))); } public string GetRelativeFilePath(string path) { path = path.TrimStart('/', '\\').Replace('/', '\\'); return $"{TestHandlerScheme}\\{path}"; } public string GetDownloadFileName(string path) { return path.Substring(path.LastIndexOf('/') + 1); } } 测试方法: public async Task InvokeTest() { var builder = new WebHostBuilder() .Configure(app => { app.UseFileAuthorization(); }) .ConfigureServices(services => { services.AddFileAuthorization(options => { options.AuthorizationScheme = "file"; options.FileRootPath = CreateFileRootPath(); }) .AddHandler<TestHandler>("id-card"); }); var server = new TestServer(builder); var response = await server.CreateClient().GetAsync("http://example.com/file/id-card/front.jpg"); Assert.Equal(200, (int)response.StatusCode); Assert.Equal("image/jpeg", response.Content.Headers.ContentType.MediaType); } 这个测试如期通过,本例中还写了其它诸多测试,就不一一贴出了,另外,这个项目目前已上传到我的github上了,需要代码的同学自取 https://github.com/rocketRobin/FileAuthorization 你也可以直接使用Nuget获取这个中间件: Install-Package FileAuthorizationInstall-Package FileAuthorization.Abstractions 如果这篇文章对你有用,那就给我点个赞吧:D 欢迎转载,转载请注明原作者和出处,谢谢 最后最后,在企业开发中我们还要检测用户上传文件的真实性,如果通过文件扩展名确认,显然不靠谱,所以我们得用其它方法,如果你也有相关的问题,可以参考我的另外一篇博客在.NetCore中使用Myrmec检测文件真实格式