首页 文章 精选 留言 我的

精选列表

搜索[序列化框架],共10000篇文章
优秀的个人博客,低调大师

sqlite ORMLite 框架应用

bean package com.test.deamo.bean; import android.os.Parcel; import android.os.Parcelable; import com.j256.ormlite.field.DatabaseField; import com.j256.ormlite.table.DatabaseTable; /** * author: yhf * Description: * date: 2016/04/20 18:22 */ @DatabaseTable(tableName = "tb_account") public class Account implements Parcelable { @DatabaseField(generatedId = true) private int id; @DatabaseField(columnName = "user_name") private String userName;// 用户姓名 @DatabaseField(columnName = "password") private String password;//密码 @DatabaseField(columnName = "token") private String token;// token值 public int getId() { return id; } public void setId(int id) { this.id = id; } public String getUserName() { return userName; } public void setUserName(String userName) { this.userName = userName; } public String getPassword() { return password; } public void setPassword(String password) { this.password = password; } public String getToken() { return token; } public void setToken(String token) { this.token = token; } @Override public int describeContents() { return 0; } @Override public void writeToParcel(Parcel dest, int flags) { dest.writeInt(this.id); dest.writeString(this.userName); dest.writeString(this.password); dest.writeString(this.token); } public Account() { } protected Account(Parcel in) { this.id = in.readInt(); this.userName = in.readString(); this.password = in.readString(); this.token = in.readString(); } public static final Creator<Account> CREATOR = new Creator<Account>() { @Override public Account createFromParcel(Parcel source) { return new Account(source); } @Override public Account[] newArray(int size) { return new Account[size]; } }; } DatabaseHelper package com.test.deamo.utils.db; import android.content.Context; import android.database.sqlite.SQLiteDatabase; import com.j256.ormlite.android.apptools.OrmLiteSqliteOpenHelper; import com.j256.ormlite.dao.Dao; import com.j256.ormlite.support.ConnectionSource; import com.j256.ormlite.table.TableUtils; import com.test.deamo.bean.Account; import java.sql.SQLException; import java.util.HashMap; import java.util.Map; /** * Created by administrator * Description 数据库操作封装 * 2016/4/27 9:06. */ public class DatabaseHelper extends OrmLiteSqliteOpenHelper { private static final String TABLE_NAME = "test.db"; private Map<String, Dao> daos = new HashMap<String, Dao>(); private DatabaseHelper(Context context) { super(context, TABLE_NAME, null, 4); } @Override public void onCreate(SQLiteDatabase database, ConnectionSource connectionSource) { try { TableUtils.createTable(connectionSource, Account.class); } catch (SQLException e) { e.printStackTrace(); } } @Override public void onUpgrade(SQLiteDatabase database, ConnectionSource connectionSource, int oldVersion, int newVersion) { try { TableUtils.dropTable(connectionSource, Account.class, true); onCreate(database, connectionSource); } catch (SQLException e) { e.printStackTrace(); } } private static DatabaseHelper instance; /** * 单例获取该Helper * * @param context * @return */ public static synchronized DatabaseHelper getHelper(Context context) { context = context.getApplicationContext(); if (instance == null) { synchronized (DatabaseHelper.class) { if (instance == null) instance = new DatabaseHelper(context); } } return instance; } public synchronized Dao getDao(Class clazz) throws SQLException { Dao dao = null; String className = clazz.getSimpleName(); if (daos.containsKey(className)) { dao = daos.get(className); } if (dao == null) { dao = super.getDao(clazz); daos.put(className, dao); } return dao; } /** * 释放资源 */ @Override public void close() { super.close(); for (String key : daos.keySet()) { Dao dao = daos.get(key); dao = null; } } } dao类 package com.test.deamo.dao; import android.content.Context; import com.j256.ormlite.dao.Dao; import com.j256.ormlite.stmt.QueryBuilder; import com.j256.ormlite.stmt.Where; import com.test.deamo.bean.Account; import com.test.deamo.utils.db.DatabaseHelper; import java.sql.SQLException; public class AccountDao { private Context context; private Dao<Account, Integer> accountDao; private DatabaseHelper databaseHelper; public AccountDao(Context context) { this.context = context; try { databaseHelper = DatabaseHelper.getHelper(this.context); accountDao = databaseHelper.getDao(Account.class); } catch (SQLException e) { e.printStackTrace(); } } /** * 添加用户信息 * @param account */ public void add(Account account){ try { accountDao.create(account); } catch (SQLException e) { e.printStackTrace(); } } /** * 更新用户信息 * @param account */ public void update(Account account){ try { accountDao.update(account); } catch (SQLException e) { e.printStackTrace(); } } /** * 根据token获取account实体 * @param token * @return Account account */ public Account getAccountWithToken(String token){ return getAccountWithFiled("token", token); } /** * 根据字段名和值获取账号实体 * @param fieldName * @param fieldVal * @return */ public Account getAccountWithFiled(String fieldName, String fieldVal){ Account account = null; try { QueryBuilder<Account, Integer> queryBuilder = accountDao.queryBuilder(); Where<Account, Integer> where = queryBuilder.where(); where.eq(fieldName, fieldVal); account = where.queryForFirst(); } catch (SQLException e) { e.printStackTrace(); } return account; } } 本文转自秋楓博客园博客,原文链接:http://www.cnblogs.com/rwxwsblog/p/5448565.html,如需转载请自行联系原作者


优秀的个人博客,低调大师

转REST框架介绍

学习 REST REST 是由 Roy Fielding 在他的论文 《Architectural Styles and the Design of Network-based Software Architectures》中提出的一个术语。 REST 是英文 Representational State Transfer 的缩写,有中文翻译为“具象状态传输”(参考: 《SIP/IMS网络中的Representational State Transfer (REST)和数据分布》)。 ————————————— 前面的内容比较枯燥,我说说我自己的理解。 但是 REST 到底是什么呢?论文我看不懂,不过找到一篇更简单易懂的东西: 《Building Web Services the REST Way》。 根据这篇文章,我整理了一下我自己对 REST 的理解: REST 首先只是一种架构样式,不是一种标准。这点和 Ajax 类似,两者都是利用现有的成熟技术。 在 REST 的定义中,一个 Web 应用总是 使用固定的 URI 向外部世界呈现(或者说暴露)一个资源。 URI 是英文 Uniform Resource Identifier 的缩写,中文翻译“通用资源标志符”。 “通用资源标志符”是指 唯一标识一个资源(xhtml 文件、图片、css 样式表)的字符串。当然了,RFC 中定义的 URI 复杂得多,不过我们此处将 URI 想象成一个人的身份证号码就行了(你不能有两个同时有效的身份证号码,一个号码也不可能同时对应两个人)。而我们天天挂在嘴边的 URL 地址就是 URI 的一种表现形式(个人理解,有错请纠正)。 知道什么是 URI 后,我们来看一个实际例子: [url]http://www.example.com/photo/logo[/url] 指向 example.com 网站(可以视为一个 Web 应用)中类型为 photo,名字为 logo 的资源。我们用浏览器访问这个 URI,看到的将可能是一个 xhtml 文档,其中用 <img src=”……” /> 来显示实际的照片。 [url]http://www.example.com/photo/logo[/url] 很容易让你想到 URL 重写。事实上,这个地址很可能会在服务器内部处理为 [url]http://www.example.com/photo.php?name=logo[/url] 这样的地址。photo.php 是服务器端的一个动态脚本文件,根据 name 参数生成 xhtml 文档返回给浏览器。 现在假设我们要获取这张照片的 XML 文档。XML 文档中包含照片的文件名、文件大小、拍摄日期等等信息。也就是说我们要获取 “同一个资源的不同表现形式的数据”。对于这个要求,我们可以很容易的用另一个 URL 地址达到:[url]http://www.example.com/xml/logo[/url]。 但是,这就违背了 “URI 唯一标识一个资源”的定义。如果我们要获取同一个资源的多种表现形式,那么就要使用更多的 URL,从而给一个资源指定了多个不同的 URI。 而在 REST 中,不管是获取照片的 xhtml 文档还是 XML 文档,或者照片文件本身,都是用同一个 URI,就是 [url]http://www.example.com/photo/logo[/url]。 那这是怎么办到的呢?Ruby On Rails 中是通过分辨 HTTP Request Header 信息来分辨客户端是想要取得资源的哪一种表现形式的数据。 当我们用浏览器访问一个网址时,浏览器会构造一个 HTTP 请求。这个请求有一个头信息,其中包括了本次请求接受何种类型的数据。通常浏览器发送的 HTTP 请求头中,Accept 的值都是 */*,也就说接受服务器返回的任何类型的数据。 看到这里,聪明的家伙应该知道了。只要我们指定一个特定的 Accept 参数,那么服务器就可以通过判断该参数来决定返回什么类型的数据。所以在一个采用 REST 架构的应用中,要获取同一个资源的不同表现形式的数据,只需要使用不同的 HTTP 请求头信息就行了。 如果考虑为 Web 应用增加 Web Services,这种技术的价值就体现出来了。比如我写了一个 Delphi 程序,现在只需要构造一个包含 Accept: text/xml 的 HTTP 请求头,然后将请求发送到 [url]http://www.example.com/photo/logo[/url] 就可以了。返回的结果就是一个 XML 文档,而不是 xhtml 文档。 因为我们的 HTTP 请求头信息有不同的状态,从而可以获得不同的数据,所以叫做“具象状态传输” :) ————————————— 除了上面的用法,REST 还有进一步的扩展。 我们在 Web 应用中处理来自客户端的请求时,通常只考虑 GET 和 POST 这两种 HTTP 请求方法。实际上,HTTP 还有 HEAD、PUT、DELETE 等请求方法。而在 REST 架构中,用不同的 HTTP 请求方法来处理对资源的 CRUD(创建、读取、更新和删除)操作: POST: 创建 GET: 读取 PUT: 更新 DELETE: 删除 经过这样的一番扩展,我们对一个资源的 CRUD 操作就可以通过同一个 URI 完成了: [url]http://www.example.com/photo/logo[/url](读取) 仍然保持为 [GET] [url]http://www.example.com/photo/logo[/url] [url]http://www.example.com/photo/logo/create[/url](创建) 改为 [POST] [url]http://www.example.com/photo/logo[/url] [url]http://www.example.com/photo/logo/update[/url](更新) 改为 [PUT] [url]http://www.example.com/photo/logo[/url] [url]http://www.example.com/photo/logo/delete[/url](删除) 改为 [DELETE] [url]http://www.example.com/photo/logo[/url] 从而进一步规范了资源标识的使用。 通过 REST 架构,Web 应用程序可以用一致的接口(URI)暴露资源给外部世界,并提供对资源的操作服务。这对于以资源为中心的 Web 应用来说非常重要。例如照片共享网站、用户社区等。 ————————————— Ruby On Rails 1.2 版对 REST 有很好的支持,但要在 PHP 中应用 REST 还需要解决不少问题: 如何在服务端判断 PUT、DELETE 请求方法; 如何获取用 PUT、DELETE 请求方法中传递的数据; 如何获取 HTTP 请求头信息中的 Accept 参数值; 如何在浏览器端发起 PUT 和 DELETE 请求。 不过我仔细看了 PHP 文档,我觉得上面几个问题都是可以解决的。 服务端综合使用 $_SERVER[’HTTP_ACCEPT’]、$_SERVER[’REQUEST_URI’]、$_SERVER [’REQUEST_METHOD’]、$_SERVER[’QUERY_STRING’] 这些变量应该可以搞定前面三个问题。而第四个问题则可以用 JavaScript 的 XMLHttpRequest 对象来实现。 不过我想 REST 的真正价值在于 Web Services,而不是通过浏览器操作的应用程序。 本文转自 fsjoy1983 51CTO博客,原文链接:http://blog.51cto.com/fsjoy/76918,如需转载请自行联系原作者

优秀的个人博客,低调大师

Qt之Concurrent框架

简述 QtConcurrent 命名空间提供了高级 API,使得可以在不使用低级线程原语(例如:互斥、读写锁、等待条件或信号量)的情况下编写多线程程序,使用 QtConcurrent 编写的程序根据可用的处理器核心数自动调整所使用的线程数。这意味着,当在未来部署多核系统时,现在编写的应用程序将继续适应。 简述 用法 Qt Concurrent 单词统计 更多参考 用法 在 C++ API changes 有关于 Qt Concurrent 的更改说明: Qt Concurrent has been moved from Qt Core to its own module 意思是说,Qt Concurrent 已经被从 Qt Core 中移到自己的模块中了。所以,要链接到 Qt Concurrent 模块,需要在 qmake 项目文件中添加: QT += concurrent 注意: QtConcurrent::Exception 类被重命名为 QException,并且 QtConcurrent::UnhandledException 类被重命名为 QUnhandledException,他们仍然位于 Qt Core 中。 Qt Concurrent QtConcurrent 包含了函数式编程风格 APIs 用于并行列表处理,包括用于共享内存(非分布式)系统的 MapReduce 和 FilterReduce 实现,以及用于管理 GUI 应用程序异步计算的类: Concurrent Map 和 Map-Reduce QtConcurrent::map():将一个函数应用于一个容器中的每一项,就地修改 items。 QtConcurrent::mapped():和 map() 类似,只是它返回一个包含修改内容的新容器。 QtConcurrent::mappedReduced():和 mapped() 类似,只是修改后的结果减少或组合成一个单一的结果。 Concurrent Filter 和 Filter-Reduce QtConcurrent::filter():从一个容器中删除所有 items,基于一个 filter 函数的结果。 QtConcurrent::filtered():和 filter() 类似,只是它返回一个包含过滤内容的新容器。 QtConcurrent::filteredReduced():和 filtered() 类似,只是过滤后的结果减少或组合成一个单一的结果。 Concurrent Run QtConcurrent::run():在另一个线程中运行一个函数。 QFuture:表示异步计算的结果 QFutureIterator:允许通过 QFuture 遍历可用的结果 QFutureWatcher:允许使用信号槽来监控一个 QFuture QFutureSynchronizer:是一个方便的类,用于一些 QFutures 的自动同步 Qt Concurrent 支持多种兼容 STL 的容器和迭代器类型,但是最好使用具有随机访问迭代器的 Qt 容器,例如:QList 或 QVector。map 和 filter 函数都接受容器和 begin/end 迭代器。 STL 迭代器支持概述: 迭代器类型 示例类 支持状态 Input Iterator 不支持 Output Iterator 不支持 Forward Iterator std::slist 支持 Bidirectional Iterator QLinkedList, std::list 支持 Random Access Iterator QList, QVector, std::vector 支持和推荐 在 Qt Concurrent 迭代大量轻量级 items 的情况下,随机访问迭代器可以更快,因为它们允许跳过容器中的任何点。此外,使用随机访问迭代器允许 Qt Concurrent 通过 QFuture::progressValue() 和 QFutureWatcher::progressValueChanged() 来提供进度信息。 非就地修改的函数(例如:mapped() 和 filtered()),在调用时会创建容器的副本。如果正在使用的是 STL 容器,此复制操作可能需要一段时间,在这种情况下,建议为容器指定 begin 和 end 迭代器。 单词统计 厉害了 Concurrent,来看一个单词统计的示例: #include <QList> #include <QMap> #include <QTextStream> #include <QString> #include <QStringList> #include <QDir> #include <QTime> #include <QApplication> #include <QDebug> #include <qtconcurrentmap.h> using namespace QtConcurrent; // 递归搜索文件 QStringList findFiles(const QString &startDir, QStringList filters) { QStringList names; QDir dir(startDir); foreach (QString file, dir.entryList(filters, QDir::Files)) names += startDir + '/' + file; foreach (QString subdir, dir.entryList(QDir::AllDirs | QDir::NoDotAndDotDot)) names += findFiles(startDir + '/' + subdir, filters); return names; } typedef QMap<QString, int> WordCount; // 单线程单词计数器函数 WordCount singleThreadedWordCount(QStringList files) { WordCount wordCount; foreach (QString file, files) { QFile f(file); f.open(QIODevice::ReadOnly); QTextStream textStream(&f); while (textStream.atEnd() == false) foreach (const QString &word, textStream.readLine().split(' ')) wordCount[word] += 1; } return wordCount; } // countWords 计算单个文件的单词数,该函数由多个线程并行调用,并且必须是线程安全的。 WordCount countWords(const QString &file) { QFile f(file); f.open(QIODevice::ReadOnly); QTextStream textStream(&f); WordCount wordCount; while (textStream.atEnd() == false) foreach (const QString &word, textStream.readLine().split(' ')) wordCount[word] += 1; return wordCount; } // reduce 将 map 的结果添加到最终结果,该函数只能由一个线程一次调用。 void reduce(WordCount &result, const WordCount &w) { QMapIterator<QString, int> i(w); while (i.hasNext()) { i.next(); result[i.key()] += i.value(); } } int main(int argc, char** argv) { QApplication app(argc, argv); qDebug() << "finding files..."; QStringList files = findFiles("../../", QStringList() << "*.cpp" << "*.h"); qDebug() << files.count() << "files"; int singleThreadTime = 0; { QTime time; time.start(); // 单线程统计,与 mapreduce 机制实现的作对比 WordCount total = singleThreadedWordCount(files); singleThreadTime = time.elapsed(); // 打印出所耗费的时间 qDebug() << "single thread" << singleThreadTime; } int mapReduceTime = 0; { QTime time; time.start(); // mappedReduced 方式进行统计 WordCount total = mappedReduced(files, countWords, reduce); mapReduceTime = time.elapsed(); qDebug() << "MapReduce" << mapReduceTime; } // 输出 mappedReduced 方式比单线程处理方式要快的倍数 qDebug() << "MapReduce speedup x" << ((double)singleThreadTime - (double)mapReduceTime) / (double)mapReduceTime + 1; } 输出如下: finding files… 2185 files single thread 5221 MapReduce 2256 MapReduce speedup x 2.31427 可以看出,共查找了 2185 个文件,单线程使用了 5221 毫秒,MapReduce 方式使用了 2256 毫秒,比单线程要快 2.31427 倍。经过反复尝试,基本都在 2 倍以上。 更多参考 Qt之Concurrent Map和Map-Reduce Qt之Concurrent Filter和Filter-Reduce Qt之Concurrent Run Qt之QFuture Qt之QFutureWatcher

优秀的个人博客,低调大师

Storm Ack框架笔记

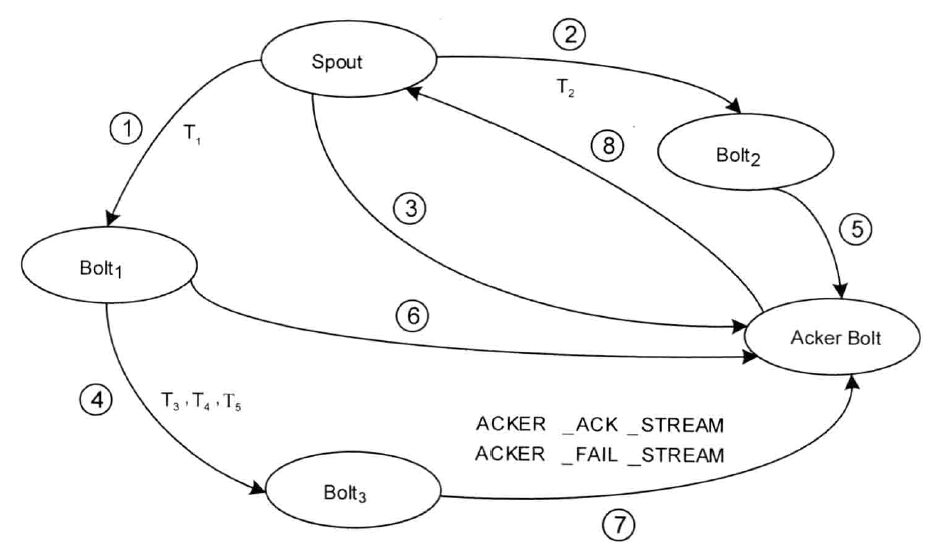
Storm利用Acker Bolt节点跟踪消息,当Spout发送出去的消息以及这些消息所衍生出来的消息均被处理后,Spout将受到对应于该消息的Ack。实现要点: 1、Storm中每条发送出去的消息都会对应一个随机的消息ID。 2、Spout发送消息后,将向Acker Bolt发送一条消息,该消息内容为<RootId,消息ID>,Acker bolt将为该消息创建一条跟踪项。 3、Bolt产生要发送的消息时,会计算每条新消息的消息ID,并将消息ID发送至Acker Bolt,Acker Bolt对消息ID进行异或后存储。于是,Storm对新发送的消息进行了跟踪。 4、Blot对输入的消息进行Ack时,也会将该消息ID发送到Acker Bolt,Acker Bolt对每条消息ID进行异或存储,由于该消息在被发送时,已经向Acker Bolt发送过消息ID,之后再被Acker时又再次发送该消息ID。根据异或的语义,这相当于对该消息的跟踪结束。 5、Acker Bolt在更新某一个消息的跟踪值时,若发现其跟踪值变为零,则向Spout节点发送消息,表明Spout发送的这条消息已经被成功处理。 6、若Spout在发送消息时未指定用于消息跟踪的ID,系统则不对消息进行跟踪,Blot新产生的消息并不会被单独跟踪。 7、Spout的每条消息以及由该消息演化而来的所有消息的跟踪负载为16个字节,8个字节的根消息ID以及8个字节的消息跟踪值AckValue.但是,由于Storm中采用HashMap对其进行存储,在32位的JVM中,每条消息至少需要20个字节的额外负载,故一条消息的跟踪需要40个字节左右的负载。 (一)1与2中,Spout发送T1到Bolt1,发送T2到Bolt2.T1和T2具有相同的内容,但表示不同的备份,每条消息都会对应一个ID,消息T1的anchors为<RootId,T1>,消息T2的anchors为<RootId,T2> (二)3中,Spout在Acker Bolt中注册了一条记录RootId=T1^T2。 (三)4与6中,Bolt1发送新的消息T3、T4、T5到Blot3,同时对输入的消息进行Ack操作,消息内容为<RootId,T1^T3^T4^T5>,此时,Acker Bolt中的跟踪项为<RootId,T1^T2^T1^T3^T4^T5=>T2^T3^T4^T5>。 (四)在5中,Bolt2对输入的消息T2进行Ack操作,它没有产生新的消息,发送到Acker Bolt的消息为<RootId,T2>,T2异或后消失。 (五)在7中,Blot3对输入的消息进行Ack操作,发送的消息为<RootId,T3^T4^T5>,此时Acker Bolt中的跟踪项为<RootId,T3^T4^T5^T3^T4^T5 =>0> (六)Acker Bolt发现RootId对应的值为零,它认为该RootId对应的消息以及所有衍生出来的消息均已经被成功处理,于是它向Spout发送消息,而Spout将调用Ack回调方法。 那么每条被处理的消息必须进行Ack或者Fail操作,否则,虽然有超时机制可以对过期消息进行清空,但可能导致消息不断重传。(所以项目中每次进入bolt都有唯一性过滤?) 参考:《Storm 源码分析》

资源下载

更多资源
腾讯云软件源

腾讯云软件源

为解决软件依赖安装时官方源访问速度慢的问题,腾讯云为一些软件搭建了缓存服务。您可以通过使用腾讯云软件源站来提升依赖包的安装速度。为了方便用户自由搭建服务架构,目前腾讯云软件源站支持公网访问和内网访问。

Nacos

Nacos

Nacos /nɑ:kəʊs/ 是 Dynamic Naming and Configuration Service 的首字母简称,一个易于构建 AI Agent 应用的动态服务发现、配置管理和AI智能体管理平台。Nacos 致力于帮助您发现、配置和管理微服务及AI智能体应用。Nacos 提供了一组简单易用的特性集,帮助您快速实现动态服务发现、服务配置、服务元数据、流量管理。Nacos 帮助您更敏捷和容易地构建、交付和管理微服务平台。

Rocky Linux

Rocky Linux

Rocky Linux(中文名:洛基)是由Gregory Kurtzer于2020年12月发起的企业级Linux发行版,作为CentOS稳定版停止维护后与RHEL(Red Hat Enterprise Linux)完全兼容的开源替代方案,由社区拥有并管理,支持x86_64、aarch64等架构。其通过重新编译RHEL源代码提供长期稳定性,采用模块化包装和SELinux安全架构,默认包含GNOME桌面环境及XFS文件系统,支持十年生命周期更新。

Sublime Text

Sublime Text

Sublime Text具有漂亮的用户界面和强大的功能,例如代码缩略图,Python的插件,代码段等。还可自定义键绑定,菜单和工具栏。Sublime Text 的主要功能包括:拼写检查,书签,完整的 Python API , Goto 功能,即时项目切换,多选择,多窗口等等。Sublime Text 是一个跨平台的编辑器,同时支持Windows、Linux、Mac OS X等操作系统。

用户登录
用户注册