首页 文章 精选 留言 我的

精选列表

搜索[组件设计],共10000篇文章
优秀的个人博客,低调大师

hadoop核心组件zookeeper简介与特点

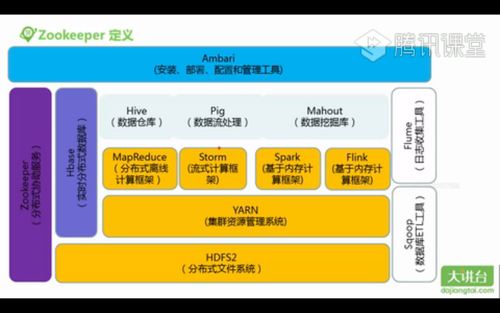
zookeeper是一个针对大型分布式系统的可靠协调系统。 1)它提供的功能包括:配置维护,名字服务,分布式同步,组服务等; 2)它的目标就是封装好复杂易出错的关键服务,将简单易用的接口和性能高效,功能稳定的系统提供给用户; 特点: 1,最终一致性:为客户端展示同一试图 2,可靠性:如果一条消息被一台服务器接受,那么它将被所有的服务器接受。 3,实时性:zookeeper不能保证两个客户端同时得到刚刚更新的数据,如果需要最新数据,应该在读数据之前调用sync()接口。 4,等待无关(wait-free):慢的或者失效的client不干预快速的client的请求。 5,原子性:更新操作要么成功,要么失败,没有中间状态。 6,顺序性:对于所有server,同一消息发布顺序一致。 基本原理 server很多,有主从之分,不过有一个leader,其他是follower, 每个server,在内存中存有一份数据,启动时,将选举出一个leader,根据poxos协议选举 leader负责处理数据更新操作,用到zab协议 一个更新操作成功的标志,大多数server在内存,成功修改数据(一个有5个,有3个写成功了) 本文转自 skinglzw 51CTO博客,原文链接:http://blog.51cto.com/skinglzw/1833186,如需转载请自行联系原作者

优秀的个人博客,低调大师

Android组件之自定义ContentProvider

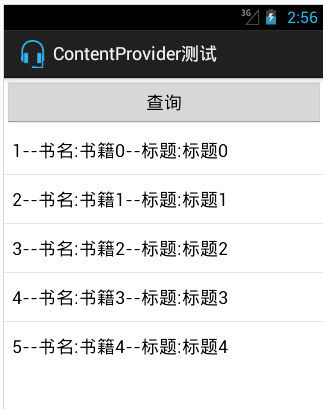
Android的数据存储有五种方式Shared Preferences、网络存储、文件存储、外储存储、SQLite,一般这些存储都只是在单独的一个应用程序之中达到一个数据的共享,有时候我们需要操作其他应用程序的一些数据,例如常见系统里的通讯录,短信,照片等等,所以云存储,通讯录,艳照门等等就孕育而生了。ContentProvider可以理解成内容提供者,也可以理解为一个接口,就是提供了一个供外部访问的接口,有的时候需要进行权限控制。 ContentProvider简介 ContentProvider向我们提供了我们在应用程序之前共享数据的一种机制,而我们知道每一个应用程序都是运行在不同的应用程序的,不同程序的之间数据共享是现实的需要,程序总不能使闭环的,Android中的ContentProvider外共享数据的好处是统一了数据的访问方式。简单总结说下: ContentProvider为存储和获取数据提供了统一的接口。ContentProvide对数据进行封装,不用关心数据存储的细节。使用表的形式来组织数据。 使用ContentProvider可以在不同的应用程序之间共享数据。 Android为常见的一些数据提供了默认的ContentProvider(包括音频、视频、图片和通讯录等)。 说到了ContentProvider这么多好处,不能不说下Uri(Universal Resource Identifier)注意不是URL,通用资源标识符,看个简单的读取联系人的Uri,content://contacts/people, content://是前缀,固定的; contacts主机名(或叫Authority)用于唯一标识这个ContentProvider,外部调用者可以根据这个标识来调用; people 路径(path)表示我们要操作的数据,路径的构建根据业务而定; 自定义ContentProvider 俗话说,欲善其事必先利其器,想要成为一个内容提供者,就先需要有数据,先建立一个SqlDbConncetion: 1 2 3 4 5 6 7 8 9 10 11 12 13 14 15 16 17 18 19 20 21 public class SqlDBConnection extends SQLiteOpenHelper { private static final String DbName = "Book.db" ; private static int version= 1 ; public SqlDBConnection(Context context) { super (context, DbName, null , version); } @Override public void onCreate(SQLiteDatabase db) { // TODO Auto-generated method stub String sqlString= "create table Book (id integer primary key autoincrement,Name nvarchar(200),Title nvarchar(200))" ; db.execSQL(sqlString); } @Override public void onUpgrade(SQLiteDatabase db, int oldVersion, int newVersion) { // TODO Auto-generated method stub } } 上篇文章讲的junit测试这个时候可以拿过来使用一下初始化下数据: 1 2 3 4 5 6 7 8 9 10 11 12 13 14 15 public class BookCase extends AndroidTestCase { public void Intial() { SqlDBConnection dbConnection = new SqlDBConnection(getContext()); SQLiteDatabase sqlDataBase = dbConnection.getWritableDatabase(); long row = 0 ; for ( int i = 0 ; i < 5 ; i++) { ContentValues values = new ContentValues(); values.put( "Name" , "书籍" +i); values.put( "Title" , "标题" + i); row = sqlDataBase.insert( "Book" , null , values); Log.i( "BookCase" , "插入成功:" + row); } } } 前面是基础工作,这个时候就可以建立一个自己的ContentProvider: + View Code 主机名是需要自己去AndroidManifest.xml文件中自己配置的,要求是唯一的,最好是用包名就好: 1 2 <provider android:name= "com.example.googlecontentprovider.MyContentProvider" android:authorities= "com.example.googlecontentprovider.MyContentProvider" ></provider> 如果觉得上面的那一串代码不是很好理解,下面调用的时候我会分别解释。 ContentResolver的使用 方法写在一个应用程序中调用属于正常,在另外一个程序中调用该程序的方法就是类似于接口了,下面先看原来初始化的数据: 重新新建一个Android测试项目,定义为BookCase,首先插入数据,定义一个Uri,这里面主机名就是上面定义的包名,book/insert与CONTENT_INSERT是对应的: 1 2 3 4 5 6 7 8 9 10 11 12 public void bookInsert() { Uri uri = Uri .parse( "content://com.example.googlecontentprovider.MyContentProvider/book/insert" ); ContentResolver resolver = getContext().getContentResolver(); ContentValues values = new ContentValues(); values.put( "Name" , "书籍5" ); values.put( "Title" , "标题5" ); uri = resolver.insert(uri, values); Log.i( "BookCase" , "Uri" + uri); long id = ContentUris.parseId(uri); Log.i( "BookCase" , "测试成功" + id); } 显示结果如下: 然后更新刚才插入的数据,同样的更具Code给Uri赋值,然后初始化一个ContentResolver,调用update方法: 1 2 3 4 5 6 7 8 9 public void bookUpdate() { Uri uri = Uri .parse( "content://com.example.googlecontentprovider.MyContentProvider/book/update" ); ContentResolver resolver = getContext().getContentResolver(); ContentValues values= new ContentValues(); values.put( "Name" , "修改" ); int count = resolver.update(uri, values, " id=?" , new String[]{ "10" }); Log.i( "BookCase" , "更新了" + count + "行" ); } 结果如下: 删除插入的数据: 1 2 3 4 5 6 7 8 9 public void bookDelete() { Uri uri = Uri .parse( "content://com.example.googlecontentprovider.MyContentProvider/book/delete" ); ContentResolver resolver = getContext().getContentResolver(); String where = " id=?" ; String[] argString = { "10" }; int count = resolver.delete(uri, where, argString); Log.i( "BookCase" , "删除了" + count + "行" ); } 结果如下: 查询所有的数据: 1 2 3 4 5 6 7 8 9 10 11 12 13 14 15 public void bookQuery() { Uri uri = Uri .parse( "content://com.example.googlecontentprovider.MyContentProvider/book/query" ); ContentResolver resolver = getContext().getContentResolver(); Cursor cursor=resolver.query(uri, new String[]{ "id" , "Name" , "Title" }, null , null , null ); if (cursor.getCount()> 0 ) { while (cursor.moveToNext()) { int id=cursor.getInt(cursor.getColumnIndex( "Id" )); String nameString=cursor.getString(cursor.getColumnIndex( "Name" )); String titleString=cursor.getString(cursor.getColumnIndex( "Title" )); Log.i( "BookCase" , id+ "---" +nameString+ "---" +titleString); } } } Log下的记录: 查询单条记录: 1 2 3 4 5 6 7 8 9 10 11 12 13 14 15 public void bookQuerySingle() { Uri uri = Uri .parse( "content://com.example.googlecontentprovider.MyContentProvider/book/query" ); ContentResolver resolver = getContext().getContentResolver(); uri=ContentUris.withAppendedId(uri, 1 ); Cursor cursor=resolver.query(uri, new String[]{ "id" , "Name" , "Title" }, null , null , null ); if (cursor.getCount()> 0 ) { while (cursor.moveToNext()) { int id=cursor.getInt(cursor.getColumnIndex( "Id" )); String nameString=cursor.getString(cursor.getColumnIndex( "Name" )); String titleString=cursor.getString(cursor.getColumnIndex( "Title" )); Log.i( "BookCase" , id+ "---" +nameString+ "---" +titleString); } } } 结果如图: 本文转自Fly_Elephant博客园博客,原文链接:http://www.cnblogs.com/xiaofeixiang/p/4072486.html,如需转载请自行联系原作者


优秀的个人博客,低调大师

android组件通讯 Intent-Action属性

Action属性应用实例 1、自定义Action属性 程序文件 /Chapter06_Intent_TestAction/src/com/amaker/ch06/app/MainActivity.java 代码 packagecom.amaker.ch06.app; importandroid.app.Activity; importandroid.content.Intent; importandroid.os.Bundle; importandroid.view.View; importandroid.view.View.OnClickListener; importandroid.widget.Button; /** * *测试IntentAction属性 */ publicclassMainActivityextendsActivity{ //定义Action属性常量 publicstaticfinalStringMY_ACTION="com.amaker.ch07.app.MY_ACTION"; //声明Button privateButtonbtn; @Override publicvoidonCreate(BundlesavedInstanceState){ super.onCreate(savedInstanceState); //设置布局视图 setContentView(R.layout.main); //实例化Button btn=(Button)findViewById(R.id.Button01); btn.setOnClickListener(newOnClickListener(){ @Override publicvoidonClick(Viewv){ //实例化Intent Intentintent=newIntent(); //为Intent设置Action属性 intent.setAction(MY_ACTION); //启动Activity startActivity(intent); } }); } } /Chapter06_Intent_TestAction/src/com/amaker/ch06/app/MyActivity.java 代码 packagecom.amaker.ch06.app; importandroid.app.Activity; importandroid.content.Intent; importandroid.os.Bundle; importandroid.widget.TextView; /** *测试IntentAction属性 */ publicclassMyActivityextendsActivity{ //声明TextView privateTextViewtv; @Override publicvoidonCreate(BundlesavedInstanceState){ super.onCreate(savedInstanceState); //设置视图布局 setContentView(R.layout.my_layout); //获得Intent对象 Intentintent=getIntent(); //获得Action Stringaction=intent.getAction(); //获得TextView tv=(TextView)findViewById(R.id.TextView01); //设置内容 tv.setText(action); } } 布局文件 /Chapter06_Intent_TestAction/res/layout/main.xml 代码 <?xmlversion="1.0"encoding="utf-8"?> <LinearLayoutxmlns:android="http://schemas.android.com/apk/res/android" android:orientation="vertical" android:layout_width="fill_parent" android:layout_height="fill_parent" > <Button android:text="测试Intent的Action属性" android:id="@+id/Button01" android:layout_width="wrap_content" android:layout_height="wrap_content"></Button> </LinearLayout> /Chapter06_Intent_TestAction/res/layout/my_layout.xml 代码 <?xmlversion="1.0"encoding="utf-8"?> <LinearLayoutxmlns:android="http://schemas.android.com/apk/res/android" android:orientation="vertical" android:layout_width="fill_parent" android:layout_height="fill_parent" > <TextView android:text="@+id/TextView01" android:id="@+id/TextView01" android:layout_width="wrap_content" android:layout_height="wrap_content"></TextView> </LinearLayout> 清单文件 /Chapter06_Intent_TestAction/AndroidManifest.xml 代码 <?xmlversion="1.0"encoding="utf-8"?> <manifestxmlns:android="http://schemas.android.com/apk/res/android" package="com.amaker.ch06.app" android:versionCode="1" android:versionName="1.0"> <applicationandroid:icon="@drawable/icon"android:label="@string/app_name"> <activityandroid:name=".MainActivity" android:label="@string/app_name"> <intent-filter> <actionandroid:name="android.intent.action.MAIN"/> <categoryandroid:name="android.intent.category.LAUNCHER"/> </intent-filter> </activity> <activityandroid:name="MyActivity"> <intent-filter> <actionandroid:name="com.amaker.ch06.app.MY_ACTION"/> <categoryandroid:name="android.intent.category.DEFAULT"/> </intent-filter> </activity> </application> <uses-sdkandroid:minSdkVersion="3"/> </manifest> 2、访问系统的Action属性 程序文件 /Chapter06_Intent_TestAction2/src/com/amaker/ch06/app/MainActivity.java 代码 packagecom.amaker.ch06.app; importandroid.app.Activity; importandroid.content.Intent; importandroid.os.Bundle; importandroid.view.View; importandroid.view.View.OnClickListener; importandroid.widget.Button; /** * *测试IntentAction属性 */ publicclassMainActivityextendsActivity{ //声明Button privateButtonbtn; @Override publicvoidonCreate(BundlesavedInstanceState){ super.onCreate(savedInstanceState); //设置当前布局视图 setContentView(R.layout.main); //实例化Button btn=(Button)findViewById(R.id.Button01); btn.setOnClickListener(newOnClickListener(){ @Override publicvoidonClick(Viewv){ //创建Intent Intentintent=newIntent(); //设置IntentAction属性 intent.setAction(Intent.ACTION_GET_CONTENT); //设置IntentType属性 intent.setType("vnd.android.cursor.item/phone"); //启动Activity startActivity(intent); } }); } } 布局文件 /Chapter06_Intent_TestAction2/res/layout/main.xml 代码 <?xmlversion="1.0"encoding="utf-8"?> <LinearLayoutxmlns:android="http://schemas.android.com/apk/res/android" android:orientation="vertical" android:layout_width="fill_parent" android:layout_height="fill_parent" > <Button android:text="测试Intent的Action属性" android:id="@+id/Button01" android:layout_width="wrap_content" android:layout_height="wrap_content"></Button> </LinearLayout> 清单文件 /Chapter06_Intent_TestAction2/AndroidManifest.xml 代码 <?xmlversion="1.0"encoding="utf-8"?> <manifestxmlns:android="http://schemas.android.com/apk/res/android" package="com.amaker.ch06.app" android:versionCode="1" android:versionName="1.0"> <applicationandroid:icon="@drawable/icon"android:label="@string/app_name"> <activityandroid:name=".MainActivity" android:label="@string/app_name"> <intent-filter> <actionandroid:name="android.intent.action.MAIN"/> <categoryandroid:name="android.intent.category.LAUNCHER"/> </intent-filter> </activity> </application> <uses-sdkandroid:minSdkVersion="3"/> </manifest> 本文转自linzheng 51CTO博客,原文链接:http://blog.51cto.com/linzheng/1080670

优秀的个人博客,低调大师

android组件通讯 Intent-Category属性

程序文件 /Chapter06_Intent_Category/src/com/amaker/test/MainActivity.java 代码 packagecom.amaker.test; importandroid.app.Activity; importandroid.content.Intent; importandroid.os.Bundle; importandroid.view.View; importandroid.view.View.OnClickListener; importandroid.widget.Button; /** *测试Intent的Category属性 */ publicclassMainActivityextendsActivity{ //声明Button privateButtonb1; @Override publicvoidonCreate(BundlesavedInstanceState){ super.onCreate(savedInstanceState); //设置当前布局 setContentView(R.layout.main); //实例化Button b1=(Button)findViewById(R.id.Button01); //为Button添加监听器 b1.setOnClickListener(newOnClickListener(){ @Override publicvoidonClick(Viewv){ //实例化Intent Intenti=newIntent(); //添加Action属性 i.setAction(Intent.ACTION_MAIN); //添加Category属性 i.addCategory(Intent.CATEGORY_HOME); //启动Activity startActivity(i); } }); } } 布局文件 /Chapter06_Intent_Category/res/layout/main.xml 代码 <?xmlversion="1.0"encoding="utf-8"?> <LinearLayoutxmlns:android="http://schemas.android.com/apk/res/android" android:orientation="vertical"android:layout_width="fill_parent" android:layout_height="fill_parent"> <TextView android:layout_width="fill_parent" android:layout_height="wrap_content" android:text="IntentCategory测试"/> <Button android:id="@+id/Button01" android:layout_width="wrap_content" android:layout_height="wrap_content" android:text="回到Home"></Button> </LinearLayout> 本文转自linzheng 51CTO博客,原文链接:http://blog.51cto.com/linzheng/1080666

资源下载

更多资源
腾讯云软件源

腾讯云软件源

为解决软件依赖安装时官方源访问速度慢的问题,腾讯云为一些软件搭建了缓存服务。您可以通过使用腾讯云软件源站来提升依赖包的安装速度。为了方便用户自由搭建服务架构,目前腾讯云软件源站支持公网访问和内网访问。

Nacos

Nacos

Nacos /nɑ:kəʊs/ 是 Dynamic Naming and Configuration Service 的首字母简称,一个易于构建 AI Agent 应用的动态服务发现、配置管理和AI智能体管理平台。Nacos 致力于帮助您发现、配置和管理微服务及AI智能体应用。Nacos 提供了一组简单易用的特性集,帮助您快速实现动态服务发现、服务配置、服务元数据、流量管理。Nacos 帮助您更敏捷和容易地构建、交付和管理微服务平台。

Rocky Linux

Rocky Linux

Rocky Linux(中文名:洛基)是由Gregory Kurtzer于2020年12月发起的企业级Linux发行版,作为CentOS稳定版停止维护后与RHEL(Red Hat Enterprise Linux)完全兼容的开源替代方案,由社区拥有并管理,支持x86_64、aarch64等架构。其通过重新编译RHEL源代码提供长期稳定性,采用模块化包装和SELinux安全架构,默认包含GNOME桌面环境及XFS文件系统,支持十年生命周期更新。

Sublime Text

Sublime Text

Sublime Text具有漂亮的用户界面和强大的功能,例如代码缩略图,Python的插件,代码段等。还可自定义键绑定,菜单和工具栏。Sublime Text 的主要功能包括:拼写检查,书签,完整的 Python API , Goto 功能,即时项目切换,多选择,多窗口等等。Sublime Text 是一个跨平台的编辑器,同时支持Windows、Linux、Mac OS X等操作系统。

用户登录
用户注册