精选列表

搜索[初体验],共231篇文章
优秀的个人博客,低调大师

ASP.NET MVC 3 Beta初体验之WebGrid

ASP.NET MVC 3 Beta中除了推出一种新的视图引擎Razor。还推出了几种新的HtmlHelper。我比较关注的是WebGrid,这篇文章将介绍一下WebGrid的使用。WebGrid提供了分页和排序的功能,在此之前在MVC中分页和排序时需要自己去写的。这篇文章将分别介绍在aspx视图引擎和Razor视图引擎中如何使用它。 我通过ADO.NET Entity Data Model从NORTHWND的Products中表中取数据。在Controller中取数据: public class HomeController : Controller { public ActionResult Index() { NORTHWNDEntities entity = new NORTHWNDEntities(); return View( entity.Products.ToList()); } } 在aspx视图引擎中使用WebGrid代码如下: < div id ="grid" > <% var grid = new WebGrid(source: Model, defaultSort: " ProductName " , rowsPerPage: 5 ); %> <% = grid.GetHtml( tableStyle: " grid " , headerStyle: " head " , alternatingRowStyle: " alt " , columns: grid.Columns( grid.Column(format: (item) => Html.ActionLink( " Edit " , " Edit " , new { id = item.ProductID })), grid.Column(format: (item) => Html.ActionLink( " Delete " , " Delete " , null , new { onclick = string .Format( " deleteRecord('Employee', '{0}') " , item.ProductID), @class = " Delete " , href = " JavaScript:void(0) " })), grid.Column( " ProductName " , " 产品名称 " ), grid.Column( " QuantityPerUnit " , " 每单位数量 " ), grid.Column( " UnitPrice " , " 单价 " ), grid.Column( " UnitsInStock " , " 库存单位 " ), grid.Column( " UnitsOnOrder " , " 订单单位 " ), grid.Column( " ReorderLevel " , " 重新排序级别 " ), grid.Column( " Discontinued " , " 已停产 " ) ) ) %> </ div > 在Razor中使用WebGrid代码如下: < div id ="grid" > @{ var grid = new WebGrid(source: Model, defaultSort: "ProductName", rowsPerPage: 10); } @grid.GetHtml( tableStyle: "grid", headerStyle: "head", alternatingRowStyle: "alt", columns: grid.Columns( grid.Column(format: (item) => Html.ActionLink("Edit", "Edit", new { id = item.ProductID })), grid.Column(format: (item) => Html.ActionLink("Delete", "Delete", null, new { onclick = string.Format("deleteRecord('Product', '{0}')", item.ProductID), @class = "Delete", href = "JavaScript:void(0)" })), grid.Column("ProductName","产品名称"), grid.Column("QuantityPerUnit","每单位数量"), grid.Column("UnitPrice","单价"), grid.Column("UnitsInStock", "库存单位"), grid.Column("UnitsOnOrder","订单单位"), grid.Column("ReorderLevel","重新排序级别"), grid.Column("Discontinued","已停产") ) ) </ div > WebGrid构造函数如下: public WebGrid(IEnumerable<dynamic> source, IEnumerable<string> columnNames = null, string defaultSort = null, int rowsPerPage = 10, bool canPage = true, bool canSort = true, string ajaxUpdateContainerId = null, string fieldNamePrefix = null, string pageFieldName = null, string selectionFieldName = null, string sortFieldName = null, string sortDirectionFieldName = null); 常见参数意思是: 1、source 表示数据源 2、columnNames表示显示的列 3、defaultSort 默认按什么排序 4、rowsPerPage 每页多少行数据 5、canPage 是否能排序 上面两段代码的意思是定义了一个既分页又能排序的grid。 运行: 在看看两个view的完整代码: aspx: <% @ Page Title = "" Language = " C# " MasterPageFile = " ~/Views/Shared/Site.Master " Inherits = " System.Web.Mvc.ViewPage<List<WebGridAspx.Models.Products>> " %> < asp:Content ID = " Content1 " ContentPlaceHolderID = " TitleContent " runat = " server " > 产品列表 </ asp:Content > < asp:Content ID = " Content2 " ContentPlaceHolderID = " MainContent " runat = " server " > < script type = " text/javascript " > function deleteRecord(a, b) { alert( " 删除: " + b); } </ script > < h2 > 产品列表 </ h2 > < div id = " grid " > <% var grid = new WebGrid(source: Model, defaultSort: " ProductName " , rowsPerPage: 5 ); %> <%= grid.GetHtml( tableStyle: " grid " , headerStyle: " head " , alternatingRowStyle: " alt " , columns: grid.Columns( grid.Column(format: (item) => Html.ActionLink( " Edit " , " Edit " , new { id = item.ProductID })), grid.Column(format: (item) => Html.ActionLink( " Delete " , " Delete " , null , new { onclick = string .Format( " deleteRecord('Employee', '{0}') " , item.ProductID), @class = " Delete " , href = " JavaScript:void(0) " })), grid.Column( " ProductName " , " 产品名称 " ), grid.Column( " QuantityPerUnit " , " 每单位数量 " ), grid.Column( " UnitPrice " , " 单价 " ), grid.Column( " UnitsInStock " , " 库存单位 " ), grid.Column( " UnitsOnOrder " , " 订单单位 " ), grid.Column( " ReorderLevel " , " 重新排序级别 " ), grid.Column( " Discontinued " , " 已停产 " ) ) ) %> </ div > </ asp:Content > Razor: 代码 @model List < WebGridRazor.Models.Products > @{ View.Title = " 产品列表 " ; } < p > < h2 > 产品列表 </ h2 > < div id = " grid " > @{ var grid = new WebGrid(source: Model, defaultSort: " ProductName " , rowsPerPage: 3 ); } @grid.GetHtml( tableStyle: " grid " , headerStyle: " head " , alternatingRowStyle: " alt " , columns: grid.Columns( grid.Column(format: (item) => Html.ActionLink( " Edit " , " Edit " , new { id = item.ProductID })), grid.Column(format: (item) => Html.ActionLink( " Delete " , " Delete " , null , new { onclick = string .Format( " deleteRecord('Product', '{0}') " , item.ProductID), @class = " Delete " , href = " JavaScript:void(0) " })), grid.Column( " ProductName " , " 产品名称 " ), grid.Column( " QuantityPerUnit " , " 每单位数量 " ), grid.Column( " UnitPrice " , " 单价 " ), grid.Column( " UnitsInStock " , " 库存单位 " ), grid.Column( " UnitsOnOrder " , " 订单单位 " ), grid.Column( " ReorderLevel " , " 重新排序级别 " ), grid.Column( " Discontinued " , " 已停产 " ) ) ) </ div > </ p > Razor去掉了那些模板页的代码,使代码看起来更整洁。比较喜欢Razor。 总结:本文很简单,介绍了一下ASP.NET MVC 3 Beta中新功能WebGrid,由于这种方式WebGrid是在内存中分页和排序的,所以不适合大数据量。 代码:http://files.cnblogs.com/zhuqil/MvcApplication11.rar 本文转自麒麟博客园博客,原文链接:http://www.cnblogs.com/zhuqil/archive/2010/10/17/ASP-NET-MVC-3-Beta-WebGrid.html,如需转载请自行联系原作者

优秀的个人博客,低调大师

Hadoop初体验:快速搭建Hadoop伪分布式环境

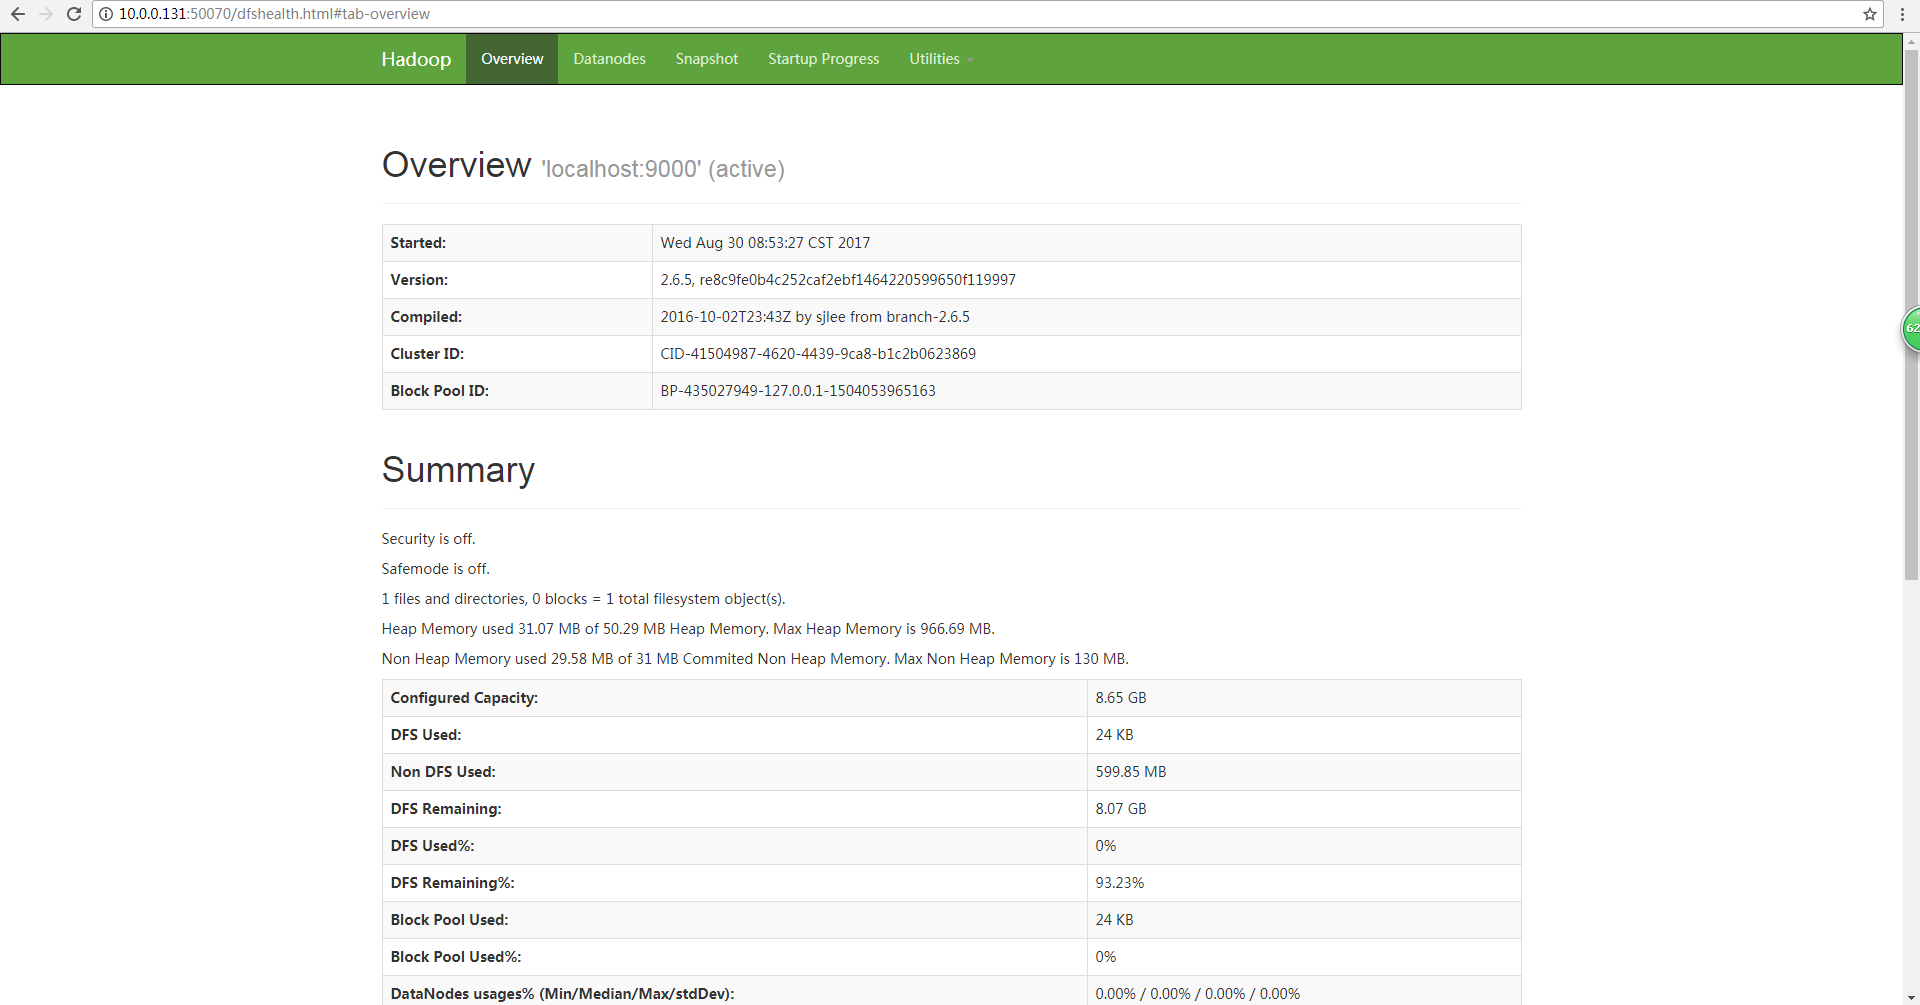
本文旨在使用一个全新安装好的Linux系统从0开始进行Hadoop伪分布式环境的搭建,以达到快速搭建的目的,从而体验Hadoop的魅力所在,为后面的继续学习提供基础环境。 对使用的系统环境作如下说明: 操作系统:CentOS 6.5 64位 主机IP地址:10.0.0.131/24 主机名:leaf 用户名:root hadoop版本:2.6.5 jdk版本:1.7 可以看到,这里直接使用root用户,而不是按照大多数的教程创建一个hadoop用户来进行操作,就是为了达到快速搭建Hadoop环境以进行体验的目的。 为了保证后面的操作能够正常完成,请先确认本机是否可以解析到主机名leaf,如果不能,请手动添加解析到/etc/hosts目录中: 1 2 3 4 5 6 [root@leaf~] #echo"127.0.0.1leaf">>/etc/hosts [root@leaf~] #pingleaf PINGleaf(127.0.0.1)56(84)bytesofdata. 64bytesfromlocalhost(127.0.0.1):icmp_seq=1ttl=64 time =0.043ms 64bytesfromlocalhost(127.0.0.1):icmp_seq=2ttl=64 time =0.048ms 64bytesfromlocalhost(127.0.0.1):icmp_seq=3ttl=64 time =0.046ms 1.rsync软件安装 使用下面命令安装: 1 [root@leaf~] #yuminstall-yrsync 2.ssh安装与免密码登陆配置 (1)ssh安装 使用下面命令安装 1 [root@leaf~] #yuminstall-yopenssh-serveropenssh-clients (2)ssh免密码登陆配置 因为Hadoop使用ssh协议来管理远程守护进程,所以需要配置免密码登陆。 关闭防火墙和selinux 为了确保能够成功配置,在配置前,先把防火墙和selinux关闭: 1 2 3 4 5 6 7 8 9 10 #关闭防火墙 [root@leaf~] #/etc/init.d/iptablesstop [root@leaf~] #chkconfig--level3iptablesoff #关闭selinux [root@leaf~] #setenforce0 [root@leaf~] #sed-is/SELINUX=enforcing/SELINUX=disabled/g/etc/selinux/config [root@leaf~] #cat/etc/selinux/config|grepdisabled #disabled-NoSELinuxpolicyisloaded. SELINUX=disabled 生成密钥对 1 2 3 4 5 6 7 8 9 10 11 12 13 14 15 16 17 18 19 [root@leaf~] #mkdir.ssh [root@leaf~] #ssh-keygen-tdsa-P''-f.ssh/id_dsa Generatingpublic /private dsakeypair. Youridentificationhasbeensaved in . ssh /id_dsa . Yourpublickeyhasbeensaved in . ssh /id_dsa .pub. Thekeyfingerprintis: 5b:af:7c:45:f3:ff: dc :50:f5:81:4b:1e:5c:c1:86:90root@leaf Thekey'srandomartimageis: +--[DSA1024]----+ |.ooo.| |E..oo| |=...| |o=+| |S.+oo| |o....| |.....| |...oo| |o.=| +-----------------+ 将公钥添加到本地信任列表 1 [root@leaf~] #cat.ssh/id_dsa.pub>>.ssh/authorized_keys 验证 上面三步完成后就完成了免密码登陆的配置,可以使用下面的命令进行验证: 1 2 3 4 5 6 7 [root@leaf~] #sshlocalhost Theauthenticityofhost 'localhost(::1)' can'tbeestablished. RSAkeyfingerprintisd1:0d:ed:eb:e7:d1:2f:02:23:70:ef:11:14:4e:fa:42. Areyousureyouwantto continue connecting( yes /no )? yes Warning:Permanentlyadded 'localhost' (RSA)tothelistofknownhosts. Lastlogin:WedAug3004:28:012017from10.0.0.1 [root@leaf~] # 在第一次登陆的时候需要输入yes,之后再登陆时就可以直接登陆了: 1 2 3 [root@leaf~] #sshlocalhost Lastlogin:WedAug3004:44:022017fromlocalhost [root@leaf~] # 3.jdk安装与配置 (1)jdk下载 这里使用的是jdk1.7版本,可以到下面的网站进行下载: http://www.oracle.com/technetwork/java/javase/downloads/java-archive-downloads-javase7-521261.html 下载完成后,可以使用winscp上传到/root目录下,如下: 1 2 [root@leaf~] #ls-lhjdk-7u80-linux-x64.tar.gz -rw-r--r--.1rootroot147MAug2912:05jdk-7u80-linux-x64. tar .gz (2)jdk安装 将jdk解压到/usr/local目录下,并创建软链接: 1 2 3 4 5 6 7 8 [root@leaf~] #cpjdk-7u80-linux-x64.tar.gz/usr/local/ [root@leaf~] #cd/usr/local/ [root@leaf local ] #tar-zxfjdk-7u80-linux-x64.tar.gz [root@leaf local ] #ls-ldjdk1.7.0_80/ drwxr-xr-x.8uucp1434096Apr112015jdk1.7.0_80/ [root@leaf local ] #ln-sjdk1.7.0_80/jdk [root@leaf local ] #ls-ldjdk lrwxrwxrwx.1rootroot12Aug3004:56jdk->jdk1.7.0_80/ (3)JAVA_HOME环境变量配置 java命令在/usr/local/jdk/bin目录下: 1 2 3 [root@leaf local ] #cdjdk/bin/ [root@leafbin] #ls-lhjava -rwxr-xr-x.1uucp1437.6KApr112015java 配置java环境变量: 1 2 3 [root@leafbin] #echo'exportJAVA_HOME=/usr/local/jdk/bin'>>/etc/profile [root@leafbin] #echo'exportPATH=$PATH:$JAVA_HOME'>>/etc/profile [root@leafbin] #source/etc/profile 这样我们就可以在任何一个目录下使用java相关的命令: 1 2 3 4 5 6 [root@leaf~] #java-version javaversion "1.7.0_80" Java(TM)SERuntimeEnvironment(build1.7.0_80-b15) JavaHotSpot(TM)64-BitServerVM(build24.80-b11,mixedmode) [root@leaf~] #javac-version javac1.7.0_80 4.hadoop安装与配置 (1)hadoop下载 这里使用hadoop 2.6.5版本,可以到下面的网站进行下载: http://hadoop.apache.org/releases.html 选择2.6.5的binary进入相应的页面便可以下载,然后使用winscp上传到/root目录下,如下: 1 2 [root@leaf~] #ls-lhhadoop-2.6.5.tar.gz -rw-r--r--.1rootroot191MAug2919:09hadoop-2.6.5. tar .gz (2)hadoop安装 将hadoop解压到/usr/local目录下,并创建软链接: 1 2 3 4 5 6 7 8 [root@leaf~] #cphadoop-2.6.5.tar.gz/usr/local [root@leaf~] #cd/usr/local [root@leaf local ] #tar-zxfhadoop-2.6.5.tar.gz [root@leaf local ] #ls-ldhadoop-2.6.5 drwxrwxr-x.9100010004096Oct32016hadoop-2.6.5 [root@leaf local ] #ln-shadoop-2.6.5hadoop [root@leaf local ] #ls-ldhadoop lrwxrwxrwx.1rootroot12Aug3005:05hadoop->hadoop-2.6.5 (3)hadoop环境变量配置 hadoop相关命令在/usr/local/hadoop/bin和/usr/local/hadoop/sbin目录下,如下所示: 1 2 3 [root@leaf local ] #cdhadoop/bin/ [root@leafbin] #ls-lhhadoop -rwxr-xr-x.1100010005.4KOct32016hadoop 配置hadoop环境变量: 1 2 [root@leafbin] #echo'exportHADOOP_HOME=/usr/local/hadoop/bin:/usr/local/hadoop/sbin'>>/etc/profile [root@leafbin] #echo'exportPATH=$PATH:$HADOOP_HOME'>>/etc/profile 这样我们就可以在任何一个目录下使用hadoop相关的命令: 1 2 3 4 5 6 7 8 9 10 11 12 13 14 15 16 17 18 [root@leaf~] #hadoop Usage:hadoop[--configconfdir]COMMAND whereCOMMANDisoneof: fsrunagenericfilesystemuserclient versionprinttheversion jar<jar>runajar file checknative[-a|-h]checknativehadoopandcompressionlibrariesavailability distcp<srcurl><desturl>copy file ordirectoriesrecursively archive-archiveNameNAME-p<parentpath><src>*<dest>createahadooparchive classpathprintstheclasspathneededtogetthe credentialinteractwithcredentialproviders Hadoopjarandtherequiredlibraries daemonlogget /set theloglevel for eachdaemon traceviewandmodifyHadooptracingsettings or CLASSNAMEruntheclassnamedCLASSNAME Mostcommandsprinthelpwheninvokedw /o parameters. (4)hadoop配置 hadoop的配置文件在/usr/local/hadoop/etc/hadoop目录下: 1 2 3 4 5 6 7 8 9 10 [root@leaf~] #cd/usr/local/hadoop/etc/hadoop/ [root@leafhadoop] #ls capacity-scheduler.xmlhadoop-policy.xmlkms-log4j.propertiesssl-client.xml.example configuration.xslhdfs-site.xmlkms-site.xmlssl-server.xml.example container-executor.cfghttpfs- env .shlog4j.propertiesyarn- env .cmd core-site.xmlhttpfs-log4j.propertiesmapred- env .cmdyarn- env .sh hadoop- env .cmdhttpfs-signature.secretmapred- env .shyarn-site.xml hadoop- env .shhttpfs-site.xmlmapred-queues.xml.template hadoop-metrics2.propertieskms-acls.xmlmapred-site.xml.template hadoop-metrics.propertieskms- env .shslaves 配置core-site.xml 1 2 3 4 5 6 <configuration> <property> <name>fs.default.name< /name > <value>hdfs: //localhost :9000< /value > < /property > < /configuration > fs.default.name这个字段下的值用于指定NameNode(HDFS的Master)的IP地址和端口号,如下面的value值hdfs://localhost:9000,就表示HDFS NameNode的IP地址或主机为localhost,端口号为9000. 配置hdfs-site.xml 1 2 3 4 5 6 7 8 9 10 11 12 13 14 <configuration> <property> <name>dfs.replication< /name > <value>1< /value > < /property > <property> <name>dfs.name. dir < /name > <value> /root/hdfs-filesystem/name < /value > < /property > <property> <name>dfs.data. dir < /name > <value> /root/hdfs-filesystem/data < /value > < /property > < /configuration > dfs.replication用于指定HDFS中每个Block块被复制的次数,起到数据冗余备份的作用;dfs.name.dir用于配置HDFS的NameNode的元数据,以逗号隔开,HDFS会把元数据冗余复制到这些目录下;dfs.data.dir用于配置HDFS的DataNode的数据目录,以逗号隔开,HDFS会把数据存在这些目录下。 配置mapred-site.xml 1 2 3 4 5 6 <configuration> <property> <name>mapred.job.tracker< /name > <value>localhost:9001< /value > < /property > < /configuration > mapred.job.tracker字段用于指定MapReduce Jobtracker的IP地址及端口号,如这里IP地址或主机为localhost,9001是MapReduce Jobtracker RPC的交互端口。 配置hadoop-env.sh 1 export JAVA_HOME= /usr/local/jdk 5.hadoop启动与测试 (1)格式化HDFS分布式文件系统 执行如下命令: 1 2 3 4 5 6 7 8 [root@leaf~] #hadoopnamenode-format ... 17 /08/30 08:41:29INFOnamenode.NNStorageRetentionManager:Goingtoretain1imageswithtxid>=0 17 /08/30 08:41:29INFOutil.ExitUtil:Exitingwithstatus0 17 /08/30 08:41:29INFOnamenode.NameNode:SHUTDOWN_MSG: /************************************************************ SHUTDOWN_MSG:ShuttingdownNameNodeatleaf /127 .0.0.1 ************************************************************/ 注意看输出显示是不是跟上面的类似,如果是,则说明操作成功。 (2)启动hadoop服务 执行如下命令: 1 2 3 4 5 6 7 8 9 10 11 12 [root@leaf~] #start-all.sh ThisscriptisDeprecated.Insteadusestart-dfs.shandstart-yarn.sh 17 /08/30 08:53:22WARNutil.NativeCodeLoader:Unabletoloadnative-hadooplibrary for yourplatform...using builtin -javaclasseswhereapplicable Startingnamenodeson[localhost] localhost:startingnamenode,loggingto /usr/local/hadoop-2 .6.5 /logs/hadoop-root-namenode-leaf .out localhost:startingdatanode,loggingto /usr/local/hadoop-2 .6.5 /logs/hadoop-root-datanode-leaf .out Startingsecondarynamenodes[0.0.0.0] 0.0.0.0:startingsecondarynamenode,loggingto /usr/local/hadoop-2 .6.5 /logs/hadoop-root-secondarynamenode-leaf .out 17 /08/30 08:53:48WARNutil.NativeCodeLoader:Unabletoloadnative-hadooplibrary for yourplatform...using builtin -javaclasseswhereapplicable startingyarndaemons startingresourcemanager,loggingto /usr/local/hadoop-2 .6.5 /logs/yarn-root-resourcemanager-leaf .out localhost:startingnodemanager,loggingto /usr/local/hadoop-2 .6.5 /logs/yarn-root-nodemanager-leaf .out (3)hadoop服务测试 启动完成后,执行jps命令,可以看到hadoop运行的守护进程,如下: 1 2 3 4 5 6 7 [root@leaf~] #jps 4167SecondaryNameNode 4708Jps 3907NameNode 4394NodeManager 4306ResourceManager 3993DataNode 也可以通过在浏览器中输入地址来访问相关页面,这里访问NameNode的页面,地址为http://10.0.0.131:50070,如下: 访问DataNode的页面,地址为http://10.0.0.131:50075,如下 本文转自 xpleaf 51CTO博客,原文链接:http://blog.51cto.com/xpleaf/1960982,如需转载请自行联系原作者

优秀的个人博客,低调大师

Exchange2013 RTM安装初体验(一)

前期微软发布了一系列的新产品,Office2013、Exchange2013、Lync2013,其中我最感兴趣的还是Exchange2013和Lync2013。当前我们同样得知前期是Preview version,可现在已经是RTM version了,无奈前段时间工作繁忙,没有抽出时间做,这两天终于腾出些时间,赶紧进行了安装测试;简单说下Exchange2013的改进,硬件方面变化很大,在测试中发现为虚拟机分配的动态内存4096-8192MB之间看,在初安装的时候占用内存不高,可在安装好后直接占用内存资源到7454MB了,结果告诉我们对内存的要求也越来越高了。活动目录DC和GC最低要求windows 2008 standard。最值得关注的是Exchange 2013 在角色上发生了重大改变,只有Client Access和Mailbox两种角色,邮箱服务器包含了典型的服务器组件和客户端访问服务器角色,用来处理所有的身份验证和代理等服务,同时只支持windows 2008 R2及windows server 2012系统。Exchange 2013 已不支持outlook 2003客户端。Exchange管理中心将取代于以前的EMC,Exchange 2013 的所有管理工作全部都迁移到了Web界面的管理中心当中;微软本来是将Exchange 2007之后的版本已经慢慢的开始启用了公用文件夹,但是现在在 Exchange 2013 中微软又启用了它。可以使用EAC来管理他们,并且现代公用文件夹将作为灾难恢复和数据库可用性组的一部分 初步了解后,我们开始安装Exchange 2013 RTM。基本信息如下: http://technet.microsoft.com/nl-NL/library/aa996719.aspx 安装步骤: 1. 环境架构---AD环境准备 2.安装DHCP服务,配置(授权及新建作用域) 3.部署命名为Ex2013-01的成员服务器, 4.下载Exchange2013必备应用程序(3个),具体见下 http://www.microsoft.com/en-us/download/details.aspx?id=34992 http://www.microsoft.com/en-us/download/details.aspx?id=17062 http://www.microsoft.com/en-us/download/details.aspx?id=26604 5.安装Exchange2013必备应用程序及安装 6.Exchange2013安全前准备,安装所需角色及功能 7.安装Exchange2013应用程序 环境介绍: Domain Name:abc.com Hostname:ABC-DC IP:192.168.100.3 Roles:DC、DHCP、DNS Hostname:MDT2012 IP:192.168.100.100 Roles:MDT Server2012 Hostname:EX2013-01 IP:192.168.100.10 Roles:Exchange Server 2013 Hostname:EX2013-02 IP:192.168.100.11 Roles:Exchange Server 2013 Hostname:TMG01 IP:192.168.100.1 Roles:Gateway Hostname:Test IP:192.168.100.x Roles:Test computer 一、环境架构---AD准备 首先是安装一台独立服务器,并且命名为:ABC-DC;同时安装ADDS服务及所需功能 开始安装ADDS服务 安装完后通过GUI来将安装了ADDS的独立服务器提升为域控制器 添加新林,域名为:ABC.COM 域及林的功能级别为:Windows server 2012;输入目录还原密码 森林中第一台DC担任DNS、GC角色 配置好信息后开始安装。 已成功将该服务器提升为DC,提升后重启即可 通过运行DSA.MSC打开用户和计算机管理控制台 为了方便管理,新建用户gaowenlong并且赋予最大的域权限 二、安装DHCP服务及配置(授权及新建作用域) 安装后,开始完成DHCP配置—授权 通过运行dhcpmgmt.msc打开DHCP控制台,新建作用域 定义地址分发范围;192.168.100.150----192.168.100.200 定义网关:192.168.100.1 DHCP服务配置完成 三、安装及部署Exchange Server2013(Ex2013-01)独立服务器;并且将该独立服务器命名为:Ex2013-01同时加入到abc.com域内 四、下载及安装Exchange2013前所需应用程序 http://www.microsoft.com/en-us/download/details.aspx?id=34992 http://www.microsoft.com/en-us/download/details.aspx?id=17062 http://www.microsoft.com/en-us/download/details.aspx?id=26604 五、将Exchange2013必备应用软件拷贝到Ex2013-01的桌面上准备安装; 安装应用所需程序; 安装以上应用程序后,需要卸载Unified安装后所附带应用程序:microsoft visual c+++++ 然后,因为运行windows server2012系统,然后安装Exchange2013所以需要安装一下角色 7.安装Exchange2013前准备;安装Exchange2013必需的角色及功能;通过powershell安装 Install-windowsfeature RSAT-ADDS 安装所需角色及功能;以管理员身份运行Powershell Install-WindowsFeature AS-HTTP-Activation, Desktop-Experience, NET-Framework-45-Features, RPC-over-HTTP-proxy, RSAT-Clustering, Web-Mgmt-Console, WAS-Process-Model, Web-Asp-Net45, Web-Basic-Auth, Web-Client-Auth, Web-Digest-Auth, Web-Dir-Browsing, Web-Dyn-Compression, Web-Http-Errors, Web-Http-Logging, Web-Http-Redirect, Web-Http-Tracing, Web-ISAPI-Ext, Web-ISAPI-Filter, Web-Lgcy-Mgmt-Console, Web-Metabase, Web-Mgmt-Console, Web-Mgmt-Service, Web-Net-Ext45, Web-Request-Monitor, Web-Server, Web-Stat-Compression, Web-Static-Content, Web-Windows-Auth, Web-WMI, Windows-Identity-Foundation–Restart 角色安装成功并且重启 7.安装exchange2013程序;不更新,直接下一步 开始拷贝所需文件 初始化设置 同意安装 开始正式安装Exchange 2013,选择所要安装的Exchange 2013的角色,本例安装所有角色(正如前面提到Exchange2013只有CAS和Mailbox两种角色),点击“next” Exchange organization Name:再次默认即可 警告再次可忽略,因为提示安装Exchange2013会对AD的架构进行扩展,忽略即可 开始安装,在此过程需要30分钟左右,具体时间可根据机器的性能来计算 在30分钟的等待中,我们看到了成功安装完成。 运行开始我们可以看见有两个Exchange控制台;一个为EMS一个是Exchange toolbox Exchange2013配置下节再做详细介绍 本文转自 高文龙 51CTO博客,原文链接:http://blog.51cto.com/gaowenlong/1059553,如需转载请自行联系原作者

优秀的个人博客,低调大师

Objective-C 初体验

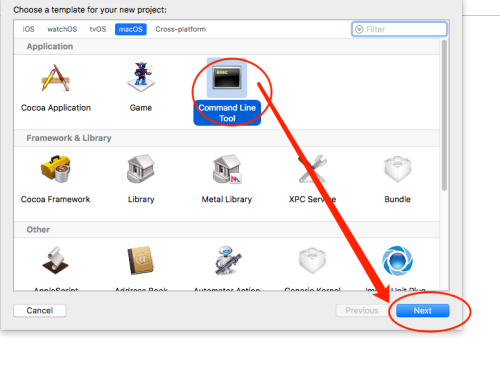
因为要接SDK的原因,现在搞搞OC,本人是以控制台程序入手学的。 本片主要知识点: 一:创建控制台项目 二:创建类(h文件与m文件分开) 三:类成员的编写,坑啊 1创建控制台项目: 1,打开XCode , File -》 New -》 Project... 2,在打开的界面中如下操作: 3,选择项目的保存位置。。。 2,新建类(h文件和m文件) 1,File-》New -》File... 2,进入创建界面后如下操作(这样会生成h文件和m文件): 3,选择文件保存的位置。。。。。 代码: Aonaufly.h如下: 1 2 3 4 5 6 7 8 9 10 11 12 13 14 15 // //Aonaufly.h //Ainy_Console // //CreatedbyAppleon2017/9/7. //Copyright2017年Apple.Allrightsreserved. // #import<Foundation/Foundation.h> @interfaceAonaufly:NSObject @property int _a,_b; -( int )sum_one:( int )csum_b:( int )d; //带参数名的方法 -( int )sum:( int )i:( int )j; //不带参数名的方法 @end Aonaufly.m代码如下: 1 2 3 4 5 6 7 8 9 10 11 12 13 14 15 16 17 18 19 20 21 // //Aonaufly.m //Ainy_Console // //CreatedbyAppleon2017/9/7. //Copyright2017年Apple.Allrightsreserved. // #import"Aonaufly.h" @implementationAonaufly @synthesize_a,_b; -( int )sum_one:( int )csum_b:( int )d { return [selfsum:c:d]; //调用本类的方法sum } -( int )sum:( int )i:( int )j { return i+j; } @end 入口main调用如下: 1 2 3 4 5 6 7 8 9 10 11 12 13 14 15 16 17 18 19 20 21 22 23 24 25 // //main.m //Ainy_Console // //CreatedbyAppleon2017/9/6. //Copyright2017年Apple.Allrightsreserved. // #import"Aonaufly.h" int main( int argc, const char *argv[]){ @autoreleasepool{ Aonaufly*myAonaufly; myAonaufly=[[Aonauflyalloc]init]; int sum=[myAonauflysum_one:1sum_b:2]; //调用方法(带参数) NSLog(@ "thisis1+2SUM:%i" ,sum); //为属性_a,_b赋值 myAonaufly._a=3; myAonaufly._b=5; //调用不带参数名的sum方法如下 sum=[myAonauflysum:myAonaufly._a:myAonaufly._b]; NSLog(@ "this%i+%ivalueis:%i" ,myAonaufly._a,myAonaufly._b,sum); } return 0; } 结果: 解析如下: 1,头文件 @property 实际声明的是seter 和 geter , 在m文件中直接用@synthesize直接实现 2,关于方法-》 -(int)定义的是返回值类型 sum_one : ( int) c sum_b : (int) d;的调用方式[ myAonaufly sum_one:1 sum_b:2] sum :(int) i : (int) j;的调用方式[myAonaufly sum:myAonaufly._a :myAonaufly._b] 很坑 ,独树一帜和很多主流编程语言都不一样。。。。 本文转自Aonaufly51CTO博客,原文链接:http://blog.51cto.com/aonaufly/1963502,如需转载请自行联系原作者

优秀的个人博客,低调大师

VDI架构—Remote FX 初体验

引言 随着微软的VDI架构在企业中的实施原来越多,企业相关的需求也在随着市场的需要而在变化,声音、图像等多媒体元素在VDI中的展现,也称为了当今虚拟化所关注的主题之一。 VDI-RemoteFX概览 随着Windows 2008 R2以及Windows 7的SP1 Beta包的发布,我得以在虚拟化的VDI部署上使用新的功能来进行测试,其中尤为关注的就是最新的Remote FX的特性。 Windows 7 SP1是面向消费级用户和IT专业人员的累积更新,包含先前通过Windows Update提供的更新,以及根据客户和合作伙伴的反馈意见为Windows 7平台持续开发的增量式更新。它可以为PC提供支持,为操作系统提供持续改进,并且便于组织以单一更新集的形式进行部署。 Windows Server 2008 R2 SP1则是面向企业和IT专业人员的累积更新,包含虚拟化增强功能(动态内存和RemoteFX)、先前通过Windows Update提供的改进,并解决了客户反馈的问题。RemoteFX描述了一组富媒体功能,使用远程桌面服务平台的用户可利用它们来部署基于虚拟机或会话的远程桌面基础结构。具体而言,RemoteFX增强了远程桌面服务中的远程桌面协议(RDP),使远程办公人员可以访问任意类型的应用程序或屏幕内容,包括富媒体和3D应用程序,从而提高最终用户的工作效率。 根据微软官方的文档显示Remote FX在硬件方面有着那么几项很关键的要求,而我的测试也是因为我的CPU不满足其中的EPT技术而宣告失败。不过整个架构是能实现的,就先展示给大伙看看啦。 RemoteFX server hardware requirements There are several hardware requirements that must be met when deploying a RemoteFX server: SLAT-enabled processor – The processor in the RemoteFX server must support Second-Level Address Translation (SLAT). In virtualization scenarios, hardware-based SLAT support improves performance. On Intel-based processors, this is called Extended Page Tables (EPT), and on AMD-based processors, it is called Nested Page Tables (NPT). GPU - At least one graphics processing unit (GPU) is required on the RemoteFX server. The GPU driver must support DirectX 9.0c and DirectX 10.0. If more than one GPU is installed in the RemoteFX server, the GPUs must be identical. The GPU must have sufficient dedicated video memory that is separate from system memory. RemoteFX encoder - The RemoteFX encoder is optional and can be installed for additional scalability on the RemoteFX server. The hardware encoder card must be installed in an x4 speed PCI-express slot or greater. Hyper-V – The Hyper-V hardware requirements must be supported on the server. The Hyper-V hardware requirements for Windows Server 2008 R2 are available on the Windows Server 2008 Technical Library (http://go.microsoft.com/fwlink/?LinkID=180919). Streaming SIMD Extensions (SSE2) processor – If you are using RemoteFX on an RD Session Host server, the processor on the RD Session Host server must support SSE2. Remote FX测试架构示意 本次测试的架构图: VDI-Remote部署测试 1.部署Remote FX服务器 根据微软的原文步骤,在VDI的基础上部署Remote FX: In this step, you will do the following: lEnable RemoteFX. lConfigure the custom RDP settings. lInstall the RemoteFX 3D video adapter on the personal virtual desktop. First, you must enable RemoteFX on the RDVH-SRV computer. To enable RemoteFX 1.Log on to RDVH-SRV as CONTOSO\Administrator. 2.Open Server Manager. To open Server Manager, click Start, point to Administrative Tools, and then click Server Manager. 3.Under the Roles Summary heading, click Add Roles. 4.On the Before You Begin page of the Add Roles Wizard, click Next. 5.On the Select Server Roles page, select the Remote Desktop Services check box, and then click Next. 6.On the Introduction to Remote Desktop Services page, click Next. 7.On the Select Role Services page, select the RemoteFX check box. The Core Services check box will be automatically selected and installed when RemoteFX is installed. 8.On the Confirm Installation Selections page, verify that the RD Virtualization Host role service will be installed, and then click Install. 9.On the Installation Results page, you are prompted to restart the server to finish the installation process. Click Close, and then click Yes to restart the server. 10.After the server restarts and you log on to the computer as CONTOSO\Administrator, the remaining steps of the installation finish. When the Installation Results page appears, confirm that installation of the RD Virtualization Host role service succeeded, and then close Server Manager. 2. 配置Remote FX 接下来还有比较重要的这几步: Next, you must configure the custom RDP settings for the virtual desktop pool to always use a LAN connection speed. To configure the custom RDP settings 1.Log on to RDCB-SRV as the CONTOSO\Administrator user account. 2.Click Start, point to Administrative Tools, point to Remote Desktop Services, and then click Remote Desktop Connection Manager. 3.Expand RD Virtualization Host Servers. 4.Right-click Personal Virtual Desktops, and then click Properties. 5.Click the Custom RDP Settings tab. 6.In the Custom RDP settings box, type connection type:i:6 and then click OK. Instead of configuring the custom RDP settings, you can also give your users the option to configure their connection speed when logging on to the RD Web Access server. This is configured by editing the web.config file on the RDCB-SRV server. To show the connection speed check box 1.Log on to RDCB-SRV as the CONTOSO\Administrator user account. 2.Navigate to C:\Windows\Web\RDWeb\Pages. 3.Double-click the web.config file. 4.Under AppSettings, change the following settings to true. <add key="ShowOptimizeExperience" value="true" /> <add key="OptimizeExperienceState" value="true" /> 5.Save the file, and then close Notepad. Finally, install the 3D video adapter on the personal virtual desktop. To install the 3D video adapter 1.Shut down the PVD1-CLNT virtual desktop. 2.Open Hyper-V Manager. To open Hyper-V Manager, click Start, point to Administrative Tools, and then click Hyper-V Manager. 3.Under Virtual Machines, right-click pvd1-clnt.contoso.com, and then click Settings. 4.Click Add Hardware. 5.In the Select the devices you want to add box, click Synthetic 3D Video Adapter, and then click Add. 6.Click OK to add the 3D Video Adapter. 7.Under Virtual Machines, right-click pvd1-clnt.contoso.com, and then click Start. 8.Under Virtual Machines, right-click pvd1-clnt.contoso.com, and then click Connect. 9.Log on to the PVD1-CLNT computer as a member of the local Administrators group. 10.The RemoteFX 3D Video Adapter driver will install. When you dialog box asking you to restart the computer appears, Restart Now. 就这样,可以在VDI的架构前提下安装成功Remote FX,可是由于我的CPU不支持Intel的EPT技术,所以没有办法开启虚拟机展示给大家,听说只有i7的全系列以及至强的X5500以上的CPU才支持此技术,也不知道是真是假。 相关报错的截图如下: 微软的问题解答描述也是如我所料,是因为CPU不支持EPT技术所导致的,如下: Q:An error occurred while attempting to start the selected virtual machine(s): Failed to Power on with Error ‘Unspecified error’ A:It is likely that you are attempting to start RemoteFX virtual machines on a server that does not have a SLAT-enabled processor. PS:SLAT-enabled processor – The processor in the RemoteFX server must support Second-Level Address Translation (SLAT). In virtualization scenarios, hardware-based SLAT support improves performance. On Intel-based processors, this is called Extended Page Tables (EPT), and on AMD-based processors, it is called Nested Page Tables (NPT). 若在将来在VDI架构中彻底的都部署了Remote FX,那么很多企业的Call Center或者是研发、设计的部门,都可以顺利地运行在Hyper-V上了,而无需借助WYSE或者思杰等第三方来完成声音、视频的高性能双向传输啦,这是节省成本的有效途径,也是一大创举啊!我们都将拭目以待!! 本文转自xury 51CTO博客,原文链接:http://blog.51cto.com/xury007/351497,如需转载请自行联系原作者

资源下载

更多资源
优质分享Android(本站安卓app)

优质分享Android(本站安卓app)

近一个月的开发和优化,本站点的第一个app全新上线。该app采用极致压缩,本体才4.36MB。系统里面做了大量数据访问、缓存优化。方便用户在手机上查看文章。后续会推出HarmonyOS的适配版本。

Mario,低调大师唯一一个Java游戏作品

Mario,低调大师唯一一个Java游戏作品

马里奥是站在游戏界顶峰的超人气多面角色。马里奥靠吃蘑菇成长,特征是大鼻子、头戴帽子、身穿背带裤,还留着胡子。与他的双胞胎兄弟路易基一起,长年担任任天堂的招牌角色。

Apache Tomcat7、8、9(Java Web服务器)

Apache Tomcat7、8、9(Java Web服务器)

Tomcat是Apache 软件基金会(Apache Software Foundation)的Jakarta 项目中的一个核心项目,由Apache、Sun 和其他一些公司及个人共同开发而成。因为Tomcat 技术先进、性能稳定,而且免费,因而深受Java 爱好者的喜爱并得到了部分软件开发商的认可,成为目前比较流行的Web 应用服务器。

Java Development Kit(Java开发工具)

Java Development Kit(Java开发工具)

JDK是 Java 语言的软件开发工具包,主要用于移动设备、嵌入式设备上的java应用程序。JDK是整个java开发的核心,它包含了JAVA的运行环境(JVM+Java系统类库)和JAVA工具。