首页 文章 精选 留言 我的

精选列表

搜索[asp.net],共1120篇文章
优秀的个人博客,低调大师

4.4管道和中间件介绍「深入浅出ASP.NET Core系列」

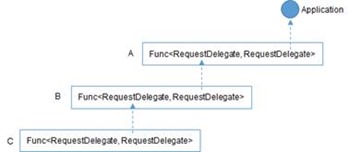
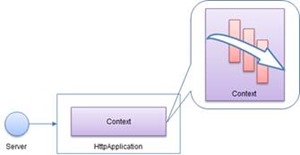
希望给你3-5分钟的碎片化学习,可能是坐地铁、等公交,积少成多,水滴石穿,谢谢关注。 管道流 我们知道一个管道可以有一个或多个中间件,而中间件的职责是根据HttpContext处理HTTP请求,然后往Response里填充东西,最后完成整个Response的输出。了解管道流机制,就能知道如何利用管道进行拦截,自定义封装中间件等高级操作,所以学习管道流机制对我们编码有质的提高。那么管道数据是如何流通的呢?如下图所示,Request进入Middleware 1,叠加一层逻辑代码到HttpContext(切确说是HttpContext的Response对象),然后调用next()进入到下一个Middleware 2,依次递推,最后所有的逻辑代码叠加完毕后返回前端。 管道实践 IApplicationBuilder构建管道有两种方法,分别是Use和Run方法,他们的区别在下面会谈到。 app.Use方法 这里先了解Use方法的第一个重载,如下图所示,他是一个类型为委托的中间件(middleware)。 这个中间件同时携带一个next的RequestDelegate委托,可以实现调用下一个管道中间件,我们看下代码实践,如下所示,context从当前管道进来,处理后,通过next.Invoke()转移到下一个管道,完成一个管道的生命周期。 其实我更喜欢截图,因为可以任意打标注,但是不方便拷贝,所以一起贴上代码吧。 app.Use(async (context, next) => { await context.Response.WriteAsync("fisrt……"); await next.Invoke(); }); 以上的用法,如果是新手可能不知其所以然,用没问题,但是内部是如何实现的?不知道!其实这里使用到了语言的高级特性委托,通过委托实现了开闭原则,也就是把管道的扩展开放出来,我们可以使用规定的app.Use方法,但是内部定义的委托参数类型,比如context,Fun<task>则对外屏蔽了实现。所以你看到的next.Invoke()已经封装了具体的实现了,对于使用者,其实可以不用去管那么多,拿来用即可。 app.Use还有另外一个重载,如下图提示:这里Func传入一个RequestDelegate,返回一个RequestDelegate。不同于第一个重载,他没有next.Invoke()的调用,而是之间返回一个RequestDelegate给app进行处理。 我们看下代码实现,外层红色框是传入的管道,内部绿色框是返回的管道。 app.Run app.Run和app.Use不同之处在于,app.Use可以调用下一个管道中间件,app.Run不会,我们演示一段代码。 app.Use(async (context, next) => { await context.Response.WriteAsync("<html><body>"); await context.Response.WriteAsync("<div>Inside middleware defined using app.Use</div>"); await next(); await context.Response.WriteAsync("</body></html>"); }); app.Run(async context => { await context.Response.WriteAsync("<div>Inside middleware defined using app.Run</div>"); }); //该管道会不会被打印呢? app.Use(async (context, next) => { await context.Response.WriteAsync("<html><body>"); await context.Response.WriteAsync("<div>Another Middleware defined using app.Use</div>"); await next(); await context.Response.WriteAsync("</body></html>"); }); 如下图所示,我们看到Run后面定义的第二个Use没有打印出来,这是因为Run不会调用随后的管道中间件导致的,所以我们一般习管性把Run方法放在所有管道中间件的最后。 希望以上分享对你有帮助,我是张飞洪,入行10年有余,人不堪其忧,吾不改其乐,谢谢您关注我的头条

优秀的个人博客,低调大师

(11)学习笔记 ) ASP.NET CORE微服务 Micro-Service ---- Thrift高效通讯 (完结)

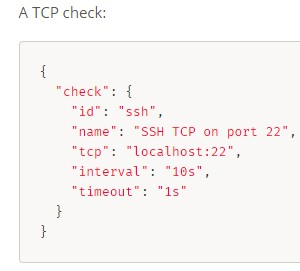
一、 什么是 RPC Restful 采用 Http 进行通讯,优点是开放、标准、简单、兼容性升级容易; 缺点是性能略低。在 QPS 高或者对响应时间要求苛刻的服务上,可以用 RPC(Remote Procedure Call),RPC 由于采用二进制传输、TCP 通讯,所以通常性能更好。 .Net Core 下的 RPC(远程方法调用)框架有 gRPC、Thrift 等,都支持主流的编程语言。 RPC 虽然效率略高,但是耦合性强,如果兼容性处理不好的话,一旦服务器端接口升级,客户端就要更新,即使是增加一个参数,而 rest 则比较灵活。 最佳实践:对内一些性能要求高的场合用 RPC,对内其他场合以及对外用 Rest。比如 web 服务器和视频转码服务器之间通讯可以用 restful 就够了,转账接口用 RPC 性能会更高一些。 二、 Thrift 基本使用 参考资料:https://www.cnblogs.com/focus-lei/p/8889389.html 1、 下载thrift http://thrift.apache.org/ 把thrift-***.exe解压到磁盘,改名为thrift.exe(用起来方便一些) 2、 编写一个UserService.thrift文件(IDL) namespace csharp RuPeng.ThriftTest1.Contract service UserService{ SaveResult Save(1:User user) User Get(1:i32 id) list<User> GetAll() } enum SaveResult { SUCCESS = 0, FAILED = 1, } struct User { 1: required i64 Id; 2: required string Name; 3: required i32 Age; 4: optional bool IsVIP; 5: optional string Remark; } service定义的是服务类,enum 是枚举,struct是传入或者传出的复杂数据类型(支持对象级联)。 语法规范http://thrift.apache.org/docs/idl 根据thrift语法生成C#代码 cmd -> thrift.exe -gen csharp UserService.thrift 创建一个类库项目 ThriftTest1.Contract,作为客户端和服务器之间的共用协议,把上一步生成的代码放进项目。 项目nuget安装apache-thrift-netcore: Install-Package apache-thrift-netcore 3、 创建服务器端项目 ThriftTest1.Server,建一个控制台项目(放到 web 项目中或者在 Linux中用守护进程运行起来(SuperVisor等,类似Windows下的“Windows服务”)也可以)。 ThriftTest1.Server项目引用ThriftTest1.Contract 创建项目:ApplicationExtenssion.cs 编写实现类UserServiceImpl.cs public class UserServiceImpl : UserService.Iface { public User Get(int id) { User u = new User(); u.Id = id; u.Name = "用户" + id; u.Age = 6; return u; } public List<User> GetAll() { List<User> list = new List<User>(); list.Add(new User { Id = 1, Name = "yzk", Age = 18, Remark = "hello" }); list.Add(new User { Id = 2, Name = "rupeng", Age = 6 }); return list; } public SaveResult Save(User user) { Console.WriteLine($"保存用户,{user.Id}"); return SaveResult.SUCCESS; } } 修改Program下的Main函数 启动服务器端 TServerTransport transport = new TServerSocket(8800);//监听8800端口 var processor = new RuPeng.ThriftTest1.Contract.UserService.Processor(new UserServiceImpl());//设置实现类 TServer server = new TThreadPoolServer(processor, transport); server.Serve(); 监听8800端口 4、创建客户端项目也引用ThriftTest1.Contract项目 调用方法 using (TTransport transport = new TSocket("localhost", 8800)) using (TProtocol protocol = new TBinaryProtocol(transport)) using (var clientUser = new UserService.Client(protocol)) { transport.Open(); User u = clientUser.Get(1); Console.WriteLine($"{u.Id},{u.Name}"); } 三、一个服务器中放多个服务 0.9.1之前只支持一个服务器一个服务,这也是建议的做法。之后支持多路服务在thrift中增加一个服务 修改UserService.thrift文件 添加以下内容 然后重新生成替换 service CalcService{ i32 Add(1:i32 i1,2:i32 i2) } 服务器: 1.创建CalcServiceImpl文件实现CalcService服务 2.修改Main方法如下: TServerTransport transport = new TServerSocket(8800); var processorUserService = new RuPeng.ThriftTest1.Contract.UserService.Processor(new UserServiceImpl()) var processorCalcService = new RuPeng.ThriftTest1.Contract.CalcService.Processor(new CalcServiceImpl()); var processorMulti = new TMultiplexedProcessor(); processorMulti.RegisterProcessor("userService", processorUserService); processorMulti.RegisterProcessor("calcService", processorCalcService); TServer server = new TThreadPoolServer(processorMulti, transport); server.Serve(); 客户端: using (TTransport transport = new TSocket("localhost", 8800)) using (TProtocol protocol = new TBinaryProtocol(transport)) using (var protocolUserService = new TMultiplexedProtocol(protocol, "userService")) using (var clientUser = new UserService.Client(protocolUserService)) using (var protocolCalcService = new TMultiplexedProtocol(protocol,"calcService")) using (var clientCalc = new CalcService.Client(protocolCalcService)) { transport.Open(); User u = clientUser.Get(1); Console.WriteLine($"{u.Id},{u.Name}"); Console.WriteLine(clientCalc.Add(1, 2)); } https://www.cnblogs.com/focus-lei/p/8889389.html (*)新版:thrift.exe -gen netcore UserService.thrift(支持.net Core) 貌似支持还不完善(http://www.cnblogs.com/zhaiyf/p/8351361.html )还不能用,编译也有问题,值得期待的是:支持异步。 四、Java 等其他语言的融入 和使用Restful做服务一样,Java也可以调用、也可以做Thrift服务,演示一下java调用c#写的Thrift服务的例子 Java编译器版本需要>=1.6 Maven添加组件包的支持(thrift maven版本一定要和生成代码的thrift的版本一致): <dependency> <groupId>org.apache.thrift</groupId> <artifactId>libthrift</artifactId> <version>0.11.0</version> </dependency> <dependency> <groupId>org.slf4j</groupId> <artifactId>slf4j-log4j12</artifactId> <version>1.7.5</version> </dependency> 在thrift的IDL文件中加入一行(各个语言的namespace等参数可以共存) 修改UserService.thrift文件 添加以下代码就可以控制生成的java类的报名,最好按照java的命名规范来。 namespace java com.rupeng.thriftTest1.contract 产生java代码 thrift.exe -gen java UserService.thrift Java代码: import org.apache.thrift.protocol.TBinaryProtocol; import org.apache.thrift.protocol.TProtocol; import org.apache.thrift.transport.TSocket; import org.apache.thrift.transport.TTransport; public class Main { public static void main(String[] args) throws Exception { System.out.println("客户端启动...."); TTransport transport = new TSocket("localhost", 8800, 30000); TProtocol protocol = new TBinaryProtocol(transport); UserService.Client client = new UserService.Client(protocol); transport.open(); User result = client.Get(1); System.out.println(result.getAge()+result.getName()+result.getRemark()); }} 也可以用Java写服务器,C#调用。当然别的语言也可以。 接口设计原则“API design is like sex: Make one mistake and support it for the rest of your life” 五、 Thrift+Consul 服务发现 注册和发现和Rest方式没有什么区别。 consul支持tcp健康监测:https://www.consul.io/docs/agent/checks.html 因为 Thrift 一般不对外,所以一般不涉及和 API 网关结合的问题 gRPC 的优势:支持异步;支持 Http2。没有Thrift性能高 总结 回顾一下我们学到的微服务:服务治理和服务发现、熔断降级、API 网关。 不是所有项目都适合微服务架构,互联网项目及结构复杂的企业信息系统才可以考虑微服务架构。 设计微服务架构,模块拆分的原则:可以独立运行,尽量服务间不要依赖,即使依赖层级也不要太深,不要想着还要 join。按业务划分、按模块划分。 扩展知识: 1、 分布式跟踪、日志服务、监控等对微服务来说非常重要 2、 gRPC 另外一个 RPC 框架,gRPC 的.Net Core 支持异步。百度“.net core grpc” https://www.jianshu.com/p/f5e1c002047a 3、 https://github.com/neuecc/MagicOnion 可以参考下这位日本 mvp 写的 grpc 封装,不需要定义接口文件。 4、 nanofabric https://github.com/geffzhang/NanoFabric简单分析 5、 Surging https://github.com/dotnetcore/surging 6、 service fabric https://azure.microsoft.com/zh-cn/documentation/learning-paths/service-fabric/ 7、 Spring Cloud 入门视频:http://www.rupeng.com/Courses/Chapter/755 8、 steeltoe http://steeltoe.io/ 参 考 文 章 https://mp.weixin.qq.com/s/g9w-qgT2YHyDX8OE5q-OHQ 9、 限流算法 https://mp.weixin.qq.com/s/bck0Q2lDj_J9pLhFEhqm9w 10、https://github.com/PolicyServer/PolicyServer.Local 认证 + 授权 是两个服务, identityserver 解决了认证 ,PolicyServer 解决授权 11、Using Polly with HttpClient factory from ASPNET Core 2.1 https://github.com/App-vNext/Polly/wiki/Polly-and-HttpClientFactory 12、CSharpKit 微服务工具包 http://www.csharpkit.com/ 现在的努力只是为了更好的将来,将来你一定不会后悔你现在的努力。一起加油吧!!! C#/.NetCore技术交流群:608188505欢迎加群交流 如果您认为这篇文章还不错或者有所收获,您可以点击右下角的【推荐】按钮精神支持,因为这种支持是我继续写作,分享的最大动力!

优秀的个人博客,低调大师

(10)学习笔记 ) ASP.NET CORE微服务 Micro-Service ---- Ocelot+Identity Server

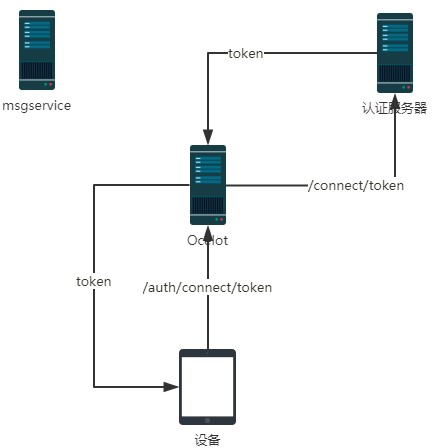
用 JWT 机制实现验证的原理如下图: 认证服务器负责颁发 Token(相当于 JWT 值)和校验 Token 的合法性。 一、 相关概念 API 资源(API Resource):微博服务器接口、斗鱼弹幕服务器接口、斗鱼直播接口就是API 资源。 客户端(Client):Client 就是官方微博 android 客户端、官方微博 ios 客户端、第三方微博客户端、微博助手等。 身份资源(Identity Resource):就是用户。 一个用户可能使用多个客户端访问服务器;一个客户端也可能服务多个用户。封禁了一个客户端,所有用户都不能使用这个这个客户端访问服务器,但是可以使用其他客户端访问;封禁了一个用户,这个用户在所有设备上都不能访问,但是不影响其他用户。 二、 搭建 identity server 认证服务器 新建一个空的 web 项目 ID4.IdServer Nuget - 》 Install-Package IdentityServer4 首先编写一个提供应用列表、账号列表的 Config 类 using IdentityServer4.Models; using System.Collections.Generic; namespace ID4.IdServer { public class Config { /// <summary> /// 返回应用列表 /// </summary> /// <returns></returns> public static IEnumerable<ApiResource> GetApiResources() { List<ApiResource> resources = new List<ApiResource>(); //ApiResource第一个参数是应用的名字,第二个参数是描述 resources.Add(new ApiResource("MsgAPI", "消息服务API")); resources.Add(new ApiResource("ProductAPI", "产品API")); return resources; } /// <summary> /// 返回账号列表 /// </summary> /// <returns></returns> public static IEnumerable<Client> GetClients() { List<Client> clients = new List<Client>(); clients.Add(new Client { ClientId = "clientPC1",//API账号、客户端Id AllowedGrantTypes = GrantTypes.ClientCredentials, ClientSecrets = { new Secret("123321".Sha256())//秘钥 }, AllowedScopes = { "MsgAPI", "ProductAPI" }//这个账号支持访问哪些应用 }); return clients; } } } 如果允许在数据库中配置账号等信息,那么可以从数据库中读取然后返回这些内容。疑问待解。 修改Startup.cs public void ConfigureServices(IServiceCollection services) { services.AddIdentityServer() .AddDeveloperSigningCredential() .AddInMemoryApiResources(Config.GetApiResources()) .AddInMemoryClients(Config.GetClients()); } public void Configure(IApplicationBuilder app, IHostingEnvironment env) { app.UseIdentityServer(); } 然后在 9500 端口启动 在 postman 里发出请求,获取 token http://localhost:9500/connect/token,发 Post 请求,表单请求内容(注意不是报文头): client_id=clientPC1 client_secret=123321 grant_type=client_credentials 把返回的 access_token 留下来后面用(注意有有效期)。 注意,其实不应该让客户端直接去申请 token,这只是咱演示,后面讲解正确做法。 三、搭建 Ocelot 服务器项目 空 Web 项目,项目名 ID4.Ocelot1 nuget 安装 IdentityServer4、Ocelot 编写配置文件 Ocelot.json(注意设置【如果较新则】) { "ReRoutes": [ { "DownstreamPathTemplate": "/api/{url}", "DownstreamScheme": "http", "UpstreamPathTemplate": "/MsgService/{url}", "UpstreamHttpMethod": ["Get", "Post"], "ServiceName": "MsgService", "LoadBalancerOptions": { "Type": "RoundRobin" }, "UseServiceDiscovery": true, "AuthenticationOptions": { "AuthenticationProviderKey": "MsgKey", "AllowedScopes": [] } }, { "DownstreamPathTemplate": "/api/{url}", "DownstreamScheme": "http", "UpstreamPathTemplate": "/ProductService/{url}", "UpstreamHttpMethod": ["Get", "Post"], "ServiceName": "ProductService", "LoadBalancerOptions": { "Type": "RoundRobin" }, "UseServiceDiscovery": true, "AuthenticationOptions": { "AuthenticationProviderKey": "ProductKey", "AllowedScopes": [] } } ], "GlobalConfiguration": { "ServiceDiscoveryProvider": { "Host": "localhost", "Port": 8500 } } } 把/MsgService 访问的都转给消息后端服务器(使用Consul进行服务发现)。也可以把Identity Server配置到Ocelot,但是我们不做,后边会讲为什么不放。 Program.cs 的 CreateWebHostBuilder 中加载 Ocelot.json .ConfigureAppConfiguration((hostingContext, builder) => { builder.AddJsonFile("Ocelot.json",false, true); }) 修改 Startup.cs 让 Ocelot 能够访问 Identity Server 进行 Token 的验证 using System; using IdentityServer4.AccessTokenValidation; using Microsoft.AspNetCore.Builder; using Microsoft.AspNetCore.Hosting; using Microsoft.Extensions.DependencyInjection; using Ocelot.DependencyInjection; using Ocelot.Middleware; namespace ID4.Ocelot1 { public class Startup { public void ConfigureServices(IServiceCollection services) { //指定Identity Server的信息 Action<IdentityServerAuthenticationOptions> isaOptMsg = o => { o.Authority = "http://localhost:9500"; o.ApiName = "MsgAPI";//要连接的应用的名字 o.RequireHttpsMetadata = false; o.SupportedTokens = SupportedTokens.Both; o.ApiSecret = "123321";//秘钥 }; Action<IdentityServerAuthenticationOptions> isaOptProduct = o => { o.Authority = "http://localhost:9500"; o.ApiName = "ProductAPI";//要连接的应用的名字 o.RequireHttpsMetadata = false; o.SupportedTokens = SupportedTokens.Both; o.ApiSecret = "123321";//秘钥 }; services.AddAuthentication() //对配置文件中使用ChatKey配置了AuthenticationProviderKey=MsgKey //的路由规则使用如下的验证方式 .AddIdentityServerAuthentication("MsgKey", isaOptMsg).AddIdentityServerAuthentication("ProductKey", isaOptProduct); services.AddOcelot(); } // This method gets called by the runtime. Use this method to configure the HTTP request pipeline. public void Configure(IApplicationBuilder app, IHostingEnvironment env) { if (env.IsDevelopment()) { app.UseDeveloperExceptionPage(); } app.UseOcelot().Wait(); } } } 很显然我们可以让不同的服务采用不同的Identity Server。 启动 Ocelot 服务器,然后向 ocelot 请求/MsgService/SMS/Send_MI(报文体还是要传 json 数据),在请求头(不是报文体)里加上: Authorization="Bearer "+上面 identityserver 返回的 accesstoken 如果返回 401,那就是认证错误。 Ocelot 会把 Authorization 值传递给后端服务器,这样在后端服务器可以用 IJwtDecoder 的这个不传递 key 的重载方法 IDictionary<string, object> DecodeToObject(string token),就可以在不验证的情况下获取 client_id 等信息。 也可以把 Identity Server 通过 Consul 进行服务治理。 Ocelot+Identity Server 实现了接口的权限验证,各个业务系统不需要再去做验证。 四、不能让客户端请求 token 上面是让客户端去请求 token,如果项目中这么搞的话,就把 client_id 特别是 secret 泄露给普通用户的。 正确的做法应该是,开发一个 token 服务,由这个服务来向 identity Server 请求 token,客户端向 token 服务发请求,把 client_id、secret 藏到这个 token 服务器上。当然这个服务器也要经过 Ocelot 转发。 五、用户名密码登录 如果 Api 和用户名、密码无关(比如系统内部之间 API 的调用),那么上面那样做就可以了,但是有时候需要用户身份验证的(比如 Android 客户端)。也就是在请求 token 的时候还要验证用户名密码,在服务中还可以获取登录用户信息。 修改的地方: 1、 ID4.IdServer 项目中增加类 ProfileService.cs using IdentityServer4.Models; using IdentityServer4.Services; using System.Linq; using System.Threading.Tasks; namespace ID4.IdServer { public class ProfileService : IProfileService { public async Task GetProfileDataAsync(ProfileDataRequestContext context) { var claims = context.Subject.Claims.ToList(); context.IssuedClaims = claims.ToList(); } public async Task IsActiveAsync(IsActiveContext context) { context.IsActive = true; } } } 增加类 ResourceOwnerPasswordValidator.cs using IdentityServer4.Models; using IdentityServer4.Validation; using System.Security.Claims; using System.Threading.Tasks; namespace ID4.IdServer { public class ResourceOwnerPasswordValidator : IResourceOwnerPasswordValidator { public async Task ValidateAsync(ResourceOwnerPasswordValidationContext context) { //根据context.UserName和context.Password与数据库的数据做校验,判断是否合法 if (context.UserName == "yzk" && context.Password == "123") { context.Result = new GrantValidationResult( subject: context.UserName, authenticationMethod: "custom", claims: new Claim[] { new Claim("Name", context.UserName), new Claim("UserId", "111"), new Claim("RealName", "名字"), new Claim("Email", "qq@qq.com") }); } else { //验证失败 context.Result = new GrantValidationResult(TokenRequestErrors.InvalidGrant, "invalid custom credential"); } } } } 当然这里的用户名密码是写死的,可以在项目中连接自己的用户数据库进行验证。claims 中可以放入多组用户的信息,这些信息都可以在业务系统中获取到。 Config.cs 修改一下,主要是把GetClients中的AllowedGrantTypes属性值改为GrantTypes.ResourceOwnerPassword, 并且在AllowedScopes中加入 IdentityServerConstants.StandardScopes.OpenId, //必须要添加,否则报forbidden错误 IdentityServerConstants.StandardScopes.Profile 修改后的 Config.cs using System.Collections.Generic; using IdentityServer4; using IdentityServer4.Models; namespace ID4.IdServer { public class Config { /// <summary> /// 返回应用列表 /// </summary> /// <returns></returns> public static IEnumerable<ApiResource> GetApiResources() { List<ApiResource> resources = new List<ApiResource>(); //ApiResource第一个参数是应用的名字,第二个参数是描述 resources.Add(new ApiResource("MsgAPI", "消息服务API")); resources.Add(new ApiResource("ProductAPI", "产品API")); return resources; } /// <summary> /// 返回客户端账号列表 /// </summary> /// <returns></returns> public static IEnumerable<Client> GetClients() { List<Client> clients = new List<Client>(); clients.Add(new Client { ClientId = "clientPC1",//API账号、客户端Id AllowedGrantTypes = GrantTypes.ResourceOwnerPassword, ClientSecrets = { new Secret("123321".Sha256())//秘钥 }, AllowedScopes = { "MsgAPI","ProductAPI",IdentityServerConstants.StandardScopes.OpenId, //必须要添加,否则报forbidden错误 IdentityServerConstants.StandardScopes.Profile }//这个账号支持访问哪些应用 }); return clients; } } } Startup.cs 的 ConfigureServices 修改为 public void ConfigureServices(IServiceCollection services) { var idResources = new List<IdentityResource> { new IdentityResources.OpenId(), //必须要添加,否则报无效的 scope 错误 new IdentityResources.Profile() }; services.AddIdentityServer() .AddDeveloperSigningCredential() .AddInMemoryIdentityResources(idResources) .AddInMemoryApiResources(Config.GetApiResources()) .AddInMemoryClients(Config.GetClients())// .AddResourceOwnerValidator<ResourceOwnerPasswordValidator>() .AddProfileService<ProfileService>(); } 主要是增加了 AddInMemoryIdentityResources 、 AddResourceOwnerValidator 、AddProfileService 2、 修改业务系统 以 MsgService 为例 Nuget -> Install-Package IdentityServer4.AccessTokenValidation 然后 Startup.cs 的 ConfigureServices 中增加 services.AddAuthentication("Bearer") .AddIdentityServerAuthentication(options => { options.Authority = "http://localhost:9500";//identity server 地址 options.RequireHttpsMetadata = false; }); Startup.cs 的 Configure 中增加 app.UseAuthentication(); 3、 请求 token 把报文头中的 grant_type 值改为 password,报文头增加 username、password 为用户名、密码。 像之前一样用返回的 access_token传递给请求的Authorization 中,在业务系统的 User中就可以获取到 ResourceOwnerPasswordValidator 中为用户设置的 claims 等信息了。 public void Send_MI(dynamic model) { string name = this.User.Identity.Name;//读取的就是"Name"这个特殊的 Claims 的值 string userId = this.User.FindFirst("UserId").Value; string realName = this.User.FindFirst("RealName").Value; string email = this.User.FindFirst("Email").Value; Console.WriteLine($"name={name},userId={userId},realName={realName},email={email}"); Console.WriteLine($"通过小米短信接口向{model.phoneNum}发送短信{model.msg}"); } 4、 独立登录服务器解决上面提到的“不能让客户端接触到 client_id、secret 的问题” 开发一个服务应用 LoginService public class RequestTokenParam { public string username { get; set; } public string password { get; set; } } using System.Collections.Generic; using System.Net.Http; using System.Threading.Tasks; using Microsoft.AspNetCore.Mvc; namespace LoginService.Controllers { [Route("api/[controller]")] [ApiController] public class LoginController : ControllerBase { [HttpPost] public async Task<ActionResult> RequestToken(RequestTokenParam model) { Dictionary<string, string> dict = new Dictionary<string, string>(); dict["client_id"] = "clientPC1"; dict["client_secret"] = "123321"; dict["grant_type"] = "password"; dict["username"] = model.username; dict["password"] = model.password; //由登录服务器向IdentityServer发请求获取Token using (HttpClient http = new HttpClient()) using (var content = new FormUrlEncodedContent(dict)) { var msg = await http.PostAsync("http://localhost:9500/connect/token", content); string result = await msg.Content.ReadAsStringAsync(); return Content(result, "application/json"); } } } } 这样客户端只要向 LoginService 的 /api/Login/ 发请求带上 json 报文体 {username:"yzk",password:"123"}即可。客户端就不知道 client_secret 这些机密信息了。 把 LoginService 配置到 Ocelot 中。 参考文章:https://www.cnblogs.com/jaycewu/p/7791102.html 注:此文章是我看杨中科老师的.Net Core微服务第二版和.Net Core微服务第二版课件整理出来的 现在的努力只是为了更好的将来,将来你一定不会后悔你现在的努力。一起加油吧!!! C#/.NetCore技术交流群:608188505欢迎加群交流 如果您认为这篇文章还不错或者有所收获,您可以点击右下角的【推荐】按钮精神支持,因为这种支持是我继续写作,分享的最大动力!
优秀的个人博客,低调大师

ASP.NET Core on K8S深入学习(3-2)DaemonSet与Job

​ 一、DaemonSet 1.1 DaemonSet是个啥? Deployment的部署可以指定副本Pod分布在多个Node节点上,且每个Node都可以运行多个Pod副本。而DaemonSet呢,它倔强地保证在每个Node上都只运行一个Pod副本。 回想一下项目经历,有哪些场景满足这个特质呢?是不是一些集群的日志、监控或者其他系统管理应用? 日志收集,比如fluentd,logstash等 系统监控,比如Prometheus Node Exporter,collectd,New Relic agent,Ganglia gmond等 系统程序,比如kube-proxy,kube-dns,glusterd,ceph等 Prometheus Node Exporter Dashboard 1.2 K8S中的DaemonSet 在K8S中,就有一些默认的使用DaemonSet方式运行的系统组件,比如我们可以通过下面一句命令查看: kubectl get daemonset --namespace=kube-system 可以看到,kube-flannel-ds 和 kube-proxy 是K8S以DaemonSet方式运行的系统组件,分别为K8S集群负责提供网络连接支持和代理支持,这里不深入讨论它们的详细情况,只需要了解它们负责什么就可以了。在通过查看Pod副本,看看各个节点的分布情况: kubectl get pod --namespace=kube-system -o wide 可以看到,它们两分布在各个Node节点上(这里是我的K8S集群中的所有节点了),且每个节点上只有一个Pod副本。 1.3DaemonSet的创建和运行 同之前的创建资源方式一样,仍然采用通过YAML配置文件的方式进行创建,只需要指定kind: DaemonSet即可: apiVersion: apps/v1 kind: DaemonSet 这里我们以Prometheus Node Exporter为例演示一下如何运行我们自己的DaemonSet。 _PS:_Prometheus是流行的系统监控方案,而Node Exporter负责收集节点上的metrics监控数据,并将数据推送给Prometheus。Prometheus则负责存储这些数据,Grafana最终将这些数据通过网页以图形的形式展现给用户。 下面是yaml配置文件对于DaemonSet资源清单的定义: apiVersion: apps/v1 kind: DaemonSet metadata: name: node-exporter-daemonset namespace: agent spec: selector: matchLabels: app: prometheus template: metadata: labels: app: prometheus spec: hostNetwork: true containers: - name: node-exporter image: prom/node-exporter imagePullPolicy: IfNotPresent command: - /bin/node_exporter - --path.procfs - /host/proc - --path.sysfs - /host/sys - --collector.filesystem.ignored-mount-points - ^/(sys|proc|dev|host|etc)($|/) volumeMounts: - name: proc mountPath: /host/proc - name: sys mountPath: /host/sys - name: root mountPath: /rootfs volumes: - name: proc hostPath: path: /proc - name: sys hostPath: path: /sys - name: root hostPath: path: / 这里暂且不纠结其中的配置内容,包括Host网络、容器启动命令以及Volume,后面会专题介绍。 同样,通过kubectl创建资源: kubectl apply -f node-exporter.yaml 然后,通过kubectl查看Pod分布情况: 可以看出,我们的Prometheus Node Exporter部署成功,且分别在两个Node节点都只部署了一个Pod副本。 二、Job 2.1 关于Job 对于ReplicaSet、Deployment、DaemonSet等类型的控制器而言,它希望Pod保持预期数目并且持久运行下去,除非用户明确删除,否则这些对象一直存在,因此可以说他们说持久服务型任务的。 对于非耐久性任务,比如压缩文件,任务完成后,Pod需要结束运行,不需要Ppod继续保持在系统中,这个时候就要用到Job。因此也可以说,Job是对ReplicaSet、Deployment、DaemonSet等持久性控制器的补充。 2.2 Job的创建与运行 同之前的创建资源方式一样,仍然采用通过YAML配置文件的方式进行创建,需要指定apiVersioin: batch 以及 kind: Job即可: apiVersion: batch/v1 (1)第一个Job 这里我们以一个简单的小Job为例,看看一个简单的Job:当Job启动后,只运行一个Pod,Pod运行结束后整个Job也就立刻结束。 apiVersion: batch/v1 kind: Job metadata: name: edc-job-hello-job namespace: jobs spec: template: metadata: labels: app: edc-job-hello-job spec: containers: - name: hello-job image: busybox imagePullPolicy: IfNotPresent command: ["echo", "hello edison's k8s job!"] restartPolicy: Never 这里需要注意的是,对Job而言,其restartPolicy只能为Never或者OnFailure,这也是它与其他控制器的差别(如Deployment控制器还允许设置为Always)。这个Job要执行的任务也很简单,就是输出一段话“hello edison's k8s job!”就结束其生命了。 _PS:_这里用到了一个busybox的镜像,busybox是一个软件工具箱,里边集成了Linux中几百个常用的Linux命令以及工具。如果我们只需要一个小型的Linux运行环境跑命令,完全可以使用这个busybox镜像,而不用拉取一个CentOS镜像。 通过查看Job运行情况可以知道,其运行结束就结束了,如下图所示,变成了Completed状态。 kubectl get pod -n jobs 还可以通过查看Log看看这个Job留下的足迹: kubectl get pod -n jobs --show-all kubectl logs edc-job-hello-job-whcts (2)并行Job 如果希望能够同时并行运行多个Pod以提高Job的执行效率,Job提供了一个贴心的配置:parallesim。例如下面的配置,我们将上面的小Job改为并行运行的Pod数量设置为3。 apiVersion: batch/v1 kind: Job metadata: name: edc-job-hello-job namespace: jobs spec: parallelism: 3 template: metadata: labels: app: edc-job-hello-job spec: containers: - name: hello-job image: busybox imagePullPolicy: IfNotPresent command: ["echo", "hello edison's k8s job!"] restartPolicy: OnFailure _PS:_默认parallelism值为1 使用上面的配置文件创建了资源后,通过以下命令查看验证: kubectl get job -n jobs kubectl get pod -o wide -n jobs 可以看出,Job一共启动了3个Pod,都是同时结束的(可以看到三个Pod的AGE都是相同的)。 此外,Job还提供了一个completions属性使我们可以设置Job完成的Pod总数,还是上面的例子: apiVersion: batch/v1 kind: Job metadata: name: edc-job-hello-job namespace: jobs spec: parallelism: 3 completions: 6 template: metadata: labels: app: edc-job-hello-job spec: containers: - name: hello-job image: busybox imagePullPolicy: IfNotPresent command: ["echo", "hello edison's k8s job!"] restartPolicy: OnFailure _PS:_默认completions也为1 上面的配置意思就是:每次运行3个Pod,直到总共有6个Pod就算成功完成。同样通过命令验证一下: 可以看到,状态和AGE都符合预期,第一批3个Pod的AGE为12s,第二批3个Pod的AGE为14s。 2.3 CronJob的创建与运行 我们都知道在Linux中,Cron程序可以定时执行任务,而在K8S中也提供了一个CronJob帮助我们实现定时任务。 继续以上面的例子,我们增加一些配置: apiVersion: batch/v1beta1 kind: CronJob metadata: name: edc-cron-job namespace: jobs spec: schedule: "*/1 * * * *" jobTemplate: spec: template: spec: containers: - name: cron-job image: busybox imagePullPolicy: IfNotPresent command: ["echo", "hello edison's k8s cron job!"] restartPolicy: OnFailure 上面加粗的配置是CronJob的独有配置,需要注意的是schedule,它的格式和Linux Cron一样,这里的"*/1 * * * *"代表每一分钟启动执行一次。对于CronJob,它需要的是jobTemplate来定义Job的模板。 同样,隔几分钟之后,通过命令来验证一下: 可以看到,在过去的三分钟里,每一分钟都启动了一个Pod,符合预期。 三、小结 Deployment可以满足我们大部分时候的应用部署(无状态服务类容器),但是针对一些特殊的场景应用,Deployment就无法胜任了。比如日志收集、系统监控等场景,就可以使用今天介绍的DaemonSet。又比如批处理定时任务,则可以使用今天介绍的Job/CronJob。 参考资料 (1)CloudMan,《每天5分钟玩转Kubernetes》 (2)李振良,《一天入门Kubernets教程》 (3)马哥(马永亮),《Kubernetes快速入门》 (4)阿龙,《Kubernetes系列-07.Pod控制器详解》 (5)elvis,《K8S-Job与CronJob的使用》 (6)五星上炕,《Kubernetes之Job详解》

资源下载

更多资源
优质分享App

优质分享App

近一个月的开发和优化,本站点的第一个app全新上线。该app采用极致压缩,本体才4.36MB。系统里面做了大量数据访问、缓存优化。方便用户在手机上查看文章。后续会推出HarmonyOS的适配版本。

Nacos

Nacos

Nacos /nɑ:kəʊs/ 是 Dynamic Naming and Configuration Service 的首字母简称,一个易于构建 AI Agent 应用的动态服务发现、配置管理和AI智能体管理平台。Nacos 致力于帮助您发现、配置和管理微服务及AI智能体应用。Nacos 提供了一组简单易用的特性集,帮助您快速实现动态服务发现、服务配置、服务元数据、流量管理。Nacos 帮助您更敏捷和容易地构建、交付和管理微服务平台。

Spring

Spring

Spring框架(Spring Framework)是由Rod Johnson于2002年提出的开源Java企业级应用框架,旨在通过使用JavaBean替代传统EJB实现方式降低企业级编程开发的复杂性。该框架基于简单性、可测试性和松耦合性设计理念,提供核心容器、应用上下文、数据访问集成等模块,支持整合Hibernate、Struts等第三方框架,其适用范围不仅限于服务器端开发,绝大多数Java应用均可从中受益。

Rocky Linux

Rocky Linux

Rocky Linux(中文名:洛基)是由Gregory Kurtzer于2020年12月发起的企业级Linux发行版,作为CentOS稳定版停止维护后与RHEL(Red Hat Enterprise Linux)完全兼容的开源替代方案,由社区拥有并管理,支持x86_64、aarch64等架构。其通过重新编译RHEL源代码提供长期稳定性,采用模块化包装和SELinux安全架构,默认包含GNOME桌面环境及XFS文件系统,支持十年生命周期更新。

用户登录
用户注册