【Android UI设计与开发】4.底部菜单栏(一)Fragment介绍和简单实现
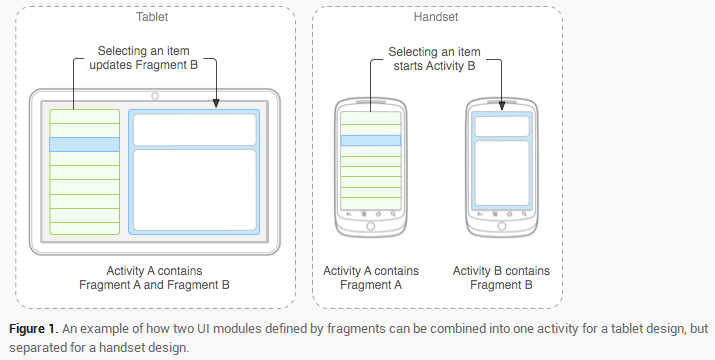
TabActivity在Android4.0以后已经被完全弃用,取而代之的是Fragment。Fragment是Android3.0新增的概念,Fragment翻译成中文是碎片的意思,不过却和Activity十分的相似。以下内容适用于3.0及以上的版本,3.0以下就不再赘述。 官方文档地址:http://developer.android.com/reference/android/support/v4/app/Fragment.html 一、Fragment的基础知识介绍 1.Fragment的特性 Android是在Android 3.0 (API level 11)开始引入Fragment的。 可以把Fragment想成Activity中的模块,这个模块有自己的布局,有自己的生命周期,单独处理自己的输入,在Activity运行的时候可以加载或者移除Fragment模块。 可以把Fragment设计成可以在多个Activity中复用的模块。 当开发的应用程序同时适用于平板电脑和手机时,可以利用Fragment实现灵活的布局,改善用户体验。如图: 2.Fragment的生命周期 因为Fragment必须嵌入在Acitivity中使用,所以Fragment的生命周期和它所在的Activity是密切相关的。 如果Activity是暂停状态,其中所有的Fragment都是暂停状态;如果Activity是stopped状态,这个Activity中所有的Fragment都不能被启动;如果Activity被销毁,那么它其中的所有Fragment都会被销毁。 但是,当Activity在活动状态,可以独立控制Fragment的状态,比如加上或者移除Fragment。 当这样进行fragment transaction(转换)的时候,可以把fragment放入Activity的back stack中,这样用户就可以进行返回操作。 3.Fragment的使用相关 使用Fragment时,需要继承Fragment或者Fragment的子类(DialogFragment, ListFragment, PreferenceFragment, WebViewFragment),所以Fragment的代码看起来和Activity的类似。 (1)使用Support Library Support Library是一个提供了API库函数的JAR文件,这样就可以在旧版本的Android上使用一些新版本的APIs。 比如android-support-v4.jar,它的完整路径是:<sdk>/extras/android/support/v4/android-support-v4.jar. 它就提供了Fragment的APIs,使得在Android 1.6 (API level 4)以上的系统都可以使用Fragment。 为了确定没有在旧版本系统上使用新版本的APIs,需要如下导入语句: import android.support.v4.app.Fragment; import android.support.v4.app.FragmentManager; 同时应该将上述的包拷入libs项目下的libs文件夹,然后在项目的Properties中添加:右键单击项目,选Properties,左边选Java Build Path,然后Add External JARs…,添加android-support-v4.jar. 当创建包含Fragment的Activity时,如果用的是Support Library,那么继承的就应该是FragmentActivity而不是Activity。 (2)一般必须实现的三个回调函数 onCreate() 系统在创建Fragment的时候调用这个方法,这里应该初始化相关的组件,一些即便是被暂停或者被停止时依然需要保留的东西。 onCreateView() 当第一次绘制Fragment的UI时系统调用这个方法,必须返回一个View,如果Fragment不提供UI也可以返回null。 注意,如果继承自ListFragment,onCreateView()默认的实现会返回一个ListView,所以不用自己实现。 onPause() 当用户离开Fragment时第一个调用这个方法,需要提交一些变化,因为用户很可能不再返回来。 (3)实现Fragment的UI 提供Fragment的UI,必须实现onCreateView()方法。 假设Fragment的布局设置写在frag_list.xml资源文件中,那么onCreateView()方法可以如下写: public class FragementList extends Fragment{ /** * 显示指定的视图 * @inflater resource ID,指明了当前的Fragment对应的资源文件 * @container 该Fragment在Activity中的父容器控件 * @savedInstanceState 是否连接该布局和其父容器控件,在这里的情况设置为false,因为系统已经插入了这个布局到父控件,设置为true将会产生多余的一个View Group。 */ @Override public View onCreateView(LayoutInflater inflater, ViewGroup container, Bundle savedInstanceState) { return inflater.inflate(R.layout.frag_list, container, false); } } (4)把Fragment加入Activity 当Fragment被加入Activity中时,它会处在对应的View Group中。 Fragment有两种加载方式:一种是在Activity的layout中使用标签<fragment>声明;另一种方法是在代码中把它加入到一个指定的ViewGroup中。 另外,Fragment它可以并不是Activity布局中的任何一部分,它可以是一个不可见的部分。 加载方式1:通过Activity的布局文件将Fragment加入Activity 在Activity的布局文件中,将Fragment作为一个子标签加入即可。 <LinearLayout xmlns:android="http://schemas.android.com/apk/res/android" android:layout_width="match_parent" android:layout_height="match_parent" android:baselineAligned="false" android:orientation="horizontal" > <fragment android:id="@+id/frag_list" android:name="com.yanis.ui.FragementList" android:layout_width="wrap_content" android:layout_height="match_parent" android:layout_weight="1" /> <fragment android:id="@+id/frag_detail" android:name="com.yanis.ui.FragementDetails" android:layout_width="wrap_content" android:layout_height="match_parent" android:layout_weight="2" /> </LinearLayout> 其中android:name属性填上创建的fragment的完整类名。 当系统创建这个Activity的布局文件时,系统会实例化每一个fragment,并且调用它们的onCreateView()方法,来获得相应fragment的布局,并将返回值插入fragment标签所在的地方。 有三种方法为Fragment提供ID: android:id属性:唯一的id android:tag属性:唯一的字符串 如果上面两个都没提供,系统使用容器view的ID。 加载方式2:通过编程的方式将Fragment加入到一个ViewGroup中 当Activity处于Running状态下的时候,可以在Activity的布局中动态地加入Fragment,只需要指定加入这个Fragment的父View Group即可。 首先,需要一个FragmentTransaction实例: FragmentManager fragmentManager = getFragmentManager() FragmentTransaction fragmentTransaction = fragmentManager.beginTransaction(); (注,如果import android.support.v4.app.FragmentManager;即用的是Support Library,那么使用的是:FragmentManager fragmentManager = getSupportFragmentManager();) 之后,用add()方法加上Fragment的对象: ExampleFragment fragment = new ExampleFragment(); fragmentTransaction.add(R.id.fragment_container, fragment); fragmentTransaction.commit(); 其中第一个参数是这个fragment的容器,即父控件组。 最后需要调用commit()方法使得FragmentTransaction实例的改变生效。 4.来个简单栗子吧 方式一:通过Activity的布局文件将Fragment加入Activity 效果图如下: 布局文件如下: <LinearLayout xmlns:android="http://schemas.android.com/apk/res/android" android:layout_width="match_parent" android:layout_height="match_parent" android:baselineAligned="false" android:orientation="horizontal" > <fragment android:id="@+id/frag_list" android:name="com.yanis.ui.FragementList" android:layout_width="wrap_content" android:layout_height="match_parent" android:layout_weight="1" /> <fragment android:id="@+id/frag_detail" android:name="com.yanis.ui.FragementDetails" android:layout_width="wrap_content" android:layout_height="match_parent" android:layout_weight="2" /> </LinearLayout> 方式二:通过编程的方式将Fragment加入到一个ViewGroup中 效果图如下: 1.主页面布局文件如下 <LinearLayout xmlns:android="http://schemas.android.com/apk/res/android" android:layout_width="match_parent" android:layout_height="match_parent" android:baselineAligned="false" android:orientation="horizontal" > <LinearLayout android:id="@+id/frag_list" android:layout_width="wrap_content" android:layout_height="match_parent" android:layout_weight="1" android:orientation="vertical"> <TextView android:layout_width="match_parent" android:layout_height="wrap_content" android:text="List" /> </LinearLayout> <LinearLayout android:id="@+id/frag_detail" android:orientation="vertical" android:layout_width="wrap_content" android:layout_height="match_parent" android:layout_weight="2" > <TextView android:layout_width="match_parent" android:layout_height="wrap_content" android:text="Details" /> </LinearLayout> </LinearLayout> 2.Activity类代码如下: package com.yanis.ui; import android.os.Bundle; import android.support.v4.app.FragmentActivity; import android.support.v4.app.FragmentManager; import android.support.v4.app.FragmentTransaction; public class MainActivity extends FragmentActivity { @Override protected void onCreate(Bundle savedInstanceState) { super.onCreate(savedInstanceState); //setContentView(R.layout.activity_main); setContentView(R.layout.activity_maino); FragmentManager fragmentManager = getSupportFragmentManager(); FragmentTransaction fragmentTransaction = fragmentManager .beginTransaction(); FragementList fragment1 = new FragementList(); fragmentTransaction.add(R.id.frag_list, fragment1); FragementDetails fragment2 = new FragementDetails(); fragmentTransaction.add(R.id.frag_detail, fragment2); fragmentTransaction.commit(); } } 本文转自叶超Luka博客园博客,原文链接:http://www.cnblogs.com/yc-755909659/p/4284586.html,如需转载请自行联系原作者