首页 文章 精选 留言 我的

精选列表

搜索[AGI开发],共10000篇文章
优秀的个人博客,低调大师

Android -- NDK开发入门

第一步,建立一个普通的Android项目HelloNDK,然后在与src同一级的目录下新建一个jni目录; 第二步,在jni目录下新建一个hello_ndk.c文件,代码如下: #include <string.h> #include <stdio.h> #include <stdlib.h> #include <unistd.h> #include <sys/ioctl.h> #include <sys/types.h> #include <sys/stat.h> #include <fcntl.h> #include <jni.h> #include <android/log.h> /********获取字符串************* */ jstring Java_com_example_hellondk_MainActivity_readJNIString( JNIEnv* env, jobject obj) { return (*env)->NewStringUTF(env, "Hello from JNI --- 22222 !"); } 说明如下: Java_com_example_hellondk_MainActivity_readJNIString // 方法名,由三部分组成,Java + [com_example_hellondk_HelloNDKActivity](包名+activity名) + [readJNIString](在java代码中调用的方法名) (*env)->NewStringUTF(env, "Hello from JNI --- 22222 !"); //在java中接收的返回值,不能直接return,一定要调用(*env)->NewStringUTF()这个方法返回 第三步,在jni目录下新建一个Android.mk文件,代码如下: LOCAL_PATH := $(call my-dir) include $(CLEAR_VARS) LOCAL_MODULE := hello_ndk LOCAL_SRC_FILES := hello_ndk.c LOCAL_LDLIBS := -llog include $(BUILD_SHARED_LIBRARY) 说明如下: LOCAL_MODULE := hello_ndk //这个与生成.so文件名有关,和导入Native Support的.so文件有关 LOCAL_SRC_FILES := hello_ndk.c //这个是读取相关的C文件名 第四步,配置android项目的native support,选中项目右键Android Tools--Add Native Support, 打开Add Android Native Support对话框,输入第三步中配置的LOACL_MODULE的值,如下图: 第五步,修改MainActivity.java文件,代码如下: package com.example.hellondk; import android.os.Bundle; import android.app.Activity; import android.view.Menu; import android.widget.TextView; public class MainActivity extends Activity { TextView mTestTv; @Override protected void onCreate(Bundle savedInstanceState) { super.onCreate(savedInstanceState); setContentView(R.layout.activity_main); mTestTv = (TextView)findViewById(R.id.test_tv); mTestTv.setText(readJNIString()); } private native String readJNIString(); static { System.loadLibrary("hello_ndk");//引入hello_ndk.so } @Override public boolean onCreateOptionsMenu(Menu menu) { // Inflate the menu; this adds items to the action bar if it is present. getMenuInflater().inflate(R.menu.main, menu); return true; } } 说明如下: 项目运行的时候首先会执行static里面的方法,引入hello_ndk.so,然后执行onCreate里的方法,读取C文件里的方法获取返回值并显示在TextView控件上。 第六步,运行Android Application项目,程序会首先生成.so文件,成功后继续运行android项目,生成.so的过程如下: 我是天王盖地虎的分割线 本文转自我爱物联网博客园博客,原文链接:http://www.cnblogs.com/yydcdut/p/3908734.html,如需转载请自行联系原作者

优秀的个人博客,低调大师

IOS开发博客学习

M了个J :http://www.cnblogs.com/mjios/tag/objective-c/ http://www.cnblogs.com/tianjian/p/3358602.html Cocos2d-x VS环境配置 泰然论坛:http://www.ityran.com/archives/category/cocos2d-iphone 1.http://www.cnblogs.com/zilongshanren/archive/2011/09/19/2181558.html 非常适用的入门教程 2.http://www.cnblogs.com/BigPolarBear/tag/iOS/ 3.一些相应的环境配置,以及简单语法介绍,适合入门 http://blog.csdn.net/xiaominghimi/article/details/6937685 http://blog.csdn.net/sdhjob/article/details/8173176 沈大海 4.Cocos2d-x的使用 http://cocos2d.cocoachina.com/ http://cocos2d.cocoachina.com/resource 重要的博客http://blog.csdn.net/honghaier/article/details/7887873 Cocos2d-x视频教程 http://www.tudou.com/plcover/Yofz8yOj62c/ 5.http://www.cnblogs.com/zilongshanren/archive/2012/02/17/2356516.htm http://www.cnblogs.com/zilongshanren/tag/cocos2d/ 8.http://blog.csdn.net/honghaier/article/details/7887873重点 OC知识点 1.http://rzchina.blog.163.com/blog/#m=0&t=1&c=fks_084069084082083074087082094095085094080066084083087074083 本文转自夏雪冬日博客园博客,原文链接:http://www.cnblogs.com/heyonggang/p/3351269.html,如需转载请自行联系原作者

优秀的个人博客,低调大师

iOS开发-状态模式

状态模式允许对象内部状态改变时改变它的行为,对象看起来好像修改了它的类。状态模式看起来和策略模式比较相像,策略模式是将可以互换的行为封装起来,然后通过使用委托的方式,决定使用哪一个行为,状态也是封装行为,不同的是可以将行为委托到当前状态。一个需要从外部设置,一个是内部通过状态变更达到行为变成的目的。 基础知识 状态模式的UML类图: State封装基本的状态行为,我们通过Cotext上下文持有状态子类的实例,外部发起请求,我们就可以委托状态进行处理。地铁里面一般都有自动饮料售卖机,我们将所有的饮料都当做商品来看,我们如果需要买饮料需要两步,投币,取货,如果没有商品还可以退钱三种行为,关于自动售卖机的存在无钱状态,有钱状态,售卖中状态,已售罄状态四种状态,稍微思考一下,可以看下面的具体实现。 设计实战 状态行为基类: @protocol StateProtocol <NSObject> @optional -(void)putMoney; @optional -(void)ejectMoney; @optional -(void)pressButton; @optional -(void)distribute; @end @interface State : NSObject<StateProtocol> @end 售卖机处于无钱状态(NoMoneyState): @protocol NoMoneyDelegate <NSObject> -(void)setCurrentState:(State *)currentState; -(State *)geHasMoneyState; @end //没钱状态 @interface NoMoneyState : State @property (weak,nonatomic) id<NoMoneyDelegate> delegate; @end @implementation NoMoneyState -(void)putMoney{ NSLog(@"NoMoneyState-putMoney:投放钱币"); [self.delegate setCurrentState:[self.delegate geHasMoneyState]]; } -(void)ejectMoney{ NSLog(@"NoMoneyState-ejectMoney:没有投入钱币,无法退钱"); } -(void)pressButton{ NSLog(@"NoMoneyState-pressButton:请先投币"); } -(void)distribute{ NSLog(@"NoMoneyState-pressButton:请投币"); } @end 售卖机处于有钱状态(HasMoneyState): @protocol HasMoneyDelegate <NSObject> -(void)setCurrentState:(State *)currentState; -(State *)getNoMoneyState; -(State *)getSoldState; @end //有钱状态 @interface HasMoneyState : State @property (weak,nonatomic) id<HasMoneyDelegate> delegate; @end @implementation HasMoneyState -(void)putMoney{ NSLog(@"HasMoneyState-putMoney:已经投入了钱,暂不支持投入"); } -(void)ejectMoney{ NSLog(@"HasMoneyState-ejectMoney:退钱,重新设置售卖机为无前状态"); [self.delegate setCurrentState:[self.delegate getNoMoneyState]]; } -(void)pressButton{ NSLog(@"HasMoneyState-pressButton:按钮按下,取货"); [self.delegate setCurrentState:[self.delegate getSoldState]]; } -(void)distribute{ NSLog(@"HasMoneyState-distribute:无法进行取出商品"); } @end 售卖机处于售卖状态: @protocol SoldDelegate <NSObject> -(void)setCurrentState:(State *)currentState; -(void)realseProduct; -(NSInteger)getCurrentCount; -(State *)getNoMoneyState; -(State *)getSoldOutState; @end //售出状态 @interface SoldState : State @property (weak,nonatomic) id<SoldDelegate> delegate; @end @implementation SoldState -(void)putMoney{ NSLog(@"SoldState-putMoney:请稍后,正在进行商品出售"); } -(void)ejectMoney{ NSLog(@"SoldState-putMoney:请稍后,正在进行商品出售,无法退钱"); } -(void)pressButton{ NSLog(@"SoldState-putMoney:请在取出物品之后重新投币"); } -(void)distribute{ [self.delegate realseProduct]; if ([self.delegate getCurrentCount]) { [self.delegate setCurrentState:[self.delegate getNoMoneyState]]; }else{ [self.delegate setCurrentState:[self.delegate getSoldOutState]]; } } @end 售罄状态(SoldOutState): @protocol SoldOutDelegate <NSObject> -(void)setCurrentState:(State *)currentState; @end //售罄状态 @interface SoldOutState : State @property (weak,nonatomic) id<SoldOutDelegate> delegate; @end @implementation SoldOutState -(void)putMoney{ NSLog(@"SoldOutState-PutMoney:已售罄"); } -(void)ejectMoney{ NSLog(@"SoldOutState-ejectMoney:无法退钱"); } -(void)pressButton{ NSLog(@"SoldOutState-pressButton:无法售出"); } -(void)distribute{ NSLog(@"SoldOutState-distribute:无法分发"); } @end 售卖机(SaleMachine): @interface SaleMachine : NSObject<NoMoneyDelegate,HasMoneyDelegate,SoldOutDelegate,SoldDelegate> @property (strong,nonatomic) NoMoneyState *noMoneyState; @property (strong,nonatomic) HasMoneyState *hasMoneyState; @property (strong,nonatomic) SoldOutState *soldOutState; @property (strong,nonatomic) SoldState *soldState; -(instancetype)initWithCount:(NSInteger)count; -(void)setCurrentState:(State *)currentState; -(void)putMoney; -(void)ejectMoney; -(void)pressButton; @end @interface SaleMachine() @property (strong,nonatomic) State *state; @property (assign,nonatomic) NSInteger productCount; @end @implementation SaleMachine -(instancetype)initWithCount:(NSInteger)count{ self=[super init]; if (self) { self.noMoneyState=[[NoMoneyState alloc]init]; self.noMoneyState.delegate=self; self.hasMoneyState=[[HasMoneyState alloc]init]; self.hasMoneyState.delegate=self; self.soldState=[[SoldState alloc]init]; self.soldState.delegate=self; self.soldOutState=[[SoldOutState alloc]init]; self.soldOutState.delegate=self; self.productCount=count; if (count) { self.state=self.noMoneyState; } } return self; } -(void)putMoney{ [self.state putMoney]; } -(void)ejectMoney{ [self.state ejectMoney]; } -(void)pressButton{ [self.state pressButton]; [self.state distribute]; } -(void)setCurrentState:(State *)currentState{ self.state=currentState; } #pragma mark - NoMoenyDelegate -(State *)geHasMoneyState{ return self.hasMoneyState; } #pragma mark - HasMoneyDelegate -(State *)getNoMoneyState{ return self.noMoneyState; } -(State *)getSoldState{ return self.soldState; } #pragma mark - SoldDelegate -(void)realseProduct{ NSLog(@"SoldDelegate-realseProduct:商品售出"); if (self.productCount) { self.productCount-=1; } } -(State *)getSoldOutState{ return self.soldOutState; } -(NSInteger)getCurrentCount{ return self.productCount; } @end 测试: SaleMachine *machine=[[SaleMachine alloc]initWithCount:1]; [machine putMoney]; [machine ejectMoney]; [machine putMoney]; [machine pressButton]; SaleMachine *next=[[SaleMachine alloc]initWithCount:1]; [next putMoney]; [next ejectMoney]; 测试效果: 状态模式的优缺点: 优点:状态模式允许一个对象基于内部状态有不同的行为,将行为委托给状态对象执行,状态转化可以由Context也可以由状态行为控制,比较灵活; 缺点:状态模式的使用必然会增加系统类和对象的个数。状态模式的结构与实现都较为复杂,如果使用不当将导致程序结构和代码的混乱。 本文转自Fly_Elephant博客园博客,原文链接:http://www.cnblogs.com/xiaofeixiang/p/5135479.html,如需转载请自行联系原作者


优秀的个人博客,低调大师

iOS开发-automaticallyAdjustsScrollViewInsets属性

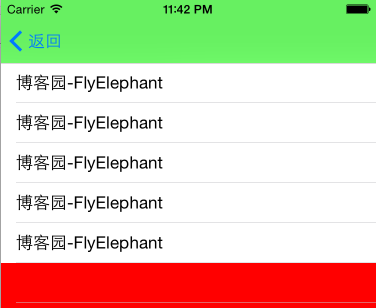
最近遇到一个问题是这样的,App一般自己都会有一个UINavigationController,顶部TableView如果有tableHeaderView如果设置起始位置是(0,0)是在导航栏的下面的,为了更好地UI希望从屏幕的(0,0)开始,就遇到了上面的这个问题,简单的看一下效果: 主要代码如下: 1 2 3 4 5 6 7 8 9 10 11 12 13 14 15 16 17 18 19 20 21 22 23 24 25 - (UITableView *)tableView { if (!_tableView) { _tableView = [[UITableView alloc] initWithFrame:CGRectMake(0, 0, CGRectGetWidth( self .view.bounds), CGRectGetHeight( self .view.bounds)) style:UITableViewStylePlain]; // _tableView.tableFooterView = [[UIView alloc] init]; _tableView.rowHeight =40.0; _tableView.sectionHeaderHeight = 0.0; _tableView.sectionFooterHeight = 0.0; _tableView.dataSource = self ; _tableView.delegate = self ; } return _tableView; } -( NSInteger )tableView:(UITableView *)tableView numberOfRowsInSection:( NSInteger )section{ return 5; } //http://www.cnblogs.com/xiaofeixiang 技术交流:228407086 -(UITableViewCell *)tableView:(UITableView *)tableView cellForRowAtIndexPath:( NSIndexPath *)indexPath{ UITableViewCell *cell=[[UITableViewCell alloc]init]; cell.textLabel.text=@ "博客园-FlyElephant" ; return cell; } 这个时候设置automaticallyAdjustsScrollViewInsets效果如下: 官方文档解释如下: 1 2 3 4 5 6 7 8 9 10 11 12 A Boolean value that indicates whether the view controller should automatically adjust its scroll view insets. Declaration SWIFT var automaticallyAdjustsScrollViewInsets: Bool OBJECTIVE-C @property ( nonatomic , assign) BOOL automaticallyAdjustsScrollViewInsets Discussion The default value of this property is YES , which allows the view controller to adjust its scroll view insets in response to the screen areas consumed by the status bar, navigation bar, and toolbar or tab bar. Set to NO if you want to manage scroll view inset adjustments yourself, such as when there is more than one scroll view in the view hierarchy. Availability Available in iOS 7.0 and later. 简单点说就是automaticallyAdjustsScrollViewInsets根据按所在界面的status bar,navigationbar,与tabbar的高度,自动调整scrollview的 inset,设置为no,不让viewController调整,我们自己修改布局即可~ 本文转自Fly_Elephant博客园博客,原文链接:http://www.cnblogs.com/xiaofeixiang/p/4655932.html,如需转载请自行联系原作者

资源下载

更多资源
腾讯云软件源

腾讯云软件源

为解决软件依赖安装时官方源访问速度慢的问题,腾讯云为一些软件搭建了缓存服务。您可以通过使用腾讯云软件源站来提升依赖包的安装速度。为了方便用户自由搭建服务架构,目前腾讯云软件源站支持公网访问和内网访问。

Nacos

Nacos

Nacos /nɑ:kəʊs/ 是 Dynamic Naming and Configuration Service 的首字母简称,一个易于构建 AI Agent 应用的动态服务发现、配置管理和AI智能体管理平台。Nacos 致力于帮助您发现、配置和管理微服务及AI智能体应用。Nacos 提供了一组简单易用的特性集,帮助您快速实现动态服务发现、服务配置、服务元数据、流量管理。Nacos 帮助您更敏捷和容易地构建、交付和管理微服务平台。

Spring

Spring

Spring框架(Spring Framework)是由Rod Johnson于2002年提出的开源Java企业级应用框架,旨在通过使用JavaBean替代传统EJB实现方式降低企业级编程开发的复杂性。该框架基于简单性、可测试性和松耦合性设计理念,提供核心容器、应用上下文、数据访问集成等模块,支持整合Hibernate、Struts等第三方框架,其适用范围不仅限于服务器端开发,绝大多数Java应用均可从中受益。

Rocky Linux

Rocky Linux

Rocky Linux(中文名:洛基)是由Gregory Kurtzer于2020年12月发起的企业级Linux发行版,作为CentOS稳定版停止维护后与RHEL(Red Hat Enterprise Linux)完全兼容的开源替代方案,由社区拥有并管理,支持x86_64、aarch64等架构。其通过重新编译RHEL源代码提供长期稳定性,采用模块化包装和SELinux安全架构,默认包含GNOME桌面环境及XFS文件系统,支持十年生命周期更新。

用户登录
用户注册