首页 文章 精选 留言 我的

精选列表

搜索[本地部署],共10012篇文章
优秀的个人博客,低调大师

部署Docker

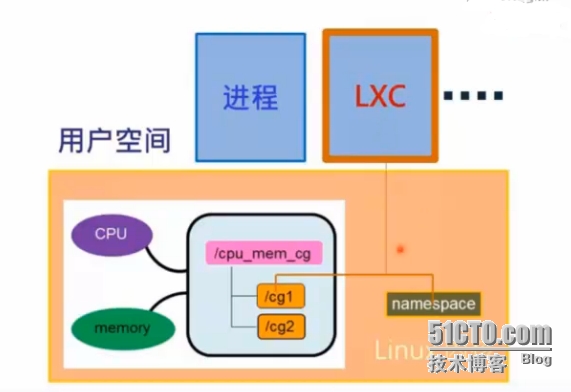
一、简介 Docker 是一个开源的应用容器引擎,让开发者可以打包他们的应用以及依赖包到一个可移植的容器中,然后发布到任何流行的 Linux 机器上,也可以实现虚拟化。容器是完全使用沙箱机制,相互之间不会有任何接口(类似 iPhone 的 app)。几乎没有性能开销,可以很容易地在机器和数据中心中运行。 Docker的理念:一个容器只运行一个服务 Docker官网口号包含了Build,Shipand Run Any App,Anywhere,即任何应用,都可以构建、发布、运行于任何环境,将环境的影响因素降至最低,统一地掌控整个应用的生命周期。 Docker的官方文档:http://docs.docker.com/ 二、安装 1 2 3 4 5 6 7 8 9 10 11 12 13 14 15 16 17 18 19 1 、安装epel源 注释:默认CentOS6.x提供的yum源里没有docker的安装包,在这里我们借助EPEL源。 #rpm-ivhhttp://dl.fedoraproject.org/pub/epel/6/x86_64/epel-release-6-8.noarch.rpm #sed-i's@^#@@'/etc/yum.repos.d/epel.repo #sed-i's@mirrorlist@#mirrorlist@'/etc/yum.repos.d/epel.repo 2 、安装docker #yum-yremovedocker #yuminstalldocker-io 3 、启动docker守护进程 #servicedockerstart #chkconfigdockeron 4 、检查docker是否已经正确安装并运行 #dockerinfo 5 、查看docker的版本 #docker-v 三、命令参数 1、docker命令帮助参数 1 2 3 4 5 6 7 8 9 10 11 12 13 14 15 16 17 18 19 20 21 22 23 24 25 26 27 28 29 30 31 32 33 34 35 36 37 38 39 40 41 [root@localhost~] #docker Usage:docker[OPTIONS]COMMAND[arg...] Commands: attachAttachtoarunningcontainer buildBuildanimage from aDockerfile commitCreateanewimage from acontainer'schanges cpCopyfiles / folders from acontainer'sfilesystemtothehostpath createCreateanewcontainer diffInspectchangesonacontainer'sfilesystem eventsGetrealtimeevents from theserver exec Runacommand in arunningcontainer exportStreamthecontentsofacontainerasatararchive historyShowthehistoryofanimage images List images import Createanewfilesystemimage from thecontentsofatarball infoDisplaysystem - wideinformation inspectReturnlow - levelinformationonacontainer killKillarunningcontainer loadLoadanimage from atararchive loginRegister or log in toaDockerregistryserver logoutLogout from aDockerregistryserver logsFetchthelogsofacontainer portLookupthepublic - facingportthat is NAT - edtoPRIVATE_PORT pausePause all processeswithinacontainer ps List containers pullPullanimage or arepository from aDockerregistryserver pushPushanimage or arepositorytoaDockerregistryserver restartRestartarunningcontainer rmRemoveone or morecontainers rmiRemoveone or moreimages runRunacommand in anewcontainer saveSaveanimagetoatararchive searchSearch for animageontheDockerHub startStartastoppedcontainer stopStoparunningcontainer tagTaganimageintoarepository topLookuptherunningprocessesofacontainer unpauseUnpauseapausedcontainer versionShowtheDockerversioninformation waitBlockuntilacontainerstops,then print itsexitcode 2、比较常用命令参数 1 2 3 4 5 6 7 8 9 10 11 12 13 14 15 16 17 18 19 20 21 22 23 24 25 26 27 28 29 30 31 32 33 34 35 36 37 38 39 40 41 42 43 44 45 46 47 48 49 50 51 52 53 54 55 56 查看Docker的版本信息 #dockerversion 在DockerHub上搜索一个指定镜像 #dockersearch 在DockerHub上搜索一个指定镜像并至少有10颗星 #dockersearch-s10ubuntu 从一个Docker的注册服务器上拉取一个镜像或一个私有仓库 #dockerpullubuntu 查看镜像列表 #dockerimages 在一个新的容器中运行一个命令 #dockerrun 移除一个或多个镜像 #dockerrmi 移除一个或多个容器 #dockerrm 附着一个运行的容器 #dockerattach 运行一个命令在一个运行的容器中 #dockerexec 从一个Dockerfile文件中构建一个镜像 #dockerbuild 查看镜像构建历史 #dockerhistory 查看容器更为详细的配置信息 #dockerinspect 保存一个镜像对归档 tar 中 #dockersave 从一个归档 tar 中加载一个镜像 #dockerload 启动、停止、重启一个运行的容器 #dockerstart|stop|restart 杀掉一个正在运行的容器 #dockerkill 额外补充 进入容器命令: dockerattach:登陆到运行的容器中 docker exec :在宿主机上运行命令到容器内部,类似在打开一个容器的终端 dockernsenter:连接到容器,需要容器PID 四、创建ssh镜像和镜像打包 1、从Docker Hub上下载ubuntu镜像 1 2 3 4 [root@localhost~] #dockerpullubuntu:14.04 [root@localhost~] #dockerimages REPOSITORYTAGIMAGEIDCREATEDVIRTUALSIZE ubuntu14.04b7cf8f0d9e823daysago188.3MB 2、基于镜像创建一个容器 1 2 3 4 [root@localhost~] #dockerrun-itubuntu:14.04/bin/bash [root@localhost~] #dockerps-a CONTAINERIDIMAGECOMMANDCREATEDSTATUSPORTSNAMES 88b6a8dfae4eubuntu:14.04 "/bin/bash" 3minutesagoUp3minutesmodest_yalow 3、进入容器安装ssh服务 1 2 3 4 5 6 7 8 9 root@88b6a8dfae4e:/ #apt-getupdate&&apt-getinstall-yopenssh-server root@0af7ccfd906e:/ #echo'root:redhat'|chpasswd root@10dbbd22172d:/ #mkdir/var/run/sshd root@10dbbd22172d:/ #sed-i's/PermitRootLoginwithout-password/PermitRootLoginyes/'/etc/ssh/sshd_config root@10dbbd22172d:/ #sed's@session\s*required\s*pam_loginuid.so@sessionoptionalpam_loginuid.so@g'-i/etc/pam.d/sshd root@10dbbd22172d:/ #exit [root@localhost~] #dockerps-l CONTAINERIDIMAGECOMMANDCREATEDSTATUSPORTSNAMES 88b6a8dfae4eubuntu:14.04 "/bin/bash" 10minutesagoExited(130)18secondsagomodest_yalow 4、构建一个ssh的镜像 1 2 3 4 5 6 [root@localhost~] #dockercommit88b6a8dfae4ezhengyas/ubuntu:sshd 3f2225df36ff67cbda098318e83128f3965758eba3e4609a094c172b0c3b03c4 [root@localhost~] #dockerimages REPOSITORYTAGIMAGEIDCREATEDVIRTUALSIZE zhengyas /ubuntu sshd3f2225df36ff21secondsago251.1MB ubuntu14.04b7cf8f0d9e823daysago188.3MB 5、基于新镜像运行一个ssh容器 1 2 3 4 5 [root@localhost~] #dockerrun-d-p2222:22zhengyas/ubuntu:sshd/usr/sbin/sshd-D 7ef47903cdb77ad9d98fd0dd3b102473d10ad3abea5311c030177db9ea9984c1 [root@localhost~] #dockerps-l CONTAINERIDIMAGECOMMANDCREATEDSTATUSPORTSNAMES 7ef47903cdb7zhengyas /ubuntu :sshd "/usr/sbin/sshd-D" 4secondsagoUp4seconds0.0.0.0:2222->22 /tcp hungry_ritchie 6、测试ssh容器是否能够正常连接 1 2 3 4 5 6 7 8 9 10 11 12 13 14 15 16 17 18 19 20 21 22 23 24 25 26 27 28 29 30 31 32 33 34 35 36 37 [root@localhost~] #sshroot192.168.0.104-p2222 ssh :Couldnotresolve hostname root192.168.0.104:Nameorservicenotknown [root@localhost~] #sshroot@192.168.0.104-p2222 Theauthenticityofhost '[192.168.0.104]:2222([192.168.0.104]:2222)' can'tbeestablished. RSAkeyfingerprintis0e:1e:4e:67:f3:4b:5a:c4:c2:f5:7b:e7:f0:2e:14:72. Areyousureyouwantto continue connecting( yes /no )? yes Warning:Permanentlyadded '[192.168.0.104]:2222' (RSA)tothelistofknownhosts. root@192.168.0.104'spassword: WelcometoUbuntu14.04LTS(GNU /Linux 3.2.0-61-genericx86_64) *Documentation:https: //help .ubuntu.com/ TheprogramsincludedwiththeUbuntusystemare free software; theexactdistributionterms for eachprogramaredescribed in the individualfiles in /usr/share/doc/ * /copyright . UbuntucomeswithABSOLUTELYNOWARRANTY,totheextentpermittedby applicablelaw. root@7ef47903cdb7:~ #ifconfig eth0Linkencap:EthernetHWaddr02:42:ac:11:00:03 inetaddr:172.17.0.3Bcast:0.0.0.0Mask:255.255.0.0 inet6addr:fe80::42:acff:fe11:3 /64 Scope:Link UPBROADCASTRUNNINGMTU:1500Metric:1 RXpackets:47errors:0dropped:0overruns:0frame:0 TXpackets:40errors:0dropped:0overruns:0carrier:0 collisions:0txqueuelen:0 RXbytes:5638(5.6KB)TXbytes:6521(6.5KB) loLinkencap:LocalLoopback inetaddr:127.0.0.1Mask:255.0.0.0 inet6addr:::1 /128 Scope:Host UPLOOPBACKRUNNINGMTU:65536Metric:1 RXpackets:0errors:0dropped:0overruns:0frame:0 TXpackets:0errors:0dropped:0overruns:0carrier:0 collisions:0txqueuelen:0 RXbytes:0(0.0B)TXbytes:0(0.0B) 7、镜像持久化,俗称镜像打包 镜像打包(Save) 1 [root@localhost~] #dockersavezhengyas/ubuntu>/root/sshd.tar 镜像导入(Load) 1 2 3 4 5 6 7 8 9 10 11 12 13 14 15 16 17 18 19 20 21 22 23 24 实验模拟 1、删除此sshd容器 [root@localhost~] #dockerps-a CONTAINERIDIMAGECOMMANDCREATEDSTATUSPORTSNAMES 7ef47903cdb7zhengyas /ubuntu :sshd "/usr/sbin/sshd-D" 14minutesagoUp14minutes0.0.0.0:2222->22 /tcp hungry_ritchie [root@localhost~] #dockerstop7ef47903cdb7 7ef47903cdb7 [root@localhost~] #dockerrm7ef47903cdb7 7ef47903cdb7 2、删除sshd镜像 [root@localhost~] #dockerrmizhengyas/ubuntu:sshd Untagged:zhengyas /ubuntu :sshd Deleted:3f2225df36ff67cbda098318e83128f3965758eba3e4609a094c172b0c3b03c4 [root@localhost~] #dockerimages REPOSITORYTAGIMAGEIDCREATEDVIRTUALSIZE ubuntu14.04b7cf8f0d9e823daysago188.3MB 3、导入打包的镜像 [root@localhost~] #dockerload</root/sshd.tar [root@localhost~] #dockerimages REPOSITORYTAGIMAGEIDCREATEDVIRTUALSIZE zhengyas /ubuntu sshd3f2225df36ff18minutesago251.1MB ubuntu14.04b7cf8f0d9e823daysago188.3MB 五、基于Dockerfile来创建mysql镜像 1、创建Dockerfile文件 1 2 3 4 5 6 7 8 9 10 11 12 13 14 15 [root@localhost~] #mkdirmysql_ubuntu [root@localhost~] #cdmysql_ubuntu/ [root@localhostmysql_ubuntu] #catDockerfile FROMubuntu:14.04 RUNapt-getupdate RUNapt-get-y install mysql-clientmysql-server RUN sed -i-e "s/^bind-address\s*=\s*127.0.0.1/bind-address=0.0.0.0/" /etc/mysql/my .cnf ADD. /startup .sh /opt/startup .sh EXPOSE3306 CMD[ "/bin/bash" , "/opt/startup.sh" ] 2、创建mysql服务启动脚本文件 1 2 3 4 5 6 7 8 9 10 11 12 13 14 15 16 17 [root@localhostmysql_ubuntu] #catstartup.sh #!/bin/bash if [!-f /var/lib/mysql/ibdata1 ]; then mysql_install_db /usr/bin/mysqld_safe & sleep 10s echo "GRANTALLON*.*TOadmin@'%'IDENTIFIEDBY'changeme'WITHGRANTOPTION;FLUSHPRIVILEGES" |mysql killallmysqld sleep 10s fi /usr/bin/mysqld_safe 3、构建mysql镜像 1 #dockerbuild-tzhengys/mysql. 4、查看镜像 1 2 3 [root@localhost~] #dockerimages REPOSITORYTAGIMAGEIDCREATEDVIRTUALSIZE zhengys /mysql latestf58add96ecb7Aboutaminuteago338.9MB 6、基于新镜像创建mysql容器 1 2 3 4 5 6 7 8 9 10 11 12 13 [root@localhost~] #mkdir/data/mysql-p [root@localhost~] #dockerrun-d-p3306:3306-v/data/mysql:/var/lib/mysqlzhengys/mysql 0112ba90e4a30a13e4f3af26f4a5bcd73e91ae3afa881a36fadd34cd953d0ada [root@localhost~] #dockerps-l CONTAINERIDIMAGECOMMANDCREATEDSTATUSPORTSNAMES 0112ba90e4a3zhengys /mysql :latest" /bin/bash /opt/star 4secondsagoUp3seconds0.0.0.0:3306->3306 /tcp reverent_hawking [root@localhost~] #ll/data/mysql/ total28680 -rw-rw----.110310618874368Apr2517:46ibdata1 -rw-rw----.11031065242880Apr2519:09ib_logfile0 -rw-rw----.11031065242880Apr2517:45ib_logfile1 drwx------.2103root4096Apr2517:45mysql drwx------.21031064096Apr2517:45performance_schema 7、测试mysql容器 1 2 3 4 5 6 7 8 [root@localhost~] #mysql-uadmin-p123456-h192.168.0.104-P3306-e'showdatabases' +--------------------+ |Database| +--------------------+ |information_schema| |mysql| |performance_schema| +--------------------+ 或者提供一个登陆mysql客户端脚本 run-client.sh 1 2 3 4 5 6 7 8 9 #!/bin/sh TAG= "mysql" CONTAINER_ID=$(docker ps | grep $TAG| awk '{print$1}' ) IP=$(dockerinspect$CONTAINER_ID|python-c 'importjson,sys;obj=json.load(sys.stdin);printobj[0]["NetworkSettings"]["IPAddress"]' ) mysql-uadmin-p-h$IP 六、简化Docker和lxc 1、Lxc和Docker结构图 Linux = linux内核 + 用户空间(Lxc) Lxc(Linux Container):linux容器 = Cgroup + Namespaces Docker集装箱 = Lxc + images lxc功能包括资源管理和隔离机制。 资源管理:通过cgroup限制cpu和内存的使用 隔离机制:用户空间namespace都是独立的 LXC包集成了这些linux内核机制提供了一个用户空间容器对象,即是针对某一应用提供资源隔离和控制轻量级虚拟系统。 Docker对container的使用基本是建立在lxc基础之上的,然而lxc存在的问题是难以移动-难以通过标准化模板制作、重建、复制和移动container。 LXC依赖namespace来实现隔离性的。 让每个容器都有自已的命名空间,确保不同容器之间不会相互影响,让每个容器成为拥有自已进程和网络空间的虚拟环境,都成为一个独立运行的单位。 此外,lxc由内核cgroup来对各个容器(进程)使用的系统资源做严格的限制。 算算时间,学习Docker也有半个月时间了,到现在为止给我的第一感觉仍然是不习惯,或许是用传统虚拟化用习惯了,或许是自已对Docker研究过于肤浅,或许自已根本没有入门等等一些原因,在没有接触到Docker之前自已玩过lxc,使用起来特别顺手,网上都说Docker自动化了lxc的管理过程,能够自动在线下载相应的发行版本rootfs Docker的火热程度,使我们做IT的不得不去深入研究、学习 好吧!今天就先到这里,后续会继续更大家聊聊Docker技术. 本文转自zys467754239 51CTO博客,原文链接:http://blog.51cto.com/467754239/1638301,如需转载请自行联系原作者

优秀的个人博客,低调大师

docker部署

环境:ubuntu-14.04.4-server-amd64 1、更换阿里云源 备份源配置文件: $ sudo cp /etc/apt/sources.list /etc/apt/sources.list_backup $ sudo vim /etc/apt/sources.list 删除文件内容,更新为: deb http://mirrors.aliyun.com/ubuntu trusty main restricted deb-src http://mirrors.aliyun.com/ubuntu trusty main restricted ## Major bug fix updates produced after the final release of the ## distribution. deb http://mirrors.aliyun.com/ubuntu trusty-updates main restricted deb-src http://mirrors.aliyun.com/ubuntu trusty-updates main restricted ## N.B. software from this repository is ENTIRELY UNSUPPORTED by the Ubuntu ## team. Also, please note that software in universe WILL NOT receive any ## review or updates from the Ubuntu security team. deb http://mirrors.aliyun.com/ubuntu trusty universe deb-src http://mirrors.aliyun.com/ubuntu trusty universe deb http://mirrors.aliyun.com/ubuntu trusty-updates universe deb-src http://mirrors.aliyun.com/ubuntu trusty-updates universe ## N.B. software from this repository is ENTIRELY UNSUPPORTED by the Ubuntu ## team, and may not be under a free licence. Please satisfy yourself as to ## your rights to use the software. Also, please note that software in ## multiverse WILL NOT receive any review or updates from the Ubuntu ## security team. deb http://mirrors.aliyun.com/ubuntu trusty multiverse deb-src http://mirrors.aliyun.com/ubuntu trusty multiverse deb http://mirrors.aliyun.com/ubuntu trusty-updates multiverse deb-src http://mirrors.aliyun.com/ubuntu trusty-updates multiverse ## N.B. software from this repository may not have been tested as ## extensively as that contained in the main release, although it includes ## newer versions of some applications which may provide useful features. ## Also, please note that software in backports WILL NOT receive any review ## or updates from the Ubuntu security team. deb http://mirrors.aliyun.com/ubuntu trusty-backports main restricted universe multiverse deb-src http://mirrors.aliyun.com/ubuntu trusty-backports main restricted universe multiverse deb http://security.ubuntu.com/ubuntu trusty-security main restricted deb-src http://security.ubuntu.com/ubuntu trusty-security main restricted deb http://security.ubuntu.com/ubuntu trusty-security universe deb-src http://security.ubuntu.com/ubuntu trusty-security universe deb http://security.ubuntu.com/ubuntu trusty-security multiverse deb-src http://security.ubuntu.com/ubuntu trusty-security multiverse 执行如下命令刷新: $ sudo apt-get clean $ sudo apt-get update 2、检查内核版本: $ uname -r 4.2.0-27-generic 3、更新包信息确保APT工作于https模式并且安装好CA证书: $ sudo apt-get update $apt-get install apt-transport-https ca-certificates 4、增加一个新GPG密钥: $ sudo apt-key adv --keyserver hkp://p80.pool.sks-keyservers.net:80 --recv-keys 58118E89F3A912897C070ADBF76221572C52609D 5、新建docker.list文件并加入相关内容: $ sudo vim /etc/apt/sources.list.d/docker.list deb https://apt.dockerproject.org/repo ubuntu-trusty main 更新APT软件包索引: $ atp-get update 假如存在旧的repo则清除: $ apt-cache policy docker-engine 验证APT是否从正确的库中获取: $ apt-get purge lxc-docker 此命令下载一个测试图像并运行于一个容器中,它将打印一份欣喜然后自动退出。 6、安装linux-image-extra kernel package $ sudo apt-get update $ sudo apt-get install linux-image-extra-$(uname -r) 检查是否有安装apparmor $ whereis apparmor 没有的话 $ apt-get install -y apparmor $ sudo reboot 7、进入docker安装阶段 $ sudo apt-get update 安装docker $ sudo apt-get install docker-engine 启动docker服务 $ sudo service docker start 验证docker安装是否OK $ sudo docker run hello-world 8、创建一个docker组并加入当前用户 $ sudo usermod -aG docker ubuntu 验证 $ docker run hello-world 9、调整内存和交换分区 当运行docker出现如下报错: WARNING: Your kernel does not support cgroup swap limit. WARNING: Your kernel does not support swap limit capabilities. Limitation discarded. 需要做如下操作: $ sudo vim /etc/default/grub 设置GRUB_CMDLINE_LINUX="cgroup_enable=memory swapaccount=1" $ sudo update-grub $ sudo reboot 10、开启UFW转发 检查UFW是否安装并启动 $ sudo ufw status $ sudo vim /etc/default/ufw 设置DEFAULT_FORWARD_POLICY="ACCEPT" 重启UFW服务并使用新的配置 $ sudo ufw reload 放行2375端口 $ sudo ufw allow 2375/tcp 11、配置DNS服务器 当用台式机启动容器时报错: WARNING: Local (127.0.0.1) DNS resolver found in resolv.conf and containers can't use it. Using default external servers : [8.8.8.8 8.8.4.4] $ sudo vim /etc/default/docker 设置DOCKER_OPTS="--dns 8.8.8.8 --dns 8.8.4.4" 重启docker守护进程 $ sudo restart docker 关闭dnsmasq $ sudo vim /etc/NetworkManager/NetworkManager.conf 注释掉dns=dnsmasq 保存后重启NetworkManager和Docker $ sudo restart network-manager $ sudo restart docker 12、Ubuntu14.04.4版本安装docker后会将其服务设为开机自启动。 升级docker $ sudo apt-get upgrade docker-engine 卸载docker包 $ sudo apt-get purge docker-engine $ sudo apt-get autoremove --purge docker-engine 删除镜像、容器、卷 $ rm -rf /var/lib/docker 同时你需要手动删除用户生成的配置文件,此略!!!

资源下载

更多资源
Mario

Mario

马里奥是站在游戏界顶峰的超人气多面角色。马里奥靠吃蘑菇成长,特征是大鼻子、头戴帽子、身穿背带裤,还留着胡子。与他的双胞胎兄弟路易基一起,长年担任任天堂的招牌角色。

腾讯云软件源

腾讯云软件源

为解决软件依赖安装时官方源访问速度慢的问题,腾讯云为一些软件搭建了缓存服务。您可以通过使用腾讯云软件源站来提升依赖包的安装速度。为了方便用户自由搭建服务架构,目前腾讯云软件源站支持公网访问和内网访问。

Nacos

Nacos

Nacos /nɑ:kəʊs/ 是 Dynamic Naming and Configuration Service 的首字母简称,一个易于构建 AI Agent 应用的动态服务发现、配置管理和AI智能体管理平台。Nacos 致力于帮助您发现、配置和管理微服务及AI智能体应用。Nacos 提供了一组简单易用的特性集,帮助您快速实现动态服务发现、服务配置、服务元数据、流量管理。Nacos 帮助您更敏捷和容易地构建、交付和管理微服务平台。

Rocky Linux

Rocky Linux

Rocky Linux(中文名:洛基)是由Gregory Kurtzer于2020年12月发起的企业级Linux发行版,作为CentOS稳定版停止维护后与RHEL(Red Hat Enterprise Linux)完全兼容的开源替代方案,由社区拥有并管理,支持x86_64、aarch64等架构。其通过重新编译RHEL源代码提供长期稳定性,采用模块化包装和SELinux安全架构,默认包含GNOME桌面环境及XFS文件系统,支持十年生命周期更新。


用户登录
用户注册