首页 文章 精选 留言 我的

精选列表

搜索[前端工程化],共10003篇文章
优秀的个人博客,低调大师

(五)Java工程化--Jenkins

Jenkins简介 Jenkins 是一种用Java语言实现的持续集成工具,Jenkins是一个平台, 在此基础上实现下面两个目的. CI 持续集成(Continous Integration) CD 持续交付(Continous Delivery) 安装 下载地址: https://jenkins.io/ 文件名为jenkins.war 启动命令:java -jar jenkins.war --httpPort=8099 访问http://localhost:8099 第一次访问会有guide,按guide配置好用户/插件等 插件安装:建议安装推荐的插件, 如不安装插件有的配置项出不来;系统管理-->插件管理-->可选插件 可以查找和安装插件 配置 (进入“系统管理”菜单) 全局工具配置 点击 系统管理-->全局工具配置 在此目录下配置JDK和MAVEN环境,以及git; (不安装git相关插件看不到配置项) JDK和Maven是配置home路径, git需要配置git.exe文件的全路径 创建任务 Jenkins的学习主要是要自己动手, 本文不再截图凑篇幅, 实践中遇到相应问题可以从管网查找资料,该下载插件的下插件,该在流程中作相应配置的做配置. 在我从上家公司离职之前的几个月, 公司的运维正在做CI方面的工作, 其间也是根据实际情况慢慢摸索, 一方面是要满足各种不同语言,项目,场景的CI, 另一方面也证实Jenkins的强大适应性,丰富的插件几乎能满足各种需求.

优秀的个人博客,低调大师

(二)Java工程化--Maven实践

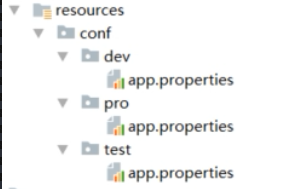
Maven项目版本号 默认版本号: 1.0-SNAPSHOT 最佳实践是约定该版本为不稳定版本,如果发布一定要删除; 建议的版本规则: 主版本号.次版本号.增量版本号-<里程碑版本> 如:1.0.0-RELEASE 10.2.5-FINAL 等. 最佳实践是结合自身情况制定大家都认可的版本号规则. 常见命令 内置的maven插件提供了常见的命令, 可以在以下位置找到对应的包: .m2\repository\org\apache\maven\plugins compile clean 删除/target,将已编译的二进制文件等删除 test test case junit/testNG package 打包 install 把项目install到本地仓库 deploy 发布jar到remote服务器 mvn help:system 查看环境变量 插件 插件仓库 https://maven.apache.org/plugins/ http://www.mojohaus.org/plugins.html 常见插件 findbugs 静态代码检查 versions 统一升级版本号 统一升级版本 http://www.mojohaus.org/versions-maven-plugin/ 可以查看使用示例, 常用的设置版本的命令为mvn versions: set –DnewVersion=1.1.0-final mvn versions:set -DnewVersion=1.1 source 打包源代码,当jar提供给外部的时候斟酌使用 assembly 打包zip、war tomcat7 <plugins> <!--静态代码bug扫描--> <plugin> <groupId>org.codehaus.mojo</groupId> <artifactId>findbugs-maven-plugin</artifactId> <version>3.0.0</version> <configuration> <threshold>High</threshold> <effort>Default</effort> <findbugsXmlOutput>true</findbugsXmlOutput> <findbugsXmlOutputDirectory>target/site</findbugsXmlOutputDirectory> </configuration> </plugin> <!--版本号管理--> <plugin> <groupId>org.codehaus.mojo</groupId> <artifactId>versions-maven-plugin</artifactId> <version>2.3</version> </plugin> <!--打包源代码--> <plugin> <artifactId>maven-source-plugin</artifactId> <version>2.3</version> <executions> <execution> <id>attach-sources</id> <phase>install</phase> <goals> <goal>jar-no-fork</goal> </goals> </execution> </executions> </plugin> <!--这个有点晕,生成可执行jar包什么的--> <plugin> <artifactId>maven-assembly-plugin</artifactId> <version>3.0.0</version> <configuration> <archieve> <manifest> <mainClass>com.xlx.Test</mainClass> </manifest> </archieve> <descriptorRefs> <descriptorRef>jar-with-dependencies</descriptorRef> </descriptorRefs> </configuration> </plugin> <!--tomcat插件--> <plugin> <groupId>org.apache.tomcat.maven</groupId> <artifactId>tomcat7-maven-plugin</artifactId> <version>2.2</version> <configuration> <port>8080</port> <path>/</path> </configuration> </plugin> </plugins> 自定义插件 学习地址https://maven.apache.org/guides/plugin/guide-java-plugin-development.html 创建项目 修改pom的<packaging>maven-plugin</packaging> 添加依赖 <dependencies> <dependency> <groupId>org.apache.maven</groupId> <artifactId>maven-plugin-api</artifactId> <version>LATEST</version> </dependency> <dependency> <groupId>org.apache.maven.plugin-tools</groupId> <artifactId>maven-plugin-annotations</artifactId> <version>LATEST</version> <scope>provided</scope> </dependency> </dependencies> 写代码实现AbstractMojo @Mojo(name="xlxTest",defaultPhase = LifecyclePhase.PACKAGE) public class Test extends AbstractMojo { /** * 接收的参数 */ @Parameter private String message; /** * 接收多个值的参数 */ @Parameter private List<String> options; /** * 命令行中接收,注意必须有property mvn:package -Dargs=this is from cmd */ @Parameter(property = "args") private String args; public void execute() throws MojoExecutionException, MojoFailureException { System.out.println("my first maven plugin message is : " + message); System.out.println("my first maven plugin options is : " + options); System.out.println("my first maven plugin args from evm is : " + args); } } mvn install 使用, maven可以接收参数, 也可以使用环境变量取,如${settings.localRepository},${project.baseUri}等 <!--项目pom修改--> <build> <plugins> <plugin> <groupId>com.xlx</groupId> <artifactId>engineering</artifactId> <version>1.0-SNAPSHOT</version> <executions> <execution> <phase>package</phase> <goals> <goal>xlxTest</goal> </goals> </execution> </executions> <configuration> <message>message</message> <options> <option>one</option> <option>two</option> </options> </configuration> </plugin> </plugins> </build> Profile 不同运行环境 dev/prod/test等 mvn clean package –P dev settings.xml 可以指定不同服务器仓储配置<profile.active>私服或者官方</profile.active> 多环境配置的配置文件路径 <profiles> <profile> <id>dev</id> <properties> <profile.active>dev</profile.active> </properties> <activation> <activeByDefault>true</activeByDefault> </activation> </profile> <profile> <id>test</id> <properties> <profile.active>test</profile.active> </properties> </profile> </profiles> <build> <resources> <resource> <directory>${baseDir}/src/main/resources</directory> <excludes> <exclude>conf/**</exclude> </excludes> </resource> <resource> <directory>src/main/resources/conf/${profile.active}</directory> </resource> </resources> </build> 私服 下载: https://www.sonatype.com/download-oss-sonatype?hsCtaTracking=920dd7b5-7ef3-47fe-9600-10fecad8aa32%7Cf59d5f10-099f-4c66-a622-0254373f4a92 安装, 解压即可, 如果需要修改端口号等信息, 可以修改文件\nexus-3.13.0-01\etc\nexus-default.properties 启动命令 转到\nexus-3.13.0-01\bin下, nexus /run 可查看启动日志 使用: http://books.sonatype.com/nexus-book/reference3/index.html pom中增加发布节点 <distributionManagement> <repository> <id>nexus-release</id> <name>nexus-release</name> <url>http://localhost:8099/repository/maven-releases/</url> </repository> <snapshotRepository> <id>nexus-snapshot</id> <name>nexus-snapshot</name> <url>http://localhost:8099/repository/maven-snapshots/</url> </snapshotRepository> </distributionManagement> 修改settings.xml 增加服务器账号密码信息 <server> <id>nexus-release</id> <username>admin</username> <password>admin123</password> </server> <server> <id>nexus-snapshot</id> <username>admin</username> <password>admin123</password> </server> 生成脚手架 mvn archetype: create-from-project 从项目生成脚手架 cd /target/generated-soource/archetype 转到此目录 mvn install 发布到仓库 可以添加到ide的脚手架列表 mvn archetype:generate –DarchetypeCatagory=local 命令行方式创建项目 local参数指定走本地仓库

优秀的个人博客,低调大师

(三)Java工程化--Git起步

GIT学习参考:https://git-scm.com/book/zh/v2 版本控制 版本控制记录了一个或若干文件的历史变化,便于今后查阅,恢复。 三类版本控制系统 本地版本控制系统 RCS : 本地存储文件变更系统,无法协作及对权限做统一管理 集中化版本控制系统 CVCS : 变更存储于集中的一台服务器 分布式版本控制系统 DVCS : 分布式存储版本库镜像, 包含文件历史变更的所有信息 Git的历史 git来自于linux团队, 是linux为了解决之前版本管理工具Bitkeeper收费的问题研发出来的。 设计目标 速度 简单 对非线性开发模式的强力支持(多个并行开发的分支) 完全分布式 适用超大规模项目 linux是开源的, 所以当他们之前使用的版本工具开始收费的适合,他们决定自己研发一个版本控制工具,即Git. 说起开源, 我们需要了解下常见的开源协议,以便我们做技术选型时考虑.例如一般的开源协议都要求使用开源框架的项目也要开源. Git与SVN(或者说其他版本控制系统)的区别 直接记录快照,而非差异比较 了解此项差异的底层实现方式非常重要,有利于我们更准确的理解和学习Git.具体可以参考文章开始的网站资料.(有图有真相) 近乎所有操作都在本地执行(得益于第一点的底层实现,即分布式存储) Git使用sha1哈希算法算出的校验和保证完整性 Git的索引是校验值而不是文件名,如果在传送过程中有信息丢失和损坏,Git就能发现. Git一般只添加数据 (只要提交便不会丢失数据,可以执行可逆操作) 使用前的配置 git config --list 显示所有配置 git config --global user.name 'user' 设置用户名 git config --global user.email 'user@xxx.com' 设置用户邮箱 ssh-keygen -t rsa -C 'user@xxx.com' 生成ssh密钥 多用户配置方法: 在.ssh路径下(C:\Users\xueli.ssh)创建文件config, 添加下面内容 # Default github user(usergithub@mail.com) Host github.com HostName github.com User git IdentityFile C:\Users\xueli.ssh\id_rsa # Default mygitlib user(second@mail.com) Host mygitlib.com HostName mygitlib.com User git IdentityFile C:\Users\xueli.ssh\mygitlib 上面是Git起步和背景知识, 下次将学习Git常用命令.

优秀的个人博客,低调大师

(一)Java工程化--Maven基础

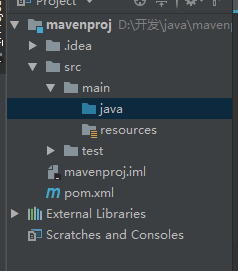
Maven 读作['mevən] 翻译成中文是"内行,专家" Maven是什么 包依赖的前世今生: 原始的jar包引用--> ant --> maven. 是一种项目管理工具 Maven优势: convertion over configuration 约定优于配置: 这个原则不仅适用于maven, 更是目前大多数框架遵循的原则,如mvc 简单 易于测试 构建简单 CI(持续集成) 插件丰富 下载和安装 下载: http://maven.apache.org/download.cgi 安装: 解压安装即可 环境变量配置: windows: 配置path MAVEN_HOME linux: 在 .bash_profile 文件中 运行参数: 定义环境变量MAVEN_OPS 配置settings.xml: settings.xml文件是个空模板,我们可以在这个文件进行一些自定义配置. 常用的配置如:repo存储目录 创建maven项目 项目结构: 遵循约定优于配置原则, 项目包的组织结构如下 pom.xml groupId 公司组织id artifactId 功能命名 version 版本号 packageing 打包方式,默认jar,可修改为maven-project,war dependancyManagement 最好之出现在父pom中,用于统一版本号,只做声明依赖,子模块pom中还需要引用,但不需要制定version. dependancy type 默认jar scope 指定哪个阶段适用,各阶段如下: compile 编译,打包,默认 如spring-core test 测试 如spring-test provided 编译 如servlet runtime 运行时 如JDBC驱动实现包 system 本地一些jar 依赖传递 依赖仲裁:(1)最短路径原则,根据依赖树就近取最接近的版本;(2)加载顺序原则;(3)exclusions 排除包 命令: mvn dependancy:tree Maven生命周期(三个过程) 区分术语:lifecycle/phase/goal 生命周期: clean 包含的phase: pre-clean --> clean --> post-clean default compile package install deploy ... site pre-site --> site -->post-site --> site-deploy A Build Lifecycle is Made Up of Phases 一个构建生命周期是有多个phase组成 A Build Phase is Made Up of Plugin Goals 一个构建phase是由多个插件目标goal构成

资源下载

更多资源
Mario

Mario

马里奥是站在游戏界顶峰的超人气多面角色。马里奥靠吃蘑菇成长,特征是大鼻子、头戴帽子、身穿背带裤,还留着胡子。与他的双胞胎兄弟路易基一起,长年担任任天堂的招牌角色。

腾讯云软件源

腾讯云软件源

为解决软件依赖安装时官方源访问速度慢的问题,腾讯云为一些软件搭建了缓存服务。您可以通过使用腾讯云软件源站来提升依赖包的安装速度。为了方便用户自由搭建服务架构,目前腾讯云软件源站支持公网访问和内网访问。

Rocky Linux

Rocky Linux

Rocky Linux(中文名:洛基)是由Gregory Kurtzer于2020年12月发起的企业级Linux发行版,作为CentOS稳定版停止维护后与RHEL(Red Hat Enterprise Linux)完全兼容的开源替代方案,由社区拥有并管理,支持x86_64、aarch64等架构。其通过重新编译RHEL源代码提供长期稳定性,采用模块化包装和SELinux安全架构,默认包含GNOME桌面环境及XFS文件系统,支持十年生命周期更新。

Sublime Text

Sublime Text

Sublime Text具有漂亮的用户界面和强大的功能,例如代码缩略图,Python的插件,代码段等。还可自定义键绑定,菜单和工具栏。Sublime Text 的主要功能包括:拼写检查,书签,完整的 Python API , Goto 功能,即时项目切换,多选择,多窗口等等。Sublime Text 是一个跨平台的编辑器,同时支持Windows、Linux、Mac OS X等操作系统。


用户登录
用户注册